The Rust Programming Language
เขียนโดย Steve Klabnik, Carol Nichols และ Chris Krycho พร้อมการช่วยเหลือจาก Rust Community
แปลภาษาไทยโดย round.online
หนังสือเล่มนี้อ้างอิง Rust 1.90.0 (release วันที่ 2025-09-18) เป็นต้นไป โดยใช้
edition = "2024" ในไฟล์ Cargo.toml ของทุกโปรเจกต์ เพื่อให้ใช้สำนวนของ Rust
2024 Edition ดูวิธีติดตั้งหรือ update Rust ได้ใน หัวข้อ “การติดตั้ง” ของบทที่ 1
และดูข้อมูลเรื่อง edition ได้ใน ภาคผนวก E
ฉบับ HTML ต้นฉบับภาษาอังกฤษอ่านออนไลน์ได้ที่
https://doc.rust-lang.org/stable/book/
และอ่าน offline ได้หลังติดตั้ง Rust ด้วย rustup โดยรันคำสั่ง rustup doc --book
มี ฉบับแปลภาษาอื่น ๆ จาก community ให้เลือกอ่าน
ต้นฉบับภาษาอังกฤษมีจำหน่ายในรูปแบบ paperback และ ebook จาก No Starch Press
🚨 อยากได้ประสบการณ์การเรียนแบบ interactive มากกว่านี้? ลอง Rust Book อีกฉบับ ที่มี quiz, highlight, visualization และอื่น ๆ: https://rust-book.cs.brown.edu
💡 หมายเหตุจากผู้แปล: นี่คือฉบับแปลภาษาไทยที่มีการดัดแปลง ของหนังสือ The Rust Programming Language ต้นฉบับ — ถ้าพบข้อผิดพลาดในการแปล กรุณาเปิด issue ที่ https://github.com/roundonline/rust-book-th
คำนำ
ภาษา Rust เดินทางมาไกลในเวลาไม่กี่ปี จากจุดเริ่มต้นและการบ่มเพาะโดย community เล็ก ๆ ของกลุ่มคนที่หลงรักภาษานี้ มาสู่การเป็นหนึ่งในภาษาโปรแกรมที่คนรักและเป็น ที่ต้องการมากที่สุดในโลก ถ้ามองย้อนกลับไป ก็เป็นเรื่องที่หลีกเลี่ยงไม่ได้ว่า พลังและคำมั่นสัญญาของ Rust จะดึงดูดความสนใจและหยั่งรากในวงการ systems programming แต่สิ่งที่ไม่ได้คาดคิดไว้คือการเติบโตของความสนใจและนวัตกรรมใน ระดับโลก ที่แทรกซึมผ่าน open source community และกระตุ้นให้เกิดการใช้งานในวง กว้างข้ามอุตสาหกรรม
ณ จุดนี้ ไม่ยากเลยที่จะชี้ให้เห็นฟีเจอร์ดี ๆ ของ Rust ที่ใช้อธิบายความสนใจและ การใช้งานที่ระเบิดออกมาแบบนี้ ใครจะไม่อยากได้ความปลอดภัยด้านหน่วยความจำ และ performance ที่รวดเร็ว และ compiler ที่เป็นมิตร และ tooling ที่ยอดเยี่ยม รวมถึงฟีเจอร์ดี ๆ อีกมากมาย? Rust ที่คุณเห็นในวันนี้ คือการผสมผสานของการวิจัย ด้าน systems programming หลายปี เข้ากับภูมิปัญญาเชิงปฏิบัติของ community ที่ มีชีวิตชีวาและเปี่ยมไปด้วยใจรัก ภาษานี้ถูกออกแบบมาอย่างมีจุดมุ่งหมายและสร้าง ขึ้นด้วยความใส่ใจ เพื่อให้นักพัฒนามีเครื่องมือที่ช่วยให้เขียนโค้ดที่ปลอดภัย รวดเร็ว และเชื่อถือได้ง่ายขึ้น
แต่สิ่งที่ทำให้ Rust พิเศษอย่างแท้จริง คือรากฐานที่มุ่งเสริมพลังให้คุณ — ผู้ใช้ — บรรลุเป้าหมายของตัวเอง นี่คือภาษาที่อยากเห็นคุณประสบความสำเร็จ และหลักการ ของการเสริมพลังนี้ก็แทรกซึมอยู่ในแกนกลางของ community ที่สร้าง ดูแล และผลักดัน ภาษานี้ นับตั้งแต่ฉบับก่อนของหนังสือเล่มนี้ Rust ได้พัฒนาต่อจนกลายเป็นภาษา ระดับโลกที่ได้รับความเชื่อมั่นอย่างแท้จริง ปัจจุบัน Rust Project ได้รับการ สนับสนุนอย่างมั่นคงจาก Rust Foundation ซึ่งยังลงทุนในโครงการสำคัญต่าง ๆ เพื่อ ให้แน่ใจว่า Rust จะปลอดภัย เสถียร และยั่งยืน
ฉบับของ The Rust Programming Language นี้เป็นการ update ครั้งใหญ่ที่ ครอบคลุม สะท้อนวิวัฒนาการของภาษาตลอดหลายปี และมีข้อมูลใหม่ ๆ ที่มีคุณค่า แต่ มันไม่ใช่แค่คู่มือเรื่อง syntax และ library เท่านั้น — มันคือคำเชิญให้เข้าร่วม community ที่ให้คุณค่ากับคุณภาพ performance และการออกแบบที่รอบคอบ ไม่ว่าคุณ จะเป็นนักพัฒนามากประสบการณ์ที่กำลังจะลอง Rust เป็นครั้งแรก หรือ Rustacean ที่ช่ำชองและอยากฝึกฝีมือให้คมขึ้น หนังสือฉบับนี้มีบางสิ่งให้คุณเสมอ
การเดินทางของ Rust เป็นการเดินทางของการร่วมมือ การเรียนรู้ และการพัฒนาอย่างต่อ เนื่อง การเติบโตของภาษาและ ecosystem ของมัน คือภาพสะท้อนโดยตรงของ community ที่มีชีวิตชีวาและหลากหลายเบื้องหลัง การมีส่วนร่วมของนักพัฒนาหลายพันคน ตั้งแต่ ผู้ออกแบบภาษาในระดับ core ไปจนถึง contributor ที่เข้ามาช่วยเป็นครั้งคราว ทั้งหมดนี้คือสิ่งที่ทำให้ Rust เป็นเครื่องมือที่ทั้งโดดเด่นและทรงพลัง การ หยิบหนังสือเล่มนี้ขึ้นมาอ่าน คุณไม่ได้แค่กำลังเรียนภาษาโปรแกรมใหม่ — คุณกำลัง เข้าร่วมการเคลื่อนไหวที่จะทำให้ software ดีขึ้น ปลอดภัยขึ้น และน่าทำงานด้วย มากขึ้น
ยินดีต้อนรับสู่ Rust community!
- Bec Rumbul, Executive Director ของ Rust Foundation
บทนำ
หมายเหตุ: หนังสือฉบับนี้เหมือนกับ The Rust Programming Language ที่จำหน่ายในรูปแบบหนังสือเล่มและ ebook โดย No Starch Press
ยินดีต้อนรับสู่ The Rust Programming Language หนังสือแนะนำเกี่ยวกับ Rust ภาษา Rust ช่วยให้คุณเขียน software ที่เร็วและน่าเชื่อถือขึ้น โดยปกติแล้วการ ออกแบบภาษาโปรแกรมมักต้องเลือกระหว่าง ergonomics ระดับสูง กับการควบคุมระดับต่ำ — Rust ท้าทายความขัดแย้งนี้ ด้วยการสร้างสมดุลระหว่างความสามารถทางเทคนิคที่ทรง พลัง กับประสบการณ์ที่ดีของนักพัฒนา Rust จึงเปิดทางให้คุณควบคุมรายละเอียดระดับ ต่ำ (เช่น การใช้หน่วยความจำ) ได้ โดยไม่ต้องเจอความยุ่งยากที่มักมาคู่กับการ ควบคุมแบบนั้น
Rust เหมาะกับใคร
Rust เหมาะกับคนหลายกลุ่มด้วยเหตุผลที่หลากหลาย ลองดูกลุ่มสำคัญ ๆ กัน
ทีมนักพัฒนา
Rust พิสูจน์ตัวเองแล้วว่าเป็นเครื่องมือที่ productive สำหรับการทำงานร่วมกัน ในทีมขนาดใหญ่ที่สมาชิกมีความรู้เรื่อง systems programming ในระดับที่แตกต่างกัน โค้ดระดับต่ำมักมี bug แบบ subtle ซึ่งในภาษาอื่น ๆ ส่วนใหญ่จะจับได้ก็ต่อเมื่อ ผ่านการเทสอย่างละเอียดและการ review code อย่างระมัดระวังโดยนักพัฒนาที่มี ประสบการณ์เท่านั้น สำหรับ Rust compiler จะทำหน้าที่เป็นด่านตรวจ โดยปฏิเสธที่ จะ compile โค้ดที่มี bug ที่ตามจับยากเหล่านี้ รวมถึง bug เรื่อง concurrency ด้วย เมื่อทำงานเคียงข้างกับ compiler ทีมก็สามารถใช้เวลาไปกับ logic ของ โปรแกรมแทนที่จะมาตามไล่ล่า bug
Rust ยังนำเครื่องมือพัฒนาสมัยใหม่มาสู่โลกของ systems programming ด้วย
- Cargo ซึ่งเป็น dependency manager และ build tool ที่มาให้ในตัว ช่วยให้การ เพิ่ม compile และจัดการ dependency เป็นเรื่องง่ายและสอดคล้องกันใน ecosystem ของ Rust
rustfmtเครื่องมือจัด format ทำให้สไตล์การเขียนโค้ดสอดคล้องกันระหว่างนัก พัฒนา- Rust Language Server ขับเคลื่อนการ integrate กับ integrated development environment (IDE) สำหรับการ complete code และแสดง error message inline
ด้วยการใช้เครื่องมือเหล่านี้และอื่น ๆ ใน ecosystem ของ Rust นักพัฒนาก็สามารถ ทำงาน systems-level ได้อย่าง productive
นักเรียน นักศึกษา
Rust เหมาะกับนักเรียน นักศึกษา และคนที่สนใจเรียนรู้แนวคิดเกี่ยวกับ systems หลายคนใช้ Rust เรียนรู้หัวข้อต่าง ๆ เช่นการพัฒนา operating system community เป็นมิตรและยินดีตอบคำถามของนักศึกษา ผ่านความพยายามต่าง ๆ รวมถึงหนังสือเล่มนี้ ทีม Rust ต้องการทำให้แนวคิดเรื่อง systems เข้าถึงได้กับคนจำนวนมากขึ้น โดยเฉพาะคนที่เพิ่งเริ่มเขียนโปรแกรม
บริษัท
บริษัทหลายร้อยแห่ง ทั้งใหญ่และเล็ก ใช้ Rust ใน production สำหรับงานหลากหลาย ตั้งแต่เครื่องมือ command line, web service, DevOps tooling, อุปกรณ์ embedded, การวิเคราะห์และ transcode เสียงและวิดีโอ, cryptocurrency, bioinformatics, search engine, แอปพลิเคชัน Internet of Things, machine learning ไปจนถึงส่วน สำคัญ ๆ ของ web browser Firefox
นักพัฒนา Open Source
Rust เหมาะกับคนที่อยากร่วมสร้างภาษา Rust, community, เครื่องมือพัฒนา และ library เรายินดีให้คุณมา contribute กับภาษา Rust
คนที่ให้คุณค่ากับความเร็วและความเสถียร
Rust เหมาะกับคนที่ต้องการความเร็วและความเสถียรในภาษา คำว่า “ความเร็ว” หมาย ถึงทั้งความเร็วที่โค้ด Rust รันได้ และความเร็วที่ Rust ช่วยให้คุณเขียน โปรแกรมได้ การตรวจสอบของ compiler รับประกันความเสถียรเมื่อมีการเพิ่มฟีเจอร์ และ refactor ตรงข้ามกับ legacy code ที่เปราะบางในภาษาที่ไม่มีการตรวจสอบเหล่า นี้ ซึ่งนักพัฒนามักไม่กล้าแก้ ด้วยการมุ่งสู่ zero-cost abstraction — ฟีเจอร์ ระดับสูงที่ compile ออกมาเป็นโค้ดระดับต่ำที่เร็วเทียบเท่ากับโค้ดที่เขียนเอง — Rust พยายามทำให้โค้ดที่ปลอดภัยเป็นโค้ดที่เร็วด้วยเช่นกัน
ภาษา Rust หวังจะรองรับผู้ใช้กลุ่มอื่น ๆ อีกมาก กลุ่มที่กล่าวมานี้เป็นเพียง stakeholder กลุ่มใหญ่ ๆ เท่านั้น โดยรวมแล้ว ความใฝ่ฝันที่ยิ่งใหญ่ที่สุดของ Rust คือการขจัดการต้องเลือกระหว่างสิ่งต่าง ๆ ที่โปรแกรมเมอร์ยอมรับมาเป็น ทศวรรษ ด้วยการมอบทั้งความปลอดภัย และ productivity, ทั้งความเร็ว และ ergonomics ลอง Rust ดู แล้วดูว่าตัวเลือกของมันเหมาะกับคุณหรือไม่
หนังสือเล่มนี้เหมาะกับใคร
หนังสือเล่มนี้ตั้งสมมติฐานว่าคุณเคยเขียนโค้ดด้วยภาษาโปรแกรมอื่นมาก่อน แต่ไม่ได้ ตั้งสมมติฐานว่าคุณเขียนภาษาไหน เราพยายามทำให้เนื้อหาเข้าถึงได้สำหรับคนจาก หลากหลายพื้นเพการเขียนโปรแกรม เราไม่ได้ใช้เวลามากกับการพูดว่าการเขียนโปรแกรม คือ อะไร หรือควรคิดเกี่ยวกับมันยังไง ถ้าคุณยังใหม่ต่อการเขียนโปรแกรมโดยสิ้น เชิง คงจะดีกว่าถ้าอ่านหนังสือที่แนะนำการเขียนโปรแกรมโดยเฉพาะ
วิธีอ่านหนังสือเล่มนี้
โดยทั่วไป หนังสือเล่มนี้ตั้งสมมติฐานว่าคุณจะอ่านตามลำดับจากต้นไปท้าย บทหลัง ๆ สร้างขึ้นบนแนวคิดของบทก่อน ๆ และบทแรก ๆ อาจไม่ลงรายละเอียดเรื่องใดเรื่องหนึ่ง แต่จะกลับมาทบทวนหัวข้อนั้นในบทหลัง
ในหนังสือเล่มนี้คุณจะพบบทอยู่สองแบบ: บทแนวคิด (concept chapter) และบทโปรเจกต์ (project chapter) ในบทแนวคิด คุณจะเรียนแง่มุมต่าง ๆ ของ Rust ในบทโปรเจกต์ เรา จะมาเขียนโปรแกรมเล็ก ๆ ร่วมกัน โดยนำสิ่งที่เรียนมาไปประยุกต์ใช้ บทที่ 2, 12 และ 21 เป็นบทโปรเจกต์ ส่วนที่เหลือเป็นบทแนวคิด
บทที่ 1 อธิบายวิธีติดตั้ง Rust วิธีเขียนโปรแกรม “Hello, world!” และวิธี ใช้ Cargo ซึ่งเป็น package manager และ build tool ของ Rust บทที่ 2 เป็น การแนะนำการเขียนโปรแกรมใน Rust แบบลงมือทำ โดยให้คุณสร้างเกมทายตัวเลข ในบทนี้ เราจะกล่าวถึงแนวคิดต่าง ๆ ในระดับ high-level และบทหลัง ๆ จะให้รายละเอียดเพิ่ม เติม ถ้าคุณอยากลงมือทำเลย บทที่ 2 คือที่สำหรับคุณ ถ้าคุณเป็นคนเรียนแบบละเอียด ที่ชอบเรียนรู้ทุกรายละเอียดก่อนไปต่อ คุณอาจจะข้ามบทที่ 2 ไป บทที่ 3 ซึ่ง ครอบคลุมฟีเจอร์ของ Rust ที่คล้ายกับภาษาโปรแกรมอื่น ๆ แล้วค่อยกลับมาที่บทที่ 2 ตอนที่อยากทำโปรเจกต์เพื่อประยุกต์รายละเอียดที่ได้เรียนมา
ใน บทที่ 4 คุณจะได้เรียนเรื่องระบบ ownership ของ Rust บทที่ 5 พูดถึง
struct และเมธอด บทที่ 6 ครอบคลุม enum, match expression และโครงสร้าง
control flow แบบ if let และ let...else คุณจะใช้ struct และ enum สร้าง
type ของตัวเอง
ใน บทที่ 7 คุณจะได้เรียนเรื่องระบบ module ของ Rust และ privacy rule สำหรับจัดระเบียบโค้ดและ application programming interface (API) สาธารณะของ มัน บทที่ 8 พูดถึงโครงสร้างข้อมูล collection ที่ใช้บ่อย ๆ ที่ standard library มีให้: vector, string และ hash map บทที่ 9 สำรวจปรัชญาและเทคนิค การจัดการ error ของ Rust
บทที่ 10 เจาะลึก generic, trait และ lifetime ซึ่งให้พลังคุณในการกำหนด
โค้ดที่ใช้กับ type หลายแบบ บทที่ 11 เรื่องการเทสทั้งหมด ซึ่งแม้จะมีการ
รับประกันความปลอดภัยของ Rust ก็ยังจำเป็นเพื่อให้แน่ใจว่า logic ของโปรแกรม
ถูกต้อง ใน บทที่ 12 เราจะสร้าง implementation ของฟีเจอร์ย่อย ๆ บางส่วน
ของเครื่องมือ command line ชื่อ grep ซึ่งใช้ค้นหาข้อความในไฟล์ ในบทนี้เรา
จะใช้แนวคิดหลายอย่างที่พูดถึงในบทก่อน ๆ
บทที่ 13 สำรวจ closure และ iterator: ฟีเจอร์ของ Rust ที่มาจากภาษา โปรแกรมแบบ functional ใน บทที่ 14 เราจะดู Cargo ในเชิงลึกขึ้น และพูดถึง best practice ในการแชร์ library ของคุณกับคนอื่น บทที่ 15 พูดถึง smart pointer ที่ standard library มีให้ และ trait ที่ทำให้ฟังก์ชันเหล่านั้นทำงาน ได้
ใน บทที่ 16 เราจะเดินผ่าน model ต่าง ๆ ของ concurrent programming และ พูดถึงวิธีที่ Rust ช่วยให้คุณเขียนโปรแกรมแบบหลาย thread อย่างไร้ความกลัว ใน บทที่ 17 เราจะต่อยอดจากนั้น โดยสำรวจ syntax async/await ของ Rust พร้อม ทั้ง task, future, stream และ model ของ concurrency แบบ lightweight ที่ มันเอื้อให้
บทที่ 18 ดูว่าสำนวนของ Rust เทียบกับหลักการของ object-oriented programming ที่คุณอาจคุ้นเคยอย่างไร บทที่ 19 คือ reference เรื่อง pattern และ pattern matching ซึ่งเป็นวิธีที่ทรงพลังในการแสดงไอเดียตลอด โปรแกรม Rust บทที่ 20 ประกอบด้วยหัวข้อขั้นสูงที่น่าสนใจหลายหัวข้อ รวม ถึง unsafe Rust, macro และรายละเอียดเพิ่มเติมเรื่อง lifetime, trait, type, function และ closure
ใน บทที่ 21 เราจะทำโปรเจกต์ให้เสร็จ โดย implement web server แบบ multithreaded ระดับต่ำ!
สุดท้าย ภาคผนวกบางส่วนมีข้อมูลที่เป็นประโยชน์เกี่ยวกับภาษาในรูปแบบที่คล้าย reference มากกว่า ภาคผนวก A ครอบคลุม keyword ของ Rust, ภาคผนวก B ครอบคลุม operator และสัญลักษณ์ของ Rust, ภาคผนวก C ครอบคลุม derivable trait ที่ standard library มีให้, ภาคผนวก D ครอบคลุมเครื่องมือพัฒนาที่ มีประโยชน์ และ ภาคผนวก E อธิบาย edition ของ Rust ใน ภาคผนวก F คุณ จะพบรายชื่อฉบับแปลของหนังสือ และใน ภาคผนวก G เราจะพูดถึงวิธีพัฒนา Rust และ nightly Rust คืออะไร
ไม่มีวิธีอ่านหนังสือเล่มนี้ที่ผิด ถ้าอยากกระโดดไปข้างหน้าก็เชิญ! คุณอาจต้อง กระโดดกลับมาบทแรก ๆ ถ้าเกิดความสับสน แต่ทำอะไรก็ตามที่ใช้ได้กับคุณ
ส่วนสำคัญของการเรียน Rust คือการเรียนรู้ที่จะอ่าน error message ที่ compiler แสดง — message พวกนี้จะนำทางคุณไปสู่โค้ดที่ทำงานได้ ดังนั้นเราจะให้ตัวอย่าง หลายตัวที่ compile ไม่ผ่าน พร้อม error message ที่ compiler จะแสดงในแต่ละ สถานการณ์ พึงรู้ว่าถ้าคุณป้อนและรันตัวอย่างแบบสุ่ม มันอาจ compile ไม่ผ่าน! อย่าลืมอ่านข้อความรอบ ๆ เพื่อดูว่าตัวอย่างที่กำลังจะรันนั้นตั้งใจให้ error หรือไม่ ในกรณีส่วนใหญ่ เราจะนำคุณไปสู่ version ที่ถูกต้องของโค้ดที่ compile ไม่ผ่าน Ferris จะช่วยให้คุณแยกแยะโค้ดที่ไม่ได้ตั้งใจให้ทำงาน:
| Ferris | ความหมาย |
|---|---|
 | โค้ดนี้ compile ไม่ผ่าน! |
 | โค้ดนี้ panic! |
 | โค้ดนี้ไม่ได้ให้พฤติกรรมตามที่ต้องการ |
ในกรณีส่วนใหญ่ เราจะนำคุณไปสู่ version ที่ถูกต้องของโค้ดที่ compile ไม่ผ่าน
Source Code
ไฟล์ source ที่ใช้ generate หนังสือเล่มนี้ดูได้ที่ GitHub
เริ่มต้นใช้งาน
มาเริ่มต้นการเดินทางสู่ Rust กันเถอะ! มีอะไรให้เรียนรู้เยอะ แต่ทุกการเดินทาง ก็ต้องเริ่มจากที่ใดที่หนึ่ง ในบทนี้เราจะพูดถึง:
- การติดตั้ง Rust บน Linux, macOS และ Windows
- การเขียนโปรแกรมที่พิมพ์
Hello, world! - การใช้
cargoซึ่งเป็น package manager และ build system ของ Rust
การติดตั้ง
การติดตั้ง
ขั้นตอนแรกคือการติดตั้ง Rust เราจะ download Rust ผ่าน rustup ซึ่งเป็น
เครื่องมือ command line สำหรับจัดการ version ของ Rust และเครื่องมือที่
เกี่ยวข้อง คุณจะต้องเชื่อมต่ออินเทอร์เน็ตเพื่อ download
หมายเหตุ: ถ้าคุณไม่อยากใช้
rustupด้วยเหตุผลใดก็ตาม โปรดดู หน้า Other Rust Installation Methods สำหรับตัวเลือกเพิ่มเติม
ขั้นตอนต่อไปนี้จะติดตั้ง Rust compiler version stable ล่าสุด การรับประกัน ความเสถียรของ Rust ทำให้แน่ใจได้ว่าตัวอย่างทั้งหมดในหนังสือที่ compile ได้ จะยัง compile ได้กับ Rust version ใหม่ ๆ ด้วย output อาจต่างกันเล็กน้อย ระหว่าง version เพราะ Rust มักปรับปรุง error message และ warning อยู่เสมอ พูดอีกอย่าง Rust version stable ใหม่ ๆ ที่คุณติดตั้งด้วยขั้นตอนเหล่านี้ ควร ทำงานได้ตามที่คาดกับเนื้อหาของหนังสือเล่มนี้
สัญลักษณ์ใน Command Line
ในบทนี้และตลอดทั้งเล่ม เราจะแสดงคำสั่งบางคำสั่งที่ใช้ใน terminal บรรทัดที่
คุณควรพิมพ์ลงใน terminal จะขึ้นต้นด้วย $ คุณไม่ต้องพิมพ์ตัวอักษร $ มัน
เป็น prompt ของ command line ที่แสดงเพื่อบอกจุดเริ่มต้นของแต่ละคำสั่ง
บรรทัดที่ไม่ได้ขึ้นต้นด้วย $ มักแสดง output ของคำสั่งก่อนหน้า นอกจากนี้
ตัวอย่างที่เฉพาะเจาะจงสำหรับ PowerShell จะใช้ > แทน $
การติดตั้ง rustup บน Linux หรือ macOS
ถ้าคุณใช้ Linux หรือ macOS เปิด terminal แล้วป้อนคำสั่งต่อไปนี้:
$ curl --proto '=https' --tlsv1.2 https://sh.rustup.rs -sSf | sh
คำสั่งนี้ download script และเริ่มติดตั้งเครื่องมือ rustup ซึ่งจะติดตั้ง
Rust version stable ล่าสุด คุณอาจถูกถาม password ของระบบ ถ้าติดตั้งสำเร็จ
จะมีบรรทัดต่อไปนี้ปรากฏ:
Rust is installed now. Great!
คุณจะต้องมี linker ด้วย ซึ่งเป็นโปรแกรมที่ Rust ใช้รวม output ที่ compile ออกมาให้เป็นไฟล์เดียว เป็นไปได้สูงว่าคุณมีอยู่แล้ว ถ้าเจอ linker error คุณ ควรติดตั้ง C compiler ซึ่งโดยทั่วไปจะมี linker มาด้วย C compiler ยังมี ประโยชน์เพราะ Rust package ที่ใช้บ่อยบางตัวพึ่งพาโค้ด C และต้องใช้ C compiler
บน macOS คุณสามารถได้ C compiler โดยรัน:
$ xcode-select --install
ผู้ใช้ Linux โดยทั่วไปควรติดตั้ง GCC หรือ Clang ตามเอกสารของ distribution
ของตน เช่น ถ้าใช้ Ubuntu คุณสามารถติดตั้ง package build-essential
การติดตั้ง rustup บน Windows
บน Windows ให้ไปที่ https://www.rust-lang.org/tools/install และทำตามคำแนะนำในการติดตั้ง Rust ในระหว่างการติดตั้ง คุณจะถูกถามให้ติดตั้ง Visual Studio ซึ่งจะให้ linker และ native library ที่จำเป็นสำหรับการ compile โปรแกรม ถ้าต้องการความช่วยเหลือเพิ่มเติมในขั้นตอนนี้ ดูที่ https://rust-lang.github.io/rustup/installation/windows-msvc.html
เนื้อหาที่เหลือของหนังสือใช้คำสั่งที่ทำงานได้ทั้งใน cmd.exe และ PowerShell ถ้ามีความแตกต่างเฉพาะ เราจะอธิบายว่าควรใช้แบบไหน
แก้ไขปัญหา
หากต้องการเช็คว่าคุณติดตั้ง Rust ถูกต้องหรือไม่ เปิด shell แล้วป้อนบรรทัดนี้:
$ rustc --version
คุณควรเห็นเลข version, commit hash และวันที่ commit ของ version stable ล่าสุดที่ release ออกมา ในรูปแบบ:
rustc x.y.z (abcabcabc yyyy-mm-dd)
ถ้าคุณเห็นข้อมูลนี้ แสดงว่าคุณติดตั้ง Rust สำเร็จแล้ว! ถ้าไม่เห็นข้อมูลนี้
ให้เช็คว่า Rust อยู่ใน system variable %PATH% ของคุณ ดังนี้
ใน Windows CMD ใช้:
> echo %PATH%
ใน PowerShell ใช้:
> echo $env:Path
ใน Linux และ macOS ใช้:
$ echo $PATH
ถ้าทุกอย่างถูกต้องแล้ว Rust ยังไม่ทำงาน มีที่หลายแห่งที่คุณขอความช่วยเหลือ ได้ ดูวิธีติดต่อกับ Rustacean คนอื่น ๆ (ชื่อเล่นน่ารัก ๆ ที่เราเรียกตัวเอง) ได้ที่ หน้า community
Update และ Uninstall
เมื่อติดตั้ง Rust ผ่าน rustup แล้ว การ update เป็น version ใหม่ที่ release
ออกมาเป็นเรื่องง่าย จาก shell ของคุณ ให้รัน update script ต่อไปนี้:
$ rustup update
ถ้าต้องการ uninstall Rust และ rustup ให้รัน uninstall script ต่อไปนี้
จาก shell:
$ rustup self uninstall
อ่าน Documentation ที่ติดตั้งไว้ในเครื่อง
การติดตั้ง Rust จะแถม documentation ฉบับ local มาด้วย เพื่อให้คุณอ่าน
offline ได้ รัน rustup doc เพื่อเปิด documentation ใน browser
ทุกครั้งที่ type หรือ function ถูกให้มาโดย standard library แล้วคุณไม่แน่ใจ ว่ามันทำอะไรหรือใช้ยังไง ให้ใช้ documentation ของ application programming interface (API) เพื่อหาคำตอบ!
ใช้ Text Editor และ IDE
หนังสือเล่มนี้ไม่ได้ตั้งสมมติฐานเกี่ยวกับเครื่องมือที่คุณใช้เขียนโค้ด Rust แทบทุก text editor ใช้ทำงานได้ทั้งนั้น! อย่างไรก็ตาม text editor และ integrated development environment (IDE) หลายตัวมี support สำหรับ Rust ใน ตัว คุณหารายชื่อ editor และ IDE ที่ค่อนข้างใหม่ได้ที่ หน้า tools บนเว็บไซต์ Rust
ทำงาน Offline กับหนังสือเล่มนี้
ในตัวอย่างหลายตัวอย่าง เราจะใช้ Rust package นอก standard library การจะ
ทำตามตัวอย่างเหล่านั้นได้ คุณต้องมีการเชื่อมต่ออินเทอร์เน็ตหรือ download
dependency เหล่านั้นไว้ล่วงหน้า ถ้าจะ download dependency ไว้ล่วงหน้า ให้
รันคำสั่งต่อไปนี้ (เราจะอธิบายว่า cargo คืออะไรและคำสั่งแต่ละตัวทำอะไร
ในรายละเอียดทีหลัง)
$ cargo new get-dependencies
$ cd get-dependencies
$ cargo add [email protected] [email protected]
การทำแบบนี้จะ cache การ download package เหล่านี้ไว้ จึงไม่ต้อง download
ใหม่ทีหลัง เมื่อรันคำสั่งนี้แล้ว ไม่จำเป็นต้องเก็บโฟลเดอร์ get-dependencies
ไว้ ถ้าคุณรันคำสั่งนี้แล้ว สามารถใช้ flag --offline กับคำสั่ง cargo
ทั้งหมดในส่วนที่เหลือของหนังสือ เพื่อใช้ version ที่ cache ไว้แทนการพยายาม
ใช้ network
Hello, World!
Hello, World!
ตอนนี้คุณติดตั้ง Rust แล้ว ก็ถึงเวลาเขียนโปรแกรม Rust แรกของคุณ มันเป็น
ธรรมเนียมเวลาเรียนภาษาใหม่ที่จะเขียนโปรแกรมเล็ก ๆ ที่พิมพ์ข้อความ
Hello, world! ออกหน้าจอ เราก็จะทำแบบเดียวกันที่นี่!
หมายเหตุ: หนังสือเล่มนี้ตั้งสมมติฐานว่าคุณคุ้นเคยกับ command line ระดับ พื้นฐาน Rust ไม่ได้เรียกร้องเฉพาะเกี่ยวกับ editor หรือ tooling หรือว่าโค้ด ของคุณอยู่ที่ไหน ดังนั้นถ้าคุณชอบใช้ IDE แทน command line ก็ใช้ IDE ที่คุณ ชอบได้เลย IDE หลายตัวตอนนี้มี support สำหรับ Rust ในระดับหนึ่ง เช็ค documentation ของ IDE สำหรับรายละเอียด ทีม Rust ได้เน้นการสนับสนุน IDE ที่ยอดเยี่ยมผ่าน
rust-analyzerดูรายละเอียดเพิ่มเติมใน ภาคผนวก D
Setup directory ของโปรเจกต์
คุณจะเริ่มด้วยการสร้าง directory เก็บโค้ด Rust ของคุณ สำหรับ Rust ไม่สำคัญ ว่าโค้ดอยู่ที่ไหน แต่สำหรับแบบฝึกหัดและโปรเจกต์ในหนังสือเล่มนี้ เราแนะนำให้ สร้าง directory projects ใน home directory และเก็บโปรเจกต์ทั้งหมดไว้ที่ นั่น
เปิด terminal แล้วป้อนคำสั่งต่อไปนี้ เพื่อสร้าง directory projects และ directory สำหรับโปรเจกต์ “Hello, world!” ภายใน directory projects
สำหรับ Linux, macOS และ PowerShell บน Windows ให้ป้อน:
$ mkdir ~/projects
$ cd ~/projects
$ mkdir hello_world
$ cd hello_world
สำหรับ Windows CMD ให้ป้อน:
> mkdir "%USERPROFILE%\projects"
> cd /d "%USERPROFILE%\projects"
> mkdir hello_world
> cd hello_world
พื้นฐานโปรแกรม Rust
ขั้นต่อไป สร้างไฟล์ source ใหม่ตั้งชื่อว่า main.rs ไฟล์ Rust ลงท้ายด้วย นามสกุล .rs เสมอ ถ้าคุณใช้คำมากกว่าหนึ่งคำในชื่อไฟล์ convention คือใช้ underscore คั่น เช่นใช้ hello_world.rs แทน helloworld.rs
ตอนนี้เปิดไฟล์ main.rs ที่เพิ่งสร้าง แล้วป้อนโค้ดใน Listing 1-1
fn main() {
    println!("Hello, world!");
}Hello, world!บันทึกไฟล์แล้วกลับไปที่ terminal ใน directory ~/projects/hello_world บน Linux หรือ macOS ป้อนคำสั่งต่อไปนี้เพื่อ compile และรันไฟล์:
$ rustc main.rs
$ ./main
Hello, world!
บน Windows ใช้คำสั่ง .\main แทน ./main:
> rustc main.rs
> .\main
Hello, world!
ไม่ว่า OS อะไร string Hello, world! ควรพิมพ์ออกมาที่ terminal ถ้าคุณไม่
เห็น output นี้ ย้อนกลับไปดู ส่วน “แก้ไขปัญหา”
ของหัวข้อการติดตั้ง เพื่อหาวิธีขอความช่วยเหลือ
ถ้า Hello, world! พิมพ์ออกมาได้ ขอแสดงความยินดี! คุณเขียนโปรแกรม Rust
อย่างเป็นทางการแล้ว นั่นทำให้คุณกลายเป็น Rust programmer — ยินดีต้อนรับ!
กายวิภาคของโปรแกรม Rust
มาทบทวนโปรแกรม “Hello, world!” นี้แบบละเอียดกัน นี่คือชิ้นแรกของจิ๊กซอว์:
fn main() {

}
บรรทัดเหล่านี้กำหนดฟังก์ชันชื่อ main ฟังก์ชัน main พิเศษ: มันเป็นโค้ด
แรกที่รันในโปรแกรม Rust ที่ executable ได้ทุกตัวเสมอ ตรงนี้ บรรทัดแรก
ประกาศฟังก์ชันชื่อ main ที่ไม่มี parameter และไม่ return อะไร ถ้ามี
parameter มันจะอยู่ภายในวงเล็บ (())
ตัว body ของฟังก์ชันห่อด้วย {} Rust กำหนดให้ใช้ curly bracket ครอบ body
ของทุกฟังก์ชัน เป็นสไตล์ที่ดีที่จะวาง curly bracket เปิดในบรรทัดเดียวกับ
การประกาศฟังก์ชัน โดยเพิ่ม space หนึ่งช่องคั่น
หมายเหตุ: ถ้าคุณอยากใช้สไตล์มาตรฐานในโปรเจกต์ Rust คุณใช้เครื่องมือจัด format อัตโนมัติชื่อ
rustfmtเพื่อจัด format โค้ดในสไตล์เฉพาะได้ (อ่านเพิ่มเรื่องrustfmtใน ภาคผนวก D) ทีม Rust ได้รวมเครื่องมือนี้มาในชุด Rust มาตรฐานเช่นเดียวกับrustcดังนั้น มันน่าจะติดตั้งไว้ในเครื่องของคุณแล้ว!
Body ของฟังก์ชัน main มีโค้ดต่อไปนี้:
#![allow(unused)]
fn main() {
println!("Hello, world!");
}
บรรทัดนี้ทำงานทั้งหมดในโปรแกรมเล็ก ๆ นี้ คือพิมพ์ข้อความออกหน้าจอ มีราย ละเอียดสำคัญสามอย่างที่ควรสังเกต
ประการแรก println! เรียก macro ของ Rust ถ้ามันเรียก function แทน มันจะ
ถูกป้อนเป็น println (ไม่มี !) Rust macro เป็นวิธีเขียนโค้ดที่ generate
โค้ดเพื่อขยาย syntax ของ Rust เราจะพูดถึงพวกมันในรายละเอียดเพิ่มเติมใน
บทที่ 20 ตอนนี้คุณแค่ต้องรู้ว่าการใช้ !
หมายความว่าคุณกำลังเรียก macro แทน function ปกติ และ macro ไม่ได้ทำตาม
กฎเดียวกันกับ function เสมอไป
ประการที่สอง คุณเห็น string "Hello, world!" เราส่ง string นี้เป็น
argument ให้ println! และ string นั้นถูกพิมพ์ออกหน้าจอ
ประการที่สาม เราจบบรรทัดด้วย semicolon (;) ซึ่งบ่งบอกว่า expression นี้
จบแล้ว และ expression ถัดไปพร้อมเริ่มได้ บรรทัดส่วนใหญ่ของโค้ด Rust จบ
ด้วย semicolon
Compile และ Execute
คุณเพิ่งรันโปรแกรมที่สร้างใหม่ ลองมาดูแต่ละขั้นตอนในกระบวนการกัน
ก่อนรันโปรแกรม Rust คุณต้อง compile มันด้วย Rust compiler โดยป้อนคำสั่ง
rustc และส่งชื่อไฟล์ source ให้ ดังนี้:
$ rustc main.rs
ถ้าคุณมีพื้นฐาน C หรือ C++ คุณจะสังเกตว่ามันคล้าย gcc หรือ clang หลัง
compile สำเร็จ Rust จะ output binary ที่ executable ได้
บน Linux, macOS และ PowerShell บน Windows คุณสามารถเห็น executable โดย
ป้อนคำสั่ง ls ใน shell:
$ ls
main  main.rs
บน Linux และ macOS คุณจะเห็นสองไฟล์ บน PowerShell บน Windows คุณจะเห็น สามไฟล์เดียวกับที่จะเห็นด้วย CMD บน CMD ของ Windows คุณจะป้อน:
> dir /B %= the /B option says to only show the file names =%
main.exe
main.pdb
main.rs
จะเห็นไฟล์ source code นามสกุล .rs, ไฟล์ executable (main.exe บน Windows แต่ main บนทุก platform อื่น) และเมื่อใช้ Windows จะมีไฟล์ที่ มี debugging information นามสกุล .pdb จากตรงนี้ คุณรันไฟล์ main หรือ main.exe ดังนี้:
$ ./main # หรือ .\main บน Windows
ถ้า main.rs ของคุณคือโปรแกรม “Hello, world!” บรรทัดนี้จะพิมพ์ Hello, world! ออกที่ terminal
ถ้าคุณคุ้นเคยกับภาษา dynamic อย่าง Ruby, Python หรือ JavaScript คุณอาจ ไม่คุ้นกับการ compile และรันโปรแกรมเป็นขั้นตอนที่แยกกัน Rust เป็นภาษาแบบ ahead-of-time compiled ซึ่งหมายความว่าคุณ compile โปรแกรมแล้วส่ง executable ให้คนอื่น และเขารันได้แม้ไม่ได้ติดตั้ง Rust ถ้าคุณส่งไฟล์ .rb, .py หรือ .js ให้ใคร เขาต้องติดตั้ง Ruby, Python หรือ JavaScript implementation ตามลำดับ แต่ในภาษาเหล่านั้น คุณต้องการเพียง คำสั่งเดียวเพื่อ compile และรันโปรแกรม ทุกอย่างคือ trade-off ในการออกแบบ ภาษา
แค่ compile ด้วย rustc ก็โอเคสำหรับโปรแกรมง่าย ๆ แต่เมื่อโปรเจกต์ของคุณ
ใหญ่ขึ้น คุณจะอยากจัดการ option ทั้งหมดและทำให้ง่ายต่อการแชร์โค้ด ขั้นต่อไป
เราจะแนะนำเครื่องมือ Cargo ให้คุณรู้จัก ซึ่งจะช่วยให้คุณเขียนโปรแกรม Rust
ในโลกจริงได้
Hello, Cargo!
Hello, Cargo!
Cargo คือ build system และ package manager ของ Rust Rustacean ส่วนใหญ่ใช้ เครื่องมือนี้จัดการโปรเจกต์ Rust ของตน เพราะ Cargo จัดการงานหลายอย่างให้ คุณ เช่น build โค้ด, download library ที่โค้ดของคุณพึ่งพา และ build library เหล่านั้น (เราเรียก library ที่โค้ดของคุณต้องการว่า dependency)
โปรแกรม Rust ที่ง่ายที่สุดอย่างที่เราเขียนมา ไม่มี dependency เลย ถ้าเรา build โปรเจกต์ “Hello, world!” ด้วย Cargo มันก็จะใช้แค่ส่วนของ Cargo ที่ จัดการการ build โค้ด เมื่อคุณเขียนโปรแกรม Rust ที่ซับซ้อนขึ้น คุณจะเพิ่ม dependency และถ้าคุณเริ่มโปรเจกต์ด้วย Cargo การเพิ่ม dependency จะทำได้ ง่ายกว่ามาก
เพราะโปรเจกต์ Rust ส่วนใหญ่ใช้ Cargo เนื้อหาที่เหลือของหนังสือเล่มนี้จึง สมมติว่าคุณใช้ Cargo เช่นกัน Cargo มาพร้อม Rust ถ้าคุณใช้ installer ทางการ ที่พูดถึงในส่วน “การติดตั้ง” ถ้าคุณติดตั้ง Rust ด้วยวิธีอื่น ให้เช็คว่า Cargo ติดตั้งอยู่หรือไม่ โดยป้อนคำสั่งต่อไปนี้ ใน terminal:
$ cargo --version
ถ้าคุณเห็นเลข version แสดงว่ามี! ถ้าเห็น error อย่าง command not found
ให้ดู documentation ของวิธีติดตั้งที่คุณใช้ เพื่อหาวิธีติดตั้ง Cargo แยก
ต่างหาก
สร้างโปรเจกต์ด้วย Cargo
มาสร้างโปรเจกต์ใหม่ด้วย Cargo แล้วดูว่ามันต่างจากโปรเจกต์ “Hello, world!” เดิมของเราอย่างไร กลับไปที่ directory projects ของคุณ (หรือที่ใดก็ตามที่ คุณตัดสินใจเก็บโค้ด) แล้วบนทุก OS รัน:
$ cargo new hello_cargo
$ cd hello_cargo
คำสั่งแรกสร้าง directory และโปรเจกต์ใหม่ชื่อ hello_cargo เราตั้งชื่อ โปรเจกต์เป็น hello_cargo และ Cargo สร้างไฟล์ของมันใน directory ชื่อ เดียวกัน
เข้าไปใน directory hello_cargo แล้วดูรายการไฟล์ คุณจะเห็นว่า Cargo generate สองไฟล์และหนึ่ง directory ให้: ไฟล์ Cargo.toml และ directory src ที่มีไฟล์ main.rs อยู่ข้างใน
มันยัง initialize Git repository ใหม่พร้อมไฟล์ .gitignore ด้วย ไฟล์ Git
จะไม่ถูก generate ถ้าคุณรัน cargo new ภายใน Git repository ที่มีอยู่
คุณ override พฤติกรรมนี้ได้โดยใช้ cargo new --vcs=git
หมายเหตุ: Git เป็น version control system ที่ใช้กันทั่วไป คุณสามารถ เปลี่ยน
cargo newให้ใช้ version control system อื่น หรือไม่ใช้เลย โดยใช้ flag--vcsรันcargo new --helpเพื่อดู option ที่มี
เปิด Cargo.toml ใน text editor ที่คุณเลือก มันควรหน้าตาคล้ายโค้ดใน Listing 1-2
[package]
name = "hello_cargo"
version = "0.1.0"
edition = "2024"

[dependencies]
cargo newไฟล์นี้อยู่ในรูปแบบ TOML (Tom’s Obvious, Minimal Language) ซึ่งเป็นรูปแบบ configuration ของ Cargo
บรรทัดแรก [package] เป็น heading ของ section ที่บ่งบอกว่าบรรทัดที่ตาม
มาเป็นการ config package เมื่อเราเพิ่มข้อมูลในไฟล์นี้ เราจะเพิ่ม section
อื่น ๆ ด้วย
สามบรรทัดถัดมา set ข้อมูล config ที่ Cargo ต้องการสำหรับ compile โปรแกรม
ของคุณ: ชื่อ, version และ edition ของ Rust ที่จะใช้ เราจะพูดถึง key
edition ใน ภาคผนวก E
บรรทัดสุดท้าย [dependencies] คือจุดเริ่มต้นของ section ให้คุณ list
dependency ใด ๆ ของโปรเจกต์ ใน Rust เราเรียก package ของโค้ดว่า crate
เราไม่ต้องการ crate อื่นใดสำหรับโปรเจกต์นี้ แต่จะต้องใช้ใน project แรก
ในบทที่ 2 ดังนั้นเราจะใช้ section dependency ตอนนั้น
ทีนี้เปิด src/main.rs แล้วดู:
Filename: src/main.rs
fn main() {
    println!("Hello, world!");
}
Cargo generate โปรแกรม “Hello, world!” ให้คุณแล้ว เหมือนที่เราเขียนใน Listing 1-1! ที่ผ่านมา ความแตกต่างระหว่างโปรเจกต์ของเราและโปรเจกต์ที่ Cargo generate ก็คือ Cargo วางโค้ดไว้ใน directory src และเรามีไฟล์ config Cargo.toml ใน directory บนสุด
Cargo คาดหวังว่าไฟล์ source ของคุณจะอยู่ภายใน directory src ส่วน directory โปรเจกต์ระดับบนสุดมีไว้สำหรับไฟล์ README, ข้อมูล license, ไฟล์ config และอื่น ๆ ที่ไม่เกี่ยวข้องกับโค้ด การใช้ Cargo ช่วยจัด ระเบียบโปรเจกต์ของคุณ มีที่สำหรับทุกอย่าง และทุกอย่างก็อยู่ที่ของมัน
ถ้าคุณเริ่มโปรเจกต์ที่ไม่ได้ใช้ Cargo อย่างที่เราทำกับโปรเจกต์
“Hello, world!” คุณสามารถแปลงมันเป็นโปรเจกต์ที่ใช้ Cargo ได้ ย้ายโค้ด
โปรเจกต์ไปไว้ใน directory src แล้วสร้างไฟล์ Cargo.toml ที่เหมาะสม
วิธีง่าย ๆ ในการได้ไฟล์ Cargo.toml นั้น คือรัน cargo init ซึ่งจะ
สร้างให้คุณอัตโนมัติ
Build และรันโปรเจกต์ Cargo
ทีนี้มาดูว่าอะไรต่างเมื่อเรา build และรันโปรแกรม “Hello, world!” ด้วย Cargo! จาก directory hello_cargo ของคุณ build โปรเจกต์โดยป้อนคำสั่ง ต่อไปนี้:
$ cargo build
   Compiling hello_cargo v0.1.0 (file:///projects/hello_cargo)
    Finished dev [unoptimized + debuginfo] target(s) in 2.85 secs
คำสั่งนี้สร้างไฟล์ executable ใน target/debug/hello_cargo (หรือ target\debug\hello_cargo.exe บน Windows) แทนที่จะอยู่ใน current directory ของคุณ เพราะ build default เป็น debug build Cargo จึงวาง binary ไว้ใน directory ชื่อ debug คุณรัน executable ได้ด้วยคำสั่งนี้:
$ ./target/debug/hello_cargo # หรือ .\target\debug\hello_cargo.exe บน Windows
Hello, world!
ถ้าทุกอย่างเรียบร้อย Hello, world! ควรพิมพ์ออก terminal การรัน
cargo build ครั้งแรกยังทำให้ Cargo สร้างไฟล์ใหม่ในระดับบนสุด:
Cargo.lock ไฟล์นี้ติดตาม version ที่แน่นอนของ dependency ในโปรเจกต์
ของคุณ โปรเจกต์นี้ไม่มี dependency ดังนั้นไฟล์จึงค่อนข้างว่าง คุณจะไม่
ต้องแก้ไฟล์นี้เอง Cargo จัดการเนื้อหาให้คุณ
เราเพิ่ง build โปรเจกต์ด้วย cargo build แล้วรันด้วย
./target/debug/hello_cargo แต่เราใช้ cargo run เพื่อ compile โค้ดแล้ว
รัน executable ที่ได้ในคำสั่งเดียวก็ได้:
$ cargo run
    Finished dev [unoptimized + debuginfo] target(s) in 0.0 secs
     Running `target/debug/hello_cargo`
Hello, world!
การใช้ cargo run สะดวกกว่าการต้องจำให้รัน cargo build แล้วใช้ path
ทั้งหมดของ binary ดังนั้นนักพัฒนาส่วนใหญ่ใช้ cargo run
สังเกตว่าครั้งนี้เราไม่เห็น output ที่บ่งบอกว่า Cargo กำลัง compile
hello_cargo Cargo รู้ว่าไฟล์ไม่เปลี่ยน ก็เลยไม่ rebuild แต่รัน binary
อย่างเดียว ถ้าคุณแก้ source code Cargo จะ rebuild โปรเจกต์ก่อนรัน และคุณ
จะเห็น output นี้:
$ cargo run
   Compiling hello_cargo v0.1.0 (file:///projects/hello_cargo)
    Finished dev [unoptimized + debuginfo] target(s) in 0.33 secs
     Running `target/debug/hello_cargo`
Hello, world!
Cargo ยังมีคำสั่งชื่อ cargo check ด้วย คำสั่งนี้เช็คโค้ดอย่างรวดเร็ว
เพื่อให้แน่ใจว่ามัน compile ได้ แต่ไม่ produce executable:
$ cargo check
   Checking hello_cargo v0.1.0 (file:///projects/hello_cargo)
    Finished dev [unoptimized + debuginfo] target(s) in 0.32 secs
ทำไมถึงไม่อยากได้ executable? บ่อยครั้ง cargo check เร็วกว่า
cargo build มาก เพราะข้ามขั้นตอน produce executable ถ้าคุณเช็คงานต่อ
เนื่องระหว่างเขียนโค้ด การใช้ cargo check จะเร่งกระบวนการให้คุณรู้ว่า
โปรเจกต์ยัง compile ผ่านหรือไม่! ด้วยเหตุนี้ Rustacean หลายคนจึงรัน
cargo check เป็นระยะระหว่างเขียนโปรแกรม เพื่อให้แน่ใจว่ามัน compile
ผ่าน แล้วค่อยรัน cargo build ตอนที่พร้อมใช้ executable
มาทบทวนสิ่งที่เราเรียนเกี่ยวกับ Cargo ที่ผ่านมา:
- เราสร้างโปรเจกต์ได้ด้วย
cargo new - เรา build โปรเจกต์ได้ด้วย
cargo build - เรา build และรันโปรเจกต์ในขั้นตอนเดียวได้ด้วย
cargo run - เรา build โปรเจกต์โดยไม่ produce binary เพื่อเช็ค error ได้ด้วย
cargo check - แทนที่จะบันทึกผลของ build ใน directory เดียวกับโค้ด Cargo เก็บมันไว้ ใน directory target/debug
ข้อดีเพิ่มเติมของการใช้ Cargo คือคำสั่งจะเหมือนกันไม่ว่าคุณทำงานบน OS อะไร ดังนั้นจากตรงนี้ เราจะไม่ให้คำแนะนำเฉพาะสำหรับ Linux และ macOS เทียบกับ Windows อีกต่อไป
Build เพื่อ Release
เมื่อโปรเจกต์ของคุณพร้อม release แล้ว คุณใช้ cargo build --release เพื่อ
compile มันพร้อม optimization ได้ คำสั่งนี้จะสร้าง executable ใน
target/release แทน target/debug การ optimize ทำให้โค้ด Rust รันเร็วขึ้น
แต่การเปิดมันใช้เวลา compile นานขึ้น นี่จึงเป็นเหตุผลที่มี profile สอง
แบบที่ต่างกัน: หนึ่งสำหรับ development ตอนที่คุณอยาก rebuild เร็วและบ่อย
อีกหนึ่งสำหรับการ build โปรแกรมสุดท้ายที่คุณจะส่งให้ user ซึ่งจะไม่ถูก
rebuild ซ้ำ ๆ และจะรันเร็วที่สุดเท่าที่ทำได้ ถ้าคุณ benchmark เวลารัน
ของโค้ด อย่าลืมรัน cargo build --release และ benchmark กับ executable
ใน target/release
ใช้ประโยชน์จาก convention ของ Cargo
สำหรับโปรเจกต์ง่าย ๆ Cargo ไม่ให้คุณค่าเพิ่มมากนักเหนือกว่าการใช้แค่
rustc แต่จะพิสูจน์คุณค่าเมื่อโปรแกรมของคุณซับซ้อนขึ้น เมื่อโปรแกรม
เติบโตเป็นหลายไฟล์หรือต้องการ dependency การให้ Cargo coordinate การ
build ก็ง่ายกว่ามาก
แม้โปรเจกต์ hello_cargo จะเรียบง่าย แต่ตอนนี้มันใช้ tooling ส่วนใหญ่ที่
คุณจะใช้จริงในส่วนที่เหลือของ Rust career ของคุณ จริง ๆ แล้ว เพื่อทำงาน
กับโปรเจกต์ที่มีอยู่ คุณใช้คำสั่งต่อไปนี้เพื่อ check out โค้ดด้วย Git
เปลี่ยนเข้า directory ของโปรเจกต์ แล้ว build ได้:
$ git clone example.org/someproject
$ cd someproject
$ cargo build
ดูข้อมูลเพิ่มเติมเกี่ยวกับ Cargo ที่ documentation ของมัน
สรุป
คุณเริ่มต้นการเดินทาง Rust ได้ดีมากแล้ว! ในบทนี้คุณได้เรียน:
- ติดตั้ง Rust version stable ล่าสุดด้วย
rustup - Update เป็น Rust version ใหม่กว่า
- เปิด documentation ที่ติดตั้งไว้ในเครื่อง
- เขียนและรันโปรแกรม “Hello, world!” โดยใช้
rustcตรง ๆ - สร้างและรันโปรเจกต์ใหม่โดยใช้ convention ของ Cargo
นี่เป็นเวลาที่ดีที่จะ build โปรแกรมที่ใหญ่ขึ้น เพื่อทำความคุ้นเคยกับการ อ่านและเขียนโค้ด Rust ดังนั้น ในบทที่ 2 เราจะ build โปรแกรมเกมทายตัวเลข ถ้าคุณอยากเริ่มด้วยการเรียนว่าแนวคิดพื้นฐานของการเขียนโปรแกรมทำงานยังไง ใน Rust ดูบทที่ 3 แล้วค่อยกลับมาที่บทที่ 2
เขียนเกมทายตัวเลข
มากระโดดเข้าสู่ Rust ด้วยการทำโปรเจกต์แบบลงมือทำร่วมกัน! บทนี้แนะนำแนวคิด
Rust ที่ใช้บ่อย ๆ ผ่านการแสดงให้คุณเห็นวิธีใช้มันในโปรแกรมจริง คุณจะได้เรียน
เรื่อง let, match, เมธอด, associated function, external crate และอื่น ๆ!
ในบทถัด ๆ ไป เราจะสำรวจไอเดียเหล่านี้ในรายละเอียดมากขึ้น ในบทนี้คุณแค่ฝึก
พื้นฐาน
เราจะ implement ปัญหา programming คลาสสิกสำหรับมือใหม่: เกมทายตัวเลข มันทำ งานแบบนี้ — โปรแกรมจะ generate จำนวนเต็มสุ่มระหว่าง 1 ถึง 100 จากนั้นจะให้ ผู้เล่นป้อนตัวเลขที่จะทาย หลังจากป้อนคำตอบแล้ว โปรแกรมจะบอกว่าคำตอบสูงไป หรือต่ำไป ถ้าคำตอบถูก เกมจะพิมพ์ข้อความแสดงความยินดีและออก
Setup โปรเจกต์ใหม่
ในการ setup โปรเจกต์ใหม่ ให้ไปที่ directory projects ที่คุณสร้างใน บทที่ 1 แล้วสร้างโปรเจกต์ใหม่ด้วย Cargo ดังนี้:
$ cargo new guessing_game
$ cd guessing_game
คำสั่งแรก cargo new รับชื่อโปรเจกต์ (guessing_game) เป็น argument แรก
คำสั่งที่สองเปลี่ยนเข้าไปใน directory โปรเจกต์ใหม่
ดูไฟล์ Cargo.toml ที่ถูก generate:
Filename: Cargo.toml
[package]
name = "guessing_game"
version = "0.1.0"
edition = "2024"

[dependencies]
อย่างที่คุณเห็นในบทที่ 1 cargo new generate โปรแกรม “Hello, world!” ให้
คุณ ดูไฟล์ src/main.rs:
Filename: src/main.rs
fn main() {
    println!("Hello, world!");
}
ทีนี้มา compile โปรแกรม “Hello, world!” นี้แล้วรันในขั้นตอนเดียวด้วย
คำสั่ง cargo run:
$ cargo run
   Compiling guessing_game v0.1.0 (file:///projects/guessing_game)
    Finished `dev` profile [unoptimized + debuginfo] target(s) in 0.08s
     Running `target/debug/guessing_game`
Hello, world!
คำสั่ง run มีประโยชน์เมื่อคุณต้องทำซ้ำในโปรเจกต์อย่างรวดเร็ว อย่างที่เรา
จะทำในเกมนี้ ทดสอบแต่ละ iteration อย่างเร็วก่อนไปทำต่อ
เปิดไฟล์ src/main.rs อีกครั้ง คุณจะเขียนโค้ดทั้งหมดในไฟล์นี้
ประมวลผลคำตอบ
ส่วนแรกของโปรแกรมเกมทายตัวเลข จะขอ input จากผู้ใช้ ประมวลผล input นั้น และ เช็คว่า input อยู่ในรูปแบบที่คาดไว้ ในการเริ่มต้น เราจะให้ผู้เล่นป้อน คำตอบ ป้อนโค้ดใน Listing 2-1 ลงใน src/main.rs
use std::io;

fn main() {
    println!("Guess the number!");

    println!("Please input your guess.");

    let mut guess = String::new();

    io::stdin()
        .read_line(&mut guess)
        .expect("Failed to read line");

    println!("You guessed: {guess}");
}โค้ดนี้มีข้อมูลเยอะ ฉะนั้นมาอธิบายทีละบรรทัด ในการรับ input จากผู้ใช้แล้ว
พิมพ์ผลออกมา เราต้องนำ library io (input/output) เข้า scope library
io มาจาก standard library ที่รู้จักในชื่อ std:
use std::io;

fn main() {
    println!("Guess the number!");

    println!("Please input your guess.");

    let mut guess = String::new();

    io::stdin()
        .read_line(&mut guess)
        .expect("Failed to read line");

    println!("You guessed: {guess}");
}
โดย default Rust มีชุดของ item ที่ประกาศใน standard library ซึ่งถูกนำเข้า scope ของทุกโปรแกรม ชุดนี้เรียกว่า prelude และคุณดูทุกอย่างในมันได้ ใน documentation ของ standard library
ถ้า type ที่คุณอยากใช้ไม่ได้อยู่ใน prelude คุณต้องนำ type นั้นเข้า scope
แบบ explicit ด้วย statement use การใช้ library std::io ให้ฟีเจอร์ที่
มีประโยชน์หลายอย่าง รวมถึงความสามารถในการรับ input จากผู้ใช้
อย่างที่คุณเห็นในบทที่ 1 ฟังก์ชัน main เป็น entry point ของโปรแกรม:
use std::io;

fn main() {
    println!("Guess the number!");

    println!("Please input your guess.");

    let mut guess = String::new();

    io::stdin()
        .read_line(&mut guess)
        .expect("Failed to read line");

    println!("You guessed: {guess}");
}
Syntax fn ประกาศฟังก์ชันใหม่ วงเล็บ () บ่งบอกว่าไม่มี parameter และ
curly bracket { เริ่ม body ของฟังก์ชัน
อย่างที่คุณเรียนในบทที่ 1 ด้วย println! เป็น macro ที่พิมพ์ string ออก
หน้าจอ:
use std::io;

fn main() {
    println!("Guess the number!");

    println!("Please input your guess.");

    let mut guess = String::new();

    io::stdin()
        .read_line(&mut guess)
        .expect("Failed to read line");

    println!("You guessed: {guess}");
}
โค้ดนี้พิมพ์ prompt บอกว่าเกมคืออะไรและขอ input จากผู้ใช้
เก็บค่าด้วยตัวแปร
ขั้นต่อไป เราจะสร้าง ตัวแปร เพื่อเก็บ input ของผู้ใช้ ดังนี้:
use std::io;

fn main() {
    println!("Guess the number!");

    println!("Please input your guess.");

    let mut guess = String::new();

    io::stdin()
        .read_line(&mut guess)
        .expect("Failed to read line");

    println!("You guessed: {guess}");
}
ทีนี้โปรแกรมเริ่มน่าสนใจแล้ว! มีหลายอย่างเกิดขึ้นในบรรทัดเล็ก ๆ นี้ เราใช้
statement let เพื่อสร้างตัวแปร นี่คืออีกตัวอย่างหนึ่ง:
let apples = 5;บรรทัดนี้สร้างตัวแปรใหม่ชื่อ apples แล้ว bind มันกับค่า 5 ใน Rust
ตัวแปรเป็น immutable โดย default หมายความว่าเมื่อให้ค่ากับตัวแปรแล้ว ค่า
นั้นจะไม่เปลี่ยน เราจะพูดถึงแนวคิดนี้ในรายละเอียดในส่วน
“ตัวแปรและ mutability” ของ
บทที่ 3 ในการทำให้ตัวแปร mutable เราเพิ่ม mut ก่อนชื่อตัวแปร:
let apples = 5; // immutable
let mut bananas = 5; // mutable
หมายเหตุ: syntax
//เริ่ม comment ที่ดำเนินไปจนจบบรรทัด Rust ละเว้น ทุกอย่างใน comment เราจะพูดถึง comment ในรายละเอียดเพิ่มเติมใน บทที่ 3
กลับมาที่โปรแกรมเกมทายตัวเลข ตอนนี้คุณรู้แล้วว่า let mut guess จะแนะนำ
ตัวแปร mutable ชื่อ guess เครื่องหมายเท่ากับ (=) บอก Rust ว่าเราอยาก
bind บางอย่างกับตัวแปรตอนนี้ ทางขวาของเครื่องหมายเท่ากับคือค่าที่ guess
ถูก bind ด้วย ซึ่งเป็นผลของการเรียก String::new ฟังก์ชันที่ return
instance ใหม่ของ String String เป็น type
string ที่ให้มาโดย standard library เป็น bit ของข้อความที่เติบโตได้ และ
encode แบบ UTF-8
Syntax :: ในบรรทัด ::new บ่งบอกว่า new เป็น associated function ของ
type String associated function คือฟังก์ชันที่ implement บน type ใน
กรณีนี้คือ String ฟังก์ชัน new นี้สร้าง string ว่างใหม่ คุณจะพบ
ฟังก์ชัน new ใน type หลายตัว เพราะมันเป็นชื่อที่ใช้บ่อยสำหรับฟังก์ชัน
ที่สร้างค่าใหม่บางอย่าง
โดยสรุป บรรทัด let mut guess = String::new(); ได้สร้างตัวแปร mutable ที่
ตอนนี้ถูก bind กับ instance ว่างใหม่ของ String เฮ้อ!
รับ input จากผู้ใช้
จำได้ว่าเรา include functionality สำหรับ input/output จาก standard
library ด้วย use std::io; ในบรรทัดแรกของโปรแกรม ทีนี้เราจะเรียกฟังก์ชัน
stdin จาก module io ซึ่งจะให้เราจัดการ input จากผู้ใช้:
use std::io;

fn main() {
    println!("Guess the number!");

    println!("Please input your guess.");

    let mut guess = String::new();

    io::stdin()
        .read_line(&mut guess)
        .expect("Failed to read line");

    println!("You guessed: {guess}");
}
ถ้าเราไม่ได้ import module io ด้วย use std::io; ที่ต้นโปรแกรม เราก็ยัง
ใช้ฟังก์ชันได้โดยเขียนการเรียกฟังก์ชันนี้เป็น std::io::stdin ฟังก์ชัน
stdin return instance ของ std::io::Stdin ซึ่ง
เป็น type ที่แทน handle ของ standard input ของ terminal คุณ
ถัดไป บรรทัด .read_line(&mut guess) เรียกเมธอด
read_line บน standard input handle เพื่อรับ
input จากผู้ใช้ เรายังส่ง &mut guess เป็น argument ให้ read_line เพื่อ
บอกมันว่าจะเก็บ input ของผู้ใช้ใน string ตัวไหน งานเต็ม ๆ ของ read_line
คือรับสิ่งที่ผู้ใช้พิมพ์ลง standard input แล้ว append เข้าไปใน string (โดย
ไม่เขียนทับเนื้อหา) เราจึงส่ง string นั้นเป็น argument argument ที่เป็น
string ต้องเป็น mutable เพื่อให้เมธอดเปลี่ยนเนื้อหาของ string ได้
& บ่งบอกว่า argument นี้เป็น reference ซึ่งให้คุณมีวิธีให้หลายส่วนของ
โค้ดเข้าถึงข้อมูลชิ้นเดียวได้ โดยไม่ต้องคัดลอกข้อมูลนั้นลงในหน่วยความจำ
หลายครั้ง reference เป็นฟีเจอร์ที่ซับซ้อน และหนึ่งในข้อได้เปรียบหลักของ
Rust คือความปลอดภัยและความง่ายของการใช้ reference คุณไม่ต้องรู้รายละเอียด
เหล่านั้นเยอะเพื่อจบโปรแกรมนี้ ตอนนี้สิ่งที่คุณต้องรู้คือ เช่นเดียวกับ
ตัวแปร reference เป็น immutable โดย default ดังนั้นคุณต้องเขียน
&mut guess แทน &guess เพื่อทำให้มัน mutable (บทที่ 4 จะอธิบาย
reference อย่างละเอียดมากขึ้น)
จัดการ failure ที่อาจเกิดขึ้นด้วย Result
เรายังทำงานอยู่กับบรรทัดโค้ดนี้ ตอนนี้เรากำลังพูดถึงบรรทัดที่สามของข้อความ แต่จำไว้ว่ามันยังเป็นส่วนหนึ่งของบรรทัดโค้ดเชิง logic เดียว ส่วนถัดไปคือ เมธอดนี้:
use std::io;

fn main() {
    println!("Guess the number!");

    println!("Please input your guess.");

    let mut guess = String::new();

    io::stdin()
        .read_line(&mut guess)
        .expect("Failed to read line");

    println!("You guessed: {guess}");
}
เราเขียนโค้ดนี้เป็นแบบนี้ก็ได้:
io::stdin().read_line(&mut guess).expect("Failed to read line");อย่างไรก็ตาม บรรทัดยาว ๆ บรรทัดเดียวอ่านยาก ทางที่ดีที่สุดคือแบ่งมัน บ่อย
ครั้งที่ฉลาดในการแนะนำ newline และ whitespace อื่น ๆ เพื่อช่วยแยกบรรทัด
ยาว ๆ เมื่อคุณเรียกเมธอดด้วย syntax .method_name() ทีนี้มาพูดถึงสิ่งที่
บรรทัดนี้ทำ
อย่างที่กล่าวไว้ก่อนหน้า read_line ใส่สิ่งที่ผู้ใช้ป้อนลงใน string ที่
เราส่งให้ แต่มันยัง return ค่า Result ด้วย Result
เป็น enumeration ที่มักเรียกว่า enum ซึ่งเป็น
type ที่อยู่ในสถานะหนึ่งจากหลายสถานะที่เป็นไปได้ เราเรียกแต่ละสถานะที่
เป็นไปได้ว่า variant
บทที่ 6 จะครอบคลุม enum ในรายละเอียดเพิ่มเติม จุด
ประสงค์ของ type Result เหล่านี้คือ encode ข้อมูลการจัดการ error
variant ของ Result คือ Ok และ Err variant Ok บ่งบอกว่า operation
สำเร็จ และมีค่าที่ generate สำเร็จอยู่ข้างใน variant Err หมายความว่า
operation ล้มเหลว และมีข้อมูลเกี่ยวกับวิธีหรือเหตุผลที่ operation ล้มเหลว
ค่าของ type Result เช่นเดียวกับค่าของ type ใด ๆ มีเมธอดที่ประกาศไว้บน
มัน instance ของ Result มี expect method ที่
คุณเรียกได้ ถ้า instance ของ Result นี้เป็นค่า Err expect จะทำให้
โปรแกรม crash และแสดงข้อความที่คุณส่งเป็น argument ให้ expect ถ้าเมธอด
read_line return Err มันน่าจะเป็นผลของ error ที่มาจาก OS เบื้องล่าง
ถ้า instance ของ Result นี้เป็นค่า Ok expect จะเอาค่าที่ Ok เก็บ
ไว้ แล้ว return แค่ค่านั้นให้คุณ เพื่อให้คุณใช้ได้ ในกรณีนี้ ค่านั้นคือ
จำนวน byte ใน input ของผู้ใช้
ถ้าคุณไม่เรียก expect โปรแกรมจะ compile ได้ แต่คุณจะได้ warning:
$ cargo build
   Compiling guessing_game v0.1.0 (file:///projects/guessing_game)
warning: unused `Result` that must be used
  --> src/main.rs:10:5
   |
10 |     io::stdin().read_line(&mut guess);
   |     ^^^^^^^^^^^^^^^^^^^^^^^^^^^^^^^^^
   |
   = note: this `Result` may be an `Err` variant, which should be handled
   = note: `#[warn(unused_must_use)]` on by default
help: use `let _ = ...` to ignore the resulting value
   |
10 |     let _ = io::stdin().read_line(&mut guess);
   |     +++++++

warning: `guessing_game` (bin "guessing_game") generated 1 warning
    Finished `dev` profile [unoptimized + debuginfo] target(s) in 0.59s
Rust เตือนว่าคุณยังไม่ได้ใช้ค่า Result ที่ return จาก read_line บ่ง
บอกว่าโปรแกรมยังไม่ได้จัดการ error ที่อาจเกิดขึ้น
วิธีที่ถูกในการ suppress warning คือเขียนโค้ดจัดการ error จริง ๆ แต่ใน
กรณีของเรา เราแค่อยากให้โปรแกรมนี้ crash เมื่อเกิดปัญหา เราจึงใช้
expect ได้ คุณจะเรียนเรื่อง recover จาก error ใน บทที่ 9
พิมพ์ค่าด้วย placeholder ของ println!
นอกจาก curly bracket ปิด เหลือแค่บรรทัดเดียวที่ต้องพูดถึงในโค้ดที่ผ่านมา:
use std::io;

fn main() {
    println!("Guess the number!");

    println!("Please input your guess.");

    let mut guess = String::new();

    io::stdin()
        .read_line(&mut guess)
        .expect("Failed to read line");

    println!("You guessed: {guess}");
}
บรรทัดนี้พิมพ์ string ที่ตอนนี้มี input ของผู้ใช้อยู่ ชุด curly bracket
{} คือ placeholder คิดถึง {} เป็นเหมือนก้ามปูเล็ก ๆ ที่จับค่าไว้ที่
เดิม เมื่อพิมพ์ค่าของตัวแปร ชื่อตัวแปรไปอยู่ภายใน curly bracket ได้ เมื่อ
พิมพ์ผลของการประเมิน expression ให้วาง curly bracket ว่างใน format string
แล้วตาม format string ด้วยรายการ expression ที่คั่นด้วย comma เพื่อพิมพ์
ในแต่ละ placeholder curly bracket ว่างในลำดับเดียวกัน การพิมพ์ตัวแปรและ
ผลของ expression ในการเรียก println! ครั้งเดียว จะเป็นแบบนี้:
#![allow(unused)]
fn main() {
let x = 5;
let y = 10;

println!("x = {x} and y + 2 = {}", y + 2);
}
โค้ดนี้จะพิมพ์ x = 5 and y + 2 = 12
ทดสอบส่วนแรก
มาทดสอบส่วนแรกของเกมทายตัวเลขกัน รันมันด้วย cargo run:
$ cargo run
   Compiling guessing_game v0.1.0 (file:///projects/guessing_game)
    Finished `dev` profile [unoptimized + debuginfo] target(s) in 6.44s
     Running `target/debug/guessing_game`
Guess the number!
Please input your guess.
6
You guessed: 6
ณ จุดนี้ ส่วนแรกของเกมเสร็จแล้ว — เรารับ input จาก keyboard แล้วพิมพ์มัน ออกมา
Generate ตัวเลขลับ
ต่อไป เราต้อง generate ตัวเลขลับที่ผู้ใช้จะพยายามทาย ตัวเลขลับควรต่างกันทุก
ครั้ง เพื่อให้เกมสนุกที่จะเล่นมากกว่าหนึ่งครั้ง เราจะใช้ตัวเลขสุ่มระหว่าง 1
ถึง 100 เพื่อให้เกมไม่ยากเกินไป Rust ยังไม่มี functionality สำหรับ random
number ใน standard library อย่างไรก็ตาม ทีม Rust จัดให้มี
crate rand ที่มี functionality ดังกล่าว
เพิ่ม functionality ด้วย crate
จำได้ว่า crate คือชุดของไฟล์ source code ของ Rust โปรเจกต์ที่เรา build อยู่
เป็น binary crate ซึ่งเป็น executable crate rand เป็น library crate ซึ่ง
มีโค้ดที่ตั้งใจให้ใช้ในโปรแกรมอื่น และ execute เองไม่ได้
การ coordinate external crate ของ Cargo เป็นจุดที่ Cargo เปล่งประกายจริง ๆ
ก่อนที่เราจะเขียนโค้ดที่ใช้ rand เราต้องแก้ไฟล์ Cargo.toml เพื่อรวม
crate rand เป็น dependency เปิดไฟล์นั้นแล้วเพิ่มบรรทัดต่อไปนี้ที่ด้านล่าง
ภายใต้ section header [dependencies] ที่ Cargo สร้างให้คุณ อย่าลืมระบุ
rand ให้เป๊ะตามที่เราใส่ไว้ ด้วย version นี้ มิฉะนั้นตัวอย่างโค้ดใน
tutorial นี้อาจไม่ทำงาน:
Filename: Cargo.toml
[dependencies]
rand = "0.8.5"
ในไฟล์ Cargo.toml ทุกอย่างที่ตามมาหลัง header เป็นส่วนหนึ่งของ section
นั้น ที่ดำเนินไปจนกระทั่ง section อื่นเริ่ม ใน [dependencies] คุณบอก
Cargo ว่าโปรเจกต์ของคุณพึ่งพา external crate ตัวไหน และต้องการ version ไหน
ของ crate เหล่านั้น ในกรณีนี้ เราระบุ crate rand ด้วย semantic version
specifier 0.8.5 Cargo เข้าใจ Semantic Versioning
(บางครั้งเรียกว่า SemVer) ซึ่งเป็นมาตรฐานในการเขียนเลข version specifier
0.8.5 จริง ๆ แล้วเป็น shorthand ของ ^0.8.5 ซึ่งหมายถึง version ใด ๆ ที่
อย่างน้อย 0.8.5 แต่ต่ำกว่า 0.9.0
Cargo ถือว่า version เหล่านี้มี API สาธารณะที่เข้ากันได้กับ version 0.8.5 และ specification นี้รับประกันว่าคุณจะได้ patch release ล่าสุดที่ยัง compile กับโค้ดในบทนี้ได้ version 0.9.0 ขึ้นไปไม่รับประกันว่าจะมี API เดียวกับที่ตัวอย่างต่อไปนี้ใช้
ทีนี้ โดยไม่เปลี่ยนโค้ดใด ๆ มา build โปรเจกต์ ตามที่แสดงใน Listing 2-2
$ cargo build
  Updating crates.io index
   Locking 15 packages to latest Rust 1.85.0 compatible versions
    Adding rand v0.8.5 (available: v0.9.0)
 Compiling proc-macro2 v1.0.93
 Compiling unicode-ident v1.0.17
 Compiling libc v0.2.170
 Compiling cfg-if v1.0.0
 Compiling byteorder v1.5.0
 Compiling getrandom v0.2.15
 Compiling rand_core v0.6.4
 Compiling quote v1.0.38
 Compiling syn v2.0.98
 Compiling zerocopy-derive v0.7.35
 Compiling zerocopy v0.7.35
 Compiling ppv-lite86 v0.2.20
 Compiling rand_chacha v0.3.1
 Compiling rand v0.8.5
 Compiling guessing_game v0.1.0 (file:///projects/guessing_game)
  Finished `dev` profile [unoptimized + debuginfo] target(s) in 2.48s
cargo build หลังเพิ่ม crate rand เป็น dependencyคุณอาจเห็นเลข version ต่างกัน (แต่ทั้งหมดจะเข้ากันได้กับโค้ด ขอบคุณ SemVer!) และบรรทัดต่าง ๆ ก็ต่างกัน (ขึ้นกับ OS) และบรรทัดอาจอยู่ในลำดับต่างกัน
เมื่อเรารวม external dependency Cargo จะ fetch version ล่าสุดของทุกอย่างที่ dependency นั้นต้องการ จาก registry ซึ่งเป็นสำเนาข้อมูลจาก Crates.io Crates.io เป็นที่ที่คนใน ecosystem ของ Rust post โปรเจกต์ Rust แบบ open source ให้คนอื่นใช้
หลัง update registry แล้ว Cargo เช็ค section [dependencies] แล้ว download
crate ใด ๆ ที่ list ไว้ที่ยังไม่ได้ download ในกรณีนี้ แม้เราจะ list แค่
rand เป็น dependency Cargo ก็ดึง crate อื่น ๆ ที่ rand พึ่งพาเพื่อทำงาน
มาด้วย หลัง download crate แล้ว Rust compile พวกมัน แล้ว compile โปรเจกต์
ที่มี dependency พร้อมใช้
ถ้าคุณรัน cargo build อีกครั้งทันทีโดยไม่เปลี่ยนอะไร คุณจะไม่ได้ output
ใด ๆ นอกจากบรรทัด Finished Cargo รู้ว่ามัน download และ compile dependency
แล้ว และคุณไม่ได้เปลี่ยนอะไรเกี่ยวกับพวกมันในไฟล์ Cargo.toml Cargo ยัง
รู้ว่าคุณไม่ได้เปลี่ยนอะไรเกี่ยวกับโค้ดของคุณ ดังนั้นมันไม่ recompile โค้ด
ด้วย เมื่อไม่มีอะไรให้ทำ มันก็แค่ออก
ถ้าคุณเปิดไฟล์ src/main.rs แก้ไขเล็กน้อย แล้วบันทึก แล้ว build ใหม่ คุณจะ เห็นแค่สองบรรทัดของ output:
$ cargo build
   Compiling guessing_game v0.1.0 (file:///projects/guessing_game)
    Finished `dev` profile [unoptimized + debuginfo] target(s) in 0.13s
บรรทัดเหล่านี้แสดงว่า Cargo update build ตามการเปลี่ยนเล็ก ๆ ของคุณในไฟล์ src/main.rs เท่านั้น dependency ของคุณไม่ได้เปลี่ยน Cargo จึงรู้ว่ามันใช้ ของที่ download และ compile ไว้แล้วซ้ำได้
รับประกันการ build ที่ทำซ้ำได้
Cargo มีกลไกที่รับประกันว่าคุณ rebuild artifact เดียวกันได้ทุกครั้งที่คุณ
หรือใครก็ตาม build โค้ดของคุณ — Cargo จะใช้แค่ version ของ dependency ที่
คุณระบุ จนกว่าคุณจะบอกเป็นอย่างอื่น เช่น สมมติว่าสัปดาห์หน้า version 0.8.6
ของ crate rand ออกมา และ version นั้นมี bug fix สำคัญ แต่ก็มี regression
ที่จะทำให้โค้ดของคุณพัง ในการจัดการเรื่องนี้ Rust สร้างไฟล์ Cargo.lock
ครั้งแรกที่คุณรัน cargo build ตอนนี้เราจึงมีไฟล์นี้ใน directory
guessing_game
เมื่อคุณ build โปรเจกต์ครั้งแรก Cargo หา version ของ dependency ทั้งหมดที่ ตรงเกณฑ์ แล้วเขียนลงไฟล์ Cargo.lock เมื่อคุณ build โปรเจกต์ในอนาคต Cargo จะเห็นว่าไฟล์ Cargo.lock มีอยู่ และจะใช้ version ที่ระบุที่นั่น แทนการทำงานหา version อีกครั้ง สิ่งนี้ให้คุณมี build ที่ทำซ้ำได้อัตโนมัติ พูดอีกอย่าง โปรเจกต์ของคุณจะอยู่ที่ 0.8.5 จนกว่าคุณจะ upgrade แบบ explicit ขอบคุณไฟล์ Cargo.lock เพราะไฟล์ Cargo.lock สำคัญสำหรับ build ที่ทำซ้ำ ได้ มันจึงมักถูก check in เข้า source control พร้อมโค้ดที่เหลือในโปรเจกต์ ของคุณ
Update crate เพื่อได้ version ใหม่
เมื่อคุณ อยาก update crate Cargo มีคำสั่ง update ซึ่งจะละเว้นไฟล์
Cargo.lock แล้วหา version ล่าสุดทั้งหมดที่ตรง specification ใน
Cargo.toml จากนั้น Cargo จะเขียน version เหล่านั้นลงไฟล์ Cargo.lock
มิฉะนั้น โดย default Cargo จะมองหาแค่ version ที่มากกว่า 0.8.5 และต่ำกว่า
0.9.0 ถ้า crate rand release version ใหม่สอง version คือ 0.8.6 และ
0.999.0 คุณจะเห็นสิ่งต่อไปนี้ถ้ารัน cargo update:
$ cargo update
    Updating crates.io index
     Locking 1 package to latest Rust 1.85.0 compatible version
    Updating rand v0.8.5 -> v0.8.6 (available: v0.999.0)
Cargo ละเว้น release 0.999.0 ณ จุดนี้ คุณจะสังเกตเห็นการเปลี่ยนแปลงในไฟล์
Cargo.lock ระบุว่า version ของ crate rand ที่คุณใช้ตอนนี้คือ 0.8.6
ถ้าจะใช้ rand version 0.999.0 หรือ version ใด ๆ ใน series 0.999.x คุณ
ต้อง update ไฟล์ Cargo.toml ให้หน้าตาเป็นแบบนี้แทน (อย่าทำการเปลี่ยนนี้
จริง ๆ เพราะตัวอย่างต่อไปนี้สมมติว่าคุณใช้ rand 0.8):
[dependencies]
rand = "0.999.0"
ครั้งถัดไปที่คุณรัน cargo build Cargo จะ update registry ของ crate ที่มี
อยู่ และประเมิน requirement rand ของคุณใหม่ตาม version ใหม่ที่คุณระบุ
มีอะไรอีกเยอะให้พูดถึง Cargo และ ecosystem ของมัน ซึ่งเราจะพูดถึงในบทที่ 14 แต่ตอนนี้แค่นี้ก็พอสำหรับสิ่งที่คุณต้องรู้ Cargo ทำให้การใช้ library ซ้ำ เป็นเรื่องง่ายมาก Rustacean จึงเขียนโปรเจกต์ขนาดเล็กที่ประกอบจาก package หลายตัวได้
Generate ตัวเลขสุ่ม
มาเริ่มใช้ rand เพื่อ generate ตัวเลขให้ทาย ขั้นต่อไปคือ update
src/main.rs ตามที่แสดงใน Listing 2-3
use std::io;

use rand::Rng;

fn main() {
    println!("Guess the number!");

    let secret_number = rand::thread_rng().gen_range(1..=100);

    println!("The secret number is: {secret_number}");

    println!("Please input your guess.");

    let mut guess = String::new();

    io::stdin()
        .read_line(&mut guess)
        .expect("Failed to read line");

    println!("You guessed: {guess}");
}ขั้นแรก เราเพิ่มบรรทัด use rand::Rng; trait Rng ประกาศเมธอดที่ random
number generator implement และ trait นี้ต้องอยู่ใน scope เราถึงใช้เมธอด
เหล่านั้นได้ บทที่ 10 จะครอบคลุม trait ในรายละเอียด
ถัดไป เราเพิ่มสองบรรทัดตรงกลาง ในบรรทัดแรก เราเรียกฟังก์ชัน
rand::thread_rng ที่ให้ random number generator เฉพาะที่เราจะใช้: ตัวที่
local กับ thread ของการ execute ปัจจุบัน และถูก seed โดย OS แล้วเราเรียก
เมธอด gen_range บน random number generator เมธอดนี้ถูกประกาศโดย trait
Rng ที่เรานำเข้า scope ด้วย statement use rand::Rng; เมธอด gen_range
รับ range expression เป็น argument แล้ว generate ตัวเลขสุ่มใน range นั้น
range expression ที่เราใช้ที่นี่อยู่ในรูป start..=end และ inclusive ทั้ง
ขอบเขตล่างและบน เราจึงต้องระบุ 1..=100 เพื่อขอตัวเลขระหว่าง 1 ถึง 100
หมายเหตุ: คุณคงไม่รู้เองว่าจะใช้ trait ตัวไหน และเรียกเมธอดและฟังก์ชัน ไหนจาก crate ดังนั้นแต่ละ crate จึงมี documentation พร้อมคำแนะนำการใช้ งาน อีกฟีเจอร์เจ๋ง ๆ ของ Cargo คือการรันคำสั่ง
cargo doc --openจะ build documentation ที่ dependency ทั้งหมดของคุณให้มา และเปิดมันใน browser ของคุณ ถ้าคุณสนใจ functionality อื่นใน craterandเช่น รันcargo doc --openแล้วคลิกrandใน sidebar ทางซ้าย
บรรทัดใหม่ที่สองพิมพ์ตัวเลขลับ ซึ่งมีประโยชน์ระหว่างที่เราพัฒนาโปรแกรม เพื่อทดสอบมัน แต่เราจะลบออกใน version สุดท้าย มันไม่เป็นเกมเลยถ้าโปรแกรม พิมพ์คำตอบทันทีที่เริ่ม!
ลองรันโปรแกรมหลาย ๆ ครั้ง:
$ cargo run
   Compiling guessing_game v0.1.0 (file:///projects/guessing_game)
    Finished `dev` profile [unoptimized + debuginfo] target(s) in 0.02s
     Running `target/debug/guessing_game`
Guess the number!
The secret number is: 7
Please input your guess.
4
You guessed: 4

$ cargo run
    Finished `dev` profile [unoptimized + debuginfo] target(s) in 0.02s
     Running `target/debug/guessing_game`
Guess the number!
The secret number is: 83
Please input your guess.
5
You guessed: 5
คุณควรได้ตัวเลขสุ่มต่างกัน และทั้งหมดควรเป็นตัวเลขระหว่าง 1 ถึง 100 ดีมาก!
เปรียบเทียบคำตอบกับตัวเลขลับ
ตอนนี้เรามี input ของผู้ใช้และตัวเลขสุ่มแล้ว เราเปรียบเทียบมันได้ ขั้นตอน นั้นแสดงใน Listing 2-4 หมายเหตุว่าโค้ดนี้ยัง compile ไม่ได้ ดังที่เราจะ อธิบาย
use std::cmp::Ordering;
use std::io;

use rand::Rng;

fn main() {
    // --snip--
    println!("Guess the number!");

    let secret_number = rand::thread_rng().gen_range(1..=100);

    println!("The secret number is: {secret_number}");

    println!("Please input your guess.");

    let mut guess = String::new();

    io::stdin()
        .read_line(&mut guess)
        .expect("Failed to read line");

    println!("You guessed: {guess}");

    match guess.cmp(&secret_number) {
        Ordering::Less => println!("Too small!"),
        Ordering::Greater => println!("Too big!"),
        Ordering::Equal => println!("You win!"),
    }
}ขั้นแรก เราเพิ่ม statement use อีกตัว นำ type ชื่อ std::cmp::Ordering
เข้า scope จาก standard library type Ordering เป็น enum อีกตัว และมี
variant Less, Greater และ Equal นี่คือสามผลลัพธ์ที่เป็นไปได้เมื่อ
คุณเปรียบเทียบสองค่า
จากนั้น เราเพิ่มห้าบรรทัดใหม่ที่ด้านล่างที่ใช้ type Ordering เมธอด cmp
เปรียบเทียบสองค่า และเรียกได้บนอะไรก็ตามที่เปรียบเทียบได้ มันรับ reference
ของอะไรก็ตามที่คุณต้องการเปรียบเทียบด้วย: ที่นี่ มันเปรียบเทียบ guess กับ
secret_number จากนั้นมัน return variant ของ enum Ordering ที่เรานำเข้า
scope ด้วย statement use เราใช้ match expression
เพื่อตัดสินใจว่าจะทำอะไรต่อ ขึ้นกับว่า variant ไหนของ Ordering ถูก return
จากการเรียก cmp ด้วยค่าใน guess และ secret_number
match expression ประกอบด้วย arm arm ประกอบด้วย pattern ที่จะ match
กับ และโค้ดที่ควรรันถ้าค่าที่ให้ match ตรงกับ pattern ของ arm นั้น Rust
เอาค่าที่ให้ match แล้วดูผ่าน pattern ของแต่ละ arm ตามลำดับ pattern และ
โครงสร้าง match เป็นฟีเจอร์ที่ทรงพลังของ Rust — มันให้คุณแสดงสถานการณ์ที่
หลากหลายที่โค้ดของคุณอาจเจอ และทำให้แน่ใจว่าคุณจัดการทั้งหมด ฟีเจอร์เหล่านี้
จะครอบคลุมในรายละเอียดในบทที่ 6 และ 19 ตามลำดับ
มาเดินผ่านตัวอย่างกับ match expression ที่เราใช้ที่นี่ สมมติว่าผู้ใช้ทาย
50 และตัวเลขลับที่ generate แบบสุ่มครั้งนี้คือ 38
เมื่อโค้ดเปรียบเทียบ 50 กับ 38 เมธอด cmp จะ return Ordering::Greater
เพราะ 50 มากกว่า 38 match expression รับค่า Ordering::Greater แล้วเริ่ม
เช็ค pattern ของแต่ละ arm มันดู pattern ของ arm แรก Ordering::Less แล้ว
เห็นว่าค่า Ordering::Greater ไม่ match Ordering::Less มันจึงละเว้นโค้ด
ใน arm นั้นและไปที่ arm ถัดไป pattern ของ arm ถัดไปคือ Ordering::Greater
ซึ่ง match Ordering::Greater! โค้ดที่เกี่ยวข้องใน arm นั้นจะ execute
และพิมพ์ Too big! ออกหน้าจอ match expression จบหลัง match สำเร็จครั้ง
แรก ดังนั้นมันจะไม่ดู arm สุดท้ายในสถานการณ์นี้
อย่างไรก็ตาม โค้ดใน Listing 2-4 ยัง compile ไม่ได้ ลองดู:
$ cargo build
   Compiling libc v0.2.86
   Compiling getrandom v0.2.2
   Compiling cfg-if v1.0.0
   Compiling ppv-lite86 v0.2.10
   Compiling rand_core v0.6.2
   Compiling rand_chacha v0.3.0
   Compiling rand v0.8.5
   Compiling guessing_game v0.1.0 (file:///projects/guessing_game)
error[E0308]: mismatched types
  --> src/main.rs:23:21
   |
23 |     match guess.cmp(&secret_number) {
   |                 --- ^^^^^^^^^^^^^^ expected `&String`, found `&{integer}`
   |                 |
   |                 arguments to this method are incorrect
   |
   = note: expected reference `&String`
              found reference `&{integer}`
note: method defined here
  --> /rustc/1159e78c4747b02ef996e55082b704c09b970588/library/core/src/cmp.rs:979:8

For more information about this error, try `rustc --explain E0308`.
error: could not compile `guessing_game` (bin "guessing_game") due to 1 previous error
แก่นของ error บอกว่ามี mismatched types Rust มีระบบ type ที่ strong และ
static อย่างไรก็ตาม มันยังมี type inference เมื่อเราเขียน
let mut guess = String::new() Rust สามารถ infer ได้ว่า guess ควรเป็น
String และไม่ได้บังคับให้เราเขียน type ส่วน secret_number เป็น type
ตัวเลข Rust มี type ตัวเลขไม่กี่ตัวที่มีค่าระหว่าง 1 ถึง 100 ได้ — i32
ตัวเลข 32-bit, u32 ตัวเลข 32-bit แบบไม่มีเครื่องหมาย, i64 ตัวเลข 64-bit
รวมถึงอื่น ๆ ถ้าไม่ระบุเป็นอย่างอื่น Rust default เป็น i32 ซึ่งเป็น type
ของ secret_number เว้นแต่คุณจะเพิ่มข้อมูล type ที่อื่นที่จะทำให้ Rust
infer เป็น type ตัวเลขอื่น เหตุผลของ error คือ Rust เปรียบเทียบ string กับ
type ตัวเลขไม่ได้
สุดท้าย เราอยากแปลง String ที่โปรแกรมอ่านเป็น input ให้เป็น type ตัวเลข
เพื่อให้เปรียบเทียบเชิงตัวเลขกับตัวเลขลับได้ เราทำโดยการเพิ่มบรรทัดนี้เข้า
ใน body ของฟังก์ชัน main:
Filename: src/main.rs
use std::cmp::Ordering;
use std::io;

use rand::Rng;

fn main() {
    println!("Guess the number!");

    let secret_number = rand::thread_rng().gen_range(1..=100);

    println!("The secret number is: {secret_number}");

    println!("Please input your guess.");

    // --snip--

    let mut guess = String::new();

    io::stdin()
        .read_line(&mut guess)
        .expect("Failed to read line");

    let guess: u32 = guess.trim().parse().expect("Please type a number!");

    println!("You guessed: {guess}");

    match guess.cmp(&secret_number) {
        Ordering::Less => println!("Too small!"),
        Ordering::Greater => println!("Too big!"),
        Ordering::Equal => println!("You win!"),
    }
}
บรรทัดนั้นคือ:
let guess: u32 = guess.trim().parse().expect("Please type a number!");เราสร้างตัวแปรชื่อ guess แต่เดี๋ยวก่อน โปรแกรมไม่ได้มีตัวแปรชื่อ guess
อยู่แล้วเหรอ? ใช่ แต่ Rust ช่วยให้เรา shadow ค่าก่อนหน้าของ guess ด้วยค่า
ใหม่ Shadowing ให้เราใช้ชื่อตัวแปร guess ซ้ำ แทนที่จะถูกบังคับให้สร้าง
ตัวแปรไม่ซ้ำกันสองตัว เช่น guess_str และ guess เราจะครอบคลุมเรื่องนี้
ในรายละเอียดเพิ่มเติมใน บทที่ 3 แต่ตอนนี้
รู้ว่าฟีเจอร์นี้มักใช้เมื่อคุณต้องการแปลงค่าจาก type หนึ่งเป็นอีก type หนึ่ง
เรา bind ตัวแปรใหม่นี้กับ expression guess.trim().parse() guess ใน
expression อ้างถึงตัวแปร guess ตัวเดิมที่มี input เป็น string เมธอด
trim บน instance ของ String จะกำจัด whitespace ใด ๆ ที่ต้นและท้าย ซึ่ง
เราต้องทำก่อนที่จะแปลง string เป็น u32 ที่มีได้แต่ข้อมูลตัวเลข ผู้ใช้
ต้องกด enter เพื่อตอบสนอง read_line และป้อนคำตอบ ซึ่งเพิ่ม
อักขระ newline เข้าไปใน string เช่น ถ้าผู้ใช้พิมพ์ 5 และกด
enter guess จะหน้าตาเป็นแบบนี้: 5\n \n แทน “newline” (บน
Windows การกด enter ให้ผลเป็น carriage return และ newline,
\r\n) เมธอด trim กำจัด \n หรือ \r\n ออก เหลือแค่ 5
เมธอด parse บน string แปลง string ให้เป็น type
อื่น ที่นี่ เราใช้มันแปลงจาก string เป็นตัวเลข เราต้องบอก Rust ถึง type
ตัวเลขที่เราต้องการแบบเป๊ะ ๆ โดยใช้ let guess: u32 colon (:) หลัง
guess บอก Rust ว่าเราจะ annotate type ของตัวแปร Rust มี type ตัวเลข
built-in ไม่กี่ตัว u32 ที่เห็นที่นี่คือจำนวนเต็ม 32-bit แบบไม่มี
เครื่องหมาย เป็น default choice ที่ดีสำหรับตัวเลขบวกขนาดเล็ก คุณจะเรียน
type ตัวเลขอื่น ๆ ใน บทที่ 3
นอกจากนี้ การ annotate u32 ในตัวอย่างโปรแกรมนี้ และการเปรียบเทียบกับ
secret_number หมายความว่า Rust จะ infer ว่า secret_number ควรเป็น u32
ด้วย ดังนั้นตอนนี้การเปรียบเทียบจะเป็นระหว่างค่าสองค่าที่มี type เดียวกัน!
เมธอด parse จะทำงานได้แค่บนอักขระที่เชิง logic แปลงเป็นตัวเลขได้ จึงทำ
ให้เกิด error ได้ง่าย ถ้า เช่น string มี A👍% ก็ไม่มีทางแปลงเป็นตัวเลข
เพราะมันอาจล้มเหลว เมธอด parse จึง return type Result เช่นเดียวกับ
เมธอด read_line (พูดถึงก่อนหน้านี้ใน
“จัดการ failure ที่อาจเกิดขึ้นด้วย Result”)
เราจะปฏิบัติต่อ Result นี้แบบเดียวกันโดยใช้เมธอด expect อีกครั้ง ถ้า
parse return variant Err ของ Result เพราะมันสร้างตัวเลขจาก string
ไม่ได้ การเรียก expect จะ crash เกมและพิมพ์ข้อความที่เราให้มัน ถ้า
parse แปลง string เป็นตัวเลขสำเร็จ มันจะ return variant Ok ของ
Result และ expect จะ return ตัวเลขที่เราต้องการจากค่า Ok
มารันโปรแกรมตอนนี้:
$ cargo run
   Compiling guessing_game v0.1.0 (file:///projects/guessing_game)
    Finished `dev` profile [unoptimized + debuginfo] target(s) in 0.26s
     Running `target/debug/guessing_game`
Guess the number!
The secret number is: 58
Please input your guess.
  76
You guessed: 76
Too big!
ดี! แม้จะมี space เพิ่มก่อนคำตอบ โปรแกรมก็ยังรู้ว่าผู้ใช้ทาย 76 รัน โปรแกรมหลาย ๆ ครั้งเพื่อตรวจสอบพฤติกรรมที่ต่างกันด้วย input หลายแบบ — ทาย ตัวเลขถูก ทายตัวเลขที่สูงเกินไป และทายตัวเลขที่ต่ำเกินไป
เรามีเกมส่วนใหญ่ทำงานแล้ว แต่ผู้ใช้ทายได้แค่ครั้งเดียว มาเปลี่ยนเรื่องนั้น ด้วยการเพิ่ม loop!
ให้ทายหลายครั้งด้วย loop
keyword loop สร้าง infinite loop เราจะเพิ่ม loop เพื่อให้ผู้ใช้มีโอกาส
ทายตัวเลขมากกว่า:
Filename: src/main.rs
use std::cmp::Ordering;
use std::io;

use rand::Rng;

fn main() {
    println!("Guess the number!");

    let secret_number = rand::thread_rng().gen_range(1..=100);

    // --snip--

    println!("The secret number is: {secret_number}");

    loop {
        println!("Please input your guess.");

        // --snip--


        let mut guess = String::new();

        io::stdin()
            .read_line(&mut guess)
            .expect("Failed to read line");

        let guess: u32 = guess.trim().parse().expect("Please type a number!");

        println!("You guessed: {guess}");

        match guess.cmp(&secret_number) {
            Ordering::Less => println!("Too small!"),
            Ordering::Greater => println!("Too big!"),
            Ordering::Equal => println!("You win!"),
        }
    }
}
อย่างที่เห็น เราย้ายทุกอย่างตั้งแต่ prompt input คำตอบลงไปใน loop อย่าลืม indent บรรทัดภายใน loop เพิ่มสี่ space และรันโปรแกรมอีกครั้ง โปรแกรมตอนนี้ จะถามคำตอบใหม่ตลอดไป ซึ่งจริง ๆ ก็เกิดปัญหาใหม่ ดูเหมือนผู้ใช้ออกไม่ได้!
ผู้ใช้สามารถ interrupt โปรแกรมได้เสมอด้วย keyboard shortcut
ctrl-C แต่ยังมีอีกวิธีหนึ่งในการหนีจากสัตว์ประหลาด
ที่ไม่รู้จักอิ่มนี้ ดังที่กล่าวไว้ในการพูดถึง parse ใน
“เปรียบเทียบคำตอบกับตัวเลขลับ”
— ถ้าผู้ใช้ป้อนคำตอบที่ไม่ใช่ตัวเลข โปรแกรมจะ crash เราใช้ประโยชน์จากสิ่ง
นั้นเพื่อให้ผู้ใช้ออกได้ ดังที่แสดงที่นี่:
$ cargo run
   Compiling guessing_game v0.1.0 (file:///projects/guessing_game)
    Finished `dev` profile [unoptimized + debuginfo] target(s) in 0.23s
     Running `target/debug/guessing_game`
Guess the number!
The secret number is: 59
Please input your guess.
45
You guessed: 45
Too small!
Please input your guess.
60
You guessed: 60
Too big!
Please input your guess.
59
You guessed: 59
You win!
Please input your guess.
quit

thread 'main' panicked at src/main.rs:28:47:
Please type a number!: ParseIntError { kind: InvalidDigit }
note: run with `RUST_BACKTRACE=1` environment variable to display a backtrace
การพิมพ์ quit จะออกจากเกม แต่อย่างที่คุณจะสังเกต การป้อน input ที่ไม่ใช่
ตัวเลขใด ๆ ก็จะทำเหมือนกัน นี่ไม่ดีที่สุด พูดน้อย ๆ — เราอยากให้เกมหยุดเมื่อ
ทายตัวเลขถูกด้วย
ออกเมื่อทายถูก
มา program ให้เกมออกเมื่อผู้ใช้ชนะ โดยเพิ่ม statement break:
Filename: src/main.rs
use std::cmp::Ordering;
use std::io;

use rand::Rng;

fn main() {
    println!("Guess the number!");

    let secret_number = rand::thread_rng().gen_range(1..=100);

    println!("The secret number is: {secret_number}");

    loop {
        println!("Please input your guess.");

        let mut guess = String::new();

        io::stdin()
            .read_line(&mut guess)
            .expect("Failed to read line");

        let guess: u32 = guess.trim().parse().expect("Please type a number!");

        println!("You guessed: {guess}");

        // --snip--

        match guess.cmp(&secret_number) {
            Ordering::Less => println!("Too small!"),
            Ordering::Greater => println!("Too big!"),
            Ordering::Equal => {
                println!("You win!");
                break;
            }
        }
    }
}
การเพิ่มบรรทัด break หลัง You win! ทำให้โปรแกรมออกจาก loop เมื่อผู้ใช้
ทายตัวเลขลับถูก การออกจาก loop ก็หมายถึงการออกจากโปรแกรม เพราะ loop เป็น
ส่วนสุดท้ายของ main
จัดการ input ที่ไม่ถูกต้อง
เพื่อปรับปรุงพฤติกรรมของเกมเพิ่ม แทนที่จะ crash โปรแกรมเมื่อผู้ใช้ป้อนสิ่ง
ที่ไม่ใช่ตัวเลข มาทำให้เกมละเว้น input ที่ไม่ใช่ตัวเลข เพื่อให้ผู้ใช้ทาย
ต่อได้ เราทำได้โดยเปลี่ยนบรรทัดที่ guess ถูกแปลงจาก String เป็น u32
ตามที่แสดงใน Listing 2-5
use std::cmp::Ordering;
use std::io;

use rand::Rng;

fn main() {
    println!("Guess the number!");

    let secret_number = rand::thread_rng().gen_range(1..=100);

    println!("The secret number is: {secret_number}");

    loop {
        println!("Please input your guess.");

        let mut guess = String::new();

        // --snip--

        io::stdin()
            .read_line(&mut guess)
            .expect("Failed to read line");

        let guess: u32 = match guess.trim().parse() {
            Ok(num) => num,
            Err(_) => continue,
        };

        println!("You guessed: {guess}");

        // --snip--

        match guess.cmp(&secret_number) {
            Ordering::Less => println!("Too small!"),
            Ordering::Greater => println!("Too big!"),
            Ordering::Equal => {
                println!("You win!");
                break;
            }
        }
    }
}เราเปลี่ยนจากการเรียก expect มาเป็น match expression เพื่อย้ายจากการ
crash บน error มาเป็นการจัดการ error จำได้ว่า parse return type Result
และ Result เป็น enum ที่มี variant Ok และ Err เราใช้ match
expression ที่นี่ เหมือนที่เราทำกับผล Ordering ของเมธอด cmp
ถ้า parse แปลง string เป็นตัวเลขสำเร็จ มันจะ return ค่า Ok ที่มีตัวเลข
ผลลัพธ์อยู่ ค่า Ok นั้นจะ match pattern ของ arm แรก และ match
expression ก็จะแค่ return ค่า num ที่ parse produce และใส่ใน Ok ตัว
เลขนั้นจะลงเอยตรงที่เราต้องการพอดี ในตัวแปร guess ใหม่ที่เรากำลังสร้าง
ถ้า parse ไม่ สามารถแปลง string เป็นตัวเลข มันจะ return ค่า Err ที่
มีข้อมูลเพิ่มเติมเกี่ยวกับ error ค่า Err ไม่ match pattern Ok(num) ใน
arm match แรก แต่มัน match pattern Err(_) ใน arm ที่สอง underscore
_ คือค่าจับทั้งหมด ในตัวอย่างนี้ เราบอกว่าเราอยาก match ค่า Err
ทั้งหมด ไม่ว่าจะมีข้อมูลอะไรอยู่ข้างใน ดังนั้นโปรแกรมจะ execute โค้ดของ
arm ที่สอง continue ซึ่งบอกโปรแกรมให้ไปที่ iteration ถัดไปของ loop
และขอคำตอบใหม่ จึงทำให้โปรแกรมละเว้น error ทั้งหมดที่ parse อาจเจอ!
ตอนนี้ทุกอย่างในโปรแกรมควรทำงานตามที่คาด ลองดู:
$ cargo run
   Compiling guessing_game v0.1.0 (file:///projects/guessing_game)
    Finished `dev` profile [unoptimized + debuginfo] target(s) in 0.13s
     Running `target/debug/guessing_game`
Guess the number!
The secret number is: 61
Please input your guess.
10
You guessed: 10
Too small!
Please input your guess.
99
You guessed: 99
Too big!
Please input your guess.
foo
Please input your guess.
61
You guessed: 61
You win!
ยอดเยี่ยม! ด้วยการแก้สุดท้ายเล็ก ๆ เราจะจบเกมทายตัวเลข จำได้ว่าโปรแกรม
ยังพิมพ์ตัวเลขลับอยู่ มันใช้ได้สำหรับการทดสอบ แต่ทำลายความเป็นเกม มาลบ
println! ที่ output ตัวเลขลับ Listing 2-6 แสดงโค้ดสุดท้าย
use std::cmp::Ordering;
use std::io;

use rand::Rng;

fn main() {
    println!("Guess the number!");

    let secret_number = rand::thread_rng().gen_range(1..=100);

    loop {
        println!("Please input your guess.");

        let mut guess = String::new();

        io::stdin()
            .read_line(&mut guess)
            .expect("Failed to read line");

        let guess: u32 = match guess.trim().parse() {
            Ok(num) => num,
            Err(_) => continue,
        };

        println!("You guessed: {guess}");

        match guess.cmp(&secret_number) {
            Ordering::Less => println!("Too small!"),
            Ordering::Greater => println!("Too big!"),
            Ordering::Equal => {
                println!("You win!");
                break;
            }
        }
    }
}ณ จุดนี้ คุณ build เกมทายตัวเลขสำเร็จแล้ว ขอแสดงความยินดี!
สรุป
โปรเจกต์นี้เป็นวิธีลงมือทำเพื่อแนะนำแนวคิด Rust ใหม่ ๆ ให้คุณ: let,
match, ฟังก์ชัน, การใช้ external crate และอื่น ๆ ในบทถัด ๆ ไป คุณจะเรียน
รู้เกี่ยวกับแนวคิดเหล่านี้ในรายละเอียดเพิ่มเติม บทที่ 3 ครอบคลุมแนวคิดที่
ภาษาโปรแกรมส่วนใหญ่มี เช่น ตัวแปร, ชนิดข้อมูล และฟังก์ชัน และแสดงวิธีใช้
ใน Rust บทที่ 4 สำรวจ ownership ฟีเจอร์ที่ทำให้ Rust ต่างจากภาษาอื่น บทที่
5 พูดถึง struct และ syntax ของเมธอด และบทที่ 6 อธิบายวิธีที่ enum ทำงาน
แนวคิดพื้นฐานของการเขียนโปรแกรม
บทนี้ครอบคลุมแนวคิดที่ปรากฏในแทบทุกภาษาโปรแกรม และวิธีการทำงานของพวกมัน ใน Rust ภาษาโปรแกรมหลายภาษามีสิ่งร่วมกันมากที่แกนกลาง ไม่มีแนวคิดใดในบทนี้ ที่เป็นเอกลักษณ์เฉพาะของ Rust แต่เราจะพูดถึงพวกมันในบริบทของ Rust และ อธิบาย convention ในการใช้งาน
โดยเฉพาะ คุณจะได้เรียนเรื่องตัวแปร, type พื้นฐาน, ฟังก์ชัน, comment และ control flow รากฐานเหล่านี้จะอยู่ในทุกโปรแกรม Rust และการเรียนรู้มันแต่ เนิ่น ๆ จะให้แกนกลางที่แข็งแรงเพื่อเริ่มต้น
Keyword
ภาษา Rust มีชุดของ keyword ที่ถูกสงวนให้ใช้โดยภาษาเท่านั้น เช่นเดียว กับในภาษาอื่น จำไว้ว่าคุณใช้คำเหล่านี้เป็นชื่อตัวแปรหรือฟังก์ชันไม่ได้ keyword ส่วนใหญ่มีความหมายพิเศษ และคุณจะใช้พวกมันทำงานต่าง ๆ ในโปรแกรม Rust ของคุณ บางตัวยังไม่มี functionality ที่ผูกอยู่ในปัจจุบัน แต่ถูก สงวนไว้สำหรับ functionality ที่อาจเพิ่มเข้ามาใน Rust ในอนาคต คุณดูราย ชื่อ keyword ได้ใน ภาคผนวก A
ตัวแปรและ mutability
ตัวแปรและ Mutability
อย่างที่กล่าวไว้ในส่วน “เก็บค่าด้วยตัวแปร” โดย default ตัวแปรเป็น immutable นี่เป็นหนึ่งในหลาย ๆ สัญญาณที่ Rust ให้คุณ เพื่อเขียนโค้ดในแบบที่ใช้ประโยชน์จากความปลอดภัยและ concurrency ที่ง่ายของ Rust อย่างไรก็ตาม คุณยังมีตัวเลือกในการทำให้ตัวแปร mutable มาสำรวจกันว่า ทำไม Rust ถึงสนับสนุนให้คุณเอนเอียงไปทาง immutability และทำไมบางครั้งคุณ อาจอยาก opt out
เมื่อตัวแปรเป็น immutable ทันทีที่ค่าถูก bind กับชื่อ คุณเปลี่ยนค่านั้นไม่
ได้ เพื่อแสดงให้เห็นเรื่องนี้ generate โปรเจกต์ใหม่ชื่อ variables ใน
directory projects ของคุณ ด้วย cargo new variables
จากนั้นใน directory variables ใหม่ของคุณ เปิด src/main.rs แล้วแทนที่ โค้ดของมันด้วยโค้ดต่อไปนี้ ซึ่งจะยัง compile ไม่ผ่าน:
Filename: src/main.rs
fn main() {
    let x = 5;
    println!("The value of x is: {x}");
    x = 6;
    println!("The value of x is: {x}");
}
บันทึกแล้วรันโปรแกรมด้วย cargo run คุณควรได้ error message เกี่ยวกับ
immutability ตามที่แสดงใน output นี้:
$ cargo run
   Compiling variables v0.1.0 (file:///projects/variables)
error[E0384]: cannot assign twice to immutable variable `x`
 --> src/main.rs:4:5
  |
2 |     let x = 5;
  |         - first assignment to `x`
3 |     println!("The value of x is: {x}");
4 |     x = 6;
  |     ^^^^^ cannot assign twice to immutable variable
  |
help: consider making this binding mutable
  |
2 |     let mut x = 5;
  |         +++

For more information about this error, try `rustc --explain E0384`.
error: could not compile `variables` (bin "variables") due to 1 previous error
ตัวอย่างนี้แสดงวิธีที่ compiler ช่วยคุณหา error ในโปรแกรม Compiler error อาจทำให้หงุดหงิด แต่จริง ๆ มันแค่หมายความว่าโปรแกรมของคุณยังไม่ได้ทำสิ่ง ที่คุณต้องการอย่างปลอดภัย — มันไม่ได้หมายความว่าคุณเขียนโปรแกรมไม่เก่ง! Rustacean ที่มีประสบการณ์ก็ยังเจอ compiler error
คุณได้รับ error message cannot assign twice to immutable variable `x`
เพราะคุณพยายาม assign ค่าที่สองให้ตัวแปร immutable x
มันสำคัญที่เราจะได้ compile-time error เมื่อพยายามเปลี่ยนค่าที่ถูกกำหนดเป็น immutable เพราะสถานการณ์นี้นี่แหละที่นำไปสู่ bug ได้ ถ้าโค้ดของเราส่วน หนึ่งทำงานบนสมมติฐานว่าค่าจะไม่เปลี่ยน และอีกส่วนหนึ่งของโค้ดเปลี่ยนค่า นั้น เป็นไปได้ที่โค้ดส่วนแรกจะไม่ทำสิ่งที่ออกแบบให้ทำ สาเหตุของ bug แบบนี้ อาจตามหายากหลังเกิดเหตุ โดยเฉพาะเมื่อโค้ดส่วนที่สองเปลี่ยนค่า บางครั้ง เท่านั้น Rust compiler รับประกันว่าเมื่อคุณบอกว่าค่าจะไม่เปลี่ยน มันก็จะ ไม่เปลี่ยนจริง ๆ คุณจึงไม่ต้องตามติดมันเอง โค้ดของคุณจึงคิดตามได้ง่ายขึ้น
แต่ mutability ก็มีประโยชน์มาก และทำให้เขียนโค้ดสะดวกขึ้นได้ แม้ตัวแปรจะ
เป็น immutable โดย default คุณก็ทำให้มัน mutable ได้ โดยเพิ่ม mut ไว้
หน้าชื่อตัวแปรเหมือนที่คุณทำใน
บทที่ 2 การเพิ่ม mut
ยังสื่อเจตนาให้ผู้อ่านโค้ดในอนาคต โดยบ่งบอกว่าส่วนอื่น ๆ ของโค้ดจะ
เปลี่ยนค่าตัวแปรนี้
เช่น มาเปลี่ยน src/main.rs เป็นแบบนี้:
Filename: src/main.rs
fn main() {
    let mut x = 5;
    println!("The value of x is: {x}");
    x = 6;
    println!("The value of x is: {x}");
}
เมื่อรันโปรแกรมตอนนี้ เราจะได้:
$ cargo run
   Compiling variables v0.1.0 (file:///projects/variables)
    Finished `dev` profile [unoptimized + debuginfo] target(s) in 0.30s
     Running `target/debug/variables`
The value of x is: 5
The value of x is: 6
เราได้รับอนุญาตให้เปลี่ยนค่าที่ bind กับ x จาก 5 เป็น 6 เมื่อใช้
mut สุดท้าย การตัดสินใจว่าจะใช้ mutability หรือไม่ ขึ้นกับคุณ และขึ้น
กับสิ่งที่คุณคิดว่าชัดเจนที่สุดในสถานการณ์นั้น ๆ
ประกาศ Constant
เช่นเดียวกับตัวแปร immutable constant คือค่าที่ถูก bind กับชื่อ และไม่ อนุญาตให้เปลี่ยน แต่มีความแตกต่างไม่กี่ข้อระหว่าง constant และตัวแปร
ประการแรก คุณไม่ได้รับอนุญาตให้ใช้ mut กับ constant Constant ไม่ใช่แค่
immutable โดย default — มัน immutable ตลอดเวลา คุณประกาศ constant โดยใช้
keyword const แทน keyword let และ ต้อง annotate type ของค่า เราจะ
ครอบคลุม type และ type annotation ในส่วนถัดไป
“ชนิดข้อมูล” ดังนั้นยังไม่ต้องห่วงรายละเอียด
ตอนนี้ แค่รู้ว่าคุณต้อง annotate type เสมอ
Constant ประกาศได้ใน scope ใด ๆ รวมถึง global scope ซึ่งทำให้มันมีประโยชน์ สำหรับค่าที่โค้ดหลายส่วนต้องรู้
ความแตกต่างสุดท้ายคือ constant ตั้งค่าได้แค่เป็น constant expression ไม่ ใช่ผลของค่าที่คำนวณได้แค่ตอน runtime
นี่คือตัวอย่างการประกาศ constant:
#![allow(unused)]
fn main() {
const THREE_HOURS_IN_SECONDS: u32 = 60 * 60 * 3;
}
ชื่อของ constant คือ THREE_HOURS_IN_SECONDS และค่าของมันถูกตั้งเป็นผลของ
การคูณ 60 (จำนวนวินาทีในนาที) ด้วย 60 (จำนวนนาทีในชั่วโมง) ด้วย 3 (จำนวน
ชั่วโมงที่เราอยากนับในโปรแกรมนี้) Convention การตั้งชื่อ constant ของ Rust
คือใช้ตัวพิมพ์ใหญ่ทั้งหมด พร้อม underscore ระหว่างคำ Compiler ประเมิน
operation ชุดจำกัดได้ตอน compile time ซึ่งให้เราเลือกเขียนค่านี้ในรูปแบบ
ที่เข้าใจและตรวจสอบได้ง่ายกว่า แทนที่จะตั้ง constant นี้เป็นค่า 10,800 ดู
ส่วน constant evaluation ของ Rust Reference สำหรับข้อมูล
เพิ่มเติมว่า operation ไหนใช้ได้เมื่อประกาศ constant
Constant ใช้งานได้ตลอดเวลาที่โปรแกรมรัน ภายใน scope ที่พวกมันถูกประกาศ คุณสมบัตินี้ทำให้ constant มีประโยชน์สำหรับค่าใน application domain ของ คุณที่หลายส่วนของโปรแกรมอาจต้องรู้ เช่น จำนวนคะแนนสูงสุดที่ผู้เล่นเกม สามารถได้รับ หรือความเร็วแสง
การตั้งชื่อค่า hardcode ที่ใช้ตลอดโปรแกรมเป็น constant มีประโยชน์ในการสื่อ ความหมายของค่านั้นให้ผู้ดูแลโค้ดในอนาคต ยังช่วยให้มีเพียงที่เดียวในโค้ดที่ คุณต้องเปลี่ยน หากค่า hardcode นั้นต้อง update ในอนาคต
Shadowing
อย่างที่คุณเห็นใน tutorial เกมทายตัวเลขใน
บทที่ 2 คุณ
ประกาศตัวแปรใหม่ที่มีชื่อเดียวกับตัวแปรก่อนหน้าได้ Rustacean บอกว่าตัวแปร
แรกถูก shadow ด้วยตัวที่สอง ซึ่งหมายความว่าตัวแปรที่สองคือสิ่งที่
compiler จะเห็น เมื่อคุณใช้ชื่อของตัวแปร ในทางผล ตัวแปรที่สองบดบังตัวแรก
รับการใช้ชื่อตัวแปรมาเป็นของตัวเอง จนกว่าตัวมันเองจะถูก shadow หรือ scope
จบ เรา shadow ตัวแปรได้โดยใช้ชื่อตัวแปรเดียวกัน และเขียน keyword let
ซ้ำ ดังนี้:
Filename: src/main.rs
fn main() {
    let x = 5;

    let x = x + 1;

    {
        let x = x * 2;
        println!("The value of x in the inner scope is: {x}");
    }

    println!("The value of x is: {x}");
}
โปรแกรมนี้ bind x กับค่า 5 ก่อน จากนั้นสร้างตัวแปร x ใหม่ด้วยการเขียน
let x = ซ้ำ เอาค่าเดิมมาบวก 1 ทำให้ค่าของ x เป็น 6 จากนั้นใน inner
scope ที่สร้างด้วย curly bracket statement let ที่สามก็ shadow x และ
สร้างตัวแปรใหม่ คูณค่าก่อนหน้าด้วย 2 ให้ x มีค่า 12 เมื่อ scope นั้น
จบ inner shadowing สิ้นสุด และ x กลับเป็น 6 เมื่อเรารันโปรแกรมนี้ มัน
จะ output:
$ cargo run
   Compiling variables v0.1.0 (file:///projects/variables)
    Finished `dev` profile [unoptimized + debuginfo] target(s) in 0.31s
     Running `target/debug/variables`
The value of x in the inner scope is: 12
The value of x is: 6
Shadowing ต่างจากการ mark ตัวแปรเป็น mut เพราะเราจะได้ compile-time
error ถ้าเผลอลอง reassign ตัวแปรนี้โดยไม่ใช้ keyword let ด้วยการใช้
let เราทำ transformation ไม่กี่อย่างบนค่าได้ แต่ตัวแปรยังคงเป็น
immutable หลัง transformation เหล่านั้นเสร็จ
ความแตกต่างอีกอย่างระหว่าง mut กับ shadowing คือ เพราะเราเป็นการสร้าง
ตัวแปรใหม่จริง ๆ เมื่อใช้ keyword let อีกครั้ง เราเปลี่ยน type ของค่าได้
แต่ใช้ชื่อเดิม เช่น สมมติว่าโปรแกรมของเราถามผู้ใช้ให้แสดงจำนวน space ที่
ต้องการระหว่างข้อความบางตัว โดยป้อนอักขระ space แล้วเราอยากเก็บ input นั้น
เป็นตัวเลข:
fn main() {
    let spaces = "   ";
    let spaces = spaces.len();
}
ตัวแปร spaces ตัวแรกเป็น type string และตัวแปร spaces ตัวที่สองเป็น
type ตัวเลข Shadowing จึงช่วยให้เราไม่ต้องคิดชื่อต่างกัน เช่น spaces_str
และ spaces_num แต่ใช้ชื่อ spaces ที่ง่ายกว่าซ้ำได้ อย่างไรก็ตาม ถ้า
เราลองใช้ mut สำหรับเรื่องนี้ ดังที่แสดงที่นี่ เราจะได้ compile-time
error:
fn main() {
    let mut spaces = "   ";
    spaces = spaces.len();
}
Error บอกว่าเราไม่ได้รับอนุญาตให้ mutate type ของตัวแปร:
$ cargo run
   Compiling variables v0.1.0 (file:///projects/variables)
error[E0308]: mismatched types
 --> src/main.rs:3:14
  |
2 |     let mut spaces = "   ";
  |                      ----- expected due to this value
3 |     spaces = spaces.len();
  |              ^^^^^^^^^^^^ expected `&str`, found `usize`

For more information about this error, try `rustc --explain E0308`.
error: could not compile `variables` (bin "variables") due to 1 previous error
ตอนนี้เราสำรวจวิธีที่ตัวแปรทำงานแล้ว มาดูชนิดข้อมูลที่พวกมันมีได้มากกว่า
ชนิดข้อมูล
ชนิดข้อมูล
ทุกค่าใน Rust เป็น ชนิดข้อมูล (data type) บางอย่าง ซึ่งบอก Rust ว่าเป็น ข้อมูลแบบไหน เพื่อให้รู้วิธีทำงานกับข้อมูลนั้น เราจะดู subset ของชนิด ข้อมูลสองกลุ่ม: scalar และ compound
จำไว้ว่า Rust เป็นภาษาแบบ statically typed ซึ่งหมายความว่ามันต้องรู้
type ของตัวแปรทั้งหมดตอน compile time โดยปกติ compiler infer type ที่
เราต้องการใช้จากค่าและวิธีที่เราใช้มันได้ ในกรณีที่มี type หลายแบบเป็นไป
ได้ เช่นเมื่อเราแปลง String เป็น type ตัวเลขด้วย parse ในส่วน
“เปรียบเทียบคำตอบกับตัวเลขลับ”
ในบทที่ 2 เราต้องเพิ่ม type annotation แบบนี้:
#![allow(unused)]
fn main() {
let guess: u32 = "42".parse().expect("Not a number!");
}
ถ้าเราไม่เพิ่ม type annotation : u32 ที่แสดงในโค้ดข้างต้น Rust จะแสดง
error ต่อไปนี้ ซึ่งหมายความว่า compiler ต้องการข้อมูลจากเราเพิ่มเพื่อรู้
ว่าจะใช้ type ไหน:
$ cargo build
   Compiling no_type_annotations v0.1.0 (file:///projects/no_type_annotations)
error[E0284]: type annotations needed
 --> src/main.rs:2:9
  |
2 |     let guess = "42".parse().expect("Not a number!");
  |         ^^^^^        ----- type must be known at this point
  |
  = note: cannot satisfy `<_ as FromStr>::Err == _`
help: consider giving `guess` an explicit type
  |
2 |     let guess: /* Type */ = "42".parse().expect("Not a number!");
  |              ++++++++++++

For more information about this error, try `rustc --explain E0284`.
error: could not compile `no_type_annotations` (bin "no_type_annotations") due to 1 previous error
คุณจะเห็น type annotation ที่ต่างกันสำหรับชนิดข้อมูลอื่น ๆ
Scalar Type
Type แบบ scalar แทนค่าเดียว Rust มี scalar type หลัก 4 แบบ: integer, floating-point number, Boolean และ character คุณอาจคุ้นเคยกับสิ่งเหล่านี้ จากภาษาโปรแกรมอื่น มาเริ่มดูว่าพวกมันทำงานยังไงใน Rust
Integer Type
integer คือตัวเลขที่ไม่มีส่วนทศนิยม เราใช้ integer type ตัวหนึ่งในบทที่
2 คือ type u32 การประกาศ type นี้บ่งบอกว่าค่าที่มันผูกอยู่ควรเป็น
unsigned integer (signed integer type ขึ้นต้นด้วย i แทน u) ที่กิน
พื้นที่ 32 bit Table 3-1 แสดง integer type built-in ใน Rust เราใช้ variant
ใด ๆ เหล่านี้ประกาศ type ของค่า integer ได้
Table 3-1: Integer Type ใน Rust
| ความยาว | Signed | Unsigned |
|---|---|---|
| 8-bit | i8 | u8 |
| 16-bit | i16 | u16 |
| 32-bit | i32 | u32 |
| 64-bit | i64 | u64 |
| 128-bit | i128 | u128 |
| ขึ้นกับ architecture | isize | usize |
แต่ละ variant เป็น signed หรือ unsigned ก็ได้ และมีขนาดชัดเจน Signed และ unsigned อ้างถึงว่าตัวเลขเป็นค่าลบได้หรือไม่ — พูดอีกอย่าง ตัวเลข ต้องมีเครื่องหมายไหม (signed) หรือจะเป็นค่าบวกตลอด และสามารถแทนได้โดยไม่มี เครื่องหมาย (unsigned) เหมือนการเขียนตัวเลขลงกระดาษ — เมื่อเครื่องหมาย สำคัญ ตัวเลขแสดงด้วยเครื่องหมายบวกหรือลบ แต่เมื่อปลอดภัยที่จะสมมติว่า ตัวเลขเป็นบวก ก็แสดงโดยไม่มีเครื่องหมาย Signed number ถูกเก็บโดยใช้รูปแบบ two’s complement
แต่ละ signed variant เก็บตัวเลขจาก −(2n − 1) ถึง 2n −
1 − 1 inclusive ได้ โดยที่ n คือจำนวน bit ที่ variant นั้นใช้ ดังนั้น
i8 เก็บตัวเลขจาก −(27) ถึง 27 − 1 ได้ ซึ่งเท่ากับ
−128 ถึง 127 Unsigned variant เก็บตัวเลขจาก 0 ถึง 2n − 1 ได้
ดังนั้น u8 เก็บตัวเลขจาก 0 ถึง 28 − 1 ได้ ซึ่งเท่ากับ 0 ถึง 255
นอกจากนี้ type isize และ usize ขึ้นกับ architecture ของคอมพิวเตอร์ที่
โปรแกรมรัน: 64 bit ถ้าอยู่บน architecture 64-bit และ 32 bit ถ้าอยู่บน
architecture 32-bit
คุณเขียน integer literal ในรูปแบบใด ๆ ที่แสดงใน Table 3-2 ได้ หมายเหตุว่า
literal ตัวเลขที่เป็นได้หลาย type ตัวเลข อนุญาตให้ใส่ type suffix เช่น
57u8 เพื่อกำหนด type literal ตัวเลขยังใช้ _ เป็นตัวคั่นเชิง visual
เพื่อทำให้ตัวเลขอ่านง่ายขึ้นได้ เช่น 1_000 ซึ่งมีค่าเดียวกับการระบุ
1000
Table 3-2: Integer Literal ใน Rust
| รูปแบบ literal | ตัวอย่าง |
|---|---|
| Decimal | 98_222 |
| Hex | 0xff |
| Octal | 0o77 |
| Binary | 0b1111_0000 |
Byte (u8 เท่านั้น) | b'A' |
แล้วจะรู้ได้ยังไงว่าใช้ integer type ไหน? ถ้าไม่แน่ใจ default ของ Rust
เป็นจุดเริ่มต้นที่ดีโดยทั่วไป — integer type default เป็น i32 สถานการณ์
หลักที่คุณจะใช้ isize หรือ usize คือเมื่อ index collection บางแบบ
Integer Overflow
สมมติว่าคุณมีตัวแปร type u8 ที่เก็บค่าระหว่าง 0 ถึง 255 ได้ ถ้าคุณ
พยายามเปลี่ยนตัวแปรเป็นค่านอก range นั้น เช่น 256 integer overflow
จะเกิดขึ้น ซึ่งให้ผลเป็นพฤติกรรมหนึ่งในสองอย่าง เมื่อคุณ compile ใน
debug mode Rust รวมการเช็ค integer overflow ที่ทำให้โปรแกรม panic
ตอน runtime ถ้าพฤติกรรมนี้เกิดขึ้น Rust ใช้คำว่า panicking เมื่อ
โปรแกรมออกพร้อม error เราจะพูดถึง panic ในรายละเอียดเพิ่มเติมในส่วน
“Unrecoverable Errors with panic!”
ในบทที่ 9
เมื่อคุณ compile ใน release mode ด้วย flag --release Rust ไม่ รวม
การเช็ค integer overflow ที่ทำให้ panic แต่ถ้า overflow เกิดขึ้น Rust
จะทำ two’s complement wrapping พูดสั้น ๆ ค่าที่มากกว่าค่าสูงสุดที่
type เก็บได้ จะ “wrap around” ไปเป็นค่าต่ำสุดที่ type เก็บได้ ในกรณีของ
u8 ค่า 256 กลายเป็น 0, ค่า 257 กลายเป็น 1 และต่อ ๆ ไป โปรแกรมจะไม่
panic แต่ตัวแปรจะมีค่าที่อาจไม่ใช่สิ่งที่คุณคาดหวัง การพึ่งพฤติกรรม
wrapping ของ integer overflow ถือว่าเป็น error
ในการจัดการความเป็นไปได้ของ overflow แบบ explicit คุณใช้ตระกูลเมธอด เหล่านี้ที่ standard library มีให้สำหรับ primitive numeric type:
- Wrap ในทุก mode ด้วยเมธอด
wrapping_*เช่นwrapping_add - Return ค่า
Noneถ้ามี overflow ด้วยเมธอดchecked_* - Return ค่าและ Boolean บ่งบอกว่ามี overflow หรือไม่ ด้วยเมธอด
overflowing_* - Saturate ที่ค่าต่ำสุดหรือสูงสุดของ type ด้วยเมธอด
saturating_*
Floating-Point Type
Rust ยังมี primitive type สำหรับ floating-point number สองแบบ ซึ่งเป็น
ตัวเลขที่มีจุดทศนิยม Floating-point type ของ Rust คือ f32 และ f64 ซึ่ง
มีขนาด 32 bit และ 64 bit ตามลำดับ Default type คือ f64 เพราะบน CPU
สมัยใหม่ มันเร็วพอ ๆ กับ f32 แต่ให้ความแม่นยำมากกว่า Floating-point type
ทั้งหมดเป็น signed
นี่คือตัวอย่างที่แสดง floating-point number ในการใช้งาน:
Filename: src/main.rs
fn main() {
    let x = 2.0; // f64

    let y: f32 = 3.0; // f32
}
Floating-point number ถูกแทนตามมาตรฐาน IEEE-754
Operation ทางตัวเลข
Rust รองรับ operation ทางคณิตศาสตร์พื้นฐานที่คุณคาดหวังสำหรับ type ตัวเลข
ทั้งหมด: บวก, ลบ, คูณ, หาร และ remainder การหาร integer ตัดเศษไปทาง 0 จน
ถึงจำนวนเต็มที่ใกล้ที่สุด โค้ดต่อไปนี้แสดงวิธีใช้ operation ทางตัวเลขแต่ละ
อย่างใน statement let:
Filename: src/main.rs
fn main() {
    // addition
    let sum = 5 + 10;

    // subtraction
    let difference = 95.5 - 4.3;

    // multiplication
    let product = 4 * 30;

    // division
    let quotient = 56.7 / 32.2;
    let truncated = -5 / 3; // Results in -1

    // remainder
    let remainder = 43 % 5;
}
แต่ละ expression ใน statement เหล่านี้ใช้ operator คณิตศาสตร์และประเมิน เป็นค่าเดียว ซึ่งจากนั้น bind กับตัวแปร ภาคผนวก B มีรายการ operator ทั้งหมดที่ Rust มี
Boolean Type
เช่นเดียวกับภาษาโปรแกรมอื่นส่วนใหญ่ Boolean type ใน Rust มีค่าที่เป็นไปได้
สองค่า: true และ false Boolean มีขนาด 1 byte Boolean type ใน Rust
ระบุด้วย bool เช่น:
Filename: src/main.rs
fn main() {
    let t = true;

    let f: bool = false; // with explicit type annotation
}
วิธีหลักในการใช้ค่า Boolean คือผ่าน conditional เช่น if expression เรา
จะครอบคลุมวิธีที่ if expression ทำงานใน Rust ในส่วน
“Control Flow”
Character Type
Type char ของ Rust เป็น primitive alphabetic type ที่สุดของภาษา นี่คือ
ตัวอย่างการประกาศค่า char:
Filename: src/main.rs
fn main() {
    let c = 'z';
    let z: char = 'ℤ'; // with explicit type annotation
    let heart_eyed_cat = '😻';
}
หมายเหตุว่าเราระบุ literal char ด้วย single quotation mark ต่างจาก
string literal ที่ใช้ double quotation mark Type char ของ Rust มีขนาด
4 byte และแทน Unicode scalar value ซึ่งหมายความว่ามันแทนได้มากกว่า ASCII
เยอะ ตัวอักษรที่มีเครื่องหมาย, อักขระจีน-ญี่ปุ่น-เกาหลี, emoji และ zero-
width space เป็นค่า char ที่ valid ใน Rust ทั้งหมด Unicode scalar value
อยู่ในช่วง U+0000 ถึง U+D7FF และ U+E000 ถึง U+10FFFF inclusive
อย่างไรก็ตาม “character” ไม่ได้เป็นแนวคิดใน Unicode จริง ๆ ดังนั้น
สัญชาตญาณของคุณเรื่อง “character” คืออะไร อาจไม่ตรงกับ char ใน Rust เรา
จะพูดถึงหัวข้อนี้ในรายละเอียดใน
“เก็บข้อความ UTF-8 ด้วย String” ในบทที่ 8
Compound Type
Compound type จัดกลุ่มหลายค่าเป็น type เดียวได้ Rust มี primitive compound type สองแบบ: tuple และ array
Tuple Type
tuple คือวิธีทั่วไปในการจัดกลุ่มตัวเลขของค่าหลายค่าที่มี type หลากหลาย ให้เป็น compound type เดียว tuple มีความยาวคงที่ — เมื่อประกาศแล้ว ไม่ สามารถเติบโตหรือหดขนาดได้
เราสร้าง tuple โดยเขียนรายการค่าคั่นด้วย comma ภายในวงเล็บ แต่ละตำแหน่งใน tuple มี type และ type ของค่าต่าง ๆ ใน tuple ไม่จำเป็นต้องเหมือนกัน เรา เพิ่ม type annotation แบบ optional ในตัวอย่างนี้:
Filename: src/main.rs
fn main() {
    let tup: (i32, f64, u8) = (500, 6.4, 1);
}
ตัวแปร tup bind กับ tuple ทั้งหมด เพราะ tuple ถือเป็น compound element
เดียว ในการดึงค่าแต่ละค่าออกจาก tuple เราใช้ pattern matching เพื่อ
destructure ค่า tuple ได้ แบบนี้:
Filename: src/main.rs
fn main() {
    let tup = (500, 6.4, 1);

    let (x, y, z) = tup;

    println!("The value of y is: {y}");
}
โปรแกรมนี้สร้าง tuple ก่อน แล้ว bind มันกับตัวแปร tup จากนั้นใช้ pattern
กับ let เพื่อเอา tup มาเปลี่ยนเป็นสามตัวแปรแยก: x, y และ z นี่
เรียกว่า destructuring เพราะแยก tuple เดียวออกเป็นสามส่วน สุดท้าย
โปรแกรมพิมพ์ค่าของ y ซึ่งคือ 6.4
เรายังเข้าถึง element ของ tuple ตรง ๆ ได้ โดยใช้ period (.) ตามด้วย
index ของค่าที่อยากเข้าถึง เช่น:
Filename: src/main.rs
fn main() {
    let x: (i32, f64, u8) = (500, 6.4, 1);

    let five_hundred = x.0;

    let six_point_four = x.1;

    let one = x.2;
}
โปรแกรมนี้สร้าง tuple x แล้วเข้าถึงแต่ละ element ของ tuple ด้วย index
ของพวกมัน เช่นเดียวกับภาษาโปรแกรมส่วนใหญ่ index แรกใน tuple คือ 0
tuple ที่ไม่มีค่าใด ๆ มีชื่อพิเศษว่า unit ค่านี้และ type ของมันเขียนเป็น
() ทั้งคู่ และแทนค่าว่างหรือ return type ว่าง Expression จะ implicitly
return ค่า unit ถ้าไม่ return ค่าอื่นใด
Array Type
อีกวิธีในการมี collection ของหลายค่าคือใช้ array ต่างจาก tuple ทุก element ของ array ต้องมี type เดียวกัน ต่างจาก array ในภาษาอื่นบางภาษา array ใน Rust มีความยาวคงที่
เราเขียนค่าใน array เป็นรายการคั่นด้วย comma ภายใน square bracket:
Filename: src/main.rs
fn main() {
    let a = [1, 2, 3, 4, 5];
}
Array มีประโยชน์เมื่อคุณอยากให้ข้อมูล allocate บน stack เช่นเดียวกับ type อื่น ๆ ที่เราเห็นมา แทนที่จะ allocate บน heap (เราจะพูดถึง stack และ heap มากขึ้นใน บทที่ 4) หรือเมื่อคุณอยากให้ แน่ใจว่ามีจำนวน element คงที่เสมอ Array ไม่ยืดหยุ่นเท่า type vector แต่ vector เป็น collection type ที่คล้ายกัน ที่ standard library มีให้ ซึ่ง อนุญาต ให้เติบโตหรือหดขนาดได้ เพราะเนื้อหาอยู่บน heap ถ้าไม่แน่ใจว่าจะ ใช้ array หรือ vector มีโอกาสสูงที่ควรใช้ vector บทที่ 8 พูดถึง vector ในรายละเอียดเพิ่มเติม
อย่างไรก็ตาม array มีประโยชน์มากกว่า เมื่อคุณรู้ว่าจำนวน element ไม่ต้อง เปลี่ยน เช่น ถ้าคุณกำลังใช้ชื่อเดือนในโปรแกรม คุณคงใช้ array แทน vector เพราะคุณรู้ว่ามันจะมี 12 element เสมอ:
#![allow(unused)]
fn main() {
let months = ["January", "February", "March", "April", "May", "June", "July",
              "August", "September", "October", "November", "December"];
}
คุณเขียน type ของ array ด้วย square bracket พร้อม type ของแต่ละ element, semicolon และจำนวน element ใน array ดังนี้:
#![allow(unused)]
fn main() {
let a: [i32; 5] = [1, 2, 3, 4, 5];
}
ที่นี่ i32 คือ type ของแต่ละ element หลัง semicolon เลข 5 บ่งบอกว่า
array มี 5 element
คุณยัง initialize array ให้มีค่าเดียวกันสำหรับแต่ละ element ได้ โดยระบุ ค่าเริ่มต้น ตามด้วย semicolon และความยาวของ array ใน square bracket ดัง ที่แสดงที่นี่:
#![allow(unused)]
fn main() {
let a = [3; 5];
}
Array ชื่อ a จะมี 5 element ที่จะถูกตั้งเป็นค่า 3 ทั้งหมดในตอนเริ่มต้น
ซึ่งเหมือนเขียน let a = [3, 3, 3, 3, 3]; แต่กระชับกว่า
เข้าถึง element ของ array
Array คือ chunk เดียวของหน่วยความจำที่มีขนาดรู้และคงที่ ที่ allocate บน stack ได้ คุณเข้าถึง element ของ array ด้วย indexing แบบนี้:
Filename: src/main.rs
fn main() {
    let a = [1, 2, 3, 4, 5];

    let first = a[0];
    let second = a[1];
}
ในตัวอย่างนี้ ตัวแปรชื่อ first จะได้ค่า 1 เพราะนั่นคือค่าที่ index
[0] ใน array ตัวแปรชื่อ second จะได้ค่า 2 จาก index [1] ใน array
เข้าถึง element ของ array แบบ invalid
มาดูว่าเกิดอะไรขึ้นถ้าคุณพยายามเข้าถึง element ของ array ที่อยู่หลังท้าย array สมมติว่าคุณรันโค้ดนี้ คล้ายเกมทายตัวเลขในบทที่ 2 เพื่อรับ index ของ array จากผู้ใช้:
Filename: src/main.rs
use std::io;

fn main() {
    let a = [1, 2, 3, 4, 5];

    println!("Please enter an array index.");

    let mut index = String::new();

    io::stdin()
        .read_line(&mut index)
        .expect("Failed to read line");

    let index: usize = index
        .trim()
        .parse()
        .expect("Index entered was not a number");

    let element = a[index];

    println!("The value of the element at index {index} is: {element}");
}
โค้ดนี้ compile สำเร็จ ถ้าคุณรันโค้ดนี้ด้วย cargo run แล้วป้อน 0,
1, 2, 3 หรือ 4 โปรแกรมจะพิมพ์ค่าที่ index นั้นใน array ออกมา ถ้า
คุณป้อนตัวเลขหลังท้าย array แทน เช่น 10 คุณจะเห็น output แบบนี้:
thread 'main' panicked at src/main.rs:19:19:
index out of bounds: the len is 5 but the index is 10
note: run with `RUST_BACKTRACE=1` environment variable to display a backtrace
โปรแกรมจบลงด้วย runtime error ในจุดที่ใช้ค่า invalid ใน operation
indexing โปรแกรมออกพร้อม error message และไม่ execute statement
println! สุดท้าย เมื่อคุณพยายามเข้าถึง element ด้วย indexing Rust จะ
เช็คว่า index ที่คุณระบุน้อยกว่าความยาว array ถ้า index มากกว่าหรือเท่า
กับความยาว Rust จะ panic การเช็คนี้ต้องเกิดตอน runtime โดยเฉพาะในกรณี
นี้ เพราะ compiler ไม่มีทางรู้ว่าผู้ใช้จะป้อนค่าอะไรเมื่อรันโค้ดทีหลัง
นี่คือตัวอย่างของหลักการ memory safety ของ Rust ในการใช้งาน ในภาษา ระดับต่ำหลายภาษา การเช็คแบบนี้ไม่ได้ทำ และเมื่อคุณให้ index ที่ไม่ถูกต้อง หน่วยความจำ invalid ก็ถูกเข้าถึงได้ Rust ปกป้องคุณจาก error แบบนี้โดย ออกทันที แทนที่จะอนุญาตการเข้าถึงหน่วยความจำและทำงานต่อ บทที่ 9 พูดถึง การจัดการ error ของ Rust เพิ่มเติม และวิธีเขียนโค้ดที่อ่านได้และปลอดภัย ที่ไม่ panic และไม่อนุญาตการเข้าถึงหน่วยความจำ invalid
ฟังก์ชัน
ฟังก์ชัน
ฟังก์ชันมีอยู่ทั่วไปในโค้ด Rust คุณเห็นหนึ่งในฟังก์ชันที่สำคัญที่สุดในภาษา
มาแล้ว — ฟังก์ชัน main ซึ่งเป็น entry point ของโปรแกรมจำนวนมาก คุณยัง
เห็น keyword fn ด้วย ซึ่งให้คุณประกาศฟังก์ชันใหม่
โค้ด Rust ใช้ snake case เป็นสไตล์ convention สำหรับชื่อฟังก์ชันและตัว แปร ซึ่งใช้ตัวพิมพ์เล็กทั้งหมด และคั่นคำด้วย underscore นี่คือโปรแกรมที่มี ตัวอย่างการประกาศฟังก์ชัน:
Filename: src/main.rs
fn main() {
    println!("Hello, world!");

    another_function();
}

fn another_function() {
    println!("Another function.");
}
เราประกาศฟังก์ชันใน Rust โดยป้อน fn ตามด้วยชื่อฟังก์ชันและชุดวงเล็บ
curly bracket บอก compiler ว่า body ของฟังก์ชันเริ่มและจบที่ไหน
เราเรียกฟังก์ชันใดก็ตามที่เราประกาศไว้ได้ โดยป้อนชื่อตามด้วยชุดวงเล็บ
เพราะ another_function ถูกประกาศในโปรแกรม จึงเรียกจากภายในฟังก์ชัน
main ได้ หมายเหตุว่าเราประกาศ another_function หลัง ฟังก์ชัน
main ใน source code — จะประกาศก่อนก็ได้ Rust ไม่สนใจว่าคุณประกาศ
ฟังก์ชันที่ไหน สนใจแค่ว่ามันถูกประกาศที่ใดที่หนึ่งใน scope ที่ผู้เรียก
เห็นได้
มาเริ่มโปรเจกต์ binary ใหม่ชื่อ functions เพื่อสำรวจฟังก์ชันเพิ่ม วาง
ตัวอย่าง another_function ใน src/main.rs แล้วรัน คุณควรเห็น output
ต่อไปนี้:
$ cargo run
   Compiling functions v0.1.0 (file:///projects/functions)
    Finished `dev` profile [unoptimized + debuginfo] target(s) in 0.28s
     Running `target/debug/functions`
Hello, world!
Another function.
บรรทัด execute ในลำดับที่ปรากฏในฟังก์ชัน main ก่อนอื่นข้อความ “Hello,
world!” ถูกพิมพ์ จากนั้น another_function ถูกเรียกและข้อความของมันถูก
พิมพ์
Parameter
เราประกาศฟังก์ชันให้มี parameter ได้ ซึ่งเป็นตัวแปรพิเศษที่เป็นส่วนหนึ่ง ของ signature ของฟังก์ชัน เมื่อฟังก์ชันมี parameter คุณส่งค่าจริงสำหรับ parameter เหล่านั้นได้ ทางเทคนิค ค่าจริงเรียกว่า argument แต่ในการ สนทนาทั่วไป คนมักใช้คำว่า parameter และ argument แทนกันได้ ทั้งสำหรับ ตัวแปรในการประกาศฟังก์ชัน หรือค่าจริงที่ส่งเข้าตอนเรียกฟังก์ชัน
ใน version นี้ของ another_function เราเพิ่ม parameter:
Filename: src/main.rs
fn main() {
    another_function(5);
}

fn another_function(x: i32) {
    println!("The value of x is: {x}");
}
ลองรันโปรแกรมนี้ คุณควรได้ output ต่อไปนี้:
$ cargo run
   Compiling functions v0.1.0 (file:///projects/functions)
    Finished `dev` profile [unoptimized + debuginfo] target(s) in 1.21s
     Running `target/debug/functions`
The value of x is: 5
การประกาศ another_function มี parameter หนึ่งตัวชื่อ x Type ของ x
ระบุเป็น i32 เมื่อเราส่ง 5 เข้า another_function macro println!
ใส่ 5 ตรงที่ curly bracket คู่ที่มี x อยู่ใน format string
ใน signature ของฟังก์ชัน คุณ ต้อง ประกาศ type ของแต่ละ parameter นี่ เป็นการตัดสินใจที่ตั้งใจในการออกแบบของ Rust — การกำหนดให้มี type annotation ในการประกาศฟังก์ชัน หมายความว่า compiler แทบไม่ต้องการให้คุณใช้มันที่อื่น ในโค้ดเพื่อหา type ที่คุณหมายถึง Compiler ยังให้ error message ที่มี ประโยชน์มากขึ้นได้ ถ้ามันรู้ว่าฟังก์ชันคาดหวัง type อะไร
เมื่อประกาศ parameter หลายตัว ให้คั่นการประกาศ parameter ด้วย comma ดังนี้:
Filename: src/main.rs
fn main() {
    print_labeled_measurement(5, 'h');
}

fn print_labeled_measurement(value: i32, unit_label: char) {
    println!("The measurement is: {value}{unit_label}");
}
ตัวอย่างนี้สร้างฟังก์ชันชื่อ print_labeled_measurement ที่มีสอง
parameter parameter แรกชื่อ value และเป็น i32 ตัวที่สองชื่อ
unit_label และเป็น type char ฟังก์ชันแล้วพิมพ์ข้อความที่มีทั้ง
value และ unit_label
ลองรันโค้ดนี้ แทนที่โปรแกรมที่อยู่ในไฟล์ src/main.rs ของโปรเจกต์
functions ของคุณ ด้วยตัวอย่างก่อนหน้า แล้วรันด้วย cargo run:
$ cargo run
   Compiling functions v0.1.0 (file:///projects/functions)
    Finished `dev` profile [unoptimized + debuginfo] target(s) in 0.31s
     Running `target/debug/functions`
The measurement is: 5h
เพราะเราเรียกฟังก์ชันด้วย 5 เป็นค่าสำหรับ value และ 'h' เป็นค่า
สำหรับ unit_label output ของโปรแกรมมีค่าเหล่านั้น
Statement และ Expression
Body ของฟังก์ชันประกอบด้วยชุดของ statement ที่อาจจบด้วย expression ที่ ผ่านมา ฟังก์ชันที่เราครอบคลุมยังไม่ได้รวม expression จบ แต่คุณเห็น expression เป็นส่วนหนึ่งของ statement แล้ว เพราะ Rust เป็นภาษา expression- based นี่เป็นความแตกต่างสำคัญที่ต้องเข้าใจ ภาษาอื่นไม่มีความแตกต่างเดียวกัน มาดูว่า statement และ expression คืออะไร และความแตกต่างกระทบ body ของ ฟังก์ชันยังไง
- Statement คือคำสั่งที่ทำการกระทำบางอย่าง และไม่ return ค่า
- Expression ประเมินเป็นค่าผลลัพธ์
มาดูตัวอย่าง
จริง ๆ แล้วเราใช้ statement และ expression มาแล้ว การสร้างตัวแปรและ
assign ค่าให้มันด้วย keyword let เป็น statement ใน Listing 3-1
let y = 6; เป็น statement
fn main() {
    let y = 6;
}main ที่มี statement หนึ่งตัวการประกาศฟังก์ชันก็เป็น statement เช่นกัน — ตัวอย่างก่อนหน้าทั้งหมดเป็น statement ในตัวมันเอง (อย่างที่เราจะเห็นในไม่ช้า การเรียกฟังก์ชันไม่ใช่ statement)
Statement ไม่ return ค่า ดังนั้นคุณ assign statement let ให้ตัวแปร
อื่นไม่ได้ อย่างที่โค้ดต่อไปนี้พยายามทำ คุณจะได้ error:
Filename: src/main.rs
fn main() {
    let x = (let y = 6);
}
เมื่อคุณรันโปรแกรมนี้ error ที่คุณจะได้หน้าตาประมาณนี้:
$ cargo run
   Compiling functions v0.1.0 (file:///projects/functions)
error: expected expression, found `let` statement
 --> src/main.rs:2:14
  |
2 |     let x = (let y = 6);
  |              ^^^
  |
  = note: only supported directly in conditions of `if` and `while` expressions

warning: unnecessary parentheses around assigned value
 --> src/main.rs:2:13
  |
2 |     let x = (let y = 6);
  |             ^         ^
  |
  = note: `#[warn(unused_parens)]` on by default
help: remove these parentheses
  |
2 -     let x = (let y = 6);
2 +     let x = let y = 6;
  |

warning: `functions` (bin "functions") generated 1 warning
error: could not compile `functions` (bin "functions") due to 1 previous error; 1 warning emitted
statement let y = 6 ไม่ return ค่า จึงไม่มีอะไรให้ x bind ด้วย นี่ต่าง
จากที่เกิดในภาษาอื่น เช่น C และ Ruby ที่การ assign return ค่าของการ assign
ในภาษาเหล่านั้น คุณเขียน x = y = 6 แล้วทั้ง x และ y มีค่า 6 ได้ —
ไม่ใช่กรณีนั้นใน Rust
Expression ประเมินเป็นค่า และประกอบเป็นโค้ดส่วนใหญ่ที่คุณจะเขียนใน Rust
พิจารณา operation คณิตศาสตร์ เช่น 5 + 6 ซึ่งเป็น expression ที่ประเมิน
เป็นค่า 11 Expression เป็นส่วนหนึ่งของ statement ได้ — ใน Listing 3-1
6 ใน statement let y = 6; เป็น expression ที่ประเมินเป็นค่า 6 การ
เรียกฟังก์ชันเป็น expression การเรียก macro เป็น expression block scope
ใหม่ที่สร้างด้วย curly bracket เป็น expression เช่น:
Filename: src/main.rs
fn main() {
    let y = {
        let x = 3;
        x + 1
    };

    println!("The value of y is: {y}");
}
Expression นี้:
{
    let x = 3;
    x + 1
}
เป็น block ที่ในกรณีนี้ประเมินเป็น 4 ค่านั้นถูก bind กับ y เป็นส่วน
หนึ่งของ statement let หมายเหตุว่าบรรทัด x + 1 ไม่มี semicolon ที่
ท้าย ซึ่งต่างจากบรรทัดส่วนใหญ่ที่คุณเห็นมา Expression ไม่รวม semicolon
ปิดท้าย ถ้าคุณเพิ่ม semicolon ที่ท้าย expression คุณเปลี่ยนมันเป็น
statement แล้วมันจะไม่ return ค่า จำเรื่องนี้ไว้ขณะที่คุณสำรวจ return
value ของฟังก์ชันและ expression ต่อไป
ฟังก์ชันที่มี Return Value
ฟังก์ชัน return ค่าให้โค้ดที่เรียกได้ เราไม่ตั้งชื่อ return value แต่ต้อง
ประกาศ type หลังลูกศร (->) ใน Rust return value ของฟังก์ชันเทียบเท่ากับ
ค่าของ expression สุดท้ายใน block ของ body ของฟังก์ชัน คุณ return ก่อนได้
โดยใช้ keyword return และระบุค่า แต่ฟังก์ชันส่วนใหญ่ return expression
สุดท้ายแบบ implicit นี่คือตัวอย่างฟังก์ชันที่ return ค่า:
Filename: src/main.rs
fn five() -> i32 {
    5
}

fn main() {
    let x = five();

    println!("The value of x is: {x}");
}
ไม่มีการเรียกฟังก์ชัน, macro หรือแม้แต่ statement let ในฟังก์ชัน five
— แค่ตัวเลข 5 ตัวเดียว นั่นเป็นฟังก์ชันที่ valid อย่างสมบูรณ์ใน Rust
หมายเหตุว่า return type ของฟังก์ชันก็ระบุไว้ด้วย เป็น -> i32 ลองรันโค้ด
นี้ output ควรหน้าตาเป็นแบบนี้:
$ cargo run
   Compiling functions v0.1.0 (file:///projects/functions)
    Finished `dev` profile [unoptimized + debuginfo] target(s) in 0.30s
     Running `target/debug/functions`
The value of x is: 5
5 ใน five เป็น return value ของฟังก์ชัน นี่คือเหตุผลที่ return type
เป็น i32 มาตรวจสอบเรื่องนี้ในรายละเอียดเพิ่มเติม มีสองจุดสำคัญ — ประการ
แรก บรรทัด let x = five(); แสดงว่าเราใช้ return value ของฟังก์ชัน
initialize ตัวแปร เพราะฟังก์ชัน five return 5 บรรทัดนั้นเหมือนกับ
ต่อไปนี้:
#![allow(unused)]
fn main() {
let x = 5;
}
ประการที่สอง ฟังก์ชัน five ไม่มี parameter และประกาศ type ของ return
value แต่ body ของฟังก์ชันเป็น 5 เดียวดายโดยไม่มี semicolon เพราะมัน
เป็น expression ที่เราอยาก return ค่ามัน
มาดูตัวอย่างอีกตัวอย่างหนึ่ง:
Filename: src/main.rs
fn main() {
    let x = plus_one(5);

    println!("The value of x is: {x}");
}

fn plus_one(x: i32) -> i32 {
    x + 1
}
การรันโค้ดนี้จะพิมพ์ The value of x is: 6 แต่จะเกิดอะไรขึ้นถ้าเราวาง
semicolon ที่ท้ายบรรทัดที่มี x + 1 เปลี่ยนมันจาก expression เป็น
statement?
Filename: src/main.rs
fn main() {
    let x = plus_one(5);

    println!("The value of x is: {x}");
}

fn plus_one(x: i32) -> i32 {
    x + 1;
}
การ compile โค้ดนี้จะ produce error ดังนี้:
$ cargo run
   Compiling functions v0.1.0 (file:///projects/functions)
error[E0308]: mismatched types
 --> src/main.rs:7:24
  |
7 | fn plus_one(x: i32) -> i32 {
  |    --------            ^^^ expected `i32`, found `()`
  |    |
  |    implicitly returns `()` as its body has no tail or `return` expression
8 |     x + 1;
  |          - help: remove this semicolon to return this value

For more information about this error, try `rustc --explain E0308`.
error: could not compile `functions` (bin "functions") due to 1 previous error
Error message หลัก mismatched types เผยปัญหาแกนกลางของโค้ดนี้ การประกาศ
ฟังก์ชัน plus_one บอกว่ามันจะ return i32 แต่ statement ไม่ประเมินเป็น
ค่า ซึ่งแสดงด้วย () ที่เป็น unit type ดังนั้นไม่มีอะไรถูก return ซึ่ง
ขัดกับการประกาศฟังก์ชัน และส่งผลให้เกิด error ใน output นี้ Rust ให้
ข้อความที่อาจช่วยแก้ปัญหานี้ — มันแนะนำให้ลบ semicolon ซึ่งจะแก้ error
คอมเมนต์
Comment
โปรแกรมเมอร์ทุกคนพยายามทำให้โค้ดของตนเข้าใจง่าย แต่บางครั้งคำอธิบายเพิ่มเติม ก็จำเป็น ในกรณีเหล่านี้ โปรแกรมเมอร์ทิ้ง comment ไว้ใน source code ของ ตน ซึ่ง compiler จะละเว้น แต่คนที่อ่าน source code อาจพบว่ามีประโยชน์
นี่คือ comment แบบง่าย:
#![allow(unused)]
fn main() {
// hello, world
}
ใน Rust สไตล์ comment ที่ idiomatic เริ่มด้วย slash สองตัว และ comment
ต่อเนื่องจนจบบรรทัด สำหรับ comment ที่ขยายเกินบรรทัดเดียว คุณต้องใส่ //
ในแต่ละบรรทัด แบบนี้:
#![allow(unused)]
fn main() {
// So we're doing something complicated here, long enough that we need
// multiple lines of comments to do it! Whew! Hopefully, this comment will
// explain what's going on.
}
Comment ยังวางที่ท้ายบรรทัดที่มีโค้ดได้:
Filename: src/main.rs
fn main() {
    let lucky_number = 7; // I'm feeling lucky today
}
แต่คุณจะเห็นพวกมันใช้ในรูปแบบนี้บ่อยกว่า โดยมี comment อยู่บรรทัดแยกเหนือ โค้ดที่มัน annotate:
Filename: src/main.rs
fn main() {
    // I'm feeling lucky today
    let lucky_number = 7;
}
Rust ยังมี comment อีกแบบ คือ documentation comment ซึ่งเราจะพูดถึงใน ส่วน “Publish Crate ไปยัง Crates.io” ของ บทที่ 14
Control Flow
Control Flow
ความสามารถในการรันโค้ดบางอย่างขึ้นกับว่า condition เป็น true หรือไม่
และความสามารถในการรันโค้ดบางอย่างซ้ำ ๆ ขณะที่ condition เป็น true เป็น
building block พื้นฐานในภาษาโปรแกรมส่วนใหญ่ โครงสร้างที่ใช้บ่อยที่สุดที่
ให้คุณควบคุม flow ของการ execute โค้ด Rust คือ if expression และ loop
if Expression
if expression ให้คุณ branch โค้ดขึ้นกับ condition คุณให้ condition แล้ว
บอกว่า “ถ้า condition นี้ตรง รัน block โค้ดนี้ ถ้า condition ไม่ตรง อย่า
รัน block โค้ดนี้”
สร้างโปรเจกต์ใหม่ชื่อ branches ใน directory projects ของคุณ เพื่อ
สำรวจ if expression ในไฟล์ src/main.rs ป้อนต่อไปนี้:
Filename: src/main.rs
fn main() {
    let number = 3;

    if number < 5 {
        println!("condition was true");
    } else {
        println!("condition was false");
    }
}
if expression ทั้งหมดเริ่มด้วย keyword if ตามด้วย condition ในกรณีนี้
condition เช็คว่าตัวแปร number มีค่าน้อยกว่า 5 หรือไม่ เราวาง block ของ
โค้ดที่จะ execute ถ้า condition เป็น true ทันทีหลัง condition ภายใน
curly bracket Block ของโค้ดที่ผูกกับ condition ใน if expression บางครั้ง
เรียกว่า arm เหมือน arm ใน match expression ที่เราพูดถึงในส่วน
“เปรียบเทียบคำตอบกับตัวเลขลับ”
ของบทที่ 2
เราสามารถใส่ else expression แบบ optional ได้ด้วย ซึ่งเราเลือกทำที่นี่
เพื่อให้โปรแกรมมี block โค้ดทางเลือกให้ execute หาก condition ประเมินเป็น
false ถ้าคุณไม่ให้ else expression และ condition เป็น false
โปรแกรมก็จะข้าม block if ไปและไปที่โค้ดถัดไป
ลองรันโค้ดนี้ คุณควรเห็น output ต่อไปนี้:
$ cargo run
   Compiling branches v0.1.0 (file:///projects/branches)
    Finished `dev` profile [unoptimized + debuginfo] target(s) in 0.31s
     Running `target/debug/branches`
condition was true
ลองเปลี่ยนค่าของ number ให้เป็นค่าที่ทำให้ condition เป็น false เพื่อ
ดูว่าเกิดอะไรขึ้น:
fn main() {
    let number = 7;

    if number < 5 {
        println!("condition was true");
    } else {
        println!("condition was false");
    }
}
รันโปรแกรมอีกครั้งและดู output:
$ cargo run
   Compiling branches v0.1.0 (file:///projects/branches)
    Finished `dev` profile [unoptimized + debuginfo] target(s) in 0.31s
     Running `target/debug/branches`
condition was false
ที่ควรหมายเหตุไว้คือ condition ในโค้ดนี้ ต้อง เป็น bool ถ้า condition
ไม่ใช่ bool เราจะได้ error เช่น ลองรันโค้ดต่อไปนี้:
Filename: src/main.rs
fn main() {
    let number = 3;

    if number {
        println!("number was three");
    }
}
condition if ประเมินเป็นค่า 3 ครั้งนี้ และ Rust โยน error:
$ cargo run
   Compiling branches v0.1.0 (file:///projects/branches)
error[E0308]: mismatched types
 --> src/main.rs:4:8
  |
4 |     if number {
  |        ^^^^^^ expected `bool`, found integer

For more information about this error, try `rustc --explain E0308`.
error: could not compile `branches` (bin "branches") due to 1 previous error
Error บ่งบอกว่า Rust คาด bool แต่ได้ integer ต่างจากภาษาอย่าง Ruby และ
JavaScript Rust จะไม่พยายามแปลง type ที่ไม่ใช่ Boolean เป็น Boolean
อัตโนมัติ คุณต้อง explicit และให้ if พร้อม Boolean เป็น condition เสมอ
ถ้าเราอยากให้ block โค้ด if รันเฉพาะเมื่อตัวเลขไม่เท่ากับ 0 เช่น เรา
เปลี่ยน if expression เป็นต่อไปนี้ได้:
Filename: src/main.rs
fn main() {
    let number = 3;

    if number != 0 {
        println!("number was something other than zero");
    }
}
การรันโค้ดนี้จะพิมพ์ number was something other than zero
จัดการ Condition หลายตัวด้วย else if
คุณใช้ condition หลายตัวได้โดยรวม if และ else ใน else if expression
เช่น:
Filename: src/main.rs
fn main() {
    let number = 6;

    if number % 4 == 0 {
        println!("number is divisible by 4");
    } else if number % 3 == 0 {
        println!("number is divisible by 3");
    } else if number % 2 == 0 {
        println!("number is divisible by 2");
    } else {
        println!("number is not divisible by 4, 3, or 2");
    }
}
โปรแกรมนี้มี path เป็นไปได้ 4 ทาง หลังรันมันแล้ว คุณควรเห็น output ต่อไปนี้:
$ cargo run
   Compiling branches v0.1.0 (file:///projects/branches)
    Finished `dev` profile [unoptimized + debuginfo] target(s) in 0.31s
     Running `target/debug/branches`
number is divisible by 3
เมื่อโปรแกรมนี้ execute มันเช็ค if expression แต่ละตัวตามลำดับ และ
execute body แรกที่ condition ประเมินเป็น true หมายเหตุว่าแม้ 6 หาร 2
ลงตัว เราไม่เห็น output number is divisible by 2 และเราก็ไม่เห็นข้อความ
number is not divisible by 4, 3, or 2 จาก block else นั่นเป็นเพราะ
Rust execute แค่ block ของ condition true ตัวแรก และเมื่อมันเจอตัวหนึ่ง
มันก็ไม่เช็คตัวที่เหลือ
การใช้ else if expression มากเกินไปทำให้โค้ดเลอะเทอะได้ ดังนั้นถ้าคุณมี
มากกว่าหนึ่งตัว คุณอาจอยาก refactor โค้ด บทที่ 6 อธิบายโครงสร้าง branching
ที่ทรงพลังของ Rust ชื่อ match สำหรับกรณีเหล่านี้
ใช้ if ใน Statement let
เพราะ if เป็น expression เราใช้มันทางขวาของ statement let เพื่อ assign
ผลให้ตัวแปรได้ ดังใน Listing 3-2
fn main() {
    let condition = true;
    let number = if condition { 5 } else { 6 };

    println!("The value of number is: {number}");
}if expression ให้ตัวแปรตัวแปร number จะถูก bind กับค่าตามผลของ if expression รันโค้ดนี้เพื่อ
ดูว่าเกิดอะไรขึ้น:
$ cargo run
   Compiling branches v0.1.0 (file:///projects/branches)
    Finished `dev` profile [unoptimized + debuginfo] target(s) in 0.30s
     Running `target/debug/branches`
The value of number is: 5
จำไว้ว่า block ของโค้ดประเมินเป็น expression สุดท้ายในนั้น และตัวเลขใน
ตัวเองก็เป็น expression ด้วย ในกรณีนี้ ค่าของ if expression ทั้งหมดขึ้น
กับว่า block ของโค้ดไหน execute สิ่งนี้หมายความว่าค่าที่มีศักยภาพเป็นผล
จาก arm แต่ละตัวของ if ต้องมี type เดียวกัน ใน Listing 3-2 ผลของทั้ง
arm if และ arm else คือ integer i32 ถ้า type mismatch ดังตัวอย่าง
ต่อไปนี้ เราจะได้ error:
Filename: src/main.rs
fn main() {
    let condition = true;

    let number = if condition { 5 } else { "six" };

    println!("The value of number is: {number}");
}
เมื่อเราพยายาม compile โค้ดนี้ เราจะได้ error arm if และ else มี type
ของค่าที่เข้ากันไม่ได้ และ Rust ระบุตำแหน่งที่จะหาปัญหาในโปรแกรมเป๊ะ ๆ:
$ cargo run
   Compiling branches v0.1.0 (file:///projects/branches)
error[E0308]: `if` and `else` have incompatible types
 --> src/main.rs:4:44
  |
4 |     let number = if condition { 5 } else { "six" };
  |                                 -          ^^^^^ expected integer, found `&str`
  |                                 |
  |                                 expected because of this

For more information about this error, try `rustc --explain E0308`.
error: could not compile `branches` (bin "branches") due to 1 previous error
Expression ใน block if ประเมินเป็น integer และ expression ใน block
else ประเมินเป็น string มันจะไม่ทำงาน เพราะตัวแปรต้องมี type เดียว และ
Rust ต้องรู้แน่นอนตอน compile time ว่า type ของตัวแปร number คืออะไร
การรู้ type ของ number ให้ compiler ตรวจสอบว่า type valid ในทุกที่ที่
เราใช้ number Rust จะไม่สามารถทำแบบนั้นได้ ถ้า type ของ number ถูก
กำหนดแค่ตอน runtime compiler ก็จะซับซ้อนขึ้นและให้การรับประกันเกี่ยวกับ
โค้ดน้อยลง ถ้ามันต้องตามติด type สมมติฐานหลายตัวสำหรับตัวแปรใด ๆ
การทำซ้ำด้วย Loop
มันบ่อยครั้งที่มีประโยชน์ในการ execute block โค้ดมากกว่าหนึ่งครั้ง สำหรับ งานนี้ Rust มี loop หลายแบบ ซึ่งจะรันผ่านโค้ดภายใน body ของ loop จน สุด แล้วเริ่มกลับที่ต้นทันที เพื่อทดลอง loop มาสร้างโปรเจกต์ใหม่ชื่อ loops
Rust มี loop สามแบบ: loop, while และ for ลองดูแต่ละแบบ
ทำซ้ำโค้ดด้วย loop
keyword loop บอก Rust ให้ execute block ของโค้ดซ้ำ ๆ ตลอดไป หรือจน
กว่าคุณบอกให้หยุดแบบ explicit
ตัวอย่าง เปลี่ยนไฟล์ src/main.rs ใน directory loops ของคุณ ให้หน้า ตาเป็นแบบนี้:
Filename: src/main.rs
fn main() {
    loop {
        println!("again!");
    }
}
เมื่อเรารันโปรแกรมนี้ เราจะเห็น again! พิมพ์ซ้ำ ๆ ต่อเนื่อง จนกว่าเรา
หยุดโปรแกรมเอง terminal ส่วนใหญ่รองรับ keyboard shortcut
ctrl-C เพื่อ interrupt โปรแกรมที่ติดอยู่ใน loop
ต่อเนื่อง ลองดู:
$ cargo run
   Compiling loops v0.1.0 (file:///projects/loops)
    Finished `dev` profile [unoptimized + debuginfo] target(s) in 0.08s
     Running `target/debug/loops`
again!
again!
again!
again!
^Cagain!
สัญลักษณ์ ^C แทนตำแหน่งที่คุณกด ctrl-C
คุณอาจเห็นหรือไม่เห็นคำ again! พิมพ์หลัง ^C ขึ้นกับว่าโค้ดอยู่ตรงไหน
ใน loop ตอนที่รับ interrupt signal
โชคดีที่ Rust ยังมีวิธี break ออกจาก loop ด้วยโค้ด คุณวาง keyword break
ภายใน loop เพื่อบอกโปรแกรมว่าจะหยุด execute loop เมื่อไหร่ จำได้ว่าเราทำ
แบบนี้ในเกมทายตัวเลขในส่วน
“ออกเมื่อทายถูก” ของ
บทที่ 2 เพื่อออกจากโปรแกรมเมื่อผู้ใช้ชนะเกมโดยทายตัวเลขถูก
เรายังใช้ continue ในเกมทายตัวเลขด้วย ซึ่งใน loop บอกโปรแกรมให้ข้ามโค้ด
ที่เหลือใน iteration นี้ของ loop และไปที่ iteration ถัดไป
Return ค่าจาก Loop
หนึ่งในการใช้ loop คือลอง operation ที่คุณรู้ว่าอาจล้มเหลว เช่น เช็ค
ว่า thread ทำงานเสร็จแล้วหรือไม่ คุณอาจยังต้องส่งผลของ operation นั้นออก
จาก loop ไปยังโค้ดที่เหลือ ในการทำสิ่งนี้ คุณเพิ่มค่าที่คุณอยากให้ return
หลัง expression break ที่ใช้หยุด loop ค่านั้นจะถูก return ออกจาก loop
เพื่อให้คุณใช้ได้ ดังที่แสดงที่นี่:
fn main() {
    let mut counter = 0;

    let result = loop {
        counter += 1;

        if counter == 10 {
            break counter * 2;
        }
    };

    println!("The result is {result}");
}
ก่อน loop เราประกาศตัวแปรชื่อ counter แล้ว initialize เป็น 0 จากนั้น
เราประกาศตัวแปรชื่อ result เพื่อเก็บค่าที่ return จาก loop ในทุก
iteration ของ loop เราเพิ่ม 1 ให้ตัวแปร counter แล้วเช็คว่า counter
เท่ากับ 10 หรือไม่ เมื่อเท่า เราใช้ keyword break พร้อมค่า
counter * 2 หลัง loop เราใช้ semicolon จบ statement ที่ assign ค่าให้
result สุดท้าย เราพิมพ์ค่าใน result ซึ่งในกรณีนี้คือ 20
คุณยัง return จากภายใน loop ได้ ขณะที่ break ออกแค่จาก loop ปัจจุบัน
return ออกจากฟังก์ชันปัจจุบันเสมอ
แยกความกำกวมด้วย Loop Label
ถ้าคุณมี loop ภายใน loop break และ continue ใช้กับ loop ในสุดที่จุด
นั้น คุณระบุ loop label บน loop แบบ optional ได้ ซึ่งจากนั้นใช้กับ
break หรือ continue เพื่อระบุว่า keyword เหล่านั้นใช้กับ loop ที่
label แทน loop ในสุด Loop label ต้องเริ่มด้วย single quote นี่คือตัวอย่าง
ที่มี loop ซ้อนสองตัว:
fn main() {
    let mut count = 0;
    'counting_up: loop {
        println!("count = {count}");
        let mut remaining = 10;

        loop {
            println!("remaining = {remaining}");
            if remaining == 9 {
                break;
            }
            if count == 2 {
                break 'counting_up;
            }
            remaining -= 1;
        }

        count += 1;
    }
    println!("End count = {count}");
}
Loop ด้านนอกมี label 'counting_up และจะนับขึ้นจาก 0 ถึง 2 Loop ด้านใน
ที่ไม่มี label นับลงจาก 10 ถึง 9 break ตัวแรกที่ไม่ระบุ label จะออกจาก
loop ด้านในเท่านั้น statement break 'counting_up; จะออกจาก loop ด้าน
นอก โค้ดนี้พิมพ์:
$ cargo run
   Compiling loops v0.1.0 (file:///projects/loops)
    Finished `dev` profile [unoptimized + debuginfo] target(s) in 0.58s
     Running `target/debug/loops`
count = 0
remaining = 10
remaining = 9
count = 1
remaining = 10
remaining = 9
count = 2
remaining = 10
End count = 2
Conditional Loop ที่กระชับด้วย while
บ่อยครั้งโปรแกรมต้องประเมิน condition ภายใน loop ขณะที่ condition เป็น
true loop รัน เมื่อ condition หยุดเป็น true โปรแกรมเรียก break
หยุด loop เป็นไปได้ที่จะ implement พฤติกรรมแบบนี้ด้วยการรวม loop, if,
else และ break คุณลองทำในโปรแกรมตอนนี้ได้ถ้าต้องการ อย่างไรก็ตาม
pattern นี้ใช้บ่อยมาก Rust จึงมีโครงสร้างภาษา built-in สำหรับมัน เรียกว่า
while loop ใน Listing 3-3 เราใช้ while วน loop โปรแกรมสามครั้ง นับ
ถอยหลังทุกครั้ง แล้วหลัง loop พิมพ์ข้อความและออก
fn main() {
    let mut number = 3;

    while number != 0 {
        println!("{number}!");

        number -= 1;
    }

    println!("LIFTOFF!!!");
}while loop รันโค้ดขณะที่ condition ประเมินเป็น trueโครงสร้างนี้ขจัด nesting หลายชั้นที่จำเป็นถ้าคุณใช้ loop, if, else
และ break และมันชัดเจนกว่า ขณะที่ condition ประเมินเป็น true โค้ดรัน
ไม่อย่างนั้นมันออกจาก loop
วน Loop ผ่าน Collection ด้วย for
คุณเลือกใช้โครงสร้าง while วน loop ผ่าน element ของ collection เช่น
array ได้ เช่น loop ใน Listing 3-4 พิมพ์แต่ละ element ใน array a
fn main() {
    let a = [10, 20, 30, 40, 50];
    let mut index = 0;

    while index < 5 {
        println!("the value is: {}", a[index]);

        index += 1;
    }
}while loopที่นี่ โค้ดนับขึ้นผ่าน element ใน array มันเริ่มที่ index 0 แล้ววน
loop จนถึง index สุดท้ายใน array (นั่นคือเมื่อ index < 5 ไม่ใช่
true อีกต่อไป) การรันโค้ดนี้จะพิมพ์ทุก element ใน array:
$ cargo run
   Compiling loops v0.1.0 (file:///projects/loops)
    Finished `dev` profile [unoptimized + debuginfo] target(s) in 0.32s
     Running `target/debug/loops`
the value is: 10
the value is: 20
the value is: 30
the value is: 40
the value is: 50
ค่า array ทั้งห้าค่าปรากฏใน terminal ตามที่คาด แม้ index จะถึงค่า 5
ในจุดหนึ่ง loop หยุด execute ก่อนพยายามดึงค่าที่หกจาก array
อย่างไรก็ตาม วิธีนี้เสี่ยง error — เราอาจทำให้โปรแกรม panic ถ้าค่า
index หรือ test condition ไม่ถูกต้อง เช่น ถ้าคุณเปลี่ยนการประกาศ array
a ให้มีสี่ element แต่ลืม update condition เป็น while index < 4
โค้ดจะ panic มันยังช้าด้วย เพราะ compiler เพิ่ม runtime code เพื่อทำการ
เช็ค conditional ว่า index อยู่ภายในขอบเขตของ array ในทุก iteration ของ
loop
ในฐานะทางเลือกที่กระชับกว่า คุณใช้ for loop และ execute โค้ดบางส่วน
สำหรับแต่ละ item ใน collection ได้ for loop หน้าตาเหมือนโค้ดใน
Listing 3-5
fn main() {
    let a = [10, 20, 30, 40, 50];

    for element in a {
        println!("the value is: {element}");
    }
}for loopเมื่อเรารันโค้ดนี้ เราจะเห็น output เดียวกับใน Listing 3-4 ที่สำคัญกว่า
คือ ตอนนี้เราเพิ่มความปลอดภัยของโค้ด และขจัดโอกาสของ bug ที่อาจเกิดจาก
การไปเกินท้าย array หรือไปไม่ไกลพอและพลาด item บางตัว Machine code ที่
generate จาก for loop ก็มีประสิทธิภาพมากกว่าได้ด้วย เพราะ index ไม่
ต้องเปรียบเทียบกับความยาว array ทุก iteration
การใช้ for loop คุณไม่ต้องจำเปลี่ยนโค้ดอื่นใด ถ้าคุณเปลี่ยนจำนวนค่าใน
array เหมือนที่คุณจะต้องทำกับวิธีที่ใช้ใน Listing 3-4
ความปลอดภัยและความกระชับของ for loop ทำให้มันเป็นโครงสร้าง loop ที่ใช้
บ่อยที่สุดใน Rust แม้ในสถานการณ์ที่คุณอยากรันโค้ดบางอย่างจำนวนครั้งหนึ่ง
อย่างในตัวอย่างนับถอยหลังที่ใช้ while loop ใน Listing 3-3 Rustacean
ส่วนใหญ่ก็จะใช้ for loop วิธีทำคือใช้ Range ที่ standard library
มีให้ ซึ่ง generate ตัวเลขทั้งหมดในลำดับ เริ่มจากตัวเลขหนึ่งและจบก่อน
อีกตัวเลขหนึ่ง
นี่คือสิ่งที่การนับถอยหลังจะหน้าตาเป็นแบบนี้โดยใช้ for loop และอีก
เมธอดที่เรายังไม่ได้พูดถึง rev เพื่อกลับด้าน range:
Filename: src/main.rs
fn main() {
    for number in (1..4).rev() {
        println!("{number}!");
    }
    println!("LIFTOFF!!!");
}
โค้ดนี้ดีขึ้นนิดหน่อย ใช่ไหม?
สรุป
คุณทำได้! นี่เป็นบทขนาดใหญ่ — คุณได้เรียนเรื่องตัวแปร, ชนิดข้อมูล scalar
และ compound, ฟังก์ชัน, comment, if expression และ loop! ในการฝึกกับ
แนวคิดที่พูดถึงในบทนี้ ลอง build โปรแกรมเพื่อทำสิ่งต่อไปนี้:
- แปลงอุณหภูมิระหว่าง Fahrenheit และ Celsius
- Generate ตัวเลข Fibonacci ตัวที่ n
- พิมพ์เนื้อเพลง Christmas carol “The Twelve Days of Christmas” โดยใช้ ประโยชน์จากการทำซ้ำในเพลง
เมื่อคุณพร้อมไปต่อ เราจะพูดถึงแนวคิดใน Rust ที่ ไม่ ค่อยมีในภาษา โปรแกรมอื่น: ownership
ทำความเข้าใจ Ownership
โอนเนอร์ชิป (ownership) เป็นฟีเจอร์ที่เป็นเอกลักษณ์ที่สุดของ Rust และมีนัย ลึกซึ้งต่อส่วนที่เหลือของภาษา มันเปิดทางให้ Rust รับประกัน memory safety ได้โดยไม่ต้องใช้ garbage collector ดังนั้นการเข้าใจว่า ownership ทำงานยัง ไงจึงสำคัญ ในบทนี้เราจะพูดถึง ownership รวมถึงฟีเจอร์ที่เกี่ยวข้องอีกหลาย อย่าง: borrowing, slice และวิธีที่ Rust จัดวางข้อมูลในหน่วยความจำ
Ownership คืออะไร?
Ownership คืออะไร?
Ownership คือชุดของกฎที่กำกับวิธีที่โปรแกรม Rust จัดการหน่วยความจำ ทุกโปรแกรมต้องจัดการวิธีที่ใช้หน่วยความจำของคอมพิวเตอร์ระหว่างรัน บางภาษามี garbage collection ที่คอยดูหน่วยความจำที่ไม่ใช้แล้วเป็นระยะ ระหว่างที่ โปรแกรมรัน ในภาษาอื่น โปรแกรมเมอร์ต้อง allocate และ free หน่วยความจำเอง แบบ explicit Rust ใช้แนวทางที่สาม — หน่วยความจำถูกจัดการผ่านระบบ ownership ที่มีชุดกฎที่ compiler ตรวจสอบ ถ้ามีกฎใดถูกฝ่าฝืน โปรแกรมจะ compile ไม่ ผ่าน ฟีเจอร์ของ ownership ทั้งหมดจะไม่ทำให้โปรแกรมช้าลงระหว่างรัน
เพราะ ownership เป็นแนวคิดใหม่สำหรับโปรแกรมเมอร์หลายคน มันใช้เวลาทำความ คุ้นเคยบ้าง ข่าวดีคือยิ่งคุณมีประสบการณ์กับ Rust และกฎของระบบ ownership มาก ขึ้น คุณจะพบว่ามันง่ายขึ้นที่จะพัฒนาโค้ดที่ปลอดภัยและมีประสิทธิภาพอย่างเป็น ธรรมชาติ สู้ ๆ!
เมื่อคุณเข้าใจ ownership คุณจะมีรากฐานที่แข็งแรงในการเข้าใจฟีเจอร์ที่ทำให้ Rust มีเอกลักษณ์ ในบทนี้ คุณจะเรียน ownership ผ่านการทำตัวอย่างที่เน้น โครงสร้างข้อมูลที่ใช้บ่อยมาก — string
Stack และ Heap
ภาษาโปรแกรมหลายภาษาไม่ได้บังคับให้คุณคิดเรื่อง stack และ heap บ่อยนัก แต่ ในภาษา systems programming อย่าง Rust การที่ค่าอยู่บน stack หรือ heap ส่งผลต่อพฤติกรรมของภาษา และว่าทำไมคุณต้องตัดสินใจบางอย่าง บางส่วนของ ownership จะถูกอธิบายในความสัมพันธ์กับ stack และ heap ในบทนี้ ดังนั้นนี่ คือคำอธิบายสั้น ๆ เพื่อเตรียมตัว
ทั้ง stack และ heap เป็นส่วนของหน่วยความจำที่โค้ดของคุณใช้ได้ตอน runtime แต่พวกมันมีโครงสร้างต่างกัน Stack เก็บค่าตามลำดับที่ได้รับมา และเอาค่าออก ในลำดับตรงข้าม นี่เรียกว่า last in, first out (LIFO) คิดถึงกองจาน — เมื่อคุณเพิ่มจาน คุณวางไว้บนสุดของกอง และเมื่อต้องการจาน คุณเอาออกจากบนสุด การเพิ่มหรือลบจานจากกลางหรือล่างไม่ work เท่าไหร่! การเพิ่มข้อมูลเรียกว่า push บน stack และการลบข้อมูลเรียกว่า pop ออกจาก stack ข้อมูลทั้งหมดที่ เก็บบน stack ต้องมีขนาดที่รู้และคงที่ ข้อมูลที่ขนาดไม่รู้ตอน compile time หรือขนาดอาจเปลี่ยน ต้องเก็บบน heap แทน
Heap มีระเบียบน้อยกว่า — เมื่อคุณใส่ข้อมูลบน heap คุณขอพื้นที่จำนวนหนึ่ง memory allocator หาที่ว่างใน heap ที่ใหญ่พอ, mark ว่ากำลังใช้, และ return pointer ซึ่งคือ address ของตำแหน่งนั้น กระบวนการนี้เรียกว่า allocate บน heap และบางครั้งย่อเป็นแค่ allocate (การ push ค่าบน stack ไม่ถือว่า เป็น allocate) เพราะ pointer ไปยัง heap มีขนาดรู้และคงที่ คุณจึงเก็บ pointer บน stack ได้ แต่เมื่อคุณต้องการข้อมูลจริง คุณต้องตาม pointer ไป คิดถึงการได้ที่นั่งในร้านอาหาร — เมื่อคุณเข้าไป คุณบอกจำนวนคนในกลุ่ม และ host หาโต๊ะว่างที่จุคนทั้งหมดได้ แล้วพาคุณไป ถ้ามีคนในกลุ่มมาสาย เขาถามได้ ว่าคุณนั่งอยู่ที่ไหน เพื่อหาคุณ
Push บน stack เร็วกว่า allocate บน heap เพราะ allocator ไม่ต้องค้นหาที่ เก็บข้อมูลใหม่ — ตำแหน่งนั้นอยู่บนสุดของ stack เสมอ เมื่อเทียบกัน การ allocate พื้นที่บน heap ต้องการงานมากกว่า เพราะ allocator ต้องหาพื้นที่ที่ ใหญ่พอจะเก็บข้อมูลก่อน แล้วทำ bookkeeping เพื่อเตรียมพร้อมสำหรับการ allocate ครั้งถัดไป
การเข้าถึงข้อมูลใน heap โดยทั่วไปช้ากว่าการเข้าถึงข้อมูลบน stack เพราะ คุณต้องตาม pointer ไป processor สมัยใหม่เร็วกว่าถ้ามันกระโดดในหน่วยความจำ น้อยลง ต่อจากการอุปมา ลองนึกถึง server ในร้านอาหารที่รับ order จากหลาย โต๊ะ มีประสิทธิภาพที่สุดที่จะรับ order ทุกอย่างที่โต๊ะหนึ่งก่อนย้ายไปอีก โต๊ะ การรับ order จากโต๊ะ A แล้ว order จากโต๊ะ B แล้วจาก A อีก แล้วจาก B อีก จะเป็นกระบวนการที่ช้ากว่ามาก ในทำนองเดียวกัน processor ทำงานได้ดีกว่า ถ้าทำงานบนข้อมูลที่อยู่ใกล้ข้อมูลอื่น (อย่างที่อยู่บน stack) มากกว่าไกล ออกไป (อย่างที่อาจอยู่บน heap)
เมื่อโค้ดของคุณเรียกฟังก์ชัน ค่าที่ส่งเข้าฟังก์ชัน (รวมถึง pointer ไป ข้อมูลบน heap ที่อาจมี) และตัวแปร local ของฟังก์ชัน ถูก push บน stack เมื่อฟังก์ชันจบ ค่าเหล่านั้นถูก pop ออกจาก stack
การติดตามว่าส่วนใดของโค้ดใช้ข้อมูลใดบน heap, การลดข้อมูลซ้ำใน heap, และ การ cleanup ข้อมูลที่ไม่ใช้บน heap เพื่อไม่ให้หมดพื้นที่ ทั้งหมดเป็นปัญหาที่ ownership จัดการ เมื่อคุณเข้าใจ ownership คุณจะไม่ต้องคิดเรื่อง stack และ heap บ่อยนัก แต่การรู้ว่าจุดประสงค์หลักของ ownership คือการจัดการข้อมูลบน heap ช่วยอธิบายว่าทำไมมันทำงานในแบบที่ทำ
กฎของ Ownership
ขั้นแรก มาดูกฎของ ownership กัน จำกฎเหล่านี้ไว้ตอนเราทำตัวอย่างที่แสดง ให้เห็น:
- ทุกค่าใน Rust มี owner
- ในเวลาเดียวกันมี owner ได้แค่หนึ่งคน
- เมื่อ owner ออกจาก scope ค่าจะถูก drop
Scope ของตัวแปร
ตอนนี้เราผ่าน syntax พื้นฐานของ Rust แล้ว เราจะไม่รวม fn main() { ทั้งหมด
ในตัวอย่าง ดังนั้นถ้าคุณตามไปด้วย อย่าลืมเอาตัวอย่างต่อไปนี้ใส่ในฟังก์ชัน
main เอง ผลลัพธ์คือ ตัวอย่างของเราจะกระชับขึ้นนิดหน่อย ให้เราโฟกัสที่ราย
ละเอียดจริง ๆ แทนโค้ด boilerplate
ตัวอย่างแรกของ ownership เราจะดู scope ของตัวแปร scope คือช่วงในโปรแกรม ที่ item valid ดูตัวแปรต่อไปนี้:
#![allow(unused)]
fn main() {
let s = "hello";
}
ตัวแปร s อ้างถึง string literal ที่ค่าของ string ถูก hardcode ลงในข้อความ
ของโปรแกรม ตัวแปรนี้ valid ตั้งแต่จุดที่ประกาศจนถึงท้าย scope ปัจจุบัน
Listing 4-1 แสดงโปรแกรมพร้อม comment annotate ตำแหน่งที่ตัวแปร s จะ
valid
fn main() {
    {                      // s is not valid here, since it's not yet declared
        let s = "hello";   // s is valid from this point forward

        // do stuff with s
    }                      // this scope is now over, and s is no longer valid
}พูดอีกอย่าง มีจุดสำคัญสองจุดในเวลาที่นี่:
- เมื่อ
sเข้ามา ใน scope มัน valid - มันยัง valid อยู่จนกว่าจะออก นอก scope
ณ จุดนี้ ความสัมพันธ์ระหว่าง scope และตอนที่ตัวแปร valid คล้ายกับในภาษา
โปรแกรมอื่น ทีนี้เราจะต่อยอดความเข้าใจนี้ ด้วยการแนะนำ type String
Type String
เพื่อแสดงกฎของ ownership เราต้องมีชนิดข้อมูลที่ซับซ้อนกว่าที่เราครอบคลุมใน
ส่วน “ชนิดข้อมูล” ของบทที่ 3 type ที่ครอบคลุม
ก่อนหน้านี้มีขนาดรู้ เก็บบน stack และ pop ออกจาก stack ได้เมื่อ scope จบ
และคัดลอกให้สร้าง instance ใหม่ที่อิสระได้เร็วและง่าย ถ้าโค้ดส่วนอื่นต้อง
ใช้ค่าเดียวกันใน scope ต่าง แต่เราอยากดูข้อมูลที่เก็บบน heap และสำรวจว่า
Rust รู้เมื่อไหร่ว่าควร cleanup ข้อมูลนั้น และ type String เป็นตัวอย่าง
ที่ดี
เราจะโฟกัสที่ส่วนของ String ที่เกี่ยวกับ ownership แง่มุมเหล่านี้ยังใช้
กับชนิดข้อมูลซับซ้อนอื่น ๆ ด้วย ไม่ว่าจะมาจาก standard library หรือสร้าง
เอง เราจะพูดถึงแง่มุมที่ไม่เกี่ยว ownership ของ String ใน
บทที่ 8
เราเห็น string literal มาแล้ว ที่ค่า string ถูก hardcode ลงในโปรแกรม
String literal สะดวก แต่ไม่เหมาะกับทุกสถานการณ์ที่เราอยากใช้ข้อความ
เหตุผลหนึ่งคือมัน immutable อีกเหตุผลคือไม่ใช่ทุกค่า string จะรู้เมื่อ
เราเขียนโค้ด เช่น ถ้าเราอยากรับ input จากผู้ใช้แล้วเก็บ? สำหรับสถานการณ์
เหล่านี้ Rust จึงมี type String type นี้จัดการข้อมูลที่ allocate บน
heap และสามารถเก็บข้อความปริมาณที่เราไม่รู้ตอน compile time คุณสร้าง
String จาก string literal ได้โดยใช้ฟังก์ชัน from แบบนี้:
#![allow(unused)]
fn main() {
let s = String::from("hello");
}
operator double colon :: ให้เรา namespace ฟังก์ชัน from นี้ภายใต้
type String แทนการใช้ชื่อแบบ string_from เราจะพูดถึง syntax นี้มาก
ขึ้นในส่วน “เมธอด” ของบทที่ 5 และตอนเราพูดถึง
namespace กับ module ใน
“Path สำหรับอ้างถึง item ใน module tree”
ในบทที่ 7
string ชนิดนี้ สามารถ ถูก mutate ได้:
fn main() {
    let mut s = String::from("hello");

    s.push_str(", world!"); // push_str() appends a literal to a String

    println!("{s}"); // this will print `hello, world!`
}
แล้วอะไรคือความแตกต่างที่นี่? ทำไม String ถึง mutate ได้ แต่ literal
ไม่ได้? ความแตกต่างอยู่ที่วิธีที่ type ทั้งสองนี้จัดการหน่วยความจำ
หน่วยความจำและการ Allocate
ในกรณีของ string literal เรารู้เนื้อหาตอน compile time ดังนั้นข้อความถูก hardcode ลงใน executable สุดท้ายโดยตรง นี่คือเหตุผลที่ string literal เร็ว และมีประสิทธิภาพ แต่คุณสมบัติเหล่านี้มาจากการที่ string literal เป็น immutable เท่านั้น น่าเสียดายที่เราไม่สามารถใส่ blob ของหน่วยความจำลงใน binary สำหรับข้อความแต่ละชิ้นที่ขนาดไม่รู้ตอน compile time และขนาดอาจ เปลี่ยนระหว่างรันโปรแกรม
กับ type String เพื่อรองรับชิ้นข้อความที่ mutable และเติบโตได้ เราต้อง
allocate หน่วยความจำจำนวนหนึ่งบน heap, ไม่รู้ตอน compile time, เพื่อเก็บ
เนื้อหา นี่หมายความว่า:
- หน่วยความจำต้องถูกขอจาก memory allocator ตอน runtime
- เราต้องมีวิธี return หน่วยความจำนี้กลับให้ allocator เมื่อเราใช้
Stringเสร็จ
ส่วนแรกนั้นเราทำ — เมื่อเราเรียก String::from การ implement ของมันขอ
หน่วยความจำที่ต้องการ นี่ค่อนข้างเป็นสากลในภาษาโปรแกรม
อย่างไรก็ตาม ส่วนที่สองต่างกัน ในภาษาที่มี garbage collector (GC) GC
ติดตามและ cleanup หน่วยความจำที่ไม่ได้ใช้แล้ว และเราไม่ต้องคิดเรื่องนั้น
ในภาษาส่วนใหญ่ที่ไม่มี GC เป็นหน้าที่ของเราที่จะระบุเมื่อหน่วยความจำไม่
ถูกใช้แล้ว และเรียกโค้ดให้ free มันแบบ explicit เหมือนที่เราทำเพื่อขอมัน
การทำสิ่งนี้ให้ถูก เป็นปัญหา programming ที่ยากมาตลอด ถ้าเราลืม เราเสีย
หน่วยความจำ ถ้าเราทำเร็วเกินไป เรามีตัวแปร invalid ถ้าเราทำสองครั้ง นั่น
ก็เป็น bug ด้วย เราต้องจับคู่ allocate หนึ่งครั้งกับ free หนึ่งครั้ง
เป๊ะ ๆ
Rust เลือกเส้นทางต่าง — หน่วยความจำถูก return อัตโนมัติเมื่อตัวแปรที่ owner
มันออกจาก scope นี่คือ version ของตัวอย่าง scope ของเราจาก Listing 4-1
ที่ใช้ String แทน string literal:
fn main() {
    {
        let s = String::from("hello"); // s is valid from this point forward

        // do stuff with s
    }                                  // this scope is now over, and s is no
                                       // longer valid
}
มีจุดธรรมชาติที่เรา return หน่วยความจำที่ String ของเราต้องการกลับให้
allocator ได้ — เมื่อ s ออกจาก scope เมื่อตัวแปรออกจาก scope Rust เรียก
ฟังก์ชันพิเศษให้เรา ฟังก์ชันนี้เรียกว่า drop และเป็นที่ที่ผู้เขียน
String ใส่โค้ดที่ return หน่วยความจำได้ Rust เรียก drop อัตโนมัติที่
curly bracket ปิด
หมายเหตุ: ใน C++ pattern การ deallocate resource ที่ท้าย lifetime ของ item บางครั้งเรียกว่า Resource Acquisition Is Initialization (RAII) ฟังก์ชัน
dropใน Rust จะคุ้นเคยกับคุณถ้าคุณใช้ RAII pattern มาก่อน
pattern นี้มีผลกระทบลึกซึ้งต่อวิธีที่เขียนโค้ด Rust ตอนนี้อาจดูง่าย แต่ พฤติกรรมของโค้ดอาจคาดไม่ถึงในสถานการณ์ที่ซับซ้อนกว่า เมื่อเราอยากให้ตัวแปร หลายตัวใช้ข้อมูลที่เรา allocate บน heap มาสำรวจบางสถานการณ์เหล่านั้นกัน
ตัวแปรและข้อมูลโต้ตอบกันด้วย Move
ตัวแปรหลายตัวโต้ตอบกับข้อมูลเดียวกันได้หลายวิธีใน Rust Listing 4-2 แสดง ตัวอย่างที่ใช้ integer
fn main() {
    let x = 5;
    let y = x;
}x ให้ yเราอาจเดาได้ว่ามันทำอะไร — “Bind ค่า 5 กับ x แล้วทำสำเนาของค่าใน x
แล้ว bind กับ y” ตอนนี้เรามีสองตัวแปร x และ y และทั้งคู่เท่ากับ 5
นี่คือสิ่งที่เกิดขึ้นจริง เพราะ integer เป็นค่าง่าย ๆ ที่มีขนาดรู้และคงที่
และค่า 5 สองตัวนี้ถูก push บน stack
ทีนี้มาดู version String:
fn main() {
    let s1 = String::from("hello");
    let s2 = s1;
}
นี่ดูคล้ายกันมาก เราจึงอาจสมมติว่าวิธีที่มันทำงานจะเหมือนกัน — นั่นคือ
บรรทัดที่สองจะทำสำเนาของค่าใน s1 แล้ว bind กับ s2 แต่นี่ไม่ใช่สิ่งที่
เกิดขึ้นทีเดียว
ดู Figure 4-1 เพื่อเห็นว่าเกิดอะไรขึ้นกับ String เบื้องลึก String
ประกอบด้วยสามส่วน แสดงทางซ้าย — pointer ไปยังหน่วยความจำที่เก็บเนื้อหา
ของ string, ความยาว และความจุ กลุ่มข้อมูลนี้เก็บบน stack ทางขวาคือหน่วย
ความจำบน heap ที่เก็บเนื้อหา

Figure 4-1: ตัวแทนในหน่วยความจำของ String ที่เก็บ
ค่า "hello" bind กับ s1
ความยาวคือจำนวนหน่วยความจำใน byte ที่เนื้อหาของ String ใช้อยู่ปัจจุบัน
ความจุคือจำนวนหน่วยความจำทั้งหมดใน byte ที่ String ได้รับจาก allocator
ความแตกต่างระหว่างความยาวและความจุสำคัญ แต่ไม่ใช่ในบริบทนี้ ดังนั้นตอนนี้
ละเว้นความจุได้
เมื่อเรา assign s1 ให้ s2 ข้อมูล String ถูกคัดลอก ซึ่งหมายความว่าเรา
คัดลอก pointer, ความยาว และความจุที่อยู่บน stack เราไม่คัดลอกข้อมูลบน
heap ที่ pointer อ้างถึง พูดอีกอย่าง ตัวแทนข้อมูลในหน่วยความจำดูเหมือน
Figure 4-2

Figure 4-2: ตัวแทนในหน่วยความจำของตัวแปร s2 ที่มี
สำเนาของ pointer, ความยาว และความจุของ s1
ตัวแทน ไม่ ดูเหมือน Figure 4-3 ซึ่งเป็นสิ่งที่หน่วยความจำจะดูเหมือนถ้า
Rust คัดลอกข้อมูล heap ด้วย ถ้า Rust ทำสิ่งนี้ operation s2 = s1 อาจ
แพงมากในแง่ของ runtime performance ถ้าข้อมูลบน heap ใหญ่

Figure 4-3: ความเป็นไปได้อีกอย่างของสิ่งที่ s2 = s1
อาจทำ ถ้า Rust คัดลอกข้อมูล heap ด้วย
ก่อนหน้านี้ เราบอกว่าเมื่อตัวแปรออกจาก scope Rust เรียกฟังก์ชัน drop
อัตโนมัติและ cleanup หน่วยความจำ heap สำหรับตัวแปรนั้น แต่ Figure 4-2
แสดงทั้ง data pointer ชี้ไปตำแหน่งเดียวกัน นี่เป็นปัญหา — เมื่อ s2 และ
s1 ออกจาก scope ทั้งคู่จะพยายาม free หน่วยความจำเดียวกัน นี่รู้จักใน
ชื่อ double free error และเป็นหนึ่งใน memory safety bug ที่เราพูดถึง
ก่อนหน้านี้ การ free หน่วยความจำสองครั้งอาจนำไปสู่ memory corruption ซึ่ง
อาจนำไปสู่ security vulnerability
เพื่อรับประกัน memory safety หลังบรรทัด let s2 = s1; Rust ถือว่า s1
ไม่ valid อีกต่อไป ดังนั้น Rust ไม่ต้อง free อะไรเมื่อ s1 ออกจาก scope
ดูสิ่งที่เกิดขึ้นเมื่อคุณพยายามใช้ s1 หลังจากสร้าง s2 — มันจะไม่
ทำงาน:
fn main() {
    let s1 = String::from("hello");
    let s2 = s1;

    println!("{s1}, world!");
}
คุณจะได้ error แบบนี้ เพราะ Rust ป้องกันคุณจากการใช้ reference ที่ถูก invalidate:
$ cargo run
   Compiling ownership v0.1.0 (file:///projects/ownership)
error[E0382]: borrow of moved value: `s1`
 --> src/main.rs:5:16
  |
2 |     let s1 = String::from("hello");
  |         -- move occurs because `s1` has type `String`, which does not implement the `Copy` trait
3 |     let s2 = s1;
  |              -- value moved here
4 |
5 |     println!("{s1}, world!");
  |                ^^ value borrowed here after move
  |
  = note: this error originates in the macro `$crate::format_args_nl` which comes from the expansion of the macro `println` (in Nightly builds, run with -Z macro-backtrace for more info)
help: consider cloning the value if the performance cost is acceptable
  |
3 |     let s2 = s1.clone();
  |                ++++++++

For more information about this error, try `rustc --explain E0382`.
error: could not compile `ownership` (bin "ownership") due to 1 previous error
ถ้าคุณเคยได้ยินคำว่า shallow copy และ deep copy ขณะทำงานกับภาษาอื่น
แนวคิดของการคัดลอก pointer, ความยาว และความจุ โดยไม่คัดลอกข้อมูล น่าจะ
ฟังดูเหมือน shallow copy แต่เพราะ Rust ยัง invalidate ตัวแปรแรกด้วย แทน
ที่จะเรียกว่า shallow copy มันถูกเรียกว่า move ในตัวอย่างนี้ เราจะบอก
ว่า s1 ถูก move ไปเป็น s2 ดังนั้นสิ่งที่เกิดขึ้นจริงแสดงใน
Figure 4-4

Figure 4-4: ตัวแทนในหน่วยความจำหลังจาก s1 ถูก
invalidate
แก้ปัญหาเราแล้ว! ด้วยแค่ s2 ที่ valid เมื่อมันออกจาก scope มันเพียง
ตัวเดียวจะ free หน่วยความจำ และเราเสร็จแล้ว
นอกจากนี้ มีตัวเลือกการออกแบบที่นัยจากนี้ — Rust จะไม่สร้างสำเนาแบบ “deep” ของข้อมูลของคุณอัตโนมัติ ดังนั้น การคัดลอก อัตโนมัติ ใด ๆ สามารถสมมติได้ ว่าไม่แพงในแง่ของ runtime performance
Scope และ Assignment
ตรงข้ามของสิ่งนี้เป็นจริงสำหรับความสัมพันธ์ระหว่าง scope, ownership และ
หน่วยความจำที่ถูก free ผ่านฟังก์ชัน drop ด้วย เมื่อคุณ assign ค่าใหม่
สมบูรณ์ให้ตัวแปรที่มีอยู่ Rust จะเรียก drop และ free หน่วยความจำของค่า
เดิมทันที พิจารณาโค้ดนี้ตัวอย่าง:
fn main() {
    let mut s = String::from("hello");
    s = String::from("ahoy");

    println!("{s}, world!");
}
เราประกาศตัวแปร s ในตอนแรกและ bind กับ String ที่มีค่า "hello" จาก
นั้นเราสร้าง String ใหม่ทันทีที่มีค่า "ahoy" แล้ว assign ให้ s ณ
จุดนี้ ไม่มีอะไรอ้างถึงค่าเดิมบน heap แล้ว Figure 4-5 แสดงข้อมูล stack
และ heap ตอนนี้:

Figure 4-5: ตัวแทนในหน่วยความจำหลังจากค่าเริ่มต้นถูก แทนที่ทั้งหมด
string เดิมจึงออกจาก scope ทันที Rust จะรันฟังก์ชัน drop กับมัน และหน่วย
ความจำของมันจะถูก free ทันที เมื่อเราพิมพ์ค่าตอนท้าย มันจะเป็น
"ahoy, world!"
ตัวแปรและข้อมูลโต้ตอบกันด้วย Clone
ถ้าเรา อยาก คัดลอกข้อมูล heap ของ String แบบ deep ไม่ใช่แค่ข้อมูล
stack เราใช้เมธอดที่ใช้บ่อยชื่อ clone ได้ เราจะพูดถึง syntax ของเมธอด
ในบทที่ 5 แต่เพราะเมธอดเป็นฟีเจอร์ที่ใช้บ่อยในภาษาโปรแกรมหลายภาษา คุณคง
เคยเห็นมาก่อน
นี่คือตัวอย่างเมธอด clone ในการใช้งาน:
fn main() {
    let s1 = String::from("hello");
    let s2 = s1.clone();

    println!("s1 = {s1}, s2 = {s2}");
}
นี่ทำงานได้ปกติและ produce พฤติกรรมที่แสดงใน Figure 4-3 แบบ explicit ที่ข้อมูล heap ถูก คัดลอกด้วย
เมื่อคุณเห็นการเรียก clone คุณรู้ว่าโค้ดบางอย่างกำลัง execute และโค้ดนั้น
อาจแพง มันเป็นสัญญาณเชิง visual ว่ามีบางอย่างต่างกำลังเกิดขึ้น
ข้อมูลที่อยู่บน Stack เท่านั้น: Copy
มีอีกประเด็นที่เรายังไม่ได้พูด โค้ดนี้ที่ใช้ integer — ส่วนหนึ่งของมัน แสดงใน Listing 4-2 — ทำงานและ valid:
fn main() {
    let x = 5;
    let y = x;

    println!("x = {x}, y = {y}");
}
แต่โค้ดนี้ดูเหมือนขัดแย้งกับสิ่งที่เราเพิ่งเรียน — เราไม่ได้เรียก clone
แต่ x ยัง valid และไม่ถูก move เข้า y
เหตุผลคือ type อย่าง integer ที่มีขนาดรู้ตอน compile time ถูกเก็บทั้งหมด
บน stack ดังนั้นสำเนาของค่าจริงทำได้เร็ว นั่นหมายความว่าไม่มีเหตุผลที่เรา
จะอยากป้องกัน x จากการ valid หลังจากเราสร้างตัวแปร y พูดอีกอย่าง ไม่
มีความแตกต่างระหว่าง deep และ shallow copy ที่นี่ ดังนั้นการเรียก clone
จะไม่ทำอะไรต่างจาก shallow copy ปกติ และเราละเว้นมันได้
Rust มี annotation พิเศษเรียกว่า trait Copy ที่เราวางบน type ที่เก็บบน
stack ได้ อย่างที่ integer เป็น (เราจะพูดถึง trait มากขึ้นใน
บทที่ 10) ถ้า type implement trait Copy ตัวแปร
ที่ใช้มันจะไม่ move แต่ถูกคัดลอกอย่างง่าย ทำให้มันยัง valid หลัง assign
ให้ตัวแปรอื่น
Rust ไม่ให้เรา annotate type ด้วย Copy ถ้า type หรือส่วนใดของมัน implement
trait Drop ถ้า type ต้องการอะไรพิเศษที่จะเกิดเมื่อค่าออกจาก scope และ
เราเพิ่ม annotation Copy ให้ type นั้น เราจะได้ compile-time error เพื่อ
เรียนรู้เกี่ยวกับวิธีเพิ่ม annotation Copy ให้ type ของคุณเพื่อ implement
trait ดู “Derivable Trait” ใน
ภาคผนวก C
แล้ว type อะไรที่ implement trait Copy? คุณเช็ค documentation ของ type
นั้น ๆ ได้เพื่อให้แน่ใจ แต่กฎทั่วไป กลุ่มของค่า scalar ง่าย ๆ ใด ๆ
implement Copy ได้ และไม่มีอะไรที่ต้องการ allocation หรือเป็น resource
รูปแบบใด ๆ ที่ implement Copy ได้ นี่คือ type บางตัวที่ implement Copy:
- type integer ทั้งหมด เช่น
u32 - type Boolean
boolที่มีค่าtrueและfalse - type floating-point ทั้งหมด เช่น
f64 - type character
char - tuple ถ้ามีแค่ type ที่ implement
Copyด้วย เช่น(i32, i32)implementCopyแต่(i32, String)ไม่
Ownership และฟังก์ชัน
กลไกของการส่งค่าให้ฟังก์ชันคล้ายกับการ assign ค่าให้ตัวแปร การส่งตัวแปรให้ ฟังก์ชันจะ move หรือ copy เหมือนที่การ assign ทำ Listing 4-3 มีตัวอย่าง พร้อม annotation บ้างที่แสดงตำแหน่งที่ตัวแปรเข้าและออก scope
fn main() {
    let s = String::from("hello");  // s comes into scope

    takes_ownership(s);             // s's value moves into the function...
                                    // ... and so is no longer valid here

    let x = 5;                      // x comes into scope

    makes_copy(x);                  // Because i32 implements the Copy trait,
                                    // x does NOT move into the function,
                                    // so it's okay to use x afterward.

} // Here, x goes out of scope, then s. However, because s's value was moved,
  // nothing special happens.

fn takes_ownership(some_string: String) { // some_string comes into scope
    println!("{some_string}");
} // Here, some_string goes out of scope and `drop` is called. The backing
  // memory is freed.

fn makes_copy(some_integer: i32) { // some_integer comes into scope
    println!("{some_integer}");
} // Here, some_integer goes out of scope. Nothing special happens.ถ้าเราพยายามใช้ s หลังการเรียก takes_ownership Rust จะโยน compile-time
error การตรวจสอบ static เหล่านี้ปกป้องเราจากความผิดพลาด ลองเพิ่มโค้ดใน
main ที่ใช้ s และ x เพื่อดูตำแหน่งที่คุณใช้พวกมันได้ และตำแหน่งที่
กฎ ownership ป้องกันคุณ
Return Value และ Scope
การ return ค่ายังโอน ownership ได้ด้วย Listing 4-4 แสดงตัวอย่างฟังก์ชันที่ return ค่าบางอย่าง พร้อม annotation คล้ายกับใน Listing 4-3
fn main() {
    let s1 = gives_ownership();        // gives_ownership moves its return
                                       // value into s1

    let s2 = String::from("hello");    // s2 comes into scope

    let s3 = takes_and_gives_back(s2); // s2 is moved into
                                       // takes_and_gives_back, which also
                                       // moves its return value into s3
} // Here, s3 goes out of scope and is dropped. s2 was moved, so nothing
  // happens. s1 goes out of scope and is dropped.

fn gives_ownership() -> String {       // gives_ownership will move its
                                       // return value into the function
                                       // that calls it

    let some_string = String::from("yours"); // some_string comes into scope

    some_string                        // some_string is returned and
                                       // moves out to the calling
                                       // function
}

// This function takes a String and returns a String.
fn takes_and_gives_back(a_string: String) -> String {
    // a_string comes into
    // scope

    a_string  // a_string is returned and moves out to the calling function
}Ownership ของตัวแปรตาม pattern เดียวกันทุกครั้ง — การ assign ค่าให้ตัวแปร
อื่น move มัน เมื่อตัวแปรที่รวมข้อมูลบน heap ออกจาก scope ค่าจะถูก cleanup
โดย drop เว้นแต่ ownership ของข้อมูลถูก move ไปยังตัวแปรอื่น
ขณะที่นี่ทำงานได้ การรับ ownership แล้ว return ownership ทุกฟังก์ชันค่อน ข้างน่าเบื่อ ถ้าเราอยากให้ฟังก์ชันใช้ค่าโดยไม่รับ ownership ล่ะ? มันน่ารำคาญ ที่อะไรก็ตามที่เราส่งเข้า ต้องส่งกลับด้วยถ้าเราอยากใช้อีก เพิ่มเติมจาก ข้อมูลใด ๆ ที่ผลจาก body ของฟังก์ชันที่เราอาจอยาก return ด้วย
Rust ให้เรา return หลายค่าโดยใช้ tuple ได้ ดังที่แสดงใน Listing 4-5
fn main() {
    let s1 = String::from("hello");

    let (s2, len) = calculate_length(s1);

    println!("The length of '{s2}' is {len}.");
}

fn calculate_length(s: String) -> (String, usize) {
    let length = s.len(); // len() returns the length of a String

    (s, length)
}แต่นี่เป็นพิธีการมากเกินไป และเป็นงานเยอะสำหรับแนวคิดที่ควรใช้บ่อย โชคดี สำหรับเรา Rust มีฟีเจอร์สำหรับการใช้ค่าโดยไม่โอน ownership — reference
Reference และ Borrowing
Reference และ Borrowing
ปัญหากับโค้ด tuple ใน Listing 4-5 คือเราต้อง return String ให้ฟังก์ชัน
ที่เรียก เพื่อให้เรายังใช้ String ได้หลังการเรียก calculate_length
เพราะ String ถูก move เข้า calculate_length แทนนั้น เราให้ reference
ของค่า String ได้ reference คล้าย pointer ตรงที่มันเป็น address ที่เรา
ตามไปเข้าถึงข้อมูลที่เก็บที่ address นั้นได้ ข้อมูลนั้นเป็นเจ้าของโดยตัว
แปรอื่น ต่างจาก pointer reference รับประกันว่าจะชี้ไปยังค่าที่ valid ของ
type หนึ่งตลอด life ของ reference นั้น
นี่คือวิธีที่คุณประกาศและใช้ฟังก์ชัน calculate_length ที่มี reference ของ
object เป็น parameter แทนการรับ ownership ของค่า:
fn main() {
    let s1 = String::from("hello");

    let len = calculate_length(&s1);

    println!("The length of '{s1}' is {len}.");
}

fn calculate_length(s: &String) -> usize {
    s.len()
}
ขั้นแรก สังเกตว่าโค้ด tuple ทั้งหมดในการประกาศตัวแปรและ return value ของ
ฟังก์ชันหายไป ขั้นที่สอง สังเกตว่าเราส่ง &s1 เข้า calculate_length
และในการประกาศ เรารับ &String แทน String ampersand เหล่านี้แทน
reference และให้คุณอ้างถึงค่าโดยไม่รับ ownership ของมัน Figure 4-6 แสดง
แนวคิดนี้

Figure 4-6: ไดอะแกรมของ &String s ที่ชี้ไปยัง
String s1
หมายเหตุ: ตรงข้ามของการอ้างอิงโดยใช้
&คือ dereference ซึ่งทำได้ด้วย dereference operator*เราจะเห็นการใช้ dereference operator บางตัวใน บทที่ 8 และพูดถึงรายละเอียดของ dereference ในบทที่ 15
มาดูใกล้ ๆ ที่การเรียกฟังก์ชันที่นี่:
fn main() {
    let s1 = String::from("hello");

    let len = calculate_length(&s1);

    println!("The length of '{s1}' is {len}.");
}

fn calculate_length(s: &String) -> usize {
    s.len()
}
syntax &s1 ให้เราสร้าง reference ที่ อ้างถึง ค่าของ s1 แต่ไม่ owner
มัน เพราะ reference ไม่ owner มัน ค่าที่มันชี้ไปจะไม่ถูก drop เมื่อ
reference หยุดใช้
ในทำนองเดียวกัน signature ของฟังก์ชันใช้ & เพื่อบ่งบอกว่า type ของ
parameter s เป็น reference มาเพิ่ม annotation อธิบายบ้าง:
fn main() {
    let s1 = String::from("hello");

    let len = calculate_length(&s1);

    println!("The length of '{s1}' is {len}.");
}

fn calculate_length(s: &String) -> usize { // s is a reference to a String
    s.len()
} // Here, s goes out of scope. But because s does not have ownership of what
  // it refers to, the String is not dropped.
scope ที่ตัวแปร s valid เหมือนกับ scope ของ parameter ฟังก์ชันใด ๆ แต่
ค่าที่ reference ชี้ไปไม่ถูก drop เมื่อ s หยุดใช้ เพราะ s ไม่มี
ownership เมื่อฟังก์ชันมี reference เป็น parameter แทนค่าจริง เราไม่ต้อง
return ค่าเพื่อคืน ownership เพราะเราไม่เคยมี ownership
เราเรียกการสร้าง reference ว่า borrowing เหมือนในชีวิตจริง ถ้าคนเป็น เจ้าของบางอย่าง คุณยืมจากเขาได้ เมื่อคุณใช้เสร็จ คุณต้องคืน คุณไม่ใช่ เจ้าของ
แล้วเกิดอะไรขึ้นถ้าเราพยายามแก้สิ่งที่กำลังยืมอยู่? ลองโค้ดใน Listing 4-6 Spoiler — มันไม่ทำงาน!
fn main() {
    let s = String::from("hello");

    change(&s);
}

fn change(some_string: &String) {
    some_string.push_str(", world");
}นี่คือ error:
$ cargo run
   Compiling ownership v0.1.0 (file:///projects/ownership)
error[E0596]: cannot borrow `*some_string` as mutable, as it is behind a `&` reference
 --> src/main.rs:8:5
  |
8 |     some_string.push_str(", world");
  |     ^^^^^^^^^^^ `some_string` is a `&` reference, so the data it refers to cannot be borrowed as mutable
  |
help: consider changing this to be a mutable reference
  |
7 | fn change(some_string: &mut String) {
  |                         +++

For more information about this error, try `rustc --explain E0596`.
error: could not compile `ownership` (bin "ownership") due to 1 previous error
เช่นเดียวกับที่ตัวแปร immutable โดย default reference ก็เช่นกัน เราไม่ได้ รับอนุญาตให้แก้สิ่งที่เรามี reference ของมัน
Mutable Reference
เราแก้โค้ดจาก Listing 4-6 ให้เราแก้ค่าที่ borrow ได้ ด้วยการแก้เล็กน้อยที่ ใช้ mutable reference แทน:
fn main() {
    let mut s = String::from("hello");

    change(&mut s);
}

fn change(some_string: &mut String) {
    some_string.push_str(", world");
}
ขั้นแรก เราเปลี่ยน s ให้เป็น mut จากนั้นเราสร้าง mutable reference ด้วย
&mut s ตรงที่เราเรียกฟังก์ชัน change และ update signature ของฟังก์ชัน
ให้รับ mutable reference ด้วย some_string: &mut String นี่ทำให้ชัดเจนมาก
ว่าฟังก์ชัน change จะ mutate ค่าที่มัน borrow
Mutable reference มีข้อจำกัดใหญ่ — ถ้าคุณมี mutable reference ของค่า คุณ
จะมี reference อื่นของค่านั้นไม่ได้ โค้ดนี้ที่พยายามสร้าง mutable
reference สองตัวของ s จะล้มเหลว:
fn main() {
    let mut s = String::from("hello");

    let r1 = &mut s;
    let r2 = &mut s;

    println!("{r1}, {r2}");
}
นี่คือ error:
$ cargo run
   Compiling ownership v0.1.0 (file:///projects/ownership)
error[E0499]: cannot borrow `s` as mutable more than once at a time
 --> src/main.rs:5:14
  |
4 |     let r1 = &mut s;
  |              ------ first mutable borrow occurs here
5 |     let r2 = &mut s;
  |              ^^^^^^ second mutable borrow occurs here
6 |
7 |     println!("{r1}, {r2}");
  |                -- first borrow later used here

For more information about this error, try `rustc --explain E0499`.
error: could not compile `ownership` (bin "ownership") due to 1 previous error
error นี้บอกว่าโค้ดนี้ invalid เพราะเรา borrow s เป็น mutable มากกว่า
หนึ่งครั้งในเวลาเดียวกันไม่ได้ mutable borrow แรกอยู่ใน r1 และต้องอยู่
จนกว่าจะใช้ใน println! แต่ระหว่างการสร้าง mutable reference นั้นและการ
ใช้มัน เราพยายามสร้าง mutable reference อีกตัวใน r2 ที่ borrow ข้อมูล
เดียวกับ r1
ข้อจำกัดที่ป้องกัน mutable reference หลายตัวของข้อมูลเดียวกันในเวลาเดียวกัน อนุญาตให้ mutate ได้ แต่ในลักษณะที่ควบคุมมาก เป็นสิ่งที่ Rustacean ใหม่ ๆ ต่อสู้ด้วย เพราะภาษาส่วนใหญ่ให้คุณ mutate เมื่อไหร่ก็ได้ ประโยชน์ของการมี ข้อจำกัดนี้คือ Rust ป้องกัน data race ตอน compile time ได้ data race คล้ายกับ race condition และเกิดขึ้นเมื่อสามพฤติกรรมนี้เกิด:
- pointer ตั้งแต่สองตัวขึ้นไปเข้าถึงข้อมูลเดียวกันในเวลาเดียวกัน
- อย่างน้อยหนึ่ง pointer กำลังถูกใช้เขียนข้อมูล
- ไม่มีกลไกที่ถูกใช้ synchronize การเข้าถึงข้อมูล
Data race ทำให้เกิด undefined behavior และวินิจฉัยและแก้ยากเมื่อพยายามตาม หาตอน runtime — Rust ป้องกันปัญหานี้โดยปฏิเสธที่จะ compile โค้ดที่มี data race!
เช่นเคย เราใช้ curly bracket สร้าง scope ใหม่ได้ ให้มี mutable reference หลายตัว แค่ไม่ใช่ พร้อมกัน:
fn main() {
    let mut s = String::from("hello");

    {
        let r1 = &mut s;
    } // r1 goes out of scope here, so we can make a new reference with no problems.

    let r2 = &mut s;
}
Rust บังคับใช้กฎคล้ายกันสำหรับการรวม mutable และ immutable reference โค้ด นี้ทำให้เกิด error:
fn main() {
    let mut s = String::from("hello");

    let r1 = &s; // no problem
    let r2 = &s; // no problem
    let r3 = &mut s; // BIG PROBLEM

    println!("{r1}, {r2}, and {r3}");
}
นี่คือ error:
$ cargo run
   Compiling ownership v0.1.0 (file:///projects/ownership)
error[E0502]: cannot borrow `s` as mutable because it is also borrowed as immutable
 --> src/main.rs:6:14
  |
4 |     let r1 = &s; // no problem
  |              -- immutable borrow occurs here
5 |     let r2 = &s; // no problem
6 |     let r3 = &mut s; // BIG PROBLEM
  |              ^^^^^^ mutable borrow occurs here
7 |
8 |     println!("{r1}, {r2}, and {r3}");
  |                -- immutable borrow later used here

For more information about this error, try `rustc --explain E0502`.
error: could not compile `ownership` (bin "ownership") due to 1 previous error
โอ้! เรา ก็ไม่ สามารถมี mutable reference ขณะที่เรามี immutable หนึ่งของ ค่าเดียวกัน
ผู้ใช้ immutable reference ไม่ได้คาดว่าค่าจะเปลี่ยนใต้พวกเขาทันที! อย่างไรก็ ตาม immutable reference หลายตัวอนุญาต เพราะไม่มีใครที่แค่อ่านข้อมูลที่มี ความสามารถส่งผลต่อการอ่านข้อมูลของคนอื่น
หมายเหตุว่า scope ของ reference เริ่มจากตรงที่ถูกแนะนำ และต่อเนื่องไปจน
ครั้งสุดท้ายที่ reference นั้นถูกใช้ เช่น โค้ดนี้จะ compile ผ่าน เพราะการ
ใช้ครั้งสุดท้ายของ immutable reference อยู่ใน println! ก่อน mutable
reference ถูกแนะนำ:
fn main() {
    let mut s = String::from("hello");

    let r1 = &s; // no problem
    let r2 = &s; // no problem
    println!("{r1} and {r2}");
    // Variables r1 and r2 will not be used after this point.

    let r3 = &mut s; // no problem
    println!("{r3}");
}
scope ของ immutable reference r1 และ r2 จบหลัง println! ที่พวกมัน
ถูกใช้ครั้งสุดท้าย ซึ่งก่อน mutable reference r3 ถูกสร้าง scope เหล่านี้
ไม่ทับซ้อนกัน โค้ดนี้จึงอนุญาต — compiler บอกได้ว่า reference ไม่ถูกใช้
แล้วในจุดก่อนท้าย scope
แม้ error เรื่อง borrowing อาจทำให้หงุดหงิดบางครั้ง จำไว้ว่ามันคือ Rust compiler ชี้ bug ที่อาจเกิดแต่เนิ่น ๆ (ตอน compile time แทน runtime) และ แสดงให้คุณเห็นตำแหน่งปัญหาเป๊ะ ๆ จากนั้น คุณไม่ต้องตามว่าทำไมข้อมูลไม่ใช่ สิ่งที่คุณคิด
Dangling Reference
ในภาษาที่มี pointer ง่ายที่จะสร้าง dangling pointer — pointer ที่อ้างถึง ตำแหน่งในหน่วยความจำที่อาจถูกให้คนอื่น — โดย free หน่วยความจำขณะที่ยัง รักษา pointer ของหน่วยความจำนั้น ใน Rust ตรงข้าม compiler รับประกันว่า reference จะไม่เป็น dangling reference — ถ้าคุณมี reference ของข้อมูล compiler จะรับประกันว่าข้อมูลจะไม่ออกจาก scope ก่อน reference ของข้อมูล
ลองพยายามสร้าง dangling reference เพื่อดูว่า Rust ป้องกันด้วย compile-time error อย่างไร:
fn main() {
    let reference_to_nothing = dangle();
}

fn dangle() -> &String {
    let s = String::from("hello");

    &s
}
นี่คือ error:
$ cargo run
   Compiling ownership v0.1.0 (file:///projects/ownership)
error[E0106]: missing lifetime specifier
 --> src/main.rs:5:16
  |
5 | fn dangle() -> &String {
  |                ^ expected named lifetime parameter
  |
  = help: this function's return type contains a borrowed value, but there is no value for it to be borrowed from
help: consider using the `'static` lifetime, but this is uncommon unless you're returning a borrowed value from a `const` or a `static`
  |
5 | fn dangle() -> &'static String {
  |                 +++++++
help: instead, you are more likely to want to return an owned value
  |
5 - fn dangle() -> &String {
5 + fn dangle() -> String {
  |

For more information about this error, try `rustc --explain E0106`.
error: could not compile `ownership` (bin "ownership") due to 1 previous error
Error message นี้อ้างถึงฟีเจอร์ที่เรายังไม่ครอบคลุม — lifetime เราจะพูดถึง lifetime ในรายละเอียดในบทที่ 10 แต่ถ้าคุณละเลยส่วนเกี่ยวกับ lifetime ข้อ ความนี้มีกุญแจว่าทำไมโค้ดนี้เป็นปัญหา:
this function's return type contains a borrowed value, but there is no value
for it to be borrowed from
มาดูใกล้ ๆ ว่าเกิดอะไรขึ้นในแต่ละ stage ของโค้ด dangle:
fn main() {
    let reference_to_nothing = dangle();
}

fn dangle() -> &String { // dangle returns a reference to a String

    let s = String::from("hello"); // s is a new String

    &s // we return a reference to the String, s
} // Here, s goes out of scope and is dropped, so its memory goes away.
  // Danger!
เพราะ s ถูกสร้างภายใน dangle เมื่อโค้ดของ dangle เสร็จ s จะถูก
deallocate แต่เราพยายาม return reference ของมัน นั่นหมายความว่า reference
นี้จะชี้ไปยัง String ที่ invalid ไม่ดีเลย! Rust จะไม่ให้เราทำสิ่งนี้
วิธีแก้ที่นี่คือ return String ตรง ๆ:
fn main() {
    let string = no_dangle();
}

fn no_dangle() -> String {
    let s = String::from("hello");

    s
}
นี่ทำงานได้โดยไม่มีปัญหา Ownership ถูก move ออก และไม่มีอะไรถูก deallocate
กฎของ Reference
มาทบทวนสิ่งที่เราพูดถึงเกี่ยวกับ reference:
- ในเวลาใดก็ตาม คุณมีได้ หนึ่ง mutable reference หรือ immutable reference จำนวนเท่าไรก็ได้
- Reference ต้อง valid เสมอ
ต่อไป เราจะดู reference แบบอื่น — slice
Slice Type
Slice Type
Slice ให้คุณอ้างถึงลำดับ element ที่ติดกันใน collection slice เป็น reference ชนิดหนึ่ง ดังนั้นไม่มี ownership
นี่คือปัญหา programming เล็ก ๆ — เขียนฟังก์ชันที่รับ string ของคำที่คั่น ด้วย space แล้ว return คำแรกที่เจอใน string นั้น ถ้าฟังก์ชันไม่เจอ space ใน string ทั้ง string ต้องเป็นหนึ่งคำ ดังนั้นทั้ง string ควรถูก return
หมายเหตุ: เพื่อจุดประสงค์ของการแนะนำ slice เราสมมติแค่ ASCII ในส่วนนี้ การพูดถึง UTF-8 handling อย่างละเอียดอยู่ในส่วน “เก็บข้อความ UTF-8 ด้วย String” ของบทที่ 8
มาทำงานผ่านวิธีเขียน signature ของฟังก์ชันนี้โดยไม่ใช้ slice เพื่อเข้าใจ ปัญหาที่ slice จะแก้:
fn first_word(s: &String) -> ?ฟังก์ชัน first_word มี parameter type &String เราไม่ต้องการ ownership
ดังนั้นนี่ก็ดี (ใน Rust ที่ idiomatic ฟังก์ชันไม่รับ ownership ของ argument
เว้นแต่ต้องการ และเหตุผลของเรื่องนั้นจะชัดเจนขึ้นเมื่อเราไปต่อ) แต่เรา
ควร return อะไร? เราไม่มีวิธีพูดถึง ส่วน ของ string จริง ๆ อย่างไรก็ตาม
เรา return index ของท้ายคำได้ บ่งบอกด้วย space ลองดู ตามที่แสดงใน
Listing 4-7
fn first_word(s: &String) -> usize {
    let bytes = s.as_bytes();

    for (i, &item) in bytes.iter().enumerate() {
        if item == b' ' {
            return i;
        }
    }

    s.len()
}

fn main() {}first_word ที่ return ค่า byte index เข้า parameter Stringเพราะเราต้องไปผ่าน String ทีละ element และเช็คว่าค่าเป็น space หรือไม่
เราจะแปลง String เป็น array ของ byte โดยใช้เมธอด as_bytes
fn first_word(s: &String) -> usize {
    let bytes = s.as_bytes();

    for (i, &item) in bytes.iter().enumerate() {
        if item == b' ' {
            return i;
        }
    }

    s.len()
}

fn main() {}
ถัดไป เราสร้าง iterator บน array ของ byte โดยใช้เมธอด iter:
fn first_word(s: &String) -> usize {
    let bytes = s.as_bytes();

    for (i, &item) in bytes.iter().enumerate() {
        if item == b' ' {
            return i;
        }
    }

    s.len()
}

fn main() {}
เราจะพูดถึง iterator ในรายละเอียดใน บทที่ 13 ตอนนี้
รู้ว่า iter เป็นเมธอดที่ return แต่ละ element ใน collection และ
enumerate ห่อผลของ iter แล้ว return แต่ละ element เป็นส่วนหนึ่งของ
tuple แทน element แรกของ tuple ที่ return จาก enumerate คือ index และ
element ที่สองคือ reference ของ element นี้สะดวกกว่าการคำนวณ index เองนิด
หน่อย
เพราะเมธอด enumerate return tuple เราใช้ pattern destructure tuple นั้น
ได้ เราจะพูดถึง pattern มากขึ้นใน บทที่ 6 ใน for
loop เราระบุ pattern ที่มี i สำหรับ index ใน tuple และ &item สำหรับ
single byte ใน tuple เพราะเราได้ reference ของ element จาก
.iter().enumerate() เราใช้ & ใน pattern
ภายใน for loop เราค้นหา byte ที่แทน space โดยใช้ byte literal syntax
ถ้าเราเจอ space เรา return ตำแหน่ง ไม่อย่างนั้น เรา return ความยาวของ
string โดยใช้ s.len()
fn first_word(s: &String) -> usize {
    let bytes = s.as_bytes();

    for (i, &item) in bytes.iter().enumerate() {
        if item == b' ' {
            return i;
        }
    }

    s.len()
}

fn main() {}
ตอนนี้เรามีวิธีหา index ของท้ายคำแรกใน string แต่มีปัญหา เรา return
usize เดี่ยว ๆ แต่มันเป็นตัวเลขที่มีความหมายเฉพาะในบริบทของ &String
พูดอีกอย่าง เพราะมันเป็นค่าที่แยกจาก String ไม่มีการรับประกันว่ามันจะ
ยัง valid ในอนาคต พิจารณาโปรแกรมใน Listing 4-8 ที่ใช้ฟังก์ชัน first_word
จาก Listing 4-7
fn first_word(s: &String) -> usize {
    let bytes = s.as_bytes();

    for (i, &item) in bytes.iter().enumerate() {
        if item == b' ' {
            return i;
        }
    }

    s.len()
}

fn main() {
    let mut s = String::from("hello world");

    let word = first_word(&s); // word will get the value 5

    s.clear(); // this empties the String, making it equal to ""

    // word still has the value 5 here, but s no longer has any content that we
    // could meaningfully use with the value 5, so word is now totally invalid!
}first_word แล้วเปลี่ยนเนื้อหา Stringโปรแกรมนี้ compile โดยไม่มี error และจะทำเหมือนกันถ้าเราใช้ word หลังการ
เรียก s.clear() เพราะ word ไม่ได้เชื่อมกับ state ของ s เลย word
ยังมีค่า 5 เราใช้ค่า 5 กับตัวแปร s พยายามดึงคำแรกออกได้ แต่นี่จะเป็น
bug เพราะเนื้อหาของ s เปลี่ยนตั้งแต่เราเซฟ 5 ใน word
การต้องห่วงว่า index ใน word จะหลุดจาก sync กับข้อมูลใน s น่าเบื่อและ
เสี่ยง error! การจัดการ index เหล่านี้ยิ่งเปราะบางถ้าเราเขียนฟังก์ชัน
second_word signature ของมันจะต้องดูเป็นแบบนี้:
fn second_word(s: &String) -> (usize, usize) {ตอนนี้เรากำลังติดตาม index เริ่ม และ จบ และเรามีค่ามากขึ้นที่คำนวณจาก ข้อมูลใน state เฉพาะ แต่ไม่ผูกกับ state นั้นเลย เรามีตัวแปรไม่เกี่ยวข้อง สามตัวลอยอยู่ที่ต้องเก็บให้ sync กัน
โชคดี Rust มีคำตอบสำหรับปัญหานี้ — string slice
String Slice
string slice คือ reference ของลำดับ element ที่ติดกันของ String และ
หน้าตาเป็นแบบนี้:
fn main() {
    let s = String::from("hello world");

    let hello = &s[0..5];
    let world = &s[6..11];
}
แทนที่จะเป็น reference ของทั้ง String hello เป็น reference ของส่วน
หนึ่งของ String ระบุใน [0..5] ที่เพิ่ม เราสร้าง slice โดยใช้ range
ภายใน square bracket ระบุ [starting_index..ending_index] โดย
starting_index คือตำแหน่งแรกใน slice และ ending_index คือหนึ่ง
มากกว่าตำแหน่งสุดท้ายใน slice ภายใน โครงสร้างข้อมูล slice เก็บตำแหน่งเริ่ม
และความยาวของ slice ซึ่งสอดคล้องกับ ending_index ลบ starting_index
ดังนั้นในกรณีของ let world = &s[6..11]; world จะเป็น slice ที่มี
pointer ไปยัง byte ที่ index 6 ของ s พร้อมค่าความยาว 5
Figure 4-7 แสดงเรื่องนี้ในไดอะแกรม

Figure 4-7: string slice ที่อ้างถึงส่วนหนึ่งของ
String
ด้วย syntax range .. ของ Rust ถ้าคุณอยากเริ่มที่ index 0 คุณ drop ค่า
ก่อน period สองตัวได้ พูดอีกอย่าง เหล่านี้เท่ากัน:
#![allow(unused)]
fn main() {
let s = String::from("hello");

let slice = &s[0..2];
let slice = &s[..2];
}
ในทำนองเดียวกัน ถ้า slice ของคุณรวม byte สุดท้ายของ String คุณ drop ตัว
เลขท้ายได้ นั่นหมายความว่าเหล่านี้เท่ากัน:
#![allow(unused)]
fn main() {
let s = String::from("hello");

let len = s.len();

let slice = &s[3..len];
let slice = &s[3..];
}
คุณยัง drop ทั้งสองค่าได้เพื่อรับ slice ของทั้ง string ดังนั้นเหล่านี้ เท่ากัน:
#![allow(unused)]
fn main() {
let s = String::from("hello");

let len = s.len();

let slice = &s[0..len];
let slice = &s[..];
}
หมายเหตุ: index range ของ string slice ต้องเกิดที่ขอบเขตอักขระ UTF-8 ที่ valid ถ้าคุณพยายามสร้าง string slice ในกลางของอักขระ multibyte โปรแกรม จะออกพร้อม error
ด้วยข้อมูลทั้งหมดนี้ในใจ มาเขียน first_word ใหม่เพื่อ return slice
type ที่บ่งบอก “string slice” เขียนเป็น &str:
fn first_word(s: &String) -> &str {
    let bytes = s.as_bytes();

    for (i, &item) in bytes.iter().enumerate() {
        if item == b' ' {
            return &s[0..i];
        }
    }

    &s[..]
}

fn main() {}
เราได้ index สำหรับท้ายคำแบบเดียวกับที่เราทำใน Listing 4-7 โดยมองหาการ เกิดครั้งแรกของ space เมื่อเราเจอ space เรา return string slice โดยใช้ ต้น string และ index ของ space เป็น index เริ่มและจบ
ตอนนี้เมื่อเราเรียก first_word เราได้ค่าเดียวกลับมาที่ผูกกับข้อมูล
ต้นทาง ค่าประกอบด้วย reference ของจุดเริ่มของ slice และจำนวน element ใน
slice
การ return slice ก็ใช้ได้สำหรับฟังก์ชัน second_word:
fn second_word(s: &String) -> &str {ตอนนี้เรามี API ที่ตรงไปตรงมาที่ทำพังยากกว่ามาก เพราะ compiler จะรับ
ประกันว่า reference เข้า String ยัง valid จำ bug ในโปรแกรมใน
Listing 4-8 ได้ไหม ตอนที่เราได้ index ท้ายคำแรก แต่แล้ว clear string
จน index invalid? โค้ดนั้นเชิง logic ผิด แต่ไม่แสดง error ใด ๆ ทันที
ปัญหาจะแสดงทีหลังถ้าเรายังพยายามใช้ index คำแรกกับ string ที่ว่างเปล่า
Slice ทำให้ bug นี้เป็นไปไม่ได้ และให้เรารู้เร็วกว่ามากว่าเรามีปัญหากับ
โค้ด การใช้ version slice ของ first_word จะโยน compile-time error:
fn first_word(s: &String) -> &str {
    let bytes = s.as_bytes();

    for (i, &item) in bytes.iter().enumerate() {
        if item == b' ' {
            return &s[0..i];
        }
    }

    &s[..]
}

fn main() {
    let mut s = String::from("hello world");

    let word = first_word(&s);

    s.clear(); // error!

    println!("the first word is: {word}");
}
นี่คือ compiler error:
$ cargo run
   Compiling ownership v0.1.0 (file:///projects/ownership)
error[E0502]: cannot borrow `s` as mutable because it is also borrowed as immutable
  --> src/main.rs:18:5
   |
16 |     let word = first_word(&s);
   |                           -- immutable borrow occurs here
17 |
18 |     s.clear(); // error!
   |     ^^^^^^^^^ mutable borrow occurs here
19 |
20 |     println!("the first word is: {word}");
   |                                   ---- immutable borrow later used here

For more information about this error, try `rustc --explain E0502`.
error: could not compile `ownership` (bin "ownership") due to 1 previous error
จำจากกฎการ borrow ได้ว่าถ้าเรามี immutable reference ของบางอย่าง เราก็จะ
รับ mutable reference เพิ่มไม่ได้ เพราะ clear ต้อง truncate String
มันต้องรับ mutable reference println! หลังการเรียก clear ใช้
reference ใน word ดังนั้น immutable reference ต้องยัง active ณ จุดนั้น
Rust ไม่อนุญาตให้ mutable reference ใน clear และ immutable reference
ใน word มีอยู่ในเวลาเดียวกัน และ compile ล้มเหลว ไม่ใช่แค่ Rust ทำให้
API ของเราใช้ง่ายขึ้น มันยังกำจัด error ทั้งกลุ่มที่ compile time ด้วย!
String Literal คือ Slice
จำได้ว่าเราพูดถึง string literal ถูกเก็บภายใน binary ตอนนี้เรารู้เรื่อง slice เราเข้าใจ string literal ได้อย่างถูกต้อง:
#![allow(unused)]
fn main() {
let s = "Hello, world!";
}
type ของ s ที่นี่คือ &str — มันเป็น slice ที่ชี้ไปยังจุดเฉพาะของ
binary นี่ก็เป็นเหตุผลที่ string literal เป็น immutable — &str เป็น
immutable reference
String Slice เป็น Parameter
การรู้ว่าคุณรับ slice ของ literal และค่า String ได้ นำเราไปสู่การปรับ
ปรุงอีกอย่างใน first_word คือ signature ของมัน:
fn first_word(s: &String) -> &str {Rustacean ที่มีประสบการณ์มากกว่าจะเขียน signature ที่แสดงใน Listing 4-9
แทน เพราะมันให้เราใช้ฟังก์ชันเดียวกันกับทั้งค่า &String และค่า &str
fn first_word(s: &str) -> &str {
    let bytes = s.as_bytes();

    for (i, &item) in bytes.iter().enumerate() {
        if item == b' ' {
            return &s[0..i];
        }
    }

    &s[..]
}

fn main() {
    let my_string = String::from("hello world");

    // `first_word` works on slices of `String`s, whether partial or whole.
    let word = first_word(&my_string[0..6]);
    let word = first_word(&my_string[..]);
    // `first_word` also works on references to `String`s, which are equivalent
    // to whole slices of `String`s.
    let word = first_word(&my_string);

    let my_string_literal = "hello world";

    // `first_word` works on slices of string literals, whether partial or
    // whole.
    let word = first_word(&my_string_literal[0..6]);
    let word = first_word(&my_string_literal[..]);

    // Because string literals *are* string slices already,
    // this works too, without the slice syntax!
    let word = first_word(my_string_literal);
}first_word โดยใช้ string slice เป็น type ของ parameter sถ้าเรามี string slice เราส่งตรง ๆ ได้ ถ้าเรามี String เราส่ง slice ของ
String หรือ reference ของ String ได้ ความยืดหยุ่นนี้ใช้ประโยชน์จาก
deref coercion ฟีเจอร์ที่เราจะครอบคลุมในส่วน
“ใช้ Deref Coercion ในฟังก์ชันและเมธอด”
ของบทที่ 15
การประกาศฟังก์ชันให้รับ string slice แทน reference ของ String ทำให้ API
ของเราทั่วไปและมีประโยชน์มากขึ้นโดยไม่เสียฟังก์ชันใด ๆ:
fn first_word(s: &str) -> &str {
    let bytes = s.as_bytes();

    for (i, &item) in bytes.iter().enumerate() {
        if item == b' ' {
            return &s[0..i];
        }
    }

    &s[..]
}

fn main() {
    let my_string = String::from("hello world");

    // `first_word` works on slices of `String`s, whether partial or whole.
    let word = first_word(&my_string[0..6]);
    let word = first_word(&my_string[..]);
    // `first_word` also works on references to `String`s, which are equivalent
    // to whole slices of `String`s.
    let word = first_word(&my_string);

    let my_string_literal = "hello world";

    // `first_word` works on slices of string literals, whether partial or
    // whole.
    let word = first_word(&my_string_literal[0..6]);
    let word = first_word(&my_string_literal[..]);

    // Because string literals *are* string slices already,
    // this works too, without the slice syntax!
    let word = first_word(my_string_literal);
}
Slice อื่น ๆ
String slice อย่างที่คุณนึกได้ เฉพาะกับ string แต่ยังมี slice type ที่ ทั่วไปกว่าด้วย พิจารณา array นี้:
#![allow(unused)]
fn main() {
let a = [1, 2, 3, 4, 5];
}
เหมือนที่เราอาจอยากอ้างถึงส่วนหนึ่งของ string เราอาจอยากอ้างถึงส่วนหนึ่ง ของ array เราทำได้แบบนี้:
#![allow(unused)]
fn main() {
let a = [1, 2, 3, 4, 5];

let slice = &a[1..3];

assert_eq!(slice, &[2, 3]);
}
slice นี้มี type &[i32] มันทำงานแบบเดียวกับ string slice ทำ โดยเก็บ
reference ของ element แรกและความยาว คุณจะใช้ slice ชนิดนี้สำหรับ
collection อื่น ๆ ทุกประเภท เราจะพูดถึง collection เหล่านี้ในรายละเอียด
เมื่อเราพูดถึง vector ในบทที่ 8
สรุป
แนวคิดของ ownership, borrowing และ slice รับประกัน memory safety ใน โปรแกรม Rust ที่ compile time ภาษา Rust ให้คุณควบคุมการใช้หน่วยความจำใน แบบเดียวกับภาษา systems programming อื่น แต่การมี owner ของข้อมูล cleanup ข้อมูลอัตโนมัติเมื่อ owner ออกจาก scope หมายความว่าคุณไม่ต้องเขียนและ debug โค้ดเพิ่มเพื่อได้การควบคุมนี้
Ownership ส่งผลต่อวิธีที่หลายส่วนอื่นของ Rust ทำงาน เราจะพูดถึงแนวคิดเหล่า
นี้ต่อตลอดส่วนที่เหลือของหนังสือ มาไปบทที่ 5 และดูการรวมชิ้นข้อมูลเข้าด้วย
กันใน struct
ใช้ Struct จัดโครงสร้างข้อมูล
struct หรือ structure คือชนิดข้อมูลที่กำหนดเอง ที่ให้คุณห่อและตั้งชื่อ ค่าหลายค่าที่เกี่ยวข้องกันให้เป็นกลุ่มที่มีความหมาย ถ้าคุณคุ้นเคยกับภาษา object-oriented struct เหมือน data attribute ของ object ในบทนี้เราจะ เปรียบเทียบ tuple กับ struct เพื่อต่อยอดจากสิ่งที่คุณรู้แล้ว และแสดงเมื่อ struct เป็นวิธีจัดกลุ่มข้อมูลที่ดีกว่า
เราจะแสดงวิธีประกาศและสร้าง instance ของ struct เราจะพูดถึงวิธีประกาศ associated function โดยเฉพาะ associated function ชนิดที่เรียกว่า เมธอด (method) เพื่อระบุพฤติกรรมที่ผูกกับ struct type Struct และ enum (พูดถึง ในบทที่ 6) เป็น building block สำหรับสร้าง type ใหม่ใน domain ของโปรแกรม คุณ เพื่อใช้ประโยชน์เต็มที่จากการตรวจสอบ type ตอน compile time ของ Rust
การประกาศและสร้าง struct
การประกาศและสร้าง Struct
Struct คล้ายกับ tuple ที่พูดถึงในส่วน “Tuple Type” ตรงที่ทั้งคู่เก็บค่าหลายค่าที่เกี่ยวข้องกัน เช่นเดียวกับ tuple ชิ้นของ struct เป็น type ต่างกันได้ ต่างจาก tuple ใน struct คุณตั้งชื่อแต่ละชิ้น ข้อมูล จึงชัดเจนว่าค่าหมายถึงอะไร การเพิ่มชื่อเหล่านี้หมายความว่า struct ยืดหยุ่นกว่า tuple — คุณไม่ต้องพึ่งลำดับของข้อมูลเพื่อระบุหรือเข้าถึงค่า ของ instance
ในการประกาศ struct เราป้อน keyword struct แล้วตั้งชื่อ struct ทั้งหมด
ชื่อของ struct ควรอธิบายความสำคัญของชิ้นข้อมูลที่จัดกลุ่มเข้าด้วยกัน
จากนั้น ภายใน curly bracket เราประกาศชื่อและ type ของชิ้นข้อมูล ซึ่งเรา
เรียกว่า field เช่น Listing 5-1 แสดง struct ที่เก็บข้อมูลเกี่ยวกับ
บัญชีผู้ใช้
struct User {
    active: bool,
    username: String,
    email: String,
    sign_in_count: u64,
}

fn main() {}Userในการใช้ struct หลังประกาศแล้ว เราสร้าง instance ของ struct นั้นโดย
ระบุค่าที่เป็นรูปธรรมให้แต่ละ field เราสร้าง instance โดยระบุชื่อ struct
แล้วเพิ่ม curly bracket ที่มีคู่ key: value โดย key คือชื่อ field และ
value คือข้อมูลที่อยากเก็บใน field เหล่านั้น เราไม่ต้องระบุ field ในลำดับ
เดียวกับที่ประกาศใน struct พูดอีกอย่าง การประกาศ struct เหมือน template
ทั่วไปสำหรับ type และ instance เติม template นั้นด้วยข้อมูลเฉพาะเพื่อสร้าง
ค่าของ type เช่น เราประกาศผู้ใช้คนหนึ่งได้ตามที่แสดงใน Listing 5-2
struct User {
    active: bool,
    username: String,
    email: String,
    sign_in_count: u64,
}

fn main() {
    let user1 = User {
        active: true,
        username: String::from("someusername123"),
        email: String::from("[email protected]"),
        sign_in_count: 1,
    };
}Userในการได้ค่าเฉพาะจาก struct เราใช้ dot notation เช่น ในการเข้าถึง email
ของผู้ใช้นี้ เราใช้ user1.email ถ้า instance เป็น mutable เราเปลี่ยน
ค่าได้โดยใช้ dot notation และ assign ลงใน field เฉพาะ Listing 5-3 แสดง
วิธีเปลี่ยนค่าใน field email ของ instance User ที่ mutable
struct User {
    active: bool,
    username: String,
    email: String,
    sign_in_count: u64,
}

fn main() {
    let mut user1 = User {
        active: true,
        username: String::from("someusername123"),
        email: String::from("[email protected]"),
        sign_in_count: 1,
    };

    user1.email = String::from("[email protected]");
}email ของ instance Userหมายเหตุว่าทั้ง instance ต้องเป็น mutable — Rust ไม่ให้เรา mark แค่บาง field เป็น mutable เช่นเดียวกับ expression ใด ๆ เราสร้าง instance ใหม่ ของ struct เป็น expression สุดท้ายใน body ของฟังก์ชันได้ เพื่อ implicitly return instance ใหม่นั้น
Listing 5-4 แสดงฟังก์ชัน build_user ที่ return instance User ด้วย
email และ username ที่ให้มา field active ได้ค่า true และ
sign_in_count ได้ค่า 1
struct User {
    active: bool,
    username: String,
    email: String,
    sign_in_count: u64,
}

fn build_user(email: String, username: String) -> User {
    User {
        active: true,
        username: username,
        email: email,
        sign_in_count: 1,
    }
}

fn main() {
    let user1 = build_user(
        String::from("[email protected]"),
        String::from("someusername123"),
    );
}build_user ที่รับ email และ username แล้ว return instance Userมันสมเหตุสมผลที่จะตั้งชื่อ parameter ของฟังก์ชันให้เหมือนกับชื่อ field
ของ struct แต่การต้องเขียนชื่อ field email และ username และตัวแปร
ซ้ำน่าเบื่อนิดหน่อย ถ้า struct มี field มากขึ้น การเขียนชื่อแต่ละตัวซ้ำ
จะยิ่งน่ารำคาญ โชคดีมี shorthand ที่สะดวก!
ใช้ Field Init Shorthand
เพราะชื่อ parameter และชื่อ field ของ struct เหมือนกันเป๊ะใน Listing 5-4
เราใช้ syntax field init shorthand เขียน build_user ใหม่ได้ ให้มัน
ทำงานเหมือนกันเป๊ะ แต่ไม่มีการเขียน username และ email ซ้ำ ดังที่
แสดงใน Listing 5-5
struct User {
    active: bool,
    username: String,
    email: String,
    sign_in_count: u64,
}

fn build_user(email: String, username: String) -> User {
    User {
        active: true,
        username,
        email,
        sign_in_count: 1,
    }
}

fn main() {
    let user1 = build_user(
        String::from("[email protected]"),
        String::from("someusername123"),
    );
}build_user ที่ใช้ field init shorthand เพราะ parameter username และ email มีชื่อเหมือน field ของ structที่นี่ เรากำลังสร้าง instance ใหม่ของ struct User ซึ่งมี field ชื่อ
email เราอยาก set ค่าของ field email เป็นค่าใน parameter email ของ
ฟังก์ชัน build_user เพราะ field email และ parameter email มีชื่อ
เหมือนกัน เราเขียนแค่ email แทน email: email
สร้าง Instance ด้วย Struct Update Syntax
บ่อยครั้งที่มีประโยชน์ในการสร้าง instance ใหม่ของ struct ที่มีค่าส่วนใหญ่ จาก instance อื่นของ type เดียวกัน แต่เปลี่ยนบางค่า คุณทำได้โดยใช้ struct update syntax
ขั้นแรก ใน Listing 5-6 เราแสดงวิธีสร้าง instance User ใหม่ใน user2
ในแบบปกติ โดยไม่มี update syntax เรา set ค่าใหม่สำหรับ email แต่ใช้ค่า
เดิมจาก user1 ที่เราสร้างใน Listing 5-2 สำหรับที่เหลือ
struct User {
    active: bool,
    username: String,
    email: String,
    sign_in_count: u64,
}

fn main() {
    // --snip--

    let user1 = User {
        email: String::from("[email protected]"),
        username: String::from("someusername123"),
        active: true,
        sign_in_count: 1,
    };

    let user2 = User {
        active: user1.active,
        username: user1.username,
        email: String::from("[email protected]"),
        sign_in_count: user1.sign_in_count,
    };
}User ใหม่ที่ใช้ค่าทั้งหมดยกเว้นหนึ่งจาก user1ใช้ struct update syntax เราได้ผลแบบเดียวกันด้วยโค้ดน้อยกว่า ดังที่แสดง
ใน Listing 5-7 syntax .. ระบุว่า field ที่เหลือที่ไม่ set แบบ explicit
ควรมีค่าเหมือน field ใน instance ที่ให้
struct User {
    active: bool,
    username: String,
    email: String,
    sign_in_count: u64,
}

fn main() {
    // --snip--

    let user1 = User {
        email: String::from("[email protected]"),
        username: String::from("someusername123"),
        active: true,
        sign_in_count: 1,
    };

    let user2 = User {
        email: String::from("[email protected]"),
        ..user1
    };
}email ใหม่สำหรับ instance User แต่ใช้ค่าที่เหลือจาก user1โค้ดใน Listing 5-7 ก็สร้าง instance ใน user2 ที่มีค่าต่างสำหรับ email
แต่มีค่าเหมือนสำหรับ field username, active และ sign_in_count จาก
user1 ..user1 ต้องมาท้ายสุด เพื่อระบุว่า field ที่เหลือใด ๆ ควรได้ค่า
จาก field ที่สอดคล้องใน user1 แต่เราเลือกระบุค่าสำหรับ field กี่ตัวก็ได้
ในลำดับใดก็ได้ ไม่ว่าลำดับของ field ใน struct จะเป็นอย่างไร
หมายเหตุว่า struct update syntax ใช้ = เหมือน assignment — นี่เพราะมัน
move ข้อมูล เหมือนที่เราเห็นในส่วน
“ตัวแปรและข้อมูลโต้ตอบกันด้วย Move” ในตัวอย่างนี้
เราใช้ user1 ไม่ได้แล้วหลังสร้าง user2 เพราะ String ใน field
username ของ user1 ถูก move เข้า user2 ถ้าเราให้ user2 ค่า
String ใหม่ทั้ง email และ username และจึงใช้แค่ค่า active และ
sign_in_count จาก user1 user1 จะยัง valid หลังสร้าง user2 ทั้ง
active และ sign_in_count เป็น type ที่ implement trait Copy ดังนั้น
พฤติกรรมที่เราพูดถึงในส่วน
“ข้อมูลที่อยู่บน Stack เท่านั้น: Copy” ใช้ได้ เรา
ยังใช้ user1.email ในตัวอย่างนี้ได้ เพราะค่าของมันไม่ถูก move ออกจาก
user1
สร้าง Type ต่างกันด้วย Tuple Struct
Rust ยังรองรับ struct ที่ดูคล้าย tuple เรียกว่า tuple struct Tuple struct มีความหมายเพิ่มที่ชื่อ struct ให้ แต่ไม่มีชื่อผูกกับ field — มี แค่ type ของ field Tuple struct มีประโยชน์เมื่อคุณอยากให้ทั้ง tuple มี ชื่อ และทำให้ tuple เป็น type ต่างจาก tuple อื่น และเมื่อการตั้งชื่อแต่ละ field เหมือน struct ปกติจะยาวหรือซ้ำ
ในการประกาศ tuple struct เริ่มด้วย keyword struct และชื่อ struct ตาม
ด้วย type ใน tuple เช่น ที่นี่เราประกาศและใช้ tuple struct สองตัวชื่อ
Color และ Point:
struct Color(i32, i32, i32);
struct Point(i32, i32, i32);

fn main() {
    let black = Color(0, 0, 0);
    let origin = Point(0, 0, 0);
}
หมายเหตุว่าค่า black และ origin เป็น type ต่างกัน เพราะเป็น instance
ของ tuple struct ต่างกัน แต่ละ struct ที่คุณประกาศเป็น type ของตัวมันเอง
แม้ field ภายใน struct อาจมี type เดียวกัน เช่น ฟังก์ชันที่รับ parameter
type Color รับ Point เป็น argument ไม่ได้ แม้ทั้งสอง type ประกอบจาก
ค่า i32 สามตัว ไม่อย่างนั้น instance ของ tuple struct คล้าย tuple ตรงที่
คุณ destructure เป็นชิ้น ๆ ได้ และใช้ . ตามด้วย index เพื่อเข้าถึงค่า
แต่ละค่าได้ ต่างจาก tuple ตรงที่ tuple struct บังคับให้คุณตั้งชื่อ type
ของ struct เมื่อ destructure เช่น เราเขียน let Point(x, y, z) = origin;
เพื่อ destructure ค่าใน origin point เข้าตัวแปรชื่อ x, y และ z
ประกาศ Unit-Like Struct
คุณยังประกาศ struct ที่ไม่มี field ใด ๆ ได้! เหล่านี้เรียกว่า unit-like
struct เพราะพฤติกรรมคล้าย () ที่เป็น unit type ที่เราเอ่ยใน
“Tuple Type” Unit-like struct มีประโยชน์เมื่อ
คุณต้อง implement trait บน type บางตัว แต่ไม่มีข้อมูลที่อยากเก็บใน type
เอง เราจะพูดถึง trait ในบทที่ 10 นี่คือตัวอย่างการประกาศและสร้าง
instance ของ unit struct ชื่อ AlwaysEqual:
struct AlwaysEqual;

fn main() {
    let subject = AlwaysEqual;
}
ในการประกาศ AlwaysEqual เราใช้ keyword struct ชื่อที่อยากได้ แล้ว
semicolon ไม่ต้องใช้ curly bracket หรือวงเล็บ! จากนั้นเราได้ instance
ของ AlwaysEqual ในตัวแปร subject แบบเดียวกัน — ใช้ชื่อที่เราประกาศ
ไว้ โดยไม่มี curly bracket หรือวงเล็บ ลองนึกว่าทีหลังเราจะ implement
พฤติกรรมสำหรับ type นี้ ว่าทุก instance ของ AlwaysEqual เท่ากับทุก
instance ของ type อื่นใดเสมอ บางทีเพื่อมีผลที่รู้สำหรับจุดประสงค์การ
ทดสอบ เราไม่ต้องการข้อมูลใด ๆ เพื่อ implement พฤติกรรมนั้น! คุณจะเห็น
ในบทที่ 10 วิธีประกาศ trait และ implement บน type ใด ๆ รวมถึง unit-like
struct
Ownership ของข้อมูล Struct
ในการประกาศ struct User ใน Listing 5-1 เราใช้ type String ที่ owned
แทน type &str ที่เป็น string slice นี่เป็นตัวเลือกที่ตั้งใจ เพราะเรา
อยากให้แต่ละ instance ของ struct นี้ own ข้อมูลทั้งหมดของมัน และให้ข้อมูล
นั้น valid ตราบที่ทั้ง struct valid
เป็นไปได้ที่ struct จะเก็บ reference ของข้อมูลที่ owned โดยอย่างอื่น แต่การทำเช่นนั้นต้องใช้ lifetime ฟีเจอร์ของ Rust ที่เราจะพูดถึงในบทที่ 10 Lifetime รับประกันว่าข้อมูลที่ struct อ้างถึง valid ตราบที่ struct valid ลองว่าคุณพยายามเก็บ reference ใน struct โดยไม่ระบุ lifetime ดัง ต่อไปนี้ใน src/main.rs — มันจะไม่ทำงาน:
struct User {
    active: bool,
    username: &str,
    email: &str,
    sign_in_count: u64,
}

fn main() {
    let user1 = User {
        active: true,
        username: "someusername123",
        email: "[email protected]",
        sign_in_count: 1,
    };
}
Compiler จะบ่นว่าต้อง lifetime specifier:
$ cargo run
   Compiling structs v0.1.0 (file:///projects/structs)
error[E0106]: missing lifetime specifier
 --> src/main.rs:3:15
  |
3 |     username: &str,
  |               ^ expected named lifetime parameter
  |
help: consider introducing a named lifetime parameter
  |
1 ~ struct User<'a> {
2 |     active: bool,
3 ~     username: &'a str,
  |

error[E0106]: missing lifetime specifier
 --> src/main.rs:4:12
  |
4 |     email: &str,
  |            ^ expected named lifetime parameter
  |
help: consider introducing a named lifetime parameter
  |
1 ~ struct User<'a> {
2 |     active: bool,
3 |     username: &str,
4 ~     email: &'a str,
  |

For more information about this error, try `rustc --explain E0106`.
error: could not compile `structs` (bin "structs") due to 2 previous errors
ในบทที่ 10 เราจะพูดถึงวิธีแก้ error เหล่านี้ เพื่อให้คุณเก็บ reference
ใน struct ได้ แต่ตอนนี้เราจะแก้ error แบบนี้โดยใช้ type ที่ owned อย่าง
String แทน reference อย่าง &str
ตัวอย่างโปรแกรมที่ใช้ struct
ตัวอย่างโปรแกรมที่ใช้ Struct
เพื่อเข้าใจว่าเมื่อไหร่เราอาจอยากใช้ struct ลองเขียนโปรแกรมที่คำนวณพื้นที่ ของสี่เหลี่ยมผืนผ้า เราจะเริ่มด้วยการใช้ตัวแปรเดี่ยว ๆ แล้ว refactor โปรแกรมจนกระทั่งเราใช้ struct แทน
มาสร้างโปรเจกต์ binary ใหม่กับ Cargo ชื่อ rectangles ที่จะรับความกว้าง และความสูงของสี่เหลี่ยมผืนผ้าที่ระบุเป็น pixel แล้วคำนวณพื้นที่ของสี่ เหลี่ยมผืนผ้า Listing 5-8 แสดงโปรแกรมสั้น ๆ ที่ทำสิ่งนั้นในไฟล์ src/main.rs ของโปรเจกต์เรา
fn main() {
    let width1 = 30;
    let height1 = 50;

    println!(
        "The area of the rectangle is {} square pixels.",
        area(width1, height1)
    );
}

fn area(width: u32, height: u32) -> u32 {
    width * height
}ทีนี้รันโปรแกรมนี้ด้วย cargo run:
$ cargo run
   Compiling rectangles v0.1.0 (file:///projects/rectangles)
    Finished `dev` profile [unoptimized + debuginfo] target(s) in 0.42s
     Running `target/debug/rectangles`
The area of the rectangle is 1500 square pixels.
โค้ดนี้สำเร็จในการหาพื้นที่ของสี่เหลี่ยมผืนผ้า โดยเรียกฟังก์ชัน area
ด้วยแต่ละมิติ แต่เราทำมากกว่านี้ได้เพื่อทำให้โค้ดนี้ชัดเจนและอ่านง่าย
ปัญหากับโค้ดนี้เห็นได้ชัดใน signature ของ area:
fn main() {
    let width1 = 30;
    let height1 = 50;

    println!(
        "The area of the rectangle is {} square pixels.",
        area(width1, height1)
    );
}

fn area(width: u32, height: u32) -> u32 {
    width * height
}
ฟังก์ชัน area ควรจะคำนวณพื้นที่ของสี่เหลี่ยมหนึ่งตัว แต่ฟังก์ชันที่เรา
เขียนมีสอง parameter และไม่ชัดเจนที่ไหนในโปรแกรมของเราว่า parameter ผูก
กัน มันจะอ่านง่ายและจัดการง่ายขึ้นถ้าจัดกลุ่ม width และ height เข้าด้วยกัน
เราพูดถึงวิธีหนึ่งที่เราอาจทำได้ในส่วน “Tuple Type”
ของบทที่ 3 — โดยใช้ tuple
Refactor ด้วย Tuple
Listing 5-9 แสดงอีก version ของโปรแกรมเราที่ใช้ tuple
fn main() {
    let rect1 = (30, 50);

    println!(
        "The area of the rectangle is {} square pixels.",
        area(rect1)
    );
}

fn area(dimensions: (u32, u32)) -> u32 {
    dimensions.0 * dimensions.1
}ในด้านหนึ่ง โปรแกรมนี้ดีขึ้น Tuple ให้เราเพิ่มโครงสร้างนิดหน่อย และตอนนี้ เราส่งแค่ argument เดียว แต่ในอีกด้านหนึ่ง version นี้ชัดเจนน้อยลง — tuple ไม่ตั้งชื่อ element ดังนั้นเราต้อง index เข้าส่วนของ tuple ทำให้การคำนวณ ของเราไม่ชัดเจน
การสับสนระหว่าง width และ height ไม่สำคัญสำหรับการคำนวณพื้นที่ แต่ถ้าเรา
อยากวาดสี่เหลี่ยมผืนผ้าบนหน้าจอ มันจะสำคัญ! เราจะต้องจำว่า width คือ
index 0 ของ tuple และ height คือ index 1 ของ tuple นี่ยิ่งยากกว่า
สำหรับคนอื่นที่จะรู้และจำ ถ้าเขาจะใช้โค้ดของเรา เพราะเราไม่ได้สื่อความหมาย
ของข้อมูลในโค้ด ตอนนี้มันง่ายขึ้นที่จะแนะนำ error
Refactor ด้วย Struct
เราใช้ struct เพิ่มความหมายโดยติด label กับข้อมูล เราเปลี่ยน tuple ที่เรา ใช้ให้เป็น struct ที่มีชื่อสำหรับทั้งหมด รวมถึงชื่อสำหรับส่วน ดังที่แสดง ใน Listing 5-10
struct Rectangle {
    width: u32,
    height: u32,
}

fn main() {
    let rect1 = Rectangle {
        width: 30,
        height: 50,
    };

    println!(
        "The area of the rectangle is {} square pixels.",
        area(&rect1)
    );
}

fn area(rectangle: &Rectangle) -> u32 {
    rectangle.width * rectangle.height
}Rectangleที่นี่ เราประกาศ struct และตั้งชื่อมัน Rectangle ภายใน curly bracket
เราประกาศ field เป็น width และ height ซึ่งทั้งคู่มี type u32 จาก
นั้นใน main เราสร้าง instance เฉพาะของ Rectangle ที่มี width 30
และ height 50
ฟังก์ชัน area ของเราตอนนี้ประกาศด้วย parameter หนึ่งตัว ที่เราตั้งชื่อ
rectangle ซึ่ง type เป็น immutable borrow ของ instance struct
Rectangle ตามที่กล่าวในบทที่ 4 เราอยาก borrow struct แทนการรับ ownership
ของมัน วิธีนี้ main ยังเก็บ ownership และใช้ rect1 ต่อได้ ซึ่งเป็น
เหตุผลที่เราใช้ & ใน signature ของฟังก์ชันและตรงที่เราเรียกฟังก์ชัน
ฟังก์ชัน area เข้าถึง field width และ height ของ instance
Rectangle (หมายเหตุว่าการเข้าถึง field ของ instance struct ที่ borrow
ไม่ move ค่า field ซึ่งเป็นเหตุผลที่คุณมักเห็น borrow ของ struct)
Signature ของฟังก์ชันเราสำหรับ area ตอนนี้บอกสิ่งที่เราหมายถึงเป๊ะ ๆ —
คำนวณพื้นที่ของ Rectangle โดยใช้ field width และ height ของมัน นี่
สื่อว่า width และ height ผูกกัน และให้ชื่อที่บรรยายค่า แทนการใช้ค่า index
ของ tuple 0 และ 1 นี่เป็นชัยชนะของความชัดเจน
เพิ่ม Functionality ด้วย Derived Trait
มันจะมีประโยชน์ที่จะพิมพ์ instance ของ Rectangle ขณะเรา debug โปรแกรม
และเห็นค่าของ field ทั้งหมด Listing 5-11 ลองใช้ println! macro
ที่เราใช้ในบทก่อน อย่างไรก็ตาม นี่จะไม่ทำงาน
struct Rectangle {
    width: u32,
    height: u32,
}

fn main() {
    let rect1 = Rectangle {
        width: 30,
        height: 50,
    };

    println!("rect1 is {rect1}");
}Rectangleเมื่อเรา compile โค้ดนี้ เราได้ error พร้อมข้อความแกนกลางนี้:
error[E0277]: `Rectangle` doesn't implement `std::fmt::Display`
println! macro ทำ formatting ได้หลายแบบ และโดย default curly bracket
บอก println! ให้ใช้ formatting ที่รู้จักในชื่อ Display — output ที่
ตั้งใจให้ end user บริโภคโดยตรง primitive type ที่เราเห็นมาแล้ว implement
Display โดย default เพราะมีแค่วิธีเดียวที่คุณจะอยากแสดง 1 หรือ
primitive type อื่นใดให้ user แต่กับ struct วิธีที่ println! ควร format
output ชัดเจนน้อยลง เพราะมีความเป็นไปได้ในการแสดงมากขึ้น — คุณอยากได้
comma หรือไม่? คุณอยากพิมพ์ curly bracket ไหม? ควรแสดง field ทั้งหมดไหม?
เพราะความกำกวมนี้ Rust ไม่พยายามเดาสิ่งที่เราต้องการ และ struct ไม่มี
implementation ของ Display ให้ใช้กับ println! และ placeholder {}
ถ้าเราอ่าน error ต่อ เราจะพบหมายเหตุที่มีประโยชน์นี้:
   |                        |`Rectangle` cannot be formatted with the default formatter
   |                        required by this formatting parameter
ลองดู! การเรียก println! macro ตอนนี้จะหน้าตาเป็น
println!("rect1 is {rect1:?}"); การใส่ specifier :? ใน curly bracket
บอก println! ว่าเราอยากใช้ output format ชื่อ Debug trait Debug ให้
เราพิมพ์ struct ในแบบที่มีประโยชน์สำหรับนักพัฒนา เพื่อให้เราเห็นค่าของมัน
ขณะเรา debug โค้ด
Compile โค้ดด้วยการเปลี่ยนนี้ ให้ตายสิ! เราก็ยังได้ error:
error[E0277]: `Rectangle` doesn't implement `Debug`
แต่อีกครั้ง compiler ให้หมายเหตุที่มีประโยชน์:
   |                        required by this formatting parameter
   |
Rust มี functionality สำหรับพิมพ์ข้อมูล debug แต่เราต้อง opt in แบบ
explicit เพื่อให้ functionality นั้นใช้กับ struct ของเราได้ ในการทำสิ่งนั้น
เราเพิ่ม outer attribute #[derive(Debug)] ก่อนการประกาศ struct ดังที่
แสดงใน Listing 5-12
#[derive(Debug)]
struct Rectangle {
    width: u32,
    height: u32,
}

fn main() {
    let rect1 = Rectangle {
        width: 30,
        height: 50,
    };

    println!("rect1 is {rect1:?}");
}Debug และพิมพ์ instance Rectangle ด้วย debug formattingทีนี้เมื่อเรารันโปรแกรม เราจะไม่ได้ error และเราจะเห็น output ต่อไปนี้:
$ cargo run
   Compiling rectangles v0.1.0 (file:///projects/rectangles)
    Finished `dev` profile [unoptimized + debuginfo] target(s) in 0.48s
     Running `target/debug/rectangles`
rect1 is Rectangle { width: 30, height: 50 }
ดี! ไม่ใช่ output ที่สวยที่สุด แต่มันแสดงค่าของ field ทั้งหมดสำหรับ
instance นี้ ซึ่งจะช่วยตอน debug แน่นอน เมื่อเรามี struct ใหญ่ขึ้น มี
ประโยชน์ที่มี output ที่อ่านง่ายขึ้นนิดหน่อย ในกรณีเหล่านั้น เราใช้
{:#?} แทน {:?} ใน string println! ได้ ในตัวอย่างนี้ การใช้สไตล์
{:#?} จะ output ต่อไปนี้:
$ cargo run
   Compiling rectangles v0.1.0 (file:///projects/rectangles)
    Finished `dev` profile [unoptimized + debuginfo] target(s) in 0.48s
     Running `target/debug/rectangles`
rect1 is Rectangle {
    width: 30,
    height: 50,
}
อีกวิธีในการพิมพ์ค่าโดยใช้ Debug format คือใช้ dbg! macro
ซึ่งรับ ownership ของ expression (ต่างจาก println! ที่รับ reference)
พิมพ์ไฟล์และเลขบรรทัดที่การเรียก dbg! macro เกิดในโค้ดของคุณ พร้อมค่า
ผลของ expression นั้น และ return ownership ของค่า
หมายเหตุ: การเรียก
dbg!macro พิมพ์ไปยัง standard error console stream (stderr) ต่างจากprintln!ซึ่งพิมพ์ไปยัง standard output console stream (stdout) เราจะพูดถึงstderrและstdoutมากขึ้นใน ส่วน “Redirect Error ไปยัง Standard Error” ในบทที่ 12
นี่คือตัวอย่างที่เราสนใจค่าที่ assign ให้ field width รวมถึงค่าของทั้ง
struct ใน rect1:
#[derive(Debug)]
struct Rectangle {
    width: u32,
    height: u32,
}

fn main() {
    let scale = 2;
    let rect1 = Rectangle {
        width: dbg!(30 * scale),
        height: 50,
    };

    dbg!(&rect1);
}
เราใส่ dbg! รอบ expression 30 * scale ได้ และเพราะ dbg! return
ownership ของค่า expression field width จะได้ค่าเดียวกับที่ไม่มีการ
เรียก dbg! ตรงนั้น เราไม่อยากให้ dbg! รับ ownership ของ rect1 เรา
จึงใช้ reference ของ rect1 ในการเรียกถัดไป นี่คือสิ่งที่ output ของ
ตัวอย่างนี้ดูเป็นแบบนี้:
$ cargo run
   Compiling rectangles v0.1.0 (file:///projects/rectangles)
    Finished `dev` profile [unoptimized + debuginfo] target(s) in 0.61s
     Running `target/debug/rectangles`
[src/main.rs:10:16] 30 * scale = 60
[src/main.rs:14:5] &rect1 = Rectangle {
    width: 60,
    height: 50,
}
เราเห็น output ส่วนแรกมาจาก src/main.rs บรรทัด 10 ที่เรา debug
expression 30 * scale และค่าผลคือ 60 (Debug formatting ที่ implement
สำหรับ integer คือพิมพ์แค่ค่า) การเรียก dbg! ในบรรทัด 14 ของ
src/main.rs output ค่าของ &rect1 ซึ่งเป็น struct Rectangle output
นี้ใช้ pretty Debug formatting ของ type Rectangle dbg! macro มี
ประโยชน์มากเมื่อคุณพยายามคิดว่าโค้ดของคุณกำลังทำอะไร!
นอกจาก trait Debug Rust ให้ trait หลายตัวที่เราใช้กับ attribute
derive ได้ ที่เพิ่มพฤติกรรมที่มีประโยชน์ให้ type custom ของเรา trait
เหล่านั้นและพฤติกรรมของพวกมัน list ใน ภาคผนวก C
เราจะครอบคลุมวิธี implement trait เหล่านี้ด้วยพฤติกรรม custom รวมถึงวิธี
สร้าง trait ของคุณเองในบทที่ 10 ยังมี attribute หลายตัวอื่นนอกจาก derive
สำหรับข้อมูลเพิ่มเติม ดู ส่วน “Attribute” ของ Rust Reference
ฟังก์ชัน area ของเราเฉพาะมาก — มันคำนวณแค่พื้นที่ของสี่เหลี่ยมผืนผ้า
จะมีประโยชน์ที่จะผูกพฤติกรรมนี้ใกล้กับ struct Rectangle ของเรามากขึ้น
เพราะมันจะไม่ทำงานกับ type อื่นใด มาดูว่าเรา refactor โค้ดนี้ต่อได้ยังไง
โดยเปลี่ยนฟังก์ชัน area ให้เป็นเมธอด area ที่ประกาศบน type
Rectangle ของเรา
เมธอด
เมธอด
เมธอดคล้ายกับฟังก์ชัน — เราประกาศพวกมันด้วย keyword fn และชื่อ พวกมัน
มี parameter และ return value ได้ และมีโค้ดที่รันเมื่อเมธอดถูกเรียกจาก
ที่อื่น ต่างจากฟังก์ชัน เมธอดถูกประกาศภายในบริบทของ struct (หรือ enum
หรือ trait object ซึ่งเราครอบคลุมใน บทที่ 6 และ
บทที่ 18 ตามลำดับ) และ parameter แรกของ
พวกมันคือ self เสมอ ซึ่งแทน instance ของ struct ที่เมธอดถูกเรียกใน
Method Syntax
มาเปลี่ยนฟังก์ชัน area ที่มี instance Rectangle เป็น parameter และ
แทนนั้นทำเป็นเมธอด area ที่ประกาศบน struct Rectangle ดังที่แสดงใน
Listing 5-13
#[derive(Debug)]
struct Rectangle {
    width: u32,
    height: u32,
}

impl Rectangle {
    fn area(&self) -> u32 {
        self.width * self.height
    }
}

fn main() {
    let rect1 = Rectangle {
        width: 30,
        height: 50,
    };

    println!(
        "The area of the rectangle is {} square pixels.",
        rect1.area()
    );
}area บน struct Rectangleในการประกาศฟังก์ชันภายในบริบทของ Rectangle เราเริ่ม block impl
(implementation) สำหรับ Rectangle ทุกอย่างภายใน block impl นี้จะ
ผูกกับ type Rectangle จากนั้นเราย้ายฟังก์ชัน area เข้า curly bracket
ของ impl และเปลี่ยน parameter แรก (และในกรณีนี้คือเดียว) ให้เป็น
self ใน signature และทุกที่ภายใน body ใน main ที่เราเรียกฟังก์ชัน
area และส่ง rect1 เป็น argument เราใช้ method syntax เรียกเมธอด
area บน instance Rectangle ของเราได้แทน method syntax ไปหลัง instance
— เราเพิ่ม dot ตามด้วยชื่อเมธอด วงเล็บ และ argument ใด ๆ
ใน signature ของ area เราใช้ &self แทน rectangle: &Rectangle
&self จริง ๆ เป็น shorthand ของ self: &Self ภายใน block impl type
Self เป็น alias ของ type ที่ block impl เป็น เมธอดต้องมี parameter
ชื่อ self ของ type Self เป็น parameter แรก Rust จึงให้คุณย่อด้วยแค่
ชื่อ self ในตำแหน่ง parameter แรก หมายเหตุว่าเรายังต้องใช้ & หน้า
shorthand self เพื่อบ่งบอกว่าเมธอดนี้ borrow instance Self เหมือนที่
เราทำใน rectangle: &Rectangle เมธอดรับ ownership ของ self, borrow
self แบบ immutable อย่างที่เราทำที่นี่, หรือ borrow self แบบ mutable
ได้ เหมือนที่ทำกับ parameter อื่นใด
เราเลือก &self ที่นี่ด้วยเหตุผลเดียวกับที่เราใช้ &Rectangle ใน version
ฟังก์ชัน — เราไม่อยากรับ ownership และเราแค่อยากอ่านข้อมูลใน struct ไม่
ใช่เขียน ถ้าเราอยากเปลี่ยน instance ที่เราเรียกเมธอดด้วยเป็นส่วนหนึ่งของ
สิ่งที่เมธอดทำ เราจะใช้ &mut self เป็น parameter แรก การมีเมธอดที่รับ
ownership ของ instance โดยใช้แค่ self เป็น parameter แรกเป็นเรื่องหา
ยาก เทคนิคนี้มักใช้เมื่อเมธอด transform self เป็นอย่างอื่น และคุณอยาก
ป้องกัน caller ใช้ instance เดิมหลัง transformation
เหตุผลหลักของการใช้เมธอดแทนฟังก์ชัน นอกจากให้ method syntax และไม่ต้อง
เขียน type ของ self ซ้ำใน signature ของทุกเมธอด คือเพื่อการจัดระเบียบ
เราใส่ทุกสิ่งที่เราทำได้กับ instance ของ type ใน block impl เดียว แทน
การให้ user ในอนาคตของโค้ดเราหา capability ของ Rectangle ในที่ต่าง ๆ
ใน library ที่เราให้
หมายเหตุว่าเราเลือกให้เมธอดมีชื่อเหมือนหนึ่งใน field ของ struct ได้ เช่น
เราประกาศเมธอดบน Rectangle ที่ชื่อ width ด้วยได้:
#[derive(Debug)]
struct Rectangle {
    width: u32,
    height: u32,
}

impl Rectangle {
    fn width(&self) -> bool {
        self.width > 0
    }
}

fn main() {
    let rect1 = Rectangle {
        width: 30,
        height: 50,
    };

    if rect1.width() {
        println!("The rectangle has a nonzero width; it is {}", rect1.width);
    }
}
ที่นี่ เราเลือกให้เมธอด width return true ถ้าค่าใน field width ของ
instance มากกว่า 0 และ false ถ้าค่าเป็น 0 — เราใช้ field ภายในเมธอด
ที่ชื่อเดียวกันได้สำหรับจุดประสงค์ใด ๆ ใน main เมื่อเราตาม rect1.width
ด้วยวงเล็บ Rust รู้ว่าเราหมายถึงเมธอด width เมื่อเราไม่ใช้วงเล็บ Rust
รู้ว่าเราหมายถึง field width
บ่อยครั้ง แต่ไม่เสมอ เมื่อเราให้เมธอดมีชื่อเหมือน field เราอยากให้มัน return แค่ค่าใน field และไม่ทำอะไรอื่น เมธอดแบบนี้เรียกว่า getter และ Rust ไม่ implement พวกมันอัตโนมัติสำหรับ field ของ struct เหมือนภาษาอื่น บางตัวทำ Getter มีประโยชน์เพราะคุณทำให้ field เป็น private ได้ แต่เมธอด เป็น public และจึงเปิดทางให้เข้าถึงแบบ read-only ของ field นั้นเป็นส่วน หนึ่งของ public API ของ type เราจะพูดถึงว่า public และ private คืออะไร และวิธีกำหนด field หรือเมธอดเป็น public หรือ private ใน บทที่ 7
Operator -> อยู่ไหน?
ใน C และ C++ มี operator ต่างกันสองตัวที่ใช้เรียกเมธอด — คุณใช้ . ถ้า
กำลังเรียกเมธอดบน object ตรง ๆ และ -> ถ้ากำลังเรียกเมธอดบน pointer
ของ object และต้อง dereference pointer ก่อน พูดอีกอย่าง ถ้า object
เป็น pointer object->something() คล้ายกับ (*object).something()
Rust ไม่มีสิ่งเทียบเท่า operator -> แทนนั้น Rust มีฟีเจอร์ชื่อ
automatic referencing และ dereferencing การเรียกเมธอดเป็นหนึ่งใน
ไม่กี่ที่ใน Rust ที่มีพฤติกรรมนี้
นี่คือวิธีที่มันทำงาน — เมื่อคุณเรียกเมธอดด้วย object.something()
Rust เพิ่ม &, &mut หรือ * อัตโนมัติ เพื่อให้ object match
signature ของเมธอด พูดอีกอย่าง สิ่งต่อไปนี้เหมือนกัน:
#![allow(unused)]
fn main() {
#[derive(Debug,Copy,Clone)]
struct Point {
    x: f64,
    y: f64,
}

impl Point {
   fn distance(&self, other: &Point) -> f64 {
       let x_squared = f64::powi(other.x - self.x, 2);
       let y_squared = f64::powi(other.y - self.y, 2);

       f64::sqrt(x_squared + y_squared)
   }
}
let p1 = Point { x: 0.0, y: 0.0 };
let p2 = Point { x: 5.0, y: 6.5 };
p1.distance(&p2);
(&p1).distance(&p2);
}
ตัวแรกดูสะอาดกว่ามาก พฤติกรรมการ reference อัตโนมัตินี้ทำงานได้ เพราะ
เมธอดมี receiver ที่ชัดเจน — type ของ self เมื่อมี receiver และชื่อ
ของเมธอด Rust รู้แน่นอนได้ว่าเมธอดกำลังอ่าน (&self), mutate
(&mut self) หรือ consume (self) ข้อเท็จจริงที่ว่า Rust ทำให้
borrowing เป็น implicit สำหรับ method receiver เป็นส่วนใหญ่ที่ทำให้
ownership ใช้สะดวกในทางปฏิบัติ
เมธอดที่มี Parameter เพิ่มเติม
มาฝึกใช้เมธอดโดย implement เมธอดที่สองบน struct Rectangle ครั้งนี้เรา
อยากให้ instance ของ Rectangle รับ instance อื่นของ Rectangle แล้ว
return true ถ้า Rectangle ที่สองพอดีอย่างสมบูรณ์ภายใน self
(Rectangle แรก) ไม่อย่างนั้นควร return false นั่นคือ เมื่อเราประกาศ
เมธอด can_hold แล้ว เราอยากเขียนโปรแกรมที่แสดงใน Listing 5-14 ได้
fn main() {
    let rect1 = Rectangle {
        width: 30,
        height: 50,
    };
    let rect2 = Rectangle {
        width: 10,
        height: 40,
    };
    let rect3 = Rectangle {
        width: 60,
        height: 45,
    };

    println!("Can rect1 hold rect2? {}", rect1.can_hold(&rect2));
    println!("Can rect1 hold rect3? {}", rect1.can_hold(&rect3));
}can_hold ที่ยังไม่เขียนOutput ที่คาดจะหน้าตาเป็นต่อไปนี้ เพราะมิติของ rect2 ทั้งคู่เล็กกว่า
มิติของ rect1 แต่ rect3 กว้างกว่า rect1:
Can rect1 hold rect2? true
Can rect1 hold rect3? false
เรารู้ว่าอยากประกาศเมธอด มันจึงอยู่ใน block impl Rectangle ชื่อเมธอด
จะเป็น can_hold และจะรับ immutable borrow ของ Rectangle อีกตัวเป็น
parameter เราบอกได้ว่า type ของ parameter จะเป็นอะไรโดยดูที่โค้ดที่เรียก
เมธอด — rect1.can_hold(&rect2) ส่ง &rect2 ซึ่งเป็น immutable borrow
ของ rect2, instance ของ Rectangle นี่สมเหตุสมผล เพราะเราต้องการแค่
อ่าน rect2 (แทนการเขียน ซึ่งจะหมายความว่าเราต้องการ mutable borrow)
และเราอยากให้ main เก็บ ownership ของ rect2 ไว้ เพื่อเราใช้ได้อีกหลัง
เรียกเมธอด can_hold Return value ของ can_hold จะเป็น Boolean และ
implementation จะเช็คว่า width และ height ของ self มากกว่า width และ
height ของ Rectangle อีกตัวตามลำดับ มาเพิ่มเมธอด can_hold ใหม่ใน
block impl จาก Listing 5-13 แสดงใน Listing 5-15
#[derive(Debug)]
struct Rectangle {
width: u32,
height: u32,
}
impl Rectangle {
fn area(&self) -> u32 {
self.width * self.height
}
fn can_hold(&self, other: &Rectangle) -> bool {
self.width > other.width && self.height > other.height
}
}
fn main() {
let rect1 = Rectangle {
width: 30,
height: 50,
};
let rect2 = Rectangle {
width: 10,
height: 40,
};
let rect3 = Rectangle {
width: 60,
height: 45,
};
println!("Can rect1 hold rect2? {}", rect1.can_hold(&rect2));
println!("Can rect1 hold rect3? {}", rect1.can_hold(&rect3));
}can_hold บน Rectangle ที่รับ instance Rectangle อีกตัวเป็น parameterเมื่อเรารันโค้ดนี้ด้วยฟังก์ชัน main ใน Listing 5-14 เราจะได้ output ที่
ต้องการ เมธอดรับ parameter หลายตัวที่เราเพิ่มใน signature หลัง parameter
self ได้ และ parameter เหล่านั้นทำงานเหมือน parameter ในฟังก์ชัน
Associated Function
ฟังก์ชันทั้งหมดที่ประกาศภายใน block impl เรียกว่า associated function
เพราะพวกมันผูกกับ type ที่ตั้งชื่อหลัง impl เราประกาศ associated function
ที่ไม่มี self เป็น parameter แรกได้ (และจึงไม่ใช่เมธอด) เพราะพวกมันไม่
ต้องการ instance ของ type ที่จะทำงานด้วย เราใช้ฟังก์ชันแบบนี้มาแล้ว — ฟังก์ชัน
String::from ที่ประกาศบน type String
Associated function ที่ไม่ใช่เมธอด มักใช้สำหรับ constructor ที่จะ return
instance ใหม่ของ struct มักเรียกว่า new แต่ new ไม่ใช่ชื่อพิเศษและไม่
ได้ built-in ในภาษา เช่น เราเลือกให้ associated function ชื่อ square ที่
มี parameter มิติหนึ่งตัว และใช้นั้นเป็นทั้ง width และ height จึงทำให้ง่าย
ขึ้นที่จะสร้าง Rectangle รูปสี่เหลี่ยมจัตุรัส แทนการต้องระบุค่าเดียวกัน
สองครั้ง:
Filename: src/main.rs
#[derive(Debug)]
struct Rectangle {
width: u32,
height: u32,
}
impl Rectangle {
fn square(size: u32) -> Self {
Self {
width: size,
height: size,
}
}
}
fn main() {
let sq = Rectangle::square(3);
}Keyword Self ใน return type และใน body ของฟังก์ชัน เป็น alias ของ type
ที่ปรากฏหลัง keyword impl ซึ่งในกรณีนี้คือ Rectangle
ในการเรียก associated function นี้ เราใช้ syntax :: กับชื่อ struct —
let sq = Rectangle::square(3); เป็นตัวอย่าง ฟังก์ชันนี้อยู่ใน namespace
ของ struct — syntax :: ใช้สำหรับทั้ง associated function และ namespace
ที่สร้างโดย module เราจะพูดถึง module ใน บทที่ 7
Block impl หลายตัว
แต่ละ struct อนุญาตให้มี block impl หลายตัว เช่น Listing 5-15 เทียบเท่า
กับโค้ดที่แสดงใน Listing 5-16 ซึ่งมีแต่ละเมธอดใน block impl ของตัวเอง
#[derive(Debug)]
struct Rectangle {
width: u32,
height: u32,
}
impl Rectangle {
fn area(&self) -> u32 {
self.width * self.height
}
}
impl Rectangle {
fn can_hold(&self, other: &Rectangle) -> bool {
self.width > other.width && self.height > other.height
}
}
fn main() {
let rect1 = Rectangle {
width: 30,
height: 50,
};
let rect2 = Rectangle {
width: 10,
height: 40,
};
let rect3 = Rectangle {
width: 60,
height: 45,
};
println!("Can rect1 hold rect2? {}", rect1.can_hold(&rect2));
println!("Can rect1 hold rect3? {}", rect1.can_hold(&rect3));
}impl หลายตัวไม่มีเหตุผลที่จะแยกเมธอดเหล่านี้เป็น block impl หลายตัวที่นี่ แต่นี่เป็น
syntax ที่ valid เราจะเห็นกรณีที่ block impl หลายตัวมีประโยชน์ในบทที่
10 ที่เราพูดถึง generic type และ trait
สรุป
Struct ให้คุณสร้าง type custom ที่มีความหมายสำหรับ domain ของคุณ ด้วยการ
ใช้ struct คุณเก็บชิ้นข้อมูลที่ผูกกันให้เชื่อมโยงกัน และตั้งชื่อแต่ละชิ้น
เพื่อทำให้โค้ดของคุณชัดเจน ใน block impl คุณประกาศฟังก์ชันที่ผูกกับ
type ของคุณได้ และเมธอดเป็น associated function ชนิดหนึ่งที่ให้คุณระบุ
พฤติกรรมที่ instance ของ struct ของคุณมี
แต่ struct ไม่ใช่วิธีเดียวที่คุณสร้าง type custom ได้ — มาดูฟีเจอร์ enum ของ Rust เพื่อเพิ่มเครื่องมืออีกตัวให้กล่องเครื่องมือของคุณ
Enum และ Pattern Matching
ในบทนี้เราจะดู enumeration หรือที่เรียกว่า enum Enum ให้คุณประกาศ type
โดยระบุ variant ที่เป็นไปได้ของมัน ก่อนอื่นเราจะประกาศและใช้ enum เพื่อ
แสดงว่า enum encode ความหมายพร้อมข้อมูลได้อย่างไร ถัดไปเราจะสำรวจ enum ที่
มีประโยชน์เป็นพิเศษ ชื่อ Option ซึ่งแสดงว่าค่าเป็นบางอย่างหรือไม่มีอะไร
ก็ได้ จากนั้นเราจะดูว่า pattern matching ใน match expression ทำให้ง่าย
ที่จะรันโค้ดต่างกันสำหรับค่าต่างกันของ enum ยังไง สุดท้ายเราจะครอบคลุมว่า
โครงสร้าง if let เป็นอีก idiom ที่สะดวกและกระชับสำหรับจัดการ enum ใน
โค้ดของคุณ
การประกาศ enum
ประกาศ Enum
ที่ struct ให้คุณวิธีจัดกลุ่ม field และข้อมูลที่ผูกกัน อย่าง Rectangle
กับ width และ height ของมัน enum ให้คุณวิธีบอกว่าค่าเป็นหนึ่งในชุดของ
ค่าที่เป็นไปได้ เช่น เราอาจอยากบอกว่า Rectangle เป็นหนึ่งในชุดของรูปร่าง
ที่เป็นไปได้ ที่รวม Circle และ Triangle ด้วย ในการทำสิ่งนี้ Rust ให้
เรา encode ความเป็นไปได้เหล่านี้เป็น enum
มาดูสถานการณ์ที่เราอาจอยากแสดงในโค้ด และดูว่าทำไม enum มีประโยชน์และเหมาะ สมกว่า struct ในกรณีนี้ สมมติว่าเราต้องทำงานกับ IP address ปัจจุบันมี มาตรฐานหลักสองตัวที่ใช้สำหรับ IP address — version สี่และ version หก เพราะ นี่คือความเป็นไปได้เดียวสำหรับ IP address ที่โปรแกรมเราจะเจอ เรา enumerate variant ที่เป็นไปได้ทั้งหมดได้ ซึ่งเป็นที่มาของชื่อ enumeration
IP address ใด ๆ เป็นได้ทั้ง version สี่หรือ version หก แต่ไม่ใช่ทั้งคู่ ในเวลาเดียวกัน คุณสมบัตินั้นของ IP address ทำให้โครงสร้างข้อมูล enum เหมาะสม เพราะค่า enum เป็นได้แค่หนึ่งใน variant ของมัน ทั้ง address version สี่และ version หกยังเป็น IP address โดยพื้นฐาน ดังนั้นพวกมัน ควรถูกปฏิบัติเป็น type เดียวเมื่อโค้ดจัดการสถานการณ์ที่ใช้กับ IP address ชนิดใดก็ได้
เราแสดงแนวคิดนี้ในโค้ดได้ โดยประกาศ enumeration IpAddrKind และระบุชนิด
ที่เป็นไปได้ที่ IP address เป็น V4 และ V6 เหล่านี้คือ variant ของ
enum:
enum IpAddrKind {
V4,
V6,
}
fn main() {
let four = IpAddrKind::V4;
let six = IpAddrKind::V6;
route(IpAddrKind::V4);
route(IpAddrKind::V6);
}
fn route(ip_kind: IpAddrKind) {}IpAddrKind ตอนนี้เป็น type custom data type ที่เราใช้ที่อื่นในโค้ดได้
ค่า Enum
เราสร้าง instance ของแต่ละ variant ทั้งสองของ IpAddrKind ได้แบบนี้:
enum IpAddrKind {
V4,
V6,
}
fn main() {
let four = IpAddrKind::V4;
let six = IpAddrKind::V6;
route(IpAddrKind::V4);
route(IpAddrKind::V6);
}
fn route(ip_kind: IpAddrKind) {}หมายเหตุว่า variant ของ enum อยู่ใน namespace ภายใต้ identifier ของมัน และ
เราใช้ double colon คั่นทั้งสอง นี่มีประโยชน์ เพราะตอนนี้ทั้งค่า
IpAddrKind::V4 และ IpAddrKind::V6 เป็น type เดียวกัน — IpAddrKind
เราจึงประกาศฟังก์ชันที่รับ IpAddrKind ใด ๆ ได้ เช่น:
enum IpAddrKind {
V4,
V6,
}
fn main() {
let four = IpAddrKind::V4;
let six = IpAddrKind::V6;
route(IpAddrKind::V4);
route(IpAddrKind::V6);
}
fn route(ip_kind: IpAddrKind) {}และเราเรียกฟังก์ชันนี้ด้วย variant ใดก็ได้:
enum IpAddrKind {
V4,
V6,
}
fn main() {
let four = IpAddrKind::V4;
let six = IpAddrKind::V6;
route(IpAddrKind::V4);
route(IpAddrKind::V6);
}
fn route(ip_kind: IpAddrKind) {}การใช้ enum มีข้อดีอีกมาก คิดเพิ่มเกี่ยวกับ type IP address ของเรา ตอนนี้ เราไม่มีวิธีเก็บ ข้อมูล IP address จริง ๆ — เรารู้แค่ว่ามันเป็น ชนิด อะไร เมื่อคุณเพิ่งเรียนเรื่อง struct ในบทที่ 5 คุณอาจอยากจัดการปัญหานี้ ด้วย struct ดังที่แสดงใน Listing 6-1
fn main() {
enum IpAddrKind {
V4,
V6,
}
struct IpAddr {
kind: IpAddrKind,
address: String,
}
let home = IpAddr {
kind: IpAddrKind::V4,
address: String::from("127.0.0.1"),
};
let loopback = IpAddr {
kind: IpAddrKind::V6,
address: String::from("::1"),
};
}IpAddrKind ของ IP address โดยใช้ structที่นี่ เราประกาศ struct IpAddr ที่มีสอง field — field kind ที่เป็น
type IpAddrKind (enum ที่เราประกาศก่อนหน้า) และ field address ที่เป็น
type String เรามีสอง instance ของ struct นี้ ตัวแรกคือ home และมีค่า
IpAddrKind::V4 เป็น kind พร้อมข้อมูล address ที่ผูกอยู่คือ 127.0.0.1
instance ที่สองคือ loopback มี variant อื่นของ IpAddrKind เป็นค่า
kind คือ V6 และมี address ::1 ผูกอยู่ เราใช้ struct ห่อค่า kind
และ address เข้าด้วยกัน ดังนั้นตอนนี้ variant ผูกกับค่า
อย่างไรก็ตาม การแสดงแนวคิดเดียวกันโดยใช้แค่ enum กระชับกว่า — แทนที่จะมี
enum ภายใน struct เราใส่ข้อมูลลงในแต่ละ variant ของ enum ตรง ๆ ได้
การประกาศ enum IpAddr ใหม่นี้บอกว่าทั้ง variant V4 และ V6 จะมีค่า
String ผูกอยู่:
fn main() {
enum IpAddr {
V4(String),
V6(String),
}
let home = IpAddr::V4(String::from("127.0.0.1"));
let loopback = IpAddr::V6(String::from("::1"));
}เราติดข้อมูลกับแต่ละ variant ของ enum ตรง ๆ ดังนั้นไม่ต้องมี struct เพิ่ม
ที่นี่ยังเห็นรายละเอียดอีกอย่างของวิธีที่ enum ทำงานง่ายขึ้น — ชื่อของ
แต่ละ variant ของ enum ที่เราประกาศ ยังกลายเป็นฟังก์ชันที่สร้าง instance
ของ enum นั่นคือ IpAddr::V4() เป็นการเรียกฟังก์ชันที่รับ argument
String แล้ว return instance ของ type IpAddr เราได้ฟังก์ชัน constructor
นี้อัตโนมัติเป็นผลของการประกาศ enum
มีข้อดีอีกอย่างของการใช้ enum แทน struct — แต่ละ variant มี type และจำนวน
ข้อมูลที่ผูกต่างกันได้ Address IP version สี่จะมี component ตัวเลขสี่ตัว
ที่มีค่าระหว่าง 0 ถึง 255 เสมอ ถ้าเราอยากเก็บ address V4 เป็นค่า u8
สี่ตัว แต่ยังแสดง address V6 เป็นค่า String หนึ่งค่า เราทำไม่ได้กับ
struct Enum จัดการกรณีนี้ได้สบาย ๆ:
fn main() {
enum IpAddr {
V4(u8, u8, u8, u8),
V6(String),
}
let home = IpAddr::V4(127, 0, 0, 1);
let loopback = IpAddr::V6(String::from("::1"));
}เราแสดงหลายวิธีในการประกาศโครงสร้างข้อมูลเพื่อเก็บ IP address version สี่
และ version หก อย่างไรก็ตาม ปรากฏว่าการอยากเก็บ IP address และ encode
ชนิดเป็นเรื่องใช้บ่อยมาก standard library มี definition ที่เราใช้ได้!
มาดูว่า standard library ประกาศ IpAddr อย่างไร มันมี enum และ variant
เป๊ะ ๆ เหมือนที่เราประกาศและใช้ แต่ฝัง address data ภายใน variant ในรูป
ของ struct สองตัวที่ต่างกัน ซึ่งประกาศต่างกันสำหรับแต่ละ variant:
#![allow(unused)]
fn main() {
struct Ipv4Addr {
// --snip--
}
struct Ipv6Addr {
// --snip--
}
enum IpAddr {
V4(Ipv4Addr),
V6(Ipv6Addr),
}
}โค้ดนี้แสดงว่าคุณใส่ข้อมูลชนิดใดก็ได้ภายใน variant ของ enum — string, type ตัวเลข หรือ struct เป็นต้น คุณรวม enum อื่นเข้าไปก็ยังได้! standard library type ก็มักไม่ซับซ้อนกว่าสิ่งที่คุณคิดได้เองมากนัก
หมายเหตุว่าแม้ standard library จะมี definition ของ IpAddr เรายังสร้าง
และใช้ definition ของเราเองได้โดยไม่ขัดกัน เพราะเราไม่ได้นำ definition
ของ standard library เข้า scope เราจะพูดถึงการนำ type เข้า scope มากขึ้น
ในบทที่ 7
มาดูตัวอย่างอีกตัวอย่างของ enum ใน Listing 6-2 — ตัวนี้มี type หลากหลาย ฝังใน variant
enum Message {
Quit,
Move { x: i32, y: i32 },
Write(String),
ChangeColor(i32, i32, i32),
}
fn main() {}Message ที่แต่ละ variant เก็บจำนวนและ type ของค่าต่างกันenum นี้มีสี่ variant ที่มี type ต่างกัน:
Quit: ไม่มีข้อมูลผูกอยู่เลยMove: มี field ที่ตั้งชื่อ เหมือน struct ทำWrite: รวมStringหนึ่งตัวChangeColor: รวมค่าi32สามตัว
การประกาศ enum ที่มี variant อย่างใน Listing 6-2 คล้ายกับการประกาศ struct
หลายชนิด ยกเว้น enum ไม่ใช้ keyword struct และ variant ทั้งหมดถูกจัด
กลุ่มภายใต้ type Message struct ต่อไปนี้จะเก็บข้อมูลเดียวกับที่ variant
ของ enum ก่อนหน้าเก็บ:
struct QuitMessage; // unit struct
struct MoveMessage {
x: i32,
y: i32,
}
struct WriteMessage(String); // tuple struct
struct ChangeColorMessage(i32, i32, i32); // tuple struct
fn main() {}แต่ถ้าเราใช้ struct ต่างกัน ที่แต่ละตัวมี type ของตนเอง เราจะไม่สามารถ
ประกาศฟังก์ชันให้รับ message ชนิดใด ๆ เหล่านี้ได้ง่ายเท่า เหมือนที่เราทำ
ได้กับ enum Message ที่ประกาศใน Listing 6-2 ซึ่งเป็น type เดียว
มีอีกความคล้ายระหว่าง enum และ struct — เหมือนที่เราประกาศเมธอดบน struct
ได้ด้วย impl เราประกาศเมธอดบน enum ได้ด้วย นี่คือเมธอดชื่อ call ที่
เราประกาศบน enum Message ของเราได้:
fn main() {
enum Message {
Quit,
Move { x: i32, y: i32 },
Write(String),
ChangeColor(i32, i32, i32),
}
impl Message {
fn call(&self) {
// method body would be defined here
}
}
let m = Message::Write(String::from("hello"));
m.call();
}Body ของเมธอดจะใช้ self เพื่อรับค่าที่เราเรียกเมธอด ในตัวอย่างนี้ เรา
สร้างตัวแปร m ที่มีค่า Message::Write(String::from("hello")) และนั่น
คือสิ่งที่ self จะเป็นใน body ของเมธอด call เมื่อ m.call() รัน
มาดู enum อีกตัวใน standard library ที่ใช้บ่อยและมีประโยชน์มาก — Option
Enum Option
ส่วนนี้สำรวจ case study ของ Option ซึ่งเป็น enum อีกตัวที่ประกาศโดย
standard library Type Option encode สถานการณ์ที่ใช้บ่อยมาก ที่ค่าอาจ
เป็นบางอย่าง หรืออาจไม่มีอะไร
เช่น ถ้าคุณขอ item แรกใน list ที่ไม่ว่าง คุณจะได้ค่า ถ้าคุณขอ item แรกใน list ที่ว่าง คุณจะไม่ได้อะไร การแสดงแนวคิดนี้ในรูปของระบบ type หมายความว่า compiler เช็คได้ว่าคุณจัดการทุก case ที่ควรจัดการหรือยัง — functionality นี้ป้องกัน bug ที่ใช้บ่อยมากในภาษาโปรแกรมอื่นได้
การออกแบบภาษาโปรแกรมมักคิดในแง่ของฟีเจอร์ที่คุณรวม แต่ฟีเจอร์ที่คุณยกเว้น ก็สำคัญ Rust ไม่มีฟีเจอร์ null ที่ภาษาอื่นหลายภาษามี Null คือค่าที่ หมายถึงไม่มีค่าที่นั่น ในภาษาที่มี null ตัวแปรอยู่ในหนึ่งในสอง state เสมอ — null หรือไม่ null
ในการนำเสนอปี 2009 “Null References: The Billion Dollar Mistake” Tony Hoare ผู้คิดค้น null บอกไว้:
ผมเรียกมันว่าความผิดพลาดมูลค่าพันล้านดอลลาร์ของผม ในตอนนั้น ผมกำลังออกแบบ ระบบ type ที่ครอบคลุมตัวแรกสำหรับ reference ในภาษา object-oriented เป้า หมายของผมคือรับประกันว่าการใช้ reference ทุกครั้งต้องปลอดภัยอย่างสมบูรณ์ ด้วยการเช็คที่ทำโดย compiler อัตโนมัติ แต่ผมต้านทานความล่อใจไม่ได้ที่จะ ใส่ null reference เพียงเพราะมัน implement ง่ายมาก สิ่งนี้นำไปสู่ error, vulnerability และ system crash นับไม่ถ้วน ซึ่งอาจทำให้เกิดความเจ็บปวด และความเสียหายมูลค่าพันล้านดอลลาร์ในสี่สิบปีที่ผ่านมา
ปัญหากับค่า null คือ ถ้าคุณพยายามใช้ค่า null เป็นค่าที่ไม่ใช่ null คุณจะ ได้ error บางชนิด เพราะคุณสมบัติ null หรือไม่ null นี้แพร่ขยายไปทั่ว มัน ง่ายมากที่จะทำ error แบบนี้
อย่างไรก็ตาม แนวคิดที่ null พยายามแสดงยังมีประโยชน์ — null คือค่าที่ตอนนี้ invalid หรือไม่มีด้วยเหตุผลบางอย่าง
ปัญหาไม่ใช่อยู่ที่แนวคิดจริง ๆ แต่อยู่ที่ implementation เฉพาะ ดังนั้น
Rust ไม่มี null แต่มี enum ที่ encode แนวคิดของค่าที่มีอยู่หรือไม่มีได้
enum นี้คือ Option<T> และ ประกาศโดย standard library
ดังนี้:
#![allow(unused)]
fn main() {
enum Option<T> {
None,
Some(T),
}
}enum Option<T> มีประโยชน์มากจนรวมใน prelude ด้วย คุณไม่ต้องนำเข้า scope
แบบ explicit variant ของมันก็รวมใน prelude ด้วย — คุณใช้ Some และ
None ตรง ๆ ได้โดยไม่มี prefix Option:: enum Option<T> ยังเป็นแค่
enum ปกติ และ Some(T) กับ None ยังเป็น variant ของ type Option<T>
syntax <T> เป็นฟีเจอร์ของ Rust ที่เรายังไม่พูดถึง มันเป็น generic type
parameter และเราจะครอบคลุม generic ในรายละเอียดในบทที่ 10 ตอนนี้สิ่งที่
คุณต้องรู้คือ <T> หมายความว่า variant Some ของ enum Option เก็บ
ข้อมูลหนึ่งชิ้นของ type ใดก็ได้ และแต่ละ type คอนกรีตที่ใช้แทน T ทำให้
type Option<T> โดยรวมเป็น type ต่างกัน นี่คือตัวอย่างการใช้ค่า Option
เก็บ type ตัวเลขและ type char:
fn main() {
let some_number = Some(5);
let some_char = Some('e');
let absent_number: Option<i32> = None;
}type ของ some_number คือ Option<i32> type ของ some_char คือ
Option<char> ซึ่งเป็น type ต่างกัน Rust infer type เหล่านี้ได้ เพราะ
เราระบุค่าภายใน variant Some สำหรับ absent_number Rust กำหนดให้เรา
annotate type Option โดยรวม — compiler infer type ที่ variant Some
ที่สอดคล้องจะเก็บไม่ได้ โดยดูแค่ค่า None ที่นี่ เราบอก Rust ว่าเรา
หมายถึง absent_number เป็น type Option<i32>
เมื่อเรามีค่า Some เรารู้ว่ามีค่าอยู่ และค่าถูกเก็บภายใน Some เมื่อ
เรามีค่า None ในแง่หนึ่งหมายเหมือน null — เราไม่มีค่าที่ valid แล้ว
ทำไม Option<T> ถึงดีกว่า null?
สั้น ๆ คือ เพราะ Option<T> และ T (โดย T เป็น type ใดก็ได้) เป็น
type ต่างกัน compiler ไม่ให้เราใช้ค่า Option<T> ราวกับว่ามันแน่นอนเป็น
ค่าที่ valid เช่น โค้ดนี้จะไม่ compile เพราะมันพยายามบวก i8 กับ
Option<i8>:
fn main() {
let x: i8 = 5;
let y: Option<i8> = Some(5);
let sum = x + y;
}ถ้าเรารันโค้ดนี้ เราได้ error message แบบนี้:
$ cargo run
Compiling enums v0.1.0 (file:///projects/enums)
error[E0277]: cannot add `Option<i8>` to `i8`
--> src/main.rs:5:17
|
5 | let sum = x + y;
| ^ no implementation for `i8 + Option<i8>`
|
= help: the trait `Add<Option<i8>>` is not implemented for `i8`
= help: the following other types implement trait `Add<Rhs>`:
`&i8` implements `Add<i8>`
`&i8` implements `Add`
`i8` implements `Add<&i8>`
`i8` implements `Add`
For more information about this error, try `rustc --explain E0277`.
error: could not compile `enums` (bin "enums") due to 1 previous error
แรง! ผลคือ error message นี้หมายความว่า Rust ไม่เข้าใจวิธีบวก i8 กับ
Option<i8> เพราะเป็น type ต่างกัน เมื่อเรามีค่า type อย่าง i8 ใน
Rust compiler จะรับประกันว่าเรามีค่าที่ valid เสมอ เราดำเนินต่อไปอย่าง
มั่นใจได้โดยไม่ต้องเช็ค null ก่อนใช้ค่านั้น เฉพาะเมื่อเรามี Option<i8>
(หรือ type ของค่าที่กำลังทำงานด้วย) เราต้องห่วงว่าอาจไม่มีค่า และ compiler
จะรับประกันว่าเราจัดการกรณีนั้นก่อนใช้ค่า
พูดอีกอย่าง คุณต้องแปลง Option<T> เป็น T ก่อนคุณทำ operation T กับ
มันได้ โดยทั่วไป สิ่งนี้ช่วยจับหนึ่งในปัญหาที่ใช้บ่อยที่สุดของ null — การ
สมมติว่าอะไรบางอย่างไม่ใช่ null ทั้งที่จริงเป็น
การกำจัดความเสี่ยงของการสมมติค่าที่ไม่ใช่ null อย่างไม่ถูกต้อง ช่วยให้คุณ
มั่นใจมากขึ้นในโค้ด เพื่อให้มีค่าที่อาจเป็น null คุณต้อง opt in แบบ
explicit โดยทำให้ type ของค่านั้นเป็น Option<T> จากนั้น เมื่อคุณใช้ค่า
นั้น คุณถูกบังคับให้จัดการ case เมื่อค่าเป็น null แบบ explicit ทุกที่ที่
ค่ามี type ที่ไม่ใช่ Option<T> คุณ สามารถ สมมติได้อย่างปลอดภัยว่าค่า
ไม่ใช่ null นี่เป็นการตัดสินใจออกแบบที่ตั้งใจของ Rust เพื่อจำกัดการแพร่
ขยายของ null และเพิ่มความปลอดภัยของโค้ด Rust
แล้วคุณดึงค่า T ออกจาก variant Some ยังไง เมื่อคุณมีค่า type
Option<T> เพื่อให้คุณใช้ค่านั้นได้? enum Option<T> มีเมธอดจำนวนมากที่
มีประโยชน์ในสถานการณ์ต่าง ๆ คุณดูได้ใน documentation ของมัน
การคุ้นเคยกับเมธอดบน Option<T> จะมีประโยชน์มากในการเดินทางกับ Rust ของ
คุณ
โดยทั่วไป เพื่อใช้ค่า Option<T> คุณอยากมีโค้ดที่จัดการแต่ละ variant
คุณอยากมีโค้ดที่รันเฉพาะเมื่อคุณมีค่า Some(T) และโค้ดนี้ใช้ T ภายในได้
คุณอยากมีโค้ดอื่นรันเฉพาะถ้าคุณมีค่า None และโค้ดนั้นไม่มีค่า T ให้ใช้
match expression คือโครงสร้าง control flow ที่ทำสิ่งนี้พอดี เมื่อใช้กับ
enum — มันจะรันโค้ดต่างกันขึ้นกับว่ามี variant ไหนของ enum และโค้ดนั้นใช้
ข้อมูลภายในค่าที่ match ได้
โครงสร้างควบคุม match
โครงสร้าง Control Flow match
Rust มีโครงสร้าง control flow ที่ทรงพลังมากชื่อ match ที่ให้คุณเปรียบ
เทียบค่ากับชุดของ pattern แล้ว execute โค้ดตามว่า pattern ไหน match
Pattern ประกอบจากค่า literal, ชื่อตัวแปร, wildcard และอื่น ๆ อีกมาก
บทที่ 19 ครอบคลุม pattern ชนิดต่าง ๆ
ทั้งหมดและสิ่งที่พวกมันทำ พลังของ match มาจากความสามารถในการแสดงออกของ
pattern และข้อเท็จจริงที่ว่า compiler ยืนยันว่าทุกกรณีที่เป็นไปได้ถูก
จัดการ
คิดถึง match expression เหมือนเครื่องคัดแยกเหรียญ — เหรียญไหลลงรางที่มีรู
ขนาดต่างกัน และแต่ละเหรียญตกผ่านรูแรกที่เจอที่มันลงพอดี ในแบบเดียวกัน
ค่าผ่านแต่ละ pattern ใน match และที่ pattern แรกที่ค่า “พอดี” ค่าตกลงใน
block โค้ดที่ผูกอยู่เพื่อถูกใช้ระหว่างการ execute
พูดถึงเหรียญ มาใช้พวกมันเป็นตัวอย่างกับ match! เราเขียนฟังก์ชันที่รับ
เหรียญสหรัฐที่ไม่รู้จัก และในแบบคล้ายกับเครื่องคัดแยก กำหนดว่าเป็นเหรียญ
อะไร แล้ว return ค่าเป็นเซ็นต์ ดังที่แสดงใน Listing 6-3
enum Coin {
Penny,
Nickel,
Dime,
Quarter,
}
fn value_in_cents(coin: Coin) -> u8 {
match coin {
Coin::Penny => 1,
Coin::Nickel => 5,
Coin::Dime => 10,
Coin::Quarter => 25,
}
}
fn main() {}match expression ที่มี variant ของ enum เป็น patternมาแยก match ในฟังก์ชัน value_in_cents ก่อน เราใส่ keyword match ตาม
ด้วย expression ซึ่งในกรณีนี้คือค่า coin ดูคล้าย conditional expression
ที่ใช้กับ if แต่มีความแตกต่างใหญ่ — กับ if condition ต้องประเมินเป็น
ค่า Boolean แต่ที่นี่เป็น type ใดก็ได้ Type ของ coin ในตัวอย่างนี้คือ
enum Coin ที่เราประกาศในบรรทัดแรก
ถัดไปคือ arm ของ match arm มีสองส่วน — pattern และโค้ดบางตัว arm แรก
ที่นี่มี pattern ที่เป็นค่า Coin::Penny แล้ว operator => ที่คั่น
pattern และโค้ดที่จะรัน โค้ดในกรณีนี้คือแค่ค่า 1 แต่ละ arm ถูกคั่นจาก
ตัวถัดไปด้วย comma
เมื่อ match expression execute มันเปรียบเทียบค่าผลลัพธ์กับ pattern ของ
แต่ละ arm ตามลำดับ ถ้า pattern match ค่า โค้ดที่ผูกกับ pattern นั้นถูก
execute ถ้า pattern นั้นไม่ match ค่า การ execute ดำเนินต่อไปยัง arm ถัด
ไป เหมือนในเครื่องคัดแยกเหรียญ เรามี arm ได้มากเท่าที่ต้องการ — ใน
Listing 6-3 match ของเรามีสี่ arm
โค้ดที่ผูกกับแต่ละ arm เป็น expression และค่าผลลัพธ์ของ expression ใน arm
ที่ match คือค่าที่ถูก return สำหรับทั้ง match expression
โดยทั่วไปเราไม่ใช้ curly bracket ถ้าโค้ดของ match arm สั้น เหมือนใน
Listing 6-3 ที่แต่ละ arm แค่ return ค่า ถ้าคุณอยากรันโค้ดหลายบรรทัดใน
match arm คุณต้องใช้ curly bracket และ comma ที่ตาม arm จึงเป็น optional
เช่น โค้ดต่อไปนี้พิมพ์ “Lucky penny!” ทุกครั้งที่เมธอดถูกเรียกด้วย
Coin::Penny แต่ยัง return ค่าสุดท้ายของ block คือ 1:
enum Coin {
Penny,
Nickel,
Dime,
Quarter,
}
fn value_in_cents(coin: Coin) -> u8 {
match coin {
Coin::Penny => {
println!("Lucky penny!");
1
}
Coin::Nickel => 5,
Coin::Dime => 10,
Coin::Quarter => 25,
}
}
fn main() {}Pattern ที่ Bind กับค่า
ฟีเจอร์ที่มีประโยชน์อีกอย่างของ match arm คือพวกมัน bind กับส่วนของค่าที่ match pattern ได้ นี่คือวิธีที่เราดึงค่าออกจาก variant ของ enum
เป็นตัวอย่าง ลองเปลี่ยน variant หนึ่งของ enum เพื่อเก็บข้อมูลภายใน ตั้งแต่
ปี 1999 ถึง 2008 สหรัฐผลิตเหรียญ quarter ที่มีการออกแบบต่างกันสำหรับ
แต่ละรัฐ 50 รัฐที่ด้านหนึ่ง เหรียญอื่นไม่มีการออกแบบรัฐ เฉพาะเหรียญ
quarter มีค่าเพิ่มเติมนี้ เราเพิ่มข้อมูลนี้เข้า enum ของเราได้ โดย
เปลี่ยน variant Quarter ให้รวมค่า UsState ที่เก็บภายใน ซึ่งเราทำใน
Listing 6-4
#[derive(Debug)] // so we can inspect the state in a minute
enum UsState {
Alabama,
Alaska,
// --snip--
}
enum Coin {
Penny,
Nickel,
Dime,
Quarter(UsState),
}
fn main() {}Coin ที่ variant Quarter เก็บค่า UsState ด้วยลองจินตนาการว่าเพื่อนกำลังพยายามรวบรวมเหรียญ quarter ของรัฐทั้ง 50 รัฐ ขณะที่เราคัดเศษเหรียญตามชนิด เราจะพูดชื่อของรัฐที่ผูกกับแต่ละ quarter ด้วย เพื่อถ้าเป็นตัวที่เพื่อนยังไม่มี เขาจะเพิ่มเข้าสะสมของเขาได้
ใน match expression สำหรับโค้ดนี้ เราเพิ่มตัวแปรชื่อ state ใน pattern
ที่ match ค่าของ variant Coin::Quarter เมื่อ Coin::Quarter match ตัว
แปร state จะ bind กับค่ารัฐของ quarter นั้น จากนั้นเราใช้ state ใน
โค้ดของ arm นั้นได้ ดังนี้:
#[derive(Debug)]
enum UsState {
Alabama,
Alaska,
// --snip--
}
enum Coin {
Penny,
Nickel,
Dime,
Quarter(UsState),
}
fn value_in_cents(coin: Coin) -> u8 {
match coin {
Coin::Penny => 1,
Coin::Nickel => 5,
Coin::Dime => 10,
Coin::Quarter(state) => {
println!("State quarter from {state:?}!");
25
}
}
}
fn main() {
value_in_cents(Coin::Quarter(UsState::Alaska));
}ถ้าเราเรียก value_in_cents(Coin::Quarter(UsState::Alaska)) coin จะ
เป็น Coin::Quarter(UsState::Alaska) เมื่อเราเปรียบเทียบค่านั้นกับ match
arm แต่ละตัว ไม่มีตัวไหน match จนกระทั่งเราถึง Coin::Quarter(state) ณ
จุดนั้น binding ของ state จะเป็นค่า UsState::Alaska เราใช้ binding
นั้นใน println! expression ได้ จึงดึงค่ารัฐภายในออกจาก variant Coin
สำหรับ Quarter
match Pattern ของ Option<T>
ในส่วนก่อนหน้า เราอยากดึงค่า T ภายในออกจากกรณี Some เมื่อใช้
Option<T> เรายังจัดการ Option<T> โดยใช้ match ได้ เหมือนที่เราทำกับ
enum Coin! แทนการเปรียบเทียบเหรียญ เราจะเปรียบเทียบ variant ของ
Option<T> แต่วิธีที่ match expression ทำงานยังเหมือนเดิม
สมมติเราอยากเขียนฟังก์ชันที่รับ Option<i32> และ ถ้ามีค่าภายใน บวก 1
กับค่านั้น ถ้าไม่มีค่าภายใน ฟังก์ชันควร return ค่า None และไม่พยายามทำ
operation ใด ๆ
ฟังก์ชันนี้เขียนง่ายมาก ขอบคุณ match และจะดูเหมือน Listing 6-5
fn main() {
fn plus_one(x: Option<i32>) -> Option<i32> {
match x {
None => None,
Some(i) => Some(i + 1),
}
}
let five = Some(5);
let six = plus_one(five);
let none = plus_one(None);
}match expression บน Option<i32>มาตรวจสอบการ execute ครั้งแรกของ plus_one ในรายละเอียดมากขึ้น เมื่อเรา
เรียก plus_one(five) ตัวแปร x ใน body ของ plus_one จะมีค่า
Some(5) จากนั้นเราเปรียบเทียบกับแต่ละ match arm:
fn main() {
fn plus_one(x: Option<i32>) -> Option<i32> {
match x {
None => None,
Some(i) => Some(i + 1),
}
}
let five = Some(5);
let six = plus_one(five);
let none = plus_one(None);
}ค่า Some(5) ไม่ match pattern None เราจึงดำเนินต่อไปยัง arm ถัดไป:
fn main() {
fn plus_one(x: Option<i32>) -> Option<i32> {
match x {
None => None,
Some(i) => Some(i + 1),
}
}
let five = Some(5);
let six = plus_one(five);
let none = plus_one(None);
}Some(5) match Some(i) ไหม? match! เรามี variant เดียวกัน i bind
กับค่าภายใน Some ดังนั้น i รับค่า 5 โค้ดใน match arm จากนั้น
execute เราจึงบวก 1 กับค่าของ i และสร้างค่า Some ใหม่กับยอดรวม 6
ภายใน
ทีนี้พิจารณาการเรียก plus_one ครั้งที่สองใน Listing 6-5 ที่ x คือ
None เราเข้า match และเปรียบเทียบกับ arm แรก:
fn main() {
fn plus_one(x: Option<i32>) -> Option<i32> {
match x {
None => None,
Some(i) => Some(i + 1),
}
}
let five = Some(5);
let six = plus_one(five);
let none = plus_one(None);
}มัน match! ไม่มีค่าให้บวก โปรแกรมจึงหยุดและ return ค่า None ทางขวาของ
=> เพราะ arm แรก match ไม่มี arm อื่นถูกเปรียบเทียบ
การรวม match และ enum มีประโยชน์ในหลายสถานการณ์ คุณจะเห็น pattern นี้
มากในโค้ด Rust — match กับ enum, bind ตัวแปรกับข้อมูลภายใน แล้ว execute
โค้ดตามนั้น มันยากนิดหน่อยตอนแรก แต่เมื่อคุณคุ้นแล้ว คุณจะอยากให้มีในทุก
ภาษา มันเป็นที่ชื่นชอบของ user อย่างต่อเนื่อง
Match ต้องครอบคลุมทุกกรณี
มีอีกแง่มุมของ match ที่เราต้องพูดถึง — pattern ของ arm ต้องครอบคลุม
ความเป็นไปได้ทั้งหมด พิจารณา version นี้ของฟังก์ชัน plus_one ของเรา
ซึ่งมี bug และจะ compile ไม่ผ่าน:
fn main() {
fn plus_one(x: Option<i32>) -> Option<i32> {
match x {
Some(i) => Some(i + 1),
}
}
let five = Some(5);
let six = plus_one(five);
let none = plus_one(None);
}เราไม่ได้จัดการกรณี None โค้ดนี้จึงทำให้เกิด bug โชคดี มันเป็น bug ที่
Rust รู้วิธีจับ ถ้าเราลอง compile โค้ดนี้ เราจะได้ error นี้:
$ cargo run
Compiling enums v0.1.0 (file:///projects/enums)
error[E0004]: non-exhaustive patterns: `None` not covered
--> src/main.rs:3:15
|
3 | match x {
| ^ pattern `None` not covered
|
note: `Option<i32>` defined here
--> /rustc/1159e78c4747b02ef996e55082b704c09b970588/library/core/src/option.rs:593:1
::: /rustc/1159e78c4747b02ef996e55082b704c09b970588/library/core/src/option.rs:597:5
|
= note: not covered
= note: the matched value is of type `Option<i32>`
help: ensure that all possible cases are being handled by adding a match arm with a wildcard pattern or an explicit pattern as shown
|
4 ~ Some(i) => Some(i + 1),
5 ~ None => todo!(),
|
For more information about this error, try `rustc --explain E0004`.
error: could not compile `enums` (bin "enums") due to 1 previous error
Rust รู้ว่าเราไม่ได้ครอบคลุมทุกกรณีที่เป็นไปได้ และยังรู้ด้วยว่าเราลืม
pattern ไหน! Match ใน Rust เป็น exhaustive — เราต้อง exhaust ทุก
ความเป็นไปได้สุดท้าย เพื่อให้โค้ด valid โดยเฉพาะในกรณีของ Option<T> เมื่อ
Rust ป้องกันเราจากการลืมจัดการกรณี None แบบ explicit มันปกป้องเราจากการ
สมมติว่าเรามีค่าเมื่อเราอาจมี null จึงทำให้ความผิดพลาดมูลค่าพันล้านดอลลาร์
ที่พูดถึงก่อนหน้าเป็นไปไม่ได้
Pattern จับทั้งหมดและ Placeholder _
ใช้ enum เรายังทำ action พิเศษสำหรับค่าเฉพาะบางตัวได้ แต่สำหรับค่าอื่น
ทั้งหมดทำ action default หนึ่งตัว ลองนึกว่าเรากำลัง implement เกมที่ ถ้า
คุณ roll dice ได้ 3 player ของคุณไม่เคลื่อนที่ แต่ได้หมวกใหม่หรูแทน ถ้า
คุณ roll ได้ 7 player ของคุณเสียหมวกหรู สำหรับค่าอื่นทั้งหมด player
ของคุณเคลื่อนที่จำนวนช่องนั้นบนกระดานเกม นี่คือ match ที่ implement
logic นั้น ด้วยผลของการ roll dice ที่ hardcode แทนค่าสุ่ม และ logic อื่น
ทั้งหมดแทนด้วยฟังก์ชันที่ไม่มี body เพราะการ implement พวกมันจริงอยู่นอก
ขอบเขตของตัวอย่างนี้:
fn main() {
let dice_roll = 9;
match dice_roll {
3 => add_fancy_hat(),
7 => remove_fancy_hat(),
other => move_player(other),
}
fn add_fancy_hat() {}
fn remove_fancy_hat() {}
fn move_player(num_spaces: u8) {}
}สำหรับ arm สองตัวแรก pattern คือค่า literal 3 และ 7 สำหรับ arm สุดท้าย
ที่ครอบคลุมค่าอื่นที่เป็นไปได้ทั้งหมด pattern คือตัวแปรที่เราเลือกตั้งชื่อ
other โค้ดที่รันสำหรับ arm other ใช้ตัวแปรโดยส่งให้ฟังก์ชัน
move_player
โค้ดนี้ compile ผ่าน แม้เราจะไม่ได้ list ค่าที่เป็นไปได้ทั้งหมดที่ u8
มีได้ เพราะ pattern สุดท้ายจะ match ค่าทั้งหมดที่ไม่ได้ list เฉพาะ
Pattern จับทั้งหมดนี้ตรงตามข้อกำหนดที่ match ต้อง exhaustive หมายเหตุว่า
เราต้องวาง arm จับทั้งหมดท้ายสุด เพราะ pattern ถูกประเมินตามลำดับ ถ้าเรา
วาง arm จับทั้งหมดก่อนหน้านี้ arm อื่นจะไม่ได้รัน Rust จะเตือนเราถ้าเรา
เพิ่ม arm หลังจับทั้งหมด!
Rust ยังมี pattern ที่เราใช้ได้เมื่อเราอยากมีจับทั้งหมด แต่ไม่อยาก ใช้
ค่าใน pattern จับทั้งหมด — _ เป็น pattern พิเศษที่ match ค่าใด ๆ และไม่
bind กับค่านั้น สิ่งนี้บอก Rust ว่าเราจะไม่ใช้ค่า Rust จึงไม่เตือนเรา
เกี่ยวกับตัวแปรที่ไม่ใช้
มาเปลี่ยนกฎของเกม — ตอนนี้ถ้าคุณ roll อะไรที่ไม่ใช่ 3 หรือ 7 คุณต้อง roll
อีก เราไม่ต้องใช้ค่าจับทั้งหมดแล้ว เราจึงเปลี่ยนโค้ดให้ใช้ _ แทนตัวแปร
ชื่อ other:
fn main() {
let dice_roll = 9;
match dice_roll {
3 => add_fancy_hat(),
7 => remove_fancy_hat(),
_ => reroll(),
}
fn add_fancy_hat() {}
fn remove_fancy_hat() {}
fn reroll() {}
}ตัวอย่างนี้ก็ตรงตามข้อกำหนด exhaustiveness ด้วย เพราะเราละเว้นค่าอื่น ทั้งหมดใน arm สุดท้ายแบบ explicit — เราไม่ได้ลืมอะไร
สุดท้าย เราจะเปลี่ยนกฎของเกมอีกครั้ง ให้ไม่มีอะไรอื่นเกิดในตาของคุณ ถ้า
คุณ roll อะไรที่ไม่ใช่ 3 หรือ 7 เราแสดงสิ่งนั้นได้โดยใช้ค่า unit (empty
tuple type ที่เราเอ่ยในส่วน “Tuple Type”) เป็น
โค้ดที่ไปกับ arm _:
fn main() {
let dice_roll = 9;
match dice_roll {
3 => add_fancy_hat(),
7 => remove_fancy_hat(),
_ => (),
}
fn add_fancy_hat() {}
fn remove_fancy_hat() {}
}ที่นี่ เรากำลังบอก Rust แบบ explicit ว่าเราจะไม่ใช้ค่าอื่นใดที่ไม่ match pattern ใน arm ก่อนหน้า และเราไม่อยากรันโค้ดในกรณีนี้
มีอีกมากเกี่ยวกับ pattern และ matching ที่เราจะครอบคลุมใน
บทที่ 19 ตอนนี้ เราจะไปต่อที่ syntax
if let ซึ่งมีประโยชน์ในสถานการณ์ที่ match expression ยาวเกินไปนิด
หน่อย
Control flow สั้น ๆ ด้วย if let และ let...else
Control Flow ที่กระชับด้วย if let และ let...else
syntax if let ให้คุณรวม if และ let เป็นวิธีจัดการค่าที่ match
pattern เดียวที่กระชับกว่า ขณะละเว้นค่าที่เหลือ พิจารณาโปรแกรมใน
Listing 6-6 ที่ match ค่า Option<u8> ในตัวแปร config_max แต่อยาก
execute โค้ดเฉพาะถ้าค่าเป็น variant Some
fn main() {
let config_max = Some(3u8);
match config_max {
Some(max) => println!("The maximum is configured to be {max}"),
_ => (),
}
}match ที่สนใจแค่การ execute โค้ดเมื่อค่าเป็น Someถ้าค่าเป็น Some เราพิมพ์ค่าใน variant Some โดย bind ค่ากับตัวแปร max
ใน pattern เราไม่อยากทำอะไรกับค่า None เพื่อ satisfy match expression
เราต้องเพิ่ม _ => () หลังประมวลผลแค่ variant เดียว ซึ่งเป็น boilerplate
ที่น่ารำคาญที่ต้องเพิ่ม
แทนนั้น เราเขียนนี้ในแบบสั้นกว่าโดยใช้ if let ได้ โค้ดต่อไปนี้ทำงาน
เหมือนกับ match ใน Listing 6-6:
fn main() {
let config_max = Some(3u8);
if let Some(max) = config_max {
println!("The maximum is configured to be {max}");
}
}syntax if let รับ pattern และ expression ที่คั่นด้วยเครื่องหมายเท่ากับ
มันทำงานแบบเดียวกับ match ที่ expression ให้กับ match และ pattern
คือ arm แรกของมัน ในกรณีนี้ pattern คือ Some(max) และ max bind กับ
ค่าภายใน Some เราใช้ max ใน body ของ block if let ได้แบบเดียวกับที่
เราใช้ max ใน match arm ที่สอดคล้อง โค้ดใน block if let รันเฉพาะถ้าค่า
match pattern
การใช้ if let หมายถึงพิมพ์น้อยลง indent น้อยลง และ boilerplate น้อยลง
อย่างไรก็ตาม คุณเสียการเช็ค exhaustive ที่ match บังคับใช้ ที่รับประกัน
ว่าคุณไม่ลืมจัดการกรณีใด ๆ การเลือกระหว่าง match และ if let ขึ้นกับ
สิ่งที่คุณทำในสถานการณ์ของคุณ และว่าการได้ความกระชับเป็น trade-off ที่
เหมาะสมสำหรับการเสียการเช็ค exhaustive
พูดอีกอย่าง คุณคิดถึง if let เป็น syntax sugar ของ match ที่รันโค้ด
เมื่อค่า match pattern หนึ่งแล้วละเว้นค่าอื่นทั้งหมดได้
เรารวม else กับ if let ได้ block โค้ดที่ไปกับ else เหมือนกับ block
โค้ดที่จะไปกับกรณี _ ใน match expression ที่เทียบเท่ากับ if let
และ else จำการประกาศ enum Coin ใน Listing 6-4 ได้ ที่ variant
Quarter เก็บค่า UsState ด้วย ถ้าเราอยากนับเหรียญที่ไม่ใช่ quarter
ทั้งหมดที่เราเห็น พร้อมประกาศรัฐของ quarter ด้วย เราทำได้ด้วย match
expression แบบนี้:
#[derive(Debug)]
enum UsState {
Alabama,
Alaska,
// --snip--
}
enum Coin {
Penny,
Nickel,
Dime,
Quarter(UsState),
}
fn main() {
let coin = Coin::Penny;
let mut count = 0;
match coin {
Coin::Quarter(state) => println!("State quarter from {state:?}!"),
_ => count += 1,
}
}หรือเราใช้ if let และ else expression แบบนี้ได้:
#[derive(Debug)]
enum UsState {
Alabama,
Alaska,
// --snip--
}
enum Coin {
Penny,
Nickel,
Dime,
Quarter(UsState),
}
fn main() {
let coin = Coin::Penny;
let mut count = 0;
if let Coin::Quarter(state) = coin {
println!("State quarter from {state:?}!");
} else {
count += 1;
}
}อยู่บน “Happy Path” ด้วย let...else
Pattern ที่ใช้บ่อยคือทำการคำนวณบางอย่างเมื่อค่ามีอยู่ และ return ค่า
default ไม่อย่างนั้น ต่อจากตัวอย่างของเรา เหรียญที่มีค่า UsState ถ้า
เราอยากพูดอะไรตลก ๆ ขึ้นกับว่ารัฐบนเหรียญ quarter เก่าแค่ไหน เราอาจ
แนะนำเมธอดบน UsState เพื่อเช็คอายุของรัฐ ดังนี้:
#[derive(Debug)] // so we can inspect the state in a minute
enum UsState {
Alabama,
Alaska,
// --snip--
}
impl UsState {
fn existed_in(&self, year: u16) -> bool {
match self {
UsState::Alabama => year >= 1819,
UsState::Alaska => year >= 1959,
// -- snip --
}
}
}
enum Coin {
Penny,
Nickel,
Dime,
Quarter(UsState),
}
fn describe_state_quarter(coin: Coin) -> Option<String> {
if let Coin::Quarter(state) = coin {
if state.existed_in(1900) {
Some(format!("{state:?} is pretty old, for America!"))
} else {
Some(format!("{state:?} is relatively new."))
}
} else {
None
}
}
fn main() {
if let Some(desc) = describe_state_quarter(Coin::Quarter(UsState::Alaska)) {
println!("{desc}");
}
}จากนั้น เราอาจใช้ if let match บนชนิดของเหรียญ แนะนำตัวแปร state
ภายใน body ของ condition เหมือนใน Listing 6-7
#[derive(Debug)] // so we can inspect the state in a minute
enum UsState {
Alabama,
Alaska,
// --snip--
}
impl UsState {
fn existed_in(&self, year: u16) -> bool {
match self {
UsState::Alabama => year >= 1819,
UsState::Alaska => year >= 1959,
// -- snip --
}
}
}
enum Coin {
Penny,
Nickel,
Dime,
Quarter(UsState),
}
fn describe_state_quarter(coin: Coin) -> Option<String> {
if let Coin::Quarter(state) = coin {
if state.existed_in(1900) {
Some(format!("{state:?} is pretty old, for America!"))
} else {
Some(format!("{state:?} is relatively new."))
}
} else {
None
}
}
fn main() {
if let Some(desc) = describe_state_quarter(Coin::Quarter(UsState::Alaska)) {
println!("{desc}");
}
}if letนั่นได้งาน แต่มันผลักงานเข้า body ของ statement if let และถ้างานที่ทำ
ซับซ้อนกว่า มันอาจตามยากว่า branch ระดับบนสุดผูกกันอย่างไร เราใช้ประโยชน์
จากข้อเท็จจริงที่ว่า expression produce ค่า ได้ ทั้งเพื่อ produce state
จาก if let หรือ return เร็ว เหมือนใน Listing 6-8 (คุณทำคล้ายกันกับ
match ก็ได้)
#[derive(Debug)] // so we can inspect the state in a minute
enum UsState {
Alabama,
Alaska,
// --snip--
}
impl UsState {
fn existed_in(&self, year: u16) -> bool {
match self {
UsState::Alabama => year >= 1819,
UsState::Alaska => year >= 1959,
// -- snip --
}
}
}
enum Coin {
Penny,
Nickel,
Dime,
Quarter(UsState),
}
fn describe_state_quarter(coin: Coin) -> Option<String> {
let state = if let Coin::Quarter(state) = coin {
state
} else {
return None;
};
if state.existed_in(1900) {
Some(format!("{state:?} is pretty old, for America!"))
} else {
Some(format!("{state:?} is relatively new."))
}
}
fn main() {
if let Some(desc) = describe_state_quarter(Coin::Quarter(UsState::Alaska)) {
println!("{desc}");
}
}if let เพื่อ produce ค่าหรือ return เร็วอันนี้ก็ตามได้ยากในแบบของมันเอง! Branch หนึ่งของ if let produce ค่า
และอีกอันคืน return จากฟังก์ชันทั้งหมด
เพื่อทำให้ pattern ที่ใช้บ่อยนี้แสดงออกได้ดีขึ้น Rust มี let...else
syntax let...else รับ pattern ทางซ้ายและ expression ทางขวา คล้าย
if let มาก แต่ไม่มี branch if มีแค่ branch else ถ้า pattern match
มันจะ bind ค่าจาก pattern ใน scope ภายนอก ถ้า pattern ไม่ match
โปรแกรมจะไหลเข้า arm else ซึ่งต้อง return จากฟังก์ชัน
ใน Listing 6-9 คุณเห็นว่า Listing 6-8 หน้าตาเป็นอย่างไรเมื่อใช้
let...else แทน if let
#[derive(Debug)] // so we can inspect the state in a minute
enum UsState {
Alabama,
Alaska,
// --snip--
}
impl UsState {
fn existed_in(&self, year: u16) -> bool {
match self {
UsState::Alabama => year >= 1819,
UsState::Alaska => year >= 1959,
// -- snip --
}
}
}
enum Coin {
Penny,
Nickel,
Dime,
Quarter(UsState),
}
fn describe_state_quarter(coin: Coin) -> Option<String> {
let Coin::Quarter(state) = coin else {
return None;
};
if state.existed_in(1900) {
Some(format!("{state:?} is pretty old, for America!"))
} else {
Some(format!("{state:?} is relatively new."))
}
}
fn main() {
if let Some(desc) = describe_state_quarter(Coin::Quarter(UsState::Alaska)) {
println!("{desc}");
}
}let...else เพื่อทำให้ flow ผ่านฟังก์ชันชัดเจนสังเกตว่ามันอยู่บน “happy path” ใน body หลักของฟังก์ชันแบบนี้ โดยไม่มี
control flow ที่ต่างกันอย่างมีนัยสำหรับสอง branch แบบที่ if let ทำ
ถ้าคุณมีสถานการณ์ที่โปรแกรมของคุณมี logic ที่ยาวเกินไปที่จะแสดงด้วย
match จำไว้ว่า if let และ let...else ก็อยู่ในกล่องเครื่องมือ Rust
ของคุณด้วย
สรุป
ตอนนี้เราครอบคลุมวิธีใช้ enum เพื่อสร้าง type custom ที่เป็นได้หนึ่งใน
ชุดของค่า enumerate แล้ว เราแสดงว่า type Option<T> ของ standard
library ช่วยคุณใช้ระบบ type ป้องกัน error อย่างไร เมื่อค่า enum มีข้อมูล
ภายใน คุณใช้ match หรือ if let ดึงและใช้ค่าเหล่านั้นได้ ขึ้นกับว่ามี
กี่กรณีที่คุณต้องจัดการ
โปรแกรม Rust ของคุณตอนนี้แสดงแนวคิดใน domain ของคุณโดยใช้ struct และ enum ได้ การสร้าง type custom เพื่อใช้ใน API ของคุณรับประกัน type safety — compiler จะรับประกันว่าฟังก์ชันของคุณได้รับเฉพาะค่าของ type ที่แต่ละฟังก์ชันคาด
เพื่อให้ API ที่จัดระเบียบดีกับ user ของคุณ ที่ตรงไปตรงมาในการใช้ และ เปิดเผยเฉพาะสิ่งที่ user ของคุณต้องการ ทีนี้มาดู module ของ Rust กัน
Package, Crate และ Module
เมื่อคุณเขียนโปรแกรมขนาดใหญ่ การจัดระเบียบโค้ดจะสำคัญขึ้นเรื่อย ๆ ด้วยการ จัดกลุ่ม functionality ที่เกี่ยวข้อง และแยกโค้ดที่มีฟีเจอร์เฉพาะ คุณจะ ทำให้ชัดเจนว่าจะหาโค้ดที่ implement ฟีเจอร์เฉพาะที่ไหน และจะไปที่ไหนเพื่อ เปลี่ยนวิธีที่ฟีเจอร์ทำงาน
โปรแกรมที่เราเขียนมาที่ผ่านมาอยู่ใน module เดียวในไฟล์เดียว เมื่อโปรเจกต์ เติบโต คุณควรจัดระเบียบโค้ดโดยแบ่งมันเป็นหลาย module แล้วเป็นหลายไฟล์ package มี binary crate หลายตัวและ library crate หนึ่งตัวแบบ optional ได้ เมื่อ package เติบโต คุณดึงส่วนเป็น crate แยกที่กลายเป็น dependency ภายนอกได้ บทนี้ครอบคลุมเทคนิคทั้งหมดเหล่านี้ สำหรับโปรเจกต์ใหญ่มากที่ ประกอบด้วยชุดของ package ที่ผูกกันที่พัฒนาไปด้วยกัน Cargo มี workspace ซึ่งเราจะครอบคลุมใน “Cargo Workspace” ใน บทที่ 14
เราจะพูดถึงการ encapsulate รายละเอียด implementation ด้วย ซึ่งให้คุณใช้ โค้ดซ้ำในระดับสูงกว่า — เมื่อคุณ implement operation แล้ว โค้ดอื่นเรียก โค้ดของคุณผ่าน public interface ของมันได้ โดยไม่ต้องรู้ว่า implementation ทำงานอย่างไร วิธีที่คุณเขียนโค้ดกำหนดว่าส่วนไหนเป็น public ให้โค้ดอื่นใช้ และส่วนไหนเป็นรายละเอียด implementation private ที่คุณสงวนสิทธิ์ที่จะ เปลี่ยน นี่เป็นอีกวิธีในการจำกัดจำนวนรายละเอียดที่คุณต้องเก็บในหัว
แนวคิดที่เกี่ยวข้องคือ scope — บริบทซ้อนที่โค้ดถูกเขียนมีชุดของชื่อที่ ประกาศว่าอยู่ “ใน scope” เมื่ออ่าน เขียน และ compile โค้ด โปรแกรมเมอร์ และ compiler ต้องรู้ว่าชื่อเฉพาะที่จุดเฉพาะอ้างถึงตัวแปร ฟังก์ชัน struct enum module constant หรือ item อื่น และ item นั้นหมายถึงอะไร คุณสร้าง scope และเปลี่ยนว่าชื่อไหนอยู่ใน scope หรือออกนอก scope ได้ คุณมี item สองตัวที่ชื่อเดียวกันใน scope เดียวไม่ได้ มีเครื่องมือให้แก้ความขัดแย้ง ของชื่อ
Rust มีฟีเจอร์หลายตัวที่ให้คุณจัดการการจัดระเบียบโค้ด รวมถึงรายละเอียดไหน ที่เปิดเผย รายละเอียดไหนเป็น private และชื่อไหนอยู่ใน scope แต่ละตัวใน โปรแกรมคุณ ฟีเจอร์เหล่านี้ บางครั้งเรียกรวมกันว่า ระบบ module รวม:
- Package: ฟีเจอร์ Cargo ที่ให้คุณ build, test และแชร์ crate
- Crate: tree ของ module ที่ produce library หรือ executable
- Module และ use: ให้คุณควบคุมการจัดระเบียบ, scope และ privacy ของ path
- Path: วิธีการตั้งชื่อ item เช่น struct, ฟังก์ชัน หรือ module
ในบทนี้ เราจะครอบคลุมฟีเจอร์ทั้งหมดเหล่านี้ พูดถึงวิธีที่พวกมันโต้ตอบกัน และอธิบายวิธีใช้พวกมันจัดการ scope ในที่สุด คุณควรมีความเข้าใจแน่นเรื่อง ระบบ module และทำงานกับ scope ได้แบบมืออาชีพ!
Package และ Crate
Package และ Crate
ส่วนแรกของระบบ module ที่เราจะครอบคลุมคือ package และ crate
crate คือจำนวนน้อยที่สุดของโค้ดที่ Rust compiler พิจารณาในเวลาหนึ่ง
แม้ว่าคุณรัน rustc แทน cargo และส่งไฟล์ source code เดียว (อย่างที่เรา
ทำเมื่อนานมาแล้วใน “พื้นฐานโปรแกรม Rust” ในบทที่
- compiler ถือว่าไฟล์นั้นเป็น crate Crate มี module ได้ และ module ประกาศในไฟล์อื่นที่ compile กับ crate ได้ อย่างที่เราจะเห็นในส่วนถัด ๆ ไป
Crate เป็นได้ในสองรูปแบบ — binary crate หรือ library crate Binary crate
คือโปรแกรมที่คุณ compile เป็น executable ที่คุณรันได้ เช่น โปรแกรม
command line หรือ server แต่ละตัวต้องมีฟังก์ชันชื่อ main ที่ประกาศว่า
เกิดอะไรขึ้นเมื่อ executable รัน Crate ทั้งหมดที่เราสร้างที่ผ่านมาเป็น
binary crate
Library crate ไม่มีฟังก์ชัน main และไม่ compile เป็น executable แทน
นั้น พวกมันประกาศ functionality ที่ตั้งใจให้แชร์กับหลายโปรเจกต์ เช่น
crate rand ที่เราใช้ใน บทที่ 2 มี functionality
ที่ generate ตัวเลขสุ่ม โดยส่วนใหญ่เมื่อ Rustacean พูดว่า “crate” พวกเขา
หมายถึง library crate และใช้ “crate” แทน concept “library” ทั่วไปในการ
เขียนโปรแกรม
crate root คือไฟล์ source ที่ Rust compiler เริ่มจาก และประกอบเป็น module root ของ crate ของคุณ (เราจะอธิบาย module อย่างละเอียดใน “ควบคุม Scope และ Privacy ด้วย Module”)
package คือ bundle ของ crate หนึ่งหรือมากกว่าที่ให้ชุดของ functionality package มีไฟล์ Cargo.toml ที่บรรยายวิธี build crate เหล่านั้น Cargo จริง ๆ เป็น package ที่มี binary crate สำหรับเครื่องมือ command line ที่คุณ ใช้ build โค้ดของคุณ Package Cargo ยังมี library crate ที่ binary crate พึ่งพา โปรเจกต์อื่นพึ่ง library crate ของ Cargo เพื่อใช้ logic เดียวกับ เครื่องมือ command line ของ Cargo ได้
Package มี binary crate ได้เท่าที่คุณอยาก แต่ library crate มากที่สุด หนึ่งตัว Package ต้องมีอย่างน้อยหนึ่ง crate ไม่ว่าจะเป็น library หรือ binary crate
มาเดินผ่านสิ่งที่เกิดเมื่อเราสร้าง package ก่อน เราป้อนคำสั่ง
cargo new my-project:
$ cargo new my-project
Created binary (application) `my-project` package
$ ls my-project
Cargo.toml
src
$ ls my-project/src
main.rs
หลังเรา run cargo new my-project เราใช้ ls เพื่อดูสิ่งที่ Cargo สร้าง
ใน directory my-project มีไฟล์ Cargo.toml ให้ package กับเรา ยังมี
directory src ที่มี main.rs เปิด Cargo.toml ใน text editor และ
หมายเหตุว่าไม่มีการเอ่ยถึง src/main.rs Cargo ตาม convention ที่
src/main.rs เป็น crate root ของ binary crate ที่มีชื่อเหมือนกับ
package ในทำนองเดียวกัน Cargo รู้ว่าถ้า directory package มี
src/lib.rs, package มี library crate ที่ชื่อเหมือนกับ package และ
src/lib.rs คือ crate root ของมัน Cargo ส่งไฟล์ crate root ให้ rustc
เพื่อ build library หรือ binary
ที่นี่ เรามี package ที่มีแค่ src/main.rs หมายความว่ามันมีแค่ binary
crate ชื่อ my-project ถ้า package มี src/main.rs และ src/lib.rs
มันมีสอง crate — binary และ library ทั้งคู่ชื่อเหมือนกับ package
Package มี binary crate หลายตัวได้โดยวางไฟล์ใน directory src/bin —
แต่ละไฟล์จะเป็น binary crate แยก
ควบคุม scope และ privacy ด้วย module
ควบคุม Scope และ Privacy ด้วย Module
ในส่วนนี้ เราจะพูดถึง module และส่วนอื่นของระบบ module ได้แก่ path ที่
ให้คุณตั้งชื่อ item, keyword use ที่นำ path เข้า scope และ keyword pub
เพื่อทำให้ item เป็น public เราจะพูดถึง keyword as, package ภายนอก และ
glob operator ด้วย
Cheat Sheet ของ Module
ก่อนเราเข้าสู่รายละเอียดของ module และ path ที่นี่เราให้ reference ด่วน
เกี่ยวกับวิธีที่ module, path, keyword use และ keyword pub ทำงานใน
compiler และวิธีที่นักพัฒนาส่วนใหญ่จัดระเบียบโค้ดของพวกเขา เราจะผ่าน
ตัวอย่างของกฎเหล่านี้แต่ละข้อตลอดบทนี้ แต่นี่เป็นที่ดีที่จะอ้างถึงเพื่อ
เตือนความจำว่า module ทำงานยังไง
- เริ่มจาก crate root: เมื่อ compile crate compiler มองในไฟล์ crate root ก่อน (โดยปกติ src/lib.rs สำหรับ library crate และ src/main.rs สำหรับ binary crate) สำหรับโค้ดที่จะ compile
- ประกาศ module: ในไฟล์ crate root คุณประกาศ module ใหม่ได้ สมมติคุณ
ประกาศ module “garden” ด้วย
mod garden;Compiler จะมองหาโค้ดของ module ในที่เหล่านี้:- Inline ภายใน curly bracket ที่แทน semicolon ตาม
mod garden - ในไฟล์ src/garden.rs
- ในไฟล์ src/garden/mod.rs
- Inline ภายใน curly bracket ที่แทน semicolon ตาม
- ประกาศ submodule: ในไฟล์ใด ๆ นอกจาก crate root คุณประกาศ submodule
ได้ เช่น คุณอาจประกาศ
mod vegetables;ใน src/garden.rs Compiler จะมองหาโค้ดของ submodule ภายใน directory ที่ตั้งชื่อตาม module พ่อ ใน ที่เหล่านี้:- Inline ตามด้วย
mod vegetablesตรง ๆ ภายใน curly bracket แทน semicolon - ในไฟล์ src/garden/vegetables.rs
- ในไฟล์ src/garden/vegetables/mod.rs
- Inline ตามด้วย
- Path ไปยังโค้ดใน module: เมื่อ module เป็นส่วนหนึ่งของ crate ของคุณ
คุณอ้างถึงโค้ดใน module นั้นจากที่อื่นใดใน crate เดียวกันได้ ตราบที่กฎ
privacy อนุญาต โดยใช้ path ไปยังโค้ด เช่น type
Asparagusใน module garden vegetables จะถูกหาที่crate::garden::vegetables::Asparagus - Private vs. public: โค้ดภายใน module เป็น private จาก module พ่อ
โดย default ในการทำให้ module เป็น public ประกาศด้วย
pub modแทนmodในการทำให้ item ภายใน module public เป็น public ด้วย ใช้pubก่อนการประกาศ - Keyword
use: ภายใน scope keyworduseสร้าง shortcut ของ item เพื่อลดการเขียน path ยาว ๆ ซ้ำ ใน scope ใดก็ตามที่อ้างถึงcrate::garden::vegetables::Asparagusได้ คุณสร้าง shortcut ด้วยuse crate::garden::vegetables::Asparagus;ได้ และจากนั้นคุณเขียนแค่Asparagusเพื่อใช้ type นั้นใน scope ก็พอ
ที่นี่ เราสร้าง binary crate ชื่อ backyard ที่แสดงกฎเหล่านี้ Directory
ของ crate ก็ชื่อ backyard มีไฟล์และ directory เหล่านี้:
backyard
├── Cargo.lock
├── Cargo.toml
└── src
├── garden
│ └── vegetables.rs
├── garden.rs
└── main.rs
ไฟล์ crate root ในกรณีนี้คือ src/main.rs และมี:
use crate::garden::vegetables::Asparagus;
pub mod garden;
fn main() {
let plant = Asparagus {};
println!("I'm growing {plant:?}!");
}บรรทัด pub mod garden; บอก compiler ให้ include โค้ดที่มันเจอใน
src/garden.rs ซึ่งคือ:
pub mod vegetables;ที่นี่ pub mod vegetables; หมายความว่าโค้ดใน src/garden/vegetables.rs
ถูก include ด้วย โค้ดนั้นคือ:
#[derive(Debug)]
pub struct Asparagus {}ทีนี้มาเข้าสู่รายละเอียดของกฎเหล่านี้และแสดงพวกมันในการใช้งาน!
จัดกลุ่มโค้ดที่ผูกกันใน Module
Module ให้เราจัดระเบียบโค้ดภายใน crate สำหรับความอ่านง่ายและการใช้ซ้ำ ได้ง่าย Module ยังให้เราควบคุม privacy ของ item ด้วย เพราะโค้ดภายใน module เป็น private โดย default Private item เป็นรายละเอียด implementation ภายในที่ไม่มีให้ภายนอกใช้ เราเลือกทำให้ module และ item ภายในเป็น public ได้ ซึ่งเปิดเผยพวกมันให้โค้ดภายนอกใช้และพึ่งพา
เป็นตัวอย่าง มาเขียน library crate ที่ให้ functionality ของร้านอาหาร เรา จะประกาศ signature ของฟังก์ชัน แต่ทิ้ง body ว่างไว้ เพื่อโฟกัสที่การจัด ระเบียบของโค้ดมากกว่าการ implement ร้านอาหาร
ในอุตสาหกรรมร้านอาหาร บางส่วนของร้านอาหารถูกอ้างถึงเป็น front of house และอื่น ๆ เป็น back of house Front of house คือที่ที่ลูกค้าอยู่ ซึ่งรวม ที่ที่ host จัดที่นั่งลูกค้า, server รับ order และเงิน, และ bartender ทำ เครื่องดื่ม Back of house คือที่ที่ chef และพ่อครัวทำงานในครัว, คนล้าง จานทำความสะอาด และผู้จัดการทำงาน administrative
ในการ structure crate ของเราในแบบนี้ เราจัดระเบียบฟังก์ชันของมันเป็น
module ซ้อน สร้าง library ใหม่ชื่อ restaurant โดยรัน
cargo new restaurant --lib จากนั้นป้อนโค้ดใน Listing 7-1 เข้า
src/lib.rs เพื่อประกาศ module และ signature ฟังก์ชัน — โค้ดนี้คือส่วน
front of house
mod front_of_house {
mod hosting {
fn add_to_waitlist() {}
fn seat_at_table() {}
}
mod serving {
fn take_order() {}
fn serve_order() {}
fn take_payment() {}
}
}front_of_house ที่มี module อื่นที่จากนั้นมีฟังก์ชันเราประกาศ module ด้วย keyword mod ตามด้วยชื่อของ module (ในกรณีนี้
front_of_house) body ของ module จากนั้นไปภายใน curly bracket ภายใน
module เราวาง module อื่นได้ เหมือนในกรณีนี้กับ module hosting และ
serving Module ยังเก็บ definition สำหรับ item อื่นได้ เช่น struct,
enum, constant, trait และเหมือนใน Listing 7-1 ฟังก์ชัน
ด้วยการใช้ module เราจัดกลุ่ม definition ที่ผูกกันเข้าด้วยกัน และตั้งชื่อ ว่าทำไมพวกมันผูกกัน โปรแกรมเมอร์ที่ใช้โค้ดนี้นำทางโค้ดตามกลุ่ม แทนต้อง อ่านผ่าน definition ทั้งหมด ทำให้ง่ายขึ้นที่จะหา definition ที่เกี่ยวข้อง กับพวกเขา โปรแกรมเมอร์ที่เพิ่ม functionality ใหม่ให้โค้ดนี้รู้ว่าจะวาง โค้ดที่ไหน เพื่อให้โปรแกรมจัดระเบียบ
ก่อนหน้านี้ เราเอ่ยว่า src/main.rs และ src/lib.rs เรียกว่า crate
root เหตุผลของชื่อพวกมันคือเนื้อหาของหนึ่งในสองไฟล์เหล่านี้ ประกอบ
เป็น module ชื่อ crate ที่ root ของโครงสร้าง module ของ crate รู้จัก
ในชื่อ module tree
Listing 7-2 แสดง module tree สำหรับโครงสร้างใน Listing 7-1
crate
└── front_of_house
├── hosting
│ ├── add_to_waitlist
│ └── seat_at_table
└── serving
├── take_order
├── serve_order
└── take_payment
tree นี้แสดงว่า module บางตัวซ้อนภายใน module อื่นอย่างไร เช่น hosting
ซ้อนภายใน front_of_house tree ยังแสดงว่า module บางตัวเป็น sibling
หมายความว่าพวกมันประกาศใน module เดียวกัน — hosting และ serving เป็น
sibling ที่ประกาศภายใน front_of_house ถ้า module A ถูกบรรจุภายใน module
B เราบอกว่า module A เป็น ลูก ของ module B และ module B เป็น พ่อ ของ
module A สังเกตว่าทั้ง module tree มี root อยู่ภายใต้ module implicit ที่
ชื่อ crate
module tree อาจเตือนคุณถึง directory tree ของ filesystem บนคอมพิวเตอร์ ของคุณ — นี่เป็นการเปรียบเทียบที่เหมาะมาก! เหมือนกับ directory ใน filesystem คุณใช้ module จัดระเบียบโค้ดของคุณ และเหมือนกับไฟล์ใน directory เราต้องการวิธีหา module ของเรา
Path สำหรับอ้างถึง item ใน module tree
Path สำหรับอ้างถึง Item ใน Module Tree
ในการแสดงให้ Rust รู้ว่าจะหา item ใน module tree ที่ไหน เราใช้ path ใน แบบเดียวกับที่เราใช้ path เมื่อ navigate filesystem ในการเรียกฟังก์ชัน เราต้องรู้ path ของมัน
Path เป็นได้สองรูปแบบ:
- absolute path คือ path เต็มที่เริ่มจาก crate root สำหรับโค้ดจาก
external crate absolute path เริ่มด้วยชื่อ crate และสำหรับโค้ดจาก crate
ปัจจุบัน มันเริ่มด้วย literal
crate - relative path เริ่มจาก module ปัจจุบัน และใช้
self,superหรือ identifier ใน module ปัจจุบัน
ทั้ง absolute และ relative path ตามด้วย identifier หนึ่งหรือมากกว่าที่
คั่นด้วย double colon (::)
กลับไปที่ Listing 7-1 สมมติเราอยากเรียกฟังก์ชัน add_to_waitlist นี่
เหมือนกับถามว่า — path ของฟังก์ชัน add_to_waitlist คืออะไร? Listing 7-3
มี Listing 7-1 ที่ลบ module และฟังก์ชันบางตัวออก
เราจะแสดงสองวิธีในการเรียกฟังก์ชัน add_to_waitlist จากฟังก์ชันใหม่
eat_at_restaurant ที่ประกาศใน crate root path เหล่านี้ถูก แต่มีปัญหา
อีกอันที่จะป้องกันไม่ให้ตัวอย่างนี้ compile ได้ตามที่เป็น เราจะอธิบายว่า
ทำไมในไม่ช้า
ฟังก์ชัน eat_at_restaurant เป็นส่วนหนึ่งของ public API ของ library
crate เรา เราจึง mark มันด้วย keyword pub ในส่วน
“เปิดเผย Path ด้วย Keyword pub” เราจะลงรายละเอียด
มากขึ้นเรื่อง pub
mod front_of_house {
mod hosting {
fn add_to_waitlist() {}
}
}
pub fn eat_at_restaurant() {
// Absolute path
crate::front_of_house::hosting::add_to_waitlist();
// Relative path
front_of_house::hosting::add_to_waitlist();
}add_to_waitlist ด้วย absolute และ relative pathครั้งแรกที่เราเรียกฟังก์ชัน add_to_waitlist ใน eat_at_restaurant เรา
ใช้ absolute path ฟังก์ชัน add_to_waitlist ประกาศใน crate เดียวกับ
eat_at_restaurant ซึ่งหมายความว่าเราใช้ keyword crate เริ่ม absolute
path ได้ จากนั้นเรารวมแต่ละ module ที่ต่อกันจนกระทั่งเราเดินไปถึง
add_to_waitlist คุณนึกถึง filesystem ที่มีโครงสร้างเดียวกันได้ — เรา
ระบุ path /front_of_house/hosting/add_to_waitlist เพื่อรันโปรแกรม
add_to_waitlist การใช้ชื่อ crate เริ่มจาก crate root เหมือนการใช้ /
เริ่มจาก filesystem root ใน shell ของคุณ
ครั้งที่สองที่เราเรียก add_to_waitlist ใน eat_at_restaurant เราใช้
relative path path เริ่มด้วย front_of_house ชื่อของ module ที่ประกาศ
ในระดับเดียวกันของ module tree กับ eat_at_restaurant ที่นี่สิ่งเทียบ
เท่า filesystem จะเป็นการใช้ path front_of_house/hosting/add_to_waitlist
การเริ่มด้วยชื่อ module หมายความว่า path เป็น relative
การเลือกใช้ relative หรือ absolute path เป็นการตัดสินใจที่คุณจะทำตาม
โปรเจกต์ของคุณ และขึ้นกับว่าคุณมีโอกาสมากกว่าที่จะย้ายโค้ดการประกาศ item
แยกจากหรือพร้อมกับโค้ดที่ใช้ item เช่น ถ้าเราย้าย module front_of_house
และฟังก์ชัน eat_at_restaurant เข้า module ชื่อ customer_experience
เราต้อง update absolute path ไปยัง add_to_waitlist แต่ relative path
จะยัง valid อย่างไรก็ตาม ถ้าเราย้ายฟังก์ชัน eat_at_restaurant แยกเข้า
module ชื่อ dining absolute path ไปยังการเรียก add_to_waitlist จะ
ยังเหมือนเดิม แต่ relative path จะต้อง update ความชอบของเราโดยทั่วไปคือ
ระบุ absolute path เพราะมีโอกาสมากกว่าที่เราจะอยากย้ายการประกาศโค้ดและ
การเรียก item อย่างอิสระจากกัน
ลอง compile Listing 7-3 และดูว่าทำไมมันยัง compile ไม่ได้! Error ที่เรา ได้แสดงใน Listing 7-4
$ cargo build
Compiling restaurant v0.1.0 (file:///projects/restaurant)
error[E0603]: module `hosting` is private
--> src/lib.rs:9:28
|
9 | crate::front_of_house::hosting::add_to_waitlist();
| ^^^^^^^ --------------- function `add_to_waitlist` is not publicly re-exported
| |
| private module
|
note: the module `hosting` is defined here
--> src/lib.rs:2:5
|
2 | mod hosting {
| ^^^^^^^^^^^
error[E0603]: module `hosting` is private
--> src/lib.rs:12:21
|
12 | front_of_house::hosting::add_to_waitlist();
| ^^^^^^^ --------------- function `add_to_waitlist` is not publicly re-exported
| |
| private module
|
note: the module `hosting` is defined here
--> src/lib.rs:2:5
|
2 | mod hosting {
| ^^^^^^^^^^^
For more information about this error, try `rustc --explain E0603`.
error: could not compile `restaurant` (lib) due to 2 previous errors
Error message บอกว่า module hosting เป็น private พูดอีกอย่าง เรามี
path ที่ถูกต้องสำหรับ module hosting และฟังก์ชัน add_to_waitlist แต่
Rust ไม่ให้เราใช้พวกมัน เพราะมันไม่มีการเข้าถึงส่วน private ใน Rust item
ทั้งหมด (ฟังก์ชัน, เมธอด, struct, enum, module และ constant) เป็น
private จาก module พ่อโดย default ถ้าคุณอยากทำให้ item อย่างฟังก์ชันหรือ
struct เป็น private คุณใส่มันใน module
Item ใน module พ่อใช้ private item ภายใน module ลูกไม่ได้ แต่ item ใน module ลูกใช้ item ใน module บรรพบุรุษได้ นี่เพราะ module ลูกห่อและซ่อน รายละเอียด implementation ของพวกมัน แต่ module ลูกเห็นบริบทที่พวกมันถูก ประกาศได้ ต่อกับการเปรียบเทียบของเรา คิดถึงกฎ privacy เหมือน back office ของร้านอาหาร — สิ่งที่เกิดในนั้นเป็น private ต่อลูกค้าร้านอาหาร แต่ผู้ จัดการ office เห็นและทำทุกอย่างในร้านอาหารที่พวกเขาดำเนินการ
Rust เลือกให้ระบบ module ทำงานในแบบนี้ เพื่อให้การซ่อนรายละเอียด
implementation ภายในเป็น default แบบนั้น คุณรู้ว่าส่วนไหนของโค้ดภายในที่
คุณเปลี่ยนได้โดยไม่ทำให้โค้ดภายนอกเสีย อย่างไรก็ตาม Rust ให้ตัวเลือกคุณ
ในการเปิดเผยส่วนภายในของโค้ด module ลูกให้ module บรรพบุรุษภายนอก โดยใช้
keyword pub เพื่อทำให้ item เป็น public
เปิดเผย Path ด้วย Keyword pub
มากลับไปที่ error ใน Listing 7-4 ที่บอกเราว่า module hosting เป็น
private เราอยากให้ฟังก์ชัน eat_at_restaurant ใน module พ่อมีการเข้าถึง
ฟังก์ชัน add_to_waitlist ใน module ลูก เราจึง mark module hosting
ด้วย keyword pub ดังที่แสดงใน Listing 7-5
mod front_of_house {
pub mod hosting {
fn add_to_waitlist() {}
}
}
// -- snip --
pub fn eat_at_restaurant() {
// Absolute path
crate::front_of_house::hosting::add_to_waitlist();
// Relative path
front_of_house::hosting::add_to_waitlist();
}hosting เป็น pub เพื่อใช้จาก eat_at_restaurantน่าเสียดาย โค้ดใน Listing 7-5 ยังคงให้ compiler error ดังที่แสดงใน Listing 7-6
$ cargo build
Compiling restaurant v0.1.0 (file:///projects/restaurant)
error[E0603]: function `add_to_waitlist` is private
--> src/lib.rs:10:37
|
10 | crate::front_of_house::hosting::add_to_waitlist();
| ^^^^^^^^^^^^^^^ private function
|
note: the function `add_to_waitlist` is defined here
--> src/lib.rs:3:9
|
3 | fn add_to_waitlist() {}
| ^^^^^^^^^^^^^^^^^^^^
error[E0603]: function `add_to_waitlist` is private
--> src/lib.rs:13:30
|
13 | front_of_house::hosting::add_to_waitlist();
| ^^^^^^^^^^^^^^^ private function
|
note: the function `add_to_waitlist` is defined here
--> src/lib.rs:3:9
|
3 | fn add_to_waitlist() {}
| ^^^^^^^^^^^^^^^^^^^^
For more information about this error, try `rustc --explain E0603`.
error: could not compile `restaurant` (lib) due to 2 previous errors
เกิดอะไรขึ้น? การเพิ่ม keyword pub หน้า mod hosting ทำให้ module เป็น
public ด้วยการเปลี่ยนนี้ ถ้าเราเข้าถึง front_of_house ได้ เราเข้าถึง
hosting ได้ แต่ เนื้อหา ของ hosting ยังเป็น private — การทำให้
module เป็น public ไม่ทำให้เนื้อหาของมันเป็น public Keyword pub บน
module เพียงให้โค้ดใน module บรรพบุรุษอ้างถึงมัน ไม่ให้เข้าถึงโค้ดภายใน
เพราะ module เป็น container ไม่มีอะไรมากที่เราทำได้โดยทำให้แค่ module
เป็น public — เราต้องไปไกลกว่าและเลือกทำให้ item หนึ่งหรือมากกว่าภายใน
module เป็น public ด้วย
Error ใน Listing 7-6 บอกว่าฟังก์ชัน add_to_waitlist เป็น private กฎ
privacy ใช้กับ struct, enum, ฟังก์ชันและเมธอด รวมถึง module
มาทำให้ฟังก์ชัน add_to_waitlist เป็น public ด้วย โดยเพิ่ม keyword
pub ก่อนการประกาศของมัน เหมือนใน Listing 7-7
mod front_of_house {
pub mod hosting {
pub fn add_to_waitlist() {}
}
}
// -- snip --
pub fn eat_at_restaurant() {
// Absolute path
crate::front_of_house::hosting::add_to_waitlist();
// Relative path
front_of_house::hosting::add_to_waitlist();
}pub ให้ mod hosting และ fn add_to_waitlist ให้เราเรียกฟังก์ชันจาก eat_at_restaurantตอนนี้โค้ดจะ compile ผ่าน! เพื่อดูว่าทำไมการเพิ่ม keyword pub ให้เราใช้
path เหล่านี้ใน eat_at_restaurant ตามกฎ privacy ได้ มาดู absolute และ
relative path
ใน absolute path เราเริ่มด้วย crate ที่ root ของ module tree ของ crate
เรา module front_of_house ประกาศใน crate root ขณะที่ front_of_house
ไม่ public แต่เพราะฟังก์ชัน eat_at_restaurant ประกาศใน module เดียวกับ
front_of_house (นั่นคือ eat_at_restaurant และ front_of_house เป็น
sibling) เราอ้างถึง front_of_house จาก eat_at_restaurant ได้ ถัดไปคือ
module hosting ที่ mark ด้วย pub เราเข้าถึง module พ่อของ hosting
ได้ จึงเข้าถึง hosting ได้ สุดท้าย ฟังก์ชัน add_to_waitlist ถูก mark
ด้วย pub และเราเข้าถึง module พ่อของมันได้ การเรียกฟังก์ชันนี้จึงทำงาน!
ใน relative path logic เหมือน absolute path ยกเว้นขั้นแรก — แทนการเริ่ม
จาก crate root path เริ่มจาก front_of_house Module front_of_house
ประกาศภายใน module เดียวกันกับ eat_at_restaurant relative path ที่เริ่ม
จาก module ที่ eat_at_restaurant ประกาศจึงทำงาน จากนั้น เพราะ hosting
และ add_to_waitlist ถูก mark ด้วย pub ส่วนที่เหลือของ path ทำงาน
และการเรียกฟังก์ชันนี้ valid!
ถ้าคุณวางแผนแชร์ library crate เพื่อให้โปรเจกต์อื่นใช้โค้ดของคุณ public API ของคุณคือสัญญากับ user ของ crate ของคุณ ที่กำหนดวิธีที่พวกเขาโต้ตอบ กับโค้ดของคุณ มีข้อพิจารณาเยอะเรื่องการจัดการการเปลี่ยนใน public API เพื่อทำให้ง่ายขึ้นที่คนจะพึ่ง crate ของคุณ ข้อพิจารณาเหล่านี้อยู่นอก ขอบเขตของหนังสือนี้ ถ้าคุณสนใจหัวข้อนี้ ดู Rust API Guidelines
Best Practice สำหรับ Package ที่มีทั้ง Binary และ Library
เราเอ่ยว่า package มีทั้ง src/main.rs binary crate root และ src/lib.rs library crate root ได้ และทั้งสอง crate จะมีชื่อของ package โดย default โดยปกติ package ที่มี pattern นี้ของการมีทั้ง library และ binary crate จะมีโค้ดใน binary crate เพียงพอที่จะเริ่ม executable ที่เรียกโค้ดที่ประกาศใน library crate สิ่งนี้ให้โปรเจกต์อื่น ได้รับประโยชน์จาก functionality ส่วนใหญ่ที่ package ให้ เพราะโค้ดของ library crate แชร์ได้
Module tree ควรประกาศใน src/lib.rs จากนั้น public item ใด ๆ ใช้ใน binary crate ได้ โดยเริ่ม path ด้วยชื่อ package Binary crate กลายเป็น user ของ library crate เหมือนกับที่ external crate สมบูรณ์จะใช้ library crate — มันใช้ได้แค่ public API เท่านั้น สิ่งนี้ช่วยให้คุณ ออกแบบ API ที่ดี — ไม่ใช่แค่คุณเป็นผู้เขียน คุณยังเป็น client ด้วย!
ใน บทที่ 12 เราจะแสดงการปฏิบัติการจัดระเบียบนี้ กับโปรแกรม command line ที่มีทั้ง binary crate และ library crate
เริ่ม Relative Path ด้วย super
เราสร้าง relative path ที่เริ่มใน module พ่อ แทน module ปัจจุบันหรือ crate
root ได้ โดยใช้ super ที่ต้น path นี่เหมือนการเริ่ม filesystem path
ด้วย syntax .. ที่หมายถึงไป directory พ่อ การใช้ super ให้เราอ้างถึง
item ที่เรารู้ว่าอยู่ใน module พ่อ ซึ่งทำให้การจัดเรียง module tree ใหม่
ง่ายขึ้นเมื่อ module ผูกใกล้กับพ่อ แต่พ่ออาจถูกย้ายไปที่อื่นใน module
tree วันหนึ่ง
พิจารณาโค้ดใน Listing 7-8 ที่ model สถานการณ์ที่ chef แก้ order ที่ผิด
และเอามาให้ลูกค้าด้วยตัวเอง ฟังก์ชัน fix_incorrect_order ที่ประกาศใน
module back_of_house เรียกฟังก์ชัน deliver_order ที่ประกาศใน module
พ่อ โดยระบุ path ไปยัง deliver_order เริ่มด้วย super
fn deliver_order() {}
mod back_of_house {
fn fix_incorrect_order() {
cook_order();
super::deliver_order();
}
fn cook_order() {}
}superฟังก์ชัน fix_incorrect_order อยู่ใน module back_of_house เราจึงใช้
super ไป module พ่อของ back_of_house ได้ ซึ่งในกรณีนี้คือ crate
root จากตรงนั้น เรามองหา deliver_order และเจอมัน สำเร็จ! เราคิดว่า
module back_of_house และฟังก์ชัน deliver_order มีโอกาสจะอยู่ในความ
สัมพันธ์เดียวกันกับกัน และถูกย้ายไปด้วยกัน ถ้าเราตัดสินใจจัดระเบียบ
module tree ของ crate ใหม่ ดังนั้นเราใช้ super เพื่อจะมีที่น้อยกว่าให้
update โค้ดในอนาคต ถ้าโค้ดนี้ถูกย้ายไปที่ module อื่น
ทำให้ Struct และ Enum เป็น Public
เรายังใช้ pub กำหนด struct และ enum เป็น public ได้ แต่มีรายละเอียด
เพิ่มเติมเรื่องการใช้ pub กับ struct และ enum ถ้าเราใช้ pub ก่อนการ
ประกาศ struct เราทำให้ struct เป็น public แต่ field ของ struct จะยัง
เป็น private เราทำให้แต่ละ field เป็น public หรือไม่ได้แบบ case-by-case
ใน Listing 7-9 เราประกาศ struct back_of_house::Breakfast ที่ public
ที่มี field toast public แต่ field seasonal_fruit private สิ่งนี้
model กรณีในร้านอาหารที่ลูกค้าเลือกชนิดขนมปังที่มากับมื้อได้ แต่ chef
ตัดสินใจว่าผลไม้ตัวไหนคู่กับมื้อ ขึ้นกับว่าอะไรอยู่ในฤดูและในสต็อก ผลไม้
ที่มีเปลี่ยนเร็ว ลูกค้าจึงเลือกผลไม้ไม่ได้ และเห็นไม่ได้แม้จะได้ผลไม้
ตัวไหน
mod back_of_house {
pub struct Breakfast {
pub toast: String,
seasonal_fruit: String,
}
impl Breakfast {
pub fn summer(toast: &str) -> Breakfast {
Breakfast {
toast: String::from(toast),
seasonal_fruit: String::from("peaches"),
}
}
}
}
pub fn eat_at_restaurant() {
// Order a breakfast in the summer with Rye toast.
let mut meal = back_of_house::Breakfast::summer("Rye");
// Change our mind about what bread we'd like.
meal.toast = String::from("Wheat");
println!("I'd like {} toast please", meal.toast);
// The next line won't compile if we uncomment it; we're not allowed
// to see or modify the seasonal fruit that comes with the meal.
// meal.seasonal_fruit = String::from("blueberries");
}เพราะ field toast ใน struct back_of_house::Breakfast เป็น public ใน
eat_at_restaurant เราเขียนและอ่าน field toast โดยใช้ dot notation ได้
สังเกตว่าเราใช้ field seasonal_fruit ใน eat_at_restaurant ไม่ได้
เพราะ seasonal_fruit เป็น private ลอง uncomment บรรทัดที่แก้ค่า field
seasonal_fruit เพื่อดูว่าคุณได้ error อะไร!
หมายเหตุว่า เพราะ back_of_house::Breakfast มี field private struct ต้อง
ให้ associated function public ที่สร้าง instance ของ Breakfast (เรา
ตั้งชื่อมัน summer ที่นี่) ถ้า Breakfast ไม่มีฟังก์ชันแบบนี้ เราสร้าง
instance ของ Breakfast ใน eat_at_restaurant ไม่ได้ เพราะเรา set ค่า
ของ field seasonal_fruit private ใน eat_at_restaurant ไม่ได้
ตรงข้าม ถ้าเราทำให้ enum เป็น public variant ทั้งหมดของมันจะเป็น public
แล้ว เราต้องการแค่ pub ก่อน keyword enum ดังที่แสดงใน Listing 7-10
mod back_of_house {
pub enum Appetizer {
Soup,
Salad,
}
}
pub fn eat_at_restaurant() {
let order1 = back_of_house::Appetizer::Soup;
let order2 = back_of_house::Appetizer::Salad;
}เพราะเราทำให้ enum Appetizer เป็น public เราใช้ variant Soup และ
Salad ใน eat_at_restaurant ได้
Enum ไม่มีประโยชน์มากเว้นแต่ variant ของมันเป็น public มันจะน่ารำคาญที่
ต้อง annotate variant ของ enum ทั้งหมดด้วย pub ในทุกกรณี default
สำหรับ variant ของ enum จึงเป็น public Struct มักมีประโยชน์โดยที่ field
ไม่ public ดังนั้น field ของ struct ตามกฎทั่วไปที่ทุกอย่างเป็น private
โดย default เว้นแต่ annotate ด้วย pub
มีอีกสถานการณ์ที่เกี่ยวกับ pub ที่เราไม่ได้ครอบคลุม และนั่นคือฟีเจอร์
ระบบ module สุดท้ายของเรา — keyword use เราจะครอบคลุม use เอง ๆ ก่อน
แล้วเราจะแสดงวิธีรวม pub และ use
นำ path เข้า scope ด้วย keyword use
นำ Path เข้า Scope ด้วย Keyword use
การต้องเขียน path เพื่อเรียกฟังก์ชันรู้สึกไม่สะดวกและซ้ำซ้อนได้ ใน
Listing 7-7 ไม่ว่าเราเลือก absolute หรือ relative path ไปยังฟังก์ชัน
add_to_waitlist ทุกครั้งที่เราอยากเรียก add_to_waitlist เราต้องระบุ
front_of_house และ hosting ด้วย โชคดี มีวิธีที่จะทำให้กระบวนการนี้
ง่ายขึ้น — เราสร้าง shortcut ของ path ด้วย keyword use ครั้งเดียว แล้ว
ใช้ชื่อสั้นกว่าทุกที่อื่นใน scope ได้
ใน Listing 7-11 เรานำ module crate::front_of_house::hosting เข้าใน
scope ของฟังก์ชัน eat_at_restaurant เพื่อให้เราต้องระบุแค่
hosting::add_to_waitlist เพื่อเรียกฟังก์ชัน add_to_waitlist ใน
eat_at_restaurant
mod front_of_house {
pub mod hosting {
pub fn add_to_waitlist() {}
}
}
use crate::front_of_house::hosting;
pub fn eat_at_restaurant() {
hosting::add_to_waitlist();
}useการเพิ่ม use และ path ใน scope คล้ายกับการสร้าง symbolic link ใน
filesystem ด้วยการเพิ่ม use crate::front_of_house::hosting ใน crate
root hosting ตอนนี้เป็นชื่อ valid ใน scope นั้น เหมือนกับว่า module
hosting ประกาศใน crate root Path ที่นำเข้า scope ด้วย use ก็เช็ค
privacy ด้วย เหมือน path อื่นใด
หมายเหตุว่า use สร้าง shortcut เฉพาะสำหรับ scope ที่ use เกิดเท่านั้น
Listing 7-12 ย้ายฟังก์ชัน eat_at_restaurant เข้า module ลูกใหม่ชื่อ
customer ซึ่งจึงเป็น scope ต่างจาก statement use body ของฟังก์ชันจะ
compile ไม่ผ่าน
mod front_of_house {
pub mod hosting {
pub fn add_to_waitlist() {}
}
}
use crate::front_of_house::hosting;
mod customer {
pub fn eat_at_restaurant() {
hosting::add_to_waitlist();
}
}use ใช้ได้แค่ใน scope ที่มันอยู่Compiler error แสดงว่า shortcut ใช้ไม่ได้แล้วภายใน module customer:
$ cargo build
Compiling restaurant v0.1.0 (file:///projects/restaurant)
error[E0433]: failed to resolve: use of unresolved module or unlinked crate `hosting`
--> src/lib.rs:11:9
|
11 | hosting::add_to_waitlist();
| ^^^^^^^ use of unresolved module or unlinked crate `hosting`
|
= help: if you wanted to use a crate named `hosting`, use `cargo add hosting` to add it to your `Cargo.toml`
help: consider importing this module through its public re-export
|
10 + use crate::hosting;
|
warning: unused import: `crate::front_of_house::hosting`
--> src/lib.rs:7:5
|
7 | use crate::front_of_house::hosting;
| ^^^^^^^^^^^^^^^^^^^^^^^^^^^^^^
|
= note: `#[warn(unused_imports)]` on by default
For more information about this error, try `rustc --explain E0433`.
warning: `restaurant` (lib) generated 1 warning
error: could not compile `restaurant` (lib) due to 1 previous error; 1 warning emitted
สังเกตว่ายังมี warning ว่า use ไม่ถูกใช้แล้วใน scope ของมัน! ในการแก้
ปัญหานี้ ย้าย use เข้า module customer ด้วย หรืออ้างถึง shortcut ใน
module พ่อด้วย super::hosting ภายใน module customer ลูก
สร้าง Path use ที่ Idiomatic
ใน Listing 7-11 คุณอาจสงสัยว่าทำไมเราระบุ use crate::front_of_house::hosting
แล้วเรียก hosting::add_to_waitlist ใน eat_at_restaurant แทนการระบุ
path use ตลอดจนถึงฟังก์ชัน add_to_waitlist เพื่อให้ผลเดียวกัน เหมือนใน
Listing 7-13
mod front_of_house {
pub mod hosting {
pub fn add_to_waitlist() {}
}
}
use crate::front_of_house::hosting::add_to_waitlist;
pub fn eat_at_restaurant() {
add_to_waitlist();
}add_to_waitlist เข้า scope ด้วย use ซึ่งไม่ idiomaticแม้ทั้ง Listing 7-11 และ Listing 7-13 ทำงานเดียวกัน Listing 7-11 เป็น
วิธี idiomatic ในการนำฟังก์ชันเข้า scope ด้วย use การนำ module พ่อของ
ฟังก์ชันเข้า scope ด้วย use หมายความว่าเราต้องระบุ module พ่อเมื่อเรียก
ฟังก์ชัน การระบุ module พ่อเมื่อเรียกฟังก์ชันทำให้ชัดเจนว่าฟังก์ชันไม่
ประกาศ local ขณะลดการเขียน path เต็มซ้ำ โค้ดใน Listing 7-13 ไม่ชัดเจนว่า
add_to_waitlist ประกาศที่ไหน
ตรงข้าม เมื่อนำ struct, enum และ item อื่นด้วย use มัน idiomatic ที่จะ
ระบุ path เต็ม Listing 7-14 แสดงวิธี idiomatic ในการนำ struct HashMap
ของ standard library เข้า scope ของ binary crate
use std::collections::HashMap;
fn main() {
let mut map = HashMap::new();
map.insert(1, 2);
}HashMap เข้า scope ในแบบ idiomaticไม่มีเหตุผลแข็งแรงเบื้องหลัง idiom นี้ — มันแค่ convention ที่เกิดขึ้น และคนคุ้นเคยกับการอ่านและเขียนโค้ด Rust ในแบบนี้
ข้อยกเว้นของ idiom นี้คือถ้าเรานำสอง item ที่มีชื่อเดียวกันเข้า scope
ด้วย statement use เพราะ Rust ไม่อนุญาตอย่างนั้น Listing 7-15 แสดงวิธี
นำสอง type Result ที่มีชื่อเดียวกันแต่ module พ่อต่างกันเข้า scope และ
วิธีอ้างถึงพวกมัน
use std::fmt;
use std::io;
fn function1() -> fmt::Result {
// --snip--
Ok(())
}
fn function2() -> io::Result<()> {
// --snip--
Ok(())
}อย่างที่คุณเห็น การใช้ module พ่อแยก type Result สองตัว ถ้าแทนเราระบุ
use std::fmt::Result และ use std::io::Result เราจะมี type Result
สองตัวใน scope เดียว และ Rust จะไม่รู้ว่าเราหมายถึงตัวไหนเมื่อเราใช้
Result
ให้ชื่อใหม่ด้วย Keyword as
มีอีกคำตอบสำหรับปัญหาของการนำสอง type ที่ชื่อเดียวกันเข้า scope เดียวกัน
ด้วย use — หลัง path เราระบุ as และชื่อ local ใหม่ หรือ alias ของ
type ได้ Listing 7-16 แสดงอีกวิธีในการเขียนโค้ดใน Listing 7-15 โดย
เปลี่ยนชื่อหนึ่งใน type Result สองตัวด้วย as
use std::fmt::Result;
use std::io::Result as IoResult;
fn function1() -> Result {
// --snip--
Ok(())
}
fn function2() -> IoResult<()> {
// --snip--
Ok(())
}asใน statement use ที่สอง เราเลือกชื่อใหม่ IoResult สำหรับ type
std::io::Result ซึ่งจะไม่ขัดกับ Result จาก std::fmt ที่เราก็นำเข้า
scope ด้วย Listing 7-15 และ Listing 7-16 ถือเป็น idiomatic ดังนั้นการ
เลือกอยู่ที่คุณ!
Re-export ชื่อด้วย pub use
เมื่อเรานำชื่อเข้า scope ด้วย keyword use ชื่อเป็น private ต่อ scope
ที่เรา import เข้า ในการเปิดทางให้โค้ดนอก scope นั้นอ้างถึงชื่อนั้น
ราวกับว่ามันประกาศใน scope นั้น เรารวม pub และ use ได้ เทคนิคนี้
เรียกว่า re-export เพราะเรากำลังนำ item เข้า scope แต่ก็ทำให้ item นั้น
มีให้คนอื่นนำเข้า scope ของพวกเขาด้วย
Listing 7-17 แสดงโค้ดใน Listing 7-11 ที่เปลี่ยน use ใน root module
เป็น pub use
mod front_of_house {
pub mod hosting {
pub fn add_to_waitlist() {}
}
}
pub use crate::front_of_house::hosting;
pub fn eat_at_restaurant() {
hosting::add_to_waitlist();
}pub useก่อนการเปลี่ยนนี้ โค้ดภายนอกจะต้องเรียกฟังก์ชัน add_to_waitlist โดยใช้
path restaurant::front_of_house::hosting::add_to_waitlist() ซึ่งจะ
ต้องการให้ module front_of_house ถูก mark เป็น pub ด้วย ตอนนี้ pub use นี้ได้ re-export module hosting จาก root module โค้ดภายนอกใช้
path restaurant::hosting::add_to_waitlist() แทนได้
Re-export มีประโยชน์เมื่อโครงสร้างภายในของโค้ดของคุณต่างจากที่โปรแกรมเมอร์
ที่เรียกโค้ดของคุณจะคิดเรื่อง domain เช่น ในการเปรียบเทียบร้านอาหารนี้
คนที่ดำเนินร้านอาหารคิดเรื่อง “front of house” และ “back of house” แต่
ลูกค้าที่เยี่ยมร้านอาหารคงไม่คิดเรื่องส่วนของร้านอาหารในคำเหล่านั้น ด้วย
pub use เราเขียนโค้ดของเราด้วยโครงสร้างหนึ่ง แต่เปิดเผยโครงสร้างต่าง
ได้ การทำอย่างนั้นทำให้ library ของเราจัดระเบียบดีสำหรับโปรแกรมเมอร์ที่
ทำงานบน library และโปรแกรมเมอร์ที่เรียก library เราจะดูตัวอย่างอีกของ
pub use และวิธีที่มันส่งผลต่อ documentation ของ crate ของคุณใน
“Export Public API ที่สะดวก” ในบทที่ 14
ใช้ Package ภายนอก
ในบทที่ 2 เราเขียนโปรเจกต์เกมทายตัวเลขที่ใช้ external package ชื่อ rand
เพื่อรับตัวเลขสุ่ม ในการใช้ rand ในโปรเจกต์ของเรา เราเพิ่มบรรทัดนี้ใน
Cargo.toml:
rand = "0.8.5"
การเพิ่ม rand เป็น dependency ใน Cargo.toml บอก Cargo ให้ download
package rand และ dependency ใด ๆ จาก crates.io
และทำให้ rand มีให้โปรเจกต์ของเรา
จากนั้น ในการนำ definition ของ rand เข้า scope ของ package ของเรา เรา
เพิ่มบรรทัด use เริ่มด้วยชื่อ crate rand และ list item ที่เราอยากนำ
เข้า scope จำได้ว่าใน “Generate ตัวเลขสุ่ม” ในบทที่
2 เรานำ trait Rng เข้า scope และเรียกฟังก์ชัน rand::thread_rng:
use std::io;
use rand::Rng;
fn main() {
println!("Guess the number!");
let secret_number = rand::thread_rng().gen_range(1..=100);
println!("The secret number is: {secret_number}");
println!("Please input your guess.");
let mut guess = String::new();
io::stdin()
.read_line(&mut guess)
.expect("Failed to read line");
println!("You guessed: {guess}");
}สมาชิกของ Rust community ทำ package หลายตัวให้ที่
crates.io และการดึงพวกมันใด ๆ เข้า package ของคุณ
เกี่ยวข้องกับขั้นตอนเดียวกัน — list พวกมันในไฟล์ Cargo.toml ของ package
ของคุณ และใช้ use นำ item จาก crate ของพวกมันเข้า scope
หมายเหตุว่า library std มาตรฐานก็เป็น crate ที่ external ต่อ package
ของเรา เพราะ standard library มากับภาษา Rust เราไม่ต้องเปลี่ยน
Cargo.toml เพื่อรวม std แต่เราต้องอ้างถึงมันด้วย use เพื่อนำ item
จากตรงนั้นเข้า scope ของ package เรา เช่น กับ HashMap เราจะใช้บรรทัด
นี้:
#![allow(unused)]
fn main() {
use std::collections::HashMap;
}นี่เป็น absolute path ที่เริ่มด้วย std ชื่อของ standard library crate
ใช้ Nested Path เพื่อทำความสะอาด List use
ถ้าเราใช้ item หลายตัวที่ประกาศใน crate หรือ module เดียวกัน การ list
แต่ละ item บนบรรทัดของตัวเองอาจกินที่แนวตั้งเยอะในไฟล์ของเรา เช่น
statement use สองตัวที่เรามีในเกมทายตัวเลขใน Listing 2-4 นำ item จาก
std เข้า scope:
use rand::Rng;
// --snip--
use std::cmp::Ordering;
use std::io;
// --snip--
fn main() {
println!("Guess the number!");
let secret_number = rand::thread_rng().gen_range(1..=100);
println!("The secret number is: {secret_number}");
println!("Please input your guess.");
let mut guess = String::new();
io::stdin()
.read_line(&mut guess)
.expect("Failed to read line");
println!("You guessed: {guess}");
match guess.cmp(&secret_number) {
Ordering::Less => println!("Too small!"),
Ordering::Greater => println!("Too big!"),
Ordering::Equal => println!("You win!"),
}
}แทน เราใช้ nested path นำ item เดียวกันเข้า scope ในบรรทัดเดียวได้ เราทำ สิ่งนี้โดยระบุส่วนที่เหมือนกันของ path ตามด้วย colon สองตัว แล้ว curly bracket รอบ list ของส่วนของ path ที่ต่างกัน ดังที่แสดงใน Listing 7-18
use rand::Rng;
// --snip--
use std::{cmp::Ordering, io};
// --snip--
fn main() {
println!("Guess the number!");
let secret_number = rand::thread_rng().gen_range(1..=100);
println!("The secret number is: {secret_number}");
println!("Please input your guess.");
let mut guess = String::new();
io::stdin()
.read_line(&mut guess)
.expect("Failed to read line");
let guess: u32 = guess.trim().parse().expect("Please type a number!");
println!("You guessed: {guess}");
match guess.cmp(&secret_number) {
Ordering::Less => println!("Too small!"),
Ordering::Greater => println!("Too big!"),
Ordering::Equal => println!("You win!"),
}
}ในโปรแกรมใหญ่ขึ้น การนำ item หลายตัวเข้า scope จาก crate หรือ module
เดียวกันโดยใช้ nested path ลดจำนวน statement use แยกที่ต้องการได้เยอะ!
เราใช้ nested path ในระดับใดของ path ได้ ซึ่งมีประโยชน์เมื่อรวม statement
use สองตัวที่แชร์ subpath เช่น Listing 7-19 แสดง statement use สอง
ตัว — ตัวหนึ่งที่นำ std::io เข้า scope และตัวหนึ่งที่นำ std::io::Write
เข้า scope
use std::io;
use std::io::Write;use สองตัวที่ตัวหนึ่งเป็น subpath ของอีกตัวส่วนที่เหมือนกันของสอง path นี้คือ std::io และนั่นคือ path แรกสมบูรณ์
ในการรวมสอง path นี้เป็น statement use เดียว เราใช้ self ใน nested
path ได้ ดังที่แสดงใน Listing 7-20
use std::io::{self, Write};use เดียวบรรทัดนี้นำ std::io และ std::io::Write เข้า scope
Import Item ด้วย Glob Operator
ถ้าเราอยากนำ public item ทั้งหมด ที่ประกาศใน path เข้า scope เราระบุ
path นั้นตามด้วย glob operator *:
#![allow(unused)]
fn main() {
use std::collections::*;
}statement use นี้นำ public item ทั้งหมดที่ประกาศใน std::collections
เข้า scope ปัจจุบัน ระวังเมื่อใช้ glob operator! Glob ทำให้ยากขึ้นที่จะ
บอกว่าชื่อไหนอยู่ใน scope และที่ที่ชื่อที่ใช้ในโปรแกรมของคุณถูกประกาศ
นอกจากนี้ ถ้า dependency เปลี่ยน definition สิ่งที่คุณ import เปลี่ยน
ด้วย ซึ่งอาจนำไปสู่ compiler error เมื่อคุณ upgrade dependency ถ้า
dependency เพิ่ม definition ที่มีชื่อเหมือน definition ของคุณใน scope
เดียวกัน เช่น
glob operator มักใช้เมื่อทำการทดสอบ เพื่อนำทุกอย่างภายใต้การทดสอบเข้า
module tests เราจะพูดถึงเรื่องนั้นใน
“วิธีเขียนเทส” ในบทที่ 11 glob operator
บางครั้งก็ใช้เป็นส่วนหนึ่งของ prelude pattern ดู
documentation ของ standard library
สำหรับข้อมูลเพิ่มเติมเรื่อง pattern นั้น
แยก module ไปคนละไฟล์
แยก Module ไปคนละไฟล์
ที่ผ่านมา ตัวอย่างทั้งหมดในบทนี้ประกาศ module หลายตัวในไฟล์เดียว เมื่อ module ใหญ่ คุณอาจอยากย้าย definition ของพวกมันไปไฟล์แยก เพื่อทำให้โค้ด ง่ายต่อการ navigate
เช่น เริ่มจากโค้ดใน Listing 7-17 ที่มี module ร้านอาหารหลายตัว เราจะดึง module เข้าไฟล์ แทนการมี module ทั้งหมดประกาศในไฟล์ crate root ในกรณีนี้ ไฟล์ crate root คือ src/lib.rs แต่ขั้นตอนนี้ก็ใช้ได้กับ binary crate ที่ ไฟล์ crate root คือ src/main.rs
ก่อนอื่น เราจะดึง module front_of_house ออกไปไฟล์ของมันเอง ลบโค้ดภายใน
curly bracket สำหรับ module front_of_house เหลือแค่การประกาศ
mod front_of_house; เพื่อให้ src/lib.rs มีโค้ดที่แสดงใน Listing 7-21
หมายเหตุว่านี่จะ compile ไม่ผ่านจนกว่าเราจะสร้างไฟล์ src/front_of_house.rs
ใน Listing 7-22
mod front_of_house;
pub use crate::front_of_house::hosting;
pub fn eat_at_restaurant() {
hosting::add_to_waitlist();
}front_of_house ที่ body จะอยู่ใน src/front_of_house.rsถัดไป วางโค้ดที่อยู่ใน curly bracket เข้าไฟล์ใหม่ชื่อ
src/front_of_house.rs ดังที่แสดงใน Listing 7-22 Compiler รู้ว่าจะมอง
ในไฟล์นี้ เพราะมันเจอการประกาศ module ใน crate root ที่ชื่อ
front_of_house
pub mod hosting {
pub fn add_to_waitlist() {}
}front_of_house ใน src/front_of_house.rsหมายเหตุว่าคุณต้อง load ไฟล์โดยใช้การประกาศ mod ครั้งเดียว ใน module
tree ของคุณ เมื่อ compiler รู้ว่าไฟล์เป็นส่วนของโปรเจกต์ (และรู้ว่าโค้ด
อยู่ที่ไหนใน module tree เพราะคุณวาง statement mod ที่ไหน) ไฟล์อื่นใน
โปรเจกต์ของคุณควรอ้างถึงโค้ดของไฟล์ที่ load โดยใช้ path ไปยังตำแหน่งที่มัน
ถูกประกาศ ดังที่ครอบคลุมในส่วน
“Path สำหรับอ้างถึง Item ใน Module Tree” พูดอีก
อย่าง mod ไม่ใช่ operation “include” ที่คุณอาจเคยเห็นในภาษาโปรแกรม
อื่น
ถัดไป เราจะดึง module hosting ออกไปไฟล์ของมันเอง กระบวนการต่างกันนิด
หน่อย เพราะ hosting เป็น module ลูกของ front_of_house ไม่ใช่ของ
module root เราจะวางไฟล์สำหรับ hosting ใน directory ใหม่ที่จะตั้งชื่อ
ตามบรรพบุรุษใน module tree ในกรณีนี้ src/front_of_house
ในการเริ่มย้าย hosting เราเปลี่ยน src/front_of_house.rs ให้มีแค่การ
ประกาศของ module hosting:
pub mod hosting;จากนั้น เราสร้าง directory src/front_of_house และไฟล์ hosting.rs
เพื่อมี definition ที่ทำใน module hosting:
pub fn add_to_waitlist() {}ถ้าแทนเราใส่ hosting.rs ใน directory src compiler จะคาดว่าโค้ด
hosting.rs อยู่ใน module hosting ที่ประกาศใน crate root และไม่
ประกาศเป็นลูกของ module front_of_house กฎของ compiler สำหรับไฟล์ไหนที่
จะเช็คสำหรับโค้ดของ module ไหน หมายความว่า directory และไฟล์ match กับ
module tree ใกล้กว่า
Path ไฟล์ทางเลือก
ที่ผ่านมาเราครอบคลุม path ไฟล์ที่ idiomatic ที่สุดที่ Rust compiler ใช้
แต่ Rust รองรับสไตล์ path ไฟล์เก่ากว่าด้วย สำหรับ module ชื่อ
front_of_house ที่ประกาศใน crate root compiler จะมองหาโค้ดของ module
ใน:
- src/front_of_house.rs (สิ่งที่เราครอบคลุม)
- src/front_of_house/mod.rs (สไตล์เก่ากว่า ยังรองรับ path)
สำหรับ module ชื่อ hosting ที่เป็น submodule ของ front_of_house
compiler จะมองหาโค้ดของ module ใน:
- src/front_of_house/hosting.rs (สิ่งที่เราครอบคลุม)
- src/front_of_house/hosting/mod.rs (สไตล์เก่ากว่า ยังรองรับ path)
ถ้าคุณใช้ทั้งสองสไตล์สำหรับ module เดียวกัน คุณจะได้ compiler error การใช้สไตล์ผสมกันสำหรับ module ต่างกันในโปรเจกต์เดียวกันอนุญาต แต่อาจ ทำให้คนที่ navigate โปรเจกต์ของคุณสับสน
ข้อเสียหลักของสไตล์ที่ใช้ไฟล์ชื่อ mod.rs คือโปรเจกต์ของคุณอาจจบลงด้วย ไฟล์ชื่อ mod.rs หลายตัว ซึ่งอาจสับสนเมื่อคุณเปิดพวกมันใน editor พร้อม กัน
เราย้ายโค้ดของแต่ละ module ไปไฟล์แยก และ module tree ยังเหมือนเดิม การ
เรียกฟังก์ชันใน eat_at_restaurant จะทำงานได้โดยไม่ต้องแก้ใด ๆ แม้
definition อยู่ในไฟล์ต่างกัน เทคนิคนี้ให้คุณย้าย module ไปไฟล์ใหม่เมื่อ
พวกมันใหญ่ขึ้น
หมายเหตุว่า statement pub use crate::front_of_house::hosting ใน
src/lib.rs ก็ไม่ได้เปลี่ยน และ use ไม่มีผลต่อไฟล์ไหนที่ถูก compile
เป็นส่วนของ crate Keyword mod ประกาศ module และ Rust มองในไฟล์ที่ชื่อ
เดียวกับ module สำหรับโค้ดที่ไปใน module นั้น
สรุป
Rust ให้คุณแบ่ง package เป็นหลาย crate และ crate เป็นหลาย module เพื่อ
ให้คุณอ้างถึง item ที่ประกาศใน module หนึ่งจากอีก module ได้ คุณทำได้โดย
ระบุ absolute หรือ relative path Path เหล่านี้นำเข้า scope ด้วย statement
use ได้ เพื่อให้คุณใช้ path สั้นกว่าสำหรับการใช้ item หลายครั้งใน scope
นั้น โค้ด module เป็น private โดย default แต่คุณทำให้ definition เป็น
public ได้ โดยเพิ่ม keyword pub
ในบทถัดไป เราจะดูโครงสร้างข้อมูล collection ใน standard library ที่คุณใช้ ในโค้ดที่จัดระเบียบดีของคุณได้
Collection ที่ใช้บ่อย
Standard library ของ Rust รวมโครงสร้างข้อมูลที่มีประโยชน์มากหลายตัวที่ เรียกว่า collection Type ข้อมูลอื่นส่วนใหญ่แทนค่าเฉพาะหนึ่งค่า แต่ collection มีค่าหลายค่าได้ ต่างจาก type array และ tuple built-in ข้อมูล ที่ collection เหล่านี้ชี้ไป ถูกเก็บบน heap ซึ่งหมายความว่าจำนวนข้อมูล ไม่ต้องรู้ตอน compile time และเติบโตหรือหดได้เมื่อโปรแกรมรัน แต่ละชนิด ของ collection มี capability และต้นทุนต่างกัน และการเลือกตัวที่เหมาะสม สำหรับสถานการณ์ปัจจุบันของคุณเป็นทักษะที่คุณจะพัฒนาตามเวลา ในบทนี้เราจะ พูดถึง collection สามตัวที่ใช้บ่อยมากในโปรแกรม Rust:
- vector ให้คุณเก็บจำนวนค่าที่ไม่คงที่ติดกัน
- string คือ collection ของอักขระ เราเอ่ยถึง type
Stringก่อนหน้า แต่ ในบทนี้เราจะพูดถึงอย่างละเอียด - hash map ให้คุณผูกค่ากับ key เฉพาะ เป็น implementation เฉพาะของ โครงสร้างข้อมูลทั่วไปกว่าที่เรียกว่า map
ในการเรียนรู้เกี่ยวกับ collection ชนิดอื่นที่ standard library มี ดู documentation
เราจะพูดถึงวิธีสร้างและ update vector, string และ hash map รวมถึงสิ่งที่ ทำให้แต่ละตัวพิเศษ
เก็บรายการค่าด้วย vector
เก็บ List ของค่าด้วย Vector
Collection type แรกที่เราจะดูคือ Vec<T> หรือที่รู้จักในชื่อ vector
Vector ให้คุณเก็บค่ามากกว่าหนึ่งค่าในโครงสร้างข้อมูลเดียวที่ใส่ค่าทั้งหมด
ติดกันในหน่วยความจำ Vector เก็บได้แค่ค่าของ type เดียวกัน พวกมันมีประโยชน์
เมื่อคุณมี list ของ item เช่น บรรทัดข้อความในไฟล์ หรือราคาของ item ใน
รถเข็นช็อปปิ้ง
สร้าง Vector ใหม่
ในการสร้าง vector ว่างใหม่ เราเรียกฟังก์ชัน Vec::new ดังที่แสดงใน
Listing 8-1
fn main() {
let v: Vec<i32> = Vec::new();
}i32หมายเหตุว่าเราเพิ่ม type annotation ที่นี่ เพราะเราไม่ได้แทรกค่าใด ๆ เข้า
vector นี้ Rust ไม่รู้ว่าเราตั้งใจเก็บ element ชนิดอะไร นี่เป็นจุดสำคัญ
Vector ถูก implement โดยใช้ generic เราจะครอบคลุมวิธีใช้ generic กับ type
ของคุณเองในบทที่ 10 ตอนนี้ รู้ว่า type Vec<T> ที่ standard library ให้
เก็บ type ใดก็ได้ เมื่อเราสร้าง vector เพื่อเก็บ type เฉพาะ เราระบุ type
ภายใน angle bracket ใน Listing 8-1 เราบอก Rust ว่า Vec<T> ใน v จะ
เก็บ element ของ type i32
บ่อยกว่านั้น คุณจะสร้าง Vec<T> ด้วยค่าเริ่มต้น และ Rust จะ infer type
ของค่าที่คุณอยากเก็บ คุณจึงไม่ค่อยต้องทำ type annotation นี้ Rust สะดวก
ให้ macro vec! ซึ่งจะสร้าง vector ใหม่ที่เก็บค่าที่คุณให้ Listing 8-2
สร้าง Vec<i32> ใหม่ที่เก็บค่า 1, 2 และ 3 integer type คือ i32
เพราะนั่นคือ default integer type ดังที่เราพูดถึงในส่วน
“ชนิดข้อมูล” ของบทที่ 3
fn main() {
let v = vec![1, 2, 3];
}เพราะเราให้ค่า i32 เริ่มต้น Rust infer ได้ว่า type ของ v คือ
Vec<i32> และไม่จำเป็นต้องมี type annotation ถัดไป เราจะดูวิธีแก้
vector
Update Vector
ในการสร้าง vector แล้วเพิ่ม element ให้มัน เราใช้เมธอด push ได้ ดังที่
แสดงใน Listing 8-3
fn main() {
let mut v = Vec::new();
v.push(5);
v.push(6);
v.push(7);
v.push(8);
}push เพื่อเพิ่มค่าให้ vectorเช่นเดียวกับตัวแปรใด ๆ ถ้าเราอยากเปลี่ยนค่า เราต้องทำให้มัน mutable โดย
ใช้ keyword mut ดังที่พูดถึงในบทที่ 3 ตัวเลขที่เราใส่ภายในเป็น type
i32 ทั้งหมด และ Rust infer สิ่งนี้จากข้อมูล เราจึงไม่ต้องมี annotation
Vec<i32>
อ่าน Element ของ Vector
มีสองวิธีในการอ้างถึงค่าที่เก็บใน vector — ผ่าน indexing หรือใช้เมธอด
get ในตัวอย่างต่อไปนี้ เรา annotate type ของค่าที่ return จากฟังก์ชัน
เหล่านี้เพื่อความชัดเจนเพิ่ม
Listing 8-4 แสดงทั้งสองเมธอดของการเข้าถึงค่าใน vector ด้วย indexing
syntax และเมธอด get
fn main() {
let v = vec![1, 2, 3, 4, 5];
let third: &i32 = &v[2];
println!("The third element is {third}");
let third: Option<&i32> = v.get(2);
match third {
Some(third) => println!("The third element is {third}"),
None => println!("There is no third element."),
}
}get เข้าถึง item ใน vectorหมายเหตุรายละเอียดบางอย่างที่นี่ เราใช้ค่า index 2 เพื่อรับ element ที่
สาม เพราะ vector ถูก index ด้วยตัวเลข เริ่มที่ศูนย์ การใช้ & และ []
ให้ reference ของ element ที่ค่า index เมื่อเราใช้เมธอด get ด้วย index
ที่ส่งเป็น argument เราได้ Option<&T> ที่เราใช้กับ match ได้
Rust ให้สองวิธีในการอ้างถึง element เพื่อให้คุณเลือกว่าโปรแกรมทำอย่างไร เมื่อคุณพยายามใช้ค่า index นอก range ของ element ที่มีอยู่ ตัวอย่าง มาดู ว่าเกิดอะไรขึ้นเมื่อเรามี vector ห้า element แล้วเราพยายามเข้าถึง element ที่ index 100 ด้วยแต่ละเทคนิค ดังที่แสดงใน Listing 8-5
fn main() {
let v = vec![1, 2, 3, 4, 5];
let does_not_exist = &v[100];
let does_not_exist = v.get(100);
}เมื่อเรารันโค้ดนี้ เมธอด [] แรกจะทำให้โปรแกรม panic เพราะมันอ้างถึง
element ที่ไม่มี เมธอดนี้ใช้ดีที่สุดเมื่อคุณอยากให้โปรแกรมของคุณ crash
ถ้ามีการพยายามเข้าถึง element หลังท้าย vector
เมื่อเมธอด get ถูกส่ง index ที่อยู่นอก vector มัน return None โดยไม่
panic คุณจะใช้เมธอดนี้ถ้าการเข้าถึง element นอก range ของ vector อาจ
เกิดเป็นครั้งคราวภายใต้สถานการณ์ปกติ จากนั้นโค้ดของคุณจะมี logic จัดการ
การมี Some(&element) หรือ None ดังที่พูดถึงในบทที่ 6 เช่น index
อาจมาจากคนที่ป้อนตัวเลข ถ้าเขาเผลอป้อนตัวเลขที่ใหญ่เกินไป และโปรแกรมได้
ค่า None คุณบอก user ได้ว่ามีกี่ item ใน vector ปัจจุบัน และให้โอกาส
อีกครั้งในการป้อนค่าที่ valid นั่นจะเป็นมิตรกับ user มากกว่าการ crash
โปรแกรมเพราะ typo!
เมื่อโปรแกรมมี reference ที่ valid borrow checker บังคับใช้กฎ ownership และ borrowing (ครอบคลุมในบทที่ 4) เพื่อรับประกันว่า reference นี้และ reference อื่นใดของเนื้อหา vector ยัง valid จำกฎที่ระบุว่าคุณมี mutable และ immutable reference ใน scope เดียวไม่ได้ กฎนั้นใช้ใน Listing 8-6 ที่ เราถือ immutable reference ของ element แรกใน vector และพยายามเพิ่ม element ที่ท้าย โปรแกรมนี้จะไม่ทำงานถ้าเราพยายามอ้างถึง element นั้นทีหลัง ในฟังก์ชันด้วย
fn main() {
let mut v = vec![1, 2, 3, 4, 5];
let first = &v[0];
v.push(6);
println!("The first element is: {first}");
}การ compile โค้ดนี้จะให้ error นี้:
$ cargo run
Compiling collections v0.1.0 (file:///projects/collections)
error[E0502]: cannot borrow `v` as mutable because it is also borrowed as immutable
--> src/main.rs:6:5
|
4 | let first = &v[0];
| - immutable borrow occurs here
5 |
6 | v.push(6);
| ^^^^^^^^^ mutable borrow occurs here
7 |
8 | println!("The first element is: {first}");
| ----- immutable borrow later used here
For more information about this error, try `rustc --explain E0502`.
error: could not compile `collections` (bin "collections") due to 1 previous error
โค้ดใน Listing 8-6 อาจดูเหมือนน่าจะทำงานได้ — ทำไม reference ของ element แรกควรห่วงเรื่องการเปลี่ยนที่ท้ายของ vector? Error นี้เกิดจากวิธีที่ vector ทำงาน — เพราะ vector ใส่ค่าติดกันในหน่วยความจำ การเพิ่ม element ใหม่ที่ท้าย vector อาจต้องการ allocate หน่วยความจำใหม่ และคัดลอก element เก่าไปยังพื้นที่ใหม่ ถ้าไม่มีที่พอที่จะใส่ element ทั้งหมดติดกันที่ vector ถูกเก็บปัจจุบัน ในกรณีนั้น reference ของ element แรกจะชี้ไปยัง หน่วยความจำที่ deallocate กฎ borrowing ป้องกันโปรแกรมจากการจบลงในสถานการณ์ นั้น
หมายเหตุ: สำหรับข้อมูลเพิ่มเติมเรื่องรายละเอียด implementation ของ type
Vec<T>ดู “The Rustonomicon”
Iterate ผ่านค่าใน Vector
ในการเข้าถึงแต่ละ element ใน vector ทีละตัว เราจะ iterate ผ่าน element
ทั้งหมด แทนการใช้ index เข้าถึงทีละตัว Listing 8-7 แสดงวิธีใช้ for loop
เพื่อรับ immutable reference ของแต่ละ element ใน vector ของค่า i32
และพิมพ์พวกมัน
fn main() {
let v = vec![100, 32, 57];
for i in &v {
println!("{i}");
}
}for loopเรายัง iterate ผ่าน mutable reference ของแต่ละ element ใน vector
mutable เพื่อทำการเปลี่ยนกับ element ทั้งหมดได้ for loop ใน Listing 8-8
จะเพิ่ม 50 ให้แต่ละ element
fn main() {
let mut v = vec![100, 32, 57];
for i in &mut v {
*i += 50;
}
}ในการเปลี่ยนค่าที่ mutable reference อ้างถึง เราต้องใช้ dereference
operator * เพื่อรับค่าใน i ก่อนเราใช้ operator += ได้ เราจะพูดถึง
dereference operator เพิ่มในส่วน
“ตาม Reference ไปยังค่า” ของบทที่ 15
การ iterate ผ่าน vector ไม่ว่า immutable หรือ mutable ปลอดภัยเพราะกฎ
ของ borrow checker ถ้าเราพยายามแทรกหรือลบ item ใน body ของ for loop
ใน Listing 8-7 และ Listing 8-8 เราจะได้ compiler error คล้ายกับที่เราได้
กับโค้ดใน Listing 8-6 reference ของ vector ที่ for loop ถือ ป้องกัน
การแก้ทั้ง vector พร้อมกัน
ใช้ Enum เก็บ Type หลายตัว
Vector เก็บได้แค่ค่าของ type เดียวกัน นี่อาจไม่สะดวก มีแน่นอน use case ที่ต้องการเก็บ list ของ item ที่ต่างกัน โชคดี variant ของ enum ถูก ประกาศใต้ enum type เดียวกัน ดังนั้นเมื่อเราต้องการ type หนึ่งแทน element ของ type ต่างกัน เราประกาศและใช้ enum ได้!
เช่น สมมติเราอยากรับค่าจาก row ใน spreadsheet ที่บาง column ใน row มี integer บางอันมี floating-point number และบางอันมี string เราประกาศ enum ที่ variant จะเก็บ value type ต่างกันได้ และ variant ของ enum ทั้งหมดจะถือเป็น type เดียวกัน คือของ enum จากนั้นเราสร้าง vector เก็บ enum นั้น และสุดท้ายเก็บ type ต่างกันได้ เราแสดงสิ่งนี้ใน Listing 8-9
fn main() {
enum SpreadsheetCell {
Int(i32),
Float(f64),
Text(String),
}
let row = vec![
SpreadsheetCell::Int(3),
SpreadsheetCell::Text(String::from("blue")),
SpreadsheetCell::Float(10.12),
];
}Rust ต้องรู้ว่า type อะไรจะอยู่ใน vector ตอน compile time เพื่อให้รู้ว่า
ต้องการหน่วยความจำเท่าไรบน heap ในการเก็บแต่ละ element เราต้อง explicit
ด้วยว่า type อะไรอนุญาตใน vector นี้ ถ้า Rust อนุญาตให้ vector เก็บ type
ใด ๆ จะมีโอกาสที่ type หนึ่งหรือมากกว่าจะทำให้เกิด error กับ operation
ที่ทำบน element ของ vector การใช้ enum บวก match expression หมายความ
ว่า Rust จะรับประกันที่ compile time ว่าทุกกรณีที่เป็นไปได้ถูกจัดการ ดัง
ที่พูดถึงในบทที่ 6
ถ้าคุณไม่รู้ชุด exhaustive ของ type ที่โปรแกรมจะได้ตอน runtime เพื่อเก็บ ใน vector เทคนิค enum จะไม่ทำงาน แทน คุณใช้ trait object ได้ ซึ่งเราจะ ครอบคลุมในบทที่ 18
ตอนนี้เราพูดถึงวิธีที่ใช้ vector บ่อยที่สุดบางตัวแล้ว อย่าลืมทบทวน
API documentation สำหรับเมธอดที่มีประโยชน์
มากมายทั้งหมดที่ประกาศบน Vec<T> โดย standard library เช่น เพิ่มเติม
จาก push เมธอด pop ลบและ return element สุดท้าย
การ Drop Vector ทำให้ Drop Element ของมัน
เหมือนกับ struct อื่นใด vector ถูก free เมื่อมันออกจาก scope ดังที่
annotate ใน Listing 8-10
fn main() {
{
let v = vec![1, 2, 3, 4];
// do stuff with v
} // <- v goes out of scope and is freed here
}เมื่อ vector ถูก drop เนื้อหาทั้งหมดของมันก็ถูก drop ด้วย หมายความว่า integer ที่มันเก็บจะถูก cleanup borrow checker รับประกันว่า reference ใด ๆ ของเนื้อหา vector ถูกใช้แค่ขณะที่ vector เองยัง valid
มาไปที่ collection type ถัดไป — String!
เก็บข้อความ UTF-8 ด้วย string
เก็บข้อความ UTF-8 ด้วย String
เราพูดถึง string ในบทที่ 4 แต่เราจะดูในรายละเอียดเพิ่มเติมตอนนี้ Rustacean ใหม่มักติดที่ string ด้วยเหตุผลสามอย่างรวมกัน — แนวโน้มของ Rust ในการเปิดเผย error ที่เป็นไปได้, string เป็นโครงสร้างข้อมูลที่ซับซ้อนกว่า โปรแกรมเมอร์หลายคนให้เครดิตมัน, และ UTF-8 ปัจจัยเหล่านี้รวมกันในแบบที่ดู ยากเมื่อคุณมาจากภาษาโปรแกรมอื่น
เราพูดถึง string ในบริบทของ collection เพราะ string ถูก implement เป็น
collection ของ byte บวกบางเมธอดเพื่อให้ functionality ที่มีประโยชน์เมื่อ
byte เหล่านั้นถูกตีความเป็นข้อความ ในส่วนนี้เราจะพูดถึง operation บน
String ที่ทุก collection type มี เช่นการสร้าง, update และอ่าน เราจะ
พูดถึงวิธีที่ String ต่างจาก collection อื่น คือวิธีที่การ index เข้า
String ซับซ้อนเพราะความต่างระหว่างวิธีที่คนและคอมพิวเตอร์ตีความข้อมูล
String
นิยาม String
เราจะนิยามก่อนว่าเราหมายถึงอะไรด้วยคำว่า string Rust มี type string
เดียวในภาษาแกน ซึ่งคือ string slice str ที่มักเห็นในรูป borrow ของมัน
&str ในบทที่ 4 เราพูดถึง string slice ซึ่งเป็น reference ของข้อมูล
string ที่ encode UTF-8 ที่เก็บที่อื่น String literal ถูกเก็บใน binary
ของโปรแกรม จึงเป็น string slice
Type String ที่ standard library ของ Rust ให้ ไม่ใช่ถูก code เข้าไป
ภาษาแกน เป็น string type ที่เติบโตได้, mutable, owned และ encode UTF-8
เมื่อ Rustacean อ้างถึง “string” ใน Rust พวกเขาอาจหมายถึง type String
หรือ string slice &str ไม่ใช่แค่ตัวเดียว แม้ส่วนนี้ส่วนใหญ่เกี่ยวกับ
String ทั้งสอง type ใช้บ่อยใน standard library ของ Rust และทั้ง
String และ string slice encode UTF-8
สร้าง String ใหม่
operation จำนวนมากที่เหมือนกันที่มีกับ Vec<T> มีกับ String ด้วย
เพราะ String จริง ๆ ถูก implement เป็น wrapper รอบ vector ของ byte
พร้อมการรับประกัน, ข้อจำกัด และ capability เพิ่มเติม ตัวอย่างฟังก์ชันที่
ทำงานแบบเดียวกันกับ Vec<T> และ String คือฟังก์ชัน new เพื่อสร้าง
instance ดังที่แสดงใน Listing 8-11
fn main() {
let mut s = String::new();
}String ว่างใหม่บรรทัดนี้สร้าง string ว่างใหม่ชื่อ s ที่เรา load ข้อมูลเข้าได้ บ่อย
ครั้งเราจะมีข้อมูลเริ่มต้นที่เราอยากเริ่ม string ด้วย สำหรับนั้น เราใช้
เมธอด to_string ซึ่งมีให้บน type ใดที่ implement trait Display
เหมือนที่ string literal ทำ Listing 8-12 แสดงสองตัวอย่าง
fn main() {
let data = "initial contents";
let s = data.to_string();
// The method also works on a literal directly:
let s = "initial contents".to_string();
}to_string สร้าง String จาก string literalโค้ดนี้สร้าง string ที่มี initial contents
เรายังใช้ฟังก์ชัน String::from สร้าง String จาก string literal ได้
โค้ดใน Listing 8-13 เทียบเท่ากับโค้ดใน Listing 8-12 ที่ใช้ to_string
fn main() {
let s = String::from("initial contents");
}String::from สร้าง String จาก string literalเพราะ string ใช้สำหรับหลายสิ่ง เราใช้ generic API ต่าง ๆ มากมายสำหรับ
string ได้ ให้ตัวเลือกเราเยอะ บางอันอาจดูซ้ำซ้อน แต่ทั้งหมดมีที่ของมัน!
ในกรณีนี้ String::from และ to_string ทำสิ่งเดียวกัน เลือกตัวไหนจึง
เป็นเรื่องสไตล์และความอ่านง่าย
จำไว้ว่า string encode UTF-8 เรารวมข้อมูลที่ encode ถูกต้องใด ๆ ในนั้น ได้ ดังที่แสดงใน Listing 8-14
fn main() {
let hello = String::from("السلام عليكم");
let hello = String::from("Dobrý den");
let hello = String::from("Hello");
let hello = String::from("שלום");
let hello = String::from("नमस्ते");
let hello = String::from("こんにちは");
let hello = String::from("안녕하세요");
let hello = String::from("你好");
let hello = String::from("Olá");
let hello = String::from("Здравствуйте");
let hello = String::from("Hola");
}ทั้งหมดเหล่านี้เป็นค่า String ที่ valid
Update String
String เติบโตในขนาดและเนื้อหาของมันเปลี่ยนได้ เหมือนเนื้อหาของ Vec<T>
ถ้าคุณ push ข้อมูลเพิ่มเข้ามัน นอกจากนี้ คุณใช้ operator + หรือ macro
format! เพื่อต่อค่า String ได้สะดวก
ต่อท้ายด้วย push_str หรือ push
เราขยาย String โดยใช้เมธอด push_str เพื่อต่อ string slice ดังที่แสดง
ใน Listing 8-15
fn main() {
let mut s = String::from("foo");
s.push_str("bar");
}String ด้วยเมธอด push_strหลังสองบรรทัดนี้ s จะมี foobar เมธอด push_str รับ string slice
เพราะเราไม่จำเป็นต้องรับ ownership ของ parameter เช่น ในโค้ดใน Listing
8-16 เราอยากใช้ s2 หลังต่อเนื้อหาของมันเข้า s1
fn main() {
let mut s1 = String::from("foo");
let s2 = "bar";
s1.push_str(s2);
println!("s2 is {s2}");
}Stringถ้าเมธอด push_str รับ ownership ของ s2 เราจะพิมพ์ค่าในบรรทัดสุดท้าย
ไม่ได้ อย่างไรก็ตาม โค้ดนี้ทำงานตามที่เราคาด!
เมธอด push รับอักขระเดียวเป็น parameter และเพิ่มมันเข้า String
Listing 8-17 เพิ่มตัวอักษร l เข้า String โดยใช้เมธอด push
fn main() {
let mut s = String::from("lo");
s.push('l');
}String โดยใช้ pushผลลัพธ์ s จะมี lol
ต่อด้วย + หรือ format!
บ่อยครั้งคุณจะอยากรวม string สองตัวที่มีอยู่ วิธีหนึ่งในการทำคือใช้
operator + ดังที่แสดงใน Listing 8-18
fn main() {
let s1 = String::from("Hello, ");
let s2 = String::from("world!");
let s3 = s1 + &s2; // note s1 has been moved here and can no longer be used
}+ รวมค่า String สองตัวเป็นค่า String ใหม่string s3 จะมี Hello, world! เหตุผลที่ s1 ไม่ valid อีกหลังการบวก
และเหตุผลที่เราใช้ reference ของ s2 เกี่ยวกับ signature ของเมธอดที่
ถูกเรียกเมื่อเราใช้ operator + Operator + ใช้เมธอด add ซึ่ง
signature ดูประมาณนี้:
fn add(self, s: &str) -> String {ใน standard library คุณจะเห็น add ประกาศโดยใช้ generic และ associated
type ที่นี่เราแทนด้วย type คอนกรีต ซึ่งเป็นสิ่งที่เกิดขึ้นเมื่อเราเรียก
เมธอดนี้ด้วยค่า String เราจะพูดถึง generic ในบทที่ 10 Signature นี้ให้
เบาะแสที่เราต้องการเพื่อเข้าใจส่วนยาก ๆ ของ operator +
ขั้นแรก s2 มี & หมายความว่าเรากำลังเพิ่ม reference ของ string ที่สอง
เข้า string แรก นี่เพราะ parameter s ในฟังก์ชัน add — เราเพิ่มได้แค่
string slice เข้า String เราเพิ่มค่า String สองตัวเข้าด้วยกันไม่ได้
แต่เดี๋ยว — type ของ &s2 คือ &String ไม่ใช่ &str ตามที่ระบุใน
parameter ที่สองของ add แล้วทำไม Listing 8-18 compile ผ่าน?
เหตุผลที่เราใช้ &s2 ในการเรียก add ได้คือ compiler บีบ argument
&String เป็น &str ได้ เมื่อเราเรียกเมธอด add Rust ใช้ deref
coercion ซึ่งที่นี่เปลี่ยน &s2 เป็น &s2[..] เราจะพูดถึง deref
coercion ในรายละเอียดเพิ่มเติมในบทที่ 15 เพราะ add ไม่รับ ownership
ของ parameter s s2 จะยังเป็น String valid หลัง operation นี้
ขั้นที่สอง เราเห็นใน signature ว่า add รับ ownership ของ self เพราะ
self ไม่ มี & นี่หมายความว่า s1 ใน Listing 8-18 จะถูก move เข้า
การเรียก add และจะไม่ valid หลังจากนั้น ดังนั้นแม้ let s3 = s1 + &s2;
ดูเหมือนจะคัดลอกทั้งสอง string และสร้างใหม่ statement นี้จริง ๆ รับ
ownership ของ s1 ต่อสำเนาเนื้อหาของ s2 แล้ว return ownership ของผล
พูดอีกอย่าง มันดูเหมือนทำสำเนาเยอะ แต่ไม่ — implementation มีประสิทธิภาพ
กว่าการคัดลอก
ถ้าเราต้องต่อ string หลายตัว พฤติกรรมของ operator + กลายเป็นไม่สะดวก:
fn main() {
let s1 = String::from("tic");
let s2 = String::from("tac");
let s3 = String::from("toe");
let s = s1 + "-" + &s2 + "-" + &s3;
}ณ จุดนี้ s จะเป็น tic-tac-toe ด้วยอักขระ + และ " ทั้งหมด ยากที่
จะเห็นสิ่งที่เกิดขึ้น สำหรับการรวม string ในแบบที่ซับซ้อนกว่า เราใช้
macro format! แทนได้:
fn main() {
let s1 = String::from("tic");
let s2 = String::from("tac");
let s3 = String::from("toe");
let s = format!("{s1}-{s2}-{s3}");
}โค้ดนี้ก็ set s เป็น tic-tac-toe macro format! ทำงานเหมือน
println! แต่แทนการพิมพ์ output ออกหน้าจอ มัน return String ที่มี
เนื้อหา version ของโค้ดที่ใช้ format! อ่านง่ายกว่ามาก และโค้ดที่
generate โดย macro format! ใช้ reference การเรียกนี้จึงไม่รับ
ownership ของ parameter ใด ๆ
Index เข้า String
ในภาษาโปรแกรมอื่นหลายภาษา การเข้าถึงอักขระแต่ละตัวใน string โดยอ้างถึง
ด้วย index เป็น operation ที่ valid และใช้บ่อย อย่างไรก็ตาม ถ้าคุณ
พยายามเข้าถึงส่วนของ String โดยใช้ indexing syntax ใน Rust คุณจะได้
error พิจารณาโค้ด invalid ใน Listing 8-19
fn main() {
let s1 = String::from("hi");
let h = s1[0];
}Stringโค้ดนี้จะให้ error ต่อไปนี้:
$ cargo run
Compiling collections v0.1.0 (file:///projects/collections)
error[E0277]: the type `str` cannot be indexed by `{integer}`
--> src/main.rs:3:16
|
3 | let h = s1[0];
| ^ string indices are ranges of `usize`
|
= help: the trait `SliceIndex<str>` is not implemented for `{integer}`
= note: you can use `.chars().nth()` or `.bytes().nth()`
for more information, see chapter 8 in The Book: <https://doc.rust-lang.org/book/ch08-02-strings.html#indexing-into-strings>
= help: the following other types implement trait `SliceIndex<T>`:
`usize` implements `SliceIndex<ByteStr>`
`usize` implements `SliceIndex<[T]>`
= note: required for `String` to implement `Index<{integer}>`
For more information about this error, try `rustc --explain E0277`.
error: could not compile `collections` (bin "collections") due to 1 previous error
Error บอกเรื่อง — string ของ Rust ไม่รองรับ indexing แต่ทำไม? ในการตอบ คำถามนั้น เราต้องพูดถึงวิธีที่ Rust เก็บ string ในหน่วยความจำ
Representation ภายใน
String คือ wrapper ของ Vec<u8> มาดู string ตัวอย่างที่ encode UTF-8
อย่างถูกต้องของเราจาก Listing 8-14 ก่อน ตัวนี้:
fn main() {
let hello = String::from("السلام عليكم");
let hello = String::from("Dobrý den");
let hello = String::from("Hello");
let hello = String::from("שלום");
let hello = String::from("नमस्ते");
let hello = String::from("こんにちは");
let hello = String::from("안녕하세요");
let hello = String::from("你好");
let hello = String::from("Olá");
let hello = String::from("Здравствуйте");
let hello = String::from("Hola");
}ในกรณีนี้ len จะเป็น 4 หมายความว่า vector ที่เก็บ string "Hola"
ยาว 4 byte แต่ละตัวอักษรเหล่านี้กิน 1 byte เมื่อ encode ใน UTF-8 อย่างไร
ก็ตาม บรรทัดต่อไปนี้อาจทำให้คุณประหลาดใจ (หมายเหตุว่า string นี้ขึ้นต้น
ด้วยตัวอักษร Cyrillic capital Ze ไม่ใช่เลข 3):
fn main() {
let hello = String::from("السلام عليكم");
let hello = String::from("Dobrý den");
let hello = String::from("Hello");
let hello = String::from("שלום");
let hello = String::from("नमस्ते");
let hello = String::from("こんにちは");
let hello = String::from("안녕하세요");
let hello = String::from("你好");
let hello = String::from("Olá");
let hello = String::from("Здравствуйте");
let hello = String::from("Hola");
}ถ้าถามว่า string ยาวเท่าไร คุณอาจตอบ 12 จริง ๆ คำตอบของ Rust คือ 24 — นั่นคือจำนวน byte ที่ใช้ encode “Здравствуйте” ใน UTF-8 เพราะแต่ละ Unicode scalar value ใน string นั้นกิน 2 byte ของ storage ดังนั้น index เข้า byte ของ string จะไม่สอดคล้องกับ Unicode scalar value ที่ valid เสมอ เพื่อแสดง พิจารณาโค้ด Rust invalid นี้:
let hello = "Здравствуйте";
let answer = &hello[0];คุณรู้แล้วว่า answer จะไม่ใช่ З ตัวอักษรแรก เมื่อ encode ใน UTF-8
byte แรกของ З คือ 208 และที่สองคือ 151 จึงดูเหมือน answer ควร
เป็น 208 จริง ๆ แต่ 208 ไม่ใช่อักขระ valid เอง ๆ การ return 208
คงไม่ใช่สิ่งที่ user อยากได้ถ้าเขาขอตัวอักษรแรกของ string นี้ แต่นั่น
คือข้อมูลเดียวที่ Rust มีที่ byte index 0 user โดยทั่วไปไม่อยากให้ค่า
byte return แม้ string มีแค่ตัวอักษร Latin — ถ้า &"hi"[0] เป็นโค้ด
valid ที่ return ค่า byte มันจะ return 104 ไม่ใช่ h
คำตอบจึงคือ เพื่อหลีกเลี่ยงการ return ค่าที่ไม่คาด และทำให้เกิด bug ที่ อาจไม่ค้นพบทันที Rust ไม่ compile โค้ดนี้เลย และป้องกันความเข้าใจผิดแต่ เนิ่นในกระบวนการพัฒนา
Byte, Scalar Value และ Grapheme Cluster
อีกจุดเรื่อง UTF-8 คือมีจริง ๆ สามวิธีที่เกี่ยวข้องในการดู string จาก มุมมองของ Rust — เป็น byte, scalar value และ grapheme cluster (สิ่งที่ ใกล้ที่สุดกับสิ่งที่เราจะเรียก ตัวอักษร)
ถ้าเราดูคำฮินดี “नमस्ते” ที่เขียนใน Devanagari script มันถูกเก็บเป็น
vector ของค่า u8 ที่ดูเป็นแบบนี้:
[224, 164, 168, 224, 164, 174, 224, 164, 184, 224, 165, 141, 224, 164, 164,
224, 165, 135]
นั่น 18 byte และเป็นวิธีที่คอมพิวเตอร์เก็บข้อมูลนี้ในที่สุด ถ้าเราดูพวก
มันเป็น Unicode scalar value ซึ่งเป็นสิ่งที่ type char ของ Rust เป็น
byte เหล่านั้นดูเป็นแบบนี้:
['न', 'म', 'स', '्', 'त', 'े']
มีค่า char หกตัวที่นี่ แต่ตัวที่สี่และหกไม่ใช่ตัวอักษร — พวกมันเป็น
diacritic ที่ไม่มีความหมายเอง ๆ สุดท้าย ถ้าเราดูพวกมันเป็น grapheme
cluster เราจะได้สิ่งที่คนจะเรียกตัวอักษรสี่ตัวที่ประกอบเป็นคำฮินดี:
["न", "म", "स्", "ते"]
Rust ให้วิธีต่างกันในการตีความข้อมูล string ดิบที่คอมพิวเตอร์เก็บ เพื่อ ให้แต่ละโปรแกรมเลือกการตีความที่ต้องการ ไม่ว่าข้อมูลเป็นภาษามนุษย์ใด
เหตุผลสุดท้ายที่ Rust ไม่ให้เรา index เข้า String เพื่อรับอักขระคือ
operation indexing คาดว่าจะใช้เวลา constant เสมอ (O(1)) แต่เป็นไปไม่ได้
ที่จะรับประกัน performance นั้นกับ String เพราะ Rust จะต้องเดินผ่าน
เนื้อหาจากต้นถึง index เพื่อกำหนดว่ามีกี่อักขระ valid
Slice String
การ index เข้า string มักเป็นความคิดไม่ดี เพราะไม่ชัดเจนว่า return type ของ operation string-indexing ควรเป็น — byte value, อักขระ, grapheme cluster หรือ string slice ถ้าคุณต้องการใช้ index จริง ๆ เพื่อสร้าง string slice ดังนั้น Rust ขอให้คุณเฉพาะมากขึ้น
แทนการ index โดยใช้ [] กับตัวเลขเดียว คุณใช้ [] กับ range เพื่อสร้าง
string slice ที่มี byte เฉพาะได้:
#![allow(unused)]
fn main() {
let hello = "Здравствуйте";
let s = &hello[0..4];
}ที่นี่ s จะเป็น &str ที่มี byte 4 ตัวแรกของ string ก่อนหน้านี้เราเอ่ย
ว่าแต่ละอักขระเหล่านี้คือ 2 byte ซึ่งหมายความว่า s จะเป็น Зд
ถ้าเราลอง slice แค่ส่วนของ byte ของอักขระด้วยอย่าง &hello[0..1] Rust
จะ panic ตอน runtime ในแบบเดียวกับถ้า index invalid ถูกเข้าถึงใน vector:
$ cargo run
Compiling collections v0.1.0 (file:///projects/collections)
Finished `dev` profile [unoptimized + debuginfo] target(s) in 0.43s
Running `target/debug/collections`
thread 'main' panicked at src/main.rs:4:19:
byte index 1 is not a char boundary; it is inside 'З' (bytes 0..2) of `Здравствуйте`
note: run with `RUST_BACKTRACE=1` environment variable to display a backtrace
คุณควรระวังเมื่อสร้าง string slice ด้วย range เพราะการทำเช่นนั้นอาจ crash โปรแกรมของคุณ
Iterate ผ่าน String
วิธีดีที่สุดในการ operate บนชิ้นของ string คือ explicit ว่าคุณอยากได้
อักขระหรือ byte สำหรับ Unicode scalar value แต่ละค่า ใช้เมธอด chars
การเรียก chars บน “Зд” แยกและ return ค่าสองค่าของ type char และคุณ
iterate ผ่านผลเพื่อเข้าถึงแต่ละ element ได้:
#![allow(unused)]
fn main() {
for c in "Зд".chars() {
println!("{c}");
}
}โค้ดนี้จะพิมพ์ต่อไปนี้:
З
д
ทางเลือก เมธอด bytes return แต่ละ byte ดิบ ซึ่งอาจเหมาะกับ domain ของ
คุณ:
#![allow(unused)]
fn main() {
for b in "Зд".bytes() {
println!("{b}");
}
}โค้ดนี้จะพิมพ์ 4 byte ที่ประกอบเป็น string นี้:
208
151
208
180
แต่อย่าลืมจำว่า Unicode scalar value ที่ valid อาจประกอบจาก byte มากกว่า 1 ตัว
การรับ grapheme cluster จาก string เหมือนกับ Devanagari script ซับซ้อน functionality นี้จึงไม่ให้โดย standard library Crate มีให้ที่ crates.io ถ้าคุณต้องการ functionality นี้
จัดการความซับซ้อนของ String
สรุป string ซับซ้อน ภาษาโปรแกรมต่างกันเลือกต่างกันในการนำเสนอความซับซ้อน
นี้ให้โปรแกรมเมอร์ Rust เลือกทำให้การจัดการข้อมูล String ที่ถูกต้องเป็น
พฤติกรรม default สำหรับโปรแกรม Rust ทั้งหมด ซึ่งหมายความว่าโปรแกรมเมอร์
ต้องคิดมากขึ้นเรื่องการจัดการข้อมูล UTF-8 ตั้งแต่ต้น Trade-off นี้เปิด
เผยความซับซ้อนของ string มากกว่าที่เห็นในภาษาโปรแกรมอื่น แต่มันป้องกัน
คุณจากการต้องจัดการ error ที่เกี่ยวกับอักขระไม่ใช่ ASCII ทีหลังในวงจรการ
พัฒนาของคุณ
ข่าวดีคือ standard library มี functionality มากมายที่สร้างจาก type
String และ &str เพื่อช่วยจัดการสถานการณ์ซับซ้อนเหล่านี้อย่างถูกต้อง
อย่าลืมเช็ค documentation สำหรับเมธอดที่มีประโยชน์อย่าง contains สำหรับ
ค้นหาใน string และ replace สำหรับแทนที่ส่วนของ string ด้วย string อื่น
มาเปลี่ยนไปสิ่งที่ซับซ้อนน้อยกว่านิดหน่อย — hash map!
เก็บคู่ key-value ด้วย hash map
เก็บ Key พร้อมค่าที่ผูกกันด้วย Hash Map
Collection ที่ใช้บ่อยตัวสุดท้ายของเราคือ hash map type HashMap<K, V>
เก็บการ map ของ key type K กับค่า type V โดยใช้ hashing function
ซึ่งกำหนดว่ามันวาง key และค่าเหล่านี้ในหน่วยความจำอย่างไร ภาษาโปรแกรม
หลายภาษารองรับโครงสร้างข้อมูลชนิดนี้ แต่มักใช้ชื่อต่าง เช่น hash,
map, object, hash table, dictionary หรือ associative array
เป็นต้น
Hash map มีประโยชน์เมื่อคุณอยาก lookup ข้อมูล ไม่ใช่โดยใช้ index อย่างที่ คุณทำได้กับ vector แต่โดยใช้ key ที่เป็น type ใดก็ได้ เช่น ในเกม คุณติด ตามคะแนนของแต่ละทีมใน hash map ได้ ที่แต่ละ key เป็นชื่อทีมและค่าเป็น คะแนนของแต่ละทีม เมื่อให้ชื่อทีม คุณดึงคะแนนได้
เราจะดู API พื้นฐานของ hash map ในส่วนนี้ แต่ของดีอีกมากซ่อนในฟังก์ชันที่
ประกาศบน HashMap<K, V> โดย standard library เช่นเคย เช็ค documentation
ของ standard library สำหรับข้อมูลเพิ่มเติม
สร้าง Hash Map ใหม่
วิธีหนึ่งในการสร้าง hash map ว่างคือใช้ new และเพิ่ม element ด้วย
insert ใน Listing 8-20 เรากำลังติดตามคะแนนของสองทีมที่ชื่อ Blue และ
Yellow ทีม Blue เริ่มที่ 10 คะแนน และทีม Yellow เริ่มที่ 50
fn main() {
use std::collections::HashMap;
let mut scores = HashMap::new();
scores.insert(String::from("Blue"), 10);
scores.insert(String::from("Yellow"), 50);
}หมายเหตุว่าเราต้อง use HashMap จากส่วน collection ของ standard
library ก่อน จาก collection ที่ใช้บ่อยสามตัวของเรา ตัวนี้ใช้น้อยที่สุด
มันจึงไม่รวมในฟีเจอร์ที่นำเข้า scope อัตโนมัติใน prelude Hash map ยังมี
support จาก standard library น้อยกว่า — ไม่มี macro built-in สำหรับ
สร้างพวกมัน เช่น
เหมือนกับ vector hash map เก็บข้อมูลบน heap HashMap นี้มี key type
String และค่า type i32 เหมือนกับ vector hash map เป็น homogeneous —
key ทั้งหมดต้องมี type เดียวกัน และค่าทั้งหมดต้องมี type เดียวกัน
เข้าถึงค่าใน Hash Map
เราดึงค่าออกจาก hash map ได้โดยให้ key ของมันกับเมธอด get ดังที่แสดง
ใน Listing 8-21
fn main() {
use std::collections::HashMap;
let mut scores = HashMap::new();
scores.insert(String::from("Blue"), 10);
scores.insert(String::from("Yellow"), 50);
let team_name = String::from("Blue");
let score = scores.get(&team_name).copied().unwrap_or(0);
}ที่นี่ score จะมีค่าที่ผูกกับทีม Blue และผลจะเป็น 10 เมธอด get
return Option<&V> — ถ้าไม่มีค่าสำหรับ key นั้นใน hash map get จะ
return None โปรแกรมนี้จัดการ Option โดยเรียก copied เพื่อรับ
Option<i32> แทน Option<&i32> แล้ว unwrap_or set score เป็นศูนย์
ถ้า scores ไม่มี entry สำหรับ key
เรา iterate ผ่านแต่ละคู่ key-value ใน hash map ได้ในแบบคล้ายที่เราทำกับ
vector โดยใช้ for loop:
fn main() {
use std::collections::HashMap;
let mut scores = HashMap::new();
scores.insert(String::from("Blue"), 10);
scores.insert(String::from("Yellow"), 50);
for (key, value) in &scores {
println!("{key}: {value}");
}
}โค้ดนี้จะพิมพ์แต่ละคู่ในลำดับสุ่ม:
Yellow: 50
Blue: 10
จัดการ Ownership ใน Hash Map
สำหรับ type ที่ implement trait Copy อย่าง i32 ค่าถูกคัดลอกเข้า hash
map สำหรับค่าที่ owned อย่าง String ค่าจะถูก move และ hash map จะเป็น
owner ของค่าเหล่านั้น ดังที่แสดงใน Listing 8-22
fn main() {
use std::collections::HashMap;
let field_name = String::from("Favorite color");
let field_value = String::from("Blue");
let mut map = HashMap::new();
map.insert(field_name, field_value);
// field_name and field_value are invalid at this point, try using them and
// see what compiler error you get!
}เราใช้ตัวแปร field_name และ field_value ไม่ได้หลังจากพวกมันถูก move
เข้า hash map ด้วยการเรียก insert
ถ้าเราแทรก reference ของค่าเข้า hash map ค่าจะไม่ถูก move เข้า hash map ค่าที่ reference ชี้ไปต้อง valid อย่างน้อยตราบที่ hash map valid เราจะ พูดถึงปัญหาเหล่านี้เพิ่มใน “ตรวจสอบ Reference ด้วย Lifetime” ในบทที่ 10
Update Hash Map
แม้จำนวนคู่ key และค่าจะเติบโตได้ แต่ละ key ที่ไม่ซ้ำมีค่าผูกอยู่ได้แค่
ค่าเดียวในเวลาเดียว (แต่ไม่ตรงข้าม — เช่น ทั้งทีม Blue และทีม Yellow มี
ค่า 10 เก็บใน hash map scores ได้)
เมื่อคุณอยากเปลี่ยนข้อมูลใน hash map คุณต้องตัดสินใจวิธีจัดการกรณีที่ key มีค่า assign อยู่แล้ว คุณแทนค่าเดิมด้วยค่าใหม่ ละเลยค่าเดิมโดย สมบูรณ์ได้ คุณเก็บค่าเดิมและละเว้นค่าใหม่ เพิ่มค่าใหม่เฉพาะถ้า key ยังไม่ มีค่าได้ หรือคุณรวมค่าเดิมและค่าใหม่ได้ มาดูวิธีทำแต่ละอย่าง!
เขียนทับค่า
ถ้าเราแทรก key และค่าเข้า hash map แล้วแทรก key เดียวกันด้วยค่าต่าง ค่า
ที่ผูกกับ key นั้นจะถูกแทน แม้โค้ดใน Listing 8-23 เรียก insert สอง
ครั้ง hash map จะมีแค่หนึ่งคู่ key-value เพราะเรากำลังแทรกค่าสำหรับ key
ของทีม Blue ทั้งสองครั้ง
fn main() {
use std::collections::HashMap;
let mut scores = HashMap::new();
scores.insert(String::from("Blue"), 10);
scores.insert(String::from("Blue"), 25);
println!("{scores:?}");
}โค้ดนี้จะพิมพ์ {"Blue": 25} ค่าเดิม 10 ถูกเขียนทับ
เพิ่ม Key และค่าเฉพาะถ้า Key ไม่มีอยู่
มันใช้บ่อยที่จะเช็คว่า key เฉพาะมีอยู่แล้วใน hash map พร้อมค่า แล้วทำ action ต่อไปนี้ — ถ้า key มีอยู่ใน hash map ค่าที่มีอยู่ควรอยู่เหมือนเดิม ถ้า key ไม่มี แทรกมันและค่าสำหรับมัน
Hash map มี API พิเศษสำหรับเรื่องนี้ชื่อ entry ที่รับ key ที่คุณอยาก
เช็คเป็น parameter Return value ของเมธอด entry คือ enum ชื่อ Entry
ที่แทนค่าที่อาจมีหรือไม่มี สมมติเราอยากเช็คว่า key สำหรับทีม Yellow มี
ค่าผูกกับมันไหม ถ้าไม่ เราอยากแทรกค่า 50 และเหมือนกันสำหรับทีม Blue
ด้วย API entry โค้ดดูเหมือน Listing 8-24
fn main() {
use std::collections::HashMap;
let mut scores = HashMap::new();
scores.insert(String::from("Blue"), 10);
scores.entry(String::from("Yellow")).or_insert(50);
scores.entry(String::from("Blue")).or_insert(50);
println!("{scores:?}");
}entry เพื่อแทรกเฉพาะถ้า key ยังไม่มีค่าเมธอด or_insert บน Entry ประกาศให้ return mutable reference ของค่า
สำหรับ key Entry ที่สอดคล้องถ้า key นั้นมีอยู่ และถ้าไม่ มันแทรก
parameter เป็นค่าใหม่สำหรับ key นี้ และ return mutable reference ของ
ค่าใหม่ เทคนิคนี้สะอาดกว่าการเขียน logic เองมาก และเพิ่มเติม เล่นได้ดี
ขึ้นกับ borrow checker
การรันโค้ดใน Listing 8-24 จะพิมพ์ {"Yellow": 50, "Blue": 10} การเรียก
entry ครั้งแรกจะแทรก key สำหรับทีม Yellow ด้วยค่า 50 เพราะทีม Yellow
ยังไม่มีค่า การเรียก entry ครั้งที่สองจะไม่เปลี่ยน hash map เพราะทีม
Blue มีค่า 10 อยู่แล้ว
Update ค่าตามค่าเดิม
อีก use case ที่ใช้บ่อยสำหรับ hash map คือ lookup ค่าของ key แล้ว update
ตามค่าเดิม เช่น Listing 8-25 แสดงโค้ดที่นับว่าแต่ละคำปรากฏกี่ครั้งใน
ข้อความ เราใช้ hash map ที่มีคำเป็น key และ increment ค่าเพื่อติดตามว่า
เราเห็นคำนั้นกี่ครั้ง ถ้าเป็นครั้งแรกที่เห็นคำ เราจะแทรกค่า 0 ก่อน
fn main() {
use std::collections::HashMap;
let text = "hello world wonderful world";
let mut map = HashMap::new();
for word in text.split_whitespace() {
let count = map.entry(word).or_insert(0);
*count += 1;
}
println!("{map:?}");
}โค้ดนี้จะพิมพ์ {"world": 2, "hello": 1, "wonderful": 1} คุณอาจเห็นคู่
key-value เดียวกันพิมพ์ในลำดับต่างกัน — จำได้จาก
“เข้าถึงค่าใน Hash Map” ว่าการ iterate ผ่าน
hash map เกิดในลำดับสุ่ม
เมธอด split_whitespace return iterator บน subslice ที่คั่นด้วย
whitespace ของค่าใน text เมธอด or_insert return mutable reference
(&mut V) ของค่าสำหรับ key ที่ระบุ ที่นี่เราเก็บ mutable reference นั้น
ในตัวแปร count ดังนั้นในการ assign ให้ค่านั้น เราต้อง dereference
count โดยใช้ asterisk (*) ก่อน Mutable reference ออกจาก scope ที่ท้าย
for loop การเปลี่ยนเหล่านี้ทั้งหมดจึงปลอดภัยและกฎ borrowing อนุญาต
Hashing Function
โดย default HashMap ใช้ hashing function ชื่อ SipHash ที่ให้การ
ต้านทาน denial-of-service (DoS) attack ที่เกี่ยวกับ hash
table1 นี่ไม่ใช่ hashing algorithm ที่เร็วที่สุด
แต่ trade-off สำหรับ security ที่ดีกว่าที่มากับการลด performance คุ้มค่า
ถ้าคุณ profile โค้ดและพบว่า default hash function ช้าเกินไปสำหรับจุด
ประสงค์ของคุณ คุณเปลี่ยนเป็นฟังก์ชันอื่นได้โดยระบุ hasher ต่าง hasher
คือ type ที่ implement trait BuildHasher เราจะพูดถึง trait และวิธี
implement ใน บทที่ 10 คุณไม่จำเป็นต้อง implement
hasher ของคุณเองจากศูนย์ crates.io
มี library ที่แชร์โดย user Rust อื่นที่ให้ hasher ที่ implement hashing
algorithm ที่ใช้บ่อยหลายตัว
สรุป
Vector, string และ hash map จะให้ functionality มากที่จำเป็นในโปรแกรม เมื่อคุณต้องเก็บ เข้าถึง และแก้ข้อมูล นี่คือแบบฝึกหัดที่ตอนนี้คุณควร แก้ได้:
- ให้ list ของ integer ใช้ vector และ return median (เมื่อเรียง ค่าใน ตำแหน่งกลาง) และ mode (ค่าที่เกิดบ่อยที่สุด — hash map จะช่วยตรงนี้) ของ list
- แปลง string เป็น Pig Latin พยัญชนะแรกของแต่ละคำถูกย้ายไปท้ายคำ และ เพิ่ม ay ดังนั้น first กลายเป็น irst-fay คำที่ขึ้นต้นด้วยสระ เพิ่ม hay ที่ท้ายแทน (apple กลายเป็น apple-hay) จำรายละเอียด เกี่ยวกับ UTF-8 encoding ไว้!
- ใช้ hash map และ vector สร้าง text interface ให้ user เพิ่มชื่อพนัก งานเข้าแผนกในบริษัทได้ เช่น “Add Sally to Engineering” หรือ “Add Amir to Sales” จากนั้นให้ user ดึง list ของคนทั้งหมดในแผนก หรือคน ทั้งหมดในบริษัทแยกตามแผนก เรียงตามตัวอักษร
API documentation ของ standard library อธิบายเมธอดที่ vector, string และ hash map มี ที่จะช่วยกับแบบฝึกหัดเหล่านี้!
เรากำลังเข้าสู่โปรแกรมที่ซับซ้อนขึ้นที่ operation ล้มเหลวได้ ดังนั้นเป็น เวลาที่สมบูรณ์แบบที่จะพูดถึงการจัดการ error เราจะทำเรื่องนั้นต่อไป!
การจัดการ Error
Error เป็นข้อเท็จจริงของชีวิตใน software ดังนั้น Rust จึงมีฟีเจอร์หลาย ตัวสำหรับจัดการสถานการณ์ที่อะไรบางอย่างผิดพลาด ในหลายกรณี Rust บังคับให้ คุณยอมรับความเป็นไปได้ของ error และทำ action บางอย่างก่อนโค้ดของคุณจะ compile ผ่าน ข้อกำหนดนี้ทำให้โปรแกรมของคุณแข็งแกร่งขึ้น โดยรับประกันว่า คุณจะค้นพบ error และจัดการอย่างเหมาะสมก่อน deploy โค้ดของคุณไป production!
Rust จัดกลุ่ม error เป็นสองหมวดหลัก — recoverable และ unrecoverable error สำหรับ recoverable error เช่น error file not found เราคงแค่ อยากรายงานปัญหาให้ user และลอง operation ใหม่ Unrecoverable error มักเป็นอาการของ bug เช่น พยายามเข้าถึงตำแหน่งหลังท้าย array เราจึงอยาก หยุดโปรแกรมทันที
ภาษาส่วนใหญ่ไม่แยก error สองชนิดนี้และจัดการทั้งคู่ในแบบเดียวกัน โดยใช้
กลไกอย่าง exception Rust ไม่มี exception แทน มันมี type Result<T, E>
สำหรับ recoverable error และ macro panic! ที่หยุด execution เมื่อโปรแกรม
เจอ unrecoverable error บทนี้ครอบคลุมการเรียก panic! ก่อน แล้วพูดถึง
การ return ค่า Result<T, E> นอกจากนี้ เราจะสำรวจข้อพิจารณาเมื่อตัดสิน
ใจว่าจะลอง recover จาก error หรือหยุด execution
Unrecoverable error ด้วย panic!
Unrecoverable Error ด้วย panic!
บางครั้งสิ่งร้ายเกิดในโค้ดของคุณ และไม่มีอะไรคุณทำได้เกี่ยวกับมัน ใน
กรณีเหล่านี้ Rust มี macro panic! มีสองวิธีที่ทำให้เกิด panic ในทาง
ปฏิบัติ — โดยทำ action ที่ทำให้โค้ดเรา panic (เช่นเข้าถึง array หลังท้าย)
หรือเรียก macro panic! แบบ explicit ในทั้งสองกรณี เราทำให้เกิด panic
ในโปรแกรมของเรา โดย default panic เหล่านี้จะพิมพ์ failure message,
unwind, cleanup stack และออก ผ่าน environment variable คุณยังให้ Rust
แสดง call stack เมื่อ panic เกิดได้ เพื่อทำให้ง่ายขึ้นในการตามหาแหล่งของ
panic
Unwind Stack หรือ Abort เมื่อเกิด Panic
โดย default เมื่อ panic เกิด โปรแกรมเริ่ม unwind ซึ่งหมายความว่า Rust เดินกลับขึ้น stack และ cleanup ข้อมูลจากแต่ละฟังก์ชันที่มันเจอ อย่างไรก็ตาม การเดินกลับและ cleanup เป็นงานเยอะ Rust จึงให้คุณเลือก ทางเลือกของการ abort ทันที ซึ่งจบโปรแกรมโดยไม่ cleanup
หน่วยความจำที่โปรแกรมใช้จะต้องถูก cleanup โดย OS ถ้าในโปรเจกต์ของคุณ
ต้องทำให้ binary ผลลัพธ์เล็กที่สุดเท่าที่ทำได้ คุณเปลี่ยนจาก unwind
เป็น abort เมื่อ panic ได้ โดยเพิ่ม panic = 'abort' เข้าใน section
[profile] ที่เหมาะสมในไฟล์ Cargo.toml ของคุณ เช่น ถ้าคุณอยาก abort
ตอน panic ใน release mode เพิ่มนี้:
[profile.release]
panic = 'abort'
ลองเรียก panic! ในโปรแกรมง่าย ๆ:
fn main() {
panic!("crash and burn");
}เมื่อคุณรันโปรแกรม คุณจะเห็นสิ่งคล้ายนี้:
$ cargo run
Compiling panic v0.1.0 (file:///projects/panic)
Finished `dev` profile [unoptimized + debuginfo] target(s) in 0.25s
Running `target/debug/panic`
thread 'main' panicked at src/main.rs:2:5:
crash and burn
note: run with `RUST_BACKTRACE=1` environment variable to display a backtrace
การเรียก panic! ทำให้เกิด error message ที่มีในสองบรรทัดสุดท้าย บรรทัด
แรกแสดง panic message ของเราและตำแหน่งใน source code ที่ panic เกิด —
src/main.rs:2:5 บ่งบอกว่ามันคือบรรทัดที่ 2 อักขระที่ 5 ของไฟล์
src/main.rs ของเรา
ในกรณีนี้ บรรทัดที่ระบุเป็นส่วนของโค้ดเรา และถ้าเราไปที่บรรทัดนั้น เราเห็น
การเรียก panic! macro ในกรณีอื่น การเรียก panic! อาจอยู่ในโค้ดที่โค้ด
เราเรียก และชื่อไฟล์และเลขบรรทัดที่ error message รายงาน จะเป็นโค้ดของคน
อื่นที่ panic! macro ถูกเรียก ไม่ใช่บรรทัดของโค้ดเราที่นำไปสู่การเรียก
panic! ในที่สุด
เราใช้ backtrace ของฟังก์ชันที่การเรียก panic! มาจาก เพื่อหาส่วนของ
โค้ดเราที่เป็นต้นเหตุได้ ในการเข้าใจวิธีใช้ backtrace ของ panic! มาดู
ตัวอย่างอีกตัวอย่างหนึ่ง และดูว่าเป็นอย่างไรเมื่อ panic! มาจาก library
เพราะ bug ในโค้ดเรา แทนที่โค้ดของเราเรียก macro ตรง ๆ Listing 9-1 มี
โค้ดที่พยายามเข้าถึง index ใน vector นอก range ของ index ที่ valid
fn main() {
let v = vec![1, 2, 3];
v[99];
}panic!ที่นี่ เรากำลังพยายามเข้าถึง element ที่ 100 ของ vector (ที่ index 99
เพราะ indexing เริ่มที่ศูนย์) แต่ vector มีแค่สาม element ในสถานการณ์นี้
Rust จะ panic การใช้ [] ควรจะ return element แต่ถ้าคุณส่ง index invalid
ไม่มี element ที่ Rust ใน return ที่นี่ที่ถูกต้อง
ใน C การพยายามอ่านหลังท้ายของโครงสร้างข้อมูลเป็น undefined behavior คุณ อาจได้อะไรก็ตามที่อยู่ในตำแหน่งหน่วยความจำที่จะสอดคล้องกับ element นั้น ในโครงสร้างข้อมูล แม้หน่วยความจำจะไม่เป็นของโครงสร้างนั้น นี่เรียกว่า buffer overread และนำไปสู่ security vulnerability ได้ ถ้า attacker จัดการ index ในแบบที่อ่านข้อมูลที่ไม่ควรได้รับอนุญาตที่เก็บหลังโครงสร้าง ข้อมูล
เพื่อปกป้องโปรแกรมของคุณจาก vulnerability ชนิดนี้ ถ้าคุณลองอ่าน element ที่ index ไม่มี Rust จะหยุด execution และปฏิเสธที่จะดำเนินต่อ ลองดู:
$ cargo run
Compiling panic v0.1.0 (file:///projects/panic)
Finished `dev` profile [unoptimized + debuginfo] target(s) in 0.27s
Running `target/debug/panic`
thread 'main' panicked at src/main.rs:4:6:
index out of bounds: the len is 3 but the index is 99
note: run with `RUST_BACKTRACE=1` environment variable to display a backtrace
Error นี้ชี้ที่บรรทัดที่ 4 ของ main.rs ของเรา ที่เราพยายามเข้าถึง index
99 ของ vector ใน v
บรรทัด note: บอกว่าเราตั้ง environment variable RUST_BACKTRACE เพื่อ
รับ backtrace ของสิ่งที่เกิดขึ้นเป๊ะ ๆ ที่ทำให้เกิด error ได้ backtrace
คือ list ของฟังก์ชันทั้งหมดที่ถูกเรียกเพื่อมาถึงจุดนี้ Backtrace ใน Rust
ทำงานเหมือนในภาษาอื่น — กุญแจของการอ่าน backtrace คือเริ่มจากด้านบนและ
อ่านจนคุณเห็นไฟล์ที่คุณเขียน นั่นคือจุดที่ปัญหาเริ่ม บรรทัดเหนือจุดนั้น
คือโค้ดที่โค้ดของคุณเรียก บรรทัดข้างใต้คือโค้ดที่เรียกโค้ดของคุณ บรรทัด
ก่อน-หลังเหล่านี้อาจรวมโค้ดแกน Rust, โค้ด standard library หรือ crate
ที่คุณใช้ ลองรับ backtrace โดย set environment variable RUST_BACKTRACE
เป็นค่าใด ๆ ยกเว้น 0 Listing 9-2 แสดง output คล้ายกับที่คุณจะเห็น
$ RUST_BACKTRACE=1 cargo run
thread 'main' panicked at src/main.rs:4:6:
index out of bounds: the len is 3 but the index is 99
stack backtrace:
0: rust_begin_unwind
at /rustc/4d91de4e48198da2e33413efdcd9cd2cc0c46688/library/std/src/panicking.rs:692:5
1: core::panicking::panic_fmt
at /rustc/4d91de4e48198da2e33413efdcd9cd2cc0c46688/library/core/src/panicking.rs:75:14
2: core::panicking::panic_bounds_check
at /rustc/4d91de4e48198da2e33413efdcd9cd2cc0c46688/library/core/src/panicking.rs:273:5
3: <usize as core::slice::index::SliceIndex<[T]>>::index
at file:///home/.rustup/toolchains/1.85/lib/rustlib/src/rust/library/core/src/slice/index.rs:274:10
4: core::slice::index::<impl core::ops::index::Index<I> for [T]>::index
at file:///home/.rustup/toolchains/1.85/lib/rustlib/src/rust/library/core/src/slice/index.rs:16:9
5: <alloc::vec::Vec<T,A> as core::ops::index::Index<I>>::index
at file:///home/.rustup/toolchains/1.85/lib/rustlib/src/rust/library/alloc/src/vec/mod.rs:3361:9
6: panic::main
at ./src/main.rs:4:6
7: core::ops::function::FnOnce::call_once
at file:///home/.rustup/toolchains/1.85/lib/rustlib/src/rust/library/core/src/ops/function.rs:250:5
note: Some details are omitted, run with `RUST_BACKTRACE=full` for a verbose backtrace.
panic! แสดงเมื่อ environment variable RUST_BACKTRACE ถูกตั้งนั่นเป็น output เยอะ! output ที่คุณเห็นอาจต่างกันขึ้นกับ OS และ Rust
version ในการรับ backtrace พร้อมข้อมูลนี้ debug symbol ต้องเปิด Debug
symbol เปิดโดย default เมื่อใช้ cargo build หรือ cargo run โดยไม่มี
flag --release อย่างที่เราทำที่นี่
ใน output ใน Listing 9-2 บรรทัดที่ 6 ของ backtrace ชี้ที่บรรทัดในโปรเจกต์ เราที่เป็นต้นเหตุ — บรรทัดที่ 4 ของ src/main.rs ถ้าเราไม่อยากให้ โปรแกรม panic เราควรเริ่มการสืบสวนที่ตำแหน่งที่ชี้โดยบรรทัดแรกที่กล่าวถึง ไฟล์ที่เราเขียน ใน Listing 9-1 ที่เราเขียนโค้ดตั้งใจให้ panic วิธีแก้ panic คือไม่ขอ element นอก range ของ index ของ vector เมื่อโค้ดของคุณ panic ในอนาคต คุณจะต้องคิดว่าโค้ดกำลังทำ action อะไรกับค่าอะไรที่ทำให้ panic และโค้ดควรทำอะไรแทน
เราจะกลับไปที่ panic! และเมื่อเราควรและไม่ควรใช้ panic! จัดการเงื่อนไข
error ในส่วน
“panic! หรือไม่ panic!”
ทีหลังในบทนี้ ถัดไป เราจะดูวิธี recover จาก error โดยใช้ Result
Recoverable error ด้วย Result
Recoverable Error ด้วย Result
Error ส่วนใหญ่ไม่จริงจังพอที่จะต้องการให้โปรแกรมหยุดทั้งหมด บางครั้งเมื่อ ฟังก์ชันล้มเหลว เป็นเพราะเหตุผลที่คุณตีความและตอบสนองได้ง่าย เช่น ถ้าคุณ ลองเปิดไฟล์ และ operation นั้นล้มเหลวเพราะไฟล์ไม่มี คุณอาจอยากสร้างไฟล์ แทนการจบ process
จำจาก “จัดการ failure ที่อาจเกิดขึ้นด้วย Result”
ในบทที่ 2 ว่า enum Result ประกาศโดยมีสอง variant Ok และ Err ดังนี้:
#![allow(unused)]
fn main() {
enum Result<T, E> {
Ok(T),
Err(E),
}
}T และ E เป็น generic type parameter — เราจะพูดถึง generic ในราย
ละเอียดเพิ่มเติมในบทที่ 10 สิ่งที่คุณต้องรู้ตอนนี้คือ T แทน type ของ
ค่าที่จะ return ในกรณีสำเร็จภายใน variant Ok และ E แทน type ของ
error ที่จะ return ในกรณีล้มเหลวภายใน variant Err เพราะ Result มี
generic type parameter เหล่านี้ เราใช้ type Result และฟังก์ชันที่
ประกาศบนมันในหลายสถานการณ์ที่ค่าสำเร็จและค่า error ที่เราอยาก return
อาจต่างกันได้
ลองเรียกฟังก์ชันที่ return ค่า Result เพราะฟังก์ชันอาจล้มเหลว ใน
Listing 9-3 เราพยายามเปิดไฟล์
use std::fs::File;
fn main() {
let greeting_file_result = File::open("hello.txt");
}Return type ของ File::open คือ Result<T, E> Generic parameter T
ถูกเติมโดย implementation ของ File::open ด้วย type ของค่าสำเร็จ
std::fs::File ซึ่งเป็น file handle Type ของ E ที่ใช้ในค่า error คือ
std::io::Error Return type นี้หมายความว่าการเรียก File::open อาจ
สำเร็จและ return file handle ที่เราอ่านหรือเขียนได้ การเรียกฟังก์ชันอาจ
ล้มเหลวด้วย — เช่น ไฟล์อาจไม่มี หรือเราอาจไม่มี permission เข้าถึงไฟล์
ฟังก์ชัน File::open ต้องมีวิธีบอกเราว่ามันสำเร็จหรือล้มเหลว และในเวลา
เดียวกันให้เราทั้ง file handle หรือข้อมูล error ข้อมูลนี้เป๊ะคือสิ่งที่
enum Result สื่อ
ในกรณีที่ File::open สำเร็จ ค่าในตัวแปร greeting_file_result จะเป็น
instance ของ Ok ที่มี file handle ในกรณีที่ล้มเหลว ค่าใน
greeting_file_result จะเป็น instance ของ Err ที่มีข้อมูลเพิ่มเติม
เกี่ยวกับชนิดของ error ที่เกิด
เราต้องเพิ่มในโค้ดใน Listing 9-3 เพื่อทำ action ต่างกันขึ้นกับค่าที่
File::open return Listing 9-4 แสดงวิธีหนึ่งในการจัดการ Result โดยใช้
เครื่องมือพื้นฐาน — match expression ที่เราพูดถึงในบทที่ 6
use std::fs::File;
fn main() {
let greeting_file_result = File::open("hello.txt");
let greeting_file = match greeting_file_result {
Ok(file) => file,
Err(error) => panic!("Problem opening the file: {error:?}"),
};
}match expression จัดการ variant Result ที่อาจ returnหมายเหตุว่า เหมือนกับ enum Option enum Result และ variant ของมันถูก
นำเข้า scope โดย prelude เราจึงไม่ต้องระบุ Result:: ก่อน variant Ok
และ Err ใน match arm
เมื่อผลคือ Ok โค้ดนี้จะ return ค่า file ภายในออกจาก variant Ok และ
เราจากนั้น assign ค่า file handle นั้นให้ตัวแปร greeting_file หลัง
match เราใช้ file handle สำหรับอ่านหรือเขียนได้
arm อีกตัวของ match จัดการกรณีที่เราได้ค่า Err จาก File::open ใน
ตัวอย่างนี้ เราเลือกเรียก panic! macro ถ้าไม่มีไฟล์ชื่อ hello.txt
ใน directory ปัจจุบันของเรา และเรารันโค้ดนี้ เราจะเห็น output ต่อไปนี้
จาก panic! macro:
$ cargo run
Compiling error-handling v0.1.0 (file:///projects/error-handling)
Finished `dev` profile [unoptimized + debuginfo] target(s) in 0.73s
Running `target/debug/error-handling`
thread 'main' panicked at src/main.rs:8:23:
Problem opening the file: Os { code: 2, kind: NotFound, message: "No such file or directory" }
note: run with `RUST_BACKTRACE=1` environment variable to display a backtrace
ตามปกติ output นี้บอกเราเป๊ะ ๆ ว่าอะไรผิดพลาด
Match บน Error ต่างกัน
โค้ดใน Listing 9-4 จะ panic! ไม่ว่าทำไม File::open ล้มเหลว อย่างไรก็
ตาม เราอยากทำ action ต่างกันสำหรับเหตุผลล้มเหลวต่างกัน ถ้า File::open
ล้มเหลวเพราะไฟล์ไม่มี เราอยากสร้างไฟล์และ return handle ให้ไฟล์ใหม่ ถ้า
File::open ล้มเหลวด้วยเหตุผลอื่น — เช่น เราไม่มี permission เปิดไฟล์ —
เรายังอยากให้โค้ด panic! ในแบบเดียวกับที่ทำใน Listing 9-4 สำหรับเรื่อง
นี้ เราเพิ่ม match expression ภายใน แสดงใน Listing 9-5
use std::fs::File;
use std::io::ErrorKind;
fn main() {
let greeting_file_result = File::open("hello.txt");
let greeting_file = match greeting_file_result {
Ok(file) => file,
Err(error) => match error.kind() {
ErrorKind::NotFound => match File::create("hello.txt") {
Ok(fc) => fc,
Err(e) => panic!("Problem creating the file: {e:?}"),
},
_ => {
panic!("Problem opening the file: {error:?}");
}
},
};
}Type ของค่าที่ File::open return ภายใน variant Err คือ io::Error
ซึ่งเป็น struct ที่ standard library ให้ struct นี้มีเมธอด kind ที่เรา
เรียกเพื่อรับค่า io::ErrorKind ได้ enum io::ErrorKind ที่ standard
library ให้ มี variant ที่แทน error ชนิดต่างกันที่อาจเป็นผลจาก io
operation Variant ที่เราอยากใช้คือ ErrorKind::NotFound ซึ่งบ่งบอกว่า
ไฟล์ที่เราพยายามเปิดยังไม่มี ดังนั้น เรา match บน greeting_file_result
แต่เรายังมี inner match บน error.kind()
เงื่อนไขที่เราอยากเช็คใน inner match คือว่าค่าที่ return โดย error.kind()
เป็น variant NotFound ของ enum ErrorKind ไหม ถ้าใช่ เราลองสร้างไฟล์
ด้วย File::create อย่างไรก็ตาม เพราะ File::create อาจล้มเหลวด้วย เรา
ต้องการ arm ที่สองใน inner match expression เมื่อไฟล์สร้างไม่ได้
error message ต่างถูกพิมพ์ arm ที่สองของ outer match ยังเหมือนเดิม
โปรแกรมจึง panic บน error อื่นนอกจาก error ไฟล์ไม่มี
ทางเลือกแทนการใช้ match กับ Result<T, E>
นั่นเป็น match เยอะ! match expression มีประโยชน์มากแต่ก็เป็น
primitive มาก ในบทที่ 13 คุณจะเรียนเกี่ยวกับ closure ซึ่งใช้กับเมธอด
หลายตัวที่ประกาศบน Result<T, E> เมธอดเหล่านี้กระชับกว่าการใช้ match
ในการจัดการค่า Result<T, E> ในโค้ดของคุณได้
เช่น นี่คืออีกวิธีเขียน logic เดียวกับที่แสดงใน Listing 9-5 ครั้งนี้
โดยใช้ closure และเมธอด unwrap_or_else:
use std::fs::File;
use std::io::ErrorKind;
fn main() {
let greeting_file = File::open("hello.txt").unwrap_or_else(|error| {
if error.kind() == ErrorKind::NotFound {
File::create("hello.txt").unwrap_or_else(|error| {
panic!("Problem creating the file: {error:?}");
})
} else {
panic!("Problem opening the file: {error:?}");
}
});
}แม้โค้ดนี้มีพฤติกรรมเดียวกับ Listing 9-5 มันไม่มี match expression
ใด ๆ และสะอาดในการอ่าน กลับมาที่ตัวอย่างนี้หลังคุณอ่านบทที่ 13 และ
lookup เมธอด unwrap_or_else ใน documentation ของ standard library
เมธอดเหล่านี้อีกมากทำความสะอาด match expression ที่ใหญ่และซ้อนได้
เมื่อคุณจัดการ error
Shortcut สำหรับ Panic บน Error
การใช้ match ทำงานได้ดีพอ แต่อาจยาวนิดหน่อยและไม่สื่อเจตนาดีเสมอ Type
Result<T, E> มีเมธอด helper หลายตัวประกาศบนมัน เพื่อทำงานต่าง ๆ ที่
เฉพาะเจาะจงมากขึ้น เมธอด unwrap คือเมธอด shortcut ที่ implement
เหมือนกับ match expression ที่เราเขียนใน Listing 9-4 ถ้าค่า Result
เป็น variant Ok unwrap จะ return ค่าภายใน Ok ถ้า Result เป็น
variant Err unwrap จะเรียก panic! macro ให้เรา นี่คือตัวอย่างของ
unwrap ในการใช้งาน:
use std::fs::File;
fn main() {
let greeting_file = File::open("hello.txt").unwrap();
}ถ้าเรารันโค้ดนี้โดยไม่มีไฟล์ hello.txt เราจะเห็น error message จากการ
เรียก panic! ที่เมธอด unwrap ทำ:
thread 'main' panicked at src/main.rs:4:49:
called `Result::unwrap()` on an `Err` value: Os { code: 2, kind: NotFound, message: "No such file or directory" }
ในทำนองเดียวกัน เมธอด expect ให้เราเลือก error message ของ panic!
ด้วย การใช้ expect แทน unwrap และให้ error message ที่ดี สื่อเจตนา
ของคุณและทำให้การตามหาแหล่งของ panic ง่ายขึ้น syntax ของ expect ดู
แบบนี้:
use std::fs::File;
fn main() {
let greeting_file = File::open("hello.txt")
.expect("hello.txt should be included in this project");
}เราใช้ expect ในแบบเดียวกับ unwrap — เพื่อ return file handle หรือ
เรียก panic! macro Error message ที่ใช้โดย expect ในการเรียก panic!
จะเป็น parameter ที่เราส่งให้ expect แทน panic! message default ที่
unwrap ใช้ นี่คือสิ่งที่ดูเหมือน:
thread 'main' panicked at src/main.rs:5:10:
hello.txt should be included in this project: Os { code: 2, kind: NotFound, message: "No such file or directory" }
ในโค้ดคุณภาพ production Rustacean ส่วนใหญ่เลือก expect แทน unwrap
และให้บริบทเพิ่มเติมว่าทำไม operation คาดว่าจะสำเร็จเสมอ แบบนั้น ถ้า
สมมติฐานของคุณถูกพิสูจน์ผิด คุณมีข้อมูลเพิ่มเติมใช้ในการ debug
Propagate Error
เมื่อ implementation ของฟังก์ชันเรียกบางอย่างที่อาจล้มเหลว แทนการจัดการ error ภายในฟังก์ชันเอง คุณ return error ให้โค้ดที่เรียก เพื่อให้มันตัดสิน ใจได้ว่าจะทำอะไร นี่รู้จักในชื่อ propagate error และให้การควบคุมเพิ่ม ให้โค้ดที่เรียก ที่อาจมีข้อมูลหรือ logic เพิ่มเติมที่กำหนดวิธีจัดการ error มากกว่าสิ่งที่คุณมีในบริบทของโค้ดคุณ
เช่น Listing 9-6 แสดงฟังก์ชันที่อ่าน username จากไฟล์ ถ้าไฟล์ไม่มีหรืออ่าน ไม่ได้ ฟังก์ชันนี้จะ return error เหล่านั้นให้โค้ดที่เรียกฟังก์ชัน
#![allow(unused)]
fn main() {
use std::fs::File;
use std::io::{self, Read};
fn read_username_from_file() -> Result<String, io::Error> {
let username_file_result = File::open("hello.txt");
let mut username_file = match username_file_result {
Ok(file) => file,
Err(e) => return Err(e),
};
let mut username = String::new();
match username_file.read_to_string(&mut username) {
Ok(_) => Ok(username),
Err(e) => Err(e),
}
}
}matchฟังก์ชันนี้เขียนในแบบสั้นกว่ามากได้ แต่เราจะเริ่มโดยทำส่วนใหญ่ด้วยตนเอง
เพื่อสำรวจการจัดการ error ในที่สุด เราจะแสดงวิธีสั้นกว่า มาดู return type
ของฟังก์ชันก่อน — Result<String, io::Error> นี่หมายความว่าฟังก์ชัน
return ค่า type Result<T, E> ที่ generic parameter T ถูกเติมด้วย
type คอนกรีต String และ generic type E ถูกเติมด้วย type คอนกรีต
io::Error
ถ้าฟังก์ชันนี้สำเร็จโดยไม่มีปัญหา โค้ดที่เรียกฟังก์ชันนี้จะได้รับค่า Ok
ที่เก็บ String — username ที่ฟังก์ชันนี้อ่านจากไฟล์ ถ้าฟังก์ชันนี้
เจอปัญหา โค้ดที่เรียกจะได้รับค่า Err ที่เก็บ instance ของ io::Error
ที่มีข้อมูลเพิ่มเติมเกี่ยวกับปัญหา เราเลือก io::Error เป็น return type
ของฟังก์ชันนี้ เพราะเกิดเป็น type ของค่า error ที่ return จาก operation
สองตัวที่เราเรียกใน body ของฟังก์ชันนี้ที่อาจล้มเหลว — ฟังก์ชัน
File::open และเมธอด read_to_string
Body ของฟังก์ชันเริ่มโดยเรียกฟังก์ชัน File::open จากนั้นเราจัดการค่า
Result ด้วย match คล้ายกับ match ใน Listing 9-4 ถ้า File::open
สำเร็จ file handle ในตัวแปร pattern file กลายเป็นค่าในตัวแปร mutable
username_file และฟังก์ชันดำเนินต่อ ในกรณี Err แทนการเรียก panic!
เราใช้ keyword return เพื่อ return ก่อนออกจากฟังก์ชันทั้งหมด และส่ง
ค่า error จาก File::open ตอนนี้ในตัวแปร pattern e กลับให้โค้ดที่เรียก
เป็นค่า error ของฟังก์ชันนี้
ดังนั้น ถ้าเรามี file handle ใน username_file ฟังก์ชันจากนั้นสร้าง
String ใหม่ในตัวแปร username และเรียกเมธอด read_to_string บน file
handle ใน username_file เพื่ออ่านเนื้อหาของไฟล์เข้า username เมธอด
read_to_string ก็ return Result ด้วยเพราะอาจล้มเหลว แม้ File::open
สำเร็จ ดังนั้น เราต้อง match อีกตัวจัดการ Result นั้น — ถ้า
read_to_string สำเร็จ ฟังก์ชันของเราสำเร็จ และเรา return username จาก
ไฟล์ที่ตอนนี้อยู่ใน username ห่อใน Ok ถ้า read_to_string ล้มเหลว
เรา return ค่า error ในแบบเดียวกับที่เรา return ค่า error ใน match
ที่จัดการ return value ของ File::open อย่างไรก็ตาม เราไม่ต้อง explicit
ว่า return เพราะนี่เป็น expression สุดท้ายในฟังก์ชัน
โค้ดที่เรียกโค้ดนี้จะจัดการการได้ค่า Ok ที่มี username หรือค่า Err
ที่มี io::Error ขึ้นอยู่กับโค้ดที่เรียกที่จะตัดสินใจว่าจะทำอะไรกับค่า
เหล่านั้น ถ้าโค้ดที่เรียกได้ค่า Err มันเรียก panic! และ crash โปรแกรม
ใช้ username default หรือ lookup username จากที่อื่นนอกจากไฟล์ เป็นต้น
ก็ได้ เราไม่มีข้อมูลพอเรื่องสิ่งที่โค้ดที่เรียกพยายามทำจริง ๆ เราจึง
propagate ข้อมูลสำเร็จหรือ error ทั้งหมดขึ้นไป ให้มันจัดการอย่างเหมาะสม
pattern การ propagate error นี้ใช้บ่อยมากใน Rust จน Rust ให้ question
mark operator ? เพื่อทำให้สิ่งนี้ง่ายขึ้น
Shortcut Operator ?
Listing 9-7 แสดง implementation ของ read_username_from_file ที่มี
functionality เดียวกับใน Listing 9-6 แต่ implementation นี้ใช้ operator
?
#![allow(unused)]
fn main() {
use std::fs::File;
use std::io::{self, Read};
fn read_username_from_file() -> Result<String, io::Error> {
let mut username_file = File::open("hello.txt")?;
let mut username = String::new();
username_file.read_to_string(&mut username)?;
Ok(username)
}
}?? ที่วางหลังค่า Result ประกาศให้ทำงานในแบบเกือบเหมือน match
expression ที่เราประกาศจัดการค่า Result ใน Listing 9-6 ถ้าค่าของ
Result เป็น Ok ค่าภายใน Ok จะถูก return จาก expression นี้ และ
โปรแกรมจะดำเนินต่อ ถ้าค่าเป็น Err Err จะถูก return จากทั้งฟังก์ชัน
เหมือนเราใช้ keyword return ดังนั้นค่า error ถูก propagate ไปยังโค้ดที่
เรียก
มีความแตกต่างระหว่างสิ่งที่ match expression จาก Listing 9-6 ทำ และ
สิ่งที่ operator ? ทำ — ค่า error ที่ operator ? ถูกเรียกบนพวกมัน
ผ่านฟังก์ชัน from ที่ประกาศใน trait From ใน standard library ซึ่งใช้
แปลงค่าจาก type หนึ่งเป็นอีก type หนึ่ง เมื่อ operator ? เรียกฟังก์ชัน
from type error ที่ได้รับถูกแปลงเป็น type error ที่ประกาศใน return
type ของฟังก์ชันปัจจุบัน นี่มีประโยชน์เมื่อฟังก์ชัน return type error
หนึ่งตัวที่แทนวิธีทั้งหมดที่ฟังก์ชันอาจล้มเหลว แม้ส่วนต่าง ๆ อาจล้มเหลว
ด้วยเหตุผลต่างกัน
เช่น เราเปลี่ยนฟังก์ชัน read_username_from_file ใน Listing 9-7 ให้
return type error custom ชื่อ OurError ที่เราประกาศได้ ถ้าเรายังประกาศ
impl From<io::Error> for OurError เพื่อสร้าง instance ของ OurError
จาก io::Error operator ? ที่เรียกใน body ของ read_username_from_file
จะเรียก from และแปลง error type โดยไม่ต้องเพิ่มโค้ดเพิ่มเติมในฟังก์ชัน
ในบริบทของ Listing 9-7 ? ที่ท้ายการเรียก File::open จะ return ค่า
ภายใน Ok ให้ตัวแปร username_file ถ้า error เกิด operator ? จะ
return ก่อนออกจากทั้งฟังก์ชัน และให้ค่า Err ใด ๆ ให้โค้ดที่เรียก สิ่ง
เดียวกันใช้กับ ? ที่ท้ายการเรียก read_to_string
Operator ? ขจัด boilerplate เยอะและทำให้ implementation ของฟังก์ชันนี้
ง่ายขึ้น เราย่อโค้ดนี้ลงไปอีกได้โดย chain การเรียกเมธอดทันทีหลัง ?
ดังที่แสดงใน Listing 9-8
#![allow(unused)]
fn main() {
use std::fs::File;
use std::io::{self, Read};
fn read_username_from_file() -> Result<String, io::Error> {
let mut username = String::new();
File::open("hello.txt")?.read_to_string(&mut username)?;
Ok(username)
}
}?เราย้ายการสร้าง String ใหม่ใน username ไปต้นฟังก์ชัน ส่วนนั้นไม่
เปลี่ยน แทนการสร้างตัวแปร username_file เรา chain การเรียก
read_to_string ตรงกับผลของ File::open("hello.txt")? เรายังมี ? ที่
ท้ายการเรียก read_to_string และเรายัง return ค่า Ok ที่มี username
เมื่อทั้ง File::open และ read_to_string สำเร็จ แทนการ return error
Functionality ยังเหมือนกับใน Listing 9-6 และ Listing 9-7 — นี่แค่วิธี
เขียนที่ต่างและ ergonomic กว่า
Listing 9-9 แสดงวิธีทำให้นี่สั้นกว่าอีก โดยใช้ fs::read_to_string
#![allow(unused)]
fn main() {
use std::fs;
use std::io;
fn read_username_from_file() -> Result<String, io::Error> {
fs::read_to_string("hello.txt")
}
}fs::read_to_string แทนการเปิดแล้วอ่านไฟล์การอ่านไฟล์เข้า string เป็น operation ที่ใช้บ่อย standard library จึงให้
ฟังก์ชัน fs::read_to_string ที่สะดวก ที่เปิดไฟล์ สร้าง String ใหม่
อ่านเนื้อหาของไฟล์ ใส่เนื้อหาเข้า String นั้น และ return มัน แน่นอน
การใช้ fs::read_to_string ไม่ให้โอกาสเราอธิบายการจัดการ error ทั้งหมด
เราจึงทำแบบยาวกว่าก่อน
ใช้ Operator ? ที่ไหน
Operator ? ใช้ได้แค่ในฟังก์ชันที่ return type เข้ากับค่าที่ ? ใช้บน
มัน นี่เพราะ operator ? ประกาศให้ทำ early return ของค่าออกจากฟังก์ชัน
ในแบบเดียวกับ match expression ที่เราประกาศใน Listing 9-6 ใน Listing
9-6 match ใช้ค่า Result และ arm early return return ค่า Err(e)
Return type ของฟังก์ชันต้องเป็น Result เพื่อให้เข้ากับ return นี้
ใน Listing 9-10 มาดู error ที่เราจะได้ถ้าใช้ operator ? ในฟังก์ชัน
main ที่ return type ไม่เข้ากับ type ของค่าที่เราใช้ ? บน
use std::fs::File;
fn main() {
let greeting_file = File::open("hello.txt")?;
}? ในฟังก์ชัน main ที่ return () จะ compile ไม่ผ่านโค้ดนี้เปิดไฟล์ ซึ่งอาจล้มเหลว Operator ? ตามค่า Result ที่ return
โดย File::open แต่ฟังก์ชัน main นี้มี return type () ไม่ใช่
Result เมื่อเรา compile โค้ดนี้ เราได้ error message ต่อไปนี้:
$ cargo run
Compiling error-handling v0.1.0 (file:///projects/error-handling)
error[E0277]: the `?` operator can only be used in a function that returns `Result` or `Option` (or another type that implements `FromResidual`)
--> src/main.rs:4:48
|
3 | fn main() {
| --------- this function should return `Result` or `Option` to accept `?`
4 | let greeting_file = File::open("hello.txt")?;
| ^ cannot use the `?` operator in a function that returns `()`
|
help: consider adding return type
|
3 ~ fn main() -> Result<(), Box<dyn std::error::Error>> {
4 | let greeting_file = File::open("hello.txt")?;
5 + Ok(())
|
For more information about this error, try `rustc --explain E0277`.
error: could not compile `error-handling` (bin "error-handling") due to 1 previous error
Error นี้ชี้ว่าเราได้รับอนุญาตให้ใช้ operator ? แค่ในฟังก์ชันที่ return
Result, Option หรือ type อื่นที่ implement FromResidual เท่านั้น
ในการแก้ error คุณมีสองตัวเลือก ตัวเลือกหนึ่งคือเปลี่ยน return type ของ
ฟังก์ชันให้เข้ากับค่าที่คุณใช้ operator ? บน ตราบที่ไม่มีข้อจำกัดห้าม
ทำเช่นนั้น ตัวเลือกอื่นคือใช้ match หรือหนึ่งในเมธอด Result<T, E>
จัดการ Result<T, E> ในแบบที่เหมาะสม
Error message ยังเอ่ยว่า ? ใช้กับค่า Option<T> ได้ด้วย เหมือนกับการ
ใช้ ? บน Result คุณใช้ ? บน Option ได้แค่ในฟังก์ชันที่ return
Option พฤติกรรมของ operator ? เมื่อเรียกบน Option<T> คล้ายกับ
พฤติกรรมเมื่อเรียกบน Result<T, E> — ถ้าค่าเป็น None None จะถูก
return ก่อนจากฟังก์ชัน ณ จุดนั้น ถ้าค่าเป็น Some ค่าภายใน Some เป็น
ค่าผลของ expression และฟังก์ชันดำเนินต่อ Listing 9-11 มีตัวอย่างของ
ฟังก์ชันที่หาอักขระสุดท้ายของบรรทัดแรกใน text ที่ให้
fn last_char_of_first_line(text: &str) -> Option<char> {
text.lines().next()?.chars().last()
}
fn main() {
assert_eq!(
last_char_of_first_line("Hello, world\nHow are you today?"),
Some('d')
);
assert_eq!(last_char_of_first_line(""), None);
assert_eq!(last_char_of_first_line("\nhi"), None);
}? บนค่า Option<T>ฟังก์ชันนี้ return Option<char> เพราะเป็นไปได้ที่มีอักขระตรงนั้น แต่ก็
เป็นไปได้ที่ไม่มี โค้ดนี้รับ argument string slice text และเรียกเมธอด
lines บนมัน ซึ่ง return iterator ผ่านบรรทัดใน string เพราะฟังก์ชันนี้
อยากตรวจสอบบรรทัดแรก มันเรียก next บน iterator เพื่อรับค่าแรกจาก
iterator ถ้า text เป็น string ว่าง การเรียก next นี้จะ return None
ซึ่งในกรณีนั้นเราใช้ ? หยุดและ return None จาก
last_char_of_first_line ถ้า text ไม่ใช่ string ว่าง next จะ return
ค่า Some ที่มี string slice ของบรรทัดแรกใน text
? ดึง string slice และเราเรียก chars บน string slice นั้นเพื่อรับ
iterator ของอักขระ เราสนใจอักขระสุดท้ายในบรรทัดแรกนี้ เราจึงเรียก last
เพื่อ return item สุดท้ายใน iterator นี่เป็น Option เพราะเป็นไปได้ที่
บรรทัดแรกเป็น string ว่าง เช่น ถ้า text ขึ้นต้นด้วยบรรทัดเปล่า แต่มี
อักขระบนบรรทัดอื่น อย่างใน "\nhi" อย่างไรก็ตาม ถ้ามีอักขระสุดท้ายบน
บรรทัดแรก จะถูก return ใน variant Some operator ? ตรงกลางให้เราวิธี
กระชับในการแสดง logic นี้ ให้เรา implement ฟังก์ชันในบรรทัดเดียวได้ ถ้า
เราใช้ operator ? บน Option ไม่ได้ เราจะต้อง implement logic นี้
โดยใช้การเรียกเมธอดเพิ่มเติมหรือ match expression
หมายเหตุว่าคุณใช้ operator ? บน Result ในฟังก์ชันที่ return Result
และคุณใช้ operator ? บน Option ในฟังก์ชันที่ return Option ได้
แต่คุณผสมและ match ไม่ได้ Operator ? จะไม่แปลง Result เป็น Option
หรือตรงกันข้ามอัตโนมัติ ในกรณีเหล่านั้น คุณใช้เมธอดอย่าง ok บน
Result หรือ ok_or บน Option ทำการแปลงแบบ explicit ได้
ที่ผ่านมา ฟังก์ชัน main ทั้งหมดที่เราใช้ return () ฟังก์ชัน main
พิเศษเพราะมันเป็น entry point และ exit point ของโปรแกรม executable และมี
ข้อจำกัดเรื่อง return type ของมัน เพื่อให้โปรแกรมทำงานตามที่คาด
โชคดี main ยัง return Result<(), E> ได้ Listing 9-12 มีโค้ดจาก
Listing 9-10 แต่เราเปลี่ยน return type ของ main เป็น
Result<(), Box<dyn Error>> และเพิ่ม return value Ok(()) ที่ท้าย
โค้ดนี้จะ compile ผ่านตอนนี้
use std::error::Error;
use std::fs::File;
fn main() -> Result<(), Box<dyn Error>> {
let greeting_file = File::open("hello.txt")?;
Ok(())
}main ให้ return Result<(), E> อนุญาตให้ใช้ operator ? บนค่า ResultType Box<dyn Error> เป็น trait object ซึ่งเราจะพูดถึงใน
“ใช้ Trait Object เพื่อนามธรรมพฤติกรรมร่วม”
ในบทที่ 18 ตอนนี้ คุณอ่าน Box<dyn Error> ว่าหมายถึง “error ชนิดใดก็ได้”
การใช้ ? บนค่า Result ในฟังก์ชัน main ที่มี error type
Box<dyn Error> อนุญาต เพราะมันให้ค่า Err ใด ๆ ถูก return ก่อน แม้
body ของฟังก์ชัน main นี้จะ return แค่ error type std::io::Error
โดยระบุ Box<dyn Error> signature นี้จะยังถูกต้องแม้โค้ดที่ return
error อื่นถูกเพิ่มเข้า body ของ main
เมื่อฟังก์ชัน main return Result<(), E> executable จะออกด้วยค่า 0
ถ้า main return Ok(()) และจะออกด้วยค่าที่ไม่ใช่ศูนย์ถ้า main
return ค่า Err Executable ที่เขียนใน C return integer เมื่อออก —
โปรแกรมที่ออกสำเร็จ return integer 0 และโปรแกรมที่ error return
integer ที่ไม่ใช่ 0 Rust ก็ return integer จาก executable เพื่อให้
เข้ากับ convention นี้
ฟังก์ชัน main return type ใด ๆ ที่ implement
trait std::process::Termination ได้ ซึ่ง
มีฟังก์ชัน report ที่ return ExitCode ปรึกษา documentation ของ
standard library สำหรับข้อมูลเพิ่มเติมเรื่องการ implement trait
Termination สำหรับ type ของคุณเอง
ตอนนี้เราพูดถึงรายละเอียดของการเรียก panic! หรือ return Result แล้ว
กลับไปที่หัวข้อของวิธีตัดสินใจว่าตัวไหนเหมาะใช้ในกรณีไหน
panic! หรือไม่ panic!
panic! หรือไม่ panic!
แล้วคุณตัดสินใจเมื่อไหร่ควรเรียก panic! และเมื่อไหร่ควร return
Result? เมื่อโค้ด panic ไม่มีวิธี recover คุณเรียก panic! สำหรับ
สถานการณ์ error ใด ๆ ได้ ไม่ว่าจะมีวิธี recover ที่เป็นไปได้หรือไม่ แต่
จากนั้นคุณกำลังตัดสินใจว่าสถานการณ์เป็น unrecoverable แทนโค้ดที่เรียก
เมื่อคุณเลือก return ค่า Result คุณให้ตัวเลือกแก่โค้ดที่เรียก โค้ดที่
เรียกเลือกพยายาม recover ในแบบที่เหมาะสำหรับสถานการณ์ของมัน หรือมัน
ตัดสินใจว่าค่า Err ในกรณีนี้เป็น unrecoverable แล้วเรียก panic! และ
เปลี่ยน recoverable error ของคุณเป็น unrecoverable ได้ ดังนั้น การ
return Result เป็นตัวเลือก default ที่ดี เมื่อคุณประกาศฟังก์ชันที่อาจ
ล้มเหลว
ในสถานการณ์เช่นตัวอย่าง, prototype code และ test เหมาะกว่าที่จะเขียนโค้ด
ที่ panic แทน return Result มาสำรวจว่าทำไม แล้วพูดถึงสถานการณ์ที่
compiler บอกไม่ได้ว่าความล้มเหลวเป็นไปไม่ได้ แต่คุณในฐานะมนุษย์บอกได้
บทจะจบด้วย guideline ทั่วไปเรื่องวิธีตัดสินใจว่าจะ panic ในโค้ด library
หรือไม่
ตัวอย่าง, Prototype Code และ Test
เมื่อคุณเขียนตัวอย่างเพื่อแสดงแนวคิด การรวมโค้ดจัดการ error ที่แข็งแกร่ง
อาจทำให้ตัวอย่างชัดเจนน้อยลง ในตัวอย่าง เข้าใจว่าการเรียกเมธอดอย่าง
unwrap ที่อาจ panic ตั้งใจเป็น placeholder ของวิธีที่คุณจะอยากให้
application ของคุณจัดการ error ซึ่งต่างกันได้ขึ้นกับสิ่งที่โค้ดที่เหลือ
ทำ
ในทำนองเดียวกัน เมธอด unwrap และ expect สะดวกมากเมื่อคุณ prototype
และคุณยังไม่พร้อมตัดสินใจวิธีจัดการ error พวกมันทิ้ง marker ชัดเจนในโค้ด
ของคุณ เมื่อคุณพร้อมทำให้โปรแกรมแข็งแกร่งขึ้น
ถ้าการเรียกเมธอดล้มเหลวใน test คุณจะอยากให้ทั้ง test ล้มเหลว แม้เมธอด
นั้นไม่ใช่ functionality ภายใต้การทดสอบ เพราะ panic! เป็นวิธีที่ test
ถูก mark เป็นความล้มเหลว การเรียก unwrap หรือ expect คือสิ่งที่เป๊ะ
ที่ควรเกิด
เมื่อคุณมีข้อมูลมากกว่า Compiler
ก็เหมาะที่จะเรียก expect เมื่อคุณมี logic อื่นที่รับประกันว่า Result
จะมีค่า Ok แต่ logic นั้นไม่ใช่สิ่งที่ compiler เข้าใจ คุณจะยังมีค่า
Result ที่ต้องจัดการ — operation ใดก็ตามที่คุณเรียกยังมีความเป็นไปได้
ของความล้มเหลวโดยทั่วไป แม้จะเป็นไปไม่ได้เชิง logic ในสถานการณ์เฉพาะของ
คุณ ถ้าคุณรับประกันได้โดยตรวจสอบโค้ดด้วยตนเองว่าคุณจะไม่มี variant Err
เลย มันยอมรับได้ที่จะเรียก expect และ document เหตุผลที่คุณคิดว่าคุณ
จะไม่มี variant Err ใน argument text นี่คือตัวอย่าง:
fn main() {
use std::net::IpAddr;
let home: IpAddr = "127.0.0.1"
.parse()
.expect("Hardcoded IP address should be valid");
}เรากำลังสร้าง instance IpAddr โดย parse string ที่ hardcode เราเห็นได้
ว่า 127.0.0.1 เป็น IP address ที่ valid มันจึงยอมรับได้ที่จะใช้
expect ที่นี่ อย่างไรก็ตาม การมี string ที่ hardcode และ valid ไม่
เปลี่ยน return type ของเมธอด parse — เรายังได้ค่า Result และ
compiler จะยังบังคับให้เราจัดการ Result ราวกับว่า variant Err เป็น
ความเป็นไปได้ เพราะ compiler ไม่ฉลาดพอที่จะเห็นว่า string นี้เป็น IP
address ที่ valid เสมอ ถ้า string IP address มาจาก user แทนการ hardcode
เข้าโปรแกรม และจึง มี ความเป็นไปได้ของความล้มเหลว เราจะอยากจัดการ
Result ในแบบที่แข็งแกร่งกว่าแน่นอน การเอ่ยถึงสมมติฐานว่า IP address นี้
ถูก hardcode จะเตือนเราให้เปลี่ยน expect เป็นโค้ดจัดการ error ที่ดีกว่า
ถ้าในอนาคต เราต้องการรับ IP address จากแหล่งอื่นแทน
Guideline สำหรับการจัดการ Error
แนะนำให้โค้ดของคุณ panic เมื่อเป็นไปได้ที่โค้ดของคุณอาจจบในสถานะแย่ ใน บริบทนี้ สถานะแย่ คือเมื่อสมมติฐาน, การรับประกัน, สัญญา หรือ invariant บางอย่างถูกทำลาย เช่นเมื่อค่า invalid, ค่าขัดแย้ง หรือค่าหาย ถูกส่งให้ โค้ดของคุณ — บวกหนึ่งหรือมากกว่าของต่อไปนี้:
- สถานะแย่เป็นสิ่งที่ไม่คาด ตรงข้ามกับสิ่งที่อาจเกิดเป็นครั้งคราว เช่น user ป้อนข้อมูลในรูปแบบผิด
- โค้ดของคุณหลังจุดนี้ต้องพึ่งการไม่อยู่ในสถานะแย่นี้ แทนการเช็คปัญหาในทุก ขั้นตอน
- ไม่มีวิธีที่ดีที่จะ encode ข้อมูลนี้ใน type ที่คุณใช้ เราจะทำงานผ่าน ตัวอย่างของสิ่งที่เราหมายถึงใน “Encode State และพฤติกรรมเป็น Type” ในบทที่ 18
ถ้ามีคนเรียกโค้ดของคุณและส่งค่าที่ไม่สมเหตุสมผล ดีที่สุดที่จะ return
error ถ้าทำได้ เพื่อให้ user ของ library ตัดสินใจว่าจะทำอะไรในกรณีนั้น
อย่างไรก็ตาม ในกรณีที่การดำเนินต่ออาจ insecure หรือเป็นอันตราย ตัวเลือก
ดีที่สุดอาจเป็นเรียก panic! และเตือนคนที่ใช้ library ของคุณถึง bug ใน
โค้ดของเขา เพื่อให้เขาแก้ระหว่าง development ในทำนองเดียวกัน panic!
มักเหมาะถ้าคุณเรียก external code ที่อยู่นอกการควบคุมของคุณและ return
สถานะ invalid ที่คุณไม่มีวิธีแก้
อย่างไรก็ตาม เมื่อความล้มเหลวคาดได้ เหมาะกว่าที่จะ return Result
แทนการเรียก panic! ตัวอย่างรวมถึง parser ที่ได้ข้อมูลผิดรูปแบบ หรือ
HTTP request ที่ return สถานะบ่งบอกว่าคุณชน rate limit ในกรณีเหล่านี้
การ return Result บ่งบอกว่าความล้มเหลวเป็นความเป็นไปได้ที่คาด ที่โค้ด
ที่เรียกต้องตัดสินใจวิธีจัดการ
เมื่อโค้ดของคุณทำ operation ที่อาจทำให้ user เสี่ยง ถ้ามันถูกเรียกด้วยค่า
invalid โค้ดของคุณควรตรวจสอบค่าว่า valid ก่อน และ panic ถ้าค่าไม่ valid
นี่ส่วนใหญ่เพื่อเหตุผลด้าน safety — การพยายาม operate บนข้อมูล invalid
อาจเปิดเผยโค้ดของคุณกับ vulnerability นี่คือเหตุผลหลักที่ standard
library จะเรียก panic! ถ้าคุณพยายามเข้าถึงหน่วยความจำที่ out-of-bounds
— การพยายามเข้าถึงหน่วยความจำที่ไม่เป็นของโครงสร้างข้อมูลปัจจุบันเป็น
ปัญหา security ที่ใช้บ่อย ฟังก์ชันมักมี สัญญา — พฤติกรรมรับประกันเฉพาะ
ถ้า input ตรงตามข้อกำหนดเฉพาะ การ panic เมื่อสัญญาถูกฝ่าฝืนสมเหตุสมผล
เพราะการฝ่าฝืนสัญญามักบ่งบอก bug ของฝั่ง caller และไม่ใช่ชนิดของ error
ที่คุณอยากให้โค้ดที่เรียกต้องจัดการแบบ explicit จริง ๆ ไม่มีวิธีสมเหตุสม
ผลให้โค้ดที่เรียก recover — โปรแกรมเมอร์ ที่เรียกต้องแก้โค้ด สัญญา
สำหรับฟังก์ชัน โดยเฉพาะเมื่อการฝ่าฝืนจะทำให้ panic ควรอธิบายใน API
documentation สำหรับฟังก์ชัน
อย่างไรก็ตาม การมีการเช็ค error เยอะในฟังก์ชันทั้งหมดของคุณจะยาวและน่ารำ
คาญ โชคดี คุณใช้ระบบ type ของ Rust (และจึงการตรวจสอบ type ที่ทำโดย
compiler) ทำการเช็คหลายอย่างให้คุณได้ ถ้าฟังก์ชันของคุณมี type เฉพาะเป็น
parameter คุณดำเนินด้วย logic ของโค้ดของคุณ โดยรู้ว่า compiler ได้รับ
ประกันแล้วว่าคุณมีค่า valid เช่น ถ้าคุณมี type แทน Option โปรแกรมของ
คุณคาดว่าจะมี บางอย่าง แทน ไม่มีอะไร โค้ดของคุณจึงไม่ต้องจัดการสอง
กรณีสำหรับ variant Some และ None — มันจะมีแค่กรณีเดียวสำหรับการมีค่า
แน่นอน โค้ดที่พยายามส่งไม่มีอะไรเข้าฟังก์ชันของคุณจะ compile ไม่ผ่าน
ฟังก์ชันของคุณจึงไม่ต้องเช็คกรณีนั้นตอน runtime ตัวอย่างอีก คือใช้
unsigned integer type อย่าง u32 ซึ่งรับประกันว่า parameter ไม่เคยเป็น
ค่าลบ
Type Custom สำหรับ Validation
มาเอาไอเดียของการใช้ระบบ type ของ Rust รับประกันว่าเรามีค่า valid ก้าวต่อ ไป และดูการสร้าง type custom สำหรับ validation จำเกมทายตัวเลขในบทที่ 2 ที่โค้ดของเราถาม user ทายตัวเลขระหว่าง 1 และ 100 เราไม่เคย validate ว่า การทายของ user อยู่ระหว่างตัวเลขเหล่านั้น ก่อนเช็คกับตัวเลขลับของเรา — เรา validate แค่ว่าการทายเป็นบวก ในกรณีนี้ ผลกระทบไม่รุนแรงมาก — output ของเรา “Too high” หรือ “Too low” จะยังถูก แต่จะเป็นการปรับปรุงที่มีประโยชน์ ที่จะแนะนำ user ไปสู่การทายที่ valid และมีพฤติกรรมต่างเมื่อ user ทายเลข นอก range เทียบกับเมื่อ user พิมพ์ตัวอักษรแทน เป็นต้น
วิธีหนึ่งในการทำคือ parse การทายเป็น i32 แทนแค่ u32 เพื่ออนุญาตตัวเลข
ลบที่อาจเป็นไปได้ และเพิ่มการเช็คตัวเลขอยู่ใน range ดังนี้:
use rand::Rng;
use std::cmp::Ordering;
use std::io;
fn main() {
println!("Guess the number!");
let secret_number = rand::thread_rng().gen_range(1..=100);
loop {
// --snip--
println!("Please input your guess.");
let mut guess = String::new();
io::stdin()
.read_line(&mut guess)
.expect("Failed to read line");
let guess: i32 = match guess.trim().parse() {
Ok(num) => num,
Err(_) => continue,
};
if guess < 1 || guess > 100 {
println!("The secret number will be between 1 and 100.");
continue;
}
match guess.cmp(&secret_number) {
// --snip--
Ordering::Less => println!("Too small!"),
Ordering::Greater => println!("Too big!"),
Ordering::Equal => {
println!("You win!");
break;
}
}
}
}if expression เช็คว่าค่าของเราอยู่นอก range ไหม, บอก user เรื่องปัญหา
และเรียก continue เริ่ม iteration ถัดไปของ loop และขอการทายอีก หลัง
if expression เราดำเนินด้วยการเปรียบเทียบระหว่าง guess และตัวเลขลับ
โดยรู้ว่า guess อยู่ระหว่าง 1 และ 100
อย่างไรก็ตาม นี่ไม่ใช่คำตอบในอุดมคติ — ถ้ามันสำคัญมากที่โปรแกรม operate แค่บนค่าระหว่าง 1 และ 100 และมีฟังก์ชันมากที่มีข้อกำหนดนี้ การมีการเช็ค แบบนี้ในทุกฟังก์ชันจะน่าเบื่อ (และอาจกระทบ performance)
แทน เราทำ type ใหม่ใน module เฉพาะและใส่ validation ในฟังก์ชันสร้าง
instance ของ type แทนการเขียน validation ซ้ำทุกที่ แบบนั้น ฟังก์ชัน
ปลอดภัยที่จะใช้ type ใหม่ใน signature และมั่นใจใช้ค่าที่ได้รับ Listing
9-13 แสดงวิธีหนึ่งในการประกาศ type Guess ที่จะสร้าง instance ของ
Guess แค่ถ้าฟังก์ชัน new ได้รับค่าระหว่าง 1 และ 100
#![allow(unused)]
fn main() {
pub struct Guess {
value: i32,
}
impl Guess {
pub fn new(value: i32) -> Guess {
if value < 1 || value > 100 {
panic!("Guess value must be between 1 and 100, got {value}.");
}
Guess { value }
}
pub fn value(&self) -> i32 {
self.value
}
}
}Guess ที่จะดำเนินแค่ด้วยค่าระหว่าง 1 และ 100หมายเหตุว่าโค้ดนี้ใน src/guessing_game.rs พึ่งการเพิ่มการประกาศ module
mod guessing_game; ใน src/lib.rs ที่เราไม่ได้แสดงที่นี่ ภายในไฟล์ของ
module ใหม่นี้ เราประกาศ struct ชื่อ Guess ที่มี field ชื่อ value
ที่เก็บ i32 นี่คือที่ที่ตัวเลขจะเก็บ
จากนั้นเรา implement associated function ชื่อ new บน Guess ที่สร้าง
instance ของค่า Guess ฟังก์ชัน new ประกาศให้มี parameter หนึ่งตัว
ชื่อ value type i32 และ return Guess โค้ดใน body ของฟังก์ชัน new
ทดสอบ value ให้แน่ใจว่าอยู่ระหว่าง 1 และ 100 ถ้า value ไม่ผ่านทดสอบ
นี้ เราเรียก panic! ซึ่งจะเตือนโปรแกรมเมอร์ที่กำลังเขียนโค้ดที่เรียก
ว่าเขามี bug ที่ต้องแก้ เพราะการสร้าง Guess ด้วย value นอก range นี้
จะฝ่าฝืนสัญญาที่ Guess::new พึ่งอยู่ เงื่อนไขที่ Guess::new อาจ panic
ควรพูดถึงใน public-facing API documentation — เราจะครอบคลุม convention
documentation ที่บ่งบอกความเป็นไปได้ของ panic! ใน API documentation
ที่คุณสร้างในบทที่ 14 ถ้า value ผ่านทดสอบ เราสร้าง Guess ใหม่ที่
field value ตั้งเป็น parameter value และ return Guess
ถัดไป เรา implement เมธอดชื่อ value ที่ borrow self ไม่มี parameter
อื่น และ return i32 เมธอดชนิดนี้บางครั้งเรียก getter เพราะจุดประสงค์
คือรับข้อมูลจาก field และ return เมธอด public นี้จำเป็น เพราะ field
value ของ struct Guess เป็น private สำคัญที่ field value เป็น
private เพื่อโค้ดที่ใช้ struct Guess ไม่อนุญาตให้ set value ตรง ๆ —
โค้ดนอก module guessing_game ต้อง ใช้ฟังก์ชัน Guess::new สร้าง
instance ของ Guess จึงรับประกันว่าไม่มีวิธีให้ Guess มี value ที่
ไม่ถูกเช็คโดยเงื่อนไขในฟังก์ชัน Guess::new
ฟังก์ชันที่มี parameter หรือ return แค่ตัวเลขระหว่าง 1 และ 100 ประกาศใน
signature ของมันว่ามันรับหรือ return Guess แทน i32 ได้ และไม่ต้อง
ทำการเช็คเพิ่มเติมใน body
สรุป
ฟีเจอร์การจัดการ error ของ Rust ออกแบบเพื่อช่วยคุณเขียนโค้ดที่แข็งแกร่ง
ขึ้น panic! macro ส่งสัญญาณว่าโปรแกรมของคุณอยู่ในสถานะที่จัดการไม่ได้
และให้คุณบอก process ให้หยุด แทนการพยายามดำเนินด้วยค่า invalid หรือไม่
ถูกต้อง enum Result ใช้ระบบ type ของ Rust บ่งบอกว่า operation อาจล้ม
เหลวในแบบที่โค้ดของคุณ recover ได้ คุณใช้ Result บอกโค้ดที่เรียกโค้ด
ของคุณว่าต้องจัดการความสำเร็จหรือความล้มเหลวที่อาจเป็นไปได้ด้วย การใช้
panic! และ Result ในสถานการณ์ที่เหมาะสม จะทำให้โค้ดของคุณน่าเชื่อถือ
ขึ้นในการเผชิญปัญหาที่หลีกเลี่ยงไม่ได้
ตอนนี้คุณเห็นวิธีที่มีประโยชน์ที่ standard library ใช้ generic กับ enum
Option และ Result แล้ว เราจะพูดถึงวิธีที่ generic ทำงานและวิธีคุณใช้
ในโค้ดของคุณ
Generic Type, Trait และ Lifetime
ทุกภาษาโปรแกรมมีเครื่องมือสำหรับจัดการการซ้ำของแนวคิดอย่างมีประสิทธิภาพ ใน Rust เครื่องมือหนึ่งคือ generic — ตัวแทนนามธรรมของ type คอนกรีตหรือ คุณสมบัติอื่น เราแสดงพฤติกรรมของ generic หรือวิธีที่พวกมันสัมพันธ์กับ generic อื่นได้ โดยไม่ต้องรู้ว่าอะไรจะอยู่ในที่ของมันเมื่อ compile และ รันโค้ด
ฟังก์ชันรับ parameter ของ generic type บางตัว แทน type คอนกรีตอย่าง
i32 หรือ String ได้ ในแบบเดียวกับที่รับ parameter ที่มีค่าไม่รู้
เพื่อรันโค้ดเดียวกันบนค่าคอนกรีตหลายตัว จริง ๆ เราใช้ generic แล้วในบทที่
6 กับ Option<T> ในบทที่ 8 กับ Vec<T> และ HashMap<K, V> และในบทที่
9 กับ Result<T, E> ในบทที่นี้ คุณจะสำรวจวิธีประกาศ type, ฟังก์ชัน และ
เมธอดของคุณเองด้วย generic!
ก่อนอื่น เราจะทบทวนวิธีดึงฟังก์ชันออกเพื่อลดการซ้ำของโค้ด แล้วเราจะใช้ เทคนิคเดียวกันสร้าง generic function จากสองฟังก์ชันที่ต่างกันแค่ที่ type ของ parameter เราจะอธิบายวิธีใช้ generic type ใน definition ของ struct และ enum ด้วย
จากนั้น คุณจะเรียนวิธีใช้ trait ประกาศพฤติกรรมในแบบ generic คุณรวม trait กับ generic type เพื่อจำกัด generic type ให้รับเฉพาะ type ที่มีพฤติกรรม เฉพาะ ตรงข้ามกับแค่ type ใด ๆ ได้
สุดท้าย เราจะพูดถึง lifetime — generic หลากหลายที่ให้ข้อมูล compiler ว่า reference สัมพันธ์กันอย่างไร Lifetime ให้เราให้ข้อมูล compiler เพียง พอเรื่องค่าที่ borrow เพื่อให้มันรับประกันได้ว่า reference จะ valid ใน สถานการณ์มากกว่าที่ทำได้โดยไม่มีความช่วยเหลือของเรา
ลดการซ้ำโดยดึงฟังก์ชัน
Generic ให้เราแทน type เฉพาะด้วย placeholder ที่แทน type หลายตัว เพื่อ ลดการซ้ำของโค้ด ก่อนลงลึก syntax ของ generic มาดูวิธีลดการซ้ำในแบบที่ไม่ เกี่ยวกับ generic type ก่อน โดยดึงฟังก์ชันที่แทนค่าเฉพาะด้วย placeholder ที่แทนค่าหลายค่า แล้วเราจะใช้เทคนิคเดียวกันดึง generic function! ด้วยการ ดูวิธีจับโค้ดที่ซ้ำที่คุณดึงเป็นฟังก์ชันได้ คุณจะเริ่มจับโค้ดที่ซ้ำที่ ใช้ generic ได้
เราจะเริ่มด้วยโปรแกรมสั้นใน Listing 10-1 ที่หาตัวเลขที่ใหญ่ที่สุดใน list
fn main() {
let number_list = vec![34, 50, 25, 100, 65];
let mut largest = &number_list[0];
for number in &number_list {
if number > largest {
largest = number;
}
}
println!("The largest number is {largest}");
assert_eq!(*largest, 100);
}เราเก็บ list ของ integer ในตัวแปร number_list และวาง reference ของ
ตัวเลขแรกใน list ในตัวแปรชื่อ largest จากนั้นเรา iterate ผ่านตัวเลข
ทั้งหมดใน list และถ้าตัวเลขปัจจุบันมากกว่าตัวเลขที่เก็บใน largest เรา
แทน reference ในตัวแปรนั้น อย่างไรก็ตาม ถ้าตัวเลขปัจจุบันน้อยกว่าหรือ
เท่ากับตัวเลขที่ใหญ่ที่สุดที่เห็นมา ตัวแปรไม่เปลี่ยน และโค้ดไปยังตัวเลข
ถัดไปใน list หลังพิจารณาตัวเลขทั้งหมดใน list largest ควรอ้างถึงตัวเลข
ที่ใหญ่ที่สุด ซึ่งในกรณีนี้คือ 100
ตอนนี้เราได้รับมอบหมายให้หาตัวเลขที่ใหญ่ที่สุดใน list ตัวเลขสอง list ที่ ต่างกัน ในการทำเช่นนั้น เราเลือกที่จะคัดลอกโค้ดใน Listing 10-1 และใช้ logic เดียวกันในสองที่ในโปรแกรม ดังที่แสดงใน Listing 10-2
fn main() {
let number_list = vec![34, 50, 25, 100, 65];
let mut largest = &number_list[0];
for number in &number_list {
if number > largest {
largest = number;
}
}
println!("The largest number is {largest}");
let number_list = vec![102, 34, 6000, 89, 54, 2, 43, 8];
let mut largest = &number_list[0];
for number in &number_list {
if number > largest {
largest = number;
}
}
println!("The largest number is {largest}");
}แม้โค้ดนี้ทำงาน การคัดลอกโค้ดน่าเบื่อและเสี่ยง error เรายังต้องจำที่จะ update โค้ดในหลายที่เมื่อเราอยากเปลี่ยน
เพื่อกำจัดการซ้ำนี้ เราจะสร้าง abstraction โดยประกาศฟังก์ชันที่ operate บน list ของ integer ใด ๆ ที่ส่งเข้าเป็น parameter คำตอบนี้ทำให้โค้ดของ เราชัดเจนขึ้นและให้เราแสดงแนวคิดของการหาตัวเลขที่ใหญ่ที่สุดใน list อย่าง เป็นนามธรรม
ใน Listing 10-3 เราดึงโค้ดที่หาตัวเลขที่ใหญ่ที่สุดเข้าฟังก์ชันชื่อ
largest จากนั้น เราเรียกฟังก์ชันหาตัวเลขที่ใหญ่ที่สุดในสอง list จาก
Listing 10-2 เรายังใช้ฟังก์ชันบน list ของค่า i32 อื่นใดที่เราอาจมีใน
อนาคตได้
fn largest(list: &[i32]) -> &i32 {
let mut largest = &list[0];
for item in list {
if item > largest {
largest = item;
}
}
largest
}
fn main() {
let number_list = vec![34, 50, 25, 100, 65];
let result = largest(&number_list);
println!("The largest number is {result}");
assert_eq!(*result, 100);
let number_list = vec![102, 34, 6000, 89, 54, 2, 43, 8];
let result = largest(&number_list);
println!("The largest number is {result}");
assert_eq!(*result, 6000);
}ฟังก์ชัน largest มี parameter ชื่อ list ซึ่งแทน slice คอนกรีตใด ๆ
ของค่า i32 ที่เราอาจส่งเข้าฟังก์ชัน ผลคือ เมื่อเราเรียกฟังก์ชัน โค้ด
รันบนค่าเฉพาะที่เราส่งเข้า
สรุป นี่คือขั้นตอนที่เราทำเพื่อเปลี่ยนโค้ดจาก Listing 10-2 เป็น Listing 10-3:
- ระบุโค้ดที่ซ้ำ
- ดึงโค้ดที่ซ้ำเข้า body ของฟังก์ชัน และระบุ input และ return value ของ โค้ดนั้นใน signature ของฟังก์ชัน
- Update สอง instance ของโค้ดที่ซ้ำให้เรียกฟังก์ชันแทน
ถัดไป เราจะใช้ขั้นตอนเดียวกันเหล่านี้กับ generic ลดการซ้ำของโค้ด ในแบบ
เดียวกับที่ body ของฟังก์ชัน operate บน list นามธรรมแทนค่าเฉพาะได้
generic ให้โค้ด operate บน type นามธรรม
เช่น สมมติเรามีสองฟังก์ชัน — ตัวหนึ่งหา item ที่ใหญ่ที่สุดใน slice ของ
ค่า i32 และตัวหนึ่งหา item ที่ใหญ่ที่สุดใน slice ของค่า char เราจะ
กำจัดการซ้ำนั้นยังไง? มาดูกัน!
Generic data type
Generic Data Type
เราใช้ generic สร้าง definition สำหรับ item อย่าง signature ฟังก์ชันหรือ struct ซึ่งเราใช้กับ type ข้อมูลคอนกรีตหลายตัวได้ ก่อนอื่นมาดูวิธีประกาศ ฟังก์ชัน struct enum และเมธอดโดยใช้ generic จากนั้น เราจะพูดถึงวิธีที่ generic กระทบ performance ของโค้ด
ในการประกาศฟังก์ชัน
เมื่อประกาศฟังก์ชันที่ใช้ generic เราวาง generic ใน signature ของฟังก์ชัน ตรงที่โดยปกติเราจะระบุ type ข้อมูลของ parameter และ return value การทำ เช่นนั้นทำให้โค้ดของเรายืดหยุ่นขึ้นและให้ functionality เพิ่มแก่ผู้เรียก ฟังก์ชันของเรา ขณะป้องกันการซ้ำของโค้ด
ต่อจากฟังก์ชัน largest ของเรา Listing 10-4 แสดงสองฟังก์ชันที่ทั้งคู่หา
ค่าที่ใหญ่ที่สุดใน slice เราจะรวมพวกมันเป็นฟังก์ชันเดียวที่ใช้ generic
fn largest_i32(list: &[i32]) -> &i32 {
let mut largest = &list[0];
for item in list {
if item > largest {
largest = item;
}
}
largest
}
fn largest_char(list: &[char]) -> &char {
let mut largest = &list[0];
for item in list {
if item > largest {
largest = item;
}
}
largest
}
fn main() {
let number_list = vec![34, 50, 25, 100, 65];
let result = largest_i32(&number_list);
println!("The largest number is {result}");
assert_eq!(*result, 100);
let char_list = vec!['y', 'm', 'a', 'q'];
let result = largest_char(&char_list);
println!("The largest char is {result}");
assert_eq!(*result, 'y');
}ฟังก์ชัน largest_i32 คือตัวที่เราดึงใน Listing 10-3 ที่หา i32 ที่
ใหญ่ที่สุดใน slice ฟังก์ชัน largest_char หา char ที่ใหญ่ที่สุดใน
slice body ของฟังก์ชันมีโค้ดเดียวกัน มากำจัดการซ้ำโดยแนะนำ generic type
parameter ในฟังก์ชันเดียว
ในการ parameterize type ในฟังก์ชันเดียวใหม่ เราต้องตั้งชื่อ type parameter
เช่นเดียวกับที่เราทำสำหรับ value parameter ของฟังก์ชัน คุณใช้ identifier
ใดเป็นชื่อ type parameter ได้ แต่เราจะใช้ T เพราะตาม convention ชื่อ
type parameter ใน Rust สั้น มักแค่ตัวอักษรเดียว และ convention การตั้งชื่อ
type ของ Rust คือ UpperCamelCase ย่อจาก type T เป็นตัวเลือก default
ของโปรแกรมเมอร์ Rust ส่วนใหญ่
เมื่อเราใช้ parameter ใน body ของฟังก์ชัน เราต้องประกาศชื่อ parameter ใน
signature เพื่อให้ compiler รู้ว่าชื่อนั้นหมายถึงอะไร ในทำนองเดียวกัน
เมื่อเราใช้ชื่อ type parameter ใน signature ฟังก์ชัน เราต้องประกาศชื่อ
type parameter ก่อนเราใช้ ในการประกาศฟังก์ชัน largest แบบ generic เรา
วางการประกาศชื่อ type ภายใน angle bracket <> ระหว่างชื่อฟังก์ชันและ
list parameter ดังนี้:
fn largest<T>(list: &[T]) -> &T {เราอ่าน definition นี้ว่า “ฟังก์ชัน largest เป็น generic บน type T
บางตัว” ฟังก์ชันนี้มี parameter หนึ่งตัวชื่อ list ซึ่งเป็น slice ของ
ค่า type T ฟังก์ชัน largest จะ return reference ของค่า type T
เดียวกัน
Listing 10-5 แสดง definition ฟังก์ชัน largest ที่รวมโดยใช้ generic data
type ใน signature listing ยังแสดงวิธีเราเรียกฟังก์ชันด้วย slice ของค่า
i32 หรือค่า char หมายเหตุว่าโค้ดนี้จะยัง compile ไม่ผ่าน
fn largest<T>(list: &[T]) -> &T {
let mut largest = &list[0];
for item in list {
if item > largest {
largest = item;
}
}
largest
}
fn main() {
let number_list = vec![34, 50, 25, 100, 65];
let result = largest(&number_list);
println!("The largest number is {result}");
let char_list = vec!['y', 'm', 'a', 'q'];
let result = largest(&char_list);
println!("The largest char is {result}");
}largest ที่ใช้ generic type parameter — ยัง compile ไม่ผ่านถ้าเรา compile โค้ดนี้ตอนนี้ เราจะได้ error นี้:
$ cargo run
Compiling chapter10 v0.1.0 (file:///projects/chapter10)
error[E0369]: binary operation `>` cannot be applied to type `&T`
--> src/main.rs:5:17
|
5 | if item > largest {
| ---- ^ ------- &T
| |
| &T
|
help: consider restricting type parameter `T` with trait `PartialOrd`
|
1 | fn largest<T: std::cmp::PartialOrd>(list: &[T]) -> &T {
| ++++++++++++++++++++++
For more information about this error, try `rustc --explain E0369`.
error: could not compile `chapter10` (bin "chapter10") due to 1 previous error
ข้อความ help เอ่ย std::cmp::PartialOrd ซึ่งเป็น trait และเราจะพูดถึง
trait ในส่วนถัดไป ตอนนี้ รู้ว่า error นี้ระบุว่า body ของ largest จะ
ไม่ทำงานสำหรับ type ที่เป็นไปได้ทั้งหมดที่ T เป็น เพราะเราอยาก
เปรียบเทียบค่า type T ใน body เราใช้ได้แค่ type ที่ค่าของพวกมัน
เรียงลำดับได้ เพื่อเปิดทางการเปรียบเทียบ standard library มี trait
std::cmp::PartialOrd ที่คุณ implement บน type ได้ (ดูภาคผนวก C สำหรับ
ข้อมูลเพิ่มเติมเรื่อง trait นี้) ในการแก้ Listing 10-5 เราตามคำแนะนำของ
ข้อความ help และจำกัด type ที่ valid สำหรับ T ให้เป็นแค่ตัวที่
implement PartialOrd Listing จะ compile ผ่านตอนนั้น เพราะ standard
library implement PartialOrd บนทั้ง i32 และ char
ในการประกาศ Struct
เรายังประกาศ struct ให้ใช้ generic type parameter ในหนึ่งหรือมากกว่าหนึ่ง
field โดยใช้ syntax <> ได้ Listing 10-6 ประกาศ struct Point<T> เพื่อ
เก็บค่าพิกัด x และ y ของ type ใด ๆ
struct Point<T> {
x: T,
y: T,
}
fn main() {
let integer = Point { x: 5, y: 10 };
let float = Point { x: 1.0, y: 4.0 };
}Point<T> ที่เก็บค่า x และ y ของ type Tsyntax สำหรับใช้ generic ใน definition struct คล้ายกับที่ใช้ใน definition ฟังก์ชัน ก่อนอื่น เราประกาศชื่อ type parameter ภายใน angle bracket หลัง ชื่อ struct จากนั้น เราใช้ generic type ใน definition struct ตรงที่ มิฉะนั้นเราจะระบุ type ข้อมูลคอนกรีต
หมายเหตุว่าเพราะเราใช้แค่ generic type หนึ่งตัวประกาศ Point<T>
definition นี้บอกว่า struct Point<T> เป็น generic บน type T บางตัว
และ field x และ y ทั้งคู่ เป็น type เดียวกัน ไม่ว่า type นั้นจะ
เป็นอะไร ถ้าเราสร้าง instance ของ Point<T> ที่มีค่า type ต่างกัน
อย่างใน Listing 10-7 โค้ดของเราจะ compile ไม่ผ่าน
struct Point<T> {
x: T,
y: T,
}
fn main() {
let wont_work = Point { x: 5, y: 4.0 };
}x และ y ต้องเป็น type เดียวกันเพราะทั้งคู่มี generic data type T เดียวกันในตัวอย่างนี้ เมื่อเรา assign ค่า integer 5 ให้ x เราให้ compiler
รู้ว่า generic type T จะเป็น integer สำหรับ instance นี้ของ Point<T>
จากนั้น เมื่อเราระบุ 4.0 สำหรับ y ซึ่งเราประกาศให้มี type เดียวกับ
x เราจะได้ error type mismatch แบบนี้:
$ cargo run
Compiling chapter10 v0.1.0 (file:///projects/chapter10)
error[E0308]: mismatched types
--> src/main.rs:7:38
|
7 | let wont_work = Point { x: 5, y: 4.0 };
| ^^^ expected integer, found floating-point number
For more information about this error, try `rustc --explain E0308`.
error: could not compile `chapter10` (bin "chapter10") due to 1 previous error
ในการประกาศ struct Point ที่ x และ y เป็น generic ทั้งคู่ แต่มี
type ต่างกันได้ เราใช้ generic type parameter หลายตัวได้ เช่น ใน
Listing 10-8 เราเปลี่ยน definition ของ Point ให้เป็น generic บน type
T และ U ที่ x เป็น type T และ y เป็น type U
struct Point<T, U> {
x: T,
y: U,
}
fn main() {
let both_integer = Point { x: 5, y: 10 };
let both_float = Point { x: 1.0, y: 4.0 };
let integer_and_float = Point { x: 5, y: 4.0 };
}Point<T, U> generic บนสอง type เพื่อให้ x และ y เป็นค่าของ type ต่างกันได้ตอนนี้ instance ทั้งหมดของ Point ที่แสดงอนุญาตแล้ว! คุณใช้ generic
type parameter มากเท่าที่อยากใน definition ได้ แต่ใช้มากกว่าไม่กี่ตัวทำ
ให้โค้ดของคุณอ่านยาก ถ้าคุณพบว่าต้องการ generic type หลายตัวในโค้ด มัน
อาจบ่งบอกว่าโค้ดต้องการการ restructure เป็นชิ้นเล็ก
ในการประกาศ Enum
อย่างที่เราทำกับ struct เราประกาศ enum ให้เก็บ generic data type ใน
variant ได้ ลองมาดู enum Option<T> ที่ standard library ให้อีกครั้ง
ซึ่งเราใช้ในบทที่ 6:
#![allow(unused)]
fn main() {
enum Option<T> {
Some(T),
None,
}
}Definition นี้ควรสมเหตุสมผลมากขึ้นกับคุณตอนนี้ อย่างที่คุณเห็น enum
Option<T> เป็น generic บน type T และมีสอง variant — Some ที่เก็บ
ค่าหนึ่งของ type T และ variant None ที่ไม่เก็บค่าใด ๆ ด้วยการใช้
enum Option<T> เราแสดงแนวคิดนามธรรมของค่าทางเลือกได้ และเพราะ
Option<T> เป็น generic เราใช้ abstraction นี้ได้ไม่ว่า type ของค่า
ทางเลือกจะเป็นอะไร
Enum ใช้ generic type หลายตัวได้ด้วย Definition ของ enum Result ที่เรา
ใช้ในบทที่ 9 เป็นตัวอย่างหนึ่ง:
#![allow(unused)]
fn main() {
enum Result<T, E> {
Ok(T),
Err(E),
}
}Enum Result เป็น generic บนสอง type T และ E และมีสอง variant —
Ok ที่เก็บค่าของ type T และ Err ที่เก็บค่าของ type E Definition
นี้ทำให้สะดวกในการใช้ enum Result ที่ใดก็ตามที่เรามี operation ที่อาจ
สำเร็จ (return ค่าของ type T) หรือล้มเหลว (return error ของ type E)
จริง ๆ นี่คือสิ่งที่เราใช้เปิดไฟล์ใน Listing 9-3 ที่ T ถูกเติมด้วย
type std::fs::File เมื่อไฟล์ถูกเปิดสำเร็จ และ E ถูกเติมด้วย type
std::io::Error เมื่อมีปัญหาเปิดไฟล์
เมื่อคุณจับสถานการณ์ในโค้ดของคุณที่มี definition struct หรือ enum หลาย ตัวที่ต่างกันแค่ที่ type ของค่าที่พวกมันเก็บ คุณหลีกเลี่ยงการซ้ำได้โดย ใช้ generic type แทน
ในการประกาศเมธอด
เรา implement เมธอดบน struct และ enum ได้ (อย่างที่เราทำในบทที่ 5) และ
ใช้ generic type ใน definition ของพวกมันด้วย Listing 10-9 แสดง struct
Point<T> ที่เราประกาศใน Listing 10-6 พร้อมเมธอดชื่อ x ที่ implement
บนมัน
struct Point<T> {
x: T,
y: T,
}
impl<T> Point<T> {
fn x(&self) -> &T {
&self.x
}
}
fn main() {
let p = Point { x: 5, y: 10 };
println!("p.x = {}", p.x());
}x บน struct Point<T> ที่จะ return reference ของ field x type Tที่นี่ เราประกาศเมธอดชื่อ x บน Point<T> ที่ return reference ของ
ข้อมูลใน field x
หมายเหตุว่าเราต้องประกาศ T หลัง impl ตรง ๆ เพื่อให้เราใช้ T ระบุ
ว่าเรากำลัง implement เมธอดบน type Point<T> โดยประกาศ T เป็น generic
type หลัง impl Rust ระบุได้ว่า type ใน angle bracket ใน Point เป็น
generic type แทน type คอนกรีต เราเลือกชื่อต่างสำหรับ generic parameter
นี้ที่ต่างจาก generic parameter ที่ประกาศใน definition struct ได้ แต่
ใช้ชื่อเดียวกันเป็น convention ถ้าคุณเขียนเมธอดภายใน impl ที่ประกาศ
generic type เมธอดนั้นจะถูกประกาศบน instance ใด ๆ ของ type ไม่ว่า type
คอนกรีตอะไรลงเอยแทน generic type
เรายังระบุข้อจำกัดบน generic type เมื่อประกาศเมธอดบน type ได้ เช่น เรา
implement เมธอดแค่บน instance Point<f32> แทนบน instance Point<T>
ด้วย generic type ใดก็ได้ ใน Listing 10-10 เราใช้ type คอนกรีต f32
หมายความว่าเราไม่ประกาศ type ใด ๆ หลัง impl
struct Point<T> {
x: T,
y: T,
}
impl<T> Point<T> {
fn x(&self) -> &T {
&self.x
}
}
impl Point<f32> {
fn distance_from_origin(&self) -> f32 {
(self.x.powi(2) + self.y.powi(2)).sqrt()
}
}
fn main() {
let p = Point { x: 5, y: 10 };
println!("p.x = {}", p.x());
}impl ที่ใช้แค่กับ struct ที่มี type คอนกรีตเฉพาะสำหรับ generic type parameter Tโค้ดนี้หมายความว่า type Point<f32> จะมีเมธอด distance_from_origin
instance อื่นของ Point<T> ที่ T ไม่ใช่ type f32 จะไม่มีเมธอดนี้
ประกาศ เมธอดวัดว่าจุดของเราอยู่ห่างจากจุดที่พิกัด (0.0, 0.0) เท่าไร และ
ใช้ operation คณิตศาสตร์ที่มีให้แค่สำหรับ type floating-point
Generic type parameter ใน definition struct ไม่ใช่ตัวเดียวกับที่คุณใช้
ใน signature เมธอดของ struct นั้นเสมอ Listing 10-11 ใช้ generic type
X1 และ Y1 สำหรับ struct Point และ X2 และ Y2 สำหรับ signature
เมธอด mixup เพื่อทำให้ตัวอย่างชัดเจนขึ้น เมธอดสร้าง instance Point
ใหม่ด้วยค่า x จาก self Point (type X1) และค่า y จาก Point
ที่ส่งเข้า (type Y2)
struct Point<X1, Y1> {
x: X1,
y: Y1,
}
impl<X1, Y1> Point<X1, Y1> {
fn mixup<X2, Y2>(self, other: Point<X2, Y2>) -> Point<X1, Y2> {
Point {
x: self.x,
y: other.y,
}
}
}
fn main() {
let p1 = Point { x: 5, y: 10.4 };
let p2 = Point { x: "Hello", y: 'c' };
let p3 = p1.mixup(p2);
println!("p3.x = {}, p3.y = {}", p3.x, p3.y);
}ใน main เราประกาศ Point ที่มี i32 สำหรับ x (ค่า 5) และ f64
สำหรับ y (ค่า 10.4) ตัวแปร p2 เป็น struct Point ที่มี string
slice สำหรับ x (ค่า "Hello") และ char สำหรับ y (ค่า c) การเรียก
mixup บน p1 ด้วย argument p2 ให้เรา p3 ซึ่งจะมี i32 สำหรับ x
เพราะ x มาจาก p1 ตัวแปร p3 จะมี char สำหรับ y เพราะ y มาจาก
p2 การเรียก println! macro จะพิมพ์ p3.x = 5, p3.y = c
จุดประสงค์ของตัวอย่างนี้คือแสดงสถานการณ์ที่ generic parameter บางตัว
ประกาศกับ impl และบางตัวประกาศกับ definition เมธอด ที่นี่ generic
parameter X1 และ Y1 ประกาศหลัง impl เพราะพวกมันไปกับ definition
struct generic parameter X2 และ Y2 ประกาศหลัง fn mixup เพราะพวก
มันเกี่ยวข้องแค่กับเมธอด
Performance ของโค้ดที่ใช้ Generic
คุณอาจสงสัยว่ามีต้นทุน runtime เมื่อใช้ generic type parameter ไหม ข่าวดีคือการใช้ generic type จะไม่ทำให้โปรแกรมของคุณรันช้ากว่าที่จะรัน ด้วย type คอนกรีต
Rust ทำสิ่งนี้สำเร็จโดยทำ monomorphization ของโค้ดที่ใช้ generic ตอน compile time Monomorphization คือกระบวนการเปลี่ยนโค้ด generic เป็น โค้ดเฉพาะโดยเติม type คอนกรีตที่ใช้เมื่อ compile ในกระบวนการนี้ compiler ทำตรงข้ามกับขั้นตอนที่เราใช้สร้าง generic function ใน Listing 10-5 — compiler ดูทุกที่ที่ generic code ถูกเรียก และ generate โค้ดสำหรับ type คอนกรีตที่ generic code ถูกเรียกด้วย
มาดูว่ามันทำงานยังไงโดยใช้ enum Option<T> generic ของ standard library:
#![allow(unused)]
fn main() {
let integer = Some(5);
let float = Some(5.0);
}เมื่อ Rust compile โค้ดนี้ มันทำ monomorphization ระหว่างกระบวนการนั้น
compiler อ่านค่าที่ถูกใช้ใน instance Option<T> และระบุสองชนิดของ
Option<T> — หนึ่งคือ i32 และอีกหนึ่งคือ f64 ดังนั้น มันขยาย
definition generic ของ Option<T> เป็นสอง definition พิเศษสำหรับ i32
และ f64 จึงแทน definition generic ด้วยตัวเฉพาะ
version monomorphize ของโค้ดดูคล้ายต่อไปนี้ (compiler ใช้ชื่อต่างจากที่ เราใช้ที่นี่เพื่อแสดง):
enum Option_i32 {
Some(i32),
None,
}
enum Option_f64 {
Some(f64),
None,
}
fn main() {
let integer = Option_i32::Some(5);
let float = Option_f64::Some(5.0);
}Option<T> generic ถูกแทนด้วย definition เฉพาะที่ compiler สร้าง เพราะ
Rust compile generic code เป็นโค้ดที่ระบุ type ในแต่ละ instance เราจ่าย
ต้นทุน runtime ไม่มีสำหรับการใช้ generic เมื่อโค้ดรัน มันทำเหมือนเรา
คัดลอกแต่ละ definition ด้วยมือ กระบวนการ monomorphization ทำให้ generic
ของ Rust มีประสิทธิภาพมากตอน runtime
นิยามพฤติกรรมร่วมด้วย trait
นิยามพฤติกรรมร่วมด้วย Trait
trait ประกาศ functionality ที่ type เฉพาะมีและแชร์กับ type อื่นได้ เรา ใช้ trait ประกาศพฤติกรรมร่วมในแบบนามธรรมได้ เราใช้ trait bound ระบุว่า generic type เป็น type ใด ๆ ที่มีพฤติกรรมเฉพาะได้
หมายเหตุ: Trait คล้ายกับฟีเจอร์ที่มักเรียกว่า interface ในภาษาอื่น แม้มีความแตกต่างบางอย่าง
ประกาศ Trait
พฤติกรรมของ type ประกอบด้วยเมธอดที่เราเรียกบน type นั้นได้ Type ต่างกัน แชร์พฤติกรรมเดียวกันถ้าเราเรียกเมธอดเดียวกันบน type เหล่านั้นได้ทั้งหมด Definition trait เป็นวิธีจัดกลุ่ม signature เมธอดเข้าด้วยกัน เพื่อประกาศ ชุดของพฤติกรรมที่จำเป็นเพื่อบรรลุจุดประสงค์บางอย่าง
เช่น สมมติเรามี struct หลายตัวที่เก็บชนิดและปริมาณข้อความต่าง ๆ — struct
NewsArticle ที่เก็บข่าวสารที่ยื่นในตำแหน่งเฉพาะ และ SocialPost ที่
มีอักขระมากที่สุด 280 ตัว พร้อม metadata ที่บ่งบอกว่ามันเป็น post ใหม่,
repost หรือ reply กับ post อื่น
เราอยากทำ library crate aggregator media ชื่อ aggregator ที่แสดงสรุป
ข้อมูลที่อาจเก็บใน instance NewsArticle หรือ SocialPost ในการทำสิ่ง
นี้ เราต้องการสรุปจากแต่ละ type และเราจะขอสรุปนั้นโดยเรียกเมธอด
summarize บน instance Listing 10-12 แสดง definition ของ trait Summary
public ที่แสดงพฤติกรรมนี้
pub trait Summary {
fn summarize(&self) -> String;
}Summary ที่ประกอบด้วยพฤติกรรมที่ให้โดยเมธอด summarizeที่นี่ เราประกาศ trait โดยใช้ keyword trait แล้วชื่อ trait ซึ่งคือ
Summary ในกรณีนี้ เรายังประกาศ trait เป็น pub เพื่อให้ crate ที่
พึ่ง crate นี้ใช้ trait นี้ได้ด้วย อย่างที่เราจะเห็นในตัวอย่างไม่กี่ตัว
ภายใน curly bracket เราประกาศ signature เมธอดที่บรรยายพฤติกรรมของ type
ที่ implement trait นี้ ซึ่งในกรณีนี้คือ fn summarize(&self) -> String
หลัง signature เมธอด แทนการให้ implementation ภายใน curly bracket เราใช้
semicolon แต่ละ type ที่ implement trait นี้ต้องให้พฤติกรรม custom ของ
ตัวเองสำหรับ body ของเมธอด Compiler จะบังคับใช้ว่า type ใด ๆ ที่มี trait
Summary จะมีเมธอด summarize ประกาศด้วย signature นี้เป๊ะ ๆ
Trait มีเมธอดหลายตัวใน body ได้ — signature เมธอด list หนึ่งตัวต่อบรรทัด และแต่ละบรรทัดจบด้วย semicolon
Implement Trait บน Type
ตอนนี้เราประกาศ signature ที่ต้องการของเมธอดของ trait Summary แล้ว เรา
implement บน type ใน aggregator media ของเราได้ Listing 10-13 แสดง
implementation ของ trait Summary บน struct NewsArticle ที่ใช้ headline,
author และ location สร้าง return value ของ summarize สำหรับ struct
SocialPost เราประกาศ summarize เป็น username ตามด้วย text ทั้งหมดของ
post สมมติว่าเนื้อหา post จำกัดแล้วที่ 280 อักขระ
pub trait Summary {
fn summarize(&self) -> String;
}
pub struct NewsArticle {
pub headline: String,
pub location: String,
pub author: String,
pub content: String,
}
impl Summary for NewsArticle {
fn summarize(&self) -> String {
format!("{}, by {} ({})", self.headline, self.author, self.location)
}
}
pub struct SocialPost {
pub username: String,
pub content: String,
pub reply: bool,
pub repost: bool,
}
impl Summary for SocialPost {
fn summarize(&self) -> String {
format!("{}: {}", self.username, self.content)
}
}Summary บน type NewsArticle และ SocialPostการ implement trait บน type คล้ายกับการ implement เมธอดปกติ ความแตกต่าง
คือหลัง impl เราใส่ชื่อ trait ที่เราอยาก implement แล้วใช้ keyword
for แล้วระบุชื่อ type ที่เราอยาก implement trait ให้ ภายใน block
impl เราใส่ signature เมธอดที่ definition trait ประกาศ แทนการเพิ่ม
semicolon หลังแต่ละ signature เราใช้ curly bracket และเติม body เมธอด
ด้วยพฤติกรรมเฉพาะที่เราอยากให้เมธอดของ trait มีสำหรับ type เฉพาะ
ตอนนี้ library implement trait Summary บน NewsArticle และ
SocialPost แล้ว user ของ crate เรียกเมธอด trait บน instance ของ
NewsArticle และ SocialPost ในแบบเดียวกับที่เราเรียกเมธอดปกติ ความ
แตกต่างเดียวคือ user ต้องนำ trait เข้า scope เช่นเดียวกับ type นี่คือ
ตัวอย่างที่ binary crate ใช้ library crate aggregator ของเรา:
use aggregator::{SocialPost, Summary};
fn main() {
let post = SocialPost {
username: String::from("horse_ebooks"),
content: String::from(
"of course, as you probably already know, people",
),
reply: false,
repost: false,
};
println!("1 new post: {}", post.summarize());
}โค้ดนี้พิมพ์ 1 new post: horse_ebooks: of course, as you probably already know, people
Crate อื่นที่พึ่ง crate aggregator ยังนำ trait Summary เข้า scope
เพื่อ implement Summary บน type ของพวกเขาเองได้ ข้อจำกัดหนึ่งที่ต้อง
หมายเหตุคือ เรา implement trait บน type ได้แค่ถ้า trait หรือ type หรือ
ทั้งคู่ เป็น local ของ crate เรา เช่น เรา implement standard library
trait อย่าง Display บน type custom อย่าง SocialPost ได้ เป็นส่วนของ
functionality crate aggregator ของเรา เพราะ type SocialPost เป็น
local ของ crate aggregator เรา เรายัง implement Summary บน Vec<T>
ใน crate aggregator เราได้ เพราะ trait Summary เป็น local ของ crate
aggregator เรา
แต่เรา implement trait ภายนอกบน type ภายนอกไม่ได้ เช่น เรา implement
trait Display บน Vec<T> ภายใน crate aggregator เราไม่ได้ เพราะ
Display และ Vec<T> ทั้งคู่ประกาศใน standard library และไม่ใช่ local
ของ crate aggregator เรา ข้อจำกัดนี้เป็นส่วนของคุณสมบัติที่เรียกว่า
coherence และเฉพาะกว่า orphan rule ที่ตั้งชื่อแบบนั้นเพราะ type พ่อ
ไม่มี กฎนี้รับประกันว่าโค้ดของคนอื่นทำให้โค้ดของคุณเสียและตรงข้ามไม่ได้
ไม่มีกฎ สอง crate implement trait เดียวกันสำหรับ type เดียวกันได้ และ
Rust ไม่รู้ว่าจะใช้ implementation ไหน
ใช้ Default Implementation
บางครั้งมีประโยชน์ที่จะมีพฤติกรรม default สำหรับเมธอดบางตัวหรือทั้งหมดใน trait แทนการกำหนด implementation สำหรับเมธอดทั้งหมดบนทุก type จากนั้น เมื่อเรา implement trait บน type เฉพาะ เราเก็บหรือ override พฤติกรรม default ของแต่ละเมธอดได้
ใน Listing 10-14 เราระบุ string default สำหรับเมธอด summarize ของ
trait Summary แทนการประกาศแค่ signature เมธอด อย่างที่เราทำใน
Listing 10-12
pub trait Summary {
fn summarize(&self) -> String {
String::from("(Read more...)")
}
}
pub struct NewsArticle {
pub headline: String,
pub location: String,
pub author: String,
pub content: String,
}
impl Summary for NewsArticle {}
pub struct SocialPost {
pub username: String,
pub content: String,
pub reply: bool,
pub repost: bool,
}
impl Summary for SocialPost {
fn summarize(&self) -> String {
format!("{}: {}", self.username, self.content)
}
}Summary ด้วย default implementation ของเมธอด summarizeในการใช้ default implementation สรุป instance ของ NewsArticle เราระบุ
block impl ว่างด้วย impl Summary for NewsArticle {}
แม้เราไม่ประกาศเมธอด summarize บน NewsArticle ตรง ๆ แล้ว เราให้
default implementation และระบุว่า NewsArticle implement trait
Summary ผลคือ เรายังเรียกเมธอด summarize บน instance ของ
NewsArticle ได้ ดังนี้:
use aggregator::{self, NewsArticle, Summary};
fn main() {
let article = NewsArticle {
headline: String::from("Penguins win the Stanley Cup Championship!"),
location: String::from("Pittsburgh, PA, USA"),
author: String::from("Iceburgh"),
content: String::from(
"The Pittsburgh Penguins once again are the best \
hockey team in the NHL.",
),
};
println!("New article available! {}", article.summarize());
}โค้ดนี้พิมพ์ New article available! (Read more...)
การสร้าง default implementation ไม่บังคับให้เราเปลี่ยนอะไรเรื่อง
implementation ของ Summary บน SocialPost ใน Listing 10-13 เหตุผลคือ
syntax สำหรับ override default implementation เหมือนกับ syntax สำหรับ
implement เมธอด trait ที่ไม่มี default implementation
Default implementation เรียกเมธอดอื่นใน trait เดียวกันได้ แม้เมธอดอื่น
เหล่านั้นไม่มี default implementation ในวิธีนี้ trait ให้ functionality
ที่มีประโยชน์เยอะและบังคับให้ผู้ implement ระบุแค่ส่วนเล็กของมัน เช่น
เราประกาศ trait Summary ให้มีเมธอด summarize_author ที่บังคับ
implement และจากนั้นประกาศเมธอด summarize ที่มี default implementation
ที่เรียกเมธอด summarize_author:
pub trait Summary {
fn summarize_author(&self) -> String;
fn summarize(&self) -> String {
format!("(Read more from {}...)", self.summarize_author())
}
}
pub struct SocialPost {
pub username: String,
pub content: String,
pub reply: bool,
pub repost: bool,
}
impl Summary for SocialPost {
fn summarize_author(&self) -> String {
format!("@{}", self.username)
}
}ในการใช้ version Summary นี้ เราแค่ต้องประกาศ summarize_author เมื่อ
เรา implement trait บน type:
pub trait Summary {
fn summarize_author(&self) -> String;
fn summarize(&self) -> String {
format!("(Read more from {}...)", self.summarize_author())
}
}
pub struct SocialPost {
pub username: String,
pub content: String,
pub reply: bool,
pub repost: bool,
}
impl Summary for SocialPost {
fn summarize_author(&self) -> String {
format!("@{}", self.username)
}
}หลังเราประกาศ summarize_author เราเรียก summarize บน instance ของ
struct SocialPost ได้ และ default implementation ของ summarize จะ
เรียก definition ของ summarize_author ที่เราให้ เพราะเรา implement
summarize_author trait Summary ให้เราพฤติกรรมของเมธอด summarize
โดยไม่บังคับให้เราเขียนโค้ดเพิ่ม นี่คือสิ่งที่ดูเหมือน:
use aggregator::{self, SocialPost, Summary};
fn main() {
let post = SocialPost {
username: String::from("horse_ebooks"),
content: String::from(
"of course, as you probably already know, people",
),
reply: false,
repost: false,
};
println!("1 new post: {}", post.summarize());
}โค้ดนี้พิมพ์ 1 new post: (Read more from @horse_ebooks...)
หมายเหตุว่าเป็นไปไม่ได้ที่จะเรียก default implementation จาก implementation ที่ override เมธอดเดียวกัน
ใช้ Trait เป็น Parameter
ตอนนี้คุณรู้วิธีประกาศและ implement trait แล้ว เราสำรวจวิธีใช้ trait
ประกาศฟังก์ชันที่รับ type ต่างกันหลายตัวได้ เราจะใช้ trait Summary ที่
เรา implement บน type NewsArticle และ SocialPost ใน Listing 10-13
ประกาศฟังก์ชัน notify ที่เรียกเมธอด summarize บน parameter item
ซึ่งเป็น type บางตัวที่ implement trait Summary ในการทำสิ่งนี้ เราใช้
syntax impl Trait ดังนี้:
pub trait Summary {
fn summarize(&self) -> String;
}
pub struct NewsArticle {
pub headline: String,
pub location: String,
pub author: String,
pub content: String,
}
impl Summary for NewsArticle {
fn summarize(&self) -> String {
format!("{}, by {} ({})", self.headline, self.author, self.location)
}
}
pub struct SocialPost {
pub username: String,
pub content: String,
pub reply: bool,
pub repost: bool,
}
impl Summary for SocialPost {
fn summarize(&self) -> String {
format!("{}: {}", self.username, self.content)
}
}
pub fn notify(item: &impl Summary) {
println!("Breaking news! {}", item.summarize());
}แทน type คอนกรีตสำหรับ parameter item เราระบุ keyword impl และชื่อ
trait Parameter นี้รับ type ใด ๆ ที่ implement trait ที่ระบุ ใน body ของ
notify เราเรียกเมธอดใด ๆ บน item ที่มาจาก trait Summary ได้ เช่น
summarize เราเรียก notify และส่ง instance ใด ๆ ของ NewsArticle
หรือ SocialPost ได้ โค้ดที่เรียกฟังก์ชันด้วย type อื่นใด เช่น String
หรือ i32 จะ compile ไม่ผ่าน เพราะ type เหล่านั้นไม่ implement
Summary
Syntax ของ Trait Bound
syntax impl Trait ทำงานสำหรับกรณีตรงไปตรงมา แต่จริง ๆ เป็น syntax sugar
ของรูปยาวที่รู้จักในชื่อ trait bound ดูแบบนี้:
pub fn notify<T: Summary>(item: &T) {
println!("Breaking news! {}", item.summarize());
}รูปยาวกว่านี้เทียบเท่ากับตัวอย่างในส่วนก่อนหน้า แต่ยาวกว่า เราวาง trait bound พร้อมการประกาศ generic type parameter หลัง colon และภายใน angle bracket
syntax impl Trait สะดวกและทำให้โค้ดกระชับขึ้นในกรณีง่าย ขณะที่ syntax
trait bound เต็มแสดงความซับซ้อนได้มากขึ้นในกรณีอื่น เช่น เรามีสอง
parameter ที่ implement Summary ได้ การทำเช่นนั้นด้วย syntax
impl Trait ดูแบบนี้:
pub fn notify(item1: &impl Summary, item2: &impl Summary) {การใช้ impl Trait เหมาะถ้าเราอยากให้ฟังก์ชันนี้อนุญาตให้ item1 และ
item2 มี type ต่างกัน (ตราบที่ทั้งสอง type implement Summary) ถ้าเรา
อยากบังคับให้ทั้งสอง parameter มี type เดียวกัน เราต้องใช้ trait bound
แบบนี้:
pub fn notify<T: Summary>(item1: &T, item2: &T) {Generic type T ที่ระบุเป็น type ของ parameter item1 และ item2
จำกัดฟังก์ชัน ดังนั้น type คอนกรีตของค่าที่ส่งเป็น argument สำหรับ item1
และ item2 ต้องเหมือนกัน
Trait Bound หลายตัวด้วย Syntax +
เรายังระบุ trait bound มากกว่าหนึ่งตัวได้ สมมติเราอยากให้ notify ใช้
display formatting และ summarize บน item ด้วย เราระบุใน definition
notify ว่า item ต้อง implement ทั้ง Display และ Summary เราทำ
ได้โดยใช้ syntax +:
pub fn notify(item: &(impl Summary + Display)) {syntax + ยัง valid กับ trait bound บน generic type:
pub fn notify<T: Summary + Display>(item: &T) {ด้วยสอง trait bound ที่ระบุ body ของ notify เรียก summarize และใช้
{} format item ได้
Trait Bound ที่ชัดเจนขึ้นด้วย Clause where
การใช้ trait bound มากเกินไปมีข้อเสีย แต่ละ generic มี trait bound ของ
ตัวเอง ดังนั้นฟังก์ชันที่มี generic type parameter หลายตัวมีข้อมูล trait
bound มากระหว่างชื่อฟังก์ชันและ list parameter ทำให้ signature ฟังก์ชัน
อ่านยาก ด้วยเหตุนี้ Rust มี syntax ทางเลือกสำหรับระบุ trait bound ภายใน
clause where หลัง signature ฟังก์ชัน ดังนั้น แทนการเขียนแบบนี้:
fn some_function<T: Display + Clone, U: Clone + Debug>(t: &T, u: &U) -> i32 {เราใช้ clause where ดังนี้:
fn some_function<T, U>(t: &T, u: &U) -> i32
where
T: Display + Clone,
U: Clone + Debug,
{
unimplemented!()
}Signature ฟังก์ชันนี้เลอะเทอะน้อยลง — ชื่อฟังก์ชัน, list parameter และ return type ใกล้กัน คล้ายกับฟังก์ชันที่ไม่มี trait bound เยอะ
Return Type ที่ Implement Trait
เรายังใช้ syntax impl Trait ในตำแหน่ง return เพื่อ return ค่าของ type
บางตัวที่ implement trait ดังที่แสดงที่นี่:
pub trait Summary {
fn summarize(&self) -> String;
}
pub struct NewsArticle {
pub headline: String,
pub location: String,
pub author: String,
pub content: String,
}
impl Summary for NewsArticle {
fn summarize(&self) -> String {
format!("{}, by {} ({})", self.headline, self.author, self.location)
}
}
pub struct SocialPost {
pub username: String,
pub content: String,
pub reply: bool,
pub repost: bool,
}
impl Summary for SocialPost {
fn summarize(&self) -> String {
format!("{}: {}", self.username, self.content)
}
}
fn returns_summarizable() -> impl Summary {
SocialPost {
username: String::from("horse_ebooks"),
content: String::from(
"of course, as you probably already know, people",
),
reply: false,
repost: false,
}
}โดยใช้ impl Summary สำหรับ return type เราระบุว่าฟังก์ชัน
returns_summarizable return type บางตัวที่ implement trait Summary
โดยไม่ตั้งชื่อ type คอนกรีต ในกรณีนี้ returns_summarizable return
SocialPost แต่โค้ดที่เรียกฟังก์ชันไม่ต้องรู้
ความสามารถในการระบุ return type แค่ด้วย trait ที่มัน implement มีประโยชน์
เป็นพิเศษในบริบทของ closure และ iterator ซึ่งเราครอบคลุมในบทที่ 13
Closure และ iterator สร้าง type ที่แค่ compiler รู้ หรือ type ที่ยาวมาก
ในการระบุ syntax impl Trait ให้คุณระบุแบบกระชับว่าฟังก์ชัน return type
บางตัวที่ implement trait Iterator โดยไม่ต้องเขียน type ยาวมาก
อย่างไรก็ตาม คุณใช้ impl Trait ได้แค่ถ้าคุณ return type เดียว เช่น
โค้ดนี้ที่ return ทั้ง NewsArticle หรือ SocialPost ที่ระบุ return
type เป็น impl Summary จะไม่ทำงาน:
pub trait Summary {
fn summarize(&self) -> String;
}
pub struct NewsArticle {
pub headline: String,
pub location: String,
pub author: String,
pub content: String,
}
impl Summary for NewsArticle {
fn summarize(&self) -> String {
format!("{}, by {} ({})", self.headline, self.author, self.location)
}
}
pub struct SocialPost {
pub username: String,
pub content: String,
pub reply: bool,
pub repost: bool,
}
impl Summary for SocialPost {
fn summarize(&self) -> String {
format!("{}: {}", self.username, self.content)
}
}
fn returns_summarizable(switch: bool) -> impl Summary {
if switch {
NewsArticle {
headline: String::from(
"Penguins win the Stanley Cup Championship!",
),
location: String::from("Pittsburgh, PA, USA"),
author: String::from("Iceburgh"),
content: String::from(
"The Pittsburgh Penguins once again are the best \
hockey team in the NHL.",
),
}
} else {
SocialPost {
username: String::from("horse_ebooks"),
content: String::from(
"of course, as you probably already know, people",
),
reply: false,
repost: false,
}
}
}การ return ทั้ง NewsArticle หรือ SocialPost ไม่อนุญาตเพราะข้อจำกัด
รอบวิธีที่ syntax impl Trait ถูก implement ใน compiler เราจะครอบคลุม
วิธีเขียนฟังก์ชันที่มีพฤติกรรมนี้ในส่วน
“ใช้ Trait Object เพื่อนามธรรมพฤติกรรมร่วม”
ของบทที่ 18
ใช้ Trait Bound Implement เมธอดแบบมีเงื่อนไข
ด้วยการใช้ trait bound กับ block impl ที่ใช้ generic type parameter
เรา implement เมธอดแบบมีเงื่อนไขสำหรับ type ที่ implement trait ที่ระบุ
ได้ เช่น type Pair<T> ใน Listing 10-15 มี implement ฟังก์ชัน new
เสมอ เพื่อ return instance ใหม่ของ Pair<T> (จำจากส่วน
“Method Syntax” ของบทที่ 5 ว่า Self เป็น
type alias สำหรับ type ของ block impl ซึ่งในกรณีนี้คือ Pair<T>) แต่
ใน block impl ถัดไป Pair<T> implement เมธอด cmp_display แค่ถ้า
type ภายใน T implement trait PartialOrd ที่เปิดทางการเปรียบเทียบ
และ trait Display ที่เปิดทางการพิมพ์
use std::fmt::Display;
struct Pair<T> {
x: T,
y: T,
}
impl<T> Pair<T> {
fn new(x: T, y: T) -> Self {
Self { x, y }
}
}
impl<T: Display + PartialOrd> Pair<T> {
fn cmp_display(&self) {
if self.x >= self.y {
println!("The largest member is x = {}", self.x);
} else {
println!("The largest member is y = {}", self.y);
}
}
}เรายัง implement trait แบบมีเงื่อนไขสำหรับ type ใด ๆ ที่ implement trait
อื่นได้ Implementation ของ trait บน type ใด ๆ ที่ตรงตาม trait bound
เรียกว่า blanket implementation และใช้กันอย่างกว้างขวางใน Rust
standard library เช่น standard library implement trait ToString บน
type ใด ๆ ที่ implement trait Display Block impl ใน standard library
ดูคล้ายโค้ดนี้:
impl<T: Display> ToString for T {
// --snip--
}เพราะ standard library มี blanket implementation นี้ เราเรียกเมธอด
to_string ที่ประกาศโดย trait ToString บน type ใด ๆ ที่ implement
trait Display ได้ เช่น เราเปลี่ยน integer เป็นค่า String ที่สอดคล้อง
ของพวกมันแบบนี้ได้ เพราะ integer implement Display:
#![allow(unused)]
fn main() {
let s = 3.to_string();
}Blanket implementation ปรากฏใน documentation สำหรับ trait ในส่วน “Implementors”
Trait และ trait bound ให้เราเขียนโค้ดที่ใช้ generic type parameter ลด การซ้ำ แต่ยังระบุให้ compiler ว่าเราอยากให้ generic type มีพฤติกรรมเฉพาะ ด้วย Compiler ใช้ข้อมูล trait bound เช็คว่า type คอนกรีตทั้งหมดที่ใช้ กับโค้ดของเราให้พฤติกรรมที่ถูก ในภาษา dynamically typed เราจะได้ error ตอน runtime ถ้าเราเรียกเมธอดบน type ที่ไม่ประกาศเมธอด แต่ Rust ย้าย error เหล่านี้ไป compile time เพื่อให้เราถูกบังคับให้แก้ปัญหาก่อนโค้ด ของเรารันได้ด้วยซ้ำ นอกจากนี้ เราไม่ต้องเขียนโค้ดที่เช็คพฤติกรรมตอน runtime เพราะเราเช็คตอน compile time แล้ว การทำเช่นนั้นปรับปรุง performance โดยไม่ต้องเสียความยืดหยุ่นของ generic
ตรวจสอบ reference ด้วย lifetime
ตรวจสอบ Reference ด้วย Lifetime
Lifetime เป็น generic อีกชนิดที่เราใช้มาแล้ว แทนการรับประกันว่า type มี พฤติกรรมที่เราอยาก lifetime รับประกันว่า reference valid ตราบที่เราต้อง การ
รายละเอียดหนึ่งที่เราไม่พูดถึงในส่วน “Reference และ Borrowing” ใน บทที่ 4 คือทุก reference ใน Rust มี lifetime ซึ่งคือ scope ที่ reference นั้น valid โดยปกติ lifetime เป็น implicit และ infer เช่นเดียวกับโดยปกติ type ถูก infer เราถูกบังคับให้ annotate type แค่เมื่อ type หลายตัวเป็นไป ได้ ในแบบคล้ายกัน เราต้อง annotate lifetime เมื่อ lifetime ของ reference สัมพันธ์กันได้ในไม่กี่แบบ Rust บังคับให้เรา annotate ความสัมพันธ์โดยใช้ generic lifetime parameter เพื่อรับประกันว่า reference จริงที่ใช้ตอน runtime จะ valid แน่นอน
การ annotate lifetime ไม่ใช่แม้แต่แนวคิดที่ภาษาโปรแกรมอื่นส่วนใหญ่มี นี่จึงจะรู้สึกไม่คุ้นเคย แม้เราจะไม่ครอบคลุม lifetime ทั้งหมดในบทนี้ เรา จะพูดถึงวิธีที่ใช้บ่อยที่คุณอาจเจอ syntax lifetime เพื่อให้คุณคุ้นเคยกับ แนวคิด
Dangling Reference
จุดประสงค์หลักของ lifetime คือป้องกัน dangling reference ซึ่ง ถ้าอนุญาต ให้มีอยู่ จะทำให้โปรแกรมอ้างถึงข้อมูลอื่นนอกจากข้อมูลที่ตั้งใจอ้าง พิจารณาโปรแกรมใน Listing 10-16 ซึ่งมี outer scope และ inner scope
fn main() {
let r;
{
let x = 5;
r = &x;
}
println!("r: {r}");
}หมายเหตุ: ตัวอย่างใน Listing 10-16, 10-17 และ 10-23 ประกาศตัวแปรโดยไม่ ให้ค่าเริ่มต้น ดังนั้นชื่อตัวแปรมีอยู่ใน outer scope แวบแรก นี่อาจดู ขัดกับการที่ Rust ไม่มีค่า null อย่างไรก็ตาม ถ้าเราลองใช้ตัวแปรก่อนให้ ค่ามัน เราจะได้ compile-time error ซึ่งแสดงว่า Rust ไม่อนุญาตค่า null จริง
Outer scope ประกาศตัวแปรชื่อ r โดยไม่มีค่าเริ่มต้น และ inner scope
ประกาศตัวแปรชื่อ x ด้วยค่าเริ่มต้น 5 ภายใน inner scope เราพยายาม set
ค่าของ r เป็น reference ของ x จากนั้น inner scope จบ และเราพยายาม
พิมพ์ค่าใน r โค้ดนี้จะ compile ไม่ผ่าน เพราะค่าที่ r อ้างถึงออกจาก
scope ก่อนเราลองใช้ นี่คือ error message:
$ cargo run
Compiling chapter10 v0.1.0 (file:///projects/chapter10)
error[E0597]: `x` does not live long enough
--> src/main.rs:6:13
|
5 | let x = 5;
| - binding `x` declared here
6 | r = &x;
| ^^ borrowed value does not live long enough
7 | }
| - `x` dropped here while still borrowed
8 |
9 | println!("r: {r}");
| - borrow later used here
For more information about this error, try `rustc --explain E0597`.
error: could not compile `chapter10` (bin "chapter10") due to 1 previous error
Error message บอกว่าตัวแปร x “ไม่อยู่นานพอ” เหตุผลคือ x จะออกจาก
scope เมื่อ inner scope จบในบรรทัด 7 แต่ r ยัง valid สำหรับ outer
scope เพราะ scope ของมันใหญ่กว่า เราบอกว่ามัน “อยู่นานกว่า” ถ้า Rust
อนุญาตให้โค้ดนี้ทำงาน r จะอ้างถึงหน่วยความจำที่ถูก deallocate เมื่อ
x ออกจาก scope และอะไรที่เราพยายามทำกับ r จะไม่ทำงานถูก แล้ว Rust
กำหนดยังไงว่าโค้ดนี้ invalid? มันใช้ borrow checker
Borrow Checker
Rust compiler มี borrow checker ที่เปรียบเทียบ scope กำหนดว่าการ borrow ทั้งหมด valid ไหม Listing 10-17 แสดงโค้ดเดียวกับ Listing 10-16 แต่มี annotation แสดง lifetime ของตัวแปร
fn main() {
let r; // ---------+-- 'a
// |
{ // |
let x = 5; // -+-- 'b |
r = &x; // | |
} // -+ |
// |
println!("r: {r}"); // |
} // ---------+r และ x ชื่อ 'a และ 'b ตามลำดับที่นี่ เรา annotate lifetime ของ r ด้วย 'a และ lifetime ของ x ด้วย
'b อย่างที่คุณเห็น block 'b ภายในเล็กกว่า block lifetime 'a ภายนอก
มาก ตอน compile time Rust เปรียบเทียบขนาดของสอง lifetime และเห็นว่า r
มี lifetime 'a แต่อ้างถึงหน่วยความจำที่มี lifetime 'b โปรแกรมถูก
ปฏิเสธเพราะ 'b สั้นกว่า 'a — เรื่องของ reference ไม่อยู่นานเท่า
reference
Listing 10-18 แก้โค้ดเพื่อให้ไม่มี dangling reference และมัน compile ผ่านโดยไม่มี error
fn main() {
let x = 5; // ----------+-- 'b
// |
let r = &x; // --+-- 'a |
// | |
println!("r: {r}"); // | |
// --+ |
} // ----------+ที่นี่ x มี lifetime 'b ซึ่งในกรณีนี้ใหญ่กว่า 'a นี่หมายความว่า
r อ้างถึง x ได้ เพราะ Rust รู้ว่า reference ใน r จะ valid เสมอ
ขณะที่ x valid
ตอนนี้คุณรู้ว่า lifetime ของ reference อยู่ที่ไหน และวิธีที่ Rust วิเคราะห์ lifetime เพื่อรับประกันว่า reference จะ valid เสมอ มาสำรวจ generic lifetime ใน parameter ฟังก์ชันและ return value
Generic Lifetime ในฟังก์ชัน
เราจะเขียนฟังก์ชันที่ return string slice ที่ยาวกว่าของสองตัว ฟังก์ชันนี้
จะรับ string slice สองตัวและ return string slice หนึ่งตัว หลังเรา
implement ฟังก์ชัน longest แล้ว โค้ดใน Listing 10-19 ควรพิมพ์
The longest string is abcd
fn main() {
let string1 = String::from("abcd");
let string2 = "xyz";
let result = longest(string1.as_str(), string2);
println!("The longest string is {result}");
}main ที่เรียกฟังก์ชัน longest หา string slice ที่ยาวกว่าของสองตัวหมายเหตุว่าเราอยากให้ฟังก์ชันรับ string slice ซึ่งเป็น reference แทน
string เพราะเราไม่อยากให้ฟังก์ชัน longest รับ ownership ของ parameter
ดู “String Slice เป็น Parameter”
ในบทที่ 4 สำหรับการพูดถึงเพิ่มเติมว่าทำไม parameter ที่เราใช้ใน Listing
10-19 คือตัวที่เราอยากได้
ถ้าเราลอง implement ฟังก์ชัน longest ดังที่แสดงใน Listing 10-20 มันจะ
compile ไม่ผ่าน
fn main() {
let string1 = String::from("abcd");
let string2 = "xyz";
let result = longest(string1.as_str(), string2);
println!("The longest string is {result}");
}
fn longest(x: &str, y: &str) -> &str {
if x.len() > y.len() { x } else { y }
}longest ที่ return string slice ที่ยาวกว่าของสองตัว แต่ยัง compile ไม่ผ่านแทน เราได้ error ต่อไปนี้ที่พูดถึง lifetime:
$ cargo run
Compiling chapter10 v0.1.0 (file:///projects/chapter10)
error[E0106]: missing lifetime specifier
--> src/main.rs:9:33
|
9 | fn longest(x: &str, y: &str) -> &str {
| ---- ---- ^ expected named lifetime parameter
|
= help: this function's return type contains a borrowed value, but the signature does not say whether it is borrowed from `x` or `y`
help: consider introducing a named lifetime parameter
|
9 | fn longest<'a>(x: &'a str, y: &'a str) -> &'a str {
| ++++ ++ ++ ++
For more information about this error, try `rustc --explain E0106`.
error: could not compile `chapter10` (bin "chapter10") due to 1 previous error
ข้อความ help เผยว่า return type ต้อง generic lifetime parameter บนมัน
เพราะ Rust บอกไม่ได้ว่า reference ที่ถูก return อ้างถึง x หรือ y
จริง ๆ เราก็ไม่รู้เหมือนกัน เพราะ block if ใน body ของฟังก์ชันนี้
return reference ของ x และ block else return reference ของ y!
เมื่อเราประกาศฟังก์ชันนี้ เราไม่รู้ค่าคอนกรีตที่จะส่งเข้าฟังก์ชันนี้ เรา
จึงไม่รู้ว่ากรณี if หรือกรณี else จะ execute เรายังไม่รู้ lifetime
คอนกรีตของ reference ที่จะส่งเข้า เราจึงดู scope เหมือนที่เราทำใน
Listing 10-17 และ 10-18 กำหนดว่า reference ที่เรา return จะ valid เสมอ
ไม่ได้ Borrow checker ก็กำหนดไม่ได้ เพราะมันไม่รู้ว่า lifetime ของ x
และ y สัมพันธ์กับ lifetime ของ return value อย่างไร ในการแก้ error นี้
เราจะเพิ่ม generic lifetime parameter ที่ประกาศความสัมพันธ์ระหว่าง
reference เพื่อให้ borrow checker ทำการวิเคราะห์ได้
Syntax ของ Lifetime Annotation
Lifetime annotation ไม่เปลี่ยนนานแค่ไหนที่ reference ใด ๆ อยู่ ตรงข้าม พวกมันบรรยายความสัมพันธ์ของ lifetime ของ reference หลายตัวกับกันโดยไม่ กระทบ lifetime เช่นเดียวกับฟังก์ชันรับ type ใด ๆ ได้เมื่อ signature ระบุ generic type parameter ฟังก์ชันรับ reference ที่มี lifetime ใด ๆ ได้ โดยระบุ generic lifetime parameter
Lifetime annotation มี syntax ที่ผิดปกตินิดหน่อย — ชื่อ lifetime
parameter ต้องขึ้นต้นด้วย apostrophe (') และโดยปกติเป็นตัวพิมพ์เล็ก
ทั้งหมดและสั้นมาก เหมือน generic type คนส่วนใหญ่ใช้ชื่อ 'a สำหรับ
lifetime annotation แรก เราวาง lifetime parameter annotation หลัง &
ของ reference โดยใช้ space คั่น annotation จาก type ของ reference
นี่คือตัวอย่างบางอัน — reference ของ i32 โดยไม่มี lifetime parameter,
reference ของ i32 ที่มี lifetime parameter ชื่อ 'a และ mutable
reference ของ i32 ที่ก็มี lifetime 'a:
&i32 // reference
&'a i32 // reference ที่มี lifetime explicit
&'a mut i32 // mutable reference ที่มี lifetime explicitLifetime annotation หนึ่งตัวเองไม่มีความหมายมาก เพราะ annotation ตั้งใจ
บอก Rust ว่า generic lifetime parameter ของ reference หลายตัวสัมพันธ์
กันยังไง มาตรวจสอบว่า lifetime annotation สัมพันธ์กันอย่างไรในบริบทของ
ฟังก์ชัน longest
ใน Signature ฟังก์ชัน
ในการใช้ lifetime annotation ใน signature ฟังก์ชัน เราต้องประกาศ generic lifetime parameter ภายใน angle bracket ระหว่างชื่อฟังก์ชันและ list parameter เช่นเดียวกับที่เราทำกับ generic type parameter
เราอยากให้ signature แสดงข้อจำกัดต่อไปนี้ — reference ที่ return จะ valid
ตราบที่ parameter ทั้งสองตัว valid นี่คือความสัมพันธ์ระหว่าง lifetime
ของ parameter และ return value เราจะตั้งชื่อ lifetime ว่า 'a แล้วเพิ่ม
เข้าแต่ละ reference ดังที่แสดงใน Listing 10-21
fn main() {
let string1 = String::from("abcd");
let string2 = "xyz";
let result = longest(string1.as_str(), string2);
println!("The longest string is {result}");
}
fn longest<'a>(x: &'a str, y: &'a str) -> &'a str {
if x.len() > y.len() { x } else { y }
}longest ระบุว่า reference ทั้งหมดใน signature ต้องมี lifetime 'a เดียวกันโค้ดนี้ควร compile และให้ผลที่เราอยากเมื่อเราใช้กับฟังก์ชัน main ใน
Listing 10-19
Signature ฟังก์ชันตอนนี้บอก Rust ว่าสำหรับ lifetime 'a บางตัว ฟังก์ชัน
รับสอง parameter ที่ทั้งคู่เป็น string slice ที่อยู่อย่างน้อยนานเท่า
lifetime 'a Signature ฟังก์ชันยังบอก Rust ว่า string slice ที่ return
จากฟังก์ชันจะอยู่อย่างน้อยนานเท่า lifetime 'a ในทางปฏิบัติ มันหมายความ
ว่า lifetime ของ reference ที่ return โดยฟังก์ชัน longest เหมือนกับ
lifetime ที่เล็กกว่าของ lifetime ของค่าที่อ้างถึงโดย argument ของ
ฟังก์ชัน ความสัมพันธ์เหล่านี้คือสิ่งที่เราอยากให้ Rust ใช้เมื่อวิเคราะห์
โค้ดนี้
จำไว้ เมื่อเราระบุ lifetime parameter ใน signature ฟังก์ชันนี้ เราไม่
เปลี่ยน lifetime ของค่าใด ๆ ที่ส่งเข้าหรือ return ตรงข้าม เรากำลังระบุ
ว่า borrow checker ควรปฏิเสธค่าใด ๆ ที่ไม่ตามข้อจำกัดเหล่านี้ หมายเหตุว่า
ฟังก์ชัน longest ไม่ต้องรู้เป๊ะ ๆ ว่า x และ y จะอยู่นานเท่าไร แค่
ว่า scope บางตัวสามารถแทน 'a ที่จะ satisfy signature นี้
เมื่อ annotate lifetime ในฟังก์ชัน annotation ไปใน signature ฟังก์ชัน ไม่ใช่ใน body ฟังก์ชัน Lifetime annotation กลายเป็นส่วนของสัญญาของ ฟังก์ชัน เหมือน type ใน signature การให้ signature ฟังก์ชันมีสัญญา lifetime หมายความว่าการวิเคราะห์ที่ Rust compiler ทำง่ายกว่า ถ้ามีปัญหา กับวิธีที่ฟังก์ชันถูก annotate หรือวิธีที่มันถูกเรียก compiler error ชี้ ไปยังส่วนของโค้ดเราและข้อจำกัดอย่างแม่นยำกว่า ถ้าตรงข้าม Rust compiler ทำการ infer มากกว่าเรื่องสิ่งที่เราตั้งใจให้ความสัมพันธ์ของ lifetime เป็น compiler อาจชี้ไปยังการใช้โค้ดของเราที่ห่างหลายขั้นจากต้นเหตุของ ปัญหาเท่านั้น
เมื่อเราส่ง reference คอนกรีตให้ longest lifetime คอนกรีตที่แทน 'a
คือส่วนของ scope ของ x ที่ทับซ้อนกับ scope ของ y พูดอีกอย่าง
generic lifetime 'a จะได้ lifetime คอนกรีตที่เท่ากับเล็กกว่าของ
lifetime ของ x และ y เพราะเรา annotate reference ที่ return ด้วย
lifetime parameter 'a เดียวกัน reference ที่ return จะ valid สำหรับ
ความยาวของเล็กกว่าของ lifetime ของ x และ y ด้วย
มาดูว่า lifetime annotation จำกัดฟังก์ชัน longest ยังไง โดยส่ง
reference ที่มี lifetime คอนกรีตต่างกัน Listing 10-22 เป็นตัวอย่างตรงไป
ตรงมา
fn main() {
let string1 = String::from("long string is long");
{
let string2 = String::from("xyz");
let result = longest(string1.as_str(), string2.as_str());
println!("The longest string is {result}");
}
}
fn longest<'a>(x: &'a str, y: &'a str) -> &'a str {
if x.len() > y.len() { x } else { y }
}longest กับ reference ของค่า String ที่มี lifetime คอนกรีตต่างกันในตัวอย่างนี้ string1 valid จนถึงท้าย outer scope, string2 valid
จนถึงท้าย inner scope และ result อ้างถึงบางอย่างที่ valid จนถึงท้าย
inner scope รันโค้ดนี้และคุณจะเห็นว่า borrow checker อนุมัติ มันจะ
compile และพิมพ์ The longest string is long string is long
ถัดไป ลองตัวอย่างที่แสดงว่า lifetime ของ reference ใน result ต้องเป็น
lifetime เล็กกว่าของสอง argument เราจะย้ายการประกาศตัวแปร result ออก
นอก inner scope แต่ทิ้งการ assign ค่าให้ตัวแปร result ภายใน scope กับ
string2 จากนั้นเราจะย้าย println! ที่ใช้ result ออกนอก inner scope
หลัง inner scope จบ โค้ดใน Listing 10-23 จะ compile ไม่ผ่าน
fn main() {
let string1 = String::from("long string is long");
let result;
{
let string2 = String::from("xyz");
result = longest(string1.as_str(), string2.as_str());
}
println!("The longest string is {result}");
}
fn longest<'a>(x: &'a str, y: &'a str) -> &'a str {
if x.len() > y.len() { x } else { y }
}result หลัง string2 ออกจาก scopeเมื่อเราลอง compile โค้ดนี้ เราได้ error นี้:
$ cargo run
Compiling chapter10 v0.1.0 (file:///projects/chapter10)
error[E0597]: `string2` does not live long enough
--> src/main.rs:6:44
|
5 | let string2 = String::from("xyz");
| ------- binding `string2` declared here
6 | result = longest(string1.as_str(), string2.as_str());
| ^^^^^^^ borrowed value does not live long enough
7 | }
| - `string2` dropped here while still borrowed
8 | println!("The longest string is {result}");
| ------ borrow later used here
For more information about this error, try `rustc --explain E0597`.
error: could not compile `chapter10` (bin "chapter10") due to 1 previous error
Error แสดงว่าเพื่อให้ result valid สำหรับ statement println!
string2 จะต้อง valid จนถึงท้าย outer scope Rust รู้เพราะเรา annotate
lifetime ของ parameter ฟังก์ชันและ return value โดยใช้ lifetime
parameter 'a เดียวกัน
ในฐานะมนุษย์ เราดูโค้ดนี้และเห็นว่า string1 ยาวกว่า string2 ดังนั้น
result จะมี reference ของ string1 เพราะ string1 ยังไม่ออกจาก scope
reference ของ string1 จะยัง valid สำหรับ statement println! อย่างไร
ก็ตาม compiler เห็นไม่ได้ว่า reference valid ในกรณีนี้ เราบอก Rust ว่า
lifetime ของ reference ที่ return โดยฟังก์ชัน longest เหมือนกับ
lifetime เล็กกว่าของ reference ที่ส่งเข้า ดังนั้น borrow checker ไม่
อนุญาตโค้ดใน Listing 10-23 ว่าอาจมี reference invalid
ลองออกแบบการทดลองเพิ่มที่แตกต่างค่าและ lifetime ของ reference ที่ส่งเข้า
ฟังก์ชัน longest และวิธีที่ใช้ reference ที่ return ทำสมมติฐานว่าการ
ทดลองของคุณจะผ่าน borrow checker หรือไม่ก่อน compile แล้วเช็คว่าคุณถูก!
ความสัมพันธ์
วิธีที่คุณต้องระบุ lifetime parameter ขึ้นกับสิ่งที่ฟังก์ชันของคุณทำ
เช่น ถ้าเราเปลี่ยน implementation ของฟังก์ชัน longest ให้ return
parameter แรกเสมอ แทน string slice ที่ยาวที่สุด เราไม่ต้องระบุ lifetime
บน parameter y โค้ดต่อไปนี้จะ compile ผ่าน:
fn main() {
let string1 = String::from("abcd");
let string2 = "efghijklmnopqrstuvwxyz";
let result = longest(string1.as_str(), string2);
println!("The longest string is {result}");
}
fn longest<'a>(x: &'a str, y: &str) -> &'a str {
x
}เราระบุ lifetime parameter 'a สำหรับ parameter x และ return type
แต่ไม่สำหรับ parameter y เพราะ lifetime ของ y ไม่มีความสัมพันธ์ใด
กับ lifetime ของ x หรือ return value
เมื่อ return reference จากฟังก์ชัน lifetime parameter สำหรับ return type
ต้อง match lifetime parameter สำหรับ parameter หนึ่งตัว ถ้า reference ที่
return ไม่ อ้างถึง parameter ตัวหนึ่ง มันต้องอ้างถึงค่าที่สร้างภายใน
ฟังก์ชันนี้ อย่างไรก็ตาม นี่จะเป็น dangling reference เพราะค่าจะออกจาก
scope ที่ท้ายฟังก์ชัน พิจารณา implementation ที่ลองของฟังก์ชัน longest
ที่จะ compile ไม่ผ่าน:
fn main() {
let string1 = String::from("abcd");
let string2 = "xyz";
let result = longest(string1.as_str(), string2);
println!("The longest string is {result}");
}
fn longest<'a>(x: &str, y: &str) -> &'a str {
let result = String::from("really long string");
result.as_str()
}ที่นี่ แม้เราระบุ lifetime parameter 'a สำหรับ return type implementation
นี้จะ compile ไม่ผ่าน เพราะ lifetime ของ return value ไม่สัมพันธ์กับ
lifetime ของ parameter เลย นี่คือ error message ที่เราได้:
$ cargo run
Compiling chapter10 v0.1.0 (file:///projects/chapter10)
error[E0515]: cannot return value referencing local variable `result`
--> src/main.rs:11:5
|
11 | result.as_str()
| ------^^^^^^^^^
| |
| returns a value referencing data owned by the current function
| `result` is borrowed here
For more information about this error, try `rustc --explain E0515`.
error: could not compile `chapter10` (bin "chapter10") due to 1 previous error
ปัญหาคือ result ออกจาก scope และถูก cleanup ที่ท้ายฟังก์ชัน longest
เรายังพยายาม return reference ของ result จากฟังก์ชัน ไม่มีวิธีที่เรา
ระบุ lifetime parameter ที่จะเปลี่ยน dangling reference และ Rust จะไม่
ให้เราสร้าง dangling reference ในกรณีนี้ การแก้ดีที่สุดคือ return type
ข้อมูลที่ owned แทน reference เพื่อให้ฟังก์ชันที่เรียกรับผิดชอบในการ
cleanup ค่า
สุดท้าย syntax lifetime เกี่ยวกับการเชื่อม lifetime ของ parameter และ return value ต่าง ๆ ของฟังก์ชัน เมื่อเชื่อมกัน Rust มีข้อมูลพอที่จะ อนุญาต operation memory-safe และไม่อนุญาต operation ที่จะสร้าง dangling pointer หรือฝ่าฝืน memory safety
ใน Definition Struct
ที่ผ่านมา struct ที่เราประกาศทั้งหมดเก็บ type ที่ owned เราประกาศ struct
ให้เก็บ reference ได้ แต่ในกรณีนั้น เราต้องเพิ่ม lifetime annotation
บนทุก reference ใน definition struct Listing 10-24 มี struct ชื่อ
ImportantExcerpt ที่เก็บ string slice
struct ImportantExcerpt<'a> {
part: &'a str,
}
fn main() {
let novel = String::from("Call me Ishmael. Some years ago...");
let first_sentence = novel.split('.').next().unwrap();
let i = ImportantExcerpt {
part: first_sentence,
};
}struct นี้มี field เดียว part ที่เก็บ string slice ซึ่งเป็น reference
เช่นเดียวกับ generic data type เราประกาศชื่อ generic lifetime parameter
ภายใน angle bracket หลังชื่อ struct เพื่อให้เราใช้ lifetime parameter
ใน body ของ definition struct annotation นี้หมายความว่า instance ของ
ImportantExcerpt outlive reference ที่มันเก็บใน field part ไม่ได้
ฟังก์ชัน main ที่นี่สร้าง instance ของ struct ImportantExcerpt ที่
เก็บ reference ของประโยคแรกของ String ที่ owned โดยตัวแปร novel
ข้อมูลใน novel มีอยู่ก่อน instance ImportantExcerpt ถูกสร้าง นอกจาก
นี้ novel ไม่ออกจาก scope จนกว่าหลัง ImportantExcerpt ออกจาก scope
ดังนั้น reference ใน instance ImportantExcerpt valid
Lifetime Elision
คุณได้เรียนว่าทุก reference มี lifetime และคุณต้องระบุ lifetime parameter สำหรับฟังก์ชันหรือ struct ที่ใช้ reference อย่างไรก็ตาม เรามีฟังก์ชันใน Listing 4-9 แสดงอีกครั้งใน Listing 10-25 ที่ compile ผ่านโดยไม่มี lifetime annotation
fn first_word(s: &str) -> &str {
let bytes = s.as_bytes();
for (i, &item) in bytes.iter().enumerate() {
if item == b' ' {
return &s[0..i];
}
}
&s[..]
}
fn main() {
let my_string = String::from("hello world");
// first_word works on slices of `String`s
let word = first_word(&my_string[..]);
let my_string_literal = "hello world";
// first_word works on slices of string literals
let word = first_word(&my_string_literal[..]);
// Because string literals *are* string slices already,
// this works too, without the slice syntax!
let word = first_word(my_string_literal);
}เหตุผลที่ฟังก์ชันนี้ compile ผ่านโดยไม่มี lifetime annotation เป็น ประวัติศาสตร์ — ใน version ก่อน 1.0 ของ Rust โค้ดนี้จะ compile ไม่ผ่าน เพราะทุก reference ต้อง lifetime explicit ในเวลานั้น signature ฟังก์ชัน จะถูกเขียนแบบนี้:
fn first_word<'a>(s: &'a str) -> &'a str {หลังเขียนโค้ด Rust เยอะ ทีม Rust พบว่าโปรแกรมเมอร์ Rust กำลังป้อน lifetime annotation เดียวกันซ้ำ ๆ ในสถานการณ์เฉพาะ สถานการณ์เหล่านี้คาด เดาได้และตาม pattern กำหนดได้ไม่กี่ตัว นักพัฒนา program pattern เหล่านี้ เข้าโค้ดของ compiler เพื่อให้ borrow checker infer lifetime ในสถานการณ์ เหล่านี้ และไม่ต้องการ annotation explicit
ประวัติ Rust ชิ้นนี้เกี่ยวข้องเพราะเป็นไปได้ที่ pattern กำหนดได้มากขึ้น จะเกิดและถูกเพิ่มเข้า compiler ในอนาคต อาจต้องการ lifetime annotation น้อยลงอีก
Pattern ที่ program เข้าการวิเคราะห์ reference ของ Rust เรียกว่า lifetime elision rules เหล่านี้ไม่ใช่กฎสำหรับโปรแกรมเมอร์ตาม — พวกมัน เป็นชุดของกรณีเฉพาะที่ compiler จะพิจารณา และถ้าโค้ดของคุณตรงกับกรณีเหล่า นี้ คุณไม่ต้องเขียน lifetime explicit
Elision rules ไม่ให้การ infer เต็ม ถ้ายังมีความกำกวมเรื่อง lifetime ที่ reference มี หลัง Rust ใช้กฎ compiler จะไม่เดาว่า lifetime ของ reference ที่เหลือควรเป็น แทนการเดา compiler จะให้ error ที่คุณแก้ได้โดยเพิ่ม lifetime annotation
Lifetime บน parameter ฟังก์ชันหรือเมธอดเรียกว่า input lifetime และ lifetime บน return value เรียกว่า output lifetime
Compiler ใช้สามกฎหา lifetime ของ reference เมื่อไม่มี annotation
explicit กฎแรกใช้กับ input lifetime และกฎที่สองและสามใช้กับ output
lifetime ถ้า compiler ถึงท้ายของสามกฎและยังมี reference ที่หา lifetime
ไม่ได้ compiler จะหยุดด้วย error กฎเหล่านี้ใช้กับ definition fn และ
block impl
กฎแรกคือ compiler assign lifetime parameter ให้แต่ละ parameter ที่เป็น
reference พูดอีกอย่าง ฟังก์ชันที่มี parameter หนึ่งตัวได้ lifetime
parameter หนึ่งตัว: fn foo<'a>(x: &'a i32); ฟังก์ชันที่มี parameter
สองตัวได้ lifetime parameter แยกสองตัว: fn foo<'a, 'b>(x: &'a i32, y: &'b i32); และต่อไป
กฎที่สองคือ ถ้ามี input lifetime parameter เดียวเป๊ะ ๆ lifetime นั้นถูก
assign ให้ output lifetime parameter ทั้งหมด: fn foo<'a>(x: &'a i32) -> &'a i32
กฎที่สามคือ ถ้ามี input lifetime parameter หลายตัว แต่หนึ่งในนั้นเป็น
&self หรือ &mut self เพราะนี่คือเมธอด lifetime ของ self ถูก
assign ให้ output lifetime parameter ทั้งหมด กฎที่สามนี้ทำให้เมธอดอ่าน
และเขียนได้ดีกว่ามาก เพราะต้องการสัญลักษณ์น้อยกว่า
ลองสมมติเราเป็น compiler เราจะใช้กฎเหล่านี้หา lifetime ของ reference ใน
signature ของฟังก์ชัน first_word ใน Listing 10-25 Signature เริ่มโดย
ไม่มี lifetime ผูกกับ reference:
fn first_word(s: &str) -> &str {จากนั้น compiler ใช้กฎแรก ซึ่งระบุว่าแต่ละ parameter ได้ lifetime ของ
ตัวเอง เราจะเรียก 'a ตามปกติ ดังนั้นตอนนี้ signature เป็นนี้:
fn first_word<'a>(s: &'a str) -> &str {กฎที่สองใช้เพราะมี input lifetime เดียวเป๊ะ ๆ กฎที่สองระบุว่า lifetime ของ input parameter หนึ่งตัวถูก assign ให้ output lifetime ดังนั้น signature เป็นนี้ตอนนี้:
fn first_word<'a>(s: &'a str) -> &'a str {ตอนนี้ reference ทั้งหมดใน signature ฟังก์ชันนี้มี lifetime และ compiler ดำเนินการวิเคราะห์ต่อโดยไม่ต้องการให้โปรแกรมเมอร์ annotate lifetime ใน signature ฟังก์ชันนี้
มาดูตัวอย่างอีก ครั้งนี้ใช้ฟังก์ชัน longest ที่ไม่มี lifetime parameter
เมื่อเราเริ่มทำงานกับมันใน Listing 10-20:
fn longest(x: &str, y: &str) -> &str {มาใช้กฎแรก — แต่ละ parameter ได้ lifetime ของตัวเอง ครั้งนี้เรามีสอง parameter แทนหนึ่ง เราจึงมีสอง lifetime:
fn longest<'a, 'b>(x: &'a str, y: &'b str) -> &str {คุณเห็นว่ากฎที่สองไม่ใช้ เพราะมี input lifetime มากกว่าหนึ่งตัว กฎที่สาม
ก็ไม่ใช้ เพราะ longest เป็นฟังก์ชันแทนเมธอด parameter ไม่มีตัวไหนเป็น
self หลังทำงานผ่านสามกฎทั้งหมด เรายังไม่หา lifetime ของ return type
ได้ นี่คือเหตุผลที่เราได้ error พยายาม compile โค้ดใน Listing 10-20 —
compiler ทำงานผ่าน lifetime elision rules แต่ยังหา lifetime ของ
reference ใน signature ทั้งหมดไม่ได้
เพราะกฎที่สามจริง ๆ ใช้แค่ใน signature เมธอด เราจะดู lifetime ในบริบทนั้น ถัดไป เพื่อดูว่าทำไมกฎที่สามหมายความว่าเราไม่ต้อง annotate lifetime ใน signature เมธอดบ่อย
ใน Definition เมธอด
เมื่อเรา implement เมธอดบน struct ที่มี lifetime เราใช้ syntax เดียวกัน กับของ generic type parameter ดังที่แสดงใน Listing 10-11 ตำแหน่งที่เรา ประกาศและใช้ lifetime parameter ขึ้นกับว่าพวกมันสัมพันธ์กับ field struct หรือ parameter เมธอดและ return value
ชื่อ lifetime สำหรับ field struct ต้องประกาศหลัง keyword impl เสมอ และ
ใช้หลังชื่อ struct เพราะ lifetime เหล่านั้นเป็นส่วนของ type ของ struct
ใน signature เมธอดภายใน block impl reference อาจผูกกับ lifetime ของ
reference ใน field struct หรืออาจอิสระ นอกจากนี้ lifetime elision rules
มักทำให้ lifetime annotation ไม่จำเป็นใน signature เมธอด มาดูตัวอย่าง
บางตัวที่ใช้ struct ชื่อ ImportantExcerpt ที่เราประกาศใน Listing 10-24
ก่อนอื่น เราจะใช้เมธอดชื่อ level ที่ parameter เดียวคือ reference ของ
self และ return value คือ i32 ซึ่งไม่ใช่ reference ของอะไร:
struct ImportantExcerpt<'a> {
part: &'a str,
}
impl<'a> ImportantExcerpt<'a> {
fn level(&self) -> i32 {
3
}
}
impl<'a> ImportantExcerpt<'a> {
fn announce_and_return_part(&self, announcement: &str) -> &str {
println!("Attention please: {announcement}");
self.part
}
}
fn main() {
let novel = String::from("Call me Ishmael. Some years ago...");
let first_sentence = novel.split('.').next().unwrap();
let i = ImportantExcerpt {
part: first_sentence,
};
}การประกาศ lifetime parameter หลัง impl และการใช้หลังชื่อ type บังคับ
แต่เพราะกฎ elision แรก เราไม่ต้อง annotate lifetime ของ reference ของ
self
นี่คือตัวอย่างที่ lifetime elision rule ที่สามใช้:
struct ImportantExcerpt<'a> {
part: &'a str,
}
impl<'a> ImportantExcerpt<'a> {
fn level(&self) -> i32 {
3
}
}
impl<'a> ImportantExcerpt<'a> {
fn announce_and_return_part(&self, announcement: &str) -> &str {
println!("Attention please: {announcement}");
self.part
}
}
fn main() {
let novel = String::from("Call me Ishmael. Some years ago...");
let first_sentence = novel.split('.').next().unwrap();
let i = ImportantExcerpt {
part: first_sentence,
};
}มีสอง input lifetime Rust จึงใช้ lifetime elision rule แรก และให้ทั้ง
&self และ announcement lifetime ของตัวเอง จากนั้น เพราะ parameter
ตัวหนึ่งเป็น &self return type ได้ lifetime ของ &self และ lifetime
ทั้งหมดถูกบัญชี
Static Lifetime
Lifetime พิเศษหนึ่งที่เราต้องพูดถึงคือ 'static ซึ่งบ่งบอกว่า reference
ที่ได้รับผลกระทบ สามารถ อยู่ตลอดระยะเวลาของโปรแกรม String literal
ทั้งหมดมี lifetime 'static ซึ่งเรา annotate ดังนี้:
#![allow(unused)]
fn main() {
let s: &'static str = "I have a static lifetime.";
}ข้อความของ string นี้ถูกเก็บโดยตรงใน binary ของโปรแกรม ซึ่งมีให้เสมอ
ดังนั้น lifetime ของ string literal ทั้งหมดเป็น 'static
คุณอาจเห็นคำแนะนำใน error message ให้ใช้ lifetime 'static แต่ก่อนระบุ
'static เป็น lifetime สำหรับ reference คิดว่า reference ที่คุณมีจริง ๆ
อยู่ตลอด lifetime ของโปรแกรมของคุณไหม และคุณอยากให้มันเป็นแบบนั้นไหม
โดยส่วนใหญ่ error message ที่แนะนำ lifetime 'static เป็นผลของการ
พยายามสร้าง dangling reference หรือ mismatch ของ lifetime ที่มี ในกรณี
เช่นนั้น คำตอบคือแก้ปัญหาเหล่านั้น ไม่ใช่ระบุ lifetime 'static
Generic Type Parameter, Trait Bound และ Lifetime
มาดูสั้น ๆ ที่ syntax ของการระบุ generic type parameter, trait bound และ lifetime ทั้งหมดในฟังก์ชันเดียว!
fn main() {
let string1 = String::from("abcd");
let string2 = "xyz";
let result = longest_with_an_announcement(
string1.as_str(),
string2,
"Today is someone's birthday!",
);
println!("The longest string is {result}");
}
use std::fmt::Display;
fn longest_with_an_announcement<'a, T>(
x: &'a str,
y: &'a str,
ann: T,
) -> &'a str
where
T: Display,
{
println!("Announcement! {ann}");
if x.len() > y.len() { x } else { y }
}นี่คือฟังก์ชัน longest จาก Listing 10-21 ที่ return string slice ที่
ยาวกว่าของสองตัว แต่ตอนนี้มี parameter เพิ่มชื่อ ann ของ generic type
T ซึ่งเติมได้ด้วย type ใด ๆ ที่ implement trait Display ตามที่ระบุ
โดย clause where parameter เพิ่มนี้จะถูกพิมพ์โดยใช้ {} นี่คือเหตุผล
ที่ trait bound Display จำเป็น เพราะ lifetime เป็น type ของ generic
การประกาศ lifetime parameter 'a และ generic type parameter T ไปใน
list เดียวกันภายใน angle bracket หลังชื่อฟังก์ชัน
สรุป
เราครอบคลุมเยอะในบทนี้! ตอนนี้คุณรู้เรื่อง generic type parameter, trait และ trait bound และ generic lifetime parameter คุณพร้อมเขียนโค้ดโดยไม่ มีการซ้ำที่ทำงานในสถานการณ์ต่างกันหลายตัว Generic type parameter ให้คุณ ใช้โค้ดกับ type ต่างกัน Trait และ trait bound รับประกันว่าแม้ type เป็น generic พวกมันจะมีพฤติกรรมที่โค้ดต้องการ คุณได้เรียนวิธีใช้ lifetime annotation รับประกันว่าโค้ดยืดหยุ่นนี้จะไม่มี dangling reference และการ วิเคราะห์ทั้งหมดนี้เกิดตอน compile time ซึ่งไม่กระทบ performance ตอน runtime!
เชื่อหรือไม่ มีอีกมากให้เรียนเรื่องหัวข้อที่เราพูดถึงในบทนี้ — บทที่ 18 พูดถึง trait object ซึ่งเป็นอีกวิธีใช้ trait ยังมี scenario ซับซ้อนกว่า ที่เกี่ยวกับ lifetime annotation ที่คุณจะต้องการแค่ใน scenario ขั้นสูง มาก สำหรับเหล่านั้น คุณควรอ่าน Rust Reference แต่ถัดไป คุณ จะเรียนวิธีเขียนเทสใน Rust เพื่อให้แน่ใจว่าโค้ดของคุณทำงานในแบบที่ควร
การเขียนเทสอัตโนมัติ
ในบทความปี 1972 ของเขาที่ชื่อ “The Humble Programmer” Edsger W. Dijkstra กล่าวว่า “การทดสอบโปรแกรมเป็นวิธีที่มีประสิทธิภาพมากในการแสดงว่ามี bug อยู่ แต่ก็ไม่เพียงพออย่างยิ่งที่จะแสดงว่าไม่มี bug” นั่นไม่ได้แปลว่าเรา ไม่ควรพยายามทดสอบให้มากที่สุดเท่าที่ทำได้!
ความถูกต้อง (correctness) ของโปรแกรมคือระดับที่โค้ดของเราทำตามที่เรา ตั้งใจ Rust ถูกออกแบบโดยให้ความสำคัญกับความถูกต้องของโปรแกรมในระดับสูง แต่ความถูกต้องนั้นซับซ้อนและพิสูจน์ไม่ง่าย ระบบ type ของ Rust รับภาระส่วน ใหญ่ไป แต่ระบบ type จับทุกอย่างไม่ได้ ดังนั้น Rust จึงรวมการสนับสนุนสำหรับ การเขียนเทสซอฟต์แวร์อัตโนมัติเข้ามาด้วย
สมมติเราเขียนฟังก์ชัน add_two ที่บวก 2 เข้ากับตัวเลขใดก็ตามที่ส่งเข้ามา
signature ของฟังก์ชันนี้รับ integer เป็น parameter และ return integer
เป็นผลลัพธ์ เมื่อเรา implement และคอมไพล์ฟังก์ชันนั้น Rust ทำการตรวจสอบ
type และตรวจสอบ borrow ทั้งหมดที่คุณเรียนมาแล้ว เพื่อให้แน่ใจว่า ตัวอย่าง
เช่น เราไม่ได้ส่งค่า String หรือ reference ที่ไม่ valid เข้าฟังก์ชันนี้
แต่ Rust ตรวจสอบไม่ได้ ว่าฟังก์ชันนี้จะทำตามที่เราตั้งใจอย่างแน่นอน นั่น
คือ return parameter บวก 2 ไม่ใช่ — สมมติ — parameter บวก 10 หรือ
parameter ลบ 50! นั่นคือที่ที่เทสเข้ามามีบทบาท
เราเขียนเทสที่ assert ได้ ตัวอย่างเช่น ว่าเมื่อเราส่ง 3 เข้าฟังก์ชัน
add_two ค่าที่ return คือ 5 เรารันเทสเหล่านี้ได้ทุกครั้งที่เราแก้ไข
โค้ดของเรา เพื่อให้แน่ใจว่าพฤติกรรมที่ถูกต้องที่มีอยู่ไม่เปลี่ยนแปลง
การเทสเป็นทักษะที่ซับซ้อน — แม้เราจะครอบคลุมรายละเอียดทุกอย่างของวิธี เขียนเทสที่ดีในบทเดียวไม่ได้ ในบทนี้เราจะพูดถึงกลไกของเครื่องมือการเทสของ Rust เราจะพูดถึง annotation และ macro ที่ใช้ได้เมื่อคุณเขียนเทส พฤติกรรม เริ่มต้นและตัวเลือกที่มีให้สำหรับการรันเทส และวิธีจัดระเบียบเทสเป็น unit test และ integration test
วิธีเขียนเทส
วิธีเขียนเทส
เทส คือฟังก์ชัน Rust ที่ตรวจสอบว่าโค้ดส่วนที่ไม่ใช่เทสทำงานในแบบที่ คาดหวัง body ของฟังก์ชันเทสโดยทั่วไปทำสามอย่างนี้:
- เตรียมข้อมูลหรือ state ที่จำเป็น
- รันโค้ดที่คุณต้องการทดสอบ
- assert ว่าผลลัพธ์ตรงกับที่คุณคาดหวัง
มาดูฟีเจอร์ที่ Rust ให้มาเฉพาะสำหรับเขียนเทสที่ทำสามขั้นตอนนี้ ซึ่งรวมถึง
attribute test, มาโครจำนวนหนึ่ง และ attribute should_panic
โครงสร้างของฟังก์ชันเทส
ง่ายที่สุดเลย เทสใน Rust คือฟังก์ชันที่ถูก annotate ด้วย attribute test
Attribute คือ metadata เกี่ยวกับชิ้นส่วนของโค้ด Rust ตัวอย่างหนึ่งคือ
attribute derive ที่เราใช้กับ struct ในบทที่ 5 เพื่อเปลี่ยนฟังก์ชันให้
เป็นฟังก์ชันเทส เพิ่ม #[test] ในบรรทัดก่อน fn เมื่อคุณรันเทสด้วยคำสั่ง
cargo test Rust จะ build binary test runner ที่รันฟังก์ชันที่ annotate
และรายงานว่าแต่ละฟังก์ชันเทสผ่านหรือไม่ผ่าน
ทุกครั้งที่เราสร้างโปรเจกต์ library ใหม่ด้วย Cargo จะมีโมดูลเทสพร้อม ฟังก์ชันเทสในนั้นถูกสร้างอัตโนมัติให้เรา โมดูลนี้ให้ template สำหรับเขียน เทสของคุณ เพื่อให้คุณไม่ต้องค้นหาโครงสร้างและ syntax ที่แน่นอนทุกครั้งที่ เริ่มโปรเจกต์ใหม่ คุณเพิ่มฟังก์ชันเทสและโมดูลเทสเพิ่มเติมได้มากเท่าที่ ต้องการ!
เราจะสำรวจบางแง่มุมของวิธีทำงานของเทส โดยทดลองกับเทสจาก template ก่อนที่ เราจะทดสอบโค้ดจริง จากนั้นเราจะเขียนเทสจริงที่เรียกโค้ดที่เราเขียนและ assert ว่าพฤติกรรมของมันถูกต้อง
มาสร้างโปรเจกต์ library ใหม่ชื่อ adder ที่จะบวกตัวเลขสองตัว:
$ cargo new adder --lib
Created library `adder` project
$ cd adder
เนื้อหาของไฟล์ src/lib.rs ใน library adder ของคุณควรเหมือน Listing
11-1
pub fn add(left: u64, right: u64) -> u64 {
left + right
}
#[cfg(test)]
mod tests {
use super::*;
#[test]
fn it_works() {
let result = add(2, 2);
assert_eq!(result, 4);
}
}cargo newไฟล์เริ่มด้วยฟังก์ชัน add ตัวอย่าง เพื่อให้เรามีอะไรไว้ทดสอบ
ตอนนี้ มาโฟกัสเฉพาะที่ฟังก์ชัน it_works สังเกต annotation #[test]
attribute นี้บอกว่านี่คือฟังก์ชันเทส ดังนั้น test runner รู้ว่าควรปฏิบัติ
กับฟังก์ชันนี้เป็นเทส เราอาจมีฟังก์ชันที่ไม่ใช่เทสในโมดูล tests ด้วย
เพื่อช่วยตั้งค่า scenario ทั่วไปหรือทำ operation ทั่วไป ดังนั้นเราจึง
ต้องระบุเสมอว่าฟังก์ชันใดเป็นเทส
body ของฟังก์ชันตัวอย่างใช้มาโคร assert_eq! เพื่อ assert ว่า result
ซึ่งมีผลลัพธ์ของการเรียก add ด้วย 2 และ 2 เท่ากับ 4 assertion นี้เป็น
ตัวอย่าง format ของเทสทั่วไป มาลองรันดูว่าเทสนี้ผ่านไหม
คำสั่ง cargo test รันเทสทั้งหมดในโปรเจกต์ของเรา ดังแสดงใน Listing 11-2
$ cargo test
Compiling adder v0.1.0 (file:///projects/adder)
Finished `test` profile [unoptimized + debuginfo] target(s) in 0.57s
Running unittests src/lib.rs (target/debug/deps/adder-01ad14159ff659ab)
running 1 test
test tests::it_works ... ok
test result: ok. 1 passed; 0 failed; 0 ignored; 0 measured; 0 filtered out; finished in 0.00s
Doc-tests adder
running 0 tests
test result: ok. 0 passed; 0 failed; 0 ignored; 0 measured; 0 filtered out; finished in 0.00s
Cargo คอมไพล์และรันเทส เราเห็นบรรทัด running 1 test บรรทัดถัดมาแสดง
ชื่อของฟังก์ชันเทสที่ถูกสร้าง ชื่อ tests::it_works และผลของการรันเทส
นั้นคือ ok สรุปรวม test result: ok. แปลว่าเทสทั้งหมดผ่าน และส่วนที่
อ่านว่า 1 passed; 0 failed รวมจำนวนเทสที่ผ่านและไม่ผ่าน
เราทำเครื่องหมายเทสว่า ignored ได้ เพื่อไม่ให้มันรันใน instance นั้น
เราจะครอบคลุมในส่วน “Ignore เทสยกเว้นถูกร้องขอเฉพาะ”
ภายในบทนี้ เพราะเราไม่ได้ทำเช่นนั้นที่นี่ สรุปจึงแสดง 0 ignored เรายัง
ส่งอาร์กิวเมนต์ให้คำสั่ง cargo test เพื่อรันเฉพาะเทสที่ชื่อตรงกับ
string ได้ นี่เรียกว่า filtering และเราจะครอบคลุมในส่วน
“รันเทสบางส่วนตามชื่อ” ที่นี่เราไม่ได้ filter
เทสที่กำลังรัน ดังนั้นท้ายสุดของสรุปแสดง 0 filtered out
สถิติ 0 measured ใช้สำหรับ benchmark test ที่วัด performance เทส
benchmark ณ ตอนเขียนนี้ ใช้ได้เฉพาะใน nightly Rust ดู
เอกสารเกี่ยวกับ benchmark test เพื่อเรียนรู้เพิ่ม
ส่วนถัดไปของ output เทสที่เริ่มที่ Doc-tests adder คือผลของ
documentation test เรายังไม่มี documentation test แต่ Rust คอมไพล์
ตัวอย่างโค้ดใดก็ตามที่ปรากฏใน API documentation ของเราได้ ฟีเจอร์นี้ช่วยให้
docs และโค้ดของคุณ sync กัน! เราจะพูดถึงวิธีเขียน documentation test ใน
ส่วน “Documentation Comment เป็นเทส” ของ
บทที่ 14 ตอนนี้ เราจะ ignore output Doc-tests
มาเริ่มปรับเทสตามความต้องการของเราเอง ก่อนอื่น เปลี่ยนชื่อของฟังก์ชัน
it_works เป็นชื่ออื่น เช่น exploration แบบนี้:
Filename: src/lib.rs
pub fn add(left: u64, right: u64) -> u64 {
left + right
}
#[cfg(test)]
mod tests {
use super::*;
#[test]
fn exploration() {
let result = add(2, 2);
assert_eq!(result, 4);
}
}จากนั้น รัน cargo test อีก output ตอนนี้แสดง exploration แทน
it_works:
$ cargo test
Compiling adder v0.1.0 (file:///projects/adder)
Finished `test` profile [unoptimized + debuginfo] target(s) in 0.59s
Running unittests src/lib.rs (target/debug/deps/adder-92948b65e88960b4)
running 1 test
test tests::exploration ... ok
test result: ok. 1 passed; 0 failed; 0 ignored; 0 measured; 0 filtered out; finished in 0.00s
Doc-tests adder
running 0 tests
test result: ok. 0 passed; 0 failed; 0 ignored; 0 measured; 0 filtered out; finished in 0.00s
ตอนนี้เราจะเพิ่มเทสอีกตัว แต่คราวนี้เราจะสร้างเทสที่ fail! เทส fail เมื่อ
อะไรบางอย่างในฟังก์ชันเทส panic แต่ละเทสรันในเธรดใหม่ และเมื่อเธรดหลัก
เห็นว่าเธรดเทสตายไป เทสจะถูกทำเครื่องหมายว่า fail ในบทที่ 9 เราพูดถึงว่า
วิธีง่ายที่สุดในการ panic คือเรียกมาโคร panic! ใส่เทสใหม่เป็นฟังก์ชัน
ชื่อ another เพื่อให้ไฟล์ src/lib.rs ของคุณดูเหมือน Listing 11-3
pub fn add(left: u64, right: u64) -> u64 {
left + right
}
#[cfg(test)]
mod tests {
use super::*;
#[test]
fn exploration() {
let result = add(2, 2);
assert_eq!(result, 4);
}
#[test]
fn another() {
panic!("Make this test fail");
}
}panic!รันเทสอีกครั้งด้วย cargo test output ควรดูเหมือน Listing 11-4 ซึ่งแสดง
ว่าเทส exploration ของเราผ่าน และ another fail
$ cargo test
Compiling adder v0.1.0 (file:///projects/adder)
Finished `test` profile [unoptimized + debuginfo] target(s) in 0.72s
Running unittests src/lib.rs (target/debug/deps/adder-92948b65e88960b4)
running 2 tests
test tests::another ... FAILED
test tests::exploration ... ok
failures:
---- tests::another stdout ----
thread 'tests::another' panicked at src/lib.rs:17:9:
Make this test fail
note: run with `RUST_BACKTRACE=1` environment variable to display a backtrace
failures:
tests::another
test result: FAILED. 1 passed; 1 failed; 0 ignored; 0 measured; 0 filtered out; finished in 0.00s
error: test failed, to rerun pass `--lib`
แทนที่จะเป็น ok บรรทัด test tests::another แสดง FAILED มีสองส่วน
ใหม่ปรากฏระหว่างผลแต่ละตัวกับสรุป — ส่วนแรกแสดงเหตุผลละเอียดของแต่ละ
failure ของเทส ในกรณีนี้ เราได้รายละเอียดว่า tests::another fail เพราะ
มัน panic ด้วยข้อความ Make this test fail ที่บรรทัด 17 ในไฟล์
src/lib.rs ส่วนถัดไป list เพียงชื่อของเทสทั้งหมดที่ fail ซึ่งมีประโยชน์
เมื่อมีเทสจำนวนมากและ output เทสที่ fail แบบละเอียดจำนวนมาก เราใช้ชื่อ
ของเทสที่ fail เพื่อรันเฉพาะเทสนั้นเพื่อ debug ง่ายขึ้นได้ เราจะพูด
เพิ่มเติมเกี่ยวกับวิธีรันเทสในส่วน
“ควบคุมว่าจะรันเทสอย่างไร”
บรรทัดสรุปแสดงที่ท้ายสุด — โดยรวม ผลเทสของเราคือ FAILED เรามีเทสหนึ่ง
ผ่านและหนึ่ง fail
ตอนนี้คุณเห็นว่าผลเทสดูเป็นยังไงใน scenario ต่าง ๆ มาดูมาโครอื่น ๆ
นอกจาก panic! ที่มีประโยชน์ในเทส
ตรวจสอบผลลัพธ์ด้วย assert!
มาโคร assert! ที่ standard library ให้มา มีประโยชน์เมื่อคุณต้องการ
แน่ใจว่าเงื่อนไขบางอย่างในเทสประเมินเป็น true เราให้มาโคร assert!
อาร์กิวเมนต์ที่ประเมินเป็น Boolean ถ้าค่าเป็น true ไม่มีอะไรเกิดขึ้น
และเทสผ่าน ถ้าค่าเป็น false มาโคร assert! เรียก panic! เพื่อทำให้
เทส fail การใช้มาโคร assert! ช่วยให้เราตรวจสอบว่าโค้ดของเราทำงานในแบบ
ที่เราตั้งใจ
ในบทที่ 5 Listing 5-15 เราใช้ struct Rectangle และเมธอด can_hold
ซึ่งถูกนำมาแสดงอีกครั้งที่นี่ใน Listing 11-5 มาวางโค้ดนี้ในไฟล์
src/lib.rs จากนั้นเขียนเทสบางตัวสำหรับมันด้วยมาโคร assert!
#[derive(Debug)]
struct Rectangle {
width: u32,
height: u32,
}
impl Rectangle {
fn can_hold(&self, other: &Rectangle) -> bool {
self.width > other.width && self.height > other.height
}
}Rectangle และเมธอด can_hold จากบทที่ 5เมธอด can_hold return Boolean ซึ่งหมายความว่ามันเป็น use case ที่
สมบูรณ์แบบสำหรับมาโคร assert! ใน Listing 11-6 เราเขียนเทสที่ใช้งาน
เมธอด can_hold โดยสร้าง instance Rectangle ที่มีความกว้าง 8 และ
ความสูง 7 และ assert ว่ามันสามารถบรรจุ instance Rectangle อีกตัวที่
มีความกว้าง 5 และความสูง 1 ได้
#[derive(Debug)]
struct Rectangle {
width: u32,
height: u32,
}
impl Rectangle {
fn can_hold(&self, other: &Rectangle) -> bool {
self.width > other.width && self.height > other.height
}
}
#[cfg(test)]
mod tests {
use super::*;
#[test]
fn larger_can_hold_smaller() {
let larger = Rectangle {
width: 8,
height: 7,
};
let smaller = Rectangle {
width: 5,
height: 1,
};
assert!(larger.can_hold(&smaller));
}
}can_hold ที่ตรวจสอบว่า rectangle ที่ใหญ่กว่าสามารถบรรจุ rectangle ที่เล็กกว่าได้จริงไหมสังเกตบรรทัด use super::*; ในโมดูล tests โมดูล tests เป็นโมดูล
ปกติที่ตามกฎ visibility ทั่วไปที่เราครอบคลุมในบทที่ 7 ส่วน
“Path สำหรับอ้างถึง item ใน Module Tree”
เพราะโมดูล tests เป็นโมดูลภายใน เราต้องนำโค้ดที่อยู่ใต้การทดสอบใน
โมดูลภายนอกเข้า scope ของโมดูลภายใน เราใช้ glob ที่นี่ ดังนั้นอะไรที่
เรานิยามในโมดูลภายนอกจะใช้ได้ในโมดูล tests นี้
เราตั้งชื่อเทสของเราว่า larger_can_hold_smaller และเราสร้าง instance
Rectangle สองตัวที่เราต้องการ จากนั้น เราเรียกมาโคร assert! และส่ง
ผลของการเรียก larger.can_hold(&smaller) ให้มัน expression นี้ควร
return true ดังนั้นเทสของเราควรผ่าน มาดูกัน!
$ cargo test
Compiling rectangle v0.1.0 (file:///projects/rectangle)
Finished `test` profile [unoptimized + debuginfo] target(s) in 0.66s
Running unittests src/lib.rs (target/debug/deps/rectangle-6584c4561e48942e)
running 1 test
test tests::larger_can_hold_smaller ... ok
test result: ok. 1 passed; 0 failed; 0 ignored; 0 measured; 0 filtered out; finished in 0.00s
Doc-tests rectangle
running 0 tests
test result: ok. 0 passed; 0 failed; 0 ignored; 0 measured; 0 filtered out; finished in 0.00s
ผ่าน! มาเพิ่มเทสอีกตัว คราวนี้ assert ว่า rectangle ที่เล็กกว่าบรรจุ rectangle ที่ใหญ่กว่าไม่ได้:
Filename: src/lib.rs
#[derive(Debug)]
struct Rectangle {
width: u32,
height: u32,
}
impl Rectangle {
fn can_hold(&self, other: &Rectangle) -> bool {
self.width > other.width && self.height > other.height
}
}
#[cfg(test)]
mod tests {
use super::*;
#[test]
fn larger_can_hold_smaller() {
// --snip--
let larger = Rectangle {
width: 8,
height: 7,
};
let smaller = Rectangle {
width: 5,
height: 1,
};
assert!(larger.can_hold(&smaller));
}
#[test]
fn smaller_cannot_hold_larger() {
let larger = Rectangle {
width: 8,
height: 7,
};
let smaller = Rectangle {
width: 5,
height: 1,
};
assert!(!smaller.can_hold(&larger));
}
}เพราะผลลัพธ์ที่ถูกต้องของฟังก์ชัน can_hold ในกรณีนี้คือ false เรา
ต้องเปลี่ยนผลนั้นเป็นค่าตรงข้ามก่อนส่งให้มาโคร assert! ผลคือเทสของ
เราจะผ่านถ้า can_hold return false:
$ cargo test
Compiling rectangle v0.1.0 (file:///projects/rectangle)
Finished `test` profile [unoptimized + debuginfo] target(s) in 0.66s
Running unittests src/lib.rs (target/debug/deps/rectangle-6584c4561e48942e)
running 2 tests
test tests::larger_can_hold_smaller ... ok
test tests::smaller_cannot_hold_larger ... ok
test result: ok. 2 passed; 0 failed; 0 ignored; 0 measured; 0 filtered out; finished in 0.00s
Doc-tests rectangle
running 0 tests
test result: ok. 0 passed; 0 failed; 0 ignored; 0 measured; 0 filtered out; finished in 0.00s
สองเทสผ่าน! ตอนนี้มาดูว่าจะเกิดอะไรกับผลเทสของเราเมื่อเราใส่ bug ใน
โค้ดของเรา เราจะเปลี่ยน implementation ของเมธอด can_hold โดยแทนที่
เครื่องหมายมากกว่า (>) ด้วยเครื่องหมายน้อยกว่า (<) เมื่อมันเปรียบ
เทียบความกว้าง:
#[derive(Debug)]
struct Rectangle {
width: u32,
height: u32,
}
// --snip--
impl Rectangle {
fn can_hold(&self, other: &Rectangle) -> bool {
self.width < other.width && self.height > other.height
}
}
#[cfg(test)]
mod tests {
use super::*;
#[test]
fn larger_can_hold_smaller() {
let larger = Rectangle {
width: 8,
height: 7,
};
let smaller = Rectangle {
width: 5,
height: 1,
};
assert!(larger.can_hold(&smaller));
}
#[test]
fn smaller_cannot_hold_larger() {
let larger = Rectangle {
width: 8,
height: 7,
};
let smaller = Rectangle {
width: 5,
height: 1,
};
assert!(!smaller.can_hold(&larger));
}
}ตอนนี้รันเทสจะได้ผลดังนี้:
$ cargo test
Compiling rectangle v0.1.0 (file:///projects/rectangle)
Finished `test` profile [unoptimized + debuginfo] target(s) in 0.66s
Running unittests src/lib.rs (target/debug/deps/rectangle-6584c4561e48942e)
running 2 tests
test tests::larger_can_hold_smaller ... FAILED
test tests::smaller_cannot_hold_larger ... ok
failures:
---- tests::larger_can_hold_smaller stdout ----
thread 'tests::larger_can_hold_smaller' panicked at src/lib.rs:28:9:
assertion failed: larger.can_hold(&smaller)
note: run with `RUST_BACKTRACE=1` environment variable to display a backtrace
failures:
tests::larger_can_hold_smaller
test result: FAILED. 1 passed; 1 failed; 0 ignored; 0 measured; 0 filtered out; finished in 0.00s
error: test failed, to rerun pass `--lib`
เทสของเราจับ bug ได้! เพราะ larger.width คือ 8 และ smaller.width
คือ 5 การเปรียบเทียบความกว้างใน can_hold ตอนนี้ return false —
8 ไม่น้อยกว่า 5
ทดสอบความเท่ากันด้วย assert_eq! และ assert_ne!
วิธีทั่วไปในการตรวจสอบ functionality คือทดสอบความเท่ากันระหว่างผลของ
โค้ดที่อยู่ใต้การทดสอบและค่าที่คุณคาดว่าโค้ดจะ return คุณทำสิ่งนี้ได้
โดยใช้มาโคร assert! และส่ง expression ที่ใช้ operator == ให้ อย่างไร
ก็ตาม นี่เป็นเทสที่ทั่วไปมาก standard library จึงให้คู่มาโคร —
assert_eq! และ assert_ne! — เพื่อทำเทสนี้สะดวกขึ้น มาโครเหล่านี้
เปรียบเทียบสองอาร์กิวเมนต์ว่าเท่ากันหรือไม่เท่ากันตามลำดับ พวกมันยัง
print ทั้งสองค่าถ้า assertion fail ซึ่งทำให้ง่ายขึ้นที่จะเห็นว่า ทำไม
เทสจึง fail ในทางตรงกันข้าม มาโคร assert! ระบุเพียงว่ามันได้ค่า
false สำหรับ expression == โดยไม่ print ค่าที่นำไปสู่ค่า false
ใน Listing 11-7 เราเขียนฟังก์ชันชื่อ add_two ที่บวก 2 กับ
parameter จากนั้นเราทดสอบฟังก์ชันนี้ด้วยมาโคร assert_eq!
pub fn add_two(a: u64) -> u64 {
a + 2
}
#[cfg(test)]
mod tests {
use super::*;
#[test]
fn it_adds_two() {
let result = add_two(2);
assert_eq!(result, 4);
}
}add_two ด้วยมาโคร assert_eq!มาตรวจดูว่ามันผ่าน!
$ cargo test
Compiling adder v0.1.0 (file:///projects/adder)
Finished `test` profile [unoptimized + debuginfo] target(s) in 0.58s
Running unittests src/lib.rs (target/debug/deps/adder-92948b65e88960b4)
running 1 test
test tests::it_adds_two ... ok
test result: ok. 1 passed; 0 failed; 0 ignored; 0 measured; 0 filtered out; finished in 0.00s
Doc-tests adder
running 0 tests
test result: ok. 0 passed; 0 failed; 0 ignored; 0 measured; 0 filtered out; finished in 0.00s
เราสร้างตัวแปรชื่อ result ที่เก็บผลของการเรียก add_two(2) จากนั้น
เราส่ง result และ 4 เป็นอาร์กิวเมนต์ให้มาโคร assert_eq! บรรทัด
output สำหรับเทสนี้คือ test tests::it_adds_two ... ok และข้อความ
ok ระบุว่าเทสของเราผ่าน!
มาใส่ bug ในโค้ดของเราเพื่อดูว่า assert_eq! ดูเป็นยังไงเมื่อ fail
เปลี่ยน implementation ของฟังก์ชัน add_two ให้บวก 3 แทน:
pub fn add_two(a: u64) -> u64 {
a + 3
}
#[cfg(test)]
mod tests {
use super::*;
#[test]
fn it_adds_two() {
let result = add_two(2);
assert_eq!(result, 4);
}
}รันเทสอีกครั้ง:
$ cargo test
Compiling adder v0.1.0 (file:///projects/adder)
Finished `test` profile [unoptimized + debuginfo] target(s) in 0.61s
Running unittests src/lib.rs (target/debug/deps/adder-92948b65e88960b4)
running 1 test
test tests::it_adds_two ... FAILED
failures:
---- tests::it_adds_two stdout ----
thread 'tests::it_adds_two' panicked at src/lib.rs:12:9:
assertion `left == right` failed
left: 5
right: 4
note: run with `RUST_BACKTRACE=1` environment variable to display a backtrace
failures:
tests::it_adds_two
test result: FAILED. 0 passed; 1 failed; 0 ignored; 0 measured; 0 filtered out; finished in 0.00s
error: test failed, to rerun pass `--lib`
เทสของเราจับ bug ได้! เทส tests::it_adds_two fail และข้อความบอกเรา
ว่า assertion ที่ fail คือ left == right และค่าของ left กับ right
คืออะไร ข้อความนี้ช่วยให้เราเริ่ม debug — อาร์กิวเมนต์ left ที่เรามี
ซึ่งเป็นผลของการเรียก add_two(2) คือ 5 แต่อาร์กิวเมนต์ right คือ 4 คุณ
นึกภาพได้ว่านี่จะช่วยมากเป็นพิเศษเมื่อเรามีเทสจำนวนมาก
สังเกตว่าในบางภาษาและ test framework parameter ของฟังก์ชัน assertion
ความเท่ากันถูกเรียก expected และ actual และลำดับที่เราระบุอาร์กิวเมนต์
มีความสำคัญ อย่างไรก็ตาม ใน Rust พวกมันถูกเรียก left และ right และ
ลำดับที่เราระบุค่าที่เราคาดหวังกับค่าที่โค้ดสร้าง ไม่สำคัญ เราเขียน
assertion ในเทสนี้เป็น assert_eq!(4, result) ก็ได้ ซึ่งจะให้ข้อความ
failure แบบเดียวกันที่แสดง assertion `left == right` failed
มาโคร assert_ne! จะผ่านถ้าสองค่าที่เราให้ไม่เท่ากัน และจะ fail ถ้า
พวกมันเท่ากัน มาโครนี้มีประโยชน์มากที่สุดสำหรับกรณีที่เราไม่แน่ใจว่าค่า
จะ เป็นอะไร แต่เรารู้แน่ ๆ ว่าค่านั้น_ไม่ควร_ เป็นอะไร ตัวอย่างเช่น
ถ้าเรากำลังทดสอบฟังก์ชันที่รับประกันว่าจะเปลี่ยน input ของมันในบางวิธี
แต่วิธีที่ input ถูกเปลี่ยนขึ้นกับวันของสัปดาห์ที่เรารันเทส สิ่งที่ดี
ที่สุดในการ assert อาจเป็นว่า output ของฟังก์ชันไม่เท่ากับ input
ภายใต้ผิว มาโคร assert_eq! และ assert_ne! ใช้ operator == และ
!= ตามลำดับ เมื่อ assertion fail มาโครเหล่านี้ print อาร์กิวเมนต์
ของพวกมันโดยใช้ debug formatting ซึ่งหมายความว่าค่าที่ถูกเปรียบเทียบ
ต้อง implement trait PartialEq และ Debug type primitive ทั้งหมด
และ type ส่วนใหญ่ใน standard library implement trait เหล่านี้ สำหรับ
struct และ enum ที่คุณนิยามเอง คุณต้อง implement PartialEq เพื่อ
assert ความเท่ากันของ type เหล่านั้น คุณจะต้อง implement Debug ด้วย
เพื่อ print ค่าเมื่อ assertion fail เพราะ trait ทั้งสองเป็น trait
ที่ derive ได้ ตามที่กล่าวถึงใน Listing 5-12 ในบทที่ 5 โดยทั่วไปแล้ว
นี่ง่ายแค่เพิ่ม annotation #[derive(PartialEq, Debug)] ในนิยามของ
struct หรือ enum ของคุณ ดู Appendix C “Derivable Trait”
สำหรับรายละเอียดเพิ่มเติมเกี่ยวกับ trait เหล่านี้และ derivable trait อื่น
เพิ่มข้อความ Failure แบบกำหนดเอง
คุณยังเพิ่มข้อความกำหนดเองที่จะ print พร้อมข้อความ failure ในฐานะ
อาร์กิวเมนต์ที่เป็น optional ให้มาโคร assert!, assert_eq! และ
assert_ne! ได้ อาร์กิวเมนต์ใดที่ระบุหลังอาร์กิวเมนต์ที่ต้องการ จะถูก
ส่งต่อไปยังมาโคร format! (พูดถึงใน
“ต่อสตริงด้วย + หรือ format!”
ในบทที่ 8) ดังนั้นคุณส่ง format string ที่มี placeholder {} และค่า
ที่จะใส่ใน placeholder เหล่านั้นได้ ข้อความกำหนดเองมีประโยชน์สำหรับ
documenting ว่า assertion หมายความว่าอะไร เมื่อเทส fail คุณจะมีภาพ
ดีกว่าว่าปัญหากับโค้ดคืออะไร
ตัวอย่างเช่น สมมติเรามีฟังก์ชันที่ทักทายคนตามชื่อ และเราต้องการทดสอบ ว่าชื่อที่เราส่งเข้าฟังก์ชันปรากฏใน output:
Filename: src/lib.rs
pub fn greeting(name: &str) -> String {
format!("Hello {name}!")
}
#[cfg(test)]
mod tests {
use super::*;
#[test]
fn greeting_contains_name() {
let result = greeting("Carol");
assert!(result.contains("Carol"));
}
}ข้อกำหนดสำหรับโปรแกรมนี้ยังไม่ได้ตกลงกัน และเราค่อนข้างแน่ใจว่าข้อความ
Hello ที่จุดเริ่มต้นของการทักทายจะเปลี่ยน เราตัดสินใจว่าเราไม่อยาก
ต้อง update เทสเมื่อข้อกำหนดเปลี่ยน ดังนั้นแทนที่จะตรวจสอบความเท่ากัน
แน่นอนกับค่าที่ return จากฟังก์ชัน greeting เราจะแค่ assert ว่า
output มีข้อความของ parameter input
ตอนนี้มาใส่ bug ในโค้ดนี้โดยเปลี่ยน greeting ให้ตัด name ออก เพื่อ
ดูว่าข้อความ failure เทสเริ่มต้นดูเป็นยังไง:
pub fn greeting(name: &str) -> String {
String::from("Hello!")
}
#[cfg(test)]
mod tests {
use super::*;
#[test]
fn greeting_contains_name() {
let result = greeting("Carol");
assert!(result.contains("Carol"));
}
}รันเทสนี้จะได้ผลดังนี้:
$ cargo test
Compiling greeter v0.1.0 (file:///projects/greeter)
Finished `test` profile [unoptimized + debuginfo] target(s) in 0.91s
Running unittests src/lib.rs (target/debug/deps/greeter-170b942eb5bf5e3a)
running 1 test
test tests::greeting_contains_name ... FAILED
failures:
---- tests::greeting_contains_name stdout ----
thread 'tests::greeting_contains_name' panicked at src/lib.rs:12:9:
assertion failed: result.contains("Carol")
note: run with `RUST_BACKTRACE=1` environment variable to display a backtrace
failures:
tests::greeting_contains_name
test result: FAILED. 0 passed; 1 failed; 0 ignored; 0 measured; 0 filtered out; finished in 0.00s
error: test failed, to rerun pass `--lib`
ผลนี้แค่ระบุว่า assertion fail และ assertion อยู่บรรทัดไหน ข้อความ
failure ที่มีประโยชน์มากกว่าจะ print ค่าจากฟังก์ชัน greeting มาเพิ่ม
ข้อความ failure กำหนดเองที่ประกอบด้วย format string พร้อม placeholder
ที่เติมด้วยค่าจริงที่เราได้จากฟังก์ชัน greeting:
pub fn greeting(name: &str) -> String {
String::from("Hello!")
}
#[cfg(test)]
mod tests {
use super::*;
#[test]
fn greeting_contains_name() {
let result = greeting("Carol");
assert!(
result.contains("Carol"),
"Greeting did not contain name, value was `{result}`"
);
}
}ตอนนี้เมื่อเรารันเทส เราจะได้ข้อความ error ที่ informative มากขึ้น:
$ cargo test
Compiling greeter v0.1.0 (file:///projects/greeter)
Finished `test` profile [unoptimized + debuginfo] target(s) in 0.93s
Running unittests src/lib.rs (target/debug/deps/greeter-170b942eb5bf5e3a)
running 1 test
test tests::greeting_contains_name ... FAILED
failures:
---- tests::greeting_contains_name stdout ----
thread 'tests::greeting_contains_name' panicked at src/lib.rs:12:9:
Greeting did not contain name, value was `Hello!`
note: run with `RUST_BACKTRACE=1` environment variable to display a backtrace
failures:
tests::greeting_contains_name
test result: FAILED. 0 passed; 1 failed; 0 ignored; 0 measured; 0 filtered out; finished in 0.00s
error: test failed, to rerun pass `--lib`
เราเห็นค่าที่เราได้จริงใน output เทส ซึ่งจะช่วยให้เรา debug ว่าเกิดอะไร ขึ้นแทนที่จะเป็นสิ่งที่เราคาดหวังให้เกิดขึ้น
ตรวจสอบ Panic ด้วย should_panic
นอกจากการตรวจสอบค่าที่ return สำคัญที่จะตรวจสอบว่าโค้ดของเราจัดการ
เงื่อนไข error ตามที่เราคาดหวัง ตัวอย่างเช่น พิจารณา type Guess ที่
เราสร้างในบทที่ 9 Listing 9-13 โค้ดอื่นที่ใช้ Guess ขึ้นกับการรับ
ประกันว่า instance Guess จะมีเฉพาะค่าระหว่าง 1 และ 100 เราเขียนเทส
ที่ทำให้แน่ใจว่าการพยายามสร้าง instance Guess ด้วยค่านอกช่วงนั้น
panic ได้
เราทำสิ่งนี้โดยเพิ่ม attribute should_panic ให้ฟังก์ชันเทสของเรา
เทสผ่านถ้าโค้ดในฟังก์ชัน panic เทส fail ถ้าโค้ดในฟังก์ชันไม่ panic
Listing 11-8 แสดงเทสที่ตรวจสอบว่าเงื่อนไข error ของ Guess::new เกิด
ขึ้นเมื่อเราคาดหวัง
pub struct Guess {
value: i32,
}
impl Guess {
pub fn new(value: i32) -> Guess {
if value < 1 || value > 100 {
panic!("Guess value must be between 1 and 100, got {value}.");
}
Guess { value }
}
}
#[cfg(test)]
mod tests {
use super::*;
#[test]
#[should_panic]
fn greater_than_100() {
Guess::new(200);
}
}panic!เราวาง attribute #[should_panic] หลัง attribute #[test] และก่อน
ฟังก์ชันเทสที่มันถูกใช้กับ มาดูผลเมื่อเทสนี้ผ่าน:
$ cargo test
Compiling guessing_game v0.1.0 (file:///projects/guessing_game)
Finished `test` profile [unoptimized + debuginfo] target(s) in 0.58s
Running unittests src/lib.rs (target/debug/deps/guessing_game-57d70c3acb738f4d)
running 1 test
test tests::greater_than_100 - should panic ... ok
test result: ok. 1 passed; 0 failed; 0 ignored; 0 measured; 0 filtered out; finished in 0.00s
Doc-tests guessing_game
running 0 tests
test result: ok. 0 passed; 0 failed; 0 ignored; 0 measured; 0 filtered out; finished in 0.00s
ดูดี! ตอนนี้มาใส่ bug ในโค้ดของเราโดยลบเงื่อนไขที่ฟังก์ชัน new จะ
panic ถ้าค่ามากกว่า 100:
pub struct Guess {
value: i32,
}
// --snip--
impl Guess {
pub fn new(value: i32) -> Guess {
if value < 1 {
panic!("Guess value must be between 1 and 100, got {value}.");
}
Guess { value }
}
}
#[cfg(test)]
mod tests {
use super::*;
#[test]
#[should_panic]
fn greater_than_100() {
Guess::new(200);
}
}เมื่อเรารันเทสใน Listing 11-8 มันจะ fail:
$ cargo test
Compiling guessing_game v0.1.0 (file:///projects/guessing_game)
Finished `test` profile [unoptimized + debuginfo] target(s) in 0.62s
Running unittests src/lib.rs (target/debug/deps/guessing_game-57d70c3acb738f4d)
running 1 test
test tests::greater_than_100 - should panic ... FAILED
failures:
---- tests::greater_than_100 stdout ----
note: test did not panic as expected at src/lib.rs:21:8
failures:
tests::greater_than_100
test result: FAILED. 0 passed; 1 failed; 0 ignored; 0 measured; 0 filtered out; finished in 0.00s
error: test failed, to rerun pass `--lib`
เราไม่ได้ข้อความที่มีประโยชน์มากในกรณีนี้ แต่เมื่อเรามองดูฟังก์ชันเทส
เราเห็นว่ามัน annotated ด้วย #[should_panic] failure ที่เราได้แปลว่า
โค้ดในฟังก์ชันเทสไม่ทำให้เกิด panic
เทสที่ใช้ should_panic อาจไม่แม่นยำ เทส should_panic ก็จะผ่าน
แม้ว่าเทสจะ panic ด้วยเหตุผลต่างจากที่เราคาดหวัง เพื่อทำให้เทส
should_panic แม่นยำขึ้น เราเพิ่ม parameter expected ที่เป็น
optional ให้ attribute should_panic ได้ test harness จะทำให้แน่ใจ
ว่าข้อความ failure มี text ที่ให้มา ตัวอย่างเช่น พิจารณาโค้ดที่แก้ไข
สำหรับ Guess ใน Listing 11-9 ที่ฟังก์ชัน new panic ด้วยข้อความ
ต่างกันขึ้นกับว่าค่าเล็กไปหรือใหญ่ไป
pub struct Guess {
value: i32,
}
// --snip--
impl Guess {
pub fn new(value: i32) -> Guess {
if value < 1 {
panic!(
"Guess value must be greater than or equal to 1, got {value}."
);
} else if value > 100 {
panic!(
"Guess value must be less than or equal to 100, got {value}."
);
}
Guess { value }
}
}
#[cfg(test)]
mod tests {
use super::*;
#[test]
#[should_panic(expected = "less than or equal to 100")]
fn greater_than_100() {
Guess::new(200);
}
}panic! ด้วยข้อความ panic ที่มี substring ที่ระบุเทสนี้จะผ่านเพราะค่าที่เราใส่ใน parameter expected ของ attribute
should_panic เป็น substring ของข้อความที่ฟังก์ชัน Guess::new panic
ด้วย เราระบุข้อความ panic ทั้งหมดที่เราคาดหวังได้ ซึ่งในกรณีนี้คือ
Guess value must be less than or equal to 100, got 200 สิ่งที่คุณ
เลือกระบุขึ้นกับว่ามากเท่าไรของข้อความ panic ที่ unique หรือ dynamic
และคุณต้องการให้เทสของคุณแม่นยำเพียงใด ในกรณีนี้ substring ของข้อความ
panic เพียงพอที่จะแน่ใจว่าโค้ดในฟังก์ชันเทสทำงานในกรณี
else if value > 100
เพื่อดูว่าเกิดอะไรขึ้นเมื่อเทส should_panic ที่มีข้อความ expected
fail มาใส่ bug ในโค้ดของเราอีกครั้งโดยสลับ body ของ block
if value < 1 กับ else if value > 100:
pub struct Guess {
value: i32,
}
impl Guess {
pub fn new(value: i32) -> Guess {
if value < 1 {
panic!(
"Guess value must be less than or equal to 100, got {value}."
);
} else if value > 100 {
panic!(
"Guess value must be greater than or equal to 1, got {value}."
);
}
Guess { value }
}
}
#[cfg(test)]
mod tests {
use super::*;
#[test]
#[should_panic(expected = "less than or equal to 100")]
fn greater_than_100() {
Guess::new(200);
}
}คราวนี้เมื่อเรารันเทส should_panic มันจะ fail:
$ cargo test
Compiling guessing_game v0.1.0 (file:///projects/guessing_game)
Finished `test` profile [unoptimized + debuginfo] target(s) in 0.66s
Running unittests src/lib.rs (target/debug/deps/guessing_game-57d70c3acb738f4d)
running 1 test
test tests::greater_than_100 - should panic ... FAILED
failures:
---- tests::greater_than_100 stdout ----
thread 'tests::greater_than_100' panicked at src/lib.rs:12:13:
Guess value must be greater than or equal to 1, got 200.
note: run with `RUST_BACKTRACE=1` environment variable to display a backtrace
note: panic did not contain expected string
panic message: "Guess value must be greater than or equal to 1, got 200."
expected substring: "less than or equal to 100"
failures:
tests::greater_than_100
test result: FAILED. 0 passed; 1 failed; 0 ignored; 0 measured; 0 filtered out; finished in 0.00s
error: test failed, to rerun pass `--lib`
ข้อความ failure ระบุว่าเทสนี้ panic ตามที่เราคาดหวังจริง แต่ข้อความ
panic ไม่ได้รวม string less than or equal to 100 ที่เราคาดหวัง
ข้อความ panic ที่เราได้ในกรณีนี้คือ
Guess value must be greater than or equal to 1, got 200 ตอนนี้
เราเริ่มหาว่า bug ของเราอยู่ที่ไหนได้!
ใช้ Result<T, E> ในเทส
เทสทั้งหมดของเราจนถึงตอนนี้ panic เมื่อพวกมัน fail เรายังเขียนเทสที่
ใช้ Result<T, E> ได้! นี่คือเทสจาก Listing 11-1 ที่เขียนใหม่ให้ใช้
Result<T, E> และ return Err แทนการ panic:
pub fn add(left: u64, right: u64) -> u64 {
left + right
}
#[cfg(test)]
mod tests {
use super::*;
#[test]
fn it_works() -> Result<(), String> {
let result = add(2, 2);
if result == 4 {
Ok(())
} else {
Err(String::from("two plus two does not equal four"))
}
}
}ฟังก์ชัน it_works ตอนนี้มี return type Result<(), String> ใน body
ของฟังก์ชัน แทนที่จะเรียกมาโคร assert_eq! เรา return Ok(()) เมื่อ
เทสผ่าน และ Err พร้อม String ข้างในเมื่อเทส fail
การเขียนเทสให้พวกมัน return Result<T, E> ทำให้คุณใช้ question mark
operator ใน body ของเทสได้ ซึ่งเป็นวิธีสะดวกในการเขียนเทสที่ควร fail
ถ้า operation ใดภายในพวกมัน return variant Err
คุณใช้ annotation #[should_panic] กับเทสที่ใช้ Result<T, E> ไม่ได้
ในการ assert ว่า operation return variant Err อย่า ใช้ question
mark operator กับค่า Result<T, E> แต่ให้ใช้
assert!(value.is_err()) แทน
ตอนนี้คุณรู้หลายวิธีในการเขียนเทสแล้ว มาดูว่าเกิดอะไรขึ้นเมื่อเรารัน
เทส และสำรวจตัวเลือกต่าง ๆ ที่เราใช้กับ cargo test ได้
ควบคุมการรันเทส
ควบคุมว่าจะรันเทสอย่างไร
เช่นเดียวกับที่ cargo run คอมไพล์โค้ดของคุณแล้วรัน binary ที่ได้ออกมา
cargo test คอมไพล์โค้ดของคุณใน test mode และรัน binary เทสที่ได้ออกมา
พฤติกรรมเริ่มต้นของ binary ที่ cargo test สร้างคือรันเทสทั้งหมดแบบ
ขนาน และจับ output ที่ถูกสร้างระหว่างการรันเทส ป้องกัน output ไม่ให้
แสดง และทำให้ง่ายขึ้นที่จะอ่าน output ที่เกี่ยวกับผลเทส อย่างไรก็ตาม
คุณระบุ option บน command line เพื่อเปลี่ยนพฤติกรรมเริ่มต้นนี้ได้
option บน command line บางตัวไปยัง cargo test และบางตัวไปยัง binary
เทสที่ได้ออกมา เพื่อแยกอาร์กิวเมนต์สองประเภทนี้ คุณ list อาร์กิวเมนต์
ที่ไปยัง cargo test ตามด้วยตัวคั่น -- แล้วตามด้วยตัวที่ไปยัง binary
เทส รัน cargo test --help แสดง option ที่คุณใช้กับ cargo test ได้
และรัน cargo test -- --help แสดง option ที่คุณใช้หลังตัวคั่นได้
option เหล่านี้ยังถูก document ใน
ส่วน “Tests” ของ The rustc Book
รันเทสแบบขนานหรือต่อเนื่อง
เมื่อคุณรันหลายเทส ตามค่าเริ่มต้นพวกมันรันแบบขนานโดยใช้เธรด แปลว่าพวก มันรันเสร็จเร็วขึ้น และคุณได้ feedback เร็วขึ้น เพราะเทสรันพร้อมกัน คุณ ต้องแน่ใจว่าเทสของคุณไม่ขึ้นต่อกัน หรือไม่ขึ้นกับ shared state ใด ๆ รวมถึง environment ที่ใช้ร่วม เช่น working directory ปัจจุบัน หรือ environment variable
ตัวอย่างเช่น สมมติแต่ละเทสของคุณรันโค้ดที่สร้างไฟล์บน disk ชื่อ test-output.txt และเขียนข้อมูลลงในไฟล์นั้น จากนั้นแต่ละเทสอ่านข้อมูล ในไฟล์นั้น และ assert ว่าไฟล์มีค่าเฉพาะที่ต่างกันในแต่ละเทส เพราะเทส รันพร้อมกัน เทสหนึ่งอาจ overwrite ไฟล์ในเวลาระหว่างที่อีกเทสกำลังเขียน และอ่านไฟล์ เทสที่สองจะ fail ไม่ใช่เพราะโค้ดไม่ถูกต้อง แต่เพราะเทส รบกวนกันระหว่างที่รันแบบขนาน วิธีแก้หนึ่งคือทำให้แน่ใจว่าแต่ละเทสเขียน ลงในไฟล์ต่างกัน อีกวิธีคือรันเทสทีละตัว
ถ้าคุณไม่อยากรันเทสแบบขนาน หรือถ้าคุณต้องการการควบคุมที่ละเอียดกว่า
เกี่ยวกับจำนวนเธรดที่ใช้ คุณส่ง flag --test-threads และจำนวนเธรด
ที่คุณต้องการใช้ให้ binary เทสได้ ดูตัวอย่างต่อไปนี้:
$ cargo test -- --test-threads=1
เราตั้งจำนวนเธรดเทสเป็น 1 บอกโปรแกรมไม่ให้ใช้ parallelism ใด ๆ การ
รันเทสด้วยเธรดเดียวจะใช้เวลานานกว่าการรันแบบขนาน แต่เทสจะไม่รบกวนกัน
ถ้าพวกมันแชร์ state
แสดง Output ของฟังก์ชัน
ตามค่าเริ่มต้น ถ้าเทสผ่าน test library ของ Rust จับอะไรก็ตามที่ถูก print
ออกไป standard output ตัวอย่างเช่น ถ้าเราเรียก println! ในเทส และเทส
ผ่าน เราจะไม่เห็น output ของ println! ใน terminal — เราจะเห็นเฉพาะ
บรรทัดที่ระบุว่าเทสผ่าน ถ้าเทส fail เราจะเห็นอะไรก็ตามที่ถูก print ออก
ไป standard output พร้อมส่วนที่เหลือของข้อความ failure
ตัวอย่างเช่น Listing 11-10 มีฟังก์ชันงี่เง่าที่ print ค่าของ parameter และ return 10 รวมถึงเทสที่ผ่านและเทสที่ fail
fn prints_and_returns_10(a: i32) -> i32 {
println!("I got the value {a}");
10
}
#[cfg(test)]
mod tests {
use super::*;
#[test]
fn this_test_will_pass() {
let value = prints_and_returns_10(4);
assert_eq!(value, 10);
}
#[test]
fn this_test_will_fail() {
let value = prints_and_returns_10(8);
assert_eq!(value, 5);
}
}println!เมื่อเรารันเทสเหล่านี้ด้วย cargo test เราจะเห็น output ต่อไปนี้:
$ cargo test
Compiling silly-function v0.1.0 (file:///projects/silly-function)
Finished `test` profile [unoptimized + debuginfo] target(s) in 0.58s
Running unittests src/lib.rs (target/debug/deps/silly_function-160869f38cff9166)
running 2 tests
test tests::this_test_will_fail ... FAILED
test tests::this_test_will_pass ... ok
failures:
---- tests::this_test_will_fail stdout ----
I got the value 8
thread 'tests::this_test_will_fail' panicked at src/lib.rs:19:9:
assertion `left == right` failed
left: 10
right: 5
note: run with `RUST_BACKTRACE=1` environment variable to display a backtrace
failures:
tests::this_test_will_fail
test result: FAILED. 1 passed; 1 failed; 0 ignored; 0 measured; 0 filtered out; finished in 0.00s
error: test failed, to rerun pass `--lib`
สังเกตว่าไม่มีที่ไหนใน output นี้ที่เราเห็น I got the value 4 ซึ่ง
ถูก print เมื่อเทสที่ผ่านรัน output นั้นถูกจับไป output จากเทสที่ fail
I got the value 8 ปรากฏในส่วนของสรุป output เทส ซึ่งยังแสดงสาเหตุของ
failure ของเทสด้วย
ถ้าเราต้องการเห็นค่าที่ถูก print สำหรับเทสที่ผ่านด้วย เราบอก Rust ให้
แสดง output ของเทสที่สำเร็จด้วย --show-output ได้:
$ cargo test -- --show-output
เมื่อเรารันเทสใน Listing 11-10 อีกครั้งด้วย flag --show-output เราจะ
เห็น output ต่อไปนี้:
$ cargo test -- --show-output
Compiling silly-function v0.1.0 (file:///projects/silly-function)
Finished `test` profile [unoptimized + debuginfo] target(s) in 0.60s
Running unittests src/lib.rs (target/debug/deps/silly_function-160869f38cff9166)
running 2 tests
test tests::this_test_will_fail ... FAILED
test tests::this_test_will_pass ... ok
successes:
---- tests::this_test_will_pass stdout ----
I got the value 4
successes:
tests::this_test_will_pass
failures:
---- tests::this_test_will_fail stdout ----
I got the value 8
thread 'tests::this_test_will_fail' panicked at src/lib.rs:19:9:
assertion `left == right` failed
left: 10
right: 5
note: run with `RUST_BACKTRACE=1` environment variable to display a backtrace
failures:
tests::this_test_will_fail
test result: FAILED. 1 passed; 1 failed; 0 ignored; 0 measured; 0 filtered out; finished in 0.00s
error: test failed, to rerun pass `--lib`
รันเทสบางส่วนตามชื่อ
การรัน test suite เต็มบางครั้งใช้เวลานาน ถ้าคุณทำงานกับโค้ดในส่วนเฉพาะ
คุณอาจต้องการรันเฉพาะเทสที่เกี่ยวข้องกับโค้ดนั้น คุณเลือกเทสที่จะรันโดย
ส่งชื่อหรือชื่อของเทสที่คุณต้องการรันให้ cargo test เป็นอาร์กิวเมนต์
ได้
เพื่อสาธิตวิธีรันเทสบางส่วน เราจะสร้างเทสสามตัวสำหรับฟังก์ชัน add_two
ก่อน ตามที่แสดงใน Listing 11-11 และเลือกตัวที่จะรัน
pub fn add_two(a: u64) -> u64 {
a + 2
}
#[cfg(test)]
mod tests {
use super::*;
#[test]
fn add_two_and_two() {
let result = add_two(2);
assert_eq!(result, 4);
}
#[test]
fn add_three_and_two() {
let result = add_two(3);
assert_eq!(result, 5);
}
#[test]
fn one_hundred() {
let result = add_two(100);
assert_eq!(result, 102);
}
}ถ้าเรารันเทสโดยไม่ส่งอาร์กิวเมนต์ใด ๆ ดังที่เราเห็นก่อนหน้า เทสทั้งหมด จะรันแบบขนาน:
$ cargo test
Compiling adder v0.1.0 (file:///projects/adder)
Finished `test` profile [unoptimized + debuginfo] target(s) in 0.62s
Running unittests src/lib.rs (target/debug/deps/adder-92948b65e88960b4)
running 3 tests
test tests::add_three_and_two ... ok
test tests::add_two_and_two ... ok
test tests::one_hundred ... ok
test result: ok. 3 passed; 0 failed; 0 ignored; 0 measured; 0 filtered out; finished in 0.00s
Doc-tests adder
running 0 tests
test result: ok. 0 passed; 0 failed; 0 ignored; 0 measured; 0 filtered out; finished in 0.00s
รันเทสเดี่ยว
เราส่งชื่อของฟังก์ชันเทสใด ๆ ให้ cargo test เพื่อรันเฉพาะเทสนั้นได้:
$ cargo test one_hundred
Compiling adder v0.1.0 (file:///projects/adder)
Finished `test` profile [unoptimized + debuginfo] target(s) in 0.69s
Running unittests src/lib.rs (target/debug/deps/adder-92948b65e88960b4)
running 1 test
test tests::one_hundred ... ok
test result: ok. 1 passed; 0 failed; 0 ignored; 0 measured; 2 filtered out; finished in 0.00s
มีเฉพาะเทสที่ชื่อ one_hundred รัน — อีกสองเทสไม่ตรงชื่อนั้น output
เทสบอกเราว่าเรามีเทสเพิ่มที่ไม่รัน โดยแสดง 2 filtered out ที่ท้ายสุด
เราระบุชื่อหลายเทสในวิธีนี้ไม่ได้ — เฉพาะค่าแรกที่ให้กับ cargo test
จะถูกใช้ แต่มีวิธีรันหลายเทส
Filter เพื่อรันหลายเทส
เราระบุส่วนหนึ่งของชื่อเทสได้ และเทสใดที่ชื่อตรงกับค่านั้นจะถูกรัน
ตัวอย่างเช่น เพราะสองในชื่อเทสของเรามี add เรารันสองเทสเหล่านั้นได้
โดยรัน cargo test add:
$ cargo test add
Compiling adder v0.1.0 (file:///projects/adder)
Finished `test` profile [unoptimized + debuginfo] target(s) in 0.61s
Running unittests src/lib.rs (target/debug/deps/adder-92948b65e88960b4)
running 2 tests
test tests::add_three_and_two ... ok
test tests::add_two_and_two ... ok
test result: ok. 2 passed; 0 failed; 0 ignored; 0 measured; 1 filtered out; finished in 0.00s
คำสั่งนี้รันเทสทั้งหมดที่มี add ในชื่อ และ filter เทสที่ชื่อ
one_hundred ออก สังเกตว่าโมดูลที่เทสปรากฏกลายเป็นส่วนหนึ่งของชื่อเทส
ดังนั้นเรารันเทสทั้งหมดในโมดูลโดย filter บนชื่อของโมดูลได้
Ignore เทสยกเว้นถูกร้องขอเฉพาะ
บางครั้งเทสบางตัวอาจใช้เวลานานมากในการ execute ดังนั้นคุณอาจต้องการ
exclude พวกมันระหว่างการรัน cargo test ส่วนใหญ่ แทนที่จะ list เทส
ทั้งหมดที่คุณต้องการรันเป็นอาร์กิวเมนต์ คุณ annotate เทสที่ใช้เวลานาน
โดยใช้ attribute ignore เพื่อ exclude พวกมันแทน ดังที่แสดงที่นี่:
Filename: src/lib.rs
pub fn add(left: u64, right: u64) -> u64 {
left + right
}
#[cfg(test)]
mod tests {
use super::*;
#[test]
fn it_works() {
let result = add(2, 2);
assert_eq!(result, 4);
}
#[test]
#[ignore]
fn expensive_test() {
// code that takes an hour to run
}
}หลัง #[test] เราเพิ่มบรรทัด #[ignore] ให้เทสที่เราต้องการ exclude
ตอนนี้เมื่อเรารันเทส it_works จะรัน แต่ expensive_test จะไม่รัน:
$ cargo test
Compiling adder v0.1.0 (file:///projects/adder)
Finished `test` profile [unoptimized + debuginfo] target(s) in 0.60s
Running unittests src/lib.rs (target/debug/deps/adder-92948b65e88960b4)
running 2 tests
test tests::expensive_test ... ignored
test tests::it_works ... ok
test result: ok. 1 passed; 0 failed; 1 ignored; 0 measured; 0 filtered out; finished in 0.00s
Doc-tests adder
running 0 tests
test result: ok. 0 passed; 0 failed; 0 ignored; 0 measured; 0 filtered out; finished in 0.00s
ฟังก์ชัน expensive_test ถูก list เป็น ignored ถ้าเราต้องการรันเฉพาะ
เทสที่ถูก ignore เราใช้ cargo test -- --ignored ได้:
$ cargo test -- --ignored
Compiling adder v0.1.0 (file:///projects/adder)
Finished `test` profile [unoptimized + debuginfo] target(s) in 0.61s
Running unittests src/lib.rs (target/debug/deps/adder-92948b65e88960b4)
running 1 test
test tests::expensive_test ... ok
test result: ok. 1 passed; 0 failed; 0 ignored; 0 measured; 1 filtered out; finished in 0.00s
Doc-tests adder
running 0 tests
test result: ok. 0 passed; 0 failed; 0 ignored; 0 measured; 0 filtered out; finished in 0.00s
โดยควบคุมว่าเทสไหนรัน คุณทำให้แน่ใจได้ว่าผล cargo test ของคุณจะกลับ
มาเร็ว เมื่อคุณอยู่ในจุดที่สมเหตุสมผลที่จะตรวจสอบผลของเทส ignored
และคุณมีเวลารอผล คุณรัน cargo test -- --ignored แทนได้ ถ้าคุณต้องการ
รันเทสทั้งหมดไม่ว่าจะถูก ignore หรือไม่ คุณรัน
cargo test -- --include-ignored ได้
การจัดระเบียบเทส
การจัดระเบียบเทส
ดังที่กล่าวไว้ตอนต้นบท การเทสเป็นวินัยที่ซับซ้อน และคนต่างกันใช้คำศัพท์ และการจัดระเบียบต่างกัน community Rust คิดถึงเทสในแง่ของสองหมวดหลัก — unit test และ integration test unit test มีขนาดเล็กและโฟกัสมากกว่า ทดสอบโมดูลหนึ่งโดยแยกออกในแต่ละครั้ง และทดสอบ interface ส่วนตัวได้ integration test อยู่ภายนอก library ของคุณทั้งหมด และใช้โค้ดของคุณใน แบบเดียวกับโค้ดภายนอกอื่นใด โดยใช้เฉพาะ public interface และอาจใช้งาน หลายโมดูลต่อเทส
การเขียนเทสทั้งสองประเภทสำคัญในการทำให้แน่ใจว่าชิ้นส่วนของ library ของ คุณทำสิ่งที่คุณคาดหวัง ทั้งแยกกันและด้วยกัน
Unit Test
จุดประสงค์ของ unit test คือทดสอบแต่ละหน่วยของโค้ดโดยแยกจากโค้ดส่วนที่
เหลือ เพื่อระบุได้รวดเร็วว่าโค้ดทำงานและไม่ทำงานตามที่คาดหวังที่ไหน
คุณจะวาง unit test ใน directory src ในแต่ละไฟล์พร้อมโค้ดที่พวกมัน
ทดสอบ ธรรมเนียมคือสร้างโมดูลชื่อ tests ในแต่ละไฟล์เพื่อบรรจุฟังก์ชัน
เทส และ annotate โมดูลด้วย cfg(test)
โมดูล tests และ #[cfg(test)]
annotation #[cfg(test)] บนโมดูล tests บอก Rust ให้คอมไพล์และรัน
โค้ดเทสเฉพาะเมื่อคุณรัน cargo test ไม่ใช่เมื่อคุณรัน cargo build
นี่ประหยัดเวลาคอมไพล์เมื่อคุณต้องการ build เฉพาะ library และประหยัด
พื้นที่ใน artifact ที่ถูกคอมไพล์เพราะเทสไม่ถูกรวม คุณจะเห็นว่าเพราะ
integration test ไปอยู่ใน directory ที่ต่างกัน พวกมันไม่ต้องการ
annotation #[cfg(test)] อย่างไรก็ตาม เพราะ unit test ไปอยู่ในไฟล์
เดียวกับโค้ด คุณจะใช้ #[cfg(test)] เพื่อระบุว่าพวกมันไม่ควรถูกรวม
ในผลที่คอมไพล์
จำได้ว่าเมื่อเราสร้างโปรเจกต์ adder ใหม่ในส่วนแรกของบทนี้ Cargo สร้าง
โค้ดนี้ให้เรา:
Filename: src/lib.rs
pub fn add(left: u64, right: u64) -> u64 {
left + right
}
#[cfg(test)]
mod tests {
use super::*;
#[test]
fn it_works() {
let result = add(2, 2);
assert_eq!(result, 4);
}
}บนโมดูล tests ที่ถูกสร้างอัตโนมัติ attribute cfg ย่อมาจาก
configuration และบอก Rust ว่า item ต่อไปนี้ควรถูกรวมเฉพาะเมื่อให้
configuration option บางอย่าง ในกรณีนี้ configuration option คือ
test ซึ่ง Rust ให้มาสำหรับการคอมไพล์และรันเทส โดยใช้ attribute cfg
Cargo คอมไพล์โค้ดเทสของเราเฉพาะถ้าเราเรียกใช้รันเทสด้วย cargo test
อย่างจริงจัง สิ่งนี้รวมฟังก์ชัน helper ใด ๆ ที่อาจอยู่ในโมดูลนี้ นอก
เหนือจากฟังก์ชันที่ annotate ด้วย #[test]
ทดสอบฟังก์ชัน Private
มีการถกเถียงใน community การเทสว่าควรหรือไม่ควรทดสอบฟังก์ชัน private
โดยตรง และภาษาอื่นทำให้ยากหรือเป็นไปไม่ได้ที่จะทดสอบฟังก์ชัน private
ไม่ว่าคุณยึดถืออุดมการณ์การเทสไหน กฎ privacy ของ Rust อนุญาตให้คุณ
ทดสอบฟังก์ชัน private ได้ พิจารณาโค้ดใน Listing 11-12 กับฟังก์ชัน
private internal_adder
pub fn add_two(a: u64) -> u64 {
internal_adder(a, 2)
}
fn internal_adder(left: u64, right: u64) -> u64 {
left + right
}
#[cfg(test)]
mod tests {
use super::*;
#[test]
fn internal() {
let result = internal_adder(2, 2);
assert_eq!(result, 4);
}
}สังเกตว่าฟังก์ชัน internal_adder ไม่ถูกทำเครื่องหมายเป็น pub เทส
เป็นแค่โค้ด Rust และโมดูล tests เป็นแค่โมดูลอื่น ดังที่เราพูดถึงใน
“Path สำหรับอ้างถึง item ใน Module Tree” item
ในโมดูลลูกใช้ item ในโมดูลบรรพบุรุษของพวกมันได้ ในเทสนี้ เรานำ item
ทั้งหมดที่เป็นของ parent ของโมดูล tests เข้า scope ด้วย
use super::* และเทสเรียก internal_adder ได้ ถ้าคุณไม่คิดว่าฟังก์ชัน
private ควรถูกทดสอบ ไม่มีอะไรใน Rust ที่จะบังคับให้คุณทำ
Integration Test
ใน Rust integration test อยู่ภายนอก library ของคุณทั้งหมด พวกมันใช้ library ของคุณในแบบเดียวกับโค้ดอื่นใด แปลว่าพวกมันเรียกได้เฉพาะ ฟังก์ชันที่เป็นส่วนหนึ่งของ public API ของ library คุณ จุดประสงค์ ของพวกมันคือทดสอบว่าหลายส่วนของ library ทำงานร่วมกันถูกต้องไหม หน่วย ของโค้ดที่ทำงานถูกต้องด้วยตัวเองอาจมีปัญหาเมื่อ integrate ดังนั้น test coverage ของโค้ดที่ integrate ก็สำคัญด้วย ในการสร้าง integration test ก่อนอื่นคุณต้องการ directory tests
Directory tests
เราสร้าง directory tests ที่ระดับ top ของ directory โปรเจกต์ของเรา ถัดจาก src Cargo รู้ว่าต้องมองหาไฟล์ integration test ใน directory นี้ เราสร้างไฟล์เทสได้มากเท่าที่ต้องการ และ Cargo จะคอมไพล์แต่ละไฟล์ เป็น crate แยก
มาสร้าง integration test กัน โดยให้โค้ดใน Listing 11-12 ยังอยู่ใน ไฟล์ src/lib.rs สร้าง directory tests และสร้างไฟล์ใหม่ชื่อ tests/integration_test.rs โครงสร้าง directory ของคุณควรดูแบบนี้:
adder
├── Cargo.lock
├── Cargo.toml
├── src
│ └── lib.rs
└── tests
└── integration_test.rs
ใส่โค้ดใน Listing 11-13 ในไฟล์ tests/integration_test.rs
use adder::add_two;
#[test]
fn it_adds_two() {
let result = add_two(2);
assert_eq!(result, 4);
}adderแต่ละไฟล์ใน directory tests เป็น crate แยก ดังนั้นเราต้องนำ library
ของเราเข้า scope ของแต่ละ crate เทส ด้วยเหตุผลนั้น เราเพิ่ม
use adder::add_two; ที่บนสุดของโค้ด ซึ่งเราไม่ต้องการใน unit test
เราไม่ต้อง annotate โค้ดใน tests/integration_test.rs ด้วย
#[cfg(test)] Cargo ปฏิบัติกับ directory tests เป็นพิเศษและคอมไพล์
ไฟล์ใน directory นี้เฉพาะเมื่อเรารัน cargo test รัน cargo test
ตอนนี้:
$ cargo test
Compiling adder v0.1.0 (file:///projects/adder)
Finished `test` profile [unoptimized + debuginfo] target(s) in 1.31s
Running unittests src/lib.rs (target/debug/deps/adder-1082c4b063a8fbe6)
running 1 test
test tests::internal ... ok
test result: ok. 1 passed; 0 failed; 0 ignored; 0 measured; 0 filtered out; finished in 0.00s
Running tests/integration_test.rs (target/debug/deps/integration_test-1082c4b063a8fbe6)
running 1 test
test it_adds_two ... ok
test result: ok. 1 passed; 0 failed; 0 ignored; 0 measured; 0 filtered out; finished in 0.00s
Doc-tests adder
running 0 tests
test result: ok. 0 passed; 0 failed; 0 ignored; 0 measured; 0 filtered out; finished in 0.00s
สามส่วนของ output รวม unit test, integration test และ doc test สังเกตว่าถ้าเทสใดในส่วนหนึ่ง fail ส่วนถัดไปจะไม่ถูกรัน ตัวอย่างเช่น ถ้า unit test fail จะไม่มี output สำหรับ integration และ doc test เพราะเทสเหล่านั้นจะถูกรันเฉพาะถ้า unit test ทั้งหมดผ่าน
ส่วนแรกสำหรับ unit test เหมือนที่เราเห็นมา — หนึ่งบรรทัดสำหรับแต่ละ
unit test (อันหนึ่งชื่อ internal ที่เราเพิ่มใน Listing 11-12) แล้ว
บรรทัดสรุปสำหรับ unit test
ส่วน integration test เริ่มด้วยบรรทัด
Running tests/integration_test.rs ถัดไปคือบรรทัดสำหรับแต่ละฟังก์ชัน
เทสใน integration test นั้น และบรรทัดสรุปสำหรับผลของ integration test
ก่อนที่ส่วน Doc-tests adder จะเริ่ม
ไฟล์ integration test แต่ละไฟล์มีส่วนของตัวเอง ดังนั้นถ้าเราเพิ่มไฟล์ อีกใน directory tests จะมีส่วน integration test อีก
เรายังรันฟังก์ชัน integration test ตัวใดตัวหนึ่งได้โดยระบุชื่อฟังก์ชัน
เทสเป็นอาร์กิวเมนต์ให้ cargo test ในการรันเทสทั้งหมดในไฟล์
integration test ตัวใดตัวหนึ่ง ใช้อาร์กิวเมนต์ --test ของ
cargo test ตามด้วยชื่อของไฟล์:
$ cargo test --test integration_test
Compiling adder v0.1.0 (file:///projects/adder)
Finished `test` profile [unoptimized + debuginfo] target(s) in 0.64s
Running tests/integration_test.rs (target/debug/deps/integration_test-82e7799c1bc62298)
running 1 test
test it_adds_two ... ok
test result: ok. 1 passed; 0 failed; 0 ignored; 0 measured; 0 filtered out; finished in 0.00s
คำสั่งนี้รันเฉพาะเทสในไฟล์ tests/integration_test.rs
Submodule ใน Integration Test
เมื่อคุณเพิ่ม integration test มากขึ้น คุณอาจต้องการสร้างไฟล์เพิ่มใน directory tests เพื่อช่วยจัดระเบียบพวกมัน ตัวอย่างเช่น คุณจัดกลุ่ม ฟังก์ชันเทสตาม functionality ที่พวกมันทดสอบได้ ตามที่กล่าวก่อนหน้า แต่ละไฟล์ใน directory tests ถูกคอมไพล์เป็น crate แยกของตัวเอง ซึ่งมี ประโยชน์สำหรับสร้าง scope แยกเพื่อเลียนแบบวิธีที่ end user จะใช้ crate ของคุณใกล้เคียงขึ้น อย่างไรก็ตาม นี่หมายความว่าไฟล์ใน directory tests ไม่แชร์พฤติกรรมเดียวกับไฟล์ใน src ที่คุณเรียนในบทที่ 7 เกี่ยวกับวิธีแยกโค้ดเป็นโมดูลและไฟล์
พฤติกรรมที่ต่างของไฟล์ directory tests เห็นชัดที่สุดเมื่อคุณมีชุด
ฟังก์ชัน helper ที่จะใช้ในไฟล์ integration test หลายไฟล์ และคุณ
พยายามทำตามขั้นตอนในส่วน
“แยก Module ไปคนละไฟล์”
ของบทที่ 7 เพื่อดึงพวกมันเป็นโมดูลทั่วไป ตัวอย่างเช่น ถ้าเราสร้าง
tests/common.rs และวางฟังก์ชันชื่อ setup ในนั้น เราเพิ่มโค้ดให้
setup ที่เราต้องการเรียกจากฟังก์ชันเทสหลายตัวในไฟล์เทสหลายไฟล์ได้:
Filename: tests/common.rs
pub fn setup() {
// setup code specific to your library's tests would go here
}เมื่อเรารันเทสอีกครั้ง เราจะเห็นส่วนใหม่ใน output เทสสำหรับไฟล์
common.rs แม้ว่าไฟล์นี้จะไม่มีฟังก์ชันเทสใด ๆ และเราไม่ได้เรียก
ฟังก์ชัน setup จากที่ใด:
$ cargo test
Compiling adder v0.1.0 (file:///projects/adder)
Finished `test` profile [unoptimized + debuginfo] target(s) in 0.89s
Running unittests src/lib.rs (target/debug/deps/adder-92948b65e88960b4)
running 1 test
test tests::internal ... ok
test result: ok. 1 passed; 0 failed; 0 ignored; 0 measured; 0 filtered out; finished in 0.00s
Running tests/common.rs (target/debug/deps/common-92948b65e88960b4)
running 0 tests
test result: ok. 0 passed; 0 failed; 0 ignored; 0 measured; 0 filtered out; finished in 0.00s
Running tests/integration_test.rs (target/debug/deps/integration_test-92948b65e88960b4)
running 1 test
test it_adds_two ... ok
test result: ok. 1 passed; 0 failed; 0 ignored; 0 measured; 0 filtered out; finished in 0.00s
Doc-tests adder
running 0 tests
test result: ok. 0 passed; 0 failed; 0 ignored; 0 measured; 0 filtered out; finished in 0.00s
การที่ common ปรากฏในผลเทสพร้อม running 0 tests แสดงสำหรับมัน
ไม่ใช่สิ่งที่เราต้องการ เราแค่ต้องการแชร์โค้ดบางส่วนกับไฟล์
integration test อื่น เพื่อหลีกเลี่ยงให้ common ปรากฏใน output เทส
แทนที่จะสร้าง tests/common.rs เราจะสร้าง tests/common/mod.rs
directory โปรเจกต์ตอนนี้ดูแบบนี้:
├── Cargo.lock
├── Cargo.toml
├── src
│ └── lib.rs
└── tests
├── common
│ └── mod.rs
└── integration_test.rs
นี่คือธรรมเนียมการตั้งชื่อเก่ากว่าที่ Rust ก็เข้าใจ ที่เรากล่าวถึงใน
“Path ไฟล์ทางเลือก” ในบทที่ 7 การตั้งชื่อ
ไฟล์แบบนี้บอก Rust ไม่ให้ปฏิบัติกับโมดูล common เป็นไฟล์
integration test เมื่อเราย้ายโค้ดฟังก์ชัน setup ไปยัง
tests/common/mod.rs และลบไฟล์ tests/common.rs ส่วนใน output เทส
จะไม่ปรากฏอีก ไฟล์ใน subdirectory ของ directory tests ไม่ได้ถูก
คอมไพล์เป็น crate แยก หรือมีส่วนใน output เทส
หลังจากเราสร้าง tests/common/mod.rs เราใช้มันจากไฟล์ integration
test ใด ๆ ในฐานะโมดูลได้ นี่คือตัวอย่างการเรียกฟังก์ชัน setup จาก
เทส it_adds_two ใน tests/integration_test.rs:
Filename: tests/integration_test.rs
use adder::add_two;
mod common;
#[test]
fn it_adds_two() {
common::setup();
let result = add_two(2);
assert_eq!(result, 4);
}สังเกตว่าการประกาศ mod common; เหมือนกับการประกาศโมดูลที่เราสาธิตใน
Listing 7-21 จากนั้นในฟังก์ชันเทส เราเรียกฟังก์ชัน common::setup()
ได้
Integration Test สำหรับ Binary Crate
ถ้าโปรเจกต์ของเราเป็น binary crate ที่มีเฉพาะไฟล์ src/main.rs และ
ไม่มีไฟล์ src/lib.rs เราสร้าง integration test ใน directory tests
และนำฟังก์ชันที่นิยามในไฟล์ src/main.rs เข้า scope ด้วย statement
use ไม่ได้ เฉพาะ library crate ที่ expose ฟังก์ชันที่ crate อื่นใช้
ได้ — binary crate มีไว้สำหรับรันด้วยตัวเอง
นี่คือหนึ่งในเหตุผลที่โปรเจกต์ Rust ที่ให้ binary มีไฟล์ src/main.rs
ตรงไปตรงมาที่เรียก logic ที่อยู่ในไฟล์ src/lib.rs โดยใช้โครงสร้าง
นั้น integration test ทำได้ ทดสอบ library crate ด้วย use เพื่อ
ทำให้ functionality ที่สำคัญใช้ได้ ถ้า functionality ที่สำคัญทำงาน
โค้ดจำนวนเล็กน้อยในไฟล์ src/main.rs ก็จะทำงานด้วย และโค้ดจำนวน
เล็กน้อยนั้นไม่ต้องถูกทดสอบ
สรุป
ฟีเจอร์การเทสของ Rust ให้วิธีระบุว่าโค้ดควรทำงานยังไง เพื่อทำให้แน่ใจ ว่ามันยังทำงานตามที่คุณคาดหวัง แม้เมื่อคุณเปลี่ยน unit test ใช้งานส่วน ต่าง ๆ ของ library แยกกัน และทดสอบรายละเอียด implementation private ได้ integration test ตรวจสอบว่าหลายส่วนของ library ทำงานร่วมกันถูก ต้อง และพวกมันใช้ public API ของ library เพื่อทดสอบโค้ดในแบบเดียวกับ ที่โค้ดภายนอกจะใช้ แม้ว่าระบบ type และกฎ ownership ของ Rust ช่วย ป้องกัน bug บางประเภท เทสยังสำคัญเพื่อลด bug เชิง logic ที่เกี่ยวกับ ว่าโค้ดของคุณคาดหวังให้ทำงานยังไง
มารวมความรู้ที่คุณเรียนในบทนี้และในบทก่อนหน้าเพื่อทำงานในโปรเจกต์กัน!
โปรเจกต์ I/O: เขียนโปรแกรม Command Line
บทนี้เป็นการทบทวนทักษะหลายอย่างที่คุณได้เรียนมาจนถึงตอนนี้ และสำรวจ ฟีเจอร์ standard library เพิ่มอีกหน่อย เราจะสร้างเครื่องมือ command line ที่ทำงานกับการ input/output ไฟล์และ command line เพื่อฝึกฝนแนวคิด Rust บางอย่างที่คุณมีอยู่ในมือแล้ว
ความเร็ว ความปลอดภัย output ที่เป็น binary เดียว และการสนับสนุน
cross-platform ของ Rust ทำให้มันเป็นภาษาที่เหมาะสมในการสร้างเครื่องมือ
command line ดังนั้นสำหรับโปรเจกต์ของเรา เราจะสร้างเวอร์ชันของเราเอง
ของเครื่องมือค้นหา command line คลาสสิก grep (globally search a
regular expression and print) ใน use case ที่ง่ายที่สุด
grep ค้นหาใน file ที่ระบุสำหรับ string ที่ระบุ เพื่อทำเช่นนั้น grep
รับ file path และ string เป็นอาร์กิวเมนต์ จากนั้นมันอ่านไฟล์ หาบรรทัด
ในไฟล์นั้นที่มี string อาร์กิวเมนต์ และ print บรรทัดเหล่านั้น
ระหว่างทาง เราจะแสดงวิธีทำให้เครื่องมือ command line ของเราใช้ฟีเจอร์
terminal ที่เครื่องมือ command line อื่น ๆ หลายตัวใช้ เราจะอ่านค่าของ
environment variable เพื่อให้ user กำหนดพฤติกรรมของเครื่องมือของเรา
เรายังจะ print ข้อความ error ไปยัง standard error console stream
(stderr) แทน standard output (stdout) เพื่อให้ ตัวอย่างเช่น user
redirect output ที่สำเร็จไปยังไฟล์ในขณะที่ยังเห็นข้อความ error บนหน้าจอ
สมาชิก community Rust คนหนึ่ง Andrew Gallant ได้สร้างเวอร์ชันของ grep
ที่มีฟีเจอร์ครบและเร็วมาก ชื่อ ripgrep ในการเปรียบเทียบ เวอร์ชันของ
เราจะค่อนข้างง่าย แต่บทนี้จะให้ความรู้พื้นฐานที่คุณต้องการเพื่อเข้าใจ
โปรเจกต์ในโลกจริงอย่าง ripgrep
โปรเจกต์ grep ของเราจะรวมแนวคิดหลายอย่างที่คุณได้เรียนมาจนถึงตอนนี้:
- จัดระเบียบโค้ด (บทที่ 7)
- ใช้ vector และ string (บทที่ 8)
- จัดการ error (บทที่ 9)
- ใช้ trait และ lifetime ที่เหมาะสม (บทที่ 10)
- เขียนเทส (บทที่ 11)
เรายังจะแนะนำสั้น ๆ เกี่ยวกับ closure, iterator และ trait object ซึ่ง บทที่ 13 และ บทที่ 18 จะครอบคลุมในรายละเอียด
รับ command line argument
รับ Command Line Argument
มาสร้างโปรเจกต์ใหม่ด้วย cargo new เหมือนเคย เราจะตั้งชื่อโปรเจกต์ของ
เราว่า minigrep เพื่อแยกจากเครื่องมือ grep ที่คุณอาจมีในระบบแล้ว:
$ cargo new minigrep
Created binary (application) `minigrep` project
$ cd minigrep
งานแรกคือทำให้ minigrep รับสองอาร์กิวเมนต์ command line — file path
และ string ที่จะค้นหา นั่นคือ เราต้องการรันโปรแกรมของเราด้วย cargo run,
hyphen สองตัวเพื่อระบุว่าอาร์กิวเมนต์ต่อไปนี้สำหรับโปรแกรมของเราไม่ใช่
สำหรับ cargo, string ที่จะค้นหา และ path ของไฟล์ที่จะค้นหาใน แบบนี้:
$ cargo run -- searchstring example-filename.txt
ตอนนี้ โปรแกรมที่ cargo new สร้างประมวลผลอาร์กิวเมนต์ที่เราให้มันไม่
ได้ บาง library ที่มีอยู่บน crates.io ช่วยใน
การเขียนโปรแกรมที่รับอาร์กิวเมนต์ command line ได้ แต่เพราะคุณกำลัง
เรียนแนวคิดนี้ มา implement ความสามารถนี้ด้วยตัวเองกัน
อ่านค่า Argument
เพื่อให้ minigrep อ่านค่าของอาร์กิวเมนต์ command line ที่เราส่งให้ได้
เราจะต้องการฟังก์ชัน std::env::args ที่ standard library ของ Rust
ให้มา ฟังก์ชันนี้ return iterator ของอาร์กิวเมนต์ command line ที่
ส่งให้ minigrep เราจะครอบคลุม iterator ทั้งหมดใน
บทที่ 13 ตอนนี้ คุณต้องรู้แค่สองรายละเอียด
เกี่ยวกับ iterator — iterator สร้างชุดของค่า และเราเรียกเมธอด collect
บน iterator เพื่อเปลี่ยนให้เป็น collection เช่น vector ซึ่งบรรจุ
element ทั้งหมดที่ iterator สร้างได้
โค้ดใน Listing 12-1 ทำให้โปรแกรม minigrep ของคุณอ่านอาร์กิวเมนต์
command line ใด ๆ ที่ส่งให้ และ collect ค่าเข้า vector
use std::env;
fn main() {
let args: Vec<String> = env::args().collect();
dbg!(args);
}ก่อนอื่น เรานำโมดูล std::env เข้า scope ด้วย statement use เพื่อให้
เราใช้ฟังก์ชัน args ของมันได้ สังเกตว่าฟังก์ชัน std::env::args ถูก
ซ้อนในโมดูลสองระดับ ดังที่เราพูดถึงใน
บทที่ 7 ในกรณีที่ฟังก์ชันที่ต้องการ
ถูกซ้อนในมากกว่าหนึ่งโมดูล เราเลือกนำโมดูล parent เข้า scope แทน
ฟังก์ชัน เมื่อทำเช่นนั้น เราใช้ฟังก์ชันอื่นจาก std::env ได้ง่าย ๆ
มันยังกำกวมน้อยกว่าการเพิ่ม use std::env::args แล้วเรียกฟังก์ชันด้วย
แค่ args เพราะ args อาจถูกเข้าใจผิดง่าย ๆ ว่าเป็นฟังก์ชันที่นิยาม
ในโมดูลปัจจุบัน
ฟังก์ชัน args และ Unicode ที่ไม่ valid
สังเกตว่า std::env::args จะ panic ถ้าอาร์กิวเมนต์ใดมี Unicode ที่
ไม่ valid ถ้าโปรแกรมของคุณต้องรับอาร์กิวเมนต์ที่มี Unicode ที่ไม่
valid ใช้ std::env::args_os แทน ฟังก์ชันนั้น return iterator ที่
สร้างค่า OsString แทนค่า String เราเลือกใช้ std::env::args
ที่นี่เพื่อความง่ายเพราะค่า OsString ต่างกันตามแต่ละ platform และ
ทำงานด้วยซับซ้อนกว่าค่า String
ในบรรทัดแรกของ main เราเรียก env::args และเราใช้ collect ทันที
เพื่อเปลี่ยน iterator เป็น vector ที่บรรจุค่าทั้งหมดที่ iterator สร้าง
เราใช้ฟังก์ชัน collect เพื่อสร้าง collection หลายประเภทได้ ดังนั้น
เราระบุ type ของ args อย่างชัดเจนเพื่อระบุว่าเราต้องการ vector ของ
string แม้คุณจะแทบไม่ต้อง annotate type ใน Rust collect เป็นฟังก์ชัน
หนึ่งที่คุณมักต้อง annotate เพราะ Rust ไม่สามารถ infer ประเภทของ
collection ที่คุณต้องการได้
สุดท้าย เรา print vector โดยใช้ debug macro มาลองรันโค้ดก่อน — ก่อน อื่นโดยไม่มีอาร์กิวเมนต์ จากนั้นด้วยสองอาร์กิวเมนต์:
$ cargo run
Compiling minigrep v0.1.0 (file:///projects/minigrep)
Finished `dev` profile [unoptimized + debuginfo] target(s) in 0.61s
Running `target/debug/minigrep`
[src/main.rs:5:5] args = [
"target/debug/minigrep",
]
$ cargo run -- needle haystack
Compiling minigrep v0.1.0 (file:///projects/minigrep)
Finished `dev` profile [unoptimized + debuginfo] target(s) in 1.57s
Running `target/debug/minigrep needle haystack`
[src/main.rs:5:5] args = [
"target/debug/minigrep",
"needle",
"haystack",
]
สังเกตว่าค่าแรกใน vector คือ "target/debug/minigrep" ซึ่งเป็นชื่อของ
binary ของเรา นี่ตรงกับพฤติกรรมของ list อาร์กิวเมนต์ใน C ที่ให้
โปรแกรมใช้ชื่อที่ใช้เรียกพวกมันใน execution ของพวกมัน มันมักสะดวกที่
จะมีสิทธิ์เข้าถึงชื่อโปรแกรมในกรณีที่คุณต้องการ print มันในข้อความ
หรือเปลี่ยนพฤติกรรมของโปรแกรมตาม alias command line ที่ใช้เรียกโปรแกรม
แต่สำหรับจุดประสงค์ของบทนี้ เราจะ ignore มันและบันทึกเฉพาะสองอาร์กิวเมนต์
ที่เราต้องการ
บันทึกค่า Argument ในตัวแปร
ตอนนี้โปรแกรมเข้าถึงค่าที่ระบุเป็นอาร์กิวเมนต์ command line ได้ ตอนนี้ เราต้องบันทึกค่าของสองอาร์กิวเมนต์ในตัวแปรเพื่อให้เราใช้ค่าตลอดส่วนที่ เหลือของโปรแกรมได้ เราทำสิ่งนั้นใน Listing 12-2
use std::env;
fn main() {
let args: Vec<String> = env::args().collect();
let query = &args[1];
let file_path = &args[2];
println!("Searching for {query}");
println!("In file {file_path}");
}ดังที่เราเห็นเมื่อเรา print vector ชื่อของโปรแกรมใช้ค่าแรกใน vector
ที่ args[0] ดังนั้นเราเริ่มอาร์กิวเมนต์ที่ index 1 อาร์กิวเมนต์แรก
ที่ minigrep รับคือ string ที่เรากำลังค้นหา ดังนั้นเราวาง reference
ของอาร์กิวเมนต์แรกในตัวแปร query อาร์กิวเมนต์ที่สองจะเป็น file path
ดังนั้นเราวาง reference ของอาร์กิวเมนต์ที่สองในตัวแปร file_path
เรา print ค่าของตัวแปรเหล่านี้ชั่วคราวเพื่อพิสูจน์ว่าโค้ดทำงานตามที่
เราตั้งใจ มารันโปรแกรมนี้อีกครั้งด้วยอาร์กิวเมนต์ test และ
sample.txt:
$ cargo run -- test sample.txt
Compiling minigrep v0.1.0 (file:///projects/minigrep)
Finished `dev` profile [unoptimized + debuginfo] target(s) in 0.0s
Running `target/debug/minigrep test sample.txt`
Searching for test
In file sample.txt
ดี โปรแกรมทำงาน! ค่าของอาร์กิวเมนต์ที่เราต้องการกำลังถูกบันทึกในตัวแปร ที่ถูกต้อง ภายหลังเราจะเพิ่มการจัดการ error เพื่อจัดการกับสถานการณ์ ที่อาจผิดพลาดบางอย่าง เช่นเมื่อ user ไม่ให้อาร์กิวเมนต์ ตอนนี้เราจะ ignore สถานการณ์นั้นและทำงานเพิ่มความสามารถในการอ่านไฟล์แทน
อ่านไฟล์
อ่านไฟล์
ตอนนี้เราจะเพิ่ม functionality เพื่ออ่านไฟล์ที่ระบุในอาร์กิวเมนต์
file_path ก่อนอื่น เราต้องการไฟล์ตัวอย่างเพื่อทดสอบ — เราจะใช้ไฟล์
ที่มี text จำนวนเล็กน้อยในหลายบรรทัดพร้อมคำที่ซ้ำกัน Listing 12-3 มี
บทกวีของ Emily Dickinson ที่จะทำงานได้ดี! สร้างไฟล์ชื่อ poem.txt ที่
ระดับ root ของโปรเจกต์ของคุณ และใส่บทกวี “I’m Nobody! Who are you?”
I'm nobody! Who are you?
Are you nobody, too?
Then there's a pair of us - don't tell!
They'd banish us, you know.
How dreary to be somebody!
How public, like a frog
To tell your name the livelong day
To an admiring bog!
เมื่อมี text แล้ว แก้ไข src/main.rs และเพิ่มโค้ดเพื่ออ่านไฟล์ ดังที่ แสดงใน Listing 12-4
use std::env;
use std::fs;
fn main() {
// --snip--
let args: Vec<String> = env::args().collect();
let query = &args[1];
let file_path = &args[2];
println!("Searching for {query}");
println!("In file {file_path}");
let contents = fs::read_to_string(file_path)
.expect("Should have been able to read the file");
println!("With text:\n{contents}");
}ก่อนอื่น เรานำส่วนที่เกี่ยวข้องของ standard library เข้ามาด้วย
statement use — เราต้องการ std::fs เพื่อจัดการไฟล์
ใน main statement ใหม่ fs::read_to_string รับ file_path, เปิด
ไฟล์นั้น และ return ค่า type std::io::Result<String> ที่บรรจุเนื้อหา
ของไฟล์
หลังจากนั้น เราเพิ่ม statement println! ชั่วคราวอีกครั้งที่ print
ค่าของ contents หลังจากอ่านไฟล์ เพื่อให้เราตรวจสอบได้ว่าโปรแกรมทำงาน
จนถึงจุดนี้
มารันโค้ดนี้ด้วย string ใด ๆ เป็นอาร์กิวเมนต์ command line แรก (เพราะ เรายังไม่ได้ implement ส่วนค้นหา) และไฟล์ poem.txt เป็นอาร์กิวเมนต์ ที่สอง:
$ cargo run -- the poem.txt
Compiling minigrep v0.1.0 (file:///projects/minigrep)
Finished `dev` profile [unoptimized + debuginfo] target(s) in 0.0s
Running `target/debug/minigrep the poem.txt`
Searching for the
In file poem.txt
With text:
I'm nobody! Who are you?
Are you nobody, too?
Then there's a pair of us - don't tell!
They'd banish us, you know.
How dreary to be somebody!
How public, like a frog
To tell your name the livelong day
To an admiring bog!
ดี! โค้ดอ่านและ print เนื้อหาของไฟล์ แต่โค้ดมีข้อบกพร่องอยู่บ้าง ตอน
นี้ฟังก์ชัน main มีหลายความรับผิดชอบ — โดยทั่วไป ฟังก์ชันชัดเจนและ
ดูแลรักษาง่ายขึ้นถ้าแต่ละฟังก์ชันรับผิดชอบเพียงหนึ่งความคิด ปัญหาอีก
อย่างคือเราไม่ได้จัดการ error ดีเท่าที่ทำได้ โปรแกรมยังเล็ก ดังนั้น
ข้อบกพร่องเหล่านี้ไม่เป็นปัญหาใหญ่ แต่เมื่อโปรแกรมเติบโต มันจะยากขึ้น
ที่จะแก้พวกมันให้สะอาด เป็นการปฏิบัติที่ดีที่จะเริ่ม refactor แต่
เนิ่น ๆ เมื่อพัฒนาโปรแกรม เพราะ refactor โค้ดจำนวนน้อยง่ายกว่ามาก
เราจะทำเช่นนั้นต่อไป
Refactor เพื่อ modularity และจัดการ error
Refactor เพื่อ Modularity และจัดการ Error ให้ดีขึ้น
เพื่อปรับปรุงโปรแกรมของเรา เราจะแก้สี่ปัญหาที่เกี่ยวกับโครงสร้างของ
โปรแกรมและวิธีจัดการ error ที่อาจเกิดขึ้น ก่อนอื่น ฟังก์ชัน main
ของเราตอนนี้ทำสองงาน — มัน parse อาร์กิวเมนต์และอ่านไฟล์ เมื่อโปรแกรม
ของเราเติบโต จำนวนงานแยกที่ฟังก์ชัน main จัดการจะเพิ่มขึ้น เมื่อ
ฟังก์ชันได้รับความรับผิดชอบ มันยากขึ้นที่จะคิดเกี่ยวกับ ยากขึ้นที่จะ
ทดสอบ และยากขึ้นที่จะเปลี่ยนโดยไม่ทำลายส่วนใดส่วนหนึ่ง ดีที่สุดที่จะ
แยก functionality เพื่อให้แต่ละฟังก์ชันรับผิดชอบหนึ่งงาน
ประเด็นนี้ยังเชื่อมโยงกับปัญหาที่สอง — แม้ query และ file_path เป็น
ตัวแปร configuration ของโปรแกรมของเรา ตัวแปรอย่าง contents ถูกใช้
ทำ logic ของโปรแกรม ยิ่ง main ยาว ยิ่งต้องนำตัวแปรมากเข้า scope —
ยิ่งมีตัวแปรใน scope มาก ยิ่งยากที่จะตามจุดประสงค์ของแต่ละตัวแปร ดี
ที่สุดที่จะจัดกลุ่มตัวแปร configuration เข้าโครงสร้างเดียวเพื่อให้
จุดประสงค์ของพวกมันชัดเจน
ปัญหาที่สามคือเราใช้ expect เพื่อ print ข้อความ error เมื่ออ่านไฟล์
fail แต่ข้อความ error แค่ print Should have been able to read the file
การอ่านไฟล์ fail ได้หลายวิธี — ตัวอย่างเช่น ไฟล์อาจหาย หรือเราอาจไม่
มี permission ที่จะเปิดมัน ตอนนี้ ไม่ว่าสถานการณ์เป็นยังไง เราจะ print
ข้อความ error แบบเดียวกันสำหรับทุกอย่าง ซึ่งไม่ให้ข้อมูลใด ๆ แก่ user!
ที่สี่ เราใช้ expect ในการจัดการ error และถ้า user รันโปรแกรมของเรา
โดยไม่ระบุอาร์กิวเมนต์เพียงพอ พวกเขาจะได้ error index out of bounds
จาก Rust ที่ไม่อธิบายปัญหาชัดเจน ดีที่สุดถ้าโค้ดจัดการ error ทั้งหมด
อยู่ที่เดียว เพื่อให้ผู้ดูแลในอนาคตมีเพียงที่เดียวที่จะปรึกษาโค้ดถ้า
logic จัดการ error ต้องเปลี่ยน การมีโค้ดจัดการ error ทั้งหมดที่เดียว
จะรับประกันด้วยว่าเรา print ข้อความที่มีความหมายต่อ end user ของเรา
มาแก้สี่ปัญหานี้โดย refactor โปรเจกต์ของเรา
แยก Concern ในโปรเจกต์ Binary
ปัญหาเชิงการจัดระเบียบของการแบ่งความรับผิดชอบสำหรับหลายงานให้ฟังก์ชัน
main ทั่วไปในโปรเจกต์ binary หลายโปรเจกต์ ผลคือ programmer Rust
หลายคนพบว่ามีประโยชน์ที่จะแยก concern แยกของโปรแกรม binary เมื่อ
ฟังก์ชัน main เริ่มใหญ่ขึ้น กระบวนการนี้มีขั้นตอนต่อไปนี้:
- แยกโปรแกรมของคุณเป็นไฟล์ main.rs และไฟล์ lib.rs และย้าย logic ของโปรแกรมของคุณไปยัง lib.rs
- ตราบใดที่ logic parse command line ของคุณเล็ก มันอยู่ในฟังก์ชัน
mainได้ - เมื่อ logic parse command line เริ่มซับซ้อน ดึงมันจากฟังก์ชัน
mainไปยังฟังก์ชันหรือ type อื่น
ความรับผิดชอบที่ยังอยู่ในฟังก์ชัน main หลังกระบวนการนี้ควรจำกัดอยู่
ที่ต่อไปนี้:
- เรียก logic parse command line ด้วยค่าอาร์กิวเมนต์
- ตั้งค่า configuration อื่นใด
- เรียกฟังก์ชัน
runใน lib.rs - จัดการ error ถ้า
runreturn error
pattern นี้เกี่ยวกับการแยก concern — main.rs จัดการการรันโปรแกรม
และ lib.rs จัดการ logic ทั้งหมดของงานในมือ เพราะคุณทดสอบฟังก์ชัน
main โดยตรงไม่ได้ โครงสร้างนี้ให้คุณทดสอบ logic ของโปรแกรมทั้งหมด
โดยย้ายมันออกจากฟังก์ชัน main โค้ดที่ยังอยู่ในฟังก์ชัน main จะ
เล็กพอที่จะตรวจสอบความถูกต้องโดยอ่าน มาทำใหม่โปรแกรมของเราโดยทำตาม
กระบวนการนี้
ดึง Argument Parser
เราจะดึง functionality สำหรับ parse อาร์กิวเมนต์เข้าฟังก์ชันที่
main จะเรียก Listing 12-5 แสดงจุดเริ่มต้นใหม่ของฟังก์ชัน main ที่
เรียกฟังก์ชันใหม่ parse_config ซึ่งเราจะนิยามใน src/main.rs
use std::env;
use std::fs;
fn main() {
let args: Vec<String> = env::args().collect();
let (query, file_path) = parse_config(&args);
// --snip--
println!("Searching for {query}");
println!("In file {file_path}");
let contents = fs::read_to_string(file_path)
.expect("Should have been able to read the file");
println!("With text:\n{contents}");
}
fn parse_config(args: &[String]) -> (&str, &str) {
let query = &args[1];
let file_path = &args[2];
(query, file_path)
}parse_config จาก mainเรายัง collect อาร์กิวเมนต์ command line เข้า vector แต่แทนที่จะ
assign ค่าอาร์กิวเมนต์ที่ index 1 ให้ตัวแปร query และค่าอาร์กิวเมนต์
ที่ index 2 ให้ตัวแปร file_path ภายในฟังก์ชัน main เราส่ง vector
ทั้งหมดให้ฟังก์ชัน parse_config ฟังก์ชัน parse_config จากนั้นเก็บ
logic ที่กำหนดว่าอาร์กิวเมนต์ไหนไปในตัวแปรไหน และส่งค่ากลับไปยัง
main เรายังสร้างตัวแปร query และ file_path ใน main แต่ main
ไม่มีความรับผิดชอบในการกำหนดว่าอาร์กิวเมนต์ command line และตัวแปร
สอดคล้องกันอย่างไรอีกต่อไป
การทำใหม่นี้อาจดูเกินจำเป็นสำหรับโปรแกรมเล็กของเรา แต่เรากำลัง refactor ในขั้นตอนเล็ก ๆ ทีละนิด หลังจากทำการเปลี่ยนแปลงนี้ รันโปรแกรม อีกครั้งเพื่อตรวจสอบว่า parse อาร์กิวเมนต์ยังทำงาน ดีที่จะตรวจสอบ ความก้าวหน้าของคุณบ่อย ๆ เพื่อช่วยระบุสาเหตุของปัญหาเมื่อพวกมันเกิดขึ้น
จัดกลุ่มค่า Configuration
เราทำอีกขั้นตอนเล็กเพื่อปรับปรุงฟังก์ชัน parse_config เพิ่มเติมได้
ตอนนี้ เรากำลัง return tuple แต่เราแยก tuple นั้นเป็นชิ้นแต่ละชิ้น
ทันที นี่เป็นสัญญาณว่าบางที เรายังไม่มี abstraction ที่ถูกต้อง
ตัวบ่งชี้อีกตัวที่แสดงว่ามีพื้นที่สำหรับการปรับปรุงคือส่วน config ของ
parse_config ซึ่งบ่งบอกว่าสองค่าที่เรา return เกี่ยวข้องกัน และทั้ง
สองเป็นส่วนหนึ่งของค่า configuration เดียว เราไม่ได้สื่อความหมายนี้ใน
โครงสร้างของข้อมูลในตอนนี้ นอกจากการจัดกลุ่มสองค่าเข้า tuple — เรา
จะใส่สองค่าเข้า struct เดียวแทน และให้ field ของ struct แต่ละตัวมีชื่อ
ที่มีความหมาย การทำเช่นนั้นจะทำให้ง่ายขึ้นสำหรับผู้ดูแลในอนาคตของโค้ด
นี้ที่จะเข้าใจว่าค่าต่าง ๆ เกี่ยวข้องกันยังไงและจุดประสงค์ของพวกมันคือ
อะไร
Listing 12-6 แสดงการปรับปรุงฟังก์ชัน parse_config
use std::env;
use std::fs;
fn main() {
let args: Vec<String> = env::args().collect();
let config = parse_config(&args);
println!("Searching for {}", config.query);
println!("In file {}", config.file_path);
let contents = fs::read_to_string(config.file_path)
.expect("Should have been able to read the file");
// --snip--
println!("With text:\n{contents}");
}
struct Config {
query: String,
file_path: String,
}
fn parse_config(args: &[String]) -> Config {
let query = args[1].clone();
let file_path = args[2].clone();
Config { query, file_path }
}parse_config เพื่อ return instance ของ struct Configเราเพิ่ม struct ชื่อ Config ที่นิยามให้มี field ชื่อ query และ
file_path signature ของ parse_config ตอนนี้ระบุว่ามัน return ค่า
Config ใน body ของ parse_config ที่เราเคย return string slice ที่
อ้างถึงค่า String ใน args เราตอนนี้นิยาม Config ให้บรรจุค่า
String ที่ own ตัวแปร args ใน main เป็น owner ของค่าอาร์กิวเมนต์
และให้ฟังก์ชัน parse_config borrow พวกมันเท่านั้น แปลว่าเราจะละเมิด
กฎ borrowing ของ Rust ถ้า Config พยายามรับ ownership ของค่าใน args
มีวิธีหลายอย่างที่เราจัดการข้อมูล String ได้ — วิธีที่ง่ายที่สุด
แม้จะไม่มีประสิทธิภาพอยู่บ้าง คือเรียกเมธอด clone บนค่า สิ่งนี้จะทำ
copy เต็มของข้อมูลให้ instance Config own ซึ่งใช้เวลาและ memory
มากกว่าการเก็บ reference ของข้อมูล string อย่างไรก็ตาม การ clone
ข้อมูลยังทำให้โค้ดของเราตรงไปตรงมามาก เพราะเราไม่ต้องจัดการ lifetime
ของ reference — ในสถานการณ์นี้ ยอมเสีย performance เล็กน้อยเพื่อได้
ความง่ายเป็น trade-off ที่คุ้มค่า
Trade-off ของการใช้ clone
มีแนวโน้มในหมู่ Rustacean หลายคนที่จะหลีกเลี่ยงการใช้ clone เพื่อ
แก้ปัญหา ownership เพราะค่า runtime ของมัน ใน
บทที่ 13 คุณจะเรียนวิธีใช้เมธอดที่มี
ประสิทธิภาพมากกว่าในสถานการณ์ประเภทนี้ แต่ตอนนี้ ก็โอเคที่จะ copy
string สักสองสามตัวเพื่อทำความก้าวหน้าต่อ เพราะคุณจะทำ copy เหล่านี้
เพียงครั้งเดียวและ file path และ query string ของคุณเล็กมาก ดีกว่า
ที่จะมีโปรแกรมที่ทำงานได้แต่ไม่มีประสิทธิภาพหน่อย กว่าที่จะพยายาม
hyperoptimize โค้ดในรอบแรก เมื่อคุณมีประสบการณ์กับ Rust มากขึ้น มัน
จะง่ายขึ้นที่จะเริ่มด้วยคำตอบที่มีประสิทธิภาพที่สุด แต่ตอนนี้
ยอมรับได้สมบูรณ์แบบที่จะเรียก clone
เราอัพเดท main เพื่อให้มันวาง instance ของ Config ที่ return โดย
parse_config ในตัวแปรชื่อ config และเราอัพเดทโค้ดที่ก่อนหน้าใช้
ตัวแปร query และ file_path แยก ให้ใช้ field บน struct Config
แทน
ตอนนี้โค้ดของเราสื่อชัดเจนขึ้นว่า query และ file_path เกี่ยวข้องกัน
และจุดประสงค์ของพวกมันคือ configure ว่าโปรแกรมจะทำงานยังไง โค้ดใดที่
ใช้ค่าเหล่านี้รู้ที่จะหาพวกมันใน instance config ใน field ที่ตั้ง
ชื่อตามจุดประสงค์ของพวกมัน
สร้าง Constructor สำหรับ Config
จนถึงตอนนี้ เราดึง logic ที่รับผิดชอบในการ parse อาร์กิวเมนต์ command
line จาก main และวางในฟังก์ชัน parse_config การทำเช่นนั้นช่วยให้
เราเห็นว่าค่า query และ file_path เกี่ยวข้องกัน และความสัมพันธ์
นั้นควรถูกสื่อในโค้ดของเรา จากนั้นเราเพิ่ม struct Config เพื่อตั้ง
ชื่อจุดประสงค์ที่เกี่ยวข้องของ query และ file_path และเพื่อสามารถ
return ชื่อค่าเป็นชื่อ field ของ struct จากฟังก์ชัน parse_config
ดังนั้น ตอนนี้จุดประสงค์ของฟังก์ชัน parse_config คือสร้าง instance
Config เราเปลี่ยน parse_config จากฟังก์ชันธรรมดาเป็นฟังก์ชันชื่อ
new ที่ associate กับ struct Config ได้ การเปลี่ยนแปลงนี้จะทำให้
โค้ด idiomatic มากขึ้น เราสร้าง instance ของ type ใน standard
library เช่น String ได้โดยเรียก String::new ในทำนองเดียวกัน โดย
เปลี่ยน parse_config เป็นฟังก์ชัน new ที่ associate กับ Config
เราจะสร้าง instance ของ Config ได้โดยเรียก Config::new Listing
12-7 แสดงการเปลี่ยนแปลงที่เราต้องทำ
use std::env;
use std::fs;
fn main() {
let args: Vec<String> = env::args().collect();
let config = Config::new(&args);
println!("Searching for {}", config.query);
println!("In file {}", config.file_path);
let contents = fs::read_to_string(config.file_path)
.expect("Should have been able to read the file");
println!("With text:\n{contents}");
// --snip--
}
// --snip--
struct Config {
query: String,
file_path: String,
}
impl Config {
fn new(args: &[String]) -> Config {
let query = args[1].clone();
let file_path = args[2].clone();
Config { query, file_path }
}
}parse_config เป็น Config::newเราอัพเดท main ที่เรากำลังเรียก parse_config ให้เรียก Config::new
แทน เราเปลี่ยนชื่อ parse_config เป็น new และย้ายมันภายใน block
impl ซึ่ง associate ฟังก์ชัน new กับ Config ลองคอมไพล์โค้ดนี้
อีกครั้งเพื่อให้แน่ใจว่ามันทำงาน
แก้การจัดการ Error
ตอนนี้เราจะทำงานแก้การจัดการ error ของเรา จำได้ว่าการพยายามเข้าถึงค่า
ใน vector args ที่ index 1 หรือ index 2 จะทำให้โปรแกรม panic ถ้า
vector มี item น้อยกว่าสาม ลองรันโปรแกรมโดยไม่มีอาร์กิวเมนต์ — มันจะ
ดูแบบนี้:
$ cargo run
Compiling minigrep v0.1.0 (file:///projects/minigrep)
Finished `dev` profile [unoptimized + debuginfo] target(s) in 0.0s
Running `target/debug/minigrep`
thread 'main' panicked at src/main.rs:27:21:
index out of bounds: the len is 1 but the index is 1
note: run with `RUST_BACKTRACE=1` environment variable to display a backtrace
บรรทัด index out of bounds: the len is 1 but the index is 1 เป็น
ข้อความ error ที่มีไว้สำหรับ programmer มันจะไม่ช่วย end user ของเรา
เข้าใจว่าพวกเขาควรทำอะไรแทน มาแก้ตอนนี้
ปรับปรุงข้อความ Error
ใน Listing 12-8 เราเพิ่มการตรวจสอบในฟังก์ชัน new ที่จะตรวจสอบว่า
slice ยาวพอก่อนเข้าถึง index 1 และ index 2 ถ้า slice ไม่ยาวพอ
โปรแกรม panic และแสดงข้อความ error ที่ดีขึ้น
use std::env;
use std::fs;
fn main() {
let args: Vec<String> = env::args().collect();
let config = Config::new(&args);
println!("Searching for {}", config.query);
println!("In file {}", config.file_path);
let contents = fs::read_to_string(config.file_path)
.expect("Should have been able to read the file");
println!("With text:\n{contents}");
}
struct Config {
query: String,
file_path: String,
}
impl Config {
// --snip--
fn new(args: &[String]) -> Config {
if args.len() < 3 {
panic!("not enough arguments");
}
// --snip--
let query = args[1].clone();
let file_path = args[2].clone();
Config { query, file_path }
}
}โค้ดนี้คล้ายกับ
ฟังก์ชัน Guess::new ที่เราเขียนใน Listing 9-13
ที่เราเรียก panic! เมื่ออาร์กิวเมนต์ value อยู่นอกช่วงค่าที่ valid
แทนที่จะตรวจสอบสำหรับช่วงของค่าที่นี่ เรากำลังตรวจสอบว่าความยาวของ
args อย่างน้อย 3 และส่วนที่เหลือของฟังก์ชันทำงานภายใต้สมมุติฐาน
ว่าเงื่อนไขนี้เป็นจริง ถ้า args มี item น้อยกว่าสาม เงื่อนไขนี้จะ
เป็น true และเราเรียกมาโคร panic! เพื่อจบโปรแกรมทันที
ด้วยโค้ดเพิ่มสองสามบรรทัดใน new มารันโปรแกรมโดยไม่มีอาร์กิวเมนต์
อีกครั้ง เพื่อดูว่า error ดูเป็นยังไงตอนนี้:
$ cargo run
Compiling minigrep v0.1.0 (file:///projects/minigrep)
Finished `dev` profile [unoptimized + debuginfo] target(s) in 0.0s
Running `target/debug/minigrep`
thread 'main' panicked at src/main.rs:26:13:
not enough arguments
note: run with `RUST_BACKTRACE=1` environment variable to display a backtrace
output นี้ดีขึ้น — ตอนนี้เรามีข้อความ error ที่สมเหตุสมผล อย่างไรก็
ตาม เรามีข้อมูลส่วนเกินที่เราไม่ต้องการให้ user ของเรา บางทีเทคนิคที่
เราใช้ใน Listing 9-13 ไม่ใช่ที่ดีที่สุดที่จะใช้ที่นี่ — การเรียก
panic! เหมาะกับปัญหา programming มากกว่าปัญหา usage
ดังที่พูดถึงในบทที่ 9 แทน เรา
จะใช้เทคนิคอีกอย่างที่คุณเรียนในบทที่ 9 —
return Result ที่ระบุความสำเร็จหรือ
error
Return Result แทนการเรียก panic!
แทน เรา return ค่า Result ที่จะบรรจุ instance Config ในกรณี
สำเร็จและจะอธิบายปัญหาในกรณี error ได้ เรายังจะเปลี่ยนชื่อฟังก์ชัน
จาก new เป็น build เพราะ programmer หลายคนคาดหวังให้ฟังก์ชัน
new ไม่ fail เมื่อ Config::build กำลังสื่อสารกับ main เราใช้
type Result เพื่อส่งสัญญาณว่ามีปัญหาได้ จากนั้น เราเปลี่ยน main
เพื่อแปลง variant Err เป็น error ที่ practical มากขึ้นสำหรับ user
ของเราโดยไม่มี text ล้อมรอบเกี่ยวกับ thread 'main' และ
RUST_BACKTRACE ที่การเรียก panic! ก่อให้เกิด
Listing 12-9 แสดงการเปลี่ยนแปลงที่เราต้องทำกับค่า return ของฟังก์ชัน
ที่ตอนนี้เรียก Config::build และ body ของฟังก์ชันที่จำเป็นเพื่อ
return Result สังเกตว่านี่จะไม่คอมไพล์จนกว่าเราจะอัพเดท main ด้วย
ซึ่งเราจะทำใน listing ถัดไป
use std::env;
use std::fs;
fn main() {
let args: Vec<String> = env::args().collect();
let config = Config::new(&args);
println!("Searching for {}", config.query);
println!("In file {}", config.file_path);
let contents = fs::read_to_string(config.file_path)
.expect("Should have been able to read the file");
println!("With text:\n{contents}");
}
struct Config {
query: String,
file_path: String,
}
impl Config {
fn build(args: &[String]) -> Result<Config, &'static str> {
if args.len() < 3 {
return Err("not enough arguments");
}
let query = args[1].clone();
let file_path = args[2].clone();
Ok(Config { query, file_path })
}
}Result จาก Config::buildฟังก์ชัน build ของเรา return Result พร้อม instance Config ใน
กรณีสำเร็จและ string literal ในกรณี error ค่า error ของเราจะเป็น
string literal ที่มี lifetime 'static เสมอ
เราทำสองการเปลี่ยนแปลงใน body ของฟังก์ชัน — แทนที่จะเรียก panic!
เมื่อ user ไม่ส่งอาร์กิวเมนต์เพียงพอ ตอนนี้เรา return ค่า Err และ
เรา wrap ค่า return Config ใน Ok การเปลี่ยนแปลงเหล่านี้ทำให้
ฟังก์ชันสอดคล้องกับ type signature ใหม่ของมัน
การ return ค่า Err จาก Config::build ให้ฟังก์ชัน main จัดการค่า
Result ที่ return จากฟังก์ชัน build และออกจาก process สะอาดขึ้น
ในกรณี error
เรียก Config::build และจัดการ Error
ในการจัดการกรณี error และ print ข้อความที่เป็นมิตรกับ user เราต้อง
อัพเดท main เพื่อจัดการ Result ที่ return โดย Config::build
ดังที่แสดงใน Listing 12-10 เรายังจะรับความรับผิดชอบของการออกจาก
เครื่องมือ command line ด้วย error code ที่ไม่เป็นศูนย์จาก panic!
และ implement มันด้วยมือแทน exit status ที่ไม่เป็นศูนย์เป็นธรรมเนียม
ที่จะส่งสัญญาณไปยัง process ที่เรียกโปรแกรมของเราว่าโปรแกรมออกด้วย
สถานะ error
use std::env;
use std::fs;
use std::process;
fn main() {
let args: Vec<String> = env::args().collect();
let config = Config::build(&args).unwrap_or_else(|err| {
println!("Problem parsing arguments: {err}");
process::exit(1);
});
// --snip--
println!("Searching for {}", config.query);
println!("In file {}", config.file_path);
let contents = fs::read_to_string(config.file_path)
.expect("Should have been able to read the file");
println!("With text:\n{contents}");
}
struct Config {
query: String,
file_path: String,
}
impl Config {
fn build(args: &[String]) -> Result<Config, &'static str> {
if args.len() < 3 {
return Err("not enough arguments");
}
let query = args[1].clone();
let file_path = args[2].clone();
Ok(Config { query, file_path })
}
}Config failใน listing นี้ เราใช้เมธอดที่เรายังไม่ครอบคลุมในรายละเอียด —
unwrap_or_else ซึ่งนิยามบน Result<T, E> โดย standard library การ
ใช้ unwrap_or_else ให้เรานิยามการจัดการ error แบบกำหนดเองที่ไม่ใช่
panic! ถ้า Result เป็นค่า Ok พฤติกรรมของเมธอดนี้คล้ายกับ
unwrap — มัน return ค่าภายในที่ Ok กำลัง wrap อย่างไรก็ตาม ถ้าค่า
เป็นค่า Err เมธอดนี้เรียกโค้ดใน closure ซึ่งเป็นฟังก์ชัน anonymous
ที่เรานิยามและส่งเป็นอาร์กิวเมนต์ให้ unwrap_or_else เราจะครอบคลุม
closure ในรายละเอียดมากขึ้นใน บทที่ 13 ตอนนี้
คุณแค่ต้องรู้ว่า unwrap_or_else จะส่งค่าภายในของ Err ซึ่งในกรณีนี้
คือ string static "not enough arguments" ที่เราเพิ่มใน Listing
12-9 ไปยัง closure ของเราในอาร์กิวเมนต์ err ที่ปรากฏระหว่าง
vertical pipe โค้ดใน closure จากนั้นใช้ค่า err ได้เมื่อมันรัน
เราเพิ่มบรรทัด use ใหม่เพื่อนำ process จาก standard library เข้า
scope โค้ดใน closure ที่จะถูกรันในกรณี error มีเพียงสองบรรทัด — เรา
print ค่า err แล้วเรียก process::exit ฟังก์ชัน process::exit
จะหยุดโปรแกรมทันทีและ return ตัวเลขที่ถูกส่งเป็น exit status code
นี่คล้ายกับการจัดการแบบ panic! ที่เราใช้ใน Listing 12-8 แต่เราไม่
ได้รับ output ส่วนเกินทั้งหมดอีก ลอง:
$ cargo run
Compiling minigrep v0.1.0 (file:///projects/minigrep)
Finished `dev` profile [unoptimized + debuginfo] target(s) in 0.48s
Running `target/debug/minigrep`
Problem parsing arguments: not enough arguments
ดี! output นี้เป็นมิตรกับ user ของเรามากกว่ามาก
ดึง Logic จาก main
ตอนนี้เราเสร็จ refactor การ parse configuration แล้ว มาหันไปยัง logic
ของโปรแกรม ดังที่เราระบุใน
“แยก Concern ในโปรเจกต์ Binary”
เราจะดึงฟังก์ชันชื่อ run ที่จะเก็บ logic ทั้งหมดที่ปัจจุบันอยู่ใน
ฟังก์ชัน main ที่ไม่เกี่ยวข้องกับการตั้งค่า configuration หรือ
จัดการ error เมื่อเราเสร็จ ฟังก์ชัน main จะกระชับและตรวจสอบความ
ถูกต้องโดยการตรวจดูง่าย และเราจะเขียนเทสสำหรับ logic อื่นทั้งหมดได้
Listing 12-11 แสดงการปรับปรุงเล็ก ๆ ทีละนิดของการดึงฟังก์ชัน run
use std::env;
use std::fs;
use std::process;
fn main() {
// --snip--
let args: Vec<String> = env::args().collect();
let config = Config::build(&args).unwrap_or_else(|err| {
println!("Problem parsing arguments: {err}");
process::exit(1);
});
println!("Searching for {}", config.query);
println!("In file {}", config.file_path);
run(config);
}
fn run(config: Config) {
let contents = fs::read_to_string(config.file_path)
.expect("Should have been able to read the file");
println!("With text:\n{contents}");
}
// --snip--
struct Config {
query: String,
file_path: String,
}
impl Config {
fn build(args: &[String]) -> Result<Config, &'static str> {
if args.len() < 3 {
return Err("not enough arguments");
}
let query = args[1].clone();
let file_path = args[2].clone();
Ok(Config { query, file_path })
}
}run ที่บรรจุ logic ที่เหลือของโปรแกรมฟังก์ชัน run ตอนนี้บรรจุ logic ที่เหลือทั้งหมดจาก main เริ่มจาก
การอ่านไฟล์ ฟังก์ชัน run รับ instance Config เป็นอาร์กิวเมนต์
Return Error จาก run
เมื่อ logic โปรแกรมที่เหลือถูกแยกเข้าฟังก์ชัน run เราปรับปรุงการ
จัดการ error ได้ เหมือนที่เราทำกับ Config::build ใน Listing 12-9
แทนที่จะให้โปรแกรม panic โดยเรียก expect ฟังก์ชัน run จะ return
Result<T, E> เมื่อสิ่งใดผิดพลาด นี่จะให้เรารวม logic ในการจัดการ
error เข้า main ในแบบที่เป็นมิตรกับ user เพิ่ม Listing 12-12 แสดง
การเปลี่ยนแปลงที่เราต้องทำกับ signature และ body ของ run
use std::env;
use std::fs;
use std::process;
use std::error::Error;
// --snip--
fn main() {
let args: Vec<String> = env::args().collect();
let config = Config::build(&args).unwrap_or_else(|err| {
println!("Problem parsing arguments: {err}");
process::exit(1);
});
println!("Searching for {}", config.query);
println!("In file {}", config.file_path);
run(config);
}
fn run(config: Config) -> Result<(), Box<dyn Error>> {
let contents = fs::read_to_string(config.file_path)?;
println!("With text:\n{contents}");
Ok(())
}
struct Config {
query: String,
file_path: String,
}
impl Config {
fn build(args: &[String]) -> Result<Config, &'static str> {
if args.len() < 3 {
return Err("not enough arguments");
}
let query = args[1].clone();
let file_path = args[2].clone();
Ok(Config { query, file_path })
}
}run ให้ return Resultเราทำการเปลี่ยนแปลงสำคัญสามอย่างที่นี่ ก่อนอื่น เราเปลี่ยน return type
ของฟังก์ชัน run เป็น Result<(), Box<dyn Error>> ฟังก์ชันนี้
ก่อนหน้านี้ return unit type () และเราเก็บอันนั้นเป็นค่าที่ return
ในกรณี Ok
สำหรับ error type เราใช้ trait object Box<dyn Error> (และเรานำ
std::error::Error เข้า scope ด้วย statement use ที่ด้านบน) เราจะ
ครอบคลุม trait object ใน บทที่ 18 ตอนนี้ แค่
รู้ว่า Box<dyn Error> หมายความว่าฟังก์ชันจะ return type ที่
implement trait Error แต่เราไม่ต้องระบุว่าค่า return จะเป็น type
เฉพาะเจาะจงอะไร นี่ให้เรามีความยืดหยุ่นที่จะ return ค่า error ที่อาจ
เป็น type ต่างกันในกรณี error ต่างกัน keyword dyn ย่อมาจาก
dynamic
ที่สอง เราลบการเรียก expect ในความนิยมของ operator ? ดังที่เรา
พูดถึงใน บทที่ 9 แทนที่จะ
panic! บน error ? จะ return ค่า error จากฟังก์ชันปัจจุบันให้
caller จัดการ
ที่สาม ฟังก์ชัน run ตอนนี้ return ค่า Ok ในกรณีสำเร็จ เราประกาศ
success type ของฟังก์ชัน run เป็น () ใน signature แปลว่าเราต้อง
wrap ค่า unit type ในค่า Ok syntax Ok(()) นี้อาจดูแปลก ๆ ในตอน
แรก แต่การใช้ () แบบนี้เป็นวิธี idiomatic ที่จะระบุว่าเรากำลัง
เรียก run เพื่อ side effect เท่านั้น — มันไม่ return ค่าที่เรา
ต้องการ
เมื่อคุณรันโค้ดนี้ มันจะคอมไพล์แต่จะแสดง warning:
$ cargo run -- the poem.txt
Compiling minigrep v0.1.0 (file:///projects/minigrep)
warning: unused `Result` that must be used
--> src/main.rs:19:5
|
19 | run(config);
| ^^^^^^^^^^^
|
= note: this `Result` may be an `Err` variant, which should be handled
= note: `#[warn(unused_must_use)]` on by default
help: use `let _ = ...` to ignore the resulting value
|
19 | let _ = run(config);
| +++++++
warning: `minigrep` (bin "minigrep") generated 1 warning
Finished `dev` profile [unoptimized + debuginfo] target(s) in 0.71s
Running `target/debug/minigrep the poem.txt`
Searching for the
In file poem.txt
With text:
I'm nobody! Who are you?
Are you nobody, too?
Then there's a pair of us - don't tell!
They'd banish us, you know.
How dreary to be somebody!
How public, like a frog
To tell your name the livelong day
To an admiring bog!
Rust บอกเราว่าโค้ดของเรา ignore ค่า Result และค่า Result อาจระบุ
ว่ามี error เกิดขึ้น แต่เราไม่ได้ตรวจสอบดูว่ามี error หรือไม่ และ
compiler เตือนเราว่าเราน่าจะตั้งใจให้มีโค้ดจัดการ error ที่นี่! มา
แก้ปัญหานั้นตอนนี้
จัดการ Error ที่ Return จาก run ใน main
เราจะตรวจสอบ error และจัดการพวกมันโดยใช้เทคนิคคล้ายกับที่เราใช้กับ
Config::build ใน Listing 12-10 แต่ต่างกันเล็กน้อย:
Filename: src/main.rs
use std::env;
use std::error::Error;
use std::fs;
use std::process;
fn main() {
// --snip--
let args: Vec<String> = env::args().collect();
let config = Config::build(&args).unwrap_or_else(|err| {
println!("Problem parsing arguments: {err}");
process::exit(1);
});
println!("Searching for {}", config.query);
println!("In file {}", config.file_path);
if let Err(e) = run(config) {
println!("Application error: {e}");
process::exit(1);
}
}
fn run(config: Config) -> Result<(), Box<dyn Error>> {
let contents = fs::read_to_string(config.file_path)?;
println!("With text:\n{contents}");
Ok(())
}
struct Config {
query: String,
file_path: String,
}
impl Config {
fn build(args: &[String]) -> Result<Config, &'static str> {
if args.len() < 3 {
return Err("not enough arguments");
}
let query = args[1].clone();
let file_path = args[2].clone();
Ok(Config { query, file_path })
}
}เราใช้ if let แทน unwrap_or_else เพื่อตรวจสอบว่า run return ค่า
Err ไหม และเรียก process::exit(1) ถ้าใช่ ฟังก์ชัน run ไม่ return
ค่าที่เราต้องการ unwrap ในแบบเดียวกับที่ Config::build return
instance Config เพราะ run return () ในกรณีสำเร็จ เราสนใจเฉพาะ
การตรวจจับ error ดังนั้นเราไม่ต้องการ unwrap_or_else ในการ return
ค่าที่ unwrap แล้ว ซึ่งจะเป็นเพียง ()
body ของ if let และฟังก์ชัน unwrap_or_else เหมือนกันในทั้งสอง
กรณี — เรา print error และออก
แยกโค้ดเข้า Library Crate
โปรเจกต์ minigrep ของเราดูดีจนถึงตอนนี้! ตอนนี้เราจะแยกไฟล์
src/main.rs และใส่โค้ดบางส่วนใน src/lib.rs ด้วยวิธีนั้น เราทดสอบ
โค้ดได้ และมีไฟล์ src/main.rs ที่มีความรับผิดชอบน้อยลง
มานิยามโค้ดที่รับผิดชอบในการค้นหา text ใน src/lib.rs แทนใน
src/main.rs ซึ่งจะให้เรา (หรือใครก็ตามอื่นที่ใช้ library minigrep
ของเรา) เรียกฟังก์ชันการค้นหาจากหลาย context มากกว่า binary
minigrep ของเรา
ก่อนอื่น มานิยาม signature ของฟังก์ชัน search ใน src/lib.rs ดังที่
แสดงใน Listing 12-13 พร้อม body ที่เรียกมาโคร unimplemented! เรา
จะอธิบาย signature ในรายละเอียดมากขึ้นเมื่อเราเติม implementation
pub fn search<'a>(query: &str, contents: &'a str) -> Vec<&'a str> {
unimplemented!();
}search ใน src/lib.rsเราใช้ keyword pub บนนิยามฟังก์ชันเพื่อกำหนด search เป็นส่วนหนึ่ง
ของ public API ของ library crate ของเรา ตอนนี้เรามี library crate
ที่เราใช้จาก binary crate ของเราได้และทดสอบได้!
ตอนนี้เราต้องนำโค้ดที่นิยามใน src/lib.rs เข้า scope ของ binary crate ใน src/main.rs และเรียกมัน ดังที่แสดงใน Listing 12-14
use std::env;
use std::error::Error;
use std::fs;
use std::process;
// --snip--
use minigrep::search;
fn main() {
// --snip--
let args: Vec<String> = env::args().collect();
let config = Config::build(&args).unwrap_or_else(|err| {
println!("Problem parsing arguments: {err}");
process::exit(1);
});
if let Err(e) = run(config) {
println!("Application error: {e}");
process::exit(1);
}
}
// --snip--
struct Config {
query: String,
file_path: String,
}
impl Config {
fn build(args: &[String]) -> Result<Config, &'static str> {
if args.len() < 3 {
return Err("not enough arguments");
}
let query = args[1].clone();
let file_path = args[2].clone();
Ok(Config { query, file_path })
}
}
fn run(config: Config) -> Result<(), Box<dyn Error>> {
let contents = fs::read_to_string(config.file_path)?;
for line in search(&config.query, &contents) {
println!("{line}");
}
Ok(())
}search ของ library crate minigrep ใน src/main.rsเราเพิ่มบรรทัด use minigrep::search เพื่อนำฟังก์ชัน search จาก
library crate เข้า scope ของ binary crate จากนั้น ในฟังก์ชัน run
แทนที่จะ print เนื้อหาของไฟล์ เราเรียกฟังก์ชัน search และส่งค่า
config.query และ contents เป็นอาร์กิวเมนต์ จากนั้น run จะใช้
loop for เพื่อ print แต่ละบรรทัดที่ return จาก search ที่ตรงกับ
query นี่ยังเป็นเวลาดีที่จะลบการเรียก println! ในฟังก์ชัน main ที่
แสดง query และ file path เพื่อให้โปรแกรมของเรา print เฉพาะผลค้นหา
(ถ้าไม่มี error เกิดขึ้น)
สังเกตว่าฟังก์ชัน search จะ collect ผลทั้งหมดเข้า vector ที่มัน return ก่อนที่ print ใด ๆ จะเกิดขึ้น implementation นี้อาจช้าในการแสดงผลเมื่อ ค้นหาไฟล์ใหญ่ เพราะผลไม่ถูก print เมื่อพวกมันถูกพบ — เราจะพูดถึงวิธี ที่เป็นไปได้ในการแก้สิ่งนี้โดยใช้ iterator ในบทที่ 13
โอ้ว! นั่นเป็นงานเยอะ แต่เราตั้งตัวเองเพื่อความสำเร็จในอนาคตแล้ว ตอน นี้ง่ายขึ้นมากที่จะจัดการ error และเราทำให้โค้ด modular มากขึ้น เกือบ ทั้งหมดของงานเราจะทำใน src/lib.rs ตั้งแต่ตอนนี้ไป
มาใช้ประโยชน์จาก modularity ที่เพิ่งค้นพบนี้โดยทำสิ่งที่จะยากด้วยโค้ด เก่า แต่ง่ายด้วยโค้ดใหม่ — เราจะเขียนเทสบางตัว!
เพิ่มฟีเจอร์ด้วย TDD
เพิ่ม Functionality ด้วย Test-Driven Development
ตอนนี้เรามี logic การค้นหาใน src/lib.rs แยกจากฟังก์ชัน main แล้ว
มันง่ายขึ้นมากที่จะเขียนเทสสำหรับ functionality หลักของโค้ดของเรา เรา
เรียกฟังก์ชันโดยตรงด้วยอาร์กิวเมนต์ต่าง ๆ และตรวจสอบค่า return โดยไม่
ต้องเรียก binary ของเราจาก command line ได้
ในส่วนนี้ เราจะเพิ่ม logic การค้นหาให้โปรแกรม minigrep โดยใช้
กระบวนการ test-driven development (TDD) ด้วยขั้นตอนต่อไปนี้:
- เขียนเทสที่ fail และรันมันเพื่อให้แน่ใจว่ามัน fail ด้วยเหตุผลที่ คุณคาดหวัง
- เขียนหรือแก้ไขโค้ดเพียงพอที่จะทำให้เทสใหม่ผ่าน
- Refactor โค้ดที่คุณเพิ่งเพิ่มหรือเปลี่ยน และให้แน่ใจว่าเทสยังผ่าน
- ทำซ้ำจากขั้นตอน 1!
แม้มันเป็นเพียงหนึ่งในหลายวิธีในการเขียนซอฟต์แวร์ TDD ช่วยขับเคลื่อน การออกแบบโค้ดได้ การเขียนเทสก่อนที่คุณจะเขียนโค้ดที่ทำให้เทสผ่านช่วย รักษา test coverage สูงตลอดกระบวนการ
เราจะ test-drive implementation ของ functionality ที่จะค้นหา query
string ในเนื้อหาไฟล์จริง ๆ และสร้าง list ของบรรทัดที่ตรงกับ query
เราจะเพิ่ม functionality นี้ในฟังก์ชันชื่อ search
เขียนเทสที่ Fail
ใน src/lib.rs เราจะเพิ่มโมดูล tests พร้อมฟังก์ชันเทส ดังที่เราทำใน
บทที่ 11 ฟังก์ชันเทสระบุพฤติกรรมที่เรา
ต้องการให้ฟังก์ชัน search มี — มันจะรับ query และ text ที่จะค้นหา
และมันจะ return เฉพาะบรรทัดจาก text ที่มี query Listing 12-15 แสดง
เทสนี้
pub fn search<'a>(query: &str, contents: &'a str) -> Vec<&'a str> {
unimplemented!();
}
// --snip--
#[cfg(test)]
mod tests {
use super::*;
#[test]
fn one_result() {
let query = "duct";
let contents = "\
Rust:
safe, fast, productive.
Pick three.";
assert_eq!(vec!["safe, fast, productive."], search(query, contents));
}
}search สำหรับ functionality ที่เราอยากให้มีเทสนี้ค้นหา string "duct" text ที่เรากำลังค้นหามีสามบรรทัด มีเพียง
หนึ่งบรรทัดที่มี "duct" (สังเกตว่า backslash หลังเครื่องหมาย double
quote เปิดบอก Rust ไม่ให้ใส่ตัว newline ที่จุดเริ่มต้นของเนื้อหา
ของ string literal นี้) เรา assert ว่าค่าที่ return จากฟังก์ชัน
search มีเฉพาะบรรทัดที่เราคาดหวัง
ถ้าเรารันเทสนี้ ปัจจุบันมันจะ fail เพราะมาโคร unimplemented! panic
ด้วยข้อความ “not implemented” สอดคล้องกับหลัก TDD เราจะทำขั้นตอนเล็ก
ของการเพิ่มโค้ดเพียงพอที่จะทำให้เทสไม่ panic เมื่อเรียกฟังก์ชัน โดย
นิยามฟังก์ชัน search ให้ return vector ว่างเสมอ ดังที่แสดงใน
Listing 12-16 จากนั้น เทสควรคอมไพล์และ fail เพราะ vector ว่างไม่ตรง
กับ vector ที่บรรจุบรรทัด "safe, fast, productive."
pub fn search<'a>(query: &str, contents: &'a str) -> Vec<&'a str> {
vec![]
}
#[cfg(test)]
mod tests {
use super::*;
#[test]
fn one_result() {
let query = "duct";
let contents = "\
Rust:
safe, fast, productive.
Pick three.";
assert_eq!(vec!["safe, fast, productive."], search(query, contents));
}
}search เพียงพอที่เรียกมันจะไม่ panicตอนนี้มาพูดถึงว่าทำไมเราต้องนิยาม lifetime 'a ชัดเจนใน signature
ของ search และใช้ lifetime นั้นกับอาร์กิวเมนต์ contents และค่า
return จำได้ใน บทที่ 10 ว่า
parameter lifetime ระบุว่า lifetime ของอาร์กิวเมนต์ตัวไหนเชื่อมกับ
lifetime ของค่า return ในกรณีนี้ เราระบุว่า vector ที่ return ควร
บรรจุ string slice ที่อ้างถึง slice ของอาร์กิวเมนต์ contents (ไม่ใช่
อาร์กิวเมนต์ query)
อีกแง่หนึ่ง เราบอก Rust ว่าข้อมูลที่ return โดยฟังก์ชัน search จะ
อยู่ตราบเท่าที่ข้อมูลที่ส่งเข้าฟังก์ชัน search ในอาร์กิวเมนต์
contents สิ่งนี้สำคัญ! ข้อมูลที่อ้างถึง_โดย_ slice ต้อง valid
สำหรับ reference ที่จะ valid — ถ้า compiler สมมติเรากำลังทำ string
slice ของ query ไม่ใช่ contents มันจะทำการตรวจสอบความปลอดภัยของ
มันไม่ถูกต้อง
ถ้าเราลืม annotation lifetime และพยายามคอมไพล์ฟังก์ชันนี้ เราจะได้ error นี้:
$ cargo build
Compiling minigrep v0.1.0 (file:///projects/minigrep)
error[E0106]: missing lifetime specifier
--> src/lib.rs:1:51
|
1 | pub fn search(query: &str, contents: &str) -> Vec<&str> {
| ---- ---- ^ expected named lifetime parameter
|
= help: this function's return type contains a borrowed value, but the signature does not say whether it is borrowed from `query` or `contents`
help: consider introducing a named lifetime parameter
|
1 | pub fn search<'a>(query: &'a str, contents: &'a str) -> Vec<&'a str> {
| ++++ ++ ++ ++
For more information about this error, try `rustc --explain E0106`.
error: could not compile `minigrep` (lib) due to 1 previous error
Rust รู้ไม่ได้ว่า parameter ไหนในสองตัวที่เราต้องการสำหรับ output
ดังนั้นเราต้องบอกมันชัดเจน สังเกตว่า text ช่วยแนะนำให้ระบุ parameter
lifetime เดียวกันสำหรับ parameter ทั้งหมดและ output type ซึ่งไม่ถูก
ต้อง! เพราะ contents เป็น parameter ที่บรรจุ text ทั้งหมดของเรา
และเราต้องการ return ส่วนของ text นั้นที่ตรงกัน เรารู้ว่า contents
เป็น parameter เดียวที่ควรเชื่อมกับค่า return โดยใช้ lifetime syntax
ภาษาโปรแกรมอื่นไม่ต้องการให้คุณเชื่อมอาร์กิวเมนต์กับค่า return ใน signature แต่การปฏิบัตินี้จะง่ายขึ้นเมื่อเวลาผ่านไป คุณอาจต้องการ เปรียบเทียบตัวอย่างนี้กับตัวอย่างในส่วน “ตรวจสอบ Reference ด้วย Lifetime” ในบทที่ 10
เขียนโค้ดเพื่อให้เทสผ่าน
ปัจจุบัน เทสของเรา fail เพราะเรา return vector ว่างเสมอ เพื่อแก้สิ่ง
นั้นและ implement search โปรแกรมของเราต้องทำตามขั้นตอนเหล่านี้:
- iterate ผ่านแต่ละบรรทัดของเนื้อหา
- ตรวจสอบว่าบรรทัดมี query string ของเราไหม
- ถ้ามี เพิ่มมันใน list ของค่าที่เรากำลัง return
- ถ้าไม่มี ไม่ทำอะไร
- Return list ของผลที่ตรงกัน
มาทำงานผ่านแต่ละขั้นตอน เริ่มด้วย iterate ผ่านบรรทัด
Iterate ผ่านบรรทัดด้วยเมธอด lines
Rust มีเมธอดที่ช่วยจัดการ iteration แบบบรรทัดต่อบรรทัดของ string
สะดวกชื่อ lines ที่ทำงานดังที่แสดงใน Listing 12-17 สังเกตว่านี่จะ
ยังไม่คอมไพล์
pub fn search<'a>(query: &str, contents: &'a str) -> Vec<&'a str> {
for line in contents.lines() {
// do something with line
}
}
#[cfg(test)]
mod tests {
use super::*;
#[test]
fn one_result() {
let query = "duct";
let contents = "\
Rust:
safe, fast, productive.
Pick three.";
assert_eq!(vec!["safe, fast, productive."], search(query, contents));
}
}contentsเมธอด lines return iterator เราจะพูดถึง iterator อย่างละเอียดใน
บทที่ 13 แต่จำได้ว่าคุณเห็นวิธีใช้
iterator แบบนี้ใน Listing 3-5 ที่เราใช้
loop for พร้อม iterator เพื่อรันโค้ดบนแต่ละ item ใน collection
ค้นหาแต่ละบรรทัดสำหรับ Query
ถัดไป เราจะตรวจสอบว่าบรรทัดปัจจุบันมี query string ของเราไหม โชคดี
string มีเมธอดที่ช่วยชื่อ contains ที่ทำสิ่งนี้ให้เรา! เพิ่มการ
เรียกเมธอด contains ในฟังก์ชัน search ดังที่แสดงใน Listing 12-18
สังเกตว่านี่ยังจะไม่คอมไพล์
pub fn search<'a>(query: &str, contents: &'a str) -> Vec<&'a str> {
for line in contents.lines() {
if line.contains(query) {
// do something with line
}
}
}
#[cfg(test)]
mod tests {
use super::*;
#[test]
fn one_result() {
let query = "duct";
let contents = "\
Rust:
safe, fast, productive.
Pick three.";
assert_eq!(vec!["safe, fast, productive."], search(query, contents));
}
}query ไหมตอนนี้ เรากำลังสร้าง functionality เพื่อให้โค้ดคอมไพล์ เราต้อง return ค่าจาก body ดังที่เราระบุว่าเราจะทำใน signature ของฟังก์ชัน
เก็บบรรทัดที่ตรงกัน
เพื่อจบฟังก์ชันนี้ เราต้องการวิธีเก็บบรรทัดที่ตรงกันที่เราต้องการ
return สำหรับนั้น เราสร้าง mutable vector ก่อน loop for และเรียก
เมธอด push เพื่อเก็บ line ใน vector ได้ หลัง loop for เรา
return vector ดังที่แสดงใน Listing 12-19
pub fn search<'a>(query: &str, contents: &'a str) -> Vec<&'a str> {
let mut results = Vec::new();
for line in contents.lines() {
if line.contains(query) {
results.push(line);
}
}
results
}
#[cfg(test)]
mod tests {
use super::*;
#[test]
fn one_result() {
let query = "duct";
let contents = "\
Rust:
safe, fast, productive.
Pick three.";
assert_eq!(vec!["safe, fast, productive."], search(query, contents));
}
}ตอนนี้ฟังก์ชัน search ควร return เฉพาะบรรทัดที่มี query และเทส
ของเราควรผ่าน มารันเทส:
$ cargo test
Compiling minigrep v0.1.0 (file:///projects/minigrep)
Finished `test` profile [unoptimized + debuginfo] target(s) in 1.22s
Running unittests src/lib.rs (target/debug/deps/minigrep-9cd200e5fac0fc94)
running 1 test
test tests::one_result ... ok
test result: ok. 1 passed; 0 failed; 0 ignored; 0 measured; 0 filtered out; finished in 0.00s
Running unittests src/main.rs (target/debug/deps/minigrep-9cd200e5fac0fc94)
running 0 tests
test result: ok. 0 passed; 0 failed; 0 ignored; 0 measured; 0 filtered out; finished in 0.00s
Doc-tests minigrep
running 0 tests
test result: ok. 0 passed; 0 failed; 0 ignored; 0 measured; 0 filtered out; finished in 0.00s
เทสของเราผ่าน ดังนั้นเรารู้ว่ามันทำงาน!
ณ จุดนี้ เราพิจารณาโอกาสในการ refactor implementation ของฟังก์ชัน search ในขณะที่รักษาเทสให้ผ่านเพื่อรักษา functionality เดิมได้ โค้ดใน ฟังก์ชัน search ไม่แย่เกินไป แต่มันไม่ได้ใช้ประโยชน์จากฟีเจอร์ที่มี ประโยชน์ของ iterator เราจะกลับมาที่ตัวอย่างนี้ใน บทที่ 13 ที่เราจะสำรวจ iterator ใน รายละเอียด และดูวิธีปรับปรุงมัน
ตอนนี้โปรแกรมทั้งหมดควรทำงาน! ลองดู ก่อนอื่นด้วยคำที่ควร return หนึ่ง บรรทัดพอดีจากบทกวีของ Emily Dickinson — frog
$ cargo run -- frog poem.txt
Compiling minigrep v0.1.0 (file:///projects/minigrep)
Finished `dev` profile [unoptimized + debuginfo] target(s) in 0.38s
Running `target/debug/minigrep frog poem.txt`
How public, like a frog
เจ๋ง! ตอนนี้มาลองคำที่จะตรงหลายบรรทัด เช่น body:
$ cargo run -- body poem.txt
Compiling minigrep v0.1.0 (file:///projects/minigrep)
Finished `dev` profile [unoptimized + debuginfo] target(s) in 0.0s
Running `target/debug/minigrep body poem.txt`
I'm nobody! Who are you?
Are you nobody, too?
How dreary to be somebody!
และสุดท้าย มาทำให้แน่ใจว่าเราไม่ได้บรรทัดใดเมื่อค้นหาคำที่ไม่มีที่ ไหนในบทกวี เช่น monomorphization:
$ cargo run -- monomorphization poem.txt
Compiling minigrep v0.1.0 (file:///projects/minigrep)
Finished `dev` profile [unoptimized + debuginfo] target(s) in 0.0s
Running `target/debug/minigrep monomorphization poem.txt`
ยอดเยี่ยม! เราสร้างเวอร์ชัน mini ของเครื่องมือคลาสสิกของเราเอง และ เรียนรู้มากเกี่ยวกับวิธีจัดโครงสร้าง application เรายังเรียนรู้บ้าง เกี่ยวกับ file input และ output, lifetime, การเทส และการ parse command line
เพื่อจบโปรเจกต์นี้ เราจะสาธิตสั้น ๆ ถึงวิธีทำงานกับ environment variable และวิธี print ไปยัง standard error ทั้งสองอย่างมีประโยชน์ เมื่อคุณเขียนโปรแกรม command line
ใช้งาน environment variable
ใช้งาน Environment Variable
เราจะปรับปรุง binary minigrep โดยเพิ่มฟีเจอร์เพิ่มเติม — option สำหรับ
การค้นหาแบบไม่สนใจตัวพิมพ์ใหญ่/เล็ก ที่ user เปิดได้ผ่าน environment
variable เราทำให้ฟีเจอร์นี้เป็น option บน command line ได้ และต้องการ
ให้ user ใส่ทุกครั้งที่อยากให้ใช้ แต่โดยทำให้มันเป็น environment
variable แทน เราอนุญาตให้ user ของเราตั้ง environment variable ครั้ง
เดียวและให้การค้นหาทั้งหมดของพวกเขาเป็นแบบไม่สนใจตัวพิมพ์ใน session
terminal นั้น
เขียนเทสที่ Fail สำหรับการค้นหาแบบไม่สนใจตัวพิมพ์
ก่อนอื่นเราเพิ่มฟังก์ชันใหม่ search_case_insensitive ให้ library
minigrep ที่จะถูกเรียกเมื่อ environment variable มีค่า เราจะทำตาม
กระบวนการ TDD ต่อ ดังนั้นขั้นตอนแรกอีกครั้งคือเขียนเทสที่ fail เราจะ
เพิ่มเทสใหม่สำหรับฟังก์ชัน search_case_insensitive ใหม่และเปลี่ยน
ชื่อเทสเก่าของเราจาก one_result เป็น case_sensitive เพื่อทำให้
ความแตกต่างระหว่างสองเทสชัดเจน ดังที่แสดงใน Listing 12-20
pub fn search<'a>(query: &str, contents: &'a str) -> Vec<&'a str> {
let mut results = Vec::new();
for line in contents.lines() {
if line.contains(query) {
results.push(line);
}
}
results
}
#[cfg(test)]
mod tests {
use super::*;
#[test]
fn case_sensitive() {
let query = "duct";
let contents = "\
Rust:
safe, fast, productive.
Pick three.
Duct tape.";
assert_eq!(vec!["safe, fast, productive."], search(query, contents));
}
#[test]
fn case_insensitive() {
let query = "rUsT";
let contents = "\
Rust:
safe, fast, productive.
Pick three.
Trust me.";
assert_eq!(
vec!["Rust:", "Trust me."],
search_case_insensitive(query, contents)
);
}
}สังเกตว่าเราแก้ contents ของเทสเก่าด้วย เราเพิ่มบรรทัดใหม่พร้อม text
"Duct tape." โดยใช้ตัว D ใหญ่ที่ไม่ควรตรงกับ query "duct" เมื่อ
เรากำลังค้นหาแบบสนใจตัวพิมพ์ การเปลี่ยนเทสเก่าแบบนี้ช่วยให้แน่ใจว่า
เราไม่ทำลาย functionality การค้นหาแบบสนใจตัวพิมพ์ที่เรา implement ไป
แล้วโดยบังเอิญ เทสนี้ควรผ่านตอนนี้และควรผ่านต่อเนื่องในขณะที่เราทำงาน
กับการค้นหาแบบไม่สนใจตัวพิมพ์
เทสใหม่สำหรับการค้นหาแบบ_ไม่สนใจตัวพิมพ์_ใช้ "rUsT" เป็น query ของ
มัน ในฟังก์ชัน search_case_insensitive ที่เรากำลังจะเพิ่ม query
"rUsT" ควรตรงกับบรรทัดที่มี "Rust:" ที่มีตัว R ใหญ่ และตรงกับ
บรรทัด "Trust me." แม้ทั้งคู่จะมีตัวพิมพ์ต่างจาก query นี่คือเทสที่
fail ของเรา และมันจะ fail ที่จะคอมไพล์เพราะเรายังไม่ได้นิยามฟังก์ชัน
search_case_insensitive รู้สึกอิสระที่จะเพิ่ม implementation
โครงร่างที่ return vector ว่างเสมอ คล้ายกับวิธีที่เราทำกับฟังก์ชัน
search ใน Listing 12-16 เพื่อดูเทสคอมไพล์และ fail
Implement ฟังก์ชัน search_case_insensitive
ฟังก์ชัน search_case_insensitive ที่แสดงใน Listing 12-21 จะเกือบ
เหมือนกับฟังก์ชัน search ความแตกต่างเดียวคือเราจะเปลี่ยน query
และแต่ละ line ให้เป็นตัวพิมพ์เล็ก เพื่อให้ไม่ว่าตัวพิมพ์ของ
อาร์กิวเมนต์ input จะเป็นอะไร พวกมันจะเป็นตัวพิมพ์เดียวกันเมื่อเรา
ตรวจสอบว่าบรรทัดมี query
pub fn search<'a>(query: &str, contents: &'a str) -> Vec<&'a str> {
let mut results = Vec::new();
for line in contents.lines() {
if line.contains(query) {
results.push(line);
}
}
results
}
pub fn search_case_insensitive<'a>(
query: &str,
contents: &'a str,
) -> Vec<&'a str> {
let query = query.to_lowercase();
let mut results = Vec::new();
for line in contents.lines() {
if line.to_lowercase().contains(&query) {
results.push(line);
}
}
results
}
#[cfg(test)]
mod tests {
use super::*;
#[test]
fn case_sensitive() {
let query = "duct";
let contents = "\
Rust:
safe, fast, productive.
Pick three.
Duct tape.";
assert_eq!(vec!["safe, fast, productive."], search(query, contents));
}
#[test]
fn case_insensitive() {
let query = "rUsT";
let contents = "\
Rust:
safe, fast, productive.
Pick three.
Trust me.";
assert_eq!(
vec!["Rust:", "Trust me."],
search_case_insensitive(query, contents)
);
}
}search_case_insensitive ให้เปลี่ยน query และ line ให้เป็นตัวพิมพ์เล็กก่อนเปรียบเทียบก่อนอื่น เราเปลี่ยน string query เป็นตัวพิมพ์เล็กและเก็บมันใน
ตัวแปรใหม่ที่ชื่อเดียวกัน shadowing query เดิม การเรียก
to_lowercase บน query จำเป็นเพื่อให้ไม่ว่า query ของ user คือ
"rust", "RUST", "Rust" หรือ "rUsT" เราจะปฏิบัติกับ query
เหมือนว่ามันเป็น "rust" และไม่สนใจตัวพิมพ์ ในขณะที่ to_lowercase
จะจัดการ Unicode พื้นฐาน มันจะไม่แม่นยำ 100 เปอร์เซ็นต์ ถ้าเราเขียน
application จริง เราจะอยากทำงานเพิ่มที่นี่หน่อย แต่ส่วนนี้เกี่ยวกับ
environment variable ไม่ใช่ Unicode เราจะปล่อยไว้แค่นั้นที่นี่
สังเกตว่า query ตอนนี้เป็น String ไม่ใช่ string slice เพราะการ
เรียก to_lowercase สร้างข้อมูลใหม่ไม่ใช่อ้างถึงข้อมูลที่มีอยู่
สมมติ query เป็น "rUsT" เป็นตัวอย่าง — string slice นั้นไม่มีตัวเล็ก
u หรือ t ให้เราใช้ ดังนั้นเราต้อง allocate String ใหม่ที่บรรจุ
"rust" เมื่อเราส่ง query เป็นอาร์กิวเมนต์ให้เมธอด contains
ตอนนี้ เราต้องเพิ่ม ampersand เพราะ signature ของ contains นิยาม
ให้รับ string slice
ถัดไป เราเพิ่มการเรียก to_lowercase บนแต่ละ line เพื่อเปลี่ยน
character ทั้งหมดเป็นตัวพิมพ์เล็ก ตอนนี้เราเปลี่ยน line และ query
เป็นตัวพิมพ์เล็กแล้ว เราจะหาคู่ที่ตรงไม่ว่า query จะเป็นตัวพิมพ์อะไร
มาดูว่า implementation นี้ผ่านเทสไหม:
$ cargo test
Compiling minigrep v0.1.0 (file:///projects/minigrep)
Finished `test` profile [unoptimized + debuginfo] target(s) in 1.33s
Running unittests src/lib.rs (target/debug/deps/minigrep-9cd200e5fac0fc94)
running 2 tests
test tests::case_insensitive ... ok
test tests::case_sensitive ... ok
test result: ok. 2 passed; 0 failed; 0 ignored; 0 measured; 0 filtered out; finished in 0.00s
Running unittests src/main.rs (target/debug/deps/minigrep-9cd200e5fac0fc94)
running 0 tests
test result: ok. 0 passed; 0 failed; 0 ignored; 0 measured; 0 filtered out; finished in 0.00s
Doc-tests minigrep
running 0 tests
test result: ok. 0 passed; 0 failed; 0 ignored; 0 measured; 0 filtered out; finished in 0.00s
ดี! พวกมันผ่าน ตอนนี้มาเรียกฟังก์ชันใหม่ search_case_insensitive จาก
ฟังก์ชัน run ก่อนอื่น เราจะเพิ่ม option configuration ให้ struct
Config เพื่อสลับระหว่างการค้นหาแบบสนใจตัวพิมพ์และไม่สนใจ การเพิ่ม
field นี้จะทำให้เกิด error ของ compiler เพราะเรายังไม่ได้ initialize
field นี้ที่ไหน:
Filename: src/main.rs
use std::env;
use std::error::Error;
use std::fs;
use std::process;
use minigrep::{search, search_case_insensitive};
// --snip--
fn main() {
let args: Vec<String> = env::args().collect();
let config = Config::build(&args).unwrap_or_else(|err| {
println!("Problem parsing arguments: {err}");
process::exit(1);
});
if let Err(e) = run(config) {
println!("Application error: {e}");
process::exit(1);
}
}
pub struct Config {
pub query: String,
pub file_path: String,
pub ignore_case: bool,
}
impl Config {
fn build(args: &[String]) -> Result<Config, &'static str> {
if args.len() < 3 {
return Err("not enough arguments");
}
let query = args[1].clone();
let file_path = args[2].clone();
Ok(Config { query, file_path })
}
}
fn run(config: Config) -> Result<(), Box<dyn Error>> {
let contents = fs::read_to_string(config.file_path)?;
let results = if config.ignore_case {
search_case_insensitive(&config.query, &contents)
} else {
search(&config.query, &contents)
};
for line in results {
println!("{line}");
}
Ok(())
}เราเพิ่ม field ignore_case ที่เก็บ Boolean ถัดไป เราต้องการให้
ฟังก์ชัน run ตรวจสอบค่าของ field ignore_case และใช้นั้นเพื่อ
ตัดสินว่าจะเรียกฟังก์ชัน search หรือ search_case_insensitive ดัง
ที่แสดงใน Listing 12-22 นี่ยังจะไม่คอมไพล์
use std::env;
use std::error::Error;
use std::fs;
use std::process;
use minigrep::{search, search_case_insensitive};
// --snip--
fn main() {
let args: Vec<String> = env::args().collect();
let config = Config::build(&args).unwrap_or_else(|err| {
println!("Problem parsing arguments: {err}");
process::exit(1);
});
if let Err(e) = run(config) {
println!("Application error: {e}");
process::exit(1);
}
}
pub struct Config {
pub query: String,
pub file_path: String,
pub ignore_case: bool,
}
impl Config {
fn build(args: &[String]) -> Result<Config, &'static str> {
if args.len() < 3 {
return Err("not enough arguments");
}
let query = args[1].clone();
let file_path = args[2].clone();
Ok(Config { query, file_path })
}
}
fn run(config: Config) -> Result<(), Box<dyn Error>> {
let contents = fs::read_to_string(config.file_path)?;
let results = if config.ignore_case {
search_case_insensitive(&config.query, &contents)
} else {
search(&config.query, &contents)
};
for line in results {
println!("{line}");
}
Ok(())
}search หรือ search_case_insensitive ตามค่าใน config.ignore_caseสุดท้าย เราต้องตรวจสอบ environment variable ฟังก์ชันสำหรับทำงานกับ
environment variable อยู่ในโมดูล env ใน standard library ซึ่งอยู่ใน
scope แล้วที่ด้านบนของ src/main.rs เราจะใช้ฟังก์ชัน var จาก
โมดูล env เพื่อตรวจสอบดูว่ามีค่าใดถูกตั้งสำหรับ environment variable
ชื่อ IGNORE_CASE ดังที่แสดงใน Listing 12-23
use std::env;
use std::error::Error;
use std::fs;
use std::process;
use minigrep::{search, search_case_insensitive};
fn main() {
let args: Vec<String> = env::args().collect();
let config = Config::build(&args).unwrap_or_else(|err| {
println!("Problem parsing arguments: {err}");
process::exit(1);
});
if let Err(e) = run(config) {
println!("Application error: {e}");
process::exit(1);
}
}
pub struct Config {
pub query: String,
pub file_path: String,
pub ignore_case: bool,
}
impl Config {
fn build(args: &[String]) -> Result<Config, &'static str> {
if args.len() < 3 {
return Err("not enough arguments");
}
let query = args[1].clone();
let file_path = args[2].clone();
let ignore_case = env::var("IGNORE_CASE").is_ok();
Ok(Config {
query,
file_path,
ignore_case,
})
}
}
fn run(config: Config) -> Result<(), Box<dyn Error>> {
let contents = fs::read_to_string(config.file_path)?;
let results = if config.ignore_case {
search_case_insensitive(&config.query, &contents)
} else {
search(&config.query, &contents)
};
for line in results {
println!("{line}");
}
Ok(())
}IGNORE_CASEที่นี่ เราสร้างตัวแปรใหม่ ignore_case เพื่อตั้งค่าของมัน เราเรียก
ฟังก์ชัน env::var และส่งชื่อของ environment variable IGNORE_CASE
ให้ ฟังก์ชัน env::var return Result ที่จะเป็น variant Ok ที่
สำเร็จที่บรรจุค่าของ environment variable ถ้า environment variable
ถูกตั้งเป็นค่าใด ๆ มันจะ return variant Err ถ้า environment
variable ไม่ถูกตั้ง
เราใช้เมธอด is_ok บน Result เพื่อตรวจสอบว่า environment variable
ถูกตั้งไหม ซึ่งหมายความว่าโปรแกรมควรทำการค้นหาแบบไม่สนใจตัวพิมพ์ ถ้า
environment variable IGNORE_CASE ไม่ถูกตั้งเป็นอะไร is_ok จะ
return false และโปรแกรมจะทำการค้นหาแบบสนใจตัวพิมพ์ เราไม่สนใจ
ค่า ของ environment variable แค่ว่ามันถูกตั้งหรือไม่ ดังนั้นเรา
ตรวจสอบ is_ok แทนการใช้ unwrap, expect หรือเมธอดอื่นที่เราเห็น
บน Result
เราส่งค่าในตัวแปร ignore_case ให้ instance Config เพื่อให้
ฟังก์ชัน run อ่านค่านั้นและตัดสินว่าจะเรียก
search_case_insensitive หรือ search ดังที่เรา implement ใน
Listing 12-22
มาลองกัน! ก่อนอื่น เราจะรันโปรแกรมของเราโดยไม่ตั้ง environment
variable และด้วย query to ซึ่งควรตรงกับบรรทัดใดที่มีคำ to ใน
ตัวพิมพ์เล็กทั้งหมด:
$ cargo run -- to poem.txt
Compiling minigrep v0.1.0 (file:///projects/minigrep)
Finished `dev` profile [unoptimized + debuginfo] target(s) in 0.0s
Running `target/debug/minigrep to poem.txt`
Are you nobody, too?
How dreary to be somebody!
ดูเหมือนยังทำงาน! ตอนนี้มารันโปรแกรมด้วย IGNORE_CASE ตั้งเป็น 1
แต่ด้วย query เดียวกัน to:
$ IGNORE_CASE=1 cargo run -- to poem.txt
ถ้าคุณใช้ PowerShell คุณต้องตั้ง environment variable และรันโปรแกรม เป็นคำสั่งแยก:
PS> $Env:IGNORE_CASE=1; cargo run -- to poem.txt
นี่จะทำให้ IGNORE_CASE ยังคงอยู่ตลอดส่วนที่เหลือของ session shell
ของคุณ มันถูก unset ได้ด้วย cmdlet Remove-Item:
PS> Remove-Item Env:IGNORE_CASE
เราควรได้บรรทัดที่มี to ที่อาจมีตัวอักษรพิมพ์ใหญ่:
Are you nobody, too?
How dreary to be somebody!
To tell your name the livelong day
To an admiring bog!
ยอดเยี่ยม เรายังได้บรรทัดที่มี To! โปรแกรม minigrep ของเราตอนนี้
ทำการค้นหาแบบไม่สนใจตัวพิมพ์ที่ควบคุมโดย environment variable ได้
ตอนนี้คุณรู้วิธีจัดการ option ที่ถูกตั้งโดยใช้อาร์กิวเมนต์ command
line หรือ environment variable
บางโปรแกรมอนุญาตให้ใช้อาร์กิวเมนต์ และ environment variable สำหรับ configuration เดียวกัน ในกรณีเหล่านั้น โปรแกรมตัดสินว่าอันใดอันหนึ่ง มีความสำคัญกว่า สำหรับการฝึกอื่นด้วยตัวคุณเอง ลองควบคุมความ sensitive ของตัวพิมพ์ผ่านอาร์กิวเมนต์ command line หรือ environment variable ตัดสินว่าอาร์กิวเมนต์ command line หรือ environment variable ควรมีความสำคัญกว่าถ้าโปรแกรมถูกรันด้วยอันหนึ่งตั้งเป็นสนใจ ตัวพิมพ์และอีกอันตั้งเป็นไม่สนใจ
โมดูล std::env มีฟีเจอร์ที่มีประโยชน์อีกมากในการจัดการ environment
variable — ดู documentation ของมันเพื่อดูว่ามีอะไรให้ใช้
Redirect error ไปยัง standard error
Redirect Error ไปยัง Standard Error
ตอนนี้ เราเขียน output ทั้งหมดของเราไปยัง terminal โดยใช้มาโคร
println! ใน terminal ส่วนใหญ่ มี output สองประเภท — standard output
(stdout) สำหรับข้อมูลทั่วไป และ standard error (stderr) สำหรับ
ข้อความ error ความแตกต่างนี้ทำให้ user เลือกที่จะ direct output ที่
สำเร็จของโปรแกรมไปยังไฟล์ในขณะที่ยัง print ข้อความ error ไปยังหน้าจอ
ได้
มาโคร println! สามารถ print เฉพาะไปยัง standard output ดังนั้นเรา
ต้องใช้อย่างอื่นเพื่อ print ไปยัง standard error
ตรวจสอบว่า Error เขียนไปที่ไหน
ก่อนอื่น มาสังเกตว่าเนื้อหาที่ minigrep print ปัจจุบันถูกเขียนไปยัง
standard output อย่างไร รวมข้อความ error ใด ๆ ที่เราต้องการเขียนไปยัง
standard error แทน เราจะทำเช่นนั้นโดย redirect standard output stream
ไปยังไฟล์ในขณะที่จงใจทำให้เกิด error เราจะไม่ redirect standard error
stream ดังนั้นเนื้อหาใดที่ส่งไปยัง standard error จะยังแสดงบนหน้าจอ
ต่อไป
โปรแกรม command line คาดหวังที่จะส่งข้อความ error ไปยัง standard error stream เพื่อให้เรายังเห็นข้อความ error บนหน้าจอแม้ว่าเรา redirect standard output stream ไปยังไฟล์ โปรแกรมของเราตอนนี้ทำตัวไม่ดี — เรา กำลังจะเห็นว่ามันบันทึก output ข้อความ error ไปยังไฟล์แทน!
เพื่อสาธิตพฤติกรรมนี้ เราจะรันโปรแกรมด้วย > และ file path
output.txt ที่เราต้องการ redirect standard output stream ไป เรา
จะไม่ส่งอาร์กิวเมนต์ใด ซึ่งควรทำให้เกิด error:
$ cargo run > output.txt
syntax > บอก shell ให้เขียนเนื้อหาของ standard output ไปยัง
output.txt แทนหน้าจอ เราไม่ได้เห็นข้อความ error ที่เราคาดหวัง print
ไปยังหน้าจอ ดังนั้นมันต้องไปสิ้นสุดในไฟล์ นี่คือสิ่งที่ output.txt
มี:
Problem parsing arguments: not enough arguments
ใช่ ข้อความ error ของเรากำลังถูก print ไปยัง standard output มีประโยชน์ มากกว่าสำหรับข้อความ error แบบนี้ที่จะถูก print ไปยัง standard error เพื่อให้เฉพาะข้อมูลจากการรันที่สำเร็จไปสิ้นสุดในไฟล์ เราจะเปลี่ยนนั้น
Print Error ไปยัง Standard Error
เราจะใช้โค้ดใน Listing 12-24 เพื่อเปลี่ยนวิธีที่ข้อความ error ถูก
print เพราะ refactor ที่เราทำไปแล้วในบทนี้ โค้ดทั้งหมดที่ print
ข้อความ error อยู่ในฟังก์ชันเดียว main standard library ให้มาโคร
eprintln! ที่ print ไปยัง standard error stream ดังนั้นมาเปลี่ยน
สองที่ที่เรากำลังเรียก println! เพื่อ print error ให้ใช้
eprintln! แทน
use std::env;
use std::error::Error;
use std::fs;
use std::process;
use minigrep::{search, search_case_insensitive};
fn main() {
let args: Vec<String> = env::args().collect();
let config = Config::build(&args).unwrap_or_else(|err| {
eprintln!("Problem parsing arguments: {err}");
process::exit(1);
});
if let Err(e) = run(config) {
eprintln!("Application error: {e}");
process::exit(1);
}
}
pub struct Config {
pub query: String,
pub file_path: String,
pub ignore_case: bool,
}
impl Config {
fn build(args: &[String]) -> Result<Config, &'static str> {
if args.len() < 3 {
return Err("not enough arguments");
}
let query = args[1].clone();
let file_path = args[2].clone();
let ignore_case = env::var("IGNORE_CASE").is_ok();
Ok(Config {
query,
file_path,
ignore_case,
})
}
}
fn run(config: Config) -> Result<(), Box<dyn Error>> {
let contents = fs::read_to_string(config.file_path)?;
let results = if config.ignore_case {
search_case_insensitive(&config.query, &contents)
} else {
search(&config.query, &contents)
};
for line in results {
println!("{line}");
}
Ok(())
}eprintln!ตอนนี้มารันโปรแกรมอีกครั้งในแบบเดิม โดยไม่มีอาร์กิวเมนต์และ redirect
standard output ด้วย >:
$ cargo run > output.txt
Problem parsing arguments: not enough arguments
ตอนนี้เราเห็น error บนหน้าจอและ output.txt ไม่มีอะไร ซึ่งเป็น พฤติกรรมที่เราคาดหวังของโปรแกรม command line
มารันโปรแกรมอีกครั้งด้วยอาร์กิวเมนต์ที่ไม่ทำให้เกิด error แต่ยัง redirect standard output ไปยังไฟล์ แบบนี้:
$ cargo run -- to poem.txt > output.txt
เราจะไม่เห็น output ใด ๆ ที่ terminal และ output.txt จะบรรจุผลของ เรา:
Filename: output.txt
Are you nobody, too?
How dreary to be somebody!
นี่สาธิตว่าตอนนี้เราใช้ standard output สำหรับ output ที่สำเร็จและ standard error สำหรับ output error ตามที่เหมาะสม
สรุป
บทนี้ทบทวนแนวคิดหลักบางอย่างที่คุณได้เรียนมา และครอบคลุมวิธีทำ
operation I/O ทั่วไปใน Rust โดยใช้อาร์กิวเมนต์ command line, ไฟล์,
environment variable และมาโคร eprintln! สำหรับ print error คุณ
พร้อมที่จะเขียน application command line ตอนนี้ ผสมกับแนวคิดในบทก่อน
หน้า โค้ดของคุณจะถูกจัดระเบียบดี เก็บข้อมูลอย่างมีประสิทธิภาพในโครงสร้าง
ข้อมูลที่เหมาะสม จัดการ error อย่างดี และถูกทดสอบดี
ถัดไป เราจะสำรวจฟีเจอร์ Rust บางอย่างที่ได้รับอิทธิพลจากภาษา functional — closure และ iterator
Functional Language Features: Iterator และ Closure
การออกแบบของ Rust ได้รับแรงบันดาลใจจากภาษาและเทคนิคที่มีอยู่หลายตัว และอิทธิพลที่สำคัญหนึ่งคือ functional programming การ programming ในสไตล์ functional มักรวมการใช้ฟังก์ชันเป็นค่าโดยส่งพวกมันในอาร์กิวเมนต์, return พวกมันจากฟังก์ชันอื่น, assign พวกมันให้ตัวแปรเพื่อ execute ภายหลัง และอื่น ๆ
ในบทนี้ เราจะไม่ถกเถียงประเด็นว่า functional programming คืออะไรหรือ ไม่ใช่ แต่จะพูดถึงฟีเจอร์บางอย่างของ Rust ที่คล้ายกับฟีเจอร์ในหลาย ภาษาที่มักถูกเรียกว่า functional
เจาะจงมากขึ้น เราจะครอบคลุม:
- Closure โครงสร้างคล้ายฟังก์ชันที่คุณเก็บในตัวแปรได้
- Iterator วิธีในการประมวลผลชุดของ element
- วิธีใช้ closure และ iterator เพื่อปรับปรุงโปรเจกต์ I/O ในบทที่ 12
- Performance ของ closure และ iterator (spoiler alert — พวกมันเร็วกว่า ที่คุณคิด!)
เราครอบคลุมฟีเจอร์ Rust อื่นบางอย่างไปแล้ว เช่น pattern matching และ enum ที่ได้รับอิทธิพลจากสไตล์ functional ด้วย เพราะการเก่ง closure และ iterator เป็นส่วนสำคัญในการเขียนโค้ด Rust ที่เร็วและ idiomatic เราจะ อุทิศบททั้งบทนี้ให้พวกมัน
Closure
Closure
Closure ของ Rust คือฟังก์ชัน anonymous ที่คุณบันทึกในตัวแปรหรือส่ง เป็นอาร์กิวเมนต์ให้ฟังก์ชันอื่นได้ คุณสร้าง closure ในที่หนึ่งและ เรียก closure ที่อื่นเพื่อประเมินมันใน context ที่ต่างได้ ต่างจาก ฟังก์ชัน closure จับค่าจาก scope ที่พวกมันถูกนิยามได้ เราจะสาธิตว่า ฟีเจอร์ closure เหล่านี้อนุญาตให้ใช้โค้ดซ้ำและกำหนดพฤติกรรมเองได้ อย่างไร
จับ Environment
เราจะตรวจสอบก่อนว่าเราใช้ closure จับค่าจาก environment ที่พวกมันถูก นิยามเพื่อใช้ภายหลังได้อย่างไร นี่คือ scenario — เป็นบางครั้ง บริษัท T-shirt ของเราแจกเสื้อ limited-edition พิเศษให้ใครบางคนใน mailing list ของเราเป็นการ promotion คนใน mailing list ใส่สีโปรดของพวกเขาใน profile ได้ ถ้าคนที่ถูกเลือกสำหรับเสื้อฟรีมีสีโปรดที่ตั้งไว้ พวกเขา จะได้เสื้อสีนั้น ถ้าคนนั้นไม่ได้ระบุสีโปรด พวกเขาจะได้สีอะไรก็ตามที่ บริษัทมีมากที่สุดในปัจจุบัน
มีวิธี implement สิ่งนี้หลายอย่าง สำหรับตัวอย่างนี้ เราจะใช้ enum
ชื่อ ShirtColor ที่มี variant Red และ Blue (จำกัดจำนวนสีที่มี
ให้ใช้เพื่อความง่าย) เราแทน inventory ของบริษัทด้วย struct
Inventory ที่มี field ชื่อ shirts ที่บรรจุ Vec<ShirtColor> ที่
แทนสีเสื้อที่มีใน stock ปัจจุบัน เมธอด giveaway ที่นิยามบน
Inventory รับค่าความชอบสีเสื้อที่เป็น optional ของผู้ชนะเสื้อฟรี
และมัน return สีเสื้อที่คนจะได้ การ setup นี้แสดงใน Listing 13-1
#[derive(Debug, PartialEq, Copy, Clone)]
enum ShirtColor {
Red,
Blue,
}
struct Inventory {
shirts: Vec<ShirtColor>,
}
impl Inventory {
fn giveaway(&self, user_preference: Option<ShirtColor>) -> ShirtColor {
user_preference.unwrap_or_else(|| self.most_stocked())
}
fn most_stocked(&self) -> ShirtColor {
let mut num_red = 0;
let mut num_blue = 0;
for color in &self.shirts {
match color {
ShirtColor::Red => num_red += 1,
ShirtColor::Blue => num_blue += 1,
}
}
if num_red > num_blue {
ShirtColor::Red
} else {
ShirtColor::Blue
}
}
}
fn main() {
let store = Inventory {
shirts: vec![ShirtColor::Blue, ShirtColor::Red, ShirtColor::Blue],
};
let user_pref1 = Some(ShirtColor::Red);
let giveaway1 = store.giveaway(user_pref1);
println!(
"The user with preference {:?} gets {:?}",
user_pref1, giveaway1
);
let user_pref2 = None;
let giveaway2 = store.giveaway(user_pref2);
println!(
"The user with preference {:?} gets {:?}",
user_pref2, giveaway2
);
}store ที่นิยามใน main มีเสื้อสีน้ำเงินสองตัวและเสื้อสีแดงหนึ่ง
ตัวที่เหลือสำหรับแจกใน promotion limited-edition นี้ เราเรียกเมธอด
giveaway สำหรับ user ที่มีความชอบเสื้อสีแดงและ user ที่ไม่มีความ
ชอบ
อีกครั้ง โค้ดนี้ implement ได้หลายวิธี และที่นี่เพื่อโฟกัสที่
closure เราติดกับแนวคิดที่คุณได้เรียนมาแล้ว ยกเว้น body ของเมธอด
giveaway ที่ใช้ closure ในเมธอด giveaway เรารับความชอบของ user
เป็น parameter type Option<ShirtColor> และเรียกเมธอด
unwrap_or_else บน user_preference เมธอด unwrap_or_else บน
Option<T> นิยามโดย standard library
มันรับหนึ่งอาร์กิวเมนต์ — closure ที่ไม่มีอาร์กิวเมนต์ที่ return ค่า
T (type เดียวกับที่เก็บใน variant Some ของ Option<T> ในกรณีนี้
คือ ShirtColor) ถ้า Option<T> เป็น variant Some unwrap_or_else
return ค่าจากภายใน Some ถ้า Option<T> เป็น variant None
unwrap_or_else เรียก closure และ return ค่าที่ return โดย closure
เราระบุ closure expression || self.most_stocked() เป็นอาร์กิวเมนต์
ให้ unwrap_or_else นี่คือ closure ที่ไม่รับ parameter เอง (ถ้า
closure มี parameter พวกมันจะปรากฏระหว่าง vertical pipe สองตัว)
body ของ closure เรียก self.most_stocked() เรากำลังนิยาม closure
ที่นี่ และ implementation ของ unwrap_or_else จะประเมิน closure
ภายหลังเมื่อจำเป็น
การรันโค้ดนี้ print ต่อไปนี้:
$ cargo run
Compiling shirt-company v0.1.0 (file:///projects/shirt-company)
Finished `dev` profile [unoptimized + debuginfo] target(s) in 0.27s
Running `target/debug/shirt-company`
The user with preference Some(Red) gets Red
The user with preference None gets Blue
แง่มุมที่น่าสนใจที่นี่คือเราได้ส่ง closure ที่เรียก
self.most_stocked() บน instance Inventory ปัจจุบัน standard
library ไม่ต้องรู้อะไรเกี่ยวกับ type Inventory หรือ ShirtColor
ที่เรานิยาม หรือ logic ที่เราต้องการใช้ใน scenario นี้ closure จับ
immutable reference ของ self instance Inventory และส่งมันพร้อม
โค้ดที่เราระบุให้เมธอด unwrap_or_else ฟังก์ชัน ในทางกลับกัน จับ
environment ของพวกมันในแบบนี้ไม่ได้
Infer และ Annotate Type ของ Closure
มีความแตกต่างมากกว่าระหว่างฟังก์ชันและ closure โดยปกติ closure ไม่
ต้องให้คุณ annotate type ของ parameter หรือค่า return เหมือนที่
ฟังก์ชัน fn ต้อง type annotation จำเป็นบนฟังก์ชันเพราะ type เป็น
ส่วนหนึ่งของ interface ชัดเจนที่ expose ให้ user ของคุณ การนิยาม
interface นี้อย่างเข้มงวดสำคัญในการรับประกันว่าทุกคนเห็นด้วยกับ type
ของค่าที่ฟังก์ชันใช้และ return closure ในทางกลับกัน ไม่ถูกใช้ใน
interface ที่ expose แบบนี้ — พวกมันถูกเก็บในตัวแปร และถูกใช้โดยไม่
ต้องตั้งชื่อและ expose พวกมันให้ user ของ library เรา
Closure มักสั้นและเกี่ยวข้องเฉพาะใน context แคบ ๆ ไม่ใช่ใน scenario ตามอำเภอใจใด ๆ ภายใน context จำกัดเหล่านี้ compiler infer type ของ parameter และ return type ได้ คล้ายกับวิธีที่มัน infer type ของตัวแปร ส่วนใหญ่ได้ (มีกรณีที่หายากที่ compiler ต้องการ closure type annotation ด้วย)
เช่นเดียวกับตัวแปร เราเพิ่ม type annotation ได้ถ้าเราต้องการเพิ่ม ความชัดเจนแต่ค่าคือ verbose มากกว่าที่จำเป็นจริง ๆ การ annotate type สำหรับ closure จะดูเหมือนนิยามที่แสดงใน Listing 13-2 ในตัวอย่าง นี้ เรากำลังนิยาม closure และเก็บมันในตัวแปร ไม่ใช่นิยาม closure ในจุดที่เราส่งมันเป็นอาร์กิวเมนต์ ดังที่เราทำใน Listing 13-1
use std::thread;
use std::time::Duration;
fn generate_workout(intensity: u32, random_number: u32) {
let expensive_closure = |num: u32| -> u32 {
println!("calculating slowly...");
thread::sleep(Duration::from_secs(2));
num
};
if intensity < 25 {
println!("Today, do {} pushups!", expensive_closure(intensity));
println!("Next, do {} situps!", expensive_closure(intensity));
} else {
if random_number == 3 {
println!("Take a break today! Remember to stay hydrated!");
} else {
println!(
"Today, run for {} minutes!",
expensive_closure(intensity)
);
}
}
}
fn main() {
let simulated_user_specified_value = 10;
let simulated_random_number = 7;
generate_workout(simulated_user_specified_value, simulated_random_number);
}ด้วย type annotation ที่เพิ่ม syntax ของ closure ดูคล้ายกับ syntax ของฟังก์ชันมากขึ้น ที่นี่ เรานิยามฟังก์ชันที่เพิ่ม 1 ให้ parameter ของมัน และ closure ที่มีพฤติกรรมเดียวกัน เพื่อเปรียบเทียบ เราเพิ่ม ช่องว่างเพื่อจัดส่วนที่เกี่ยวข้องให้ตรงกัน นี่แสดงว่า syntax closure คล้ายกับ syntax ฟังก์ชันอย่างไร ยกเว้นการใช้ pipe และจำนวน syntax ที่เป็น optional:
fn add_one_v1 (x: u32) -> u32 { x + 1 }
let add_one_v2 = |x: u32| -> u32 { x + 1 };
let add_one_v3 = |x| { x + 1 };
let add_one_v4 = |x| x + 1 ;บรรทัดแรกแสดงนิยามฟังก์ชัน และบรรทัดที่สองแสดงนิยาม closure ที่
annotate เต็ม ในบรรทัดที่สาม เราลบ type annotation จากนิยาม closure
ในบรรทัดที่สี่ เราลบวงเล็บ ซึ่งเป็น optional เพราะ body ของ closure
มีเพียง expression เดียว เหล่านี้เป็นนิยามที่ valid ทั้งหมดที่จะ
สร้างพฤติกรรมเดียวกันเมื่อถูกเรียก บรรทัด add_one_v3 และ
add_one_v4 ต้องการให้ closure ถูกประเมินเพื่อให้สามารถคอมไพล์ได้
เพราะ type จะถูก infer จากการใช้พวกมัน นี่คล้ายกับ
let v = Vec::new(); ที่ต้องการ type annotation หรือค่าของบาง type
ที่ถูก insert เข้า Vec เพื่อให้ Rust สามารถ infer type ได้
สำหรับนิยาม closure compiler จะ infer type คอนกรีตหนึ่งสำหรับแต่ละ
parameter และสำหรับค่า return ของพวกมัน ตัวอย่างเช่น Listing 13-3
แสดงนิยามของ closure สั้นที่แค่ return ค่าที่มันรับเป็น parameter
closure นี้ไม่มีประโยชน์มากยกเว้นเพื่อจุดประสงค์ของตัวอย่างนี้
สังเกตว่าเราไม่ได้เพิ่ม type annotation ใด ๆ ในนิยาม เพราะไม่มี type
annotation เราเรียก closure ด้วย type ใดก็ได้ ซึ่งเราทำที่นี่ด้วย
String ในครั้งแรก ถ้าเราจากนั้นพยายามเรียก example_closure ด้วย
integer เราจะได้ error
fn main() {
let example_closure = |x| x;
let s = example_closure(String::from("hello"));
let n = example_closure(5);
}compiler ให้ error นี้แก่เรา:
$ cargo run
Compiling closure-example v0.1.0 (file:///projects/closure-example)
error[E0308]: mismatched types
--> src/main.rs:5:29
|
5 | let n = example_closure(5);
| --------------- ^ expected `String`, found integer
| |
| arguments to this function are incorrect
|
note: expected because the closure was earlier called with an argument of type `String`
--> src/main.rs:4:29
|
4 | let s = example_closure(String::from("hello"));
| --------------- ^^^^^^^^^^^^^^^^^^^^^ expected because this argument is of type `String`
| |
| in this closure call
note: closure parameter defined here
--> src/main.rs:2:28
|
2 | let example_closure = |x| x;
| ^
help: try using a conversion method
|
5 | let n = example_closure(5.to_string());
| ++++++++++++
For more information about this error, try `rustc --explain E0308`.
error: could not compile `closure-example` (bin "closure-example") due to 1 previous error
ครั้งแรกที่เราเรียก example_closure ด้วยค่า String compiler
infer type ของ x และ return type ของ closure เป็น String type
เหล่านั้นจากนั้นถูก lock เข้า closure ใน example_closure และเรา
ได้ error type เมื่อเราพยายามใช้ type ต่างกับ closure เดียวกัน
ครั้งถัดไป
จับ Reference หรือย้าย Ownership
Closure จับค่าจาก environment ของพวกมันได้สามวิธี ซึ่ง map ตรงกับ สามวิธีที่ฟังก์ชันรับ parameter — borrow immutably, borrow mutably และรับ ownership closure จะตัดสินว่าใช้วิธีไหนตามสิ่งที่ body ของ ฟังก์ชันทำกับค่าที่จับ
ใน Listing 13-4 เรานิยาม closure ที่จับ immutable reference ของ
vector ชื่อ list เพราะมันต้องการเพียง immutable reference เพื่อ
print ค่า
fn main() {
let list = vec![1, 2, 3];
println!("Before defining closure: {list:?}");
let only_borrows = || println!("From closure: {list:?}");
println!("Before calling closure: {list:?}");
only_borrows();
println!("After calling closure: {list:?}");
}ตัวอย่างนี้ยังแสดงว่าตัวแปร bind กับนิยาม closure ได้ และเราเรียก closure ภายหลังโดยใช้ชื่อตัวแปรและวงเล็บเหมือนกับชื่อตัวแปรเป็นชื่อ ฟังก์ชันได้
เพราะเรามี immutable reference หลายตัวของ list พร้อมกันได้ list
ยังเข้าถึงได้จากโค้ดก่อนนิยาม closure, หลังนิยาม closure แต่ก่อน
closure ถูกเรียก และหลัง closure ถูกเรียก โค้ดนี้คอมไพล์ รัน และ
print:
$ cargo run
Compiling closure-example v0.1.0 (file:///projects/closure-example)
Finished `dev` profile [unoptimized + debuginfo] target(s) in 0.43s
Running `target/debug/closure-example`
Before defining closure: [1, 2, 3]
Before calling closure: [1, 2, 3]
From closure: [1, 2, 3]
After calling closure: [1, 2, 3]
ถัดไป ใน Listing 13-5 เราเปลี่ยน body ของ closure เพื่อให้มันเพิ่ม
element ให้ vector list closure ตอนนี้จับ mutable reference
fn main() {
let mut list = vec![1, 2, 3];
println!("Before defining closure: {list:?}");
let mut borrows_mutably = || list.push(7);
borrows_mutably();
println!("After calling closure: {list:?}");
}โค้ดนี้คอมไพล์ รัน และ print:
$ cargo run
Compiling closure-example v0.1.0 (file:///projects/closure-example)
Finished `dev` profile [unoptimized + debuginfo] target(s) in 0.43s
Running `target/debug/closure-example`
Before defining closure: [1, 2, 3]
After calling closure: [1, 2, 3, 7]
สังเกตว่าไม่มี println! ระหว่างนิยามและการเรียกของ closure
borrows_mutably อีกแล้ว — เมื่อ borrows_mutably ถูกนิยาม มันจับ
mutable reference ของ list เราไม่ใช้ closure อีกหลัง closure ถูก
เรียก ดังนั้น mutable borrow จบ ระหว่างนิยาม closure และการเรียก
closure immutable borrow เพื่อ print ไม่ได้รับอนุญาต เพราะไม่มี
borrow อื่นที่อนุญาตเมื่อมี mutable borrow ลองเพิ่ม println! ที่นั่น
เพื่อดูว่าคุณจะได้ข้อความ error อะไร!
ถ้าคุณต้องการบังคับให้ closure รับ ownership ของค่าที่มันใช้ใน
environment แม้ว่า body ของ closure ไม่ได้ต้องการ ownership อย่าง
เคร่งครัด คุณใช้ keyword move ก่อน list parameter ได้
เทคนิคนี้มีประโยชน์มากที่สุดเมื่อส่ง closure ให้เธรดใหม่เพื่อย้าย
ข้อมูลให้มันถูก own โดยเธรดใหม่ เราจะพูดถึงเธรดและทำไมคุณจะต้องการ
ใช้พวกมันในรายละเอียดในบทที่ 16 เมื่อเราพูดถึง concurrency แต่ตอนนี้
มาสำรวจสั้น ๆ เกี่ยวกับ spawn เธรดใหม่โดยใช้ closure ที่ต้องการ
keyword move Listing 13-6 แสดง Listing 13-4 ที่แก้ให้ print vector
ในเธรดใหม่ไม่ใช่ในเธรดหลัก
use std::thread;
fn main() {
let list = vec![1, 2, 3];
println!("Before defining closure: {list:?}");
thread::spawn(move || println!("From thread: {list:?}"))
.join()
.unwrap();
}move เพื่อบังคับให้ closure สำหรับเธรดรับ ownership ของ listเรา spawn เธรดใหม่ ให้เธรด closure เพื่อรันเป็นอาร์กิวเมนต์ body
ของ closure print list ออก ใน Listing 13-4 closure จับ list โดย
ใช้ immutable reference เท่านั้นเพราะนั่นเป็นจำนวนสิทธิ์เข้าถึงน้อย
ที่สุดของ list ที่ต้องการเพื่อ print มัน ในตัวอย่างนี้ แม้ว่า body
ของ closure ยังต้องการเพียง immutable reference เราต้องระบุว่า
list ควรถูกย้ายเข้า closure โดยใส่ keyword move ที่จุดเริ่มต้น
ของนิยาม closure ถ้าเธรดหลักทำ operation มากขึ้นก่อนเรียก join
บนเธรดใหม่ เธรดใหม่อาจเสร็จก่อนส่วนที่เหลือของเธรดหลักเสร็จ หรือเธรด
หลักอาจเสร็จก่อน ถ้าเธรดหลักรักษา ownership ของ list แต่จบก่อน
เธรดใหม่และ drop list immutable reference ในเธรดจะไม่ valid
ดังนั้น compiler ต้องการให้ list ถูกย้ายเข้า closure ที่ให้เธรด
ใหม่เพื่อให้ reference จะ valid ลองลบ keyword move หรือใช้ list
ในเธรดหลักหลัง closure ถูกนิยามเพื่อดูว่าคุณจะได้ error ของ compiler
อะไร!
ย้ายค่าที่จับออกจาก Closure
เมื่อ closure ได้จับ reference หรือจับ ownership ของค่าจาก environment ที่ closure ถูกนิยาม (ดังนั้นกระทบสิ่งที่ถ้ามี ถูกย้าย_เข้า_ closure) โค้ดใน body ของ closure นิยามสิ่งที่เกิดขึ้นกับ reference หรือค่า เมื่อ closure ถูกประเมินภายหลัง (ดังนั้นกระทบสิ่งที่ถ้ามี ถูกย้าย ออกจาก closure)
body ของ closure ทำสิ่งใดต่อไปนี้ได้ — ย้ายค่าที่จับออกจาก closure, mutate ค่าที่จับ, ทั้งไม่ย้ายและไม่ mutate ค่า หรือไม่จับอะไรจาก environment ตั้งแต่ต้น
วิธีที่ closure จับและจัดการค่าจาก environment กระทบ trait ที่
closure implement และ trait คือวิธีที่ฟังก์ชันและ struct ระบุว่า
ประเภทของ closure ไหนที่พวกมันใช้ได้ closure จะ implement หนึ่ง, สอง
หรือทั้งสาม trait Fn เหล่านี้อัตโนมัติในแบบ additive ขึ้นกับวิธีที่
body ของ closure จัดการค่า:
FnOnceใช้กับ closure ที่ถูกเรียกได้ครั้งเดียว closure ทั้งหมด implement อย่างน้อย trait นี้เพราะ closure ทั้งหมดถูกเรียกได้ closure ที่ย้ายค่าที่จับออกจาก body ของมันจะ implement เฉพาะFnOnceและไม่ implement traitFnอื่นเพราะมันถูกเรียกได้เพียง ครั้งเดียวFnMutใช้กับ closure ที่ไม่ย้ายค่าที่จับออกจาก body แต่อาจ mutate ค่าที่จับ closure เหล่านี้ถูกเรียกได้มากกว่าหนึ่งครั้งFnใช้กับ closure ที่ไม่ย้ายค่าที่จับออกจาก body และไม่ mutate ค่าที่จับ รวมถึง closure ที่ไม่จับอะไรจาก environment ของพวกมัน closure เหล่านี้ถูกเรียกได้มากกว่าหนึ่งครั้งโดยไม่ mutate environment ของพวกมัน ซึ่งสำคัญในกรณีเช่นการเรียก closure หลาย ครั้งพร้อมกัน
มาดูนิยามของเมธอด unwrap_or_else บน Option<T> ที่เราใช้ใน
Listing 13-1:
impl<T> Option<T> {
pub fn unwrap_or_else<F>(self, f: F) -> T
where
F: FnOnce() -> T
{
match self {
Some(x) => x,
None => f(),
}
}
}จำได้ว่า T เป็น generic type ที่แทน type ของค่าใน variant Some
ของ Option type T นั้นยังเป็น return type ของฟังก์ชัน
unwrap_or_else — โค้ดที่เรียก unwrap_or_else บน Option<String>
ตัวอย่างเช่น จะได้ String
ถัดไป สังเกตว่าฟังก์ชัน unwrap_or_else มี parameter generic type
เพิ่ม F type F เป็น type ของ parameter ชื่อ f ซึ่งเป็น closure
ที่เราให้เมื่อเรียก unwrap_or_else
trait bound ที่ระบุบน generic type F คือ FnOnce() -> T ซึ่งหมาย
ความว่า F ต้องสามารถถูกเรียกครั้งเดียว ไม่รับอาร์กิวเมนต์ และ
return T การใช้ FnOnce ใน trait bound แสดงข้อจำกัดว่า
unwrap_or_else จะไม่เรียก f มากกว่าหนึ่งครั้ง ใน body ของ
unwrap_or_else เราเห็นว่าถ้า Option เป็น Some f จะไม่ถูก
เรียก ถ้า Option เป็น None f จะถูกเรียกครั้งเดียว เพราะ
closure ทั้งหมด implement FnOnce unwrap_or_else รับ closure ทั้ง
สามประเภทและยืดหยุ่นมากที่สุดเท่าที่ทำได้
สังเกต — ถ้าสิ่งที่เราต้องการทำไม่ต้องการการจับค่าจาก environment เราใช้ชื่อของฟังก์ชันแทน closure ที่เราต้องการอะไรบางอย่างที่ implement หนึ่งของ trait
Fnได้ ตัวอย่างเช่น บนค่าOption<Vec<T>>เราเรียกunwrap_or_else(Vec::new)เพื่อได้ vector ว่างใหม่ถ้าค่าเป็นNonecompiler implement traitFnใด ที่ใช้ได้สำหรับนิยามฟังก์ชันอัตโนมัติ
ตอนนี้มาดูเมธอด standard library sort_by_key ที่นิยามบน slice เพื่อ
ดูว่ามันต่างจาก unwrap_or_else อย่างไรและทำไม sort_by_key ใช้
FnMut แทน FnOnce สำหรับ trait bound closure รับหนึ่งอาร์กิวเมนต์
ในรูปแบบของ reference ของ item ปัจจุบันใน slice ที่กำลังถูกพิจารณา
และมัน return ค่า type K ที่ ordered ได้ ฟังก์ชันนี้มีประโยชน์เมื่อ
คุณต้องการ sort slice ตาม attribute เฉพาะของแต่ละ item ใน Listing
13-7 เรามี list ของ instance Rectangle และเราใช้ sort_by_key
เพื่อ order พวกมันตาม attribute width ของพวกมันจากต่ำไปสูง
#[derive(Debug)]
struct Rectangle {
width: u32,
height: u32,
}
fn main() {
let mut list = [
Rectangle { width: 10, height: 1 },
Rectangle { width: 3, height: 5 },
Rectangle { width: 7, height: 12 },
];
list.sort_by_key(|r| r.width);
println!("{list:#?}");
}sort_by_key เพื่อ order rectangle ตามความกว้างโค้ดนี้ print:
$ cargo run
Compiling rectangles v0.1.0 (file:///projects/rectangles)
Finished `dev` profile [unoptimized + debuginfo] target(s) in 0.41s
Running `target/debug/rectangles`
[
Rectangle {
width: 3,
height: 5,
},
Rectangle {
width: 7,
height: 12,
},
Rectangle {
width: 10,
height: 1,
},
]
เหตุผลที่ sort_by_key นิยามให้รับ closure FnMut คือมันเรียก
closure หลายครั้ง — ครั้งหนึ่งสำหรับแต่ละ item ใน slice closure
|r| r.width ไม่จับ, mutate หรือย้ายอะไรจาก environment ของมัน
ดังนั้นมันตรงข้อกำหนด trait bound
ในทางตรงข้าม Listing 13-8 แสดงตัวอย่างของ closure ที่ implement
เฉพาะ trait FnOnce เพราะมันย้ายค่าออกจาก environment compiler
จะไม่ให้เราใช้ closure นี้กับ sort_by_key
#[derive(Debug)]
struct Rectangle {
width: u32,
height: u32,
}
fn main() {
let mut list = [
Rectangle { width: 10, height: 1 },
Rectangle { width: 3, height: 5 },
Rectangle { width: 7, height: 12 },
];
let mut sort_operations = vec![];
let value = String::from("closure called");
list.sort_by_key(|r| {
sort_operations.push(value);
r.width
});
println!("{list:#?}");
}FnOnce กับ sort_by_keyนี่เป็นวิธีที่ประดิษฐ์และสับสน (ที่ไม่ทำงาน) ที่จะพยายามนับจำนวน
ครั้งที่ sort_by_key เรียก closure เมื่อ sort list โค้ดนี้
พยายามทำการนับนี้โดย push value — String จาก environment ของ
closure — เข้า vector sort_operations closure จับ value และ
ย้าย value ออกจาก closure โดยโอน ownership ของ value ให้
vector sort_operations closure นี้ถูกเรียกได้ครั้งเดียว — การ
พยายามเรียกมันครั้งที่สองจะไม่ทำงาน เพราะ value จะไม่อยู่ใน
environment ที่จะถูก push เข้า sort_operations อีก! ดังนั้น
closure นี้ implement เฉพาะ FnOnce เมื่อเราพยายามคอมไพล์โค้ดนี้
เราได้ error ว่า value ย้ายออกจาก closure ไม่ได้เพราะ closure
ต้อง implement FnMut:
$ cargo run
Compiling rectangles v0.1.0 (file:///projects/rectangles)
error[E0507]: cannot move out of `value`, a captured variable in an `FnMut` closure
--> src/main.rs:18:30
|
15 | let value = String::from("closure called");
| ----- ------------------------------ move occurs because `value` has type `String`, which does not implement the `Copy` trait
| |
| captured outer variable
16 |
17 | list.sort_by_key(|r| {
| --- captured by this `FnMut` closure
18 | sort_operations.push(value);
| ^^^^^ `value` is moved here
|
help: consider cloning the value if the performance cost is acceptable
|
18 | sort_operations.push(value.clone());
| ++++++++
For more information about this error, try `rustc --explain E0507`.
error: could not compile `rectangles` (bin "rectangles") due to 1 previous error
error ชี้ไปยังบรรทัดใน body ของ closure ที่ย้าย value ออกจาก
environment เพื่อแก้ เราต้องเปลี่ยน body ของ closure ให้มันไม่ย้าย
ค่าออกจาก environment การเก็บ counter ใน environment และเพิ่ม
ค่าของมันใน body ของ closure เป็นวิธีตรงไปตรงมามากกว่าในการนับ
จำนวนครั้งที่ closure ถูกเรียก closure ใน Listing 13-9 ทำงานกับ
sort_by_key ได้เพราะมันจับเพียง mutable reference ของ counter
num_sort_operations และดังนั้นถูกเรียกได้มากกว่าหนึ่งครั้ง
#[derive(Debug)]
struct Rectangle {
width: u32,
height: u32,
}
fn main() {
let mut list = [
Rectangle { width: 10, height: 1 },
Rectangle { width: 3, height: 5 },
Rectangle { width: 7, height: 12 },
];
let mut num_sort_operations = 0;
list.sort_by_key(|r| {
num_sort_operations += 1;
r.width
});
println!("{list:#?}, sorted in {num_sort_operations} operations");
}FnMut กับ sort_by_key ได้รับอนุญาตtrait Fn สำคัญเมื่อนิยามหรือใช้ฟังก์ชันหรือ type ที่ใช้ closure
ในส่วนถัดไป เราจะพูดถึง iterator เมธอด iterator หลายตัวรับ
อาร์กิวเมนต์ closure ดังนั้นเก็บรายละเอียด closure เหล่านี้ในใจ
ขณะที่เราดำเนินต่อ!
ประมวลผลชุดข้อมูลด้วย iterator
ประมวลผลชุด Item ด้วย Iterator
pattern iterator ให้คุณทำงานบางอย่างบนลำดับของ item ทีละตัว iterator รับผิดชอบ logic ของการ iterate ผ่านแต่ละ item และกำหนดเมื่อลำดับจบ เมื่อคุณใช้ iterator คุณไม่ต้อง reimplement logic นั้นเอง
ใน Rust iterator เป็น lazy หมายความว่าพวกมันไม่มีผลจนกว่าคุณจะ
เรียกเมธอดที่ consume iterator เพื่อใช้มันให้หมด ตัวอย่างเช่น โค้ดใน
Listing 13-10 สร้าง iterator ผ่าน item ใน vector v1 โดยเรียก
เมธอด iter ที่นิยามบน Vec<T> โค้ดนี้โดยตัวมันเองไม่ทำอะไรที่มี
ประโยชน์
fn main() {
let v1 = vec![1, 2, 3];
let v1_iter = v1.iter();
}iterator ถูกเก็บในตัวแปร v1_iter เมื่อเราสร้าง iterator แล้ว เรา
ใช้มันได้หลายวิธี ใน Listing 3-5 เรา iterate ผ่าน array โดยใช้ loop
for เพื่อ execute โค้ดบางอย่างบนแต่ละ item ของมัน เบื้องหลัง
นี่สร้างและจากนั้น consume iterator โดยปริยาย แต่เรามองข้ามว่ามัน
ทำงานอย่างไรจนถึงตอนนี้
ในตัวอย่างใน Listing 13-11 เราแยกการสร้าง iterator จากการใช้
iterator ใน loop for เมื่อ loop for ถูกเรียกโดยใช้ iterator ใน
v1_iter แต่ละ element ใน iterator ถูกใช้ใน iteration หนึ่งของ
loop ซึ่ง print ออกแต่ละค่า
fn main() {
let v1 = vec![1, 2, 3];
let v1_iter = v1.iter();
for val in v1_iter {
println!("Got: {val}");
}
}forในภาษาที่ไม่มี iterator ที่ standard library ของพวกมันให้มา คุณคงจะ เขียน functionality เดียวกันนี้โดยเริ่มตัวแปรที่ index 0 ใช้ตัวแปร นั้น index เข้า vector เพื่อรับค่า และเพิ่มค่าตัวแปรใน loop จนกว่า มันถึงจำนวนรวมของ item ใน vector
iterator จัดการ logic ทั้งหมดนั้นให้คุณ ตัดโค้ดที่ซ้ำที่คุณอาจทำพัง iterator ให้คุณยืดหยุ่นมากขึ้นในการใช้ logic เดียวกันกับลำดับหลาย ประเภทต่างกัน ไม่ใช่แค่โครงสร้างข้อมูลที่คุณ index เข้าได้ เช่น vector มาตรวจสอบว่า iterator ทำอย่างนั้นได้อย่างไร
Trait Iterator และเมธอด next
iterator ทั้งหมด implement trait ชื่อ Iterator ที่นิยามใน standard
library นิยามของ trait ดูแบบนี้:
#![allow(unused)]
fn main() {
pub trait Iterator {
type Item;
fn next(&mut self) -> Option<Self::Item>;
// methods with default implementations elided
}
}สังเกตว่านิยามนี้ใช้ syntax ใหม่บางอย่าง — type Item และ
Self::Item ซึ่งกำลังนิยาม associated type กับ trait นี้ เราจะพูด
ถึง associated type อย่างลึกในบทที่ 20 ตอนนี้ ทั้งหมดที่คุณต้องรู้
คือโค้ดนี้บอกว่าการ implement trait Iterator ต้องการให้คุณนิยาม
type Item ด้วย และ type Item นี้ใช้ใน return type ของเมธอด
next อีกแง่หนึ่ง type Item จะเป็น type ที่ return จาก iterator
trait Iterator ต้องการให้ผู้ implement นิยามเพียงหนึ่งเมธอด —
เมธอด next ซึ่ง return หนึ่ง item ของ iterator ในแต่ละครั้ง
wrapped ใน Some และเมื่อ iteration จบ return None
เราเรียกเมธอด next บน iterator โดยตรงได้ Listing 13-12 สาธิตค่า
ที่ return จากการเรียก next ซ้ำบน iterator ที่สร้างจาก vector
#[cfg(test)]
mod tests {
#[test]
fn iterator_demonstration() {
let v1 = vec![1, 2, 3];
let mut v1_iter = v1.iter();
assert_eq!(v1_iter.next(), Some(&1));
assert_eq!(v1_iter.next(), Some(&2));
assert_eq!(v1_iter.next(), Some(&3));
assert_eq!(v1_iter.next(), None);
}
}next บน iteratorสังเกตว่าเราต้องทำให้ v1_iter เป็น mutable — การเรียกเมธอด next
บน iterator เปลี่ยน state ภายในที่ iterator ใช้เพื่อตามว่ามันอยู่ที่
ไหนในลำดับ อีกแง่หนึ่ง โค้ดนี้ consume หรือใช้ iterator หมด แต่ละ
การเรียก next กิน item หนึ่งจาก iterator เราไม่ต้องทำให้
v1_iter เป็น mutable เมื่อเราใช้ loop for เพราะ loop รับ
ownership ของ v1_iter และทำให้มัน mutable เบื้องหลัง
สังเกตด้วยว่าค่าที่เราได้จากการเรียก next เป็น immutable reference
ของค่าใน vector เมธอด iter สร้าง iterator ผ่าน immutable reference
ถ้าเราต้องการสร้าง iterator ที่รับ ownership ของ v1 และ return
ค่าที่ own เราเรียก into_iter แทน iter ได้ ในทำนองเดียวกัน ถ้า
เราต้องการ iterate ผ่าน mutable reference เราเรียก iter_mut แทน
iter ได้
เมธอดที่ Consume Iterator
trait Iterator มีหลายเมธอดต่างกันที่มี implementation เริ่มต้นที่
standard library ให้มา — คุณค้นหาเกี่ยวกับเมธอดเหล่านี้ได้โดยดูใน
API documentation ของ standard library สำหรับ trait Iterator
บางเมธอดเหล่านี้เรียกเมธอด next ในนิยามของพวกมัน ซึ่งเป็นเหตุผล
ที่คุณต้อง implement เมธอด next เมื่อ implement trait Iterator
เมธอดที่เรียก next ถูกเรียก consuming adapter เพราะการเรียก
พวกมันใช้ iterator หมด ตัวอย่างหนึ่งคือเมธอด sum ซึ่งรับ
ownership ของ iterator และ iterate ผ่าน item โดยเรียก next ซ้ำ
ดังนั้น consume iterator เมื่อมัน iterate ผ่าน มันเพิ่มแต่ละ item
ให้ running total และ return total เมื่อ iteration เสร็จ Listing
13-13 มีเทสแสดงการใช้เมธอด sum
#[cfg(test)]
mod tests {
#[test]
fn iterator_sum() {
let v1 = vec![1, 2, 3];
let v1_iter = v1.iter();
let total: i32 = v1_iter.sum();
assert_eq!(total, 6);
}
}sum เพื่อรับ total ของ item ทั้งหมดใน iteratorเราไม่ได้รับอนุญาตให้ใช้ v1_iter หลังการเรียก sum เพราะ sum
รับ ownership ของ iterator ที่เราเรียกมันบน
เมธอดที่ผลิต Iterator อื่น
Iterator adapter คือเมธอดที่นิยามบน trait Iterator ที่ไม่
consume iterator แทน พวกมันผลิต iterator ต่างกันโดยเปลี่ยนแง่มุม
บางอย่างของ iterator เดิม
Listing 13-14 แสดงตัวอย่างของการเรียก iterator adapter เมธอด map
ซึ่งรับ closure ที่จะเรียกบนแต่ละ item ขณะที่ item ถูก iterate
เมธอด map return iterator ใหม่ที่ผลิต item ที่ถูกแก้ closure ที่นี่
สร้าง iterator ใหม่ที่แต่ละ item จาก vector จะถูกเพิ่มขึ้น 1
fn main() {
let v1: Vec<i32> = vec![1, 2, 3];
v1.iter().map(|x| x + 1);
}map เพื่อสร้าง iterator ใหม่อย่างไรก็ตาม โค้ดนี้สร้าง warning:
$ cargo run
Compiling iterators v0.1.0 (file:///projects/iterators)
warning: unused `Map` that must be used
--> src/main.rs:4:5
|
4 | v1.iter().map(|x| x + 1);
| ^^^^^^^^^^^^^^^^^^^^^^^^
|
= note: iterators are lazy and do nothing unless consumed
= note: `#[warn(unused_must_use)]` on by default
help: use `let _ = ...` to ignore the resulting value
|
4 | let _ = v1.iter().map(|x| x + 1);
| +++++++
warning: `iterators` (bin "iterators") generated 1 warning
Finished `dev` profile [unoptimized + debuginfo] target(s) in 0.47s
Running `target/debug/iterators`
โค้ดใน Listing 13-14 ไม่ทำอะไร — closure ที่เราระบุไม่เคยถูกเรียก warning เตือนเราทำไม — iterator adapter เป็น lazy และเราต้อง consume iterator ที่นี่
เพื่อแก้ warning นี้และ consume iterator เราจะใช้เมธอด collect
ที่เราใช้กับ env::args ใน Listing 12-1 เมธอดนี้ consume iterator
และ collect ค่าที่ได้เข้า collection data type
ใน Listing 13-15 เรา collect ผลของการ iterate ผ่าน iterator ที่
return จากการเรียก map เข้า vector vector นี้จะลงเอยที่บรรจุแต่ละ
item จาก vector เดิม เพิ่มขึ้น 1
fn main() {
let v1: Vec<i32> = vec![1, 2, 3];
let v2: Vec<_> = v1.iter().map(|x| x + 1).collect();
assert_eq!(v2, vec![2, 3, 4]);
}map เพื่อสร้าง iterator ใหม่ และจากนั้นเรียกเมธอด collect เพื่อ consume iterator ใหม่และสร้าง vectorเพราะ map รับ closure เราระบุ operation ใดก็ได้ที่เราต้องการทำบน
แต่ละ item นี่เป็นตัวอย่างยอดเยี่ยมของวิธีที่ closure ให้คุณกำหนด
พฤติกรรมเองในขณะที่ใช้พฤติกรรม iteration ที่ trait Iterator ให้มา
ซ้ำ
คุณ chain การเรียก iterator adapter หลายตัวเพื่อทำการกระทำที่ซับซ้อน ในแบบที่อ่านได้ แต่เพราะ iterator ทั้งหมดเป็น lazy คุณต้องเรียกหนึ่ง ในเมธอด consuming adapter เพื่อรับผลจากการเรียก iterator adapter
Closure ที่จับ Environment ของพวกมัน
iterator adapter หลายตัวรับ closure เป็นอาร์กิวเมนต์ และโดยทั่วไป closure ที่เราจะระบุเป็นอาร์กิวเมนต์ให้ iterator adapter จะเป็น closure ที่จับ environment ของพวกมัน
สำหรับตัวอย่างนี้ เราจะใช้เมธอด filter ที่รับ closure closure รับ
item จาก iterator และ return bool ถ้า closure return true ค่า
จะถูกรวมใน iteration ที่ผลิตโดย filter ถ้า closure return false
ค่าจะไม่ถูกรวม
ใน Listing 13-16 เราใช้ filter กับ closure ที่จับตัวแปร
shoe_size จาก environment ของมันเพื่อ iterate ผ่าน collection ของ
instance struct Shoe มันจะ return เฉพาะรองเท้าที่เป็นขนาดที่ระบุ
#[derive(PartialEq, Debug)]
struct Shoe {
size: u32,
style: String,
}
fn shoes_in_size(shoes: Vec<Shoe>, shoe_size: u32) -> Vec<Shoe> {
shoes.into_iter().filter(|s| s.size == shoe_size).collect()
}
#[cfg(test)]
mod tests {
use super::*;
#[test]
fn filters_by_size() {
let shoes = vec![
Shoe {
size: 10,
style: String::from("sneaker"),
},
Shoe {
size: 13,
style: String::from("sandal"),
},
Shoe {
size: 10,
style: String::from("boot"),
},
];
let in_my_size = shoes_in_size(shoes, 10);
assert_eq!(
in_my_size,
vec![
Shoe {
size: 10,
style: String::from("sneaker")
},
Shoe {
size: 10,
style: String::from("boot")
},
]
);
}
}filter กับ closure ที่จับ shoe_sizeฟังก์ชัน shoes_in_size รับ ownership ของ vector ของรองเท้าและขนาด
รองเท้าเป็น parameter มัน return vector ที่บรรจุเฉพาะรองเท้าของขนาด
ที่ระบุ
ใน body ของ shoes_in_size เราเรียก into_iter เพื่อสร้าง iterator
ที่รับ ownership ของ vector จากนั้น เราเรียก filter เพื่อ adapt
iterator นั้นเป็น iterator ใหม่ที่บรรจุเฉพาะ element ที่ closure
return true
closure จับ parameter shoe_size จาก environment และเปรียบเทียบ
ค่ากับขนาดของแต่ละรองเท้า เก็บเฉพาะรองเท้าของขนาดที่ระบุ สุดท้าย
การเรียก collect รวมค่าที่ return โดย iterator ที่ adapt เข้า
vector ที่ return โดยฟังก์ชัน
เทสแสดงว่าเมื่อเราเรียก shoes_in_size เราได้คืนเฉพาะรองเท้าที่
มีขนาดเดียวกับค่าที่เราระบุ
ปรับปรุงโปรเจกต์ I/O
ปรับปรุงโปรเจกต์ I/O ของเรา
ด้วยความรู้ใหม่นี้เกี่ยวกับ iterator เราปรับปรุงโปรเจกต์ I/O ในบทที่
12 ได้โดยใช้ iterator เพื่อทำให้โค้ดชัดเจนและกระชับมากขึ้น มาดู
ว่า iterator ปรับปรุง implementation ของเราของฟังก์ชัน Config::build
และฟังก์ชัน search ได้อย่างไร
ลบ clone โดยใช้ Iterator
ใน Listing 12-6 เราเพิ่มโค้ดที่รับ slice ของค่า String และสร้าง
instance ของ struct Config โดย index เข้า slice และ clone ค่า ทำให้
struct Config own ค่าเหล่านั้นได้ ใน Listing 13-17 เราได้
reproduce implementation ของฟังก์ชัน Config::build ในแบบที่มันเป็น
ใน Listing 12-23
use std::env;
use std::error::Error;
use std::fs;
use std::process;
use minigrep::{search, search_case_insensitive};
fn main() {
let args: Vec<String> = env::args().collect();
let config = Config::build(&args).unwrap_or_else(|err| {
println!("Problem parsing arguments: {err}");
process::exit(1);
});
if let Err(e) = run(config) {
println!("Application error: {e}");
process::exit(1);
}
}
pub struct Config {
pub query: String,
pub file_path: String,
pub ignore_case: bool,
}
impl Config {
fn build(args: &[String]) -> Result<Config, &'static str> {
if args.len() < 3 {
return Err("not enough arguments");
}
let query = args[1].clone();
let file_path = args[2].clone();
let ignore_case = env::var("IGNORE_CASE").is_ok();
Ok(Config {
query,
file_path,
ignore_case,
})
}
}
fn run(config: Config) -> Result<(), Box<dyn Error>> {
let contents = fs::read_to_string(config.file_path)?;
let results = if config.ignore_case {
search_case_insensitive(&config.query, &contents)
} else {
search(&config.query, &contents)
};
for line in results {
println!("{line}");
}
Ok(())
}Config::build จาก Listing 12-23ในเวลานั้น เราบอกไม่ให้กังวลเกี่ยวกับการเรียก clone ที่ไม่มี
ประสิทธิภาพเพราะเราจะลบพวกมันในอนาคต ดี เวลานั้นคือตอนนี้!
เราต้องการ clone ที่นี่เพราะเรามี slice ที่มี element String ใน
parameter args แต่ฟังก์ชัน build ไม่ own args เพื่อ return
ownership ของ instance Config เราต้อง clone ค่าจาก field query
และ file_path ของ Config เพื่อให้ instance Config own ค่าของ
มันได้
ด้วยความรู้ใหม่ของเราเกี่ยวกับ iterator เราเปลี่ยนฟังก์ชัน build
ให้รับ ownership ของ iterator เป็นอาร์กิวเมนต์แทน borrow slice ได้
เราจะใช้ functionality iterator แทนโค้ดที่ตรวจสอบความยาวของ slice
และ index เข้าที่เฉพาะ นี่จะทำให้ชัดเจนว่าฟังก์ชัน Config::build
กำลังทำอะไรเพราะ iterator จะเข้าถึงค่า
เมื่อ Config::build รับ ownership ของ iterator และหยุดใช้
operation indexing ที่ borrow เราย้ายค่า String จาก iterator เข้า
Config แทนการเรียก clone และทำ allocation ใหม่ได้
ใช้ Iterator ที่ Return โดยตรง
เปิดไฟล์ src/main.rs ของโปรเจกต์ I/O ของคุณ ซึ่งควรดูแบบนี้:
Filename: src/main.rs
use std::env;
use std::error::Error;
use std::fs;
use std::process;
use minigrep::{search, search_case_insensitive};
fn main() {
let args: Vec<String> = env::args().collect();
let config = Config::build(&args).unwrap_or_else(|err| {
eprintln!("Problem parsing arguments: {err}");
process::exit(1);
});
// --snip--
if let Err(e) = run(config) {
eprintln!("Application error: {e}");
process::exit(1);
}
}
pub struct Config {
pub query: String,
pub file_path: String,
pub ignore_case: bool,
}
impl Config {
fn build(args: &[String]) -> Result<Config, &'static str> {
if args.len() < 3 {
return Err("not enough arguments");
}
let query = args[1].clone();
let file_path = args[2].clone();
let ignore_case = env::var("IGNORE_CASE").is_ok();
Ok(Config {
query,
file_path,
ignore_case,
})
}
}
fn run(config: Config) -> Result<(), Box<dyn Error>> {
let contents = fs::read_to_string(config.file_path)?;
let results = if config.ignore_case {
search_case_insensitive(&config.query, &contents)
} else {
search(&config.query, &contents)
};
for line in results {
println!("{line}");
}
Ok(())
}เราจะเปลี่ยนจุดเริ่มต้นของฟังก์ชัน main ที่เรามีใน Listing 12-24
ก่อน ให้เป็นโค้ดใน Listing 13-18 ซึ่งคราวนี้ใช้ iterator นี่จะไม่
คอมไพล์จนกว่าเราจะอัพเดท Config::build ด้วย
use std::env;
use std::error::Error;
use std::fs;
use std::process;
use minigrep::{search, search_case_insensitive};
fn main() {
let config = Config::build(env::args()).unwrap_or_else(|err| {
eprintln!("Problem parsing arguments: {err}");
process::exit(1);
});
// --snip--
if let Err(e) = run(config) {
eprintln!("Application error: {e}");
process::exit(1);
}
}
pub struct Config {
pub query: String,
pub file_path: String,
pub ignore_case: bool,
}
impl Config {
fn build(args: &[String]) -> Result<Config, &'static str> {
if args.len() < 3 {
return Err("not enough arguments");
}
let query = args[1].clone();
let file_path = args[2].clone();
let ignore_case = env::var("IGNORE_CASE").is_ok();
Ok(Config {
query,
file_path,
ignore_case,
})
}
}
fn run(config: Config) -> Result<(), Box<dyn Error>> {
let contents = fs::read_to_string(config.file_path)?;
let results = if config.ignore_case {
search_case_insensitive(&config.query, &contents)
} else {
search(&config.query, &contents)
};
for line in results {
println!("{line}");
}
Ok(())
}env::args ให้ Config::buildฟังก์ชัน env::args return iterator! ไม่ใช่ collect ค่า iterator
เข้า vector แล้วส่ง slice ให้ Config::build ตอนนี้เรากำลังส่ง
ownership ของ iterator ที่ return จาก env::args ให้
Config::build โดยตรง
ถัดไป เราต้องอัพเดทนิยามของ Config::build มาเปลี่ยน signature ของ
Config::build ให้ดูเหมือน Listing 13-19 นี่ยังจะไม่คอมไพล์ เพราะ
เราต้องอัพเดท body ของฟังก์ชัน
use std::env;
use std::error::Error;
use std::fs;
use std::process;
use minigrep::{search, search_case_insensitive};
fn main() {
let config = Config::build(env::args()).unwrap_or_else(|err| {
eprintln!("Problem parsing arguments: {err}");
process::exit(1);
});
if let Err(e) = run(config) {
eprintln!("Application error: {e}");
process::exit(1);
}
}
pub struct Config {
pub query: String,
pub file_path: String,
pub ignore_case: bool,
}
impl Config {
fn build(
mut args: impl Iterator<Item = String>,
) -> Result<Config, &'static str> {
// --snip--
if args.len() < 3 {
return Err("not enough arguments");
}
let query = args[1].clone();
let file_path = args[2].clone();
let ignore_case = env::var("IGNORE_CASE").is_ok();
Ok(Config {
query,
file_path,
ignore_case,
})
}
}
fn run(config: Config) -> Result<(), Box<dyn Error>> {
let contents = fs::read_to_string(config.file_path)?;
let results = if config.ignore_case {
search_case_insensitive(&config.query, &contents)
} else {
search(&config.query, &contents)
};
for line in results {
println!("{line}");
}
Ok(())
}Config::build ให้คาดหวัง iteratordocumentation ของ standard library สำหรับฟังก์ชัน env::args แสดง
ว่า type ของ iterator ที่มัน return คือ std::env::Args และ type
นั้น implement trait Iterator และ return ค่า String
เราได้อัพเดท signature ของฟังก์ชัน Config::build เพื่อให้ parameter
args มี generic type ที่มี trait bound impl Iterator<Item = String>
แทน &[String] การใช้ syntax impl Trait ที่เราพูดถึงในส่วน
“ใช้ Trait เป็น Parameter” ของบทที่ 10
แปลว่า args เป็น type ใดก็ได้ที่ implement trait Iterator และ
return item String
เพราะเรากำลังรับ ownership ของ args และเราจะ mutate args โดย
iterate ผ่านมัน เราเพิ่ม keyword mut เข้า specification ของ
parameter args เพื่อทำให้มัน mutable ได้
ใช้เมธอด Trait Iterator
ถัดไป เราจะแก้ body ของ Config::build เพราะ args implement
trait Iterator เรารู้ว่าเราเรียกเมธอด next บนมันได้! Listing
13-20 อัพเดทโค้ดจาก Listing 12-23 เพื่อใช้เมธอด next
use std::env;
use std::error::Error;
use std::fs;
use std::process;
use minigrep::{search, search_case_insensitive};
fn main() {
let config = Config::build(env::args()).unwrap_or_else(|err| {
eprintln!("Problem parsing arguments: {err}");
process::exit(1);
});
if let Err(e) = run(config) {
eprintln!("Application error: {e}");
process::exit(1);
}
}
pub struct Config {
pub query: String,
pub file_path: String,
pub ignore_case: bool,
}
impl Config {
fn build(
mut args: impl Iterator<Item = String>,
) -> Result<Config, &'static str> {
args.next();
let query = match args.next() {
Some(arg) => arg,
None => return Err("Didn't get a query string"),
};
let file_path = match args.next() {
Some(arg) => arg,
None => return Err("Didn't get a file path"),
};
let ignore_case = env::var("IGNORE_CASE").is_ok();
Ok(Config {
query,
file_path,
ignore_case,
})
}
}
fn run(config: Config) -> Result<(), Box<dyn Error>> {
let contents = fs::read_to_string(config.file_path)?;
let results = if config.ignore_case {
search_case_insensitive(&config.query, &contents)
} else {
search(&config.query, &contents)
};
for line in results {
println!("{line}");
}
Ok(())
}Config::build ให้ใช้เมธอด iteratorจำได้ว่าค่าแรกในค่า return ของ env::args คือชื่อของโปรแกรม เรา
ต้องการ ignore นั้นและไปยังค่าถัดไป ดังนั้นก่อนอื่นเราเรียก next
และไม่ทำอะไรกับค่า return จากนั้น เราเรียก next เพื่อรับค่าที่เรา
ต้องการใส่ใน field query ของ Config ถ้า next return Some
เราใช้ match เพื่อดึงค่า ถ้ามัน return None หมายความว่า
อาร์กิวเมนต์ไม่พอที่ถูกให้ และเรา return เร็วด้วยค่า Err เราทำสิ่ง
เดียวกันสำหรับค่า file_path
ทำให้โค้ดชัดเจนด้วย Iterator Adapter
เรายังใช้ประโยชน์ของ iterator ในฟังก์ชัน search ในโปรเจกต์ I/O
ของเราได้ ซึ่ง reproduce ที่นี่ใน Listing 13-21 ในแบบที่มันเป็นใน
Listing 12-19
pub fn search<'a>(query: &str, contents: &'a str) -> Vec<&'a str> {
let mut results = Vec::new();
for line in contents.lines() {
if line.contains(query) {
results.push(line);
}
}
results
}
#[cfg(test)]
mod tests {
use super::*;
#[test]
fn one_result() {
let query = "duct";
let contents = "\
Rust:
safe, fast, productive.
Pick three.";
assert_eq!(vec!["safe, fast, productive."], search(query, contents));
}
}search จาก Listing 12-19เราเขียนโค้ดนี้ในแบบที่กระชับมากขึ้นโดยใช้เมธอด iterator adapter ได้
การทำเช่นนั้นยังให้เราหลีกเลี่ยงการมี vector results ระหว่างกลาง
ที่ mutable สไตล์ functional programming ชอบลดจำนวน mutable state
เพื่อทำให้โค้ดชัดเจน การลบ mutable state อาจช่วยให้การปรับปรุงใน
อนาคตทำให้การค้นหาเกิดขึ้นแบบขนานได้ เพราะเราไม่ต้องจัดการการเข้าถึง
แบบ concurrent ของ vector results Listing 13-22 แสดงการเปลี่ยนนี้
pub fn search<'a>(query: &str, contents: &'a str) -> Vec<&'a str> {
contents
.lines()
.filter(|line| line.contains(query))
.collect()
}
pub fn search_case_insensitive<'a>(
query: &str,
contents: &'a str,
) -> Vec<&'a str> {
let query = query.to_lowercase();
let mut results = Vec::new();
for line in contents.lines() {
if line.to_lowercase().contains(&query) {
results.push(line);
}
}
results
}
#[cfg(test)]
mod tests {
use super::*;
#[test]
fn case_sensitive() {
let query = "duct";
let contents = "\
Rust:
safe, fast, productive.
Pick three.
Duct tape.";
assert_eq!(vec!["safe, fast, productive."], search(query, contents));
}
#[test]
fn case_insensitive() {
let query = "rUsT";
let contents = "\
Rust:
safe, fast, productive.
Pick three.
Trust me.";
assert_eq!(
vec!["Rust:", "Trust me."],
search_case_insensitive(query, contents)
);
}
}searchจำได้ว่าจุดประสงค์ของฟังก์ชัน search คือ return บรรทัดทั้งหมดใน
contents ที่มี query คล้ายกับตัวอย่าง filter ใน Listing 13-16
โค้ดนี้ใช้ adapter filter เพื่อเก็บเฉพาะบรรทัดที่
line.contains(query) return true เราจากนั้น collect บรรทัดที่
ตรงกันเข้า vector อื่นด้วย collect ง่ายขึ้นมาก! รู้สึกอิสระที่จะ
ทำการเปลี่ยนแปลงเดียวกันเพื่อใช้เมธอด iterator ในฟังก์ชัน
search_case_insensitive ด้วย
สำหรับการปรับปรุงเพิ่มเติม return iterator จากฟังก์ชัน search โดย
ลบการเรียก collect และเปลี่ยน return type เป็น
impl Iterator<Item = &'a str> เพื่อให้ฟังก์ชันกลายเป็น iterator
adapter สังเกตว่าคุณจะต้องอัพเดทเทสด้วย! ค้นหาผ่านไฟล์ขนาดใหญ่โดยใช้
เครื่องมือ minigrep ของคุณก่อนและหลังการเปลี่ยนแปลงนี้ เพื่อสังเกต
ความแตกต่างในพฤติกรรม ก่อนการเปลี่ยนแปลงนี้ โปรแกรมจะไม่ print ผลใด
จนกว่ามันจะ collect ผลทั้งหมด แต่หลังการเปลี่ยนแปลง ผลจะถูก print
เมื่อแต่ละบรรทัดที่ตรงกันถูกพบ เพราะ loop for ในฟังก์ชัน run
สามารถใช้ประโยชน์จากความเป็น lazy ของ iterator
เลือกระหว่าง Loop และ Iterator
คำถามที่มีตรรกะถัดไปคือสไตล์ไหนคุณควรเลือกในโค้ดของคุณเองและทำไม — implementation เดิมใน Listing 13-21 หรือเวอร์ชันที่ใช้ iterator ใน Listing 13-22 (สมมติเรากำลัง collect ผลทั้งหมดก่อน return พวกมัน ไม่ใช่ return iterator) programmer Rust ส่วนใหญ่ชอบใช้สไตล์ iterator มันยากขึ้นหน่อยที่จะเข้าใจในตอนแรก แต่เมื่อคุณคุ้นกับ iterator adapter ต่าง ๆ และสิ่งที่พวกมันทำ iterator เข้าใจง่ายขึ้นได้ แทนที่ จะ fiddle กับชิ้นส่วนต่าง ๆ ของการ loop และสร้าง vector ใหม่ โค้ด โฟกัสที่วัตถุประสงค์ระดับสูงของ loop นี่ทำให้โค้ดที่พบทั่วไปเป็นนามธรรม เพื่อให้ง่ายขึ้นในการเห็นแนวคิดที่เป็นเอกลักษณ์ของโค้ดนี้ เช่น เงื่อนไข filter ที่แต่ละ element ใน iterator ต้องผ่าน
แต่ implementation สองแบบเทียบเท่ากันจริงไหม? สมมุติฐานโดยสัญชาตญาณ อาจเป็นว่า loop ระดับต่ำกว่าจะเร็วกว่า มาพูดถึง performance
Performance: loop vs. iterator
Performance — Loop vs. Iterator
ในการตัดสินว่าจะใช้ loop หรือ iterator คุณต้องรู้ว่า implementation
ไหนเร็วกว่า — เวอร์ชันของฟังก์ชัน search ที่มี loop for ชัดเจน
หรือเวอร์ชันที่มี iterator
เรารัน benchmark โดยโหลดเนื้อหาทั้งหมดของ The Adventures of Sherlock
Holmes โดย Sir Arthur Conan Doyle เข้า String และค้นหาคำ the
ในเนื้อหา นี่คือผลของ benchmark บนเวอร์ชันของ search ที่ใช้ loop
for และเวอร์ชันที่ใช้ iterator:
test bench_search_for ... bench: 19,620,300 ns/iter (+/- 915,700)
test bench_search_iter ... bench: 19,234,900 ns/iter (+/- 657,200)
implementation สองแบบมี performance ที่คล้ายกัน! เราจะไม่อธิบายโค้ด benchmark ที่นี่เพราะประเด็นไม่ใช่การพิสูจน์ว่าสองเวอร์ชันเทียบเท่า กัน แต่เพื่อรับความรู้สึกทั่วไปว่า implementation สองแบบนี้ เปรียบเทียบกันในเชิง performance อย่างไร
สำหรับ benchmark ที่ครอบคลุมมากขึ้น คุณควรตรวจสอบโดยใช้ text ต่าง ๆ
ของขนาดต่าง ๆ เป็น contents, คำต่าง ๆ และคำที่ยาวต่าง ๆ เป็น
query และความหลากหลายอื่นทุกประเภท ประเด็นคือสิ่งนี้ — iterator
แม้ว่าเป็น abstraction ระดับสูง ถูกคอมไพล์ลงเป็นโค้ดประมาณเดียวกับที่
คุณเขียนโค้ดระดับต่ำกว่าด้วยตัวเอง iterator เป็นหนึ่งใน zero-cost
abstraction ของ Rust ซึ่งเราหมายความว่าการใช้ abstraction ไม่
impose overhead runtime เพิ่ม นี่คล้ายกับวิธีที่ Bjarne Stroustrup
ผู้ออกแบบดั้งเดิมและ implementer ของ C++ นิยาม zero-overhead ในการ
นำเสนอ keynote ETAPS 2012 ของเขา “Foundations of C++”:
โดยทั่วไป implementation C++ ปฏิบัติตามหลัก zero-overhead — สิ่งที่ คุณไม่ใช้ คุณไม่จ่ายสำหรับ และเพิ่มเติม — สิ่งที่คุณใช้ คุณไม่ สามารถ hand code ได้ดีกว่า
ในหลายกรณี โค้ด Rust ที่ใช้ iterator คอมไพล์เป็น assembly เดียวกับ ที่คุณเขียนด้วยมือ Optimization เช่น loop unrolling และการ eliminate bound checking บนการเข้าถึง array ใช้และทำให้โค้ดที่ได้มีประสิทธิภาพ สุด ๆ ตอนนี้คุณรู้สิ่งนี้แล้ว คุณใช้ iterator และ closure ได้โดยไม่ กลัว! พวกมันทำให้โค้ดดูเหมือนเป็นระดับสูงแต่ไม่ impose บทลงโทษ performance runtime สำหรับการทำเช่นนั้น
สรุป
Closure และ iterator เป็นฟีเจอร์ Rust ที่ได้รับแรงบันดาลใจจากแนวคิด ภาษาโปรแกรม functional พวกมันมีส่วนต่อความสามารถของ Rust ที่จะแสดง แนวคิดระดับสูงอย่างชัดเจนที่ performance ระดับต่ำ implementation ของ closure และ iterator เป็นเช่นนั้นที่ performance runtime ไม่ถูก กระทบ นี่เป็นส่วนของเป้าหมายของ Rust ที่พยายามให้ zero-cost abstraction
ตอนนี้เราปรับปรุง expressiveness ของโปรเจกต์ I/O ของเราแล้ว มาดู
ฟีเจอร์เพิ่มของ cargo ที่จะช่วยให้เราแชร์โปรเจกต์กับโลก
Cargo และ Crates.io เพิ่มเติม
จนถึงตอนนี้ เราได้ใช้เพียงฟีเจอร์พื้นฐานที่สุดของ Cargo เพื่อ build, รัน และทดสอบโค้ดของเรา แต่มันทำได้มากกว่านี้ ในบทนี้ เราจะพูดถึง ฟีเจอร์ขั้นสูงอื่นเพื่อแสดงให้คุณเห็นวิธีทำต่อไปนี้:
- กำหนด build ของคุณผ่าน release profile
- Publish library บน crates.io
- จัดระเบียบโปรเจกต์ใหญ่ด้วย workspace
- ติดตั้ง binary จาก crates.io
- ขยาย Cargo โดยใช้คำสั่งกำหนดเอง
Cargo ทำได้มากกว่า functionality ที่เราครอบคลุมในบทนี้ ดังนั้นสำหรับ คำอธิบายเต็มของฟีเจอร์ทั้งหมดของมัน ดู documentation ของมัน
ปรับ build ด้วย release profile
ปรับ Build ด้วย Release Profile
ใน Rust release profile คือ profile ที่นิยามไว้ล่วงหน้าและกำหนด เองได้ ด้วย configuration ต่างกันที่อนุญาตให้ programmer มีการควบคุม มากขึ้นเหนือ option ต่าง ๆ สำหรับการคอมไพล์โค้ด แต่ละ profile ถูก กำหนดอย่างอิสระจากตัวอื่น
Cargo มีสอง profile หลัก — profile dev ที่ Cargo ใช้เมื่อคุณรัน
cargo build และ profile release ที่ Cargo ใช้เมื่อคุณรัน
cargo build --release profile dev ถูกนิยามด้วย default ที่ดี
สำหรับการพัฒนา และ profile release มี default ที่ดีสำหรับ release
build
ชื่อ profile เหล่านี้อาจคุ้นจาก output ของ build ของคุณ:
$ cargo build
Finished `dev` profile [unoptimized + debuginfo] target(s) in 0.00s
$ cargo build --release
Finished `release` profile [optimized] target(s) in 0.32s
dev และ release คือ profile ต่างกันเหล่านี้ที่ compiler ใช้
Cargo มี setting เริ่มต้นสำหรับแต่ละ profile ที่ใช้เมื่อคุณยังไม่ได้
เพิ่ม section [profile.*] ในไฟล์ Cargo.toml ของโปรเจกต์ชัดเจน
โดยเพิ่ม section [profile.*] สำหรับ profile ใดที่คุณต้องการกำหนด
เอง คุณ override subset ใดของ setting เริ่มต้น ตัวอย่างเช่น นี่คือ
ค่าเริ่มต้นสำหรับ setting opt-level สำหรับ profile dev และ
release:
Filename: Cargo.toml
[profile.dev]
opt-level = 0
[profile.release]
opt-level = 3
setting opt-level ควบคุมจำนวน optimization ที่ Rust จะใช้กับโค้ด
ของคุณ ในช่วง 0 ถึง 3 การใช้ optimization มากขึ้นยืดเวลาการคอมไพล์
ดังนั้นถ้าคุณอยู่ในการพัฒนาและคอมไพล์โค้ดของคุณบ่อย คุณจะต้องการ
optimization น้อยลงเพื่อคอมไพล์เร็วขึ้นแม้ว่าโค้ดที่ได้รันช้าลง
ดังนั้น opt-level เริ่มต้นสำหรับ dev คือ 0 เมื่อคุณพร้อม
release โค้ดของคุณ ดีที่สุดที่จะใช้เวลาคอมไพล์มากขึ้น คุณจะคอมไพล์
ใน release mode เพียงครั้งเดียว แต่คุณจะรันโปรแกรมที่คอมไพล์หลาย
ครั้ง ดังนั้น release mode trade เวลาคอมไพล์นานกว่าสำหรับโค้ดที่
รันเร็วกว่า นั่นคือเหตุผลที่ opt-level เริ่มต้นสำหรับ profile
release คือ 3
คุณ override setting เริ่มต้นโดยเพิ่มค่าต่างกันสำหรับมันใน Cargo.toml ได้ ตัวอย่างเช่น ถ้าเราต้องการใช้ optimization level 1 ใน development profile เราเพิ่มสองบรรทัดนี้ในไฟล์ Cargo.toml ของ โปรเจกต์เรา:
Filename: Cargo.toml
[profile.dev]
opt-level = 1
โค้ดนี้ override setting เริ่มต้นของ 0 ตอนนี้เมื่อเรารัน
cargo build Cargo จะใช้ default สำหรับ profile dev บวกการกำหนด
เองของเราที่ opt-level เพราะเราตั้ง opt-level เป็น 1 Cargo
จะใช้ optimization มากขึ้นกว่า default แต่ไม่มากเท่าใน release build
สำหรับ list เต็มของ option configuration และ default สำหรับแต่ละ profile ดู documentation ของ Cargo
Publish crate ไปยัง Crates.io
Publish Crate ไปยัง Crates.io
เราใช้ package จาก crates.io เป็น dependency ของโปรเจกต์ของเรา แต่คุณยังแชร์โค้ดของคุณกับคนอื่นโดย publish package ของคุณเองได้ crate registry ที่ crates.io แจกจ่าย source code ของ package ของคุณ ดังนั้นมัน host โค้ดที่เป็น open source เป็นหลัก
Rust และ Cargo มีฟีเจอร์ที่ทำให้ package ที่คุณ publish ง่ายขึ้นที่ คนจะหาและใช้ เราจะพูดถึงฟีเจอร์เหล่านี้บางอย่างถัดไป แล้วอธิบายวิธี publish package
ทำ Documentation Comment ที่มีประโยชน์
การ document package ของคุณอย่างแม่นยำจะช่วยให้ user อื่นรู้วิธีและ
เวลาที่ใช้พวกมัน ดังนั้นคุ้มค่าที่จะลงทุนเวลาเขียน documentation ใน
บทที่ 3 เราพูดถึงวิธี comment โค้ด Rust โดยใช้สอง slash // Rust
ยังมี comment ประเภทเฉพาะสำหรับ documentation ที่รู้จักกันในชื่อ
documentation comment ซึ่งจะสร้าง documentation HTML HTML แสดง
เนื้อหาของ documentation comment สำหรับ item ของ public API ที่มีไว้
สำหรับ programmer ที่สนใจรู้วิธี_ใช้_ crate ของคุณ ตรงข้ามกับวิธีที่
crate ของคุณ_ถูก implement_
Documentation comment ใช้สาม slash /// แทนสอง และสนับสนุน notation
Markdown สำหรับ format text วาง documentation comment ก่อน item ที่
พวกมันกำลัง document Listing 14-1 แสดง documentation comment สำหรับ
ฟังก์ชัน add_one ใน crate ชื่อ my_crate
/// Adds one to the number given.
///
/// # Examples
///
/// ```
/// let arg = 5;
/// let answer = my_crate::add_one(arg);
///
/// assert_eq!(6, answer);
/// ```
pub fn add_one(x: i32) -> i32 {
x + 1
}ที่นี่ เราให้คำอธิบายของสิ่งที่ฟังก์ชัน add_one ทำ เริ่ม section
ด้วย heading Examples แล้วให้โค้ดที่สาธิตวิธีใช้ฟังก์ชัน add_one
เราสร้าง documentation HTML จาก documentation comment นี้โดยรัน
cargo doc ได้ คำสั่งนี้รันเครื่องมือ rustdoc ที่ distribute พร้อม
Rust และใส่ documentation HTML ที่สร้างใน directory target/doc
เพื่อความสะดวก การรัน cargo doc --open จะ build HTML สำหรับ
documentation ของ crate ปัจจุบันของคุณ (รวม documentation สำหรับ
dependency ทั้งหมดของ crate ของคุณ) และเปิดผลใน web browser นำทาง
ไปที่ฟังก์ชัน add_one และคุณจะเห็นว่า text ใน documentation
comment ถูก render อย่างไร ดังที่แสดงใน Figure 14-1
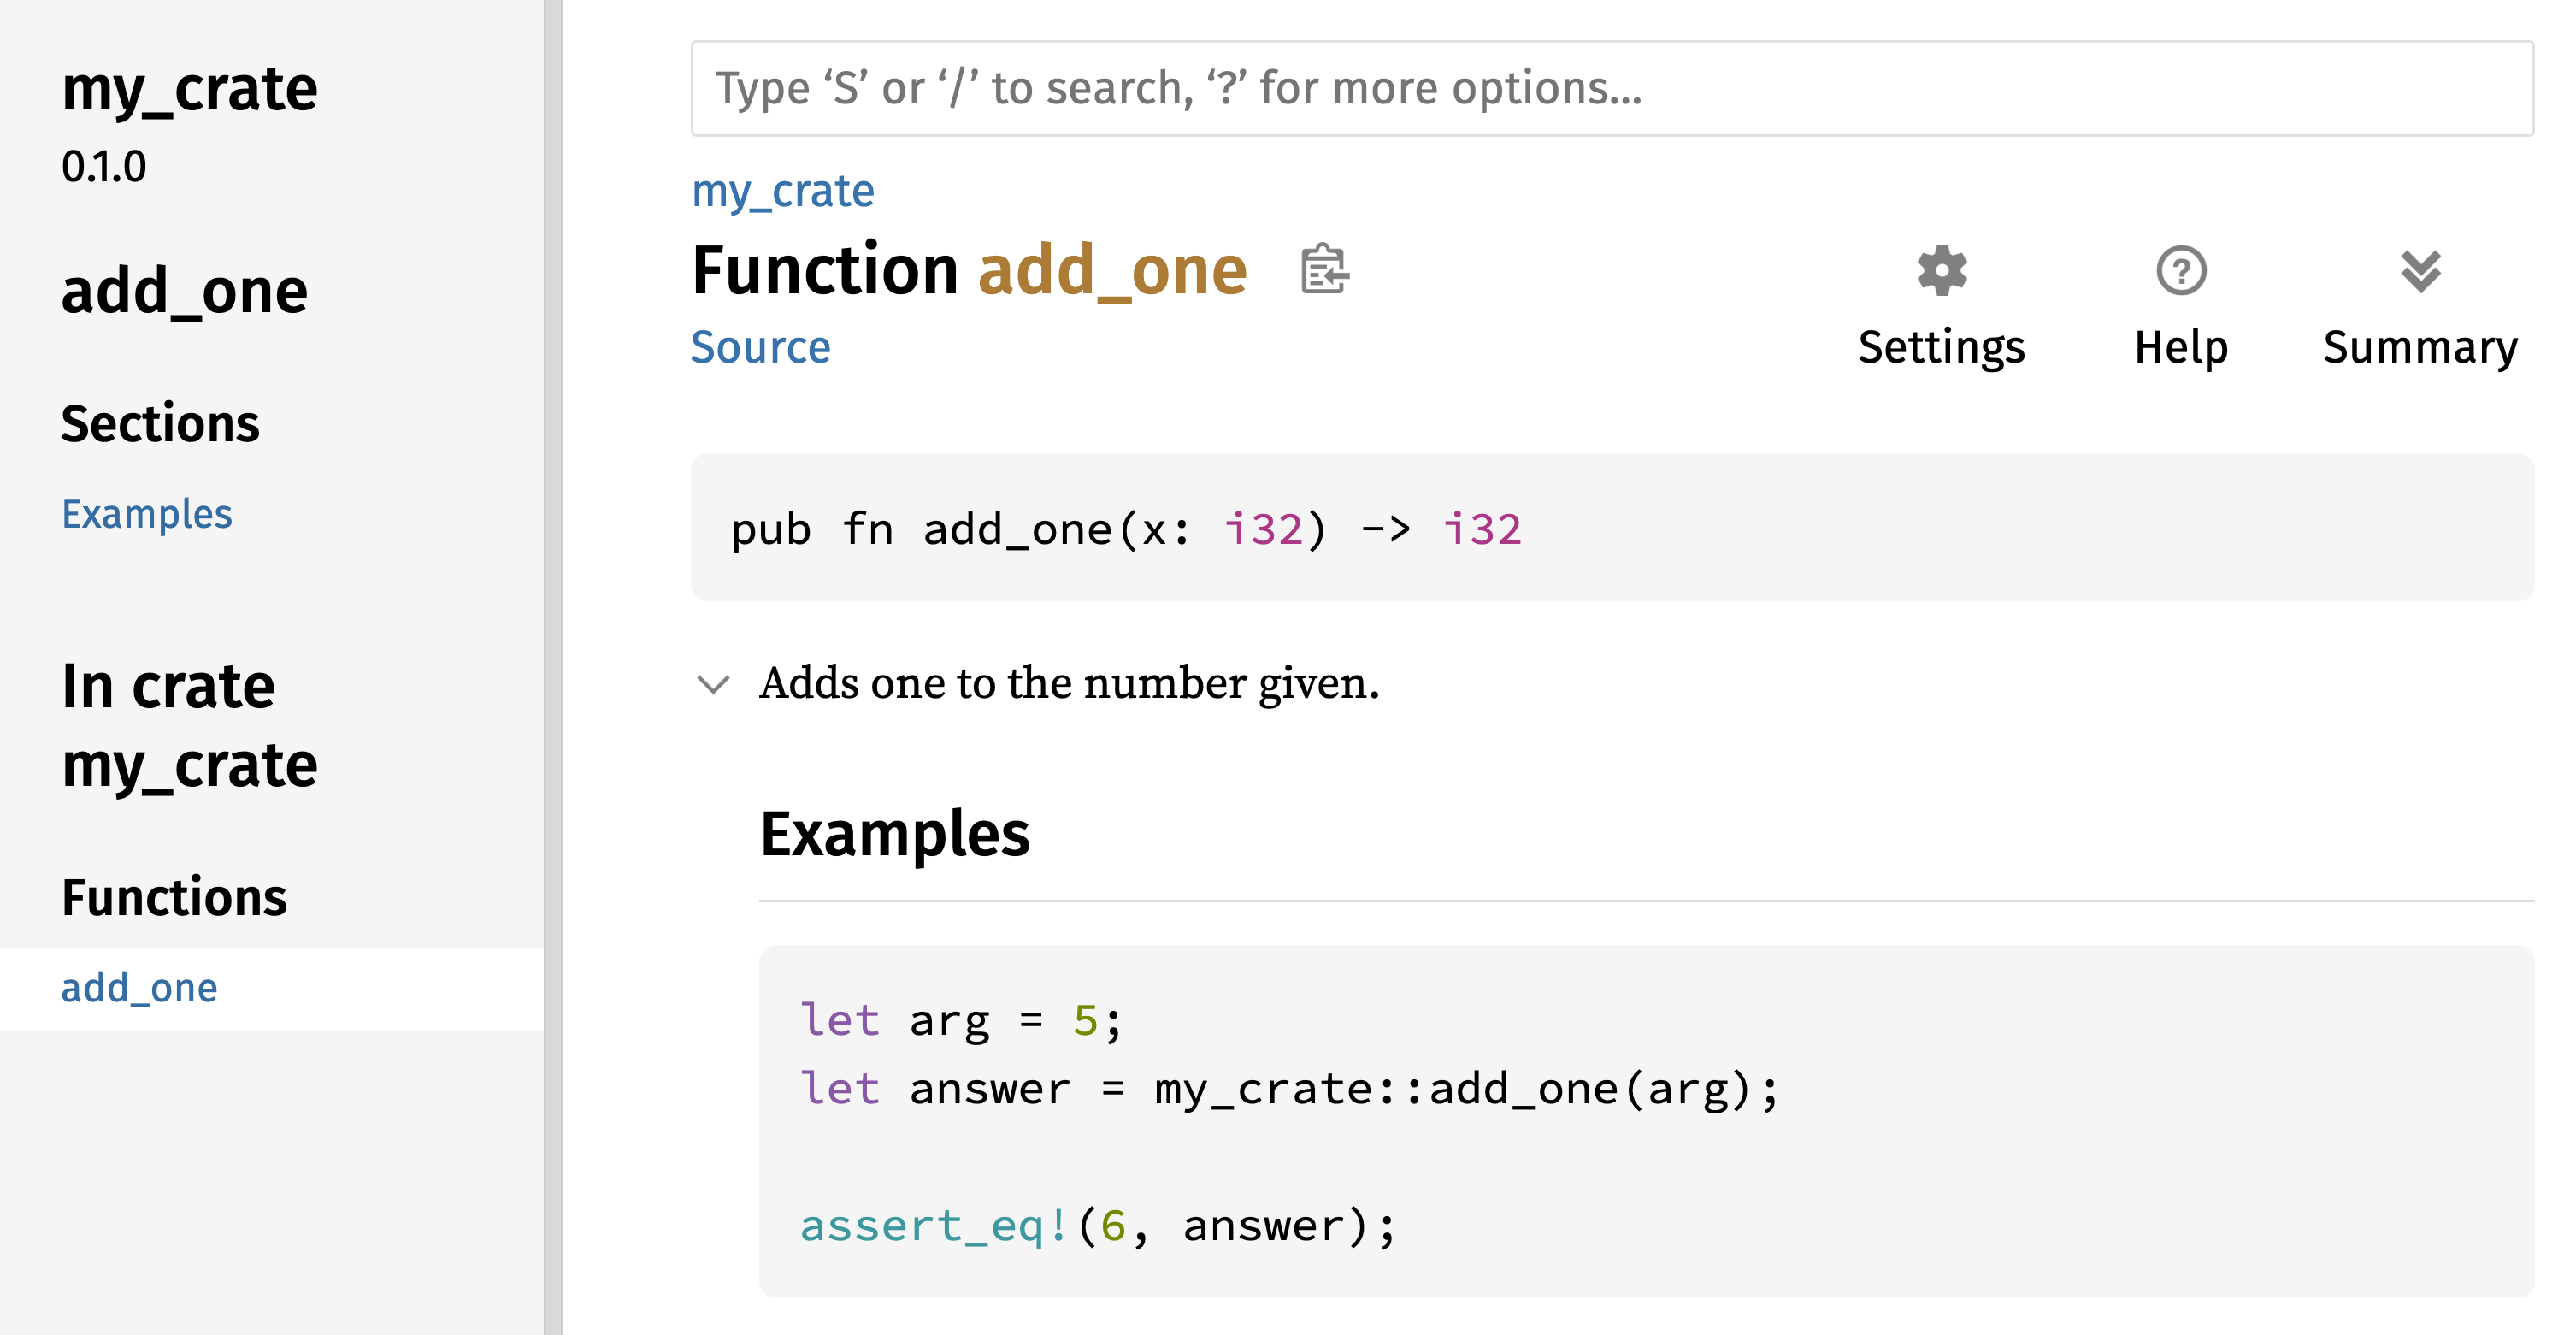
Figure 14-1: documentation HTML สำหรับฟังก์ชัน
add_one
Section ที่ใช้บ่อย
เราใช้ heading Markdown # Examples ใน Listing 14-1 เพื่อสร้าง
section ใน HTML ด้วยชื่อ “Examples” นี่คือ section อื่นที่ author
ของ crate ใช้บ่อยใน documentation ของพวกเขา:
- Panics — เหล่านี้เป็น scenario ที่ฟังก์ชันที่ถูก document panic ได้ Caller ของฟังก์ชันที่ไม่ต้องการให้โปรแกรมของพวกเขา panic ควร ทำให้แน่ใจว่าพวกเขาไม่เรียกฟังก์ชันในสถานการณ์เหล่านี้
- Errors — ถ้าฟังก์ชัน return
Resultการอธิบายประเภทของ error ที่อาจเกิดขึ้นและเงื่อนไขใดอาจทำให้ error เหล่านั้นถูก return ได้ มีประโยชน์ต่อ caller เพื่อให้พวกเขาเขียนโค้ดเพื่อจัดการประเภท ต่างกันของ error ในวิธีต่างกันได้ - Safety — ถ้าฟังก์ชันเป็น
unsafeที่เรียก (เราพูดถึง unsafety ในบทที่ 20) ควรมี section ที่อธิบายทำไมฟังก์ชันเป็น unsafe และครอบคลุม invariant ที่ฟังก์ชันคาดหวังให้ caller รักษาไว้
documentation comment ส่วนใหญ่ไม่ต้องการ section ทั้งหมดเหล่านี้ แต่นี่เป็น checklist ที่ดีเพื่อเตือนคุณถึงแง่มุมของโค้ดของคุณที่ user จะสนใจที่จะรู้
Documentation Comment เป็นเทส
การเพิ่ม block โค้ดตัวอย่างใน documentation comment ของคุณช่วยสาธิต
วิธีใช้ library ของคุณและมีโบนัสเพิ่ม — การรัน cargo test จะรัน
ตัวอย่างโค้ดใน documentation ของคุณเป็นเทส! ไม่มีอะไรดีกว่า
documentation พร้อมตัวอย่าง แต่ไม่มีอะไรแย่กว่าตัวอย่างที่ไม่ทำงาน
เพราะโค้ดเปลี่ยนตั้งแต่ documentation ถูกเขียน ถ้าเรารัน cargo test
ด้วย documentation สำหรับฟังก์ชัน add_one จาก Listing 14-1 เรา
จะเห็น section ในผลเทสที่ดูแบบนี้:
Doc-tests my_crate
running 1 test
test src/lib.rs - add_one (line 5) ... ok
test result: ok. 1 passed; 0 failed; 0 ignored; 0 measured; 0 filtered out; finished in 0.27s
ตอนนี้ ถ้าเราเปลี่ยนฟังก์ชันหรือตัวอย่างเพื่อให้ assert_eq! ใน
ตัวอย่าง panic และรัน cargo test อีกครั้ง เราจะเห็นว่า doc test
จับว่าตัวอย่างและโค้ดไม่ sync กัน!
Comment Item ที่บรรจุ
สไตล์ doc comment //! เพิ่ม documentation ให้ item ที่ บรรจุ
comment ไม่ใช่ให้ item ตามหลัง comment โดยทั่วไปเราใช้ doc
comment เหล่านี้ภายในไฟล์ root ของ crate (src/lib.rs ตามธรรมเนียม)
หรือภายในโมดูลเพื่อ document crate หรือโมดูลเป็นภาพรวม
ตัวอย่างเช่น เพื่อเพิ่ม documentation ที่อธิบายจุดประสงค์ของ crate
my_crate ที่บรรจุฟังก์ชัน add_one เราเพิ่ม documentation comment
ที่เริ่มด้วย //! ที่จุดเริ่มต้นของไฟล์ src/lib.rs ดังที่แสดงใน
Listing 14-2
//! # My Crate
//!
//! `my_crate` is a collection of utilities to make performing certain
//! calculations more convenient.
/// Adds one to the number given.
// --snip--
///
/// # Examples
///
/// ```
/// let arg = 5;
/// let answer = my_crate::add_one(arg);
///
/// assert_eq!(6, answer);
/// ```
pub fn add_one(x: i32) -> i32 {
x + 1
}my_crate ภาพรวมสังเกตว่าไม่มีโค้ดใดหลังบรรทัดสุดท้ายที่เริ่มด้วย //! เพราะเรา
เริ่ม comment ด้วย //! แทน /// เรากำลัง document item ที่บรรจุ
comment นี้ ไม่ใช่ item ที่ตามหลัง comment นี้ ในกรณีนี้ item นั้น
คือไฟล์ src/lib.rs ซึ่งเป็น root ของ crate comment เหล่านี้
อธิบาย crate ทั้งหมด
เมื่อเรารัน cargo doc --open comment เหล่านี้จะแสดงในหน้าแรกของ
documentation สำหรับ my_crate เหนือ list ของ item public ใน crate
ดังที่แสดงใน Figure 14-2
Documentation comment ภายใน item มีประโยชน์สำหรับอธิบาย crate และ โมดูลโดยเฉพาะ ใช้พวกมันเพื่ออธิบายจุดประสงค์ภาพรวมของ container เพื่อช่วยให้ user ของคุณเข้าใจการจัดระเบียบของ crate
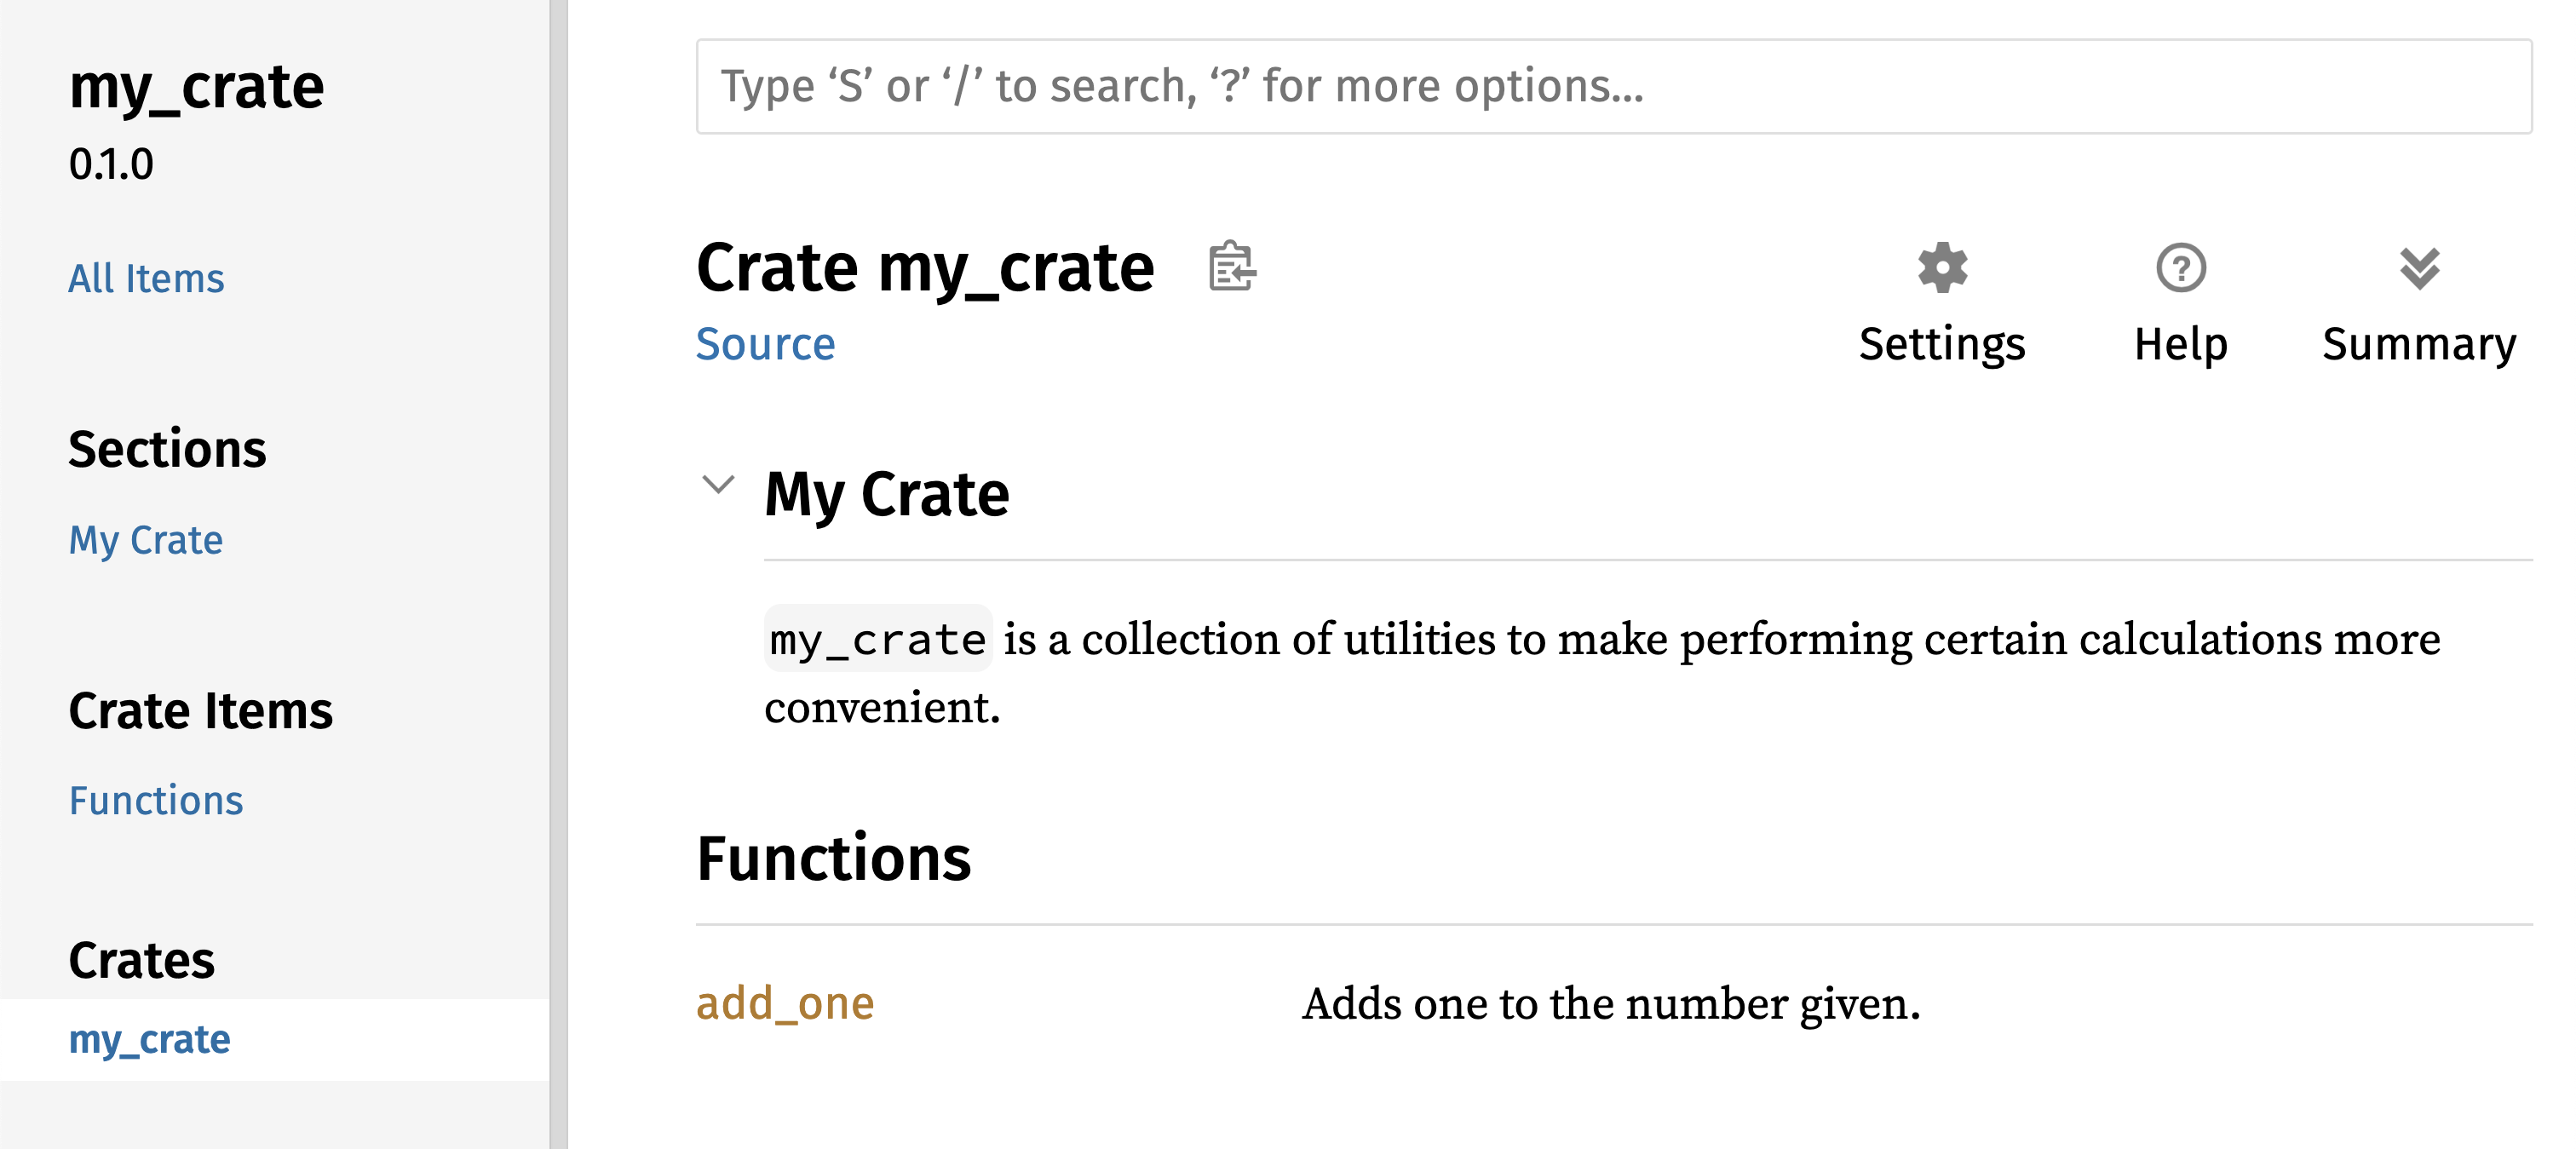
Figure 14-2: documentation ที่ render สำหรับ
my_crate รวม comment ที่อธิบาย crate ทั้งภาพรวม
Export Public API ที่สะดวก
โครงสร้างของ public API ของคุณเป็นการพิจารณาหลักเมื่อ publish crate คนที่ใช้ crate ของคุณคุ้นเคยกับโครงสร้างน้อยกว่าคุณ และอาจมี ความยากในการหาชิ้นส่วนที่พวกเขาต้องการใช้ถ้า crate ของคุณมีลำดับ ชั้นโมดูลใหญ่
ในบทที่ 7 เราครอบคลุมวิธีทำให้ item เป็น public โดยใช้ keyword
pub และวิธีนำ item เข้า scope ด้วย keyword use อย่างไรก็ตาม
โครงสร้างที่สมเหตุสมผลกับคุณในขณะที่คุณพัฒนา crate อาจไม่สะดวกมาก
สำหรับ user ของคุณ คุณอาจต้องการจัดระเบียบ struct ของคุณในลำดับ
ชั้นที่บรรจุหลายระดับ แต่จากนั้นคนที่ต้องการใช้ type ที่คุณนิยาม
ลึกในลำดับชั้นอาจมีปัญหาในการรู้ว่า type นั้นมีอยู่ พวกเขาอาจรำคาญ
ที่ต้องใส่ use my_crate::some_module::another_module::UsefulType;
แทน use my_crate::UsefulType;
ข่าวดีคือถ้าโครงสร้าง ไม่ สะดวกสำหรับคนอื่นใช้จาก library อื่น คุณ
ไม่ต้องจัดระเบียบภายในใหม่ — แทน คุณ re-export item เพื่อสร้าง
โครงสร้าง public ที่ต่างจากโครงสร้าง private ของคุณโดยใช้ pub use
ได้ Re-export รับ item public ในที่หนึ่งและทำให้มัน public ในอีก
ที่ เหมือนกับว่ามันถูกนิยามในอีกที่แทน
ตัวอย่างเช่น สมมติเราสร้าง library ชื่อ art สำหรับ model แนวคิด
ศิลปะ ภายใน library นี้มีสองโมดูล — โมดูล kinds ที่บรรจุสอง enum
ชื่อ PrimaryColor และ SecondaryColor และโมดูล utils ที่บรรจุ
ฟังก์ชันชื่อ mix ดังที่แสดงใน Listing 14-3
//! # Art
//!
//! A library for modeling artistic concepts.
pub mod kinds {
/// The primary colors according to the RYB color model.
pub enum PrimaryColor {
Red,
Yellow,
Blue,
}
/// The secondary colors according to the RYB color model.
pub enum SecondaryColor {
Orange,
Green,
Purple,
}
}
pub mod utils {
use crate::kinds::*;
/// Combines two primary colors in equal amounts to create
/// a secondary color.
pub fn mix(c1: PrimaryColor, c2: PrimaryColor) -> SecondaryColor {
// --snip--
unimplemented!();
}
}art ที่มี item จัดระเบียบเข้าโมดูล kinds และ utilsFigure 14-3 แสดงว่าหน้าแรกของ documentation สำหรับ crate นี้ที่
สร้างโดย cargo doc จะดูเป็นยังไง
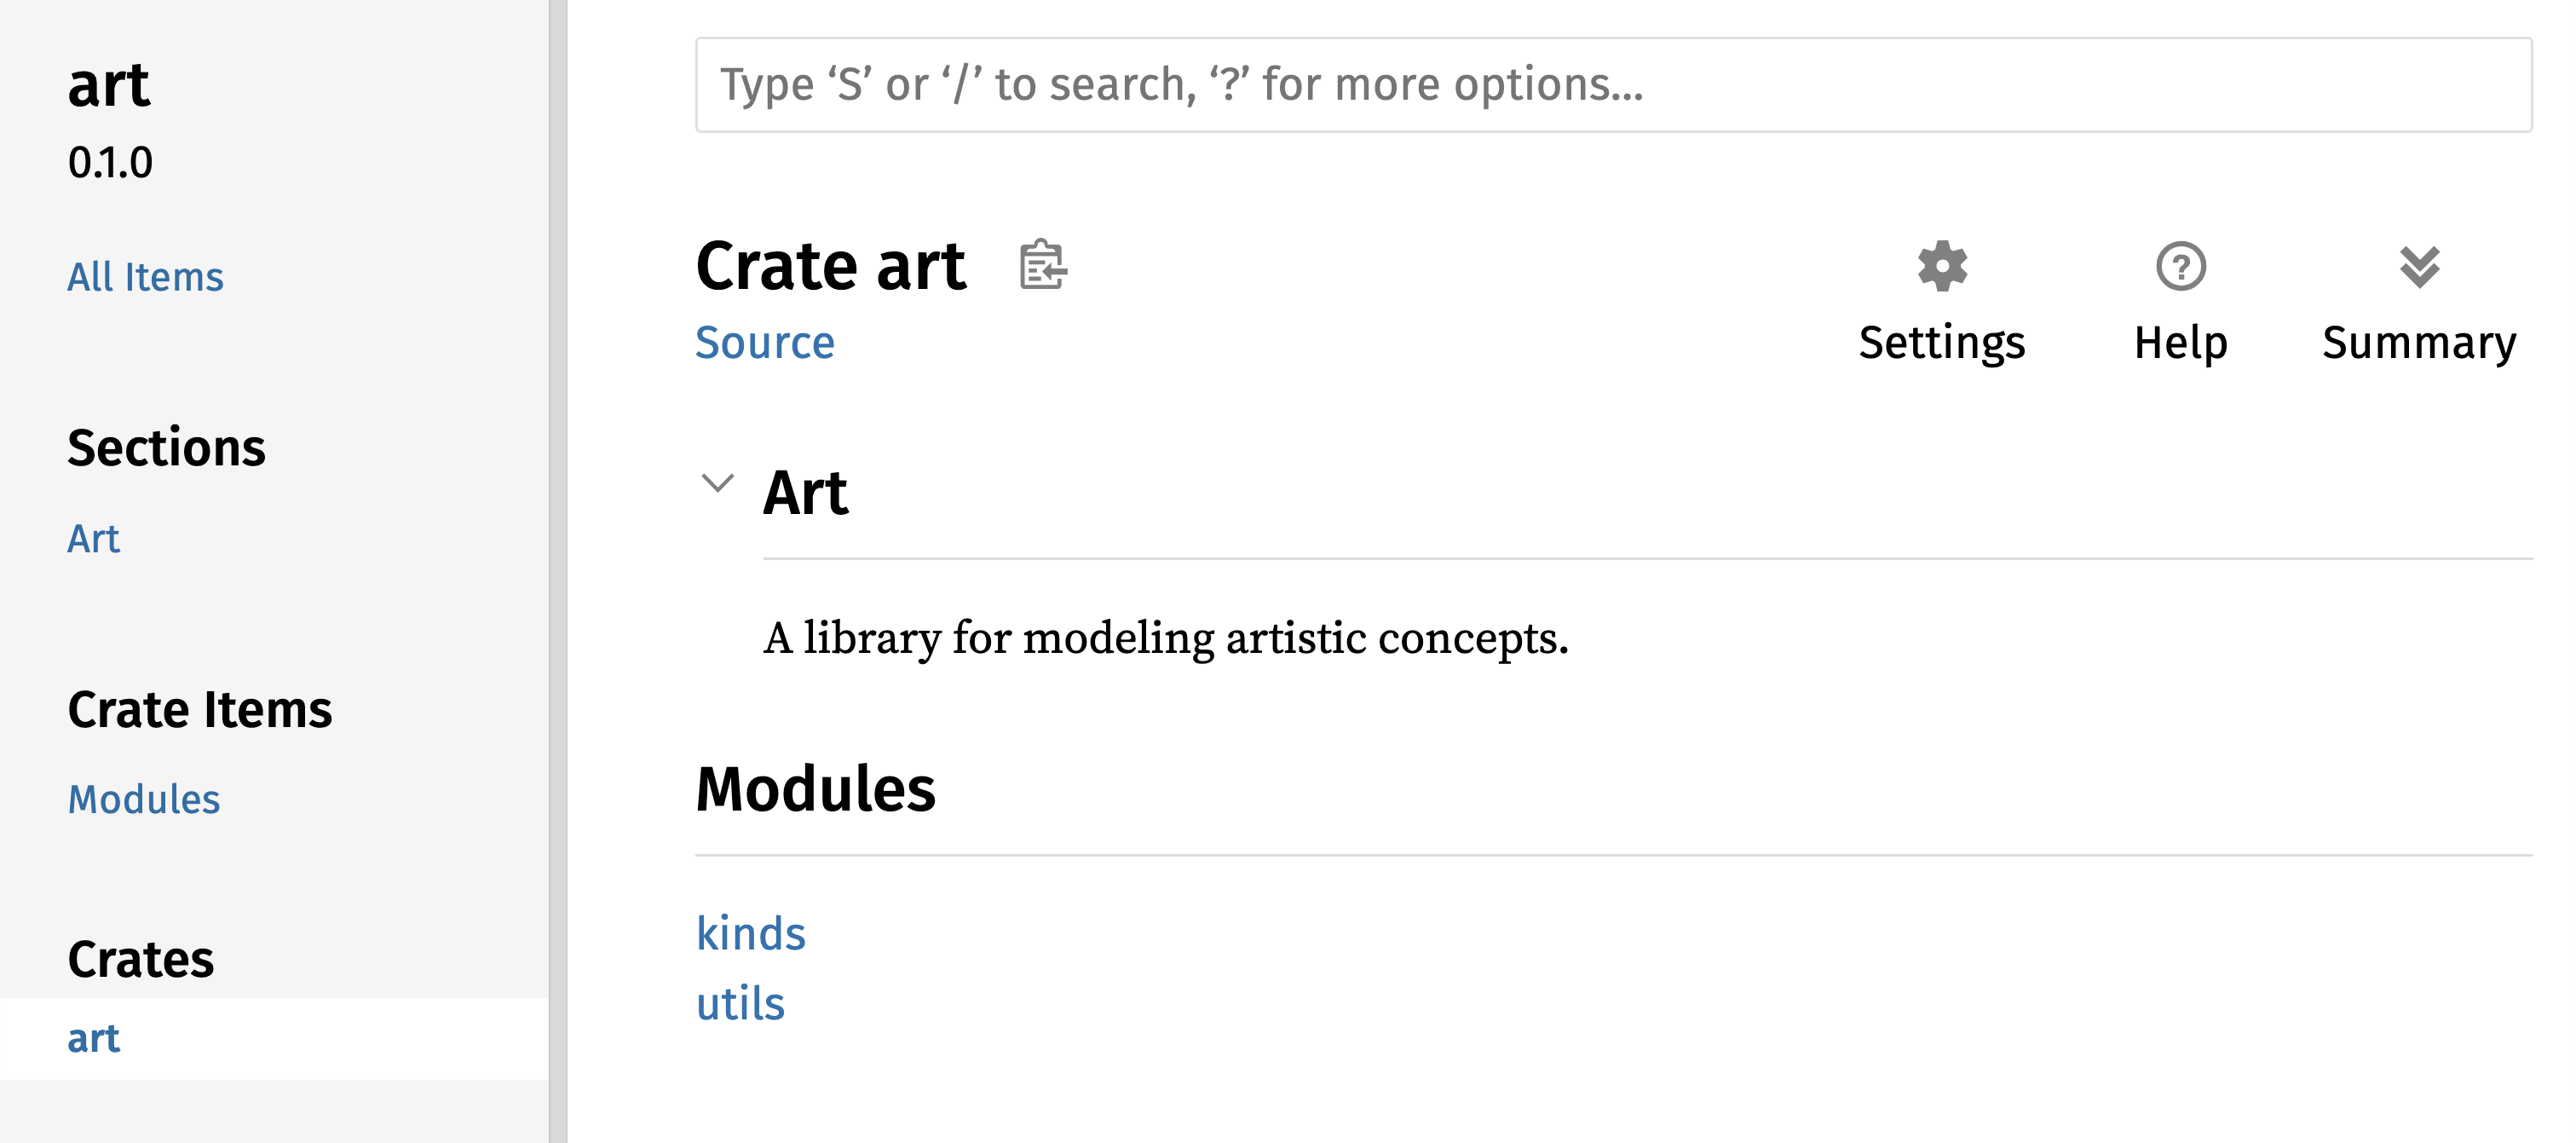
Figure 14-3: หน้าแรกของ documentation สำหรับ
art ที่ list โมดูล kinds และ utils
สังเกตว่า type PrimaryColor และ SecondaryColor ไม่ถูก list บน
หน้าแรก และฟังก์ชัน mix ก็ไม่ เราต้อง click kinds และ utils
เพื่อเห็นพวกมัน
crate อื่นที่ขึ้นกับ library นี้จะต้องการ statement use ที่นำ
item จาก art เข้า scope ระบุโครงสร้างโมดูลที่นิยามปัจจุบัน Listing
14-4 แสดงตัวอย่างของ crate ที่ใช้ item PrimaryColor และ mix
จาก crate art
use art::kinds::PrimaryColor;
use art::utils::mix;
fn main() {
let red = PrimaryColor::Red;
let yellow = PrimaryColor::Yellow;
mix(red, yellow);
}art ด้วยโครงสร้างภายในของมันที่ถูก exportผู้เขียนของโค้ดใน Listing 14-4 ที่ใช้ crate art ต้องหาว่า
PrimaryColor อยู่ในโมดูล kinds และ mix อยู่ในโมดูล utils
โครงสร้างโมดูลของ crate art เกี่ยวข้องมากกว่าต่อ developer ที่
ทำงานบน crate art มากกว่าต่อคนที่ใช้มัน โครงสร้างภายในไม่บรรจุ
ข้อมูลที่มีประโยชน์ใด ๆ สำหรับคนที่พยายามเข้าใจวิธีใช้ crate art
แต่กลับทำให้สับสนเพราะ developer ที่ใช้มันต้องหาว่ามองที่ไหน และ
ต้องระบุชื่อโมดูลใน statement use
เพื่อลบการจัดระเบียบภายในจาก public API เราแก้โค้ด crate art
ใน Listing 14-3 เพื่อเพิ่ม statement pub use เพื่อ re-export
item ที่ระดับสูง ดังที่แสดงใน Listing 14-5
//! # Art
//!
//! A library for modeling artistic concepts.
pub use self::kinds::PrimaryColor;
pub use self::kinds::SecondaryColor;
pub use self::utils::mix;
pub mod kinds {
// --snip--
/// The primary colors according to the RYB color model.
pub enum PrimaryColor {
Red,
Yellow,
Blue,
}
/// The secondary colors according to the RYB color model.
pub enum SecondaryColor {
Orange,
Green,
Purple,
}
}
pub mod utils {
// --snip--
use crate::kinds::*;
/// Combines two primary colors in equal amounts to create
/// a secondary color.
pub fn mix(c1: PrimaryColor, c2: PrimaryColor) -> SecondaryColor {
SecondaryColor::Orange
}
}pub use เพื่อ re-export itemAPI documentation ที่ cargo doc สร้างสำหรับ crate นี้ตอนนี้จะ
list และ link re-export บนหน้าแรก ดังที่แสดงใน Figure 14-4 ทำให้
type PrimaryColor และ SecondaryColor และฟังก์ชัน mix หาง่ายขึ้น
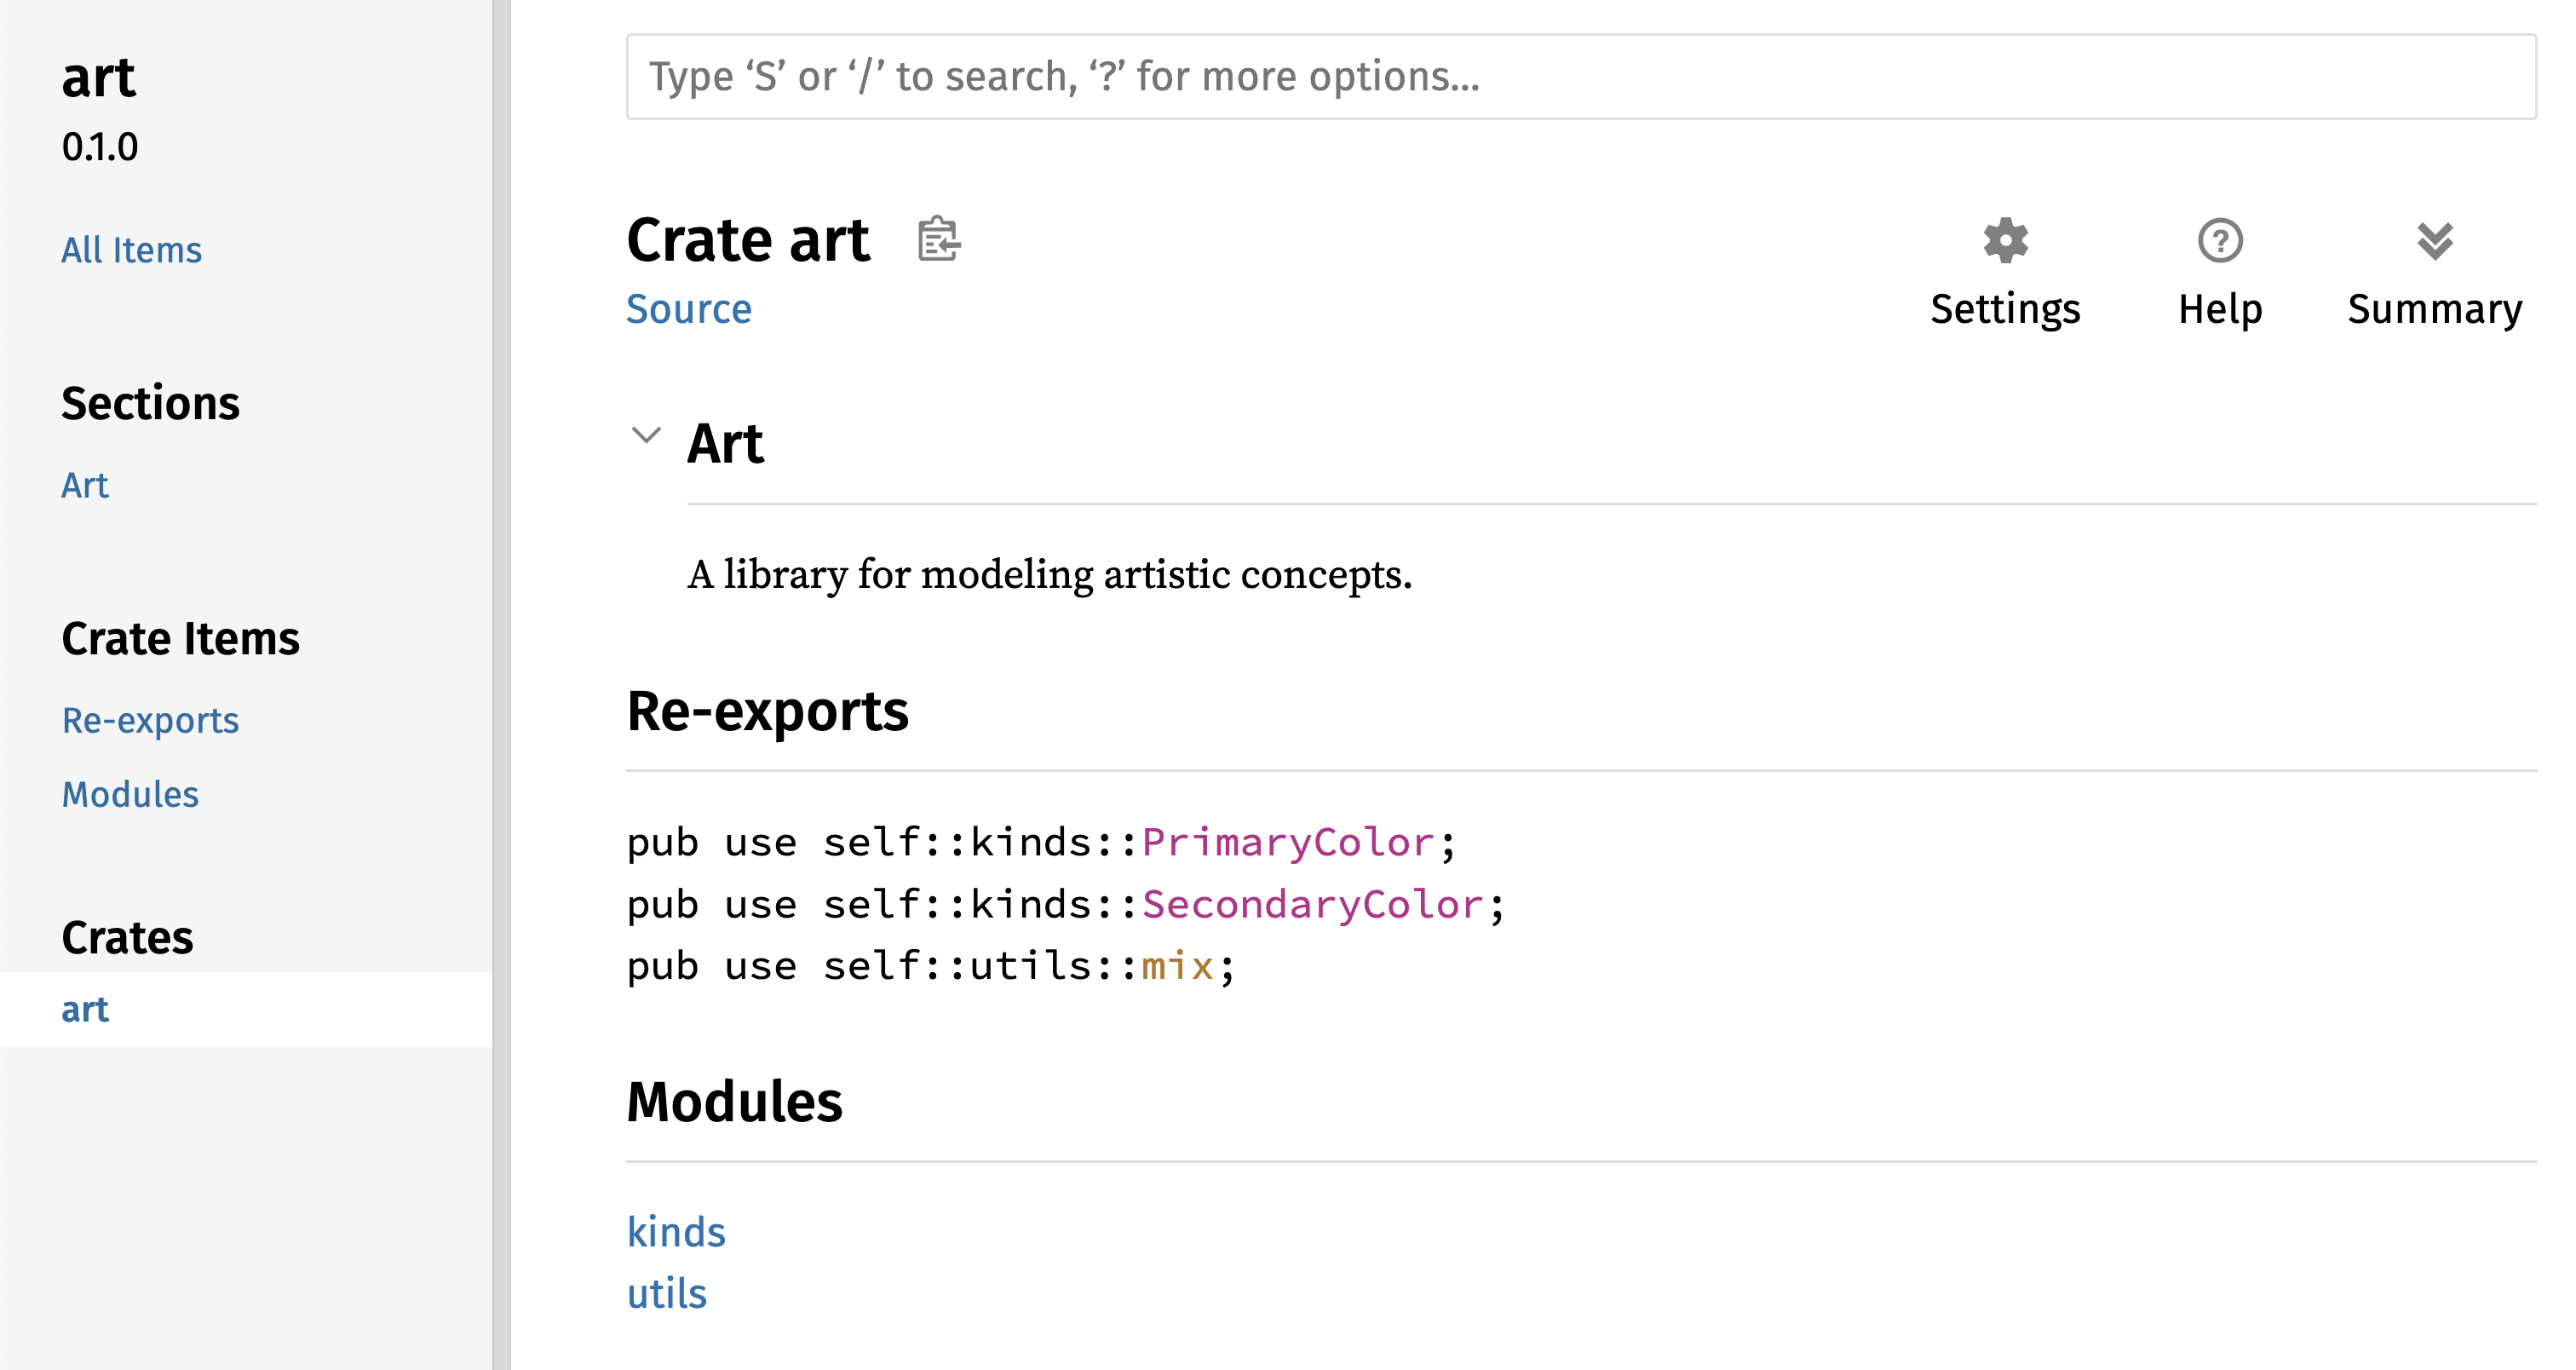
Figure 14-4: หน้าแรกของ documentation สำหรับ
art ที่ list re-export
User ของ crate art ยังเห็นและใช้โครงสร้างภายในจาก Listing 14-3
ดังที่สาธิตใน Listing 14-4 ได้ หรือพวกเขาใช้โครงสร้างที่สะดวกขึ้น
ใน Listing 14-5 ดังที่แสดงใน Listing 14-6
use art::PrimaryColor;
use art::mix;
fn main() {
// --snip--
let red = PrimaryColor::Red;
let yellow = PrimaryColor::Yellow;
mix(red, yellow);
}artในกรณีที่มีโมดูลซ้อนหลายตัว การ re-export type ที่ระดับสูงด้วย
pub use ทำให้เกิดความแตกต่างที่สำคัญในประสบการณ์ของคนที่ใช้ crate
การใช้ pub use อีกแบบที่ใช้บ่อยคือ re-export นิยามของ dependency
ใน crate ปัจจุบันเพื่อทำให้นิยามของ crate นั้นเป็นส่วนหนึ่งของ
public API ของ crate ของคุณ
การสร้างโครงสร้าง public API ที่มีประโยชน์เป็นศิลปะมากกว่าวิทยาศาสตร์
และคุณ iterate เพื่อหา API ที่ทำงานดีที่สุดสำหรับ user ของคุณได้
การเลือก pub use ให้คุณยืดหยุ่นในวิธีที่คุณจัดโครงสร้าง crate
ภายในและ decouple โครงสร้างภายในนั้นจากสิ่งที่คุณแสดงต่อ user ของ
คุณ ดูโค้ดบางส่วนของ crate ที่คุณติดตั้งเพื่อดูว่าโครงสร้างภายในของ
พวกมันต่างจาก public API ของพวกมันไหม
ตั้งค่า Account Crates.io
ก่อนที่คุณจะ publish crate ใด คุณต้องสร้าง account บน
crates.io และรับ API token เพื่อ
ทำเช่นนั้น เยี่ยมชมหน้าหลักที่
crates.io และ log in ผ่าน
GitHub account (GitHub account ปัจจุบันเป็นข้อกำหนด แต่ site อาจ
สนับสนุนวิธีอื่นในการสร้าง account ในอนาคต) เมื่อคุณ log in แล้ว
เยี่ยม account setting ของคุณที่
https://crates.io/me/ และดึง
API key ของคุณ จากนั้น รันคำสั่ง cargo login และวาง API key เมื่อ
ถูกแจ้ง แบบนี้:
$ cargo login
abcdefghijklmnopqrstuvwxyz012345
คำสั่งนี้จะแจ้ง Cargo เรื่อง API token ของคุณและเก็บมันใน local ที่ ~/.cargo/credentials.toml สังเกตว่า token นี้เป็น secret — อย่า แชร์มันกับใครอื่น ถ้าคุณแชร์มันกับใครด้วยเหตุผลใด คุณควร revoke มัน และสร้าง token ใหม่บน crates.io
เพิ่ม Metadata ให้ Crate ใหม่
สมมติว่าคุณมี crate ที่คุณต้องการ publish ก่อน publish คุณต้องเพิ่ม
metadata ใน section [package] ของไฟล์ Cargo.toml ของ crate
crate ของคุณจะต้องการชื่อ unique ในขณะที่คุณทำงานบน crate ใน local
คุณตั้งชื่อ crate อะไรก็ได้ที่คุณต้องการ อย่างไรก็ตาม ชื่อ crate
บน crates.io ถูก allocate แบบ
first-come, first-served เมื่อชื่อ crate ถูกใช้ ไม่มีใครอื่นที่ publish
crate ด้วยชื่อนั้นได้ ก่อนพยายาม publish crate ค้นหาชื่อที่คุณต้องการ
ใช้ ถ้าชื่อถูกใช้แล้ว คุณจะต้องหาชื่ออื่นและแก้ field name ในไฟล์
Cargo.toml ภายใต้ section [package] เพื่อใช้ชื่อใหม่สำหรับ
publishing แบบนี้:
Filename: Cargo.toml
[package]
name = "guessing_game"
แม้คุณจะเลือกชื่อ unique เมื่อคุณรัน cargo publish เพื่อ publish
crate ในจุดนี้ คุณจะได้ warning และตามด้วย error:
$ cargo publish
Updating crates.io index
warning: manifest has no description, license, license-file, documentation, homepage or repository.
See https://doc.rust-lang.org/cargo/reference/manifest.html#package-metadata for more info.
--snip--
error: failed to publish to registry at https://crates.io
Caused by:
the remote server responded with an error (status 400 Bad Request): missing or empty metadata fields: description, license. Please see https://doc.rust-lang.org/cargo/reference/manifest.html for more information on configuring these fields
นี่ส่งผลใน error เพราะคุณกำลังขาดข้อมูลสำคัญ — description และ
license จำเป็นเพื่อให้คนรู้ว่า crate ของคุณทำอะไรและภายใต้เงื่อนไข
ใดพวกเขาใช้มันได้ ใน Cargo.toml เพิ่ม description ที่เป็นแค่ประโยค
หรือสอง เพราะมันจะปรากฏพร้อม crate ของคุณในผลค้นหา สำหรับ field
license คุณต้องให้ ค่า license identifier
Software Package Data Exchange (SPDX) ของ Linux Foundation
list identifier ที่คุณใช้สำหรับค่านี้ได้ ตัวอย่างเช่น เพื่อระบุว่า
คุณ license crate ของคุณโดยใช้ MIT License เพิ่ม identifier MIT:
Filename: Cargo.toml
[package]
name = "guessing_game"
license = "MIT"
ถ้าคุณต้องการใช้ license ที่ไม่ปรากฏใน SPDX คุณต้องวาง text ของ
license นั้นในไฟล์ รวมไฟล์ในโปรเจกต์ของคุณ แล้วใช้ license-file
เพื่อระบุชื่อของไฟล์นั้นแทนการใช้ key license
แนวทางว่า license ไหนเหมาะสมสำหรับโปรเจกต์ของคุณอยู่นอกเหนือ scope
ของหนังสือเล่มนี้ คนหลายคนใน community Rust license โปรเจกต์ของพวก
เขาในแบบเดียวกับ Rust โดยใช้ dual license ของ MIT OR Apache-2.0
การปฏิบัตินี้สาธิตว่าคุณยังระบุ license identifier หลายตัวคั่นด้วย
OR เพื่อมี license หลายตัวสำหรับโปรเจกต์ของคุณได้
ด้วยชื่อ unique, version, description ของคุณ และ license ที่เพิ่ม ไฟล์ Cargo.toml สำหรับโปรเจกต์ที่พร้อม publish อาจดูแบบนี้:
Filename: Cargo.toml
[package]
name = "guessing_game"
version = "0.1.0"
edition = "2024"
description = "A fun game where you guess what number the computer has chosen."
license = "MIT OR Apache-2.0"
[dependencies]
Documentation ของ Cargo อธิบาย metadata อื่นที่คุณระบุได้เพื่อให้แน่ใจว่าคนอื่นค้นพบและใช้ crate ของคุณได้ง่ายขึ้น
Publish ไปยัง Crates.io
ตอนนี้คุณสร้าง account, บันทึก API token ของคุณ, เลือกชื่อสำหรับ crate ของคุณ และระบุ metadata ที่จำเป็น คุณพร้อม publish! การ publish crate อัพโหลด version เฉพาะไปยัง crates.io ให้คนอื่นใช้
ระวัง เพราะ publish เป็น ถาวร version ไม่เคยถูก overwrite ได้ และโค้ดลบไม่ได้ยกเว้นในบางสถานการณ์ เป้าหมายหลักหนึ่งของ Crates.io คือทำหน้าที่เป็น archive ถาวรของโค้ดเพื่อให้ build ของโปรเจกต์ ทั้งหมดที่ขึ้นกับ crate จาก crates.io จะทำงานต่อ การอนุญาต การลบ version จะทำให้บรรลุเป้าหมายนั้นเป็นไปไม่ได้ อย่างไรก็ตาม ไม่มีขีดจำกัดของจำนวน version ของ crate ที่คุณ publish ได้
รันคำสั่ง cargo publish อีกครั้ง มันควรสำเร็จตอนนี้:
$ cargo publish
Updating crates.io index
Packaging guessing_game v0.1.0 (file:///projects/guessing_game)
Packaged 6 files, 1.2KiB (895.0B compressed)
Verifying guessing_game v0.1.0 (file:///projects/guessing_game)
Compiling guessing_game v0.1.0
(file:///projects/guessing_game/target/package/guessing_game-0.1.0)
Finished `dev` profile [unoptimized + debuginfo] target(s) in 0.19s
Uploading guessing_game v0.1.0 (file:///projects/guessing_game)
Uploaded guessing_game v0.1.0 to registry `crates-io`
note: waiting for `guessing_game v0.1.0` to be available at registry
`crates-io`.
You may press ctrl-c to skip waiting; the crate should be available shortly.
Published guessing_game v0.1.0 at registry `crates-io`
ยินดีด้วย! ตอนนี้คุณแชร์โค้ดของคุณกับ community Rust แล้ว และใคร ๆ เพิ่ม crate ของคุณเป็น dependency ของโปรเจกต์ของพวกเขาได้ง่าย
Publish Version ใหม่ของ Crate ที่มีอยู่
เมื่อคุณทำการเปลี่ยนแปลงให้ crate ของคุณและพร้อม release version
ใหม่ คุณเปลี่ยนค่า version ที่ระบุในไฟล์ Cargo.toml ของคุณและ
republish ใช้ กฎ Semantic Versioning เพื่อตัดสินว่าตัวเลข
version ถัดไปที่เหมาะสมคืออะไร ตามประเภทของการเปลี่ยนแปลงที่คุณทำ
จากนั้น รัน cargo publish เพื่ออัพโหลด version ใหม่
Deprecate Version จาก Crates.io
แม้คุณลบ version ก่อนหน้าของ crate ไม่ได้ คุณป้องกันโปรเจกต์ในอนาคต จากการเพิ่มพวกมันเป็น dependency ใหม่ได้ นี่มีประโยชน์เมื่อ version ของ crate ถูกพังด้วยเหตุผลใดเหตุผลหนึ่ง ในสถานการณ์เช่นนี้ Cargo สนับสนุนการ yank version ของ crate
Yank version ป้องกันโปรเจกต์ใหม่จากการขึ้นกับ version นั้นใน ขณะที่อนุญาตให้โปรเจกต์ที่มีอยู่ทั้งหมดที่ขึ้นกับมันดำเนินต่อ โดย หลัก yank แปลว่าโปรเจกต์ทั้งหมดที่มี Cargo.lock จะไม่พัง และไฟล์ Cargo.lock ในอนาคตที่สร้างจะไม่ใช้ version ที่ถูก yank
เพื่อ yank version ของ crate ใน directory ของ crate ที่คุณเคย
publish ก่อนหน้า รัน cargo yank และระบุ version ที่คุณต้องการ
yank ตัวอย่างเช่น ถ้าเราเคย publish crate ชื่อ guessing_game
version 1.0.1 และเราต้องการ yank มัน เราจะรันต่อไปนี้ใน directory
โปรเจกต์สำหรับ guessing_game:
$ cargo yank --vers 1.0.1
Updating crates.io index
Yank [email protected]
โดยเพิ่ม --undo ในคำสั่ง คุณยัง undo yank และอนุญาตให้โปรเจกต์
เริ่มขึ้นกับ version อีกได้:
$ cargo yank --vers 1.0.1 --undo
Updating crates.io index
Unyank [email protected]
Yank ไม่ ลบโค้ดใด ตัวอย่างเช่น มันไม่สามารถลบ secret ที่อัพโหลด โดยบังเอิญได้ ถ้าสิ่งนั้นเกิด คุณต้อง reset secret เหล่านั้นทันที
Cargo workspace
Cargo Workspace
ในบทที่ 12 เราสร้าง package ที่รวม binary crate และ library crate เมื่อโปรเจกต์ของคุณพัฒนา คุณอาจพบว่า library crate ใหญ่ขึ้นต่อเนื่อง และคุณต้องการแยก package ของคุณเพิ่มเข้า library crate หลายตัว Cargo เสนอฟีเจอร์ที่เรียกว่า workspace ที่ช่วยจัดการ package ที่เกี่ยวข้อง หลายตัวที่ถูกพัฒนาควบคู่กัน
สร้าง Workspace
workspace คือชุดของ package ที่แชร์ Cargo.lock และ output
directory เดียวกัน มาสร้างโปรเจกต์โดยใช้ workspace — เราจะใช้โค้ดเล็ก
น้อยเพื่อให้เราโฟกัสที่โครงสร้างของ workspace มีหลายวิธีในการจัด
โครงสร้าง workspace ดังนั้นเราจะแสดงเพียงวิธีทั่วไปหนึ่ง เราจะมี
workspace ที่บรรจุ binary และสอง library โดย binary ซึ่งจะให้
functionality หลัก จะขึ้นกับสอง library นั้น library หนึ่งจะให้ฟังก์ชัน add_one และ
library อื่นฟังก์ชัน add_two สาม crate เหล่านี้จะเป็นส่วนของ
workspace เดียวกัน เราจะเริ่มโดยสร้าง directory ใหม่สำหรับ workspace:
$ mkdir add
$ cd add
ถัดไป ใน directory add เราสร้างไฟล์ Cargo.toml ที่จะ configure
workspace ทั้งหมด ไฟล์นี้จะไม่มี section [package] แทน มันจะเริ่ม
ด้วย section [workspace] ที่จะอนุญาตให้เราเพิ่ม member ให้
workspace เรายังพยายามใช้ version ล่าสุดและดีที่สุดของอัลกอริทึม
resolver ของ Cargo ใน workspace ของเราโดยตั้งค่า resolver เป็น "3":
Filename: Cargo.toml
[workspace]
resolver = "3"
ถัดไป เราจะสร้าง binary crate adder โดยรัน cargo new ภายใน
directory add:
$ cargo new adder
Created binary (application) `adder` package
Adding `adder` as member of workspace at `file:///projects/add`
การรัน cargo new ภายใน workspace ยังเพิ่ม package ที่เพิ่งสร้าง
อัตโนมัติให้ key members ในนิยาม [workspace] ใน Cargo.toml ของ
workspace แบบนี้:
[workspace]
resolver = "3"
members = ["adder"]
ในจุดนี้ เรา build workspace ได้โดยรัน cargo build ไฟล์ใน
directory add ของคุณควรดูแบบนี้:
├── Cargo.lock
├── Cargo.toml
├── adder
│ ├── Cargo.toml
│ └── src
│ └── main.rs
└── target
workspace มี directory target หนึ่งที่ระดับสูงที่ artifact ที่
คอมไพล์จะถูกวาง — package adder ไม่มี directory target ของตัวเอง
แม้เราจะรัน cargo build จากภายใน directory adder artifact ที่
คอมไพล์จะยังลงเอยที่ add/target ไม่ใช่ add/adder/target Cargo จัด
โครงสร้าง directory target ใน workspace แบบนี้เพราะ crate ใน
workspace มีไว้ขึ้นต่อกัน ถ้าแต่ละ crate มี directory target ของ
ตัวเอง แต่ละ crate จะต้อง recompile แต่ละ crate อื่นใน workspace เพื่อ
วาง artifact ใน directory target ของตัวเอง โดยแชร์ directory
target เดียว crate หลีกเลี่ยงการ rebuild ที่ไม่จำเป็นได้
สร้าง Package ที่สองใน Workspace
ถัดไป มาสร้าง package member อีกตัวใน workspace และเรียกมัน
add_one สร้าง library crate ใหม่ชื่อ add_one:
$ cargo new add_one --lib
Created library `add_one` package
Adding `add_one` as member of workspace at `file:///projects/add`
Cargo.toml ระดับสูงตอนนี้จะรวม path add_one ใน list members:
Filename: Cargo.toml
[workspace]
resolver = "3"
members = ["adder", "add_one"]
directory add ของคุณตอนนี้ควรมี directory และไฟล์เหล่านี้:
├── Cargo.lock
├── Cargo.toml
├── add_one
│ ├── Cargo.toml
│ └── src
│ └── lib.rs
├── adder
│ ├── Cargo.toml
│ └── src
│ └── main.rs
└── target
ในไฟล์ add_one/src/lib.rs มาเพิ่มฟังก์ชัน add_one:
Filename: add_one/src/lib.rs
pub fn add_one(x: i32) -> i32 {
x + 1
}ตอนนี้เรามี package adder กับ binary ของเราขึ้นกับ package
add_one ที่มี library ของเรา ก่อนอื่น เราจะต้องเพิ่ม path
dependency บน add_one ให้ adder/Cargo.toml
Filename: adder/Cargo.toml
[dependencies]
add_one = { path = "../add_one" }
Cargo ไม่สมมติว่า crate ใน workspace จะขึ้นต่อกัน ดังนั้นเราต้อง ชัดเจนเกี่ยวกับความสัมพันธ์ของ dependency
ถัดไป มาใช้ฟังก์ชัน add_one (จาก crate add_one) ใน crate
adder เปิดไฟล์ adder/src/main.rs และเปลี่ยนฟังก์ชัน main ให้
เรียกฟังก์ชัน add_one ดังใน Listing 14-7
fn main() {
let num = 10;
println!("Hello, world! {num} plus one is {}!", add_one::add_one(num));
}add_one จาก crate adderมา build workspace โดยรัน cargo build ใน directory add ระดับสูง!
$ cargo build
Compiling add_one v0.1.0 (file:///projects/add/add_one)
Compiling adder v0.1.0 (file:///projects/add/adder)
Finished `dev` profile [unoptimized + debuginfo] target(s) in 0.22s
เพื่อรัน binary crate จาก directory add เราระบุว่า package ไหนใน
workspace ที่เราต้องการรันโดยใช้อาร์กิวเมนต์ -p และชื่อ package
กับ cargo run ได้:
$ cargo run -p adder
Finished `dev` profile [unoptimized + debuginfo] target(s) in 0.00s
Running `target/debug/adder`
Hello, world! 10 plus one is 11!
นี่รันโค้ดใน adder/src/main.rs ซึ่งขึ้นกับ crate add_one
ขึ้นกับ Package ภายนอก
สังเกตว่า workspace มีไฟล์ Cargo.lock เพียงไฟล์เดียวที่ระดับสูง
ไม่ใช่มี Cargo.lock ใน directory ของแต่ละ crate นี่รับประกันว่า
crate ทั้งหมดใช้ version เดียวกันของ dependency ทั้งหมด ถ้าเราเพิ่ม
package rand ในไฟล์ adder/Cargo.toml และ add_one/Cargo.toml
Cargo จะ resolve ทั้งสองเป็น version หนึ่งของ rand และบันทึกใน
Cargo.lock เดียว การทำให้ crate ทั้งหมดใน workspace ใช้ dependency
เดียวกันแปลว่า crate จะเข้ากันได้กับกันและกันเสมอ มาเพิ่ม crate
rand ที่ section [dependencies] ในไฟล์ add_one/Cargo.toml
เพื่อให้เราใช้ crate rand ใน crate add_one ได้:
Filename: add_one/Cargo.toml
[dependencies]
rand = "0.8.5"
ตอนนี้เราเพิ่ม use rand; ในไฟล์ add_one/src/lib.rs ได้ และ
build workspace ทั้งหมดโดยรัน cargo build ใน directory add จะ
นำมาและคอมไพล์ crate rand เราจะได้ warning หนึ่งเพราะเราไม่ได้อ้าง
ถึง rand ที่เรานำเข้า scope:
$ cargo build
Updating crates.io index
Downloaded rand v0.8.5
--snip--
Compiling rand v0.8.5
Compiling add_one v0.1.0 (file:///projects/add/add_one)
warning: unused import: `rand`
--> add_one/src/lib.rs:1:5
|
1 | use rand;
| ^^^^
|
= note: `#[warn(unused_imports)]` on by default
warning: `add_one` (lib) generated 1 warning (run `cargo fix --lib -p add_one` to apply 1 suggestion)
Compiling adder v0.1.0 (file:///projects/add/adder)
Finished `dev` profile [unoptimized + debuginfo] target(s) in 0.95s
Cargo.lock ระดับสูงตอนนี้บรรจุข้อมูลเกี่ยวกับ dependency ของ
add_one บน rand อย่างไรก็ตาม แม้ rand ถูกใช้ที่ใดที่หนึ่งใน
workspace เราใช้มันใน crate อื่นใน workspace ไม่ได้ยกเว้นเราเพิ่ม
rand ในไฟล์ Cargo.toml ของพวกมันด้วย ตัวอย่างเช่น ถ้าเราเพิ่ม
use rand; ในไฟล์ adder/src/main.rs สำหรับ package adder เรา
จะได้ error:
$ cargo build
--snip--
Compiling adder v0.1.0 (file:///projects/add/adder)
error[E0432]: unresolved import `rand`
--> adder/src/main.rs:2:5
|
2 | use rand;
| ^^^^ no external crate `rand`
เพื่อแก้นี้ แก้ไฟล์ Cargo.toml สำหรับ package adder และระบุว่า
rand เป็น dependency สำหรับมันด้วย การ build package adder จะ
เพิ่ม rand ใน list ของ dependency สำหรับ adder ใน Cargo.lock
แต่ไม่มี copy เพิ่มของ rand ที่จะถูก download Cargo จะรับประกันว่า
ทุก crate ในทุก package ใน workspace ที่ใช้ package rand จะใช้
version เดียวกันตราบใดที่พวกมันระบุ version ที่เข้ากันได้ของ rand
ประหยัดพื้นที่ของเราและรับประกันว่า crate ใน workspace จะเข้ากันได้
กับกันและกัน
ถ้า crate ใน workspace ระบุ version ที่ไม่เข้ากันได้ของ dependency เดียวกัน Cargo จะ resolve แต่ละตัว แต่ยังพยายาม resolve version น้อยที่สุดเท่าที่จะเป็นไปได้
เพิ่มเทสให้ Workspace
สำหรับการปรับปรุงอื่น มาเพิ่มเทสของฟังก์ชัน add_one::add_one ภายใน
crate add_one:
Filename: add_one/src/lib.rs
pub fn add_one(x: i32) -> i32 {
x + 1
}
#[cfg(test)]
mod tests {
use super::*;
#[test]
fn it_works() {
assert_eq!(3, add_one(2));
}
}ตอนนี้รัน cargo test ใน directory add ระดับสูง การรัน
cargo test ใน workspace ที่จัดโครงสร้างแบบนี้จะรันเทสสำหรับ crate
ทั้งหมดใน workspace:
$ cargo test
Compiling add_one v0.1.0 (file:///projects/add/add_one)
Compiling adder v0.1.0 (file:///projects/add/adder)
Finished `test` profile [unoptimized + debuginfo] target(s) in 0.20s
Running unittests src/lib.rs (target/debug/deps/add_one-93c49ee75dc46543)
running 1 test
test tests::it_works ... ok
test result: ok. 1 passed; 0 failed; 0 ignored; 0 measured; 0 filtered out; finished in 0.00s
Running unittests src/main.rs (target/debug/deps/adder-3a47283c568d2b6a)
running 0 tests
test result: ok. 0 passed; 0 failed; 0 ignored; 0 measured; 0 filtered out; finished in 0.00s
Doc-tests add_one
running 0 tests
test result: ok. 0 passed; 0 failed; 0 ignored; 0 measured; 0 filtered out; finished in 0.00s
section แรกของ output แสดงว่าเทส it_works ใน crate add_one ผ่าน
section ถัดไปแสดงว่าพบเทสศูนย์ใน crate adder และ section สุดท้าย
แสดงว่าพบ documentation test ศูนย์ใน crate add_one
เรายังรันเทสสำหรับ crate ตัวใดตัวหนึ่งใน workspace จาก directory
ระดับสูงได้โดยใช้ flag -p และระบุชื่อของ crate ที่เราต้องการ
ทดสอบ:
$ cargo test -p add_one
Finished `test` profile [unoptimized + debuginfo] target(s) in 0.00s
Running unittests src/lib.rs (target/debug/deps/add_one-93c49ee75dc46543)
running 1 test
test tests::it_works ... ok
test result: ok. 1 passed; 0 failed; 0 ignored; 0 measured; 0 filtered out; finished in 0.00s
Doc-tests add_one
running 0 tests
test result: ok. 0 passed; 0 failed; 0 ignored; 0 measured; 0 filtered out; finished in 0.00s
output นี้แสดงว่า cargo test รันเฉพาะเทสสำหรับ crate add_one
และไม่ได้รันเทส crate adder
ถ้าคุณ publish crate ใน workspace ไปยัง
crates.io แต่ละ crate ใน
workspace จะต้องถูก publish แยก เช่นเดียวกับ cargo test เรา
publish crate ตัวใดตัวหนึ่งใน workspace ของเราได้โดยใช้ flag -p
และระบุชื่อของ crate ที่เราต้องการ publish
สำหรับการฝึกเพิ่ม เพิ่ม crate add_two ให้ workspace นี้ในแบบ
คล้ายกับ crate add_one!
เมื่อโปรเจกต์ของคุณเติบโต พิจารณาใช้ workspace — มันช่วยให้คุณทำงาน กับ component เล็กลง เข้าใจง่ายขึ้น มากกว่าหนึ่ง blob ใหญ่ของโค้ด นอกจากนี้ การเก็บ crate ใน workspace ทำให้การประสานงานระหว่าง crate ง่ายขึ้นได้ถ้าพวกมันมักถูกเปลี่ยนพร้อมกัน
ติดตั้ง binary ด้วย cargo install
ติดตั้ง Binary ด้วย cargo install
คำสั่ง cargo install อนุญาตให้คุณติดตั้งและใช้ binary crate ใน
local นี่ไม่ได้มีไว้แทน package ของระบบ — มันมีไว้เป็นวิธีสะดวก
สำหรับ developer Rust ในการติดตั้งเครื่องมือที่คนอื่นแชร์บน
crates.io สังเกตว่าคุณติดตั้ง
ได้เฉพาะ package ที่มี binary target binary target คือโปรแกรมที่
รันได้ที่ถูกสร้างถ้า crate มีไฟล์ src/main.rs หรือไฟล์อื่นที่ระบุ
เป็น binary ตรงข้ามกับ library target ที่รันไม่ได้ด้วยตัวเองแต่
เหมาะสำหรับรวมภายในโปรแกรมอื่น โดยปกติ crate มีข้อมูลในไฟล์ README
เกี่ยวกับว่า crate เป็น library, มี binary target หรือทั้งสอง
binary ทั้งหมดที่ติดตั้งด้วย cargo install ถูกเก็บใน folder bin
ของ root การติดตั้ง ถ้าคุณติดตั้ง Rust โดยใช้ rustup.rs และไม่มี
configuration กำหนดเอง directory นี้จะเป็น $HOME/.cargo/bin ทำให้
แน่ใจว่า directory นี้อยู่ใน $PATH ของคุณเพื่อสามารถรันโปรแกรมที่
คุณติดตั้งด้วย cargo install ได้
ตัวอย่างเช่น ในบทที่ 12 เรากล่าวว่ามี implementation Rust ของ
เครื่องมือ grep ที่เรียก ripgrep สำหรับค้นหาไฟล์ เพื่อติดตั้ง
ripgrep เรารันต่อไปนี้ได้:
$ cargo install ripgrep
Updating crates.io index
Downloaded ripgrep v14.1.1
Downloaded 1 crate (213.6 KB) in 0.40s
Installing ripgrep v14.1.1
--snip--
Compiling grep v0.3.2
Finished `release` profile [optimized + debuginfo] target(s) in 6.73s
Installing ~/.cargo/bin/rg
Installed package `ripgrep v14.1.1` (executable `rg`)
บรรทัดที่สองท้ายสุดของ output แสดงที่อยู่และชื่อของ binary ที่ติดตั้ง
ซึ่งในกรณีของ ripgrep คือ rg ตราบใดที่ directory การติดตั้ง
อยู่ใน $PATH ของคุณ ดังที่กล่าวก่อนหน้า คุณรัน rg --help และ
เริ่มใช้เครื่องมือที่เร็วและ Rust ขึ้นสำหรับค้นหาไฟล์!
ขยาย Cargo ด้วยคำสั่ง custom
ขยาย Cargo ด้วยคำสั่ง Custom
Cargo ถูกออกแบบเพื่อให้คุณขยายมันด้วย subcommand ใหม่โดยไม่ต้องแก้
มันได้ ถ้า binary ใน $PATH ของคุณชื่อ cargo-something คุณรันมัน
เหมือนเป็น subcommand ของ Cargo โดยรัน cargo something ได้ คำสั่ง
custom แบบนี้ยังถูก list เมื่อคุณรัน cargo --list การสามารถใช้
cargo install เพื่อติดตั้ง extension และจากนั้นรันพวกมันเหมือน
เครื่องมือ Cargo ที่ built-in เป็นข้อดีที่สะดวกสุด ๆ ของการออกแบบ
ของ Cargo!
สรุป
การแชร์โค้ดด้วย Cargo และ crates.io เป็นส่วนของสิ่งที่ทำ ให้ ecosystem ของ Rust มีประโยชน์สำหรับงานหลากหลายต่างกัน standard library ของ Rust เล็กและเสถียร แต่ crate ง่ายที่จะแชร์ ใช้ และ ปรับปรุงในช่วงเวลาต่างจากของภาษา อย่าอายที่จะแชร์โค้ดที่มีประโยชน์ ต่อคุณบน crates.io — เป็นไปได้ ว่ามันจะมีประโยชน์ต่อคนอื่นด้วย!
Smart Pointer
pointer คือแนวคิดทั่วไปสำหรับตัวแปรที่บรรจุ address ใน memory
address นี้อ้างถึง หรือ “ชี้ที่” ข้อมูลอื่น ประเภท pointer ที่ทั่วไปที่สุดใน
Rust คือ reference ซึ่งคุณเรียนในบทที่ 4 reference ถูกระบุด้วย
สัญลักษณ์ & และ borrow ค่าที่พวกมันชี้ พวกมันไม่มีความสามารถพิเศษ
ใด ๆ นอกจากการอ้างถึงข้อมูล และพวกมันไม่มี overhead
Smart pointer ในทางตรงข้าม คือโครงสร้างข้อมูลที่ทำตัวเหมือน pointer แต่ยังมี metadata เพิ่มและความสามารถ แนวคิดของ smart pointer ไม่ unique กับ Rust — smart pointer มีต้นกำเนิดใน C++ และมีอยู่ในภาษาอื่น ด้วย Rust มี smart pointer ที่หลากหลายนิยามใน standard library ที่ ให้ functionality นอกเหนือที่ reference ให้ เพื่อสำรวจแนวคิดทั่วไป เราจะดูตัวอย่างต่าง ๆ ของ smart pointer รวมถึงประเภท smart pointer แบบ reference counting pointer นี้อนุญาตให้คุณให้ข้อมูลมีหลาย owner โดยตามจำนวน owner และเมื่อไม่มี owner เหลือ ทำความสะอาดข้อมูล
ใน Rust ด้วยแนวคิดของ ownership และ borrowing มีความแตกต่างเพิ่ม ระหว่าง reference และ smart pointer — ในขณะที่ reference เพียง borrow ข้อมูล ในหลายกรณี smart pointer own ข้อมูลที่พวกมันชี้
Smart pointer มักถูก implement โดยใช้ struct ต่างจาก struct ปกติ
smart pointer implement trait Deref และ Drop trait Deref
อนุญาตให้ instance ของ struct smart pointer ทำตัวเหมือน reference
เพื่อให้คุณเขียนโค้ดของคุณทำงานกับ reference หรือ smart pointer
trait Drop อนุญาตให้คุณกำหนดโค้ดที่รันเมื่อ instance ของ smart
pointer ออกจาก scope ในบทนี้ เราจะพูดถึงทั้งสอง trait และสาธิตทำไม
พวกมันสำคัญต่อ smart pointer
เนื่องจาก pattern smart pointer เป็น design pattern ทั่วไปที่ใช้ บ่อยใน Rust บทนี้จะไม่ครอบคลุม smart pointer ที่มีอยู่ทุกตัว หลาย library มี smart pointer ของตัวเอง และคุณยังเขียนของตัวเองได้ เรา จะครอบคลุม smart pointer ที่ใช้บ่อยที่สุดใน standard library:
Box<T>สำหรับ allocate ค่าบน heapRc<T>ประเภท reference counting ที่อนุญาตให้มี ownership หลายRef<T>และRefMut<T>ที่เข้าถึงผ่านRefCell<T>ประเภทที่ บังคับใช้กฎ borrowing ที่ runtime แทน compile time
นอกจากนี้ เราจะครอบคลุม pattern interior mutability ที่ประเภท immutable expose API สำหรับ mutate ค่าภายใน เรายังจะพูดถึง reference cycle — ว่าพวกมันรั่ว memory ได้ยังไงและวิธีป้องกัน
มาดำดิ่งกัน!
ใช้ Box<T> ชี้ไปยังข้อมูลบน heap
ใช้ Box<T> ชี้ไปยังข้อมูลบน Heap
smart pointer ที่ตรงไปตรงมาที่สุดคือ box ซึ่ง type ของมันถูกเขียน
Box<T> Box อนุญาตให้คุณเก็บข้อมูลบน heap ไม่ใช่ stack สิ่งที่เหลือ
บน stack คือ pointer ไปยังข้อมูล heap อ้างอิงบทที่ 4 เพื่อทบทวนความ
แตกต่างระหว่าง stack และ heap
Box ไม่มี overhead performance นอกจากการเก็บข้อมูลของพวกมันบน heap แทนบน stack แต่พวกมันก็ไม่มีความสามารถเพิ่มมาก คุณจะใช้พวกมันบ่อยที่ สุดในสถานการณ์เหล่านี้:
- เมื่อคุณมี type ที่ขนาดไม่รู้ที่ compile time และคุณต้องการใช้ค่า ของ type นั้นใน context ที่ต้องการขนาดแน่นอน
- เมื่อคุณมีข้อมูลจำนวนมาก และคุณต้องการโอน ownership แต่ต้องการ มั่นใจว่าข้อมูลจะไม่ถูก copy เมื่อคุณทำ
- เมื่อคุณต้องการ own ค่า และคุณสนใจเพียงว่ามันเป็น type ที่ implement trait เฉพาะ ไม่ใช่เป็น type เฉพาะ
เราจะสาธิตสถานการณ์แรกใน “เปิดใช้ Recursive Type ด้วย Box” ในกรณีที่สอง การโอน ownership ของข้อมูลจำนวนมากใช้เวลานานเพราะข้อมูล ถูก copy ไปมาบน stack เพื่อปรับปรุง performance ในสถานการณ์นี้ เรา เก็บข้อมูลจำนวนมากบน heap ใน box ได้ จากนั้น เฉพาะข้อมูล pointer จำนวนน้อยถูก copy ไปมาบน stack ในขณะที่ข้อมูลที่มันอ้างถึงอยู่ที่ เดียวบน heap กรณีที่สามเรียกว่า trait object และ “ใช้ Trait Object เพื่อ Abstract เหนือพฤติกรรมร่วม” ในบทที่ 18 อุทิศให้กับหัวข้อนั้น ดังนั้น สิ่งที่คุณเรียนที่นี่คุณจะ ใช้อีกในส่วนนั้น!
เก็บข้อมูลบน Heap
ก่อนที่เราจะพูดถึง use case เก็บ heap สำหรับ Box<T> เราจะครอบคลุม
syntax และวิธี interact กับค่าที่เก็บภายใน Box<T>
Listing 15-1 แสดงวิธีใช้ box เพื่อเก็บค่า i32 บน heap
fn main() {
let b = Box::new(5);
println!("b = {b}");
}i32 บน heap โดยใช้ boxเรานิยามตัวแปร b ให้มีค่าของ Box ที่ชี้ไปยังค่า 5 ซึ่ง allocate
บน heap โปรแกรมนี้จะ print b = 5 — ในกรณีนี้ เราเข้าถึงข้อมูลใน
box คล้ายกับวิธีที่เราจะถ้าข้อมูลนี้อยู่บน stack เช่นเดียวกับค่า own
ใด ๆ เมื่อ box ออกจาก scope เช่นที่ b ทำที่ท้ายสุดของ main มัน
จะถูก deallocate การ deallocate เกิดทั้งสำหรับ box (เก็บบน stack)
และข้อมูลที่มันชี้ (เก็บบน heap)
การใส่ค่าเดียวบน heap ไม่มีประโยชน์มาก ดังนั้นคุณจะไม่ใช้ box โดย
ตัวเองในวิธีนี้บ่อยมาก การมีค่าเช่น i32 เดียวบน stack ที่พวกมัน
ถูกเก็บเป็นค่าเริ่มต้น เหมาะสมมากกว่าในสถานการณ์ส่วนใหญ่ มาดูกรณีที่
box อนุญาตให้เรานิยาม type ที่เราจะไม่ได้รับอนุญาตให้นิยามถ้าเราไม่
มี box
เปิดใช้ Recursive Type ด้วย Box
ค่าของ recursive type สามารถมีค่าอื่นของ type เดียวกันเป็นส่วนของ ตัวเองได้ Recursive type ก่อให้เกิดประเด็นเพราะ Rust ต้องรู้ที่ compile time ว่า type ใช้พื้นที่เท่าไร อย่างไรก็ตาม การซ้อนของค่า ของ recursive type ในทางทฤษฎีอาจดำเนินไปไม่สิ้นสุด ดังนั้น Rust รู้ ไม่ได้ว่าค่าต้องการพื้นที่เท่าไร เพราะ box มีขนาดที่รู้ เราเปิดใช้ recursive type โดย insert box ในนิยาม recursive type ได้
เป็นตัวอย่างของ recursive type มาสำรวจ cons list นี่เป็นประเภทข้อมูล ที่พบบ่อยในภาษาโปรแกรม functional ประเภท cons list ที่เราจะนิยาม ตรงไปตรงมา ยกเว้นการ recursion — ดังนั้น แนวคิดในตัวอย่างที่เราจะ ทำงานด้วยจะมีประโยชน์เมื่อใดก็ตามที่คุณเข้าไปในสถานการณ์ซับซ้อน มากขึ้นที่เกี่ยวข้องกับ recursive type
เข้าใจ Cons List
cons list คือโครงสร้างข้อมูลที่มาจากภาษาโปรแกรม Lisp และ dialect
ของมัน ประกอบด้วยคู่ซ้อน และเป็นเวอร์ชัน Lisp ของ linked list ชื่อ
ของมันมาจากฟังก์ชัน cons (ย่อมาจาก construct function) ใน Lisp
ที่สร้างคู่ใหม่จากสองอาร์กิวเมนต์ของมัน โดยเรียก cons บนคู่ที่
ประกอบด้วยค่าและอีกคู่ เราสร้าง cons list ที่ประกอบด้วยคู่ recursive
ได้
ตัวอย่างเช่น นี่คือ pseudocode ของ cons list ที่บรรจุ list 1, 2, 3
ที่แต่ละคู่อยู่ในวงเล็บ:
(1, (2, (3, Nil)))
แต่ละ item ใน cons list บรรจุสอง element — ค่าของ item ปัจจุบันและ
ของ item ถัดไป item สุดท้ายใน list บรรจุเพียงค่าที่เรียก Nil โดย
ไม่มี item ถัดไป cons list ถูกผลิตโดยเรียกฟังก์ชัน cons แบบ
recursive ชื่อ canonical เพื่อ denote กรณีฐานของ recursion คือ
Nil สังเกตว่านี่ไม่เหมือนกับแนวคิด “null” หรือ “nil” ที่พูดถึงใน
บทที่ 6 ซึ่งเป็นค่าที่ไม่ valid หรือไม่มี
cons list ไม่ใช่โครงสร้างข้อมูลที่ใช้ทั่วไปใน Rust ส่วนใหญ่ของเวลา
เมื่อคุณมี list ของ item ใน Rust Vec<T> เป็นทางเลือกที่ดีกว่าใช้
ประเภทข้อมูล recursive อื่นที่ซับซ้อนกว่า มี ประโยชน์ในสถานการณ์
ต่าง ๆ แต่โดยเริ่มด้วย cons list ในบทนี้ เราสำรวจวิธีที่ box ให้เรา
นิยามประเภทข้อมูล recursive โดยไม่ต้องเสียสมาธิมากได้
Listing 15-2 บรรจุนิยาม enum สำหรับ cons list สังเกตว่าโค้ดนี้ยังจะ
ไม่คอมไพล์ เพราะ type List ไม่มีขนาดที่รู้ ซึ่งเราจะสาธิต
enum List {
Cons(i32, List),
Nil,
}
fn main() {}i32สังเกต — เรากำลัง implement cons list ที่เก็บเฉพาะค่า
i32เพื่อ จุดประสงค์ของตัวอย่างนี้ เรา implement มันโดยใช้ generic ก็ได้ ดังที่เราพูดถึงในบทที่ 10 เพื่อนิยามประเภท cons list ที่เก็บค่า ของ type ใดก็ได้
การใช้ type List เพื่อเก็บ list 1, 2, 3 จะดูเหมือนโค้ดใน Listing
15-3
enum List {
Cons(i32, List),
Nil,
}
// --snip--
use crate::List::{Cons, Nil};
fn main() {
let list = Cons(1, Cons(2, Cons(3, Nil)));
}List เพื่อเก็บ list 1, 2, 3ค่า Cons แรกเก็บ 1 และค่า List อื่น ค่า List นี้คือค่า
Cons อื่นที่เก็บ 2 และค่า List อื่น ค่า List นี้เป็นค่า
Cons อีกตัวที่เก็บ 3 และค่า List ซึ่งสุดท้ายคือ Nil variant
ที่ไม่ recursive ที่ส่งสัญญาณการสิ้นสุดของ list
ถ้าเราพยายามคอมไพล์โค้ดใน Listing 15-3 เราได้ error ที่แสดงใน Listing 15-4
$ cargo run
Compiling cons-list v0.1.0 (file:///projects/cons-list)
error[E0072]: recursive type `List` has infinite size
--> src/main.rs:1:1
|
1 | enum List {
| ^^^^^^^^^
2 | Cons(i32, List),
| ---- recursive without indirection
|
help: insert some indirection (e.g., a `Box`, `Rc`, or `&`) to break the cycle
|
2 | Cons(i32, Box<List>),
| ++++ +
error[E0391]: cycle detected when computing when `List` needs drop
--> src/main.rs:1:1
|
1 | enum List {
| ^^^^^^^^^
|
= note: ...which immediately requires computing when `List` needs drop again
= note: cycle used when computing whether `List` needs drop
= note: see https://rustc-dev-guide.rust-lang.org/overview.html#queries and https://rustc-dev-guide.rust-lang.org/query.html for more information
Some errors have detailed explanations: E0072, E0391.
For more information about an error, try `rustc --explain E0072`.
error: could not compile `cons-list` (bin "cons-list") due to 2 previous errors
error แสดงว่า type นี้ “มีขนาด infinite” เหตุผลคือเรานิยาม List
ด้วย variant ที่เป็น recursive — มันเก็บค่าอื่นของตัวเองโดยตรง ผลคือ
Rust หาไม่ได้ว่าต้องการพื้นที่เท่าไรเพื่อเก็บค่า List มาแยกย่อยว่า
ทำไมเราได้ error นี้ ก่อนอื่น เราจะดูว่า Rust ตัดสินอย่างไรว่าต้องการ
พื้นที่เท่าไรเพื่อเก็บค่าของ type ที่ไม่ recursive
คำนวณขนาดของ Type ที่ไม่ Recursive
จำได้ enum Message ที่เรานิยามใน Listing 6-2 เมื่อเราพูดถึงนิยาม
enum ในบทที่ 6:
enum Message {
Quit,
Move { x: i32, y: i32 },
Write(String),
ChangeColor(i32, i32, i32),
}
fn main() {}เพื่อตัดสินว่า allocate พื้นที่เท่าไรสำหรับค่า Message Rust ผ่าน
แต่ละ variant เพื่อดูว่า variant ไหนต้องการพื้นที่มากที่สุด Rust
เห็นว่า Message::Quit ไม่ต้องการพื้นที่ใด Message::Move ต้องการ
พื้นที่พอที่เก็บค่า i32 สองตัว และเช่นนั้นต่อไป เพราะจะถูกใช้เพียง
variant เดียว พื้นที่มากที่สุดที่ค่า Message จะต้องการคือพื้นที่
ที่จะใช้เก็บ variant ที่ใหญ่ที่สุดของมัน
เปรียบเทียบนี้กับสิ่งที่เกิดเมื่อ Rust พยายามตัดสินว่า recursive type
เช่น enum List ใน Listing 15-2 ต้องการพื้นที่เท่าไร compiler เริ่ม
โดยดูที่ variant Cons ซึ่งเก็บค่าของ type i32 และค่าของ type
List ดังนั้น Cons ต้องการพื้นที่จำนวนเท่ากับขนาดของ i32 บวก
ขนาดของ List เพื่อหาว่า type List ต้องการ memory เท่าไร compiler
ดู variant เริ่มด้วย variant Cons variant Cons เก็บค่าของ type
i32 และค่าของ type List และกระบวนการนี้ดำเนินไปไม่สิ้นสุด ดังที่
แสดงใน Figure 15-1

Figure 15-1: List infinite ที่ประกอบด้วย
variant Cons infinite
ได้ Recursive Type ที่มีขนาดรู้
เพราะ Rust หาไม่ได้ว่า allocate พื้นที่เท่าไรสำหรับ type ที่นิยาม แบบ recursive compiler ให้ error ด้วยข้อเสนอแนะที่ช่วยนี้:
help: insert some indirection (e.g., a `Box`, `Rc`, or `&`) to break the cycle
|
2 | Cons(i32, Box<List>),
| ++++ +
ในข้อเสนอแนะนี้ indirection หมายความว่าแทนการเก็บค่าโดยตรง เราควร เปลี่ยนโครงสร้างข้อมูลให้เก็บค่าโดยอ้อมโดยเก็บ pointer ไปยังค่าแทน
เพราะ Box<T> คือ pointer Rust รู้เสมอว่า Box<T> ต้องการพื้นที่
เท่าไร — ขนาดของ pointer ไม่เปลี่ยนตามจำนวนข้อมูลที่มันชี้ นี่หมาย
ความว่าเราใส่ Box<T> ภายใน variant Cons แทนค่า List อื่นโดยตรง
ได้ Box<T> จะชี้ไปยังค่า List ถัดไปที่จะอยู่บน heap ไม่ใช่ภายใน
variant Cons ในเชิงแนวคิด เรายังมี list สร้างด้วย list ที่เก็บ
list อื่น แต่ implementation นี้ตอนนี้เหมือนการวาง item ถัดจากกัน
ไม่ใช่ภายในกัน
เราเปลี่ยนนิยามของ enum List ใน Listing 15-2 และการใช้ List ใน
Listing 15-3 ให้เป็นโค้ดใน Listing 15-5 ซึ่งจะคอมไพล์ได้
enum List {
Cons(i32, Box<List>),
Nil,
}
use crate::List::{Cons, Nil};
fn main() {
let list = Cons(1, Box::new(Cons(2, Box::new(Cons(3, Box::new(Nil))))));
}List ที่ใช้ Box<T> เพื่อมีขนาดที่รู้variant Cons ต้องการขนาดของ i32 บวกพื้นที่ที่จะเก็บข้อมูล pointer
ของ box variant Nil ไม่เก็บค่า ดังนั้นมันต้องการพื้นที่น้อยกว่า
บน stack กว่า variant Cons เรารู้ตอนนี้ว่าค่า List ใด ๆ จะใช้
ขนาดของ i32 บวกขนาดของข้อมูล pointer ของ box โดยใช้ box เราตัด
chain infinite recursive ดังนั้น compiler หาขนาดที่ต้องการเก็บค่า
List ได้ Figure 15-2 แสดงว่า variant Cons ดูเป็นยังไงตอนนี้

Figure 15-2: List ที่ไม่มีขนาด infinite
เพราะ Cons เก็บ Box
Box ให้เฉพาะ indirection และ heap allocation — พวกมันไม่มีความสามารถ พิเศษอื่นใด เช่นที่เราจะเห็นกับ smart pointer type อื่น พวกมันยังไม่ มี overhead performance ที่ความสามารถพิเศษเหล่านี้ก่อ ดังนั้นพวกมัน มีประโยชน์ในกรณีเช่น cons list ที่ indirection เป็นฟีเจอร์เดียวที่ เราต้องการ เราจะดู use case เพิ่มสำหรับ box ในบทที่ 18
type Box<T> เป็น smart pointer เพราะมัน implement trait Deref
ซึ่งอนุญาตให้ค่า Box<T> ถูกปฏิบัติเหมือน reference เมื่อค่า
Box<T> ออกจาก scope ข้อมูล heap ที่ box กำลังชี้ก็ถูกทำความสะอาด
ด้วยเพราะ implementation trait Drop trait สองตัวนี้จะสำคัญมากขึ้น
ต่อ functionality ที่ smart pointer type อื่นที่เราจะพูดถึงในส่วนที่
เหลือของบทนี้ให้มา มาสำรวจ trait สองตัวนี้ในรายละเอียดมากขึ้น
ปฏิบัติต่อ smart pointer เหมือน reference ปกติ
ปฏิบัติต่อ Smart Pointer เหมือน Reference ปกติ
การ implement trait Deref อนุญาตให้คุณกำหนดพฤติกรรมของ
dereference operator * (ไม่สับสนกับ operator คูณหรือ glob)
โดยการ implement Deref ในแบบที่ smart pointer ถูกปฏิบัติเหมือน
reference ปกติ คุณเขียนโค้ดที่ทำงานบน reference และใช้โค้ดนั้นกับ
smart pointer ด้วยได้
มาดูก่อนว่า dereference operator ทำงานกับ reference ปกติยังไง จาก
นั้น เราจะพยายามนิยาม type กำหนดเองที่ทำตัวเหมือน Box<T> และดู
ทำไม dereference operator ไม่ทำงานเหมือน reference บน type ที่
เราเพิ่งนิยาม เราจะสำรวจว่าการ implement trait Deref ทำให้เป็นไป
ได้ที่ smart pointer ทำงานในแบบคล้ายกับ reference ได้ จากนั้น เรา
จะดูฟีเจอร์ deref coercion ของ Rust และวิธีที่มันให้เราทำงานกับ
reference หรือ smart pointer
ตาม Reference ไปยังค่า
reference ปกติเป็นประเภทของ pointer และวิธีหนึ่งที่จะคิดถึง pointer
คือเป็นลูกศรไปยังค่าที่เก็บที่อื่น ใน Listing 15-6 เราสร้าง reference
ของค่า i32 แล้วใช้ dereference operator เพื่อตาม reference ไปยัง
ค่า
fn main() {
let x = 5;
let y = &x;
assert_eq!(5, x);
assert_eq!(5, *y);
}i32ตัวแปร x เก็บค่า i32 5 เราตั้ง y เท่ากับ reference ของ x
เรา assert ว่า x เท่ากับ 5 ได้ อย่างไรก็ตาม ถ้าเราต้องการทำ
assertion เกี่ยวกับค่าใน y เราต้องใช้ *y เพื่อตาม reference
ไปยังค่าที่มันชี้ (ดังนั้น dereference) เพื่อให้ compiler
เปรียบเทียบค่าจริงได้ เมื่อเรา dereference y เรามีสิทธิ์เข้าถึงค่า
integer ที่ y กำลังชี้ที่เรา compare กับ 5 ได้
ถ้าเราพยายามเขียน assert_eq!(5, y); แทน เราจะได้ error การคอมไพล์
นี้:
$ cargo run
Compiling deref-example v0.1.0 (file:///projects/deref-example)
error[E0277]: can't compare `{integer}` with `&{integer}`
--> src/main.rs:6:5
|
6 | assert_eq!(5, y);
| ^^^^^^^^^^^^^^^^ no implementation for `{integer} == &{integer}`
|
= help: the trait `PartialEq<&{integer}>` is not implemented for `{integer}`
= note: this error originates in the macro `assert_eq` (in Nightly builds, run with -Z macro-backtrace for more info)
For more information about this error, try `rustc --explain E0277`.
error: could not compile `deref-example` (bin "deref-example") due to 1 previous error
การ compare ตัวเลขและ reference ของตัวเลขไม่ได้รับอนุญาตเพราะพวก มันเป็น type ต่างกัน เราต้องใช้ dereference operator เพื่อตาม reference ไปยังค่าที่มันกำลังชี้
ใช้ Box<T> เหมือน Reference
เราเขียนโค้ดใน Listing 15-6 ใหม่เพื่อใช้ Box<T> แทน reference ได้
— dereference operator ที่ใช้บน Box<T> ใน Listing 15-7 ทำงานในแบบ
เดียวกับ dereference operator ที่ใช้บน reference ใน Listing 15-6
fn main() {
let x = 5;
let y = Box::new(x);
assert_eq!(5, x);
assert_eq!(5, *y);
}Box<i32>ความแตกต่างหลักระหว่าง Listing 15-7 และ Listing 15-6 คือที่นี่เรา
ตั้ง y เป็น instance ของ box ที่ชี้ไปยังค่าที่ copy ของ x แทน
reference ที่ชี้ไปยังค่าของ x ใน assertion สุดท้าย เราใช้
dereference operator เพื่อตาม pointer ของ box ในแบบเดียวกับที่เรา
ทำเมื่อ y เป็น reference ได้ ถัดไป เราจะสำรวจว่าอะไรพิเศษเกี่ยวกับ
Box<T> ที่ทำให้เราใช้ dereference operator ได้ โดยนิยาม box type
ของเราเอง
นิยาม Smart Pointer ของเราเอง
มา build wrapper type คล้ายกับ type Box<T> ที่ standard library
ให้มา เพื่อสัมผัสว่าประเภท smart pointer ทำตัวต่างจาก reference ตาม
ค่าเริ่มต้นยังไง จากนั้น เราจะดูวิธีเพิ่มความสามารถที่จะใช้
dereference operator
สังเกต — มีความแตกต่างใหญ่หนึ่งระหว่าง type
MyBox<T>ที่เรากำลัง จะ build และBox<T>จริง — เวอร์ชันของเราจะไม่เก็บข้อมูลของมัน บน heap เรากำลังโฟกัสตัวอย่างนี้ที่Derefดังนั้นที่ข้อมูลถูก เก็บจริงสำคัญน้อยกว่าพฤติกรรมเหมือน pointer
type Box<T> ในที่สุดถูกนิยามเป็น tuple struct ที่มีหนึ่ง element
ดังนั้น Listing 15-8 นิยาม type MyBox<T> ในแบบเดียวกัน เรายังจะ
นิยามฟังก์ชัน new เพื่อตรงกับฟังก์ชัน new ที่นิยามบน Box<T>
struct MyBox<T>(T);
impl<T> MyBox<T> {
fn new(x: T) -> MyBox<T> {
MyBox(x)
}
}
fn main() {}MyBox<T>เรานิยาม struct ชื่อ MyBox และประกาศ generic parameter T เพราะ
เราต้องการให้ type ของเราเก็บค่าของ type ใดก็ได้ type MyBox คือ
tuple struct ที่มีหนึ่ง element ของ type T ฟังก์ชัน MyBox::new
รับหนึ่ง parameter ของ type T และ return instance MyBox ที่เก็บ
ค่าที่ส่งเข้า
ลองเพิ่มฟังก์ชัน main ใน Listing 15-7 ให้ Listing 15-8 และเปลี่ยน
มันให้ใช้ type MyBox<T> ที่เรานิยามแทน Box<T> โค้ดใน Listing
15-9 จะไม่คอมไพล์ เพราะ Rust ไม่รู้วิธี dereference MyBox
struct MyBox<T>(T);
impl<T> MyBox<T> {
fn new(x: T) -> MyBox<T> {
MyBox(x)
}
}
fn main() {
let x = 5;
let y = MyBox::new(x);
assert_eq!(5, x);
assert_eq!(5, *y);
}MyBox<T> ในแบบเดียวกับที่เราใช้ reference และ Box<T>นี่คือ error การคอมไพล์ที่ได้:
$ cargo run
Compiling deref-example v0.1.0 (file:///projects/deref-example)
error[E0614]: type `MyBox<{integer}>` cannot be dereferenced
--> src/main.rs:14:19
|
14 | assert_eq!(5, *y);
| ^^ can't be dereferenced
For more information about this error, try `rustc --explain E0614`.
error: could not compile `deref-example` (bin "deref-example") due to 1 previous error
type MyBox<T> ของเรา dereference ไม่ได้เพราะเรายังไม่ได้
implement ความสามารถนั้นบน type ของเรา เพื่อเปิดใช้ dereferencing
ด้วย operator * เรา implement trait Deref
Implement Trait Deref
ดังที่พูดใน “Implement Trait บน Type”
ในบทที่ 10 เพื่อ implement trait เราต้องให้ implementation สำหรับ
เมธอดที่ต้องการของ trait trait Deref ที่ standard library ให้มา
ต้องให้เรา implement หนึ่งเมธอดชื่อ deref ที่ borrow self และ
return reference ของข้อมูลภายใน Listing 15-10 บรรจุ implementation
ของ Deref ที่จะเพิ่มในนิยามของ MyBox<T>
use std::ops::Deref;
impl<T> Deref for MyBox<T> {
type Target = T;
fn deref(&self) -> &Self::Target {
&self.0
}
}
struct MyBox<T>(T);
impl<T> MyBox<T> {
fn new(x: T) -> MyBox<T> {
MyBox(x)
}
}
fn main() {
let x = 5;
let y = MyBox::new(x);
assert_eq!(5, x);
assert_eq!(5, *y);
}Deref บน MyBox<T>syntax type Target = T; นิยาม associated type สำหรับ trait Deref
ใช้ associated type เป็นวิธีต่างเล็กน้อยในการประกาศ generic
parameter แต่คุณไม่ต้องกังวลเกี่ยวกับพวกมันตอนนี้ — เราจะครอบคลุม
พวกมันในรายละเอียดมากขึ้นในบทที่ 20
เราเติม body ของเมธอด deref ด้วย &self.0 เพื่อให้ deref return
reference ของค่าที่เราต้องการเข้าถึงด้วย operator * — จำได้จาก
“สร้าง Type ต่างด้วย Tuple Struct”
ในบทที่ 5 ว่า .0 เข้าถึงค่าแรกใน tuple struct ฟังก์ชัน main
ใน Listing 15-9 ที่เรียก * บนค่า MyBox<T> ตอนนี้คอมไพล์ได้ และ
assertion ผ่าน!
โดยไม่มี trait Deref compiler dereference ได้เฉพาะ reference &
เมธอด deref ให้ compiler ความสามารถที่จะรับค่าของ type ใดก็ตามที่
implement Deref และเรียกเมธอด deref เพื่อรับ reference ที่มัน
รู้วิธี dereference
เมื่อเราใส่ *y ใน Listing 15-9 เบื้องหลัง Rust จริง ๆ รันโค้ดนี้:
*(y.deref())Rust แทนที่ operator * ด้วยการเรียกเมธอด deref แล้ว
dereference ธรรมดา เพื่อให้เราไม่ต้องคิดว่าเราต้องเรียกเมธอด deref
หรือไม่ ฟีเจอร์ Rust นี้ให้เราเขียนโค้ดที่ทำงานเหมือนกันไม่ว่าเรามี
reference ปกติหรือ type ที่ implement Deref
เหตุผลที่เมธอด deref return reference ของค่า และว่า dereference
ธรรมดาภายนอกวงเล็บใน *(y.deref()) ยังจำเป็น เกี่ยวข้องกับระบบ
ownership ถ้าเมธอด deref return ค่าโดยตรงแทน reference ของค่า ค่า
จะถูกย้ายออกจาก self เราไม่ต้องการรับ ownership ของค่าภายในภายใน
MyBox<T> ในกรณีนี้หรือในกรณีส่วนใหญ่ที่เราใช้ dereference
operator
สังเกตว่า operator * ถูกแทนที่ด้วยการเรียกเมธอด deref แล้วการ
เรียก operator * เพียงครั้งเดียว แต่ละครั้งที่เราใช้ * ใน
โค้ดของเรา เพราะการแทนที่ของ operator * ไม่ recursive infinitely
เราลงเอยที่ข้อมูลของ type i32 ซึ่งตรงกับ 5 ใน assert_eq! ใน
Listing 15-9
ใช้ Deref Coercion ในฟังก์ชันและเมธอด
Deref coercion แปลง reference ของ type ที่ implement trait
Deref เป็น reference ของอีก type ตัวอย่างเช่น deref coercion แปลง
&String เป็น &str ได้เพราะ String implement trait Deref แบบ
ที่มัน return &str Deref coercion เป็นความสะดวกที่ Rust ทำกับ
อาร์กิวเมนต์ของฟังก์ชันและเมธอด และมันทำงานเฉพาะบน type ที่
implement trait Deref มันเกิดอัตโนมัติเมื่อเราส่ง reference ของ
ค่าของ type เฉพาะเป็นอาร์กิวเมนต์ให้ฟังก์ชันหรือเมธอดที่ไม่ตรงกับ
type ของ parameter ในนิยามของฟังก์ชันหรือเมธอด ลำดับของการเรียก
เมธอด deref แปลง type ที่เราให้เป็น type ที่ parameter ต้องการ
Deref coercion ถูกเพิ่มใน Rust เพื่อให้ programmer ที่เขียนการเรียก
ฟังก์ชันและเมธอดไม่ต้องเพิ่ม reference ชัดเจนและ dereference ด้วย
& และ * มาก ฟีเจอร์ deref coercion ยังให้เราเขียนโค้ดมากขึ้นที่
ทำงานได้สำหรับ reference หรือ smart pointer
เพื่อเห็น deref coercion ในการกระทำ มาใช้ type MyBox<T> ที่เรา
นิยามใน Listing 15-8 รวมถึง implementation ของ Deref ที่เราเพิ่ม
ใน Listing 15-10 Listing 15-11 แสดงนิยามของฟังก์ชันที่มี parameter
เป็น string slice
fn hello(name: &str) {
println!("Hello, {name}!");
}
fn main() {}hello ที่มี parameter name ของ type &strเราเรียกฟังก์ชัน hello ด้วย string slice เป็นอาร์กิวเมนต์ได้ เช่น
hello("Rust"); ตัวอย่างเช่น Deref coercion ทำให้เป็นไปได้ที่จะ
เรียก hello ด้วย reference ของค่าของ type MyBox<String> ดังที่
แสดงใน Listing 15-12
use std::ops::Deref;
impl<T> Deref for MyBox<T> {
type Target = T;
fn deref(&self) -> &T {
&self.0
}
}
struct MyBox<T>(T);
impl<T> MyBox<T> {
fn new(x: T) -> MyBox<T> {
MyBox(x)
}
}
fn hello(name: &str) {
println!("Hello, {name}!");
}
fn main() {
let m = MyBox::new(String::from("Rust"));
hello(&m);
}hello ด้วย reference ของค่า MyBox<String> ซึ่งทำงานได้เพราะ deref coercionที่นี่เรากำลังเรียกฟังก์ชัน hello ด้วยอาร์กิวเมนต์ &m ซึ่งเป็น
reference ของค่า MyBox<String> เพราะเรา implement trait Deref
บน MyBox<T> ใน Listing 15-10 Rust เปลี่ยน &MyBox<String> เป็น
&String โดยเรียก deref standard library ให้ implementation ของ
Deref บน String ที่ return string slice และนี่อยู่ใน API
documentation สำหรับ Deref Rust เรียก deref อีกครั้งเพื่อ
เปลี่ยน &String เป็น &str ซึ่งตรงกับนิยามของฟังก์ชัน hello
ถ้า Rust ไม่ implement deref coercion เราจะต้องเขียนโค้ดใน Listing
15-13 แทนโค้ดใน Listing 15-12 เพื่อเรียก hello ด้วยค่าของ type
&MyBox<String>
use std::ops::Deref;
impl<T> Deref for MyBox<T> {
type Target = T;
fn deref(&self) -> &T {
&self.0
}
}
struct MyBox<T>(T);
impl<T> MyBox<T> {
fn new(x: T) -> MyBox<T> {
MyBox(x)
}
}
fn hello(name: &str) {
println!("Hello, {name}!");
}
fn main() {
let m = MyBox::new(String::from("Rust"));
hello(&(*m)[..]);
}(*m) dereference MyBox<String> เป็น String จากนั้น & และ
[..] รับ string slice ของ String ที่เท่ากับ string ทั้งหมดเพื่อ
ตรง signature ของ hello โค้ดนี้โดยไม่มี deref coercion อ่าน
ยากกว่า เขียนยากกว่า และเข้าใจยากกว่าด้วยสัญลักษณ์เหล่านี้ทั้งหมด
ที่เกี่ยวข้อง Deref coercion อนุญาตให้ Rust จัดการการแปลงเหล่านี้
ให้เราอัตโนมัติ
เมื่อ trait Deref ถูกนิยามสำหรับ type ที่เกี่ยวข้อง Rust จะ
วิเคราะห์ type และใช้ Deref::deref มากเท่าที่จำเป็นเพื่อรับ
reference ที่ตรงกับ type ของ parameter จำนวนครั้งที่ Deref::deref
ต้องถูก insert ถูก resolve ที่ compile time ดังนั้นไม่มีบทลงโทษ
runtime สำหรับการใช้ประโยชน์ของ deref coercion!
จัดการ Deref Coercion กับ Mutable Reference
คล้ายกับวิธีที่คุณใช้ trait Deref เพื่อ override operator * บน
immutable reference คุณใช้ trait DerefMut เพื่อ override operator
* บน mutable reference ได้
Rust ทำ deref coercion เมื่อมันพบ type และ implementation trait ในสามกรณี:
- จาก
&Tเป็น&Uเมื่อT: Deref<Target=U> - จาก
&mut Tเป็น&mut Uเมื่อT: DerefMut<Target=U> - จาก
&mut Tเป็น&Uเมื่อT: Deref<Target=U>
กรณีสองแรกเหมือนกันยกเว้นที่กรณีที่สอง implement mutability กรณีแรก
ระบุว่าถ้าคุณมี &T และ T implement Deref ไปยัง type U
บางตัว คุณรับ &U ได้แบบโปร่งใส กรณีที่สองระบุว่า deref coercion
เดียวกันเกิดสำหรับ mutable reference
กรณีที่สามยุ่งยากกว่า — Rust จะยัง coerce mutable reference เป็น immutable ด้วย แต่ตรงข้าม_ไม่_ เป็นไปได้ — immutable reference จะ ไม่ coerce เป็น mutable reference เพราะกฎ borrowing ถ้าคุณมี mutable reference mutable reference นั้นต้องเป็น reference เดียว ของข้อมูลนั้น (มิฉะนั้น โปรแกรมจะไม่คอมไพล์) การแปลงหนึ่ง mutable reference เป็นหนึ่ง immutable reference จะไม่ทำลายกฎ borrowing การแปลง immutable reference เป็น mutable reference จะต้องการให้ immutable reference เริ่มต้นเป็น immutable reference เดียวของข้อมูล นั้น แต่กฎ borrowing ไม่รับประกันสิ่งนั้น ดังนั้น Rust ไม่ทำ สมมุติฐานว่าการแปลง immutable reference เป็น mutable reference เป็นไปได้
รันโค้ดตอน cleanup ด้วย trait Drop
รันโค้ดตอน Cleanup ด้วย Trait Drop
trait ที่สองที่สำคัญต่อ pattern smart pointer คือ Drop ซึ่งให้คุณ
กำหนดสิ่งที่เกิดเมื่อค่ากำลังจะออกจาก scope คุณให้ implementation
สำหรับ trait Drop บน type ใดก็ได้ และโค้ดนั้นใช้ปล่อย resource
เช่นไฟล์หรือ network connection ได้
เรากำลังแนะนำ Drop ใน context ของ smart pointer เพราะ functionality
ของ trait Drop เกือบเสมอถูกใช้เมื่อ implement smart pointer
ตัวอย่างเช่น เมื่อ Box<T> ถูก drop มันจะ deallocate พื้นที่บน heap
ที่ box ชี้
ในบางภาษา สำหรับบาง type programmer ต้องเรียกโค้ดเพื่อปล่อย memory หรือ resource ทุกครั้งที่พวกเขาเสร็จใช้ instance ของ type เหล่านั้น ตัวอย่างรวม file handle, socket และ lock ถ้า programmer ลืม ระบบอาจ overload และ crash ใน Rust คุณระบุได้ว่าโค้ดเฉพาะถูกรันเมื่อใดก็ตาม ที่ค่าออกจาก scope และ compiler จะ insert โค้ดนี้อัตโนมัติ ผลคือ คุณไม่ต้องระวังเกี่ยวกับการวางโค้ด cleanup ทุกที่ในโปรแกรมที่ instance ของ type เฉพาะเสร็จ — คุณยังจะไม่รั่ว resource!
คุณระบุโค้ดที่จะรันเมื่อค่าออกจาก scope โดย implement trait Drop
trait Drop ต้องการให้คุณ implement หนึ่งเมธอดชื่อ drop ที่รับ
mutable reference ของ self เพื่อเห็นเมื่อ Rust เรียก drop มา
implement drop ด้วย statement println! ตอนนี้
Listing 15-14 แสดง struct CustomSmartPointer ที่ functionality
custom เดียวคือมันจะ print Dropping CustomSmartPointer! เมื่อ
instance ออกจาก scope เพื่อแสดงเมื่อ Rust รันเมธอด drop
struct CustomSmartPointer {
data: String,
}
impl Drop for CustomSmartPointer {
fn drop(&mut self) {
println!("Dropping CustomSmartPointer with data `{}`!", self.data);
}
}
fn main() {
let c = CustomSmartPointer {
data: String::from("my stuff"),
};
let d = CustomSmartPointer {
data: String::from("other stuff"),
};
println!("CustomSmartPointers created");
}CustomSmartPointer ที่ implement trait Drop ที่เราจะวางโค้ด cleanup ของเราtrait Drop ถูกรวมใน prelude ดังนั้นเราไม่ต้องนำมันเข้า scope เรา
implement trait Drop บน CustomSmartPointer และให้ implementation
สำหรับเมธอด drop ที่เรียก println! body ของเมธอด drop คือที่
คุณจะวาง logic ใดที่คุณต้องการให้รันเมื่อ instance ของ type ของคุณ
ออกจาก scope เรากำลัง print text ที่นี่เพื่อสาธิตด้วยภาพเมื่อ Rust
จะเรียก drop
ใน main เราสร้างสอง instance ของ CustomSmartPointer แล้ว print
CustomSmartPointers created ที่ท้ายสุดของ main instance ของ
CustomSmartPointer ของเราจะออกจาก scope และ Rust จะเรียกโค้ดที่
เราใส่ในเมธอด drop print ข้อความสุดท้ายของเรา สังเกตว่าเราไม่ต้อง
เรียกเมธอด drop ชัดเจน
เมื่อเรารันโปรแกรมนี้ เราจะเห็น output ต่อไปนี้:
$ cargo run
Compiling drop-example v0.1.0 (file:///projects/drop-example)
Finished `dev` profile [unoptimized + debuginfo] target(s) in 0.60s
Running `target/debug/drop-example`
CustomSmartPointers created
Dropping CustomSmartPointer with data `other stuff`!
Dropping CustomSmartPointer with data `my stuff`!
Rust เรียก drop ให้เราอัตโนมัติเมื่อ instance ของเราออกจาก scope
เรียกโค้ดที่เราระบุ ตัวแปรถูก drop ในลำดับย้อนกลับของการสร้างพวกมัน
ดังนั้น d ถูก drop ก่อน c จุดประสงค์ของตัวอย่างนี้คือให้คุณเห็น
ด้วยภาพว่าเมธอด drop ทำงานยังไง — โดยปกติคุณจะระบุโค้ด
cleanup ที่ type ของคุณต้องการรันแทนข้อความ print
โชคไม่ดี ไม่ตรงไปตรงมาที่จะ disable functionality drop อัตโนมัติ
การ disable drop มักไม่จำเป็น — ประเด็นทั้งหมดของ trait Drop คือ
มันถูกดูแลอัตโนมัติ บางครั้ง อย่างไรก็ตาม คุณอาจต้องการทำความสะอาด
ค่าเร็ว ตัวอย่างหนึ่งคือเมื่อใช้ smart pointer ที่จัดการ lock — คุณ
อาจต้องการบังคับเมธอด drop ที่ปล่อย lock เพื่อให้โค้ดอื่นใน scope
เดียวกัน acquire lock ได้ Rust ไม่ให้คุณเรียกเมธอด drop ของ trait
Drop ด้วยมือ — แทน คุณต้องเรียกฟังก์ชัน std::mem::drop ที่
standard library ให้มาถ้าคุณต้องการบังคับให้ค่าถูก drop ก่อนสิ้นสุด
ของ scope ของมัน
การพยายามเรียกเมธอด drop ของ trait Drop ด้วยมือโดยแก้ฟังก์ชัน
main จาก Listing 15-14 จะไม่ทำงาน ดังที่แสดงใน Listing 15-15
struct CustomSmartPointer {
data: String,
}
impl Drop for CustomSmartPointer {
fn drop(&mut self) {
println!("Dropping CustomSmartPointer with data `{}`!", self.data);
}
}
fn main() {
let c = CustomSmartPointer {
data: String::from("some data"),
};
println!("CustomSmartPointer created");
c.drop();
println!("CustomSmartPointer dropped before the end of main");
}drop จาก trait Drop ด้วยมือเพื่อ cleanup เร็วเมื่อเราพยายามคอมไพล์โค้ดนี้ เราจะได้ error นี้:
$ cargo run
Compiling drop-example v0.1.0 (file:///projects/drop-example)
error[E0040]: explicit use of destructor method
--> src/main.rs:16:7
|
16 | c.drop();
| ^^^^ explicit destructor calls not allowed
|
help: consider using `drop` function
|
16 - c.drop();
16 + drop(c);
|
For more information about this error, try `rustc --explain E0040`.
error: could not compile `drop-example` (bin "drop-example") due to 1 previous error
ข้อความ error นี้ระบุว่าเราไม่ได้รับอนุญาตให้เรียก drop ชัดเจน
ข้อความ error ใช้คำ destructor ซึ่งเป็นคำ programming ทั่วไป
สำหรับฟังก์ชันที่ cleanup instance destructor คล้ายกับ
constructor ซึ่งสร้าง instance ฟังก์ชัน drop ใน Rust เป็น
destructor เฉพาะหนึ่ง
Rust ไม่ให้เราเรียก drop ชัดเจน เพราะ Rust ยังจะเรียก drop
อัตโนมัติบนค่าที่ท้ายสุดของ main นี่จะทำให้เกิด error double free
เพราะ Rust จะพยายาม cleanup ค่าเดียวกันสองครั้ง
เราไม่สามารถ disable การ insert drop อัตโนมัติเมื่อค่าออกจาก scope
และเราเรียกเมธอด drop ชัดเจนไม่ได้ ดังนั้น ถ้าเราต้องการบังคับให้
ค่าถูก cleanup เร็ว เราใช้ฟังก์ชัน std::mem::drop
ฟังก์ชัน std::mem::drop ต่างจากเมธอด drop ใน trait Drop
เราเรียกมันโดยส่งค่าที่เราต้องการ force-drop เป็นอาร์กิวเมนต์
ฟังก์ชันอยู่ใน prelude ดังนั้นเราแก้ main ใน Listing 15-15 เพื่อ
เรียกฟังก์ชัน drop ดังที่แสดงใน Listing 15-16 ได้
struct CustomSmartPointer {
data: String,
}
impl Drop for CustomSmartPointer {
fn drop(&mut self) {
println!("Dropping CustomSmartPointer with data `{}`!", self.data);
}
}
fn main() {
let c = CustomSmartPointer {
data: String::from("some data"),
};
println!("CustomSmartPointer created");
drop(c);
println!("CustomSmartPointer dropped before the end of main");
}std::mem::drop เพื่อ drop ค่าชัดเจนก่อนมันออกจาก scopeการรันโค้ดนี้จะ print ต่อไปนี้:
$ cargo run
Compiling drop-example v0.1.0 (file:///projects/drop-example)
Finished `dev` profile [unoptimized + debuginfo] target(s) in 0.73s
Running `target/debug/drop-example`
CustomSmartPointer created
Dropping CustomSmartPointer with data `some data`!
CustomSmartPointer dropped before the end of main
text Dropping CustomSmartPointer with data `some data`! ถูก print
ระหว่าง text CustomSmartPointer created และ
CustomSmartPointer dropped before the end of main แสดงว่าโค้ดของ
เมธอด drop ถูกเรียกเพื่อ drop c ที่จุดนั้น
คุณใช้โค้ดที่ระบุใน implementation trait Drop ได้หลายวิธีเพื่อทำ
cleanup สะดวกและปลอดภัย — ตัวอย่างเช่น คุณใช้มันเพื่อสร้าง memory
allocator ของคุณเอง! ด้วย trait Drop และระบบ ownership ของ Rust
คุณไม่ต้องจำที่จะ cleanup เพราะ Rust ทำมันอัตโนมัติ
คุณยังไม่ต้องกังวลเกี่ยวกับปัญหาที่เกิดจากการ cleanup ค่าที่ยังใช้
อยู่โดยบังเอิญ — ระบบ ownership ที่ทำให้แน่ใจว่า reference valid
เสมอยังรับประกันว่า drop ถูกเรียกเพียงครั้งเดียวเมื่อค่าไม่ถูก
ใช้อีก
ตอนนี้เราตรวจสอบ Box<T> และลักษณะของ smart pointer บางอย่างแล้ว
มาดู smart pointer อื่นที่นิยามใน standard library
Rc<T>: smart pointer แบบนับ reference
Rc<T> — Smart Pointer แบบนับ Reference
ในกรณีส่วนใหญ่ ownership ชัดเจน — คุณรู้แน่ชัดว่าตัวแปรไหน own ค่าที่ ให้ อย่างไรก็ตาม มีกรณีที่ค่าเดียวอาจมีหลาย owner ตัวอย่างเช่น ใน โครงสร้างข้อมูล graph หลาย edge อาจชี้ไปยัง node เดียวกัน และ node นั้นในเชิงแนวคิดถูก own โดย edge ทั้งหมดที่ชี้ไปที่มัน node ไม่ควร ถูก cleanup ยกเว้นมันไม่มี edge ใดที่ชี้ที่มัน และดังนั้นไม่มี owner
คุณต้องเปิดใช้ multiple ownership ชัดเจนโดยใช้ type Rust Rc<T>
ซึ่งย่อมาจาก reference counting type Rc<T> ตามจำนวน
reference ของค่าเพื่อตัดสินว่าค่ายังถูกใช้อยู่ไหม ถ้ามี reference
ศูนย์ของค่า ค่า cleanup ได้โดยไม่มี reference ใดที่กลายเป็นไม่ valid
จินตนาการ Rc<T> เป็น TV ในห้องครอบครัว เมื่อคนหนึ่งเข้ามาดู TV
พวกเขาเปิดมัน คนอื่นเข้ามาในห้องและดู TV ได้ เมื่อคนสุดท้ายออกจาก
ห้อง พวกเขาปิด TV เพราะมันไม่ถูกใช้อีก ถ้าใครปิด TV ในขณะที่คนอื่น
ยังดูอยู่ จะมีการประท้วงจากคนดู TV ที่เหลือ!
เราใช้ type Rc<T> เมื่อเราต้องการ allocate ข้อมูลบน heap ให้หลาย
ส่วนของโปรแกรมของเราอ่าน และเราตัดสินที่ compile time ไม่ได้ว่า
ส่วนไหนจะเสร็จใช้ข้อมูลล่าสุด ถ้าเรารู้ส่วนไหนจะเสร็จล่าสุด เราทำให้
ส่วนนั้นเป็น owner ของข้อมูลก็ได้ และกฎ ownership ปกติที่บังคับใช้
ที่ compile time จะมีผล
สังเกตว่า Rc<T> ใช้เฉพาะใน scenario เธรดเดียว เมื่อเราพูดถึง
concurrency ในบทที่ 16 เราจะครอบคลุมวิธีทำ reference counting ใน
โปรแกรม multithreaded
แชร์ข้อมูล
มากลับไปยังตัวอย่าง cons list ของเราใน Listing 15-5 จำได้ว่าเรานิยาม
มันโดยใช้ Box<T> คราวนี้ เราจะสร้างสอง list ที่ทั้งคู่แชร์ ownership
ของ list ที่สาม ในเชิงแนวคิด นี่ดูคล้ายกับ Figure 15-3

Figure 15-3: สอง list, b และ c แชร์
ownership ของ list ที่สาม a
เราจะสร้าง list a ที่บรรจุ 5 แล้ว 10 จากนั้น เราจะสร้างอีก
สอง list — b ที่เริ่มด้วย 3 และ c ที่เริ่มด้วย 4 ทั้ง list
b และ c จะต่อไปยัง list a แรกที่บรรจุ 5 และ 10 อีกแง่
หนึ่ง ทั้งสอง list จะแชร์ list แรกที่บรรจุ 5 และ 10
การพยายาม implement scenario นี้โดยใช้นิยามของ List กับ Box<T>
ของเราจะไม่ทำงาน ดังที่แสดงใน Listing 15-17
enum List {
Cons(i32, Box<List>),
Nil,
}
use crate::List::{Cons, Nil};
fn main() {
let a = Cons(5, Box::new(Cons(10, Box::new(Nil))));
let b = Cons(3, Box::new(a));
let c = Cons(4, Box::new(a));
}Box<T> ที่พยายามแชร์ ownership ของ list ที่สามเมื่อเราคอมไพล์โค้ดนี้ เราได้ error นี้:
$ cargo run
Compiling cons-list v0.1.0 (file:///projects/cons-list)
error[E0382]: use of moved value: `a`
--> src/main.rs:11:30
|
9 | let a = Cons(5, Box::new(Cons(10, Box::new(Nil))));
| - move occurs because `a` has type `List`, which does not implement the `Copy` trait
10 | let b = Cons(3, Box::new(a));
| - value moved here
11 | let c = Cons(4, Box::new(a));
| ^ value used here after move
|
note: if `List` implemented `Clone`, you could clone the value
--> src/main.rs:1:1
|
1 | enum List {
| ^^^^^^^^^ consider implementing `Clone` for this type
...
10 | let b = Cons(3, Box::new(a));
| - you could clone this value
For more information about this error, try `rustc --explain E0382`.
error: could not compile `cons-list` (bin "cons-list") due to 1 previous error
variant Cons own ข้อมูลที่พวกมันเก็บ ดังนั้นเมื่อเราสร้าง list
b a ถูกย้ายเข้า b และ b own a จากนั้น เมื่อเราพยายามใช้
a อีกครั้งเมื่อสร้าง c เราไม่ได้รับอนุญาตเพราะ a ถูกย้ายไป
เราเปลี่ยนนิยามของ Cons ให้เก็บ reference แทนได้ แต่จากนั้นเรา
จะต้องระบุ parameter lifetime โดยระบุ parameter lifetime เราจะระบุ
ว่าทุก element ใน list จะอยู่อย่างน้อยตราบเท่าที่ list ทั้งหมด นี่
เป็นกรณีสำหรับ element และ list ใน Listing 15-17 แต่ไม่ในทุก scenario
แทน เราจะเปลี่ยนนิยามของ List ของเราให้ใช้ Rc<T> ในที่ของ
Box<T> ดังที่แสดงใน Listing 15-18 แต่ละ variant Cons ตอนนี้จะ
เก็บค่าและ Rc<T> ที่ชี้ไปยัง List เมื่อเราสร้าง b แทนการรับ
ownership ของ a เราจะ clone Rc<List> ที่ a กำลังเก็บ ดังนั้น
เพิ่มจำนวน reference จากหนึ่งเป็นสอง และให้ a และ b แชร์
ownership ของข้อมูลใน Rc<List> นั้น เรายังจะ clone a เมื่อสร้าง
c เพิ่มจำนวน reference จากสองเป็นสาม ทุกครั้งที่เราเรียก
Rc::clone reference count ของข้อมูลภายใน Rc<List> จะเพิ่ม และ
ข้อมูลจะไม่ถูก cleanup ยกเว้นมี reference ศูนย์ของมัน
enum List {
Cons(i32, Rc<List>),
Nil,
}
use crate::List::{Cons, Nil};
use std::rc::Rc;
fn main() {
let a = Rc::new(Cons(5, Rc::new(Cons(10, Rc::new(Nil)))));
let b = Cons(3, Rc::clone(&a));
let c = Cons(4, Rc::clone(&a));
}List ที่ใช้ Rc<T>เราต้องเพิ่ม statement use เพื่อนำ Rc<T> เข้า scope เพราะมันไม่
อยู่ใน prelude ใน main เราสร้าง list ที่เก็บ 5 และ 10 และเก็บ
มันใน Rc<List> ใหม่ใน a จากนั้น เมื่อเราสร้าง b และ c เรา
เรียกฟังก์ชัน Rc::clone และส่ง reference ของ Rc<List> ใน a
เป็นอาร์กิวเมนต์
เราเรียก a.clone() แทน Rc::clone(&a) ได้ แต่ธรรมเนียมของ Rust
คือใช้ Rc::clone ในกรณีนี้ implementation ของ Rc::clone ไม่ทำ
deep copy ของข้อมูลทั้งหมดเหมือนที่ implementation clone ของ
type ส่วนใหญ่ทำ การเรียก Rc::clone เพียงเพิ่ม reference count
ซึ่งไม่ใช้เวลามาก Deep copy ของข้อมูลใช้เวลามาก โดยใช้ Rc::clone
สำหรับ reference counting เราแยกความแตกต่างด้วยสายตาระหว่างประเภท
clone แบบ deep-copy และประเภท clone ที่เพิ่ม reference count เมื่อ
มองหาปัญหา performance ในโค้ด เราต้องพิจารณาเฉพาะ clone แบบ
deep-copy และไม่สนใจการเรียก Rc::clone ได้
Clone เพื่อเพิ่ม Reference Count
มาเปลี่ยนตัวอย่างที่ใช้งานของเราใน Listing 15-18 เพื่อให้เราเห็น
reference count เปลี่ยนเมื่อเราสร้างและ drop reference ของ
Rc<List> ใน a
ใน Listing 15-19 เราจะเปลี่ยน main ให้มี scope ภายในรอบ list c
จากนั้น เราเห็นว่า reference count เปลี่ยนยังไงเมื่อ c ออกจาก
scope ได้
enum List {
Cons(i32, Rc<List>),
Nil,
}
use crate::List::{Cons, Nil};
use std::rc::Rc;
// --snip--
fn main() {
let a = Rc::new(Cons(5, Rc::new(Cons(10, Rc::new(Nil)))));
println!("count after creating a = {}", Rc::strong_count(&a));
let b = Cons(3, Rc::clone(&a));
println!("count after creating b = {}", Rc::strong_count(&a));
{
let c = Cons(4, Rc::clone(&a));
println!("count after creating c = {}", Rc::strong_count(&a));
}
println!("count after c goes out of scope = {}", Rc::strong_count(&a));
}ที่แต่ละจุดในโปรแกรมที่ reference count เปลี่ยน เรา print reference
count ที่เราได้โดยเรียกฟังก์ชัน Rc::strong_count ฟังก์ชันนี้ถูก
ตั้งชื่อ strong_count ไม่ใช่ count เพราะ type Rc<T> ยังมี
weak_count — เราจะเห็นว่า weak_count ใช้ทำอะไรใน
“ป้องกัน Reference Cycle โดยใช้ Weak<T>”
โค้ดนี้ print ต่อไปนี้:
$ cargo run
Compiling cons-list v0.1.0 (file:///projects/cons-list)
Finished `dev` profile [unoptimized + debuginfo] target(s) in 0.45s
Running `target/debug/cons-list`
count after creating a = 1
count after creating b = 2
count after creating c = 3
count after c goes out of scope = 2
เราเห็นว่า Rc<List> ใน a มี reference count เริ่มต้นที่ 1 จากนั้น
แต่ละครั้งที่เราเรียก clone count ขึ้น 1 เมื่อ c ออกจาก scope
count ลง 1 เราไม่ต้องเรียกฟังก์ชันเพื่อลด reference count เหมือนที่
เราต้องเรียก Rc::clone เพื่อเพิ่ม reference count — implementation
ของ trait Drop ลด reference count อัตโนมัติเมื่อค่า Rc<T> ออกจาก
scope
สิ่งที่เราเห็นไม่ได้ในตัวอย่างนี้คือเมื่อ b แล้ว a ออกจาก scope
ที่ท้ายสุดของ main count เป็น 0 และ Rc<List> ถูก cleanup
สมบูรณ์ การใช้ Rc<T> อนุญาตให้ค่าเดียวมีหลาย owner และ count
รับประกันว่าค่ายัง valid ตราบใดที่ owner ใดยังมีอยู่
ผ่าน immutable reference Rc<T> อนุญาตให้คุณแชร์ข้อมูลระหว่างหลาย
ส่วนของโปรแกรมของคุณสำหรับอ่านเท่านั้น ถ้า Rc<T> อนุญาตให้คุณมี
หลาย mutable reference ด้วย คุณอาจละเมิดกฎ borrowing หนึ่งที่พูดถึง
ในบทที่ 4 — multiple mutable borrow ไปยังที่เดียวก่อให้เกิด data
race และความไม่สอดคล้องได้ แต่การ mutate ข้อมูลได้มีประโยชน์มาก!
ในส่วนถัดไป เราจะพูดถึง pattern interior mutability และ type
RefCell<T> ที่คุณใช้ร่วมกับ Rc<T> เพื่อทำงานกับข้อจำกัด
immutability นี้ได้
RefCell<T> และ Interior Mutability Pattern
RefCell<T> และ Pattern Interior Mutability
Interior mutability เป็น design pattern ใน Rust ที่อนุญาตให้คุณ
mutate ข้อมูลแม้เมื่อมี immutable reference ของข้อมูลนั้น — โดยปกติ
การกระทำนี้ไม่ได้รับอนุญาตโดยกฎ borrowing เพื่อ mutate ข้อมูล pattern
ใช้โค้ด unsafe ภายในโครงสร้างข้อมูลเพื่อ bend กฎปกติของ Rust ที่
ควบคุม mutation และ borrowing โค้ด unsafe ระบุให้ compiler ว่าเรา
กำลังตรวจสอบกฎด้วยมือแทนการพึ่ง compiler ในการตรวจให้เรา — เราจะพูด
ถึงโค้ด unsafe เพิ่มในบทที่ 20
เราใช้ type ที่ใช้ pattern interior mutability ได้เฉพาะเมื่อเรา
รับประกันได้ว่ากฎ borrowing จะถูกปฏิบัติตามที่ runtime แม้ว่า
compiler รับประกันสิ่งนั้นไม่ได้ โค้ด unsafe ที่เกี่ยวข้องถูก wrap
ใน API ที่ปลอดภัย และ type ภายนอกยังเป็น immutable
มาสำรวจแนวคิดนี้โดยดู type RefCell<T> ที่ตามหา pattern interior
mutability
บังคับใช้กฎ Borrowing ที่ Runtime
ต่างจาก Rc<T> type RefCell<T> แทน single ownership เหนือข้อมูล
ที่มันเก็บ ดังนั้น อะไรทำให้ RefCell<T> ต่างจาก type เช่น Box<T>?
จำกฎ borrowing ที่คุณเรียนในบทที่ 4:
- ในเวลาใดเวลาหนึ่ง คุณมีได้ ไม่ก็ หนึ่ง mutable reference หรือ จำนวนเท่าไรก็ได้ของ immutable reference (แต่ไม่ทั้งสอง)
- Reference ต้อง valid เสมอ
ด้วย reference และ Box<T> invariant ของกฎ borrowing ถูกบังคับใช้
ที่ compile time ด้วย RefCell<T> invariant เหล่านี้ถูกบังคับใช้
ที่ runtime ด้วย reference ถ้าคุณทำผิดกฎเหล่านี้ คุณจะได้ error
compiler ด้วย RefCell<T> ถ้าคุณทำผิดกฎเหล่านี้ โปรแกรมของคุณจะ
panic และออก
ข้อดีของการตรวจสอบกฎ borrowing ที่ compile time คือ error จะถูกจับ เร็วขึ้นในกระบวนการพัฒนา และไม่มีผลต่อ performance ที่ runtime เพราะการวิเคราะห์ทั้งหมดเสร็จล่วงหน้า ด้วยเหตุผลเหล่านั้น การตรวจสอบ กฎ borrowing ที่ compile time เป็นทางเลือกที่ดีที่สุดในกรณีส่วนใหญ่ ซึ่งเป็นเหตุผลที่นี่เป็น default ของ Rust
ข้อดีของการตรวจสอบกฎ borrowing ที่ runtime แทนคือ scenario ที่ memory-safe บางอย่างถูกอนุญาตที่ที่จะไม่ถูกอนุญาตโดยการตรวจสอบ compile-time การวิเคราะห์ static เช่น Rust compiler โดยธรรมชาติเป็น conservative คุณสมบัติบางอย่างของโค้ดเป็นไปไม่ได้ที่จะตรวจจับโดย การวิเคราะห์โค้ด — ตัวอย่างที่มีชื่อเสียงที่สุดคือ Halting Problem ซึ่งอยู่นอก scope ของหนังสือเล่มนี้แต่เป็นหัวข้อที่น่าสนใจที่ค้นคว้า
เพราะการวิเคราะห์บางอย่างเป็นไปไม่ได้ ถ้า Rust compiler แน่ใจไม่ได้
ว่าโค้ดเป็นไปตามกฎ ownership มันอาจปฏิเสธโปรแกรมที่ถูกต้อง — ในวิธี
นี้ มันเป็น conservative ถ้า Rust ยอมรับโปรแกรมที่ไม่ถูกต้อง user
จะไม่สามารถเชื่อการรับประกันที่ Rust ทำ อย่างไรก็ตาม ถ้า Rust ปฏิเสธ
โปรแกรมที่ถูกต้อง programmer จะไม่สะดวก แต่ไม่มีอะไร catastrophic
เกิด type RefCell<T> มีประโยชน์เมื่อคุณแน่ใจว่าโค้ดของคุณตามกฎ
borrowing แต่ compiler ไม่สามารถเข้าใจและรับประกันสิ่งนั้น
คล้ายกับ Rc<T> RefCell<T> ใช้เฉพาะใน scenario เธรดเดียวและจะให้
error ที่ compile time ถ้าคุณพยายามใช้มันใน context multithreaded
เราจะพูดถึงวิธีรับ functionality ของ RefCell<T> ในโปรแกรม
multithreaded ในบทที่ 16
นี่คือสรุปเหตุผลที่จะเลือก Box<T>, Rc<T> หรือ RefCell<T>:
Rc<T>เปิดใช้ owner หลายตัวของข้อมูลเดียวกัน —Box<T>และRefCell<T>มี owner เดียวBox<T>อนุญาต immutable หรือ mutable borrow ที่ตรวจสอบที่ compile time —Rc<T>อนุญาตเฉพาะ immutable borrow ที่ตรวจสอบที่ compile time —RefCell<T>อนุญาต immutable หรือ mutable borrow ที่ตรวจสอบที่ runtime- เพราะ
RefCell<T>อนุญาต mutable borrow ที่ตรวจสอบที่ runtime คุณ mutate ค่าภายในRefCell<T>แม้เมื่อRefCell<T>เป็น immutable ได้
การ mutate ค่าภายในค่า immutable คือ pattern interior mutability มาดูสถานการณ์ที่ interior mutability มีประโยชน์และตรวจสอบว่ามันเป็น ไปได้ยังไง
ใช้ Interior Mutability
ผลของกฎ borrowing คือเมื่อคุณมีค่า immutable คุณ borrow มันแบบ mutable ไม่ได้ ตัวอย่างเช่น โค้ดนี้จะไม่คอมไพล์:
fn main() {
let x = 5;
let y = &mut x;
}ถ้าคุณพยายามคอมไพล์โค้ดนี้ คุณจะได้ error ต่อไปนี้:
$ cargo run
Compiling borrowing v0.1.0 (file:///projects/borrowing)
error[E0596]: cannot borrow `x` as mutable, as it is not declared as mutable
--> src/main.rs:3:13
|
3 | let y = &mut x;
| ^^^^^^ cannot borrow as mutable
|
help: consider changing this to be mutable
|
2 | let mut x = 5;
| +++
For more information about this error, try `rustc --explain E0596`.
error: could not compile `borrowing` (bin "borrowing") due to 1 previous error
อย่างไรก็ตาม มีสถานการณ์ที่จะมีประโยชน์ที่ค่า mutate ตัวเองในเมธอด
ของมันแต่ปรากฏเป็น immutable ต่อโค้ดอื่น โค้ดภายนอกเมธอดของค่าจะ
ไม่สามารถ mutate ค่าได้ การใช้ RefCell<T> เป็นวิธีหนึ่งที่จะรับ
ความสามารถที่จะมี interior mutability แต่ RefCell<T> ไม่ได้หลบ
กฎ borrowing สมบูรณ์ — borrow checker ใน compiler อนุญาต interior
mutability นี้ และกฎ borrowing ถูกตรวจสอบที่ runtime แทน ถ้าคุณ
ละเมิดกฎ คุณจะได้ panic! แทน error compiler
มาทำงานผ่านตัวอย่างที่ปฏิบัติได้ที่เราใช้ RefCell<T> เพื่อ mutate
ค่า immutable และดูทำไมนั่นมีประโยชน์
ทดสอบด้วย Mock Object
บางครั้งระหว่างการทดสอบ programmer จะใช้ type ในที่ของอีก type เพื่อ สังเกตพฤติกรรมเฉพาะและ assert ว่ามันถูก implement ถูกต้อง type placeholder นี้เรียก test double คิดถึงมันในความหมายของ stunt double ในการทำหนัง ที่บุคคลก้าวเข้าและทดแทนนักแสดงเพื่อทำฉากที่ ยุ่งยากเฉพาะ Test double ยืนแทน type อื่นเมื่อเรารันเทส Mock object เป็นประเภทเฉพาะของ test double ที่บันทึกสิ่งที่เกิดระหว่าง เทสเพื่อให้คุณ assert ว่าการกระทำที่ถูกต้องเกิดได้
Rust ไม่มี object ในความหมายเดียวกับที่ภาษาอื่นมี object และ Rust ไม่มี functionality mock object built-in ใน standard library เหมือนที่บางภาษาอื่นมี อย่างไรก็ตาม คุณสร้าง struct ที่จะรับใช้ จุดประสงค์เดียวกับ mock object ได้แน่นอน
นี่คือ scenario ที่เราจะทดสอบ — เราจะสร้าง library ที่ตามค่าเทียบ กับค่าสูงสุดและส่งข้อความตามว่าค่าปัจจุบันใกล้ค่าสูงสุดแค่ไหน library นี้ใช้ตาม quota ของ user สำหรับจำนวนการเรียก API ที่พวกเขา ได้รับอนุญาตให้ทำได้ ตัวอย่างเช่น
library ของเราจะให้เฉพาะ functionality ของการตามว่าค่าใกล้สูงสุด
แค่ไหนและข้อความควรเป็นอะไรที่เวลาไหน Application ที่ใช้ library
ของเราจะถูกคาดหวังให้ให้กลไกในการส่งข้อความ — application แสดง
ข้อความให้ user โดยตรง ส่ง email ส่งข้อความ text หรือทำอย่างอื่น
ได้ library ไม่ต้องรู้รายละเอียดนั้น ทั้งหมดที่มันต้องการคืออะไร
ที่ implement trait ที่เราจะให้ที่เรียก Messenger Listing 15-20
แสดงโค้ด library
pub trait Messenger {
fn send(&self, msg: &str);
}
pub struct LimitTracker<'a, T: Messenger> {
messenger: &'a T,
value: usize,
max: usize,
}
impl<'a, T> LimitTracker<'a, T>
where
T: Messenger,
{
pub fn new(messenger: &'a T, max: usize) -> LimitTracker<'a, T> {
LimitTracker {
messenger,
value: 0,
max,
}
}
pub fn set_value(&mut self, value: usize) {
self.value = value;
let percentage_of_max = self.value as f64 / self.max as f64;
if percentage_of_max >= 1.0 {
self.messenger.send("Error: You are over your quota!");
} else if percentage_of_max >= 0.9 {
self.messenger
.send("Urgent warning: You've used up over 90% of your quota!");
} else if percentage_of_max >= 0.75 {
self.messenger
.send("Warning: You've used up over 75% of your quota!");
}
}
}ส่วนสำคัญหนึ่งของโค้ดนี้คือ trait Messenger มีหนึ่งเมธอดที่เรียก
send ที่รับ immutable reference ของ self และ text ของข้อความ
trait นี้คือ interface ที่ mock object ของเราต้อง implement เพื่อให้
mock ถูกใช้ในแบบเดียวกับที่ object จริงถูกใช้ ส่วนสำคัญอื่นคือเรา
ต้องการทดสอบพฤติกรรมของเมธอด set_value บน LimitTracker เรา
เปลี่ยนสิ่งที่เราส่งเข้าสำหรับ parameter value ได้ แต่ set_value
ไม่ return อะไรให้เราทำ assertion บน เราต้องการที่จะพูดว่าถ้าเรา
สร้าง LimitTracker ด้วยอะไรที่ implement trait Messenger และค่า
เฉพาะสำหรับ max messenger ถูกบอกให้ส่งข้อความที่เหมาะสมเมื่อเรา
ส่งตัวเลขต่างกันสำหรับ value
เราต้องการ mock object ที่แทนการส่ง email หรือข้อความ text เมื่อเรา
เรียก send จะเพียงตามข้อความที่มันถูกบอกให้ส่ง เราสร้าง instance
ใหม่ของ mock object สร้าง LimitTracker ที่ใช้ mock object เรียก
เมธอด set_value บน LimitTracker แล้วตรวจสอบว่า mock object มี
ข้อความที่เราคาดหวังได้ Listing 15-21 แสดงการพยายาม implement mock
object เพื่อทำสิ่งนั้น แต่ borrow checker จะไม่อนุญาต
pub trait Messenger {
fn send(&self, msg: &str);
}
pub struct LimitTracker<'a, T: Messenger> {
messenger: &'a T,
value: usize,
max: usize,
}
impl<'a, T> LimitTracker<'a, T>
where
T: Messenger,
{
pub fn new(messenger: &'a T, max: usize) -> LimitTracker<'a, T> {
LimitTracker {
messenger,
value: 0,
max,
}
}
pub fn set_value(&mut self, value: usize) {
self.value = value;
let percentage_of_max = self.value as f64 / self.max as f64;
if percentage_of_max >= 1.0 {
self.messenger.send("Error: You are over your quota!");
} else if percentage_of_max >= 0.9 {
self.messenger
.send("Urgent warning: You've used up over 90% of your quota!");
} else if percentage_of_max >= 0.75 {
self.messenger
.send("Warning: You've used up over 75% of your quota!");
}
}
}
#[cfg(test)]
mod tests {
use super::*;
struct MockMessenger {
sent_messages: Vec<String>,
}
impl MockMessenger {
fn new() -> MockMessenger {
MockMessenger {
sent_messages: vec![],
}
}
}
impl Messenger for MockMessenger {
fn send(&self, message: &str) {
self.sent_messages.push(String::from(message));
}
}
#[test]
fn it_sends_an_over_75_percent_warning_message() {
let mock_messenger = MockMessenger::new();
let mut limit_tracker = LimitTracker::new(&mock_messenger, 100);
limit_tracker.set_value(80);
assert_eq!(mock_messenger.sent_messages.len(), 1);
}
}MockMessenger ที่ borrow checker ไม่อนุญาตโค้ดเทสนี้นิยาม struct MockMessenger ที่มี field sent_messages
กับ Vec ของค่า String เพื่อตามข้อความที่มันถูกบอกให้ส่ง เรายัง
นิยาม associated function new เพื่อทำให้สะดวกในการสร้างค่า
MockMessenger ใหม่ที่เริ่มด้วย list ข้อความว่าง เราจากนั้น
implement trait Messenger สำหรับ MockMessenger เพื่อให้เราให้
MockMessenger ให้ LimitTracker ได้ ในนิยามของเมธอด send เรา
รับข้อความที่ส่งเข้าเป็น parameter และเก็บมันใน list sent_messages
ของ MockMessenger
ในเทส เรากำลังทดสอบสิ่งที่เกิดเมื่อ LimitTracker ถูกบอกให้ตั้ง
value เป็นอะไรที่มากกว่า 75 เปอร์เซ็นต์ของค่า max ก่อนอื่น เรา
สร้าง MockMessenger ใหม่ซึ่งจะเริ่มด้วย list ข้อความว่าง จากนั้น
เราสร้าง LimitTracker ใหม่และให้มัน reference ของ MockMessenger
ใหม่และค่า max ของ 100 เราเรียกเมธอด set_value บน
LimitTracker ด้วยค่า 80 ซึ่งมากกว่า 75 เปอร์เซ็นต์ของ 100 จาก
นั้น เรา assert ว่า list ของข้อความที่ MockMessenger กำลังตามควร
มีหนึ่งข้อความในนั้นตอนนี้
อย่างไรก็ตาม มีปัญหาหนึ่งกับเทสนี้ ดังที่แสดงที่นี่:
$ cargo test
Compiling limit-tracker v0.1.0 (file:///projects/limit-tracker)
error[E0596]: cannot borrow `self.sent_messages` as mutable, as it is behind a `&` reference
--> src/lib.rs:58:13
|
58 | self.sent_messages.push(String::from(message));
| ^^^^^^^^^^^^^^^^^^ `self` is a `&` reference, so the data it refers to cannot be borrowed as mutable
|
help: consider changing this to be a mutable reference in the `impl` method and the `trait` definition
|
2 ~ fn send(&mut self, msg: &str);
3 | }
...
56 | impl Messenger for MockMessenger {
57 ~ fn send(&mut self, message: &str) {
|
For more information about this error, try `rustc --explain E0596`.
error: could not compile `limit-tracker` (lib test) due to 1 previous error
เราแก้ MockMessenger ให้ตามข้อความไม่ได้ เพราะเมธอด send รับ
immutable reference ของ self เรายังรับข้อเสนอแนะจาก text error
ที่จะใช้ &mut self ในทั้งเมธอด impl และนิยาม trait ไม่ได้ เรา
ไม่ต้องการเปลี่ยน trait Messenger เพียงเพื่อการทดสอบ แทน เราต้อง
หาวิธีทำให้โค้ดเทสของเราทำงานถูกต้องกับการออกแบบที่มีอยู่ของเรา
นี่คือสถานการณ์ที่ interior mutability ช่วยได้! เราจะเก็บ
sent_messages ภายใน RefCell<T> และจากนั้นเมธอด send จะ
สามารถแก้ sent_messages เพื่อเก็บข้อความที่เราเห็น Listing 15-22
แสดงว่าดูเป็นยังไง
pub trait Messenger {
fn send(&self, msg: &str);
}
pub struct LimitTracker<'a, T: Messenger> {
messenger: &'a T,
value: usize,
max: usize,
}
impl<'a, T> LimitTracker<'a, T>
where
T: Messenger,
{
pub fn new(messenger: &'a T, max: usize) -> LimitTracker<'a, T> {
LimitTracker {
messenger,
value: 0,
max,
}
}
pub fn set_value(&mut self, value: usize) {
self.value = value;
let percentage_of_max = self.value as f64 / self.max as f64;
if percentage_of_max >= 1.0 {
self.messenger.send("Error: You are over your quota!");
} else if percentage_of_max >= 0.9 {
self.messenger
.send("Urgent warning: You've used up over 90% of your quota!");
} else if percentage_of_max >= 0.75 {
self.messenger
.send("Warning: You've used up over 75% of your quota!");
}
}
}
#[cfg(test)]
mod tests {
use super::*;
use std::cell::RefCell;
struct MockMessenger {
sent_messages: RefCell<Vec<String>>,
}
impl MockMessenger {
fn new() -> MockMessenger {
MockMessenger {
sent_messages: RefCell::new(vec![]),
}
}
}
impl Messenger for MockMessenger {
fn send(&self, message: &str) {
self.sent_messages.borrow_mut().push(String::from(message));
}
}
#[test]
fn it_sends_an_over_75_percent_warning_message() {
// --snip--
let mock_messenger = MockMessenger::new();
let mut limit_tracker = LimitTracker::new(&mock_messenger, 100);
limit_tracker.set_value(80);
assert_eq!(mock_messenger.sent_messages.borrow().len(), 1);
}
}RefCell<T> เพื่อ mutate ค่าภายในในขณะที่ค่าภายนอกถือว่า immutablefield sent_messages ตอนนี้เป็น type RefCell<Vec<String>> แทน
Vec<String> ในฟังก์ชัน new เราสร้าง instance
RefCell<Vec<String>> ใหม่รอบ vector ว่าง
สำหรับ implementation ของเมธอด send parameter แรกยังเป็น
immutable borrow ของ self ซึ่งตรงกับนิยาม trait เราเรียก
borrow_mut บน RefCell<Vec<String>> ใน self.sent_messages เพื่อ
รับ mutable reference ของค่าภายใน RefCell<Vec<String>> ซึ่งเป็น
vector จากนั้น เราเรียก push บน mutable reference ของ vector
เพื่อตามข้อความที่ส่งระหว่างเทสได้
การเปลี่ยนแปลงสุดท้ายที่เราต้องทำคือใน assertion — เพื่อเห็นว่ามี
item เท่าไรใน vector ภายใน เราเรียก borrow บน
RefCell<Vec<String>> เพื่อรับ immutable reference ของ vector
ตอนนี้คุณเห็นวิธีใช้ RefCell<T> แล้ว มาขุดลงไปว่ามันทำงานยังไง!
ตาม Borrow ที่ Runtime
เมื่อสร้าง immutable และ mutable reference เราใช้ syntax & และ
&mut ตามลำดับ ด้วย RefCell<T> เราใช้เมธอด borrow และ
borrow_mut ซึ่งเป็นส่วนของ API ที่ปลอดภัยที่เป็นของ RefCell<T>
เมธอด borrow return type smart pointer Ref<T> และ borrow_mut
return type smart pointer RefMut<T> ทั้งสอง type implement
Deref ดังนั้นเราปฏิบัติกับพวกมันเหมือน reference ปกติได้
RefCell<T> ตามว่ามี smart pointer Ref<T> และ RefMut<T> เท่าไร
ที่ active ปัจจุบัน ทุกครั้งที่เราเรียก borrow RefCell<T> เพิ่ม
count ของว่ามี immutable borrow เท่าไรที่ active เมื่อค่า Ref<T>
ออกจาก scope count ของ immutable borrow ลง 1 เช่นเดียวกับกฎ
borrowing ที่ compile-time RefCell<T> ให้เรามี immutable borrow
หลายตัวหรือหนึ่ง mutable borrow ที่จุดใดในเวลา
ถ้าเราพยายามละเมิดกฎเหล่านี้ แทนที่จะได้ error compiler ที่เราจะได้
กับ reference implementation ของ RefCell<T> จะ panic ที่ runtime
Listing 15-23 แสดงการแก้ของ implementation send ใน Listing
15-22 เรากำลังจงใจพยายามสร้างสอง mutable borrow ที่ active สำหรับ
scope เดียวกันเพื่อแสดงว่า RefCell<T> ป้องกันเราจากการทำสิ่งนี้
ที่ runtime
pub trait Messenger {
fn send(&self, msg: &str);
}
pub struct LimitTracker<'a, T: Messenger> {
messenger: &'a T,
value: usize,
max: usize,
}
impl<'a, T> LimitTracker<'a, T>
where
T: Messenger,
{
pub fn new(messenger: &'a T, max: usize) -> LimitTracker<'a, T> {
LimitTracker {
messenger,
value: 0,
max,
}
}
pub fn set_value(&mut self, value: usize) {
self.value = value;
let percentage_of_max = self.value as f64 / self.max as f64;
if percentage_of_max >= 1.0 {
self.messenger.send("Error: You are over your quota!");
} else if percentage_of_max >= 0.9 {
self.messenger
.send("Urgent warning: You've used up over 90% of your quota!");
} else if percentage_of_max >= 0.75 {
self.messenger
.send("Warning: You've used up over 75% of your quota!");
}
}
}
#[cfg(test)]
mod tests {
use super::*;
use std::cell::RefCell;
struct MockMessenger {
sent_messages: RefCell<Vec<String>>,
}
impl MockMessenger {
fn new() -> MockMessenger {
MockMessenger {
sent_messages: RefCell::new(vec![]),
}
}
}
impl Messenger for MockMessenger {
fn send(&self, message: &str) {
let mut one_borrow = self.sent_messages.borrow_mut();
let mut two_borrow = self.sent_messages.borrow_mut();
one_borrow.push(String::from(message));
two_borrow.push(String::from(message));
}
}
#[test]
fn it_sends_an_over_75_percent_warning_message() {
let mock_messenger = MockMessenger::new();
let mut limit_tracker = LimitTracker::new(&mock_messenger, 100);
limit_tracker.set_value(80);
assert_eq!(mock_messenger.sent_messages.borrow().len(), 1);
}
}RefCell<T> จะ panicเราสร้างตัวแปร one_borrow สำหรับ smart pointer RefMut<T> ที่
return จาก borrow_mut จากนั้น เราสร้าง mutable borrow อื่นในแบบ
เดียวกันในตัวแปร two_borrow นี่ทำสอง mutable reference ใน scope
เดียวกัน ซึ่งไม่ได้รับอนุญาต เมื่อเรารันเทสสำหรับ library ของเรา
โค้ดใน Listing 15-23 จะคอมไพล์โดยไม่มี error แต่เทสจะ fail:
$ cargo test
Compiling limit-tracker v0.1.0 (file:///projects/limit-tracker)
Finished `test` profile [unoptimized + debuginfo] target(s) in 0.91s
Running unittests src/lib.rs (target/debug/deps/limit_tracker-e599811fa246dbde)
running 1 test
test tests::it_sends_an_over_75_percent_warning_message ... FAILED
failures:
---- tests::it_sends_an_over_75_percent_warning_message stdout ----
thread 'tests::it_sends_an_over_75_percent_warning_message' panicked at src/lib.rs:60:53:
RefCell already borrowed
note: run with `RUST_BACKTRACE=1` environment variable to display a backtrace
failures:
tests::it_sends_an_over_75_percent_warning_message
test result: FAILED. 0 passed; 1 failed; 0 ignored; 0 measured; 0 filtered out; finished in 0.00s
error: test failed, to rerun pass `--lib`
สังเกตว่าโค้ด panic ด้วยข้อความ already borrowed: BorrowMutError
นี่คือวิธีที่ RefCell<T> จัดการการละเมิดกฎ borrowing ที่ runtime
การเลือกจับ error borrowing ที่ runtime ไม่ใช่ที่ compile time ดัง
ที่เราทำที่นี่ หมายความว่าคุณอาจหาความผิดพลาดในโค้ดของคุณภายหลังใน
กระบวนการพัฒนา — อาจไม่จนกว่าโค้ดของคุณถูก deploy ไปยัง production
ด้วย โค้ดของคุณจะรับ performance runtime ปรับเล็กเป็นผลจากการตาม
borrow ที่ runtime ไม่ใช่ที่ compile time อย่างไรก็ตาม การใช้
RefCell<T> ทำให้เป็นไปได้ที่จะเขียน mock object ที่แก้ตัวเองเพื่อ
ตามข้อความที่มันเห็นในขณะที่คุณใช้มันใน context ที่อนุญาตเฉพาะค่า
immutable คุณใช้ RefCell<T> แม้ trade-off ของมันเพื่อรับ
functionality มากขึ้นกว่าที่ reference ปกติให้
อนุญาตให้มี Owner หลายตัวของ Mutable Data
วิธีทั่วไปในการใช้ RefCell<T> คือร่วมกับ Rc<T> จำได้ว่า Rc<T>
ให้คุณมี owner หลายตัวของข้อมูลบางตัว แต่มันให้เฉพาะการเข้าถึง
immutable ของข้อมูลนั้น ถ้าคุณมี Rc<T> ที่เก็บ RefCell<T> คุณ
รับค่าที่มี owner หลายตัว_และ_ ที่คุณ mutate ได้!
ตัวอย่างเช่น จำได้ตัวอย่าง cons list ใน Listing 15-18 ที่เราใช้
Rc<T> เพื่ออนุญาตให้หลาย list แชร์ ownership ของอีก list เพราะ
Rc<T> เก็บเฉพาะค่า immutable เราเปลี่ยนค่าใน list ไม่ได้เมื่อ
เราสร้างพวกมันแล้ว มาเพิ่ม RefCell<T> สำหรับความสามารถที่จะเปลี่ยน
ค่าใน list Listing 15-24 แสดงว่าโดยใช้ RefCell<T> ในนิยาม Cons
เราแก้ค่าที่เก็บใน list ทั้งหมดได้
#[derive(Debug)]
enum List {
Cons(Rc<RefCell<i32>>, Rc<List>),
Nil,
}
use crate::List::{Cons, Nil};
use std::cell::RefCell;
use std::rc::Rc;
fn main() {
let value = Rc::new(RefCell::new(5));
let a = Rc::new(Cons(Rc::clone(&value), Rc::new(Nil)));
let b = Cons(Rc::new(RefCell::new(3)), Rc::clone(&a));
let c = Cons(Rc::new(RefCell::new(4)), Rc::clone(&a));
*value.borrow_mut() += 10;
println!("a after = {a:?}");
println!("b after = {b:?}");
println!("c after = {c:?}");
}Rc<RefCell<i32>> เพื่อสร้าง List ที่เรา mutate ได้เราสร้างค่าที่เป็น instance ของ Rc<RefCell<i32>> และเก็บมันใน
ตัวแปรชื่อ value เพื่อให้เราเข้าถึงมันโดยตรงภายหลัง จากนั้น เรา
สร้าง List ใน a กับ variant Cons ที่เก็บ value เราต้อง
clone value เพื่อให้ทั้ง a และ value มี ownership ของค่า 5
ภายในไม่ใช่โอน ownership จาก value ให้ a หรือให้ a borrow
จาก value
เรา wrap list a ใน Rc<T> เพื่อให้เมื่อเราสร้าง list b และ
c พวกมันทั้งคู่อ้างถึง a ได้ ซึ่งคือสิ่งที่เราทำใน Listing
15-18
หลังจากที่เราสร้าง list ใน a, b และ c แล้ว เราต้องการเพิ่ม
10 ให้ค่าใน value เราทำสิ่งนี้โดยเรียก borrow_mut บน value
ซึ่งใช้ฟีเจอร์ dereferencing อัตโนมัติที่เราพูดถึงใน
“Operator -> อยู่ที่ไหน?”
ในบทที่ 5 เพื่อ dereference Rc<T> ไปยังค่า RefCell<T> ภายใน
เมธอด borrow_mut return smart pointer RefMut<T> และเราใช้
dereference operator บนมันและเปลี่ยนค่าภายใน
เมื่อเรา print a, b และ c เราเห็นว่าพวกมันทั้งหมดมีค่าที่
แก้ของ 15 ไม่ใช่ 5:
$ cargo run
Compiling cons-list v0.1.0 (file:///projects/cons-list)
Finished `dev` profile [unoptimized + debuginfo] target(s) in 0.63s
Running `target/debug/cons-list`
a after = Cons(RefCell { value: 15 }, Nil)
b after = Cons(RefCell { value: 3 }, Cons(RefCell { value: 15 }, Nil))
c after = Cons(RefCell { value: 4 }, Cons(RefCell { value: 15 }, Nil))
เทคนิคนี้เนียนสุด! โดยใช้ RefCell<T> เรามีค่า List ที่ปรากฏ
ภายนอกเป็น immutable แต่เราใช้เมธอดบน RefCell<T> ที่ให้สิทธิ์
เข้าถึง interior mutability ของมันเพื่อให้เราแก้ข้อมูลของเราเมื่อ
เราต้องการได้ การตรวจสอบ runtime ของกฎ borrowing ปกป้องเราจาก data
race และบางครั้งคุ้มค่าที่จะ trade ความเร็วบ้างเพื่อความยืดหยุ่นนี้
ในโครงสร้างข้อมูลของเรา สังเกตว่า RefCell<T> ไม่ทำงานสำหรับโค้ด
multithreaded! Mutex<T> เป็นเวอร์ชัน thread-safe ของ
RefCell<T> และเราจะพูดถึง Mutex<T> ในบทที่ 16
Reference cycle ทำให้หน่วยความจำรั่วได้
Reference Cycle ทำให้หน่วยความจำรั่วได้
การรับประกัน memory safety ของ Rust ทำให้มันยาก แต่ไม่เป็นไปไม่ได้
ที่จะสร้างหน่วยความจำที่ไม่ถูก cleanup โดยบังเอิญ (รู้จักในชื่อ
memory leak) การป้องกัน memory leak สมบูรณ์ไม่ใช่หนึ่งในการรับ
ประกันของ Rust หมายความว่า memory leak เป็น memory safe ใน Rust
เราเห็นได้ว่า Rust อนุญาต memory leak โดยใช้ Rc<T> และ
RefCell<T> — เป็นไปได้ที่จะสร้าง reference ที่ item อ้างถึงกันใน
cycle นี่สร้าง memory leak เพราะ reference count ของแต่ละ item ใน
cycle จะไม่ถึง 0 และค่าจะไม่ถูก drop
สร้าง Reference Cycle
มาดูว่า reference cycle อาจเกิดยังไงและวิธีป้องกัน เริ่มด้วยนิยาม
ของ enum List และเมธอด tail ใน Listing 15-25
use crate::List::{Cons, Nil};
use std::cell::RefCell;
use std::rc::Rc;
#[derive(Debug)]
enum List {
Cons(i32, RefCell<Rc<List>>),
Nil,
}
impl List {
fn tail(&self) -> Option<&RefCell<Rc<List>>> {
match self {
Cons(_, item) => Some(item),
Nil => None,
}
}
}
fn main() {}RefCell<T> เพื่อให้เราแก้สิ่งที่ variant Cons อ้างถึงเราใช้รูปแบบอื่นของนิยาม List จาก Listing 15-5 element ที่สองใน
variant Cons ตอนนี้เป็น RefCell<Rc<List>> หมายความว่าแทนการมี
ความสามารถที่จะแก้ค่า i32 ดังที่เราทำใน Listing 15-24 เราต้องการ
แก้ค่า List ที่ variant Cons กำลังชี้ เรายังเพิ่มเมธอด tail
เพื่อทำให้สะดวกสำหรับเราในการเข้าถึง item ที่สองถ้าเรามี variant
Cons
ใน Listing 15-26 เรากำลังเพิ่มฟังก์ชัน main ที่ใช้นิยามใน Listing
15-25 โค้ดนี้สร้าง list ใน a และ list ใน b ที่ชี้ไปยัง list
ใน a จากนั้น มันแก้ list ใน a ให้ชี้ไปยัง b สร้าง reference
cycle มี statement println! ระหว่างทางเพื่อแสดงว่า reference count
เป็นอะไรที่จุดต่าง ๆ ในกระบวนการนี้
use crate::List::{Cons, Nil};
use std::cell::RefCell;
use std::rc::Rc;
#[derive(Debug)]
enum List {
Cons(i32, RefCell<Rc<List>>),
Nil,
}
impl List {
fn tail(&self) -> Option<&RefCell<Rc<List>>> {
match self {
Cons(_, item) => Some(item),
Nil => None,
}
}
}
fn main() {
let a = Rc::new(Cons(5, RefCell::new(Rc::new(Nil))));
println!("a initial rc count = {}", Rc::strong_count(&a));
println!("a next item = {:?}", a.tail());
let b = Rc::new(Cons(10, RefCell::new(Rc::clone(&a))));
println!("a rc count after b creation = {}", Rc::strong_count(&a));
println!("b initial rc count = {}", Rc::strong_count(&b));
println!("b next item = {:?}", b.tail());
if let Some(link) = a.tail() {
*link.borrow_mut() = Rc::clone(&b);
}
println!("b rc count after changing a = {}", Rc::strong_count(&b));
println!("a rc count after changing a = {}", Rc::strong_count(&a));
// Uncomment the next line to see that we have a cycle;
// it will overflow the stack.
// println!("a next item = {:?}", a.tail());
}List ที่ชี้ไปหากันเราสร้าง instance Rc<List> ที่เก็บค่า List ในตัวแปร a ด้วย
list เริ่มต้นของ 5, Nil เราจากนั้นสร้าง instance Rc<List> ที่
เก็บค่า List อื่นในตัวแปร b ที่บรรจุค่า 10 และชี้ไปยัง list
ใน a
เราแก้ a ให้มันชี้ไปยัง b แทน Nil สร้าง cycle เราทำสิ่งนั้น
โดยใช้เมธอด tail เพื่อรับ reference ของ RefCell<Rc<List>> ใน
a ที่เราใส่ในตัวแปร link จากนั้น เราใช้เมธอด borrow_mut บน
RefCell<Rc<List>> เพื่อเปลี่ยนค่าภายในจาก Rc<List> ที่เก็บค่า
Nil เป็น Rc<List> ใน b
เมื่อเรารันโค้ดนี้ เก็บ println! สุดท้ายเป็น comment ตอนนี้ เรา
จะได้ output นี้:
$ cargo run
Compiling cons-list v0.1.0 (file:///projects/cons-list)
Finished `dev` profile [unoptimized + debuginfo] target(s) in 0.53s
Running `target/debug/cons-list`
a initial rc count = 1
a next item = Some(RefCell { value: Nil })
a rc count after b creation = 2
b initial rc count = 1
b next item = Some(RefCell { value: Cons(5, RefCell { value: Nil }) })
b rc count after changing a = 2
a rc count after changing a = 2
reference count ของ instance Rc<List> ในทั้ง a และ b เป็น 2
หลังจากที่เราเปลี่ยน list ใน a ให้ชี้ไปยัง b ที่ท้ายสุดของ
main Rust drop ตัวแปร b ซึ่งลด reference count ของ instance
Rc<List> b จาก 2 เป็น 1 memory ที่ Rc<List> มีบน heap จะไม่
ถูก drop ที่จุดนี้เพราะ reference count ของมันคือ 1 ไม่ใช่ 0
จากนั้น Rust drop a ซึ่งลด reference count ของ instance Rc<List>
a จาก 2 เป็น 1 ด้วย memory ของ instance นี้ก็ drop ไม่ได้ เพราะ
instance Rc<List> อื่นยังอ้างถึงมัน memory ที่ allocate ให้ list
จะยังไม่ถูกเก็บตลอดไป เพื่อ visualize reference cycle นี้ เราได้
สร้าง diagram ใน Figure 15-4

Figure 15-4: reference cycle ของ list a และ
b ที่ชี้ไปหากัน
ถ้าคุณ uncomment println! สุดท้ายและรันโปรแกรม Rust จะพยายาม print
cycle นี้ด้วย a ชี้ไปยัง b ชี้ไปยัง a และเช่นนั้นต่อไปจนกว่ามัน
overflow stack
เปรียบเทียบกับโปรแกรมในโลกจริง ผลของการสร้าง reference cycle ใน ตัวอย่างนี้ไม่รุนแรงมาก — หลังจากเราสร้าง reference cycle โปรแกรม จบ อย่างไรก็ตาม ถ้าโปรแกรมที่ซับซ้อนกว่า allocate memory เยอะใน cycle และเก็บมันเป็นเวลานาน โปรแกรมจะใช้ memory มากกว่าที่ต้องการ และอาจ overwhelm ระบบ ทำให้มันใช้ memory ที่มีหมด
การสร้าง reference cycle ไม่ทำง่าย แต่ก็ไม่เป็นไปไม่ได้ ถ้าคุณมี
ค่า RefCell<T> ที่บรรจุค่า Rc<T> หรือการรวมประเภทซ้อนคล้ายกัน
ของ type ที่มี interior mutability และ reference counting คุณต้อง
รับประกันว่าคุณไม่สร้าง cycle — คุณพึ่ง Rust ในการจับพวกมันไม่ได้
การสร้าง reference cycle จะเป็น bug logic ในโปรแกรมของคุณที่คุณควร
ใช้ automated test, code review และการปฏิบัติพัฒนาซอฟต์แวร์อื่นเพื่อ
ลด
วิธีแก้อื่นสำหรับการหลีกเลี่ยง reference cycle คือการจัดระเบียบ
โครงสร้างข้อมูลของคุณใหม่เพื่อให้บาง reference แสดง ownership และ
บาง reference ไม่ ผลคือ คุณมี cycle ที่ประกอบด้วยความสัมพันธ์
ownership บางอย่างและความสัมพันธ์ไม่ใช่ ownership บางอย่างได้ และ
เฉพาะความสัมพันธ์ ownership กระทบว่าค่า drop ได้หรือไม่ ใน Listing
15-25 เราต้องการ variant Cons เสมอที่จะ own list ของพวกมัน ดังนั้น
การจัดระเบียบโครงสร้างข้อมูลใหม่เป็นไปไม่ได้ มาดูตัวอย่างโดยใช้
graph ที่ประกอบด้วย node parent และ node child เพื่อเห็นเมื่อ
ความสัมพันธ์ไม่ใช่ ownership เป็นวิธีที่เหมาะสมในการป้องกัน
reference cycle
ป้องกัน Reference Cycle โดยใช้ Weak<T>
จนถึงตอนนี้ เราได้สาธิตว่าการเรียก Rc::clone เพิ่ม strong_count
ของ instance Rc<T> และ instance Rc<T> ถูก cleanup เฉพาะถ้า
strong_count ของมันคือ 0 คุณยังสร้าง weak reference ของค่าภายใน
instance Rc<T> ได้โดยเรียก Rc::downgrade และส่ง reference ของ
Rc<T> Strong reference คือวิธีที่คุณแชร์ ownership ของ instance
Rc<T> Weak reference ไม่แสดงความสัมพันธ์ ownership และ count
ของพวกมันไม่กระทบเมื่อ instance Rc<T> ถูก cleanup พวกมันจะไม่ทำ
ให้เกิด reference cycle เพราะ cycle ใดที่เกี่ยวข้อง weak reference
บางตัวจะถูกตัดเมื่อ strong reference count ของค่าที่เกี่ยวข้องเป็น
0
เมื่อคุณเรียก Rc::downgrade คุณได้ smart pointer type Weak<T>
แทนการเพิ่ม strong_count ใน instance Rc<T> ขึ้น 1 การเรียก
Rc::downgrade เพิ่ม weak_count ขึ้น 1 type Rc<T> ใช้
weak_count เพื่อตามว่ามี reference Weak<T> เท่าไรที่มีอยู่
คล้ายกับ strong_count ความแตกต่างคือ weak_count ไม่ต้องเป็น 0
สำหรับ instance Rc<T> ที่จะถูก cleanup
เพราะค่าที่ Weak<T> reference อาจถูก drop เพื่อทำอะไรกับค่าที่
Weak<T> กำลังชี้ คุณต้องรับประกันว่าค่ายังมีอยู่ ทำสิ่งนี้โดย
เรียกเมธอด upgrade บน instance Weak<T> ซึ่งจะ return
Option<Rc<T>> คุณจะได้ผลของ Some ถ้าค่า Rc<T> ยังไม่ถูก drop
และผลของ None ถ้าค่า Rc<T> ถูก drop แล้ว เพราะ upgrade
return Option<Rc<T>> Rust จะรับประกันว่ากรณี Some และกรณี
None ถูกจัดการ และจะไม่มี pointer ที่ไม่ valid
เป็นตัวอย่าง แทนการใช้ list ที่ item รู้เฉพาะเกี่ยวกับ item ถัดไป เราจะสร้างต้นไม้ที่ item รู้เกี่ยวกับ item child ของพวกมัน_และ_ item parent
สร้างโครงสร้างข้อมูลต้นไม้
เพื่อเริ่ม เราจะ build ต้นไม้ที่ node รู้เกี่ยวกับ node child ของ
พวกมัน เราจะสร้าง struct ชื่อ Node ที่เก็บค่า i32 ของตัวเอง
รวมถึง reference ของค่า Node child ของมัน:
Filename: src/main.rs
use std::cell::RefCell;
use std::rc::Rc;
#[derive(Debug)]
struct Node {
value: i32,
children: RefCell<Vec<Rc<Node>>>,
}
fn main() {
let leaf = Rc::new(Node {
value: 3,
children: RefCell::new(vec![]),
});
let branch = Rc::new(Node {
value: 5,
children: RefCell::new(vec![Rc::clone(&leaf)]),
});
}เราต้องการให้ Node own children ของมัน และเราต้องการแชร์ ownership
นั้นกับตัวแปรเพื่อให้เราเข้าถึงแต่ละ Node ในต้นไม้โดยตรงได้ เพื่อ
ทำสิ่งนี้ เรานิยาม item Vec<T> ให้เป็นค่าของ type Rc<Node> เรา
ยังต้องการแก้ว่า node ไหนเป็น child ของอีก node ดังนั้นเรามี
RefCell<T> ใน children รอบ Vec<Rc<Node>>
ถัดไป เราจะใช้นิยาม struct ของเราและสร้างหนึ่ง instance Node ชื่อ
leaf ที่มีค่า 3 และไม่มี children และอีก instance ชื่อ branch
ที่มีค่า 5 และ leaf เป็นหนึ่งใน children ของมัน ดังที่แสดงใน
Listing 15-27
use std::cell::RefCell;
use std::rc::Rc;
#[derive(Debug)]
struct Node {
value: i32,
children: RefCell<Vec<Rc<Node>>>,
}
fn main() {
let leaf = Rc::new(Node {
value: 3,
children: RefCell::new(vec![]),
});
let branch = Rc::new(Node {
value: 5,
children: RefCell::new(vec![Rc::clone(&leaf)]),
});
}leaf ที่ไม่มี children และ node branch ที่มี leaf เป็นหนึ่งใน childrenเรา clone Rc<Node> ใน leaf และเก็บนั้นใน branch หมายความว่า
Node ใน leaf ตอนนี้มีสอง owner — leaf และ branch เราไปจาก
branch ไปยัง leaf ผ่าน branch.children ได้ แต่ไม่มีวิธีไปจาก
leaf ไปยัง branch เหตุผลคือ leaf ไม่มี reference ของ branch
และไม่รู้ว่าพวกมันเกี่ยวข้องกัน เราต้องการให้ leaf รู้ว่า branch
เป็น parent ของมัน เราจะทำสิ่งนั้นต่อไป
เพิ่ม Reference จาก Child ไปยัง Parent
เพื่อทำให้ node child รู้เกี่ยวกับ parent ของมัน เราต้องเพิ่ม field
parent ในนิยาม struct Node ของเรา ปัญหาคือในการตัดสินว่า type
ของ parent ควรเป็นอะไร เรารู้ว่ามันบรรจุ Rc<T> ไม่ได้ เพราะนั่น
จะสร้าง reference cycle กับ leaf.parent ชี้ไปยัง branch และ
branch.children ชี้ไปยัง leaf ซึ่งจะทำให้ค่า strong_count
ของพวกมันไม่เป็น 0
คิดถึงความสัมพันธ์ในอีกแบบ node parent ควร own children ของมัน — ถ้า node parent ถูก drop, node child ของมันควรถูก drop ด้วย อย่าง ไรก็ตาม child ไม่ควร own parent ของมัน — ถ้าเรา drop node child parent ควรยังมีอยู่ นี่คือกรณีสำหรับ weak reference!
ดังนั้น แทน Rc<T> เราจะทำให้ type ของ parent ใช้ Weak<T>
เจาะจง RefCell<Weak<Node>> ตอนนี้นิยาม struct Node ของเราดูแบบ
นี้:
Filename: src/main.rs
use std::cell::RefCell;
use std::rc::{Rc, Weak};
#[derive(Debug)]
struct Node {
value: i32,
parent: RefCell<Weak<Node>>,
children: RefCell<Vec<Rc<Node>>>,
}
fn main() {
let leaf = Rc::new(Node {
value: 3,
parent: RefCell::new(Weak::new()),
children: RefCell::new(vec![]),
});
println!("leaf parent = {:?}", leaf.parent.borrow().upgrade());
let branch = Rc::new(Node {
value: 5,
parent: RefCell::new(Weak::new()),
children: RefCell::new(vec![Rc::clone(&leaf)]),
});
*leaf.parent.borrow_mut() = Rc::downgrade(&branch);
println!("leaf parent = {:?}", leaf.parent.borrow().upgrade());
}node จะสามารถอ้างถึง node parent ของมัน แต่ไม่ own parent ใน
Listing 15-28 เราอัพเดท main ให้ใช้นิยามใหม่นี้เพื่อให้ node
leaf จะมีวิธีอ้างถึง parent ของมัน branch
use std::cell::RefCell;
use std::rc::{Rc, Weak};
#[derive(Debug)]
struct Node {
value: i32,
parent: RefCell<Weak<Node>>,
children: RefCell<Vec<Rc<Node>>>,
}
fn main() {
let leaf = Rc::new(Node {
value: 3,
parent: RefCell::new(Weak::new()),
children: RefCell::new(vec![]),
});
println!("leaf parent = {:?}", leaf.parent.borrow().upgrade());
let branch = Rc::new(Node {
value: 5,
parent: RefCell::new(Weak::new()),
children: RefCell::new(vec![Rc::clone(&leaf)]),
});
*leaf.parent.borrow_mut() = Rc::downgrade(&branch);
println!("leaf parent = {:?}", leaf.parent.borrow().upgrade());
}leaf ที่มี weak reference ของ node parent ของมัน branchการสร้าง node leaf ดูคล้ายกับ Listing 15-27 ยกเว้น field parent
— leaf เริ่มต้นโดยไม่มี parent ดังนั้นเราสร้าง instance reference
Weak<Node> ใหม่ว่าง
ที่จุดนี้ เมื่อเราพยายามรับ reference ของ parent ของ leaf โดยใช้
เมธอด upgrade เราได้ค่า None เราเห็นนี้ใน output จาก statement
println! แรก:
leaf parent = None
เมื่อเราสร้าง node branch มันจะมี reference Weak<Node> ใหม่ใน
field parent ด้วยเพราะ branch ไม่มี node parent เรายังมี leaf
เป็นหนึ่งใน children ของ branch เมื่อเรามี instance Node ใน
branch แล้ว เราแก้ leaf ให้มัน reference Weak<Node> ของ
parent ของมันได้ เราใช้เมธอด borrow_mut บน RefCell<Weak<Node>>
ใน field parent ของ leaf และจากนั้นเราใช้ฟังก์ชัน Rc::downgrade
เพื่อสร้าง reference Weak<Node> ของ branch จาก Rc<Node> ใน
branch
เมื่อเรา print parent ของ leaf อีก คราวนี้เราจะได้ variant Some
ที่เก็บ branch — ตอนนี้ leaf เข้าถึง parent ของมันได้! เมื่อ
เรา print leaf เรายังหลีกเลี่ยง cycle ที่ในที่สุดจบใน stack
overflow เหมือนที่เรามีใน Listing 15-26 — reference Weak<Node> ถูก
print เป็น (Weak):
leaf parent = Some(Node { value: 5, parent: RefCell { value: (Weak) },
children: RefCell { value: [Node { value: 3, parent: RefCell { value: (Weak) },
children: RefCell { value: [] } }] } })
การขาด output ไม่สิ้นสุดระบุว่าโค้ดนี้ไม่ได้สร้าง reference cycle
เรายังบอกนี้โดยดูค่าที่เราได้จากการเรียก Rc::strong_count และ
Rc::weak_count
Visualize การเปลี่ยนแปลง strong_count และ weak_count
มาดูว่าค่า strong_count และ weak_count ของ instance Rc<Node>
เปลี่ยนยังไงโดยสร้าง scope ภายในใหม่และย้ายการสร้าง branch เข้า
scope นั้น โดยทำเช่นนั้น เราเห็นสิ่งที่เกิดเมื่อ branch ถูกสร้าง
และจากนั้น drop เมื่อมันออกจาก scope ได้ การแก้ถูกแสดงใน Listing
15-29
use std::cell::RefCell;
use std::rc::{Rc, Weak};
#[derive(Debug)]
struct Node {
value: i32,
parent: RefCell<Weak<Node>>,
children: RefCell<Vec<Rc<Node>>>,
}
fn main() {
let leaf = Rc::new(Node {
value: 3,
parent: RefCell::new(Weak::new()),
children: RefCell::new(vec![]),
});
println!(
"leaf strong = {}, weak = {}",
Rc::strong_count(&leaf),
Rc::weak_count(&leaf),
);
{
let branch = Rc::new(Node {
value: 5,
parent: RefCell::new(Weak::new()),
children: RefCell::new(vec![Rc::clone(&leaf)]),
});
*leaf.parent.borrow_mut() = Rc::downgrade(&branch);
println!(
"branch strong = {}, weak = {}",
Rc::strong_count(&branch),
Rc::weak_count(&branch),
);
println!(
"leaf strong = {}, weak = {}",
Rc::strong_count(&leaf),
Rc::weak_count(&leaf),
);
}
println!("leaf parent = {:?}", leaf.parent.borrow().upgrade());
println!(
"leaf strong = {}, weak = {}",
Rc::strong_count(&leaf),
Rc::weak_count(&leaf),
);
}branch ใน scope ภายในและตรวจสอบ strong และ weak reference countหลังจาก leaf ถูกสร้าง Rc<Node> ของมันมี strong count 1 และ
weak count 0 ใน scope ภายใน เราสร้าง branch และ associate มันกับ
leaf ที่จุดที่เมื่อเรา print count Rc<Node> ใน branch จะมี
strong count 1 และ weak count 1 (สำหรับ leaf.parent ชี้ไปยัง
branch ด้วย Weak<Node>) เมื่อเรา print count ใน leaf เราจะ
เห็นมันจะมี strong count 2 เพราะ branch ตอนนี้มี clone ของ
Rc<Node> ของ leaf ที่เก็บใน branch.children แต่จะยังมี weak
count 0
เมื่อ scope ภายในจบ branch ออกจาก scope และ strong count ของ
Rc<Node> ลดเป็น 0 ดังนั้น Node ของมันถูก drop weak count 1
จาก leaf.parent ไม่มีผลต่อว่า Node ถูก drop หรือไม่ ดังนั้นเรา
ไม่ได้ memory leak ใด!
ถ้าเราพยายามเข้าถึง parent ของ leaf หลังจากท้ายสุดของ scope เรา
จะได้ None อีก ที่ท้ายสุดของโปรแกรม Rc<Node> ใน leaf มี
strong count 1 และ weak count 0 เพราะตัวแปร leaf ตอนนี้เป็น
reference เดียวของ Rc<Node> อีก
logic ทั้งหมดที่จัดการ count และการ drop ค่าถูก built เข้าใน
Rc<T> และ Weak<T> และ implementation trait Drop ของพวกมัน
โดยระบุว่าความสัมพันธ์จาก child ไปยัง parent ของมันควรเป็น reference
Weak<T> ในนิยามของ Node คุณสามารถมี node parent ชี้ไปยัง node
child และในทางกลับกันโดยไม่สร้าง reference cycle และ memory leak
สรุป
บทนี้ครอบคลุมวิธีใช้ smart pointer เพื่อทำการรับประกันและ trade-off
ต่างจากที่ Rust ทำเป็นค่าเริ่มต้นกับ reference ปกติ type Box<T>
มีขนาดที่รู้และชี้ไปยังข้อมูลที่ allocate บน heap type Rc<T> ตาม
จำนวน reference ของข้อมูลบน heap เพื่อให้ข้อมูลมี owner หลายตัวได้
type RefCell<T> ด้วย interior mutability ของมันให้เรา type ที่
เราใช้ได้เมื่อเราต้องการ type ที่ immutable แต่ต้องเปลี่ยนค่าภายใน
ของ type นั้น มันยังบังคับใช้กฎ borrowing ที่ runtime ไม่ใช่ที่
compile time
ยังพูดถึง trait Deref และ Drop ซึ่งเปิดใช้ functionality ของ
smart pointer มาก เราสำรวจ reference cycle ที่ก่อให้เกิด memory
leak ได้และวิธีป้องกันพวกมันโดยใช้ Weak<T>
ถ้าบทนี้กระตุ้นความสนใจของคุณและคุณต้องการ implement smart pointer ของคุณเอง ดู “The Rustonomicon” สำหรับข้อมูลที่มีประโยชน์ เพิ่ม
ถัดไป เราจะพูดถึง concurrency ใน Rust คุณจะเรียนเกี่ยวกับ smart pointer ใหม่บางตัวด้วย
Fearless Concurrency
การจัดการ programming แบบ concurrent อย่างปลอดภัยและมีประสิทธิภาพเป็น อีกหนึ่งเป้าหมายหลักของ Rust Concurrent programming ที่ส่วนต่าง ๆ ของโปรแกรม execute อย่างอิสระ และ parallel programming ที่ส่วน ต่าง ๆ ของโปรแกรม execute พร้อมกัน กำลังสำคัญเพิ่มขึ้นเมื่อ computer มากขึ้นใช้ประโยชน์จาก processor หลายตัวของพวกมัน ในอดีต programming ใน context เหล่านี้ยากและมีแนวโน้ม error Rust หวังที่จะเปลี่ยนนั้น
ในตอนแรก ทีม Rust คิดว่าการรับประกัน memory safety และการป้องกัน ปัญหา concurrency เป็นสองความท้าทายแยกที่จะถูกแก้ด้วยวิธีต่าง ๆ เมื่อเวลาผ่านไป ทีมค้นพบว่าระบบ ownership และ type เป็นชุดเครื่องมือ ที่ทรงพลังที่ช่วยจัดการปัญหา memory safety และ concurrency! โดย ใช้ ownership และการตรวจสอบ type, error concurrency หลายอย่างเป็น error ที่ compile-time ใน Rust ไม่ใช่ error ที่ runtime ดังนั้น แทนการให้คุณใช้เวลามากพยายาม reproduce สถานการณ์แน่นอนที่ bug concurrency ที่ runtime เกิด โค้ดที่ไม่ถูกต้องจะปฏิเสธที่จะคอมไพล์ และเสนอ error ที่อธิบายปัญหา ผลคือ คุณแก้โค้ดของคุณในขณะที่คุณ ทำงานบนมัน ไม่ใช่อาจจะหลังจากมันถูก ship ไป production เราตั้ง ชื่อเล่นแง่มุมนี้ของ Rust ว่า fearless concurrency Fearless concurrency อนุญาตให้คุณเขียนโค้ดที่ปลอดจาก bug ที่ละเอียดอ่อนและ ง่ายที่จะ refactor โดยไม่แนะนำ bug ใหม่
สังเกต — เพื่อความง่าย เราจะอ้างถึงปัญหาหลายอย่างว่า concurrent ไม่ใช่แม่นยำขึ้นโดยพูด concurrent และ/หรือ parallel สำหรับบทนี้ โปรดทดแทนในใจ concurrent และ/หรือ parallel เมื่อใดก็ตามที่เราใช้ concurrent ในบทถัดไปที่ความแตกต่างสำคัญกว่า เราจะเจาะจงขึ้น
ภาษาหลายภาษามีความเชื่ออย่างแน่นแฟ้นเกี่ยวกับวิธีแก้ที่พวกมันเสนอ สำหรับการจัดการปัญหา concurrent ตัวอย่างเช่น Erlang มี functionality สง่างามสำหรับ concurrency แบบ message-passing แต่มีเพียงวิธีคลุมเครือ ในการแชร์ state ระหว่างเธรด การสนับสนุนเพียง subset ของวิธีแก้ที่ เป็นไปได้เป็นกลยุทธ์ที่สมเหตุสมผลสำหรับภาษาระดับสูงเพราะภาษาระดับสูง สัญญาประโยชน์จากการยอมเสียการควบคุมบางอย่างเพื่อรับ abstraction อย่างไรก็ตาม ภาษาระดับต่ำถูกคาดหวังให้วิธีแก้กับ performance ที่ดี ที่สุดในสถานการณ์ใดก็ตามและมี abstraction น้อยลงเหนือ hardware ดังนั้น Rust เสนอเครื่องมือที่หลากหลายสำหรับ model ปัญหาในแบบใดที่ เหมาะสมสำหรับสถานการณ์และข้อกำหนดของคุณ
นี่คือหัวข้อที่เราจะครอบคลุมในบทนี้:
- วิธีสร้างเธรดเพื่อรันโค้ดหลายชิ้นพร้อมกัน
- Concurrency แบบ Message-passing ที่ channel ส่งข้อความระหว่างเธรด
- Concurrency แบบ Shared-state ที่หลายเธรดมีสิทธิ์เข้าถึงข้อมูล บางตัว
- trait
SyncและSendที่ขยายการรับประกัน concurrency ของ Rust ไปยัง type ที่ user นิยามรวม type ที่ standard library ให้มา
ใช้ thread รันโค้ดพร้อมกัน
ใช้ Thread รันโค้ดพร้อมกัน
ใน OS ปัจจุบันส่วนใหญ่ โค้ดของโปรแกรมที่ execute ถูกรันใน process และ OS จะจัดการหลาย process พร้อมกัน ภายในโปรแกรม คุณยังมีส่วนอิสระ ที่รันพร้อมกันได้ ฟีเจอร์ที่รันส่วนอิสระเหล่านี้เรียก thread ตัวอย่างเช่น web server มีหลายเธรดได้เพื่อให้มันตอบสนองได้มากกว่า หนึ่ง request พร้อมกัน
การแยกการคำนวณในโปรแกรมของคุณเป็นหลายเธรดเพื่อรันหลายงานพร้อมกัน ปรับปรุง performance ได้ แต่ยังเพิ่มความซับซ้อน เพราะเธรดรันพร้อมกัน ได้ ไม่มีการรับประกันโดยกำเนิดเกี่ยวกับลำดับที่ส่วนของโค้ดของคุณบน เธรดต่าง ๆ จะรัน นี่นำไปสู่ปัญหา เช่น:
- Race condition ที่เธรดเข้าถึงข้อมูลหรือ resource ในลำดับไม่ สอดคล้อง
- Deadlock ที่สองเธรดรอกันและกัน ป้องกันทั้งสองเธรดไม่ให้ดำเนินต่อ
- Bug ที่เกิดเฉพาะในสถานการณ์เฉพาะและ reproduce และแก้อย่างเชื่อถือ ได้ยาก
Rust พยายาม mitigate ผลกระทบลบของการใช้เธรด แต่ programming ใน context multithreaded ยังใช้ความคิดอย่างระวังและต้องจัดโครงสร้างโค้ดที่ ต่างจากในโปรแกรมที่รันในเธรดเดียว
ภาษาโปรแกรม implement เธรดในไม่กี่วิธีต่างกัน และ OS หลายตัวให้ API ที่ภาษาโปรแกรมเรียกได้สำหรับสร้างเธรดใหม่ standard library ของ Rust ใช้ model 1:1 ของ implementation เธรด ที่โปรแกรมใช้หนึ่งเธรดของ OS ต่อหนึ่งเธรดภาษา มี crate ที่ implement model อื่นของ threading ที่ทำ trade-off ต่างกับ model 1:1 (ระบบ async ของ Rust ที่เราจะเห็น ในบทถัดไป ให้แนวทาง concurrency อีกแบบด้วย)
สร้าง Thread ใหม่ด้วย spawn
เพื่อสร้างเธรดใหม่ เราเรียกฟังก์ชัน thread::spawn และส่ง closure
(เราพูดถึง closure ในบทที่ 13) ที่บรรจุโค้ดที่เราต้องการรันในเธรด
ใหม่ ตัวอย่างใน Listing 16-1 print text บางตัวจากเธรดหลักและ text
อื่นจากเธรดใหม่
use std::thread;
use std::time::Duration;
fn main() {
thread::spawn(|| {
for i in 1..10 {
println!("hi number {i} from the spawned thread!");
thread::sleep(Duration::from_millis(1));
}
});
for i in 1..5 {
println!("hi number {i} from the main thread!");
thread::sleep(Duration::from_millis(1));
}
}สังเกตว่าเมื่อเธรดหลักของโปรแกรม Rust เสร็จ เธรดที่ spawn ทั้งหมด ถูก shut down ไม่ว่าพวกมันจะรันเสร็จหรือไม่ output จากโปรแกรมนี้ อาจต่างกันเล็กน้อยทุกครั้ง แต่มันจะดูคล้ายต่อไปนี้:
hi number 1 from the main thread!
hi number 1 from the spawned thread!
hi number 2 from the main thread!
hi number 2 from the spawned thread!
hi number 3 from the main thread!
hi number 3 from the spawned thread!
hi number 4 from the main thread!
hi number 4 from the spawned thread!
hi number 5 from the spawned thread!
การเรียก thread::sleep บังคับให้เธรดหยุด execution ของมันเป็นเวลา
สั้น อนุญาตให้เธรดอื่นรัน เธรดอาจสลับเทิร์น แต่นั่นไม่รับประกัน —
มันขึ้นกับว่า OS ของคุณ schedule เธรดยังไง ในการรันนี้ เธรดหลัก
print ก่อน แม้ statement print จากเธรดที่ spawn ปรากฏก่อนในโค้ด
และแม้เราจะบอกเธรดที่ spawn ให้ print จนกว่า i เป็น 9 มันเพียง
ไปถึง 5 ก่อนเธรดหลัก shut down
ถ้าคุณรันโค้ดนี้และเห็นเฉพาะ output จากเธรดหลัก หรือไม่เห็น overlap ใด ลองเพิ่มตัวเลขในช่วงเพื่อสร้างโอกาสมากขึ้นให้ OS สลับระหว่างเธรด
รอให้เธรดทั้งหมดเสร็จ
โค้ดใน Listing 16-1 ไม่เพียงหยุดเธรดที่ spawn ก่อนเวลาส่วนใหญ่ เนื่องจากเธรดหลักจบ แต่เพราะไม่มีการรับประกันลำดับที่เธรดรัน เรา ยังรับประกันไม่ได้ว่าเธรดที่ spawn จะได้รันเลย!
เราแก้ปัญหาของเธรดที่ spawn ไม่รันหรือมันจบก่อนเวลาได้โดยบันทึก
ค่า return ของ thread::spawn ในตัวแปร return type ของ
thread::spawn คือ JoinHandle<T> JoinHandle<T> คือค่า own ที่
เมื่อเราเรียกเมธอด join บนมัน จะรอให้เธรดของมันเสร็จ Listing
16-2 แสดงวิธีใช้ JoinHandle<T> ของเธรดที่เราสร้างใน Listing 16-1
และวิธีเรียก join เพื่อให้แน่ใจว่าเธรดที่ spawn เสร็จก่อน main
ออก
use std::thread;
use std::time::Duration;
fn main() {
let handle = thread::spawn(|| {
for i in 1..10 {
println!("hi number {i} from the spawned thread!");
thread::sleep(Duration::from_millis(1));
}
});
for i in 1..5 {
println!("hi number {i} from the main thread!");
thread::sleep(Duration::from_millis(1));
}
handle.join().unwrap();
}JoinHandle<T> จาก thread::spawn เพื่อรับประกันว่าเธรดถูกรันจนเสร็จการเรียก join บน handle block เธรดที่กำลังรันปัจจุบันจนกว่าเธรด
ที่แทนโดย handle จะ terminate Blocking เธรดหมายความว่าเธรดนั้นถูก
ป้องกันจากการทำงานหรือออก เพราะเราใส่การเรียก join หลัง loop for
ของเธรดหลัก การรัน Listing 16-2 ควรสร้าง output คล้ายนี้:
hi number 1 from the main thread!
hi number 2 from the main thread!
hi number 1 from the spawned thread!
hi number 3 from the main thread!
hi number 2 from the spawned thread!
hi number 4 from the main thread!
hi number 3 from the spawned thread!
hi number 4 from the spawned thread!
hi number 5 from the spawned thread!
hi number 6 from the spawned thread!
hi number 7 from the spawned thread!
hi number 8 from the spawned thread!
hi number 9 from the spawned thread!
เธรดสองตัวยังสลับต่อ แต่เธรดหลักรอเพราะการเรียก handle.join()
และไม่จบจนกว่าเธรดที่ spawn จะเสร็จ
แต่มาดูสิ่งที่เกิดเมื่อเราย้าย handle.join() ไปก่อน loop for
ใน main แทน แบบนี้:
use std::thread;
use std::time::Duration;
fn main() {
let handle = thread::spawn(|| {
for i in 1..10 {
println!("hi number {i} from the spawned thread!");
thread::sleep(Duration::from_millis(1));
}
});
handle.join().unwrap();
for i in 1..5 {
println!("hi number {i} from the main thread!");
thread::sleep(Duration::from_millis(1));
}
}เธรดหลักจะรอเธรดที่ spawn ให้เสร็จและจากนั้นรัน loop for ของมัน
ดังนั้น output จะไม่ถูก interleave อีก ดังที่แสดงที่นี่:
hi number 1 from the spawned thread!
hi number 2 from the spawned thread!
hi number 3 from the spawned thread!
hi number 4 from the spawned thread!
hi number 5 from the spawned thread!
hi number 6 from the spawned thread!
hi number 7 from the spawned thread!
hi number 8 from the spawned thread!
hi number 9 from the spawned thread!
hi number 1 from the main thread!
hi number 2 from the main thread!
hi number 3 from the main thread!
hi number 4 from the main thread!
รายละเอียดเล็ก ๆ เช่นที่ที่ join ถูกเรียก กระทบว่าเธรดของคุณรัน
พร้อมกันหรือไม่
ใช้ Closure move กับ Thread
เรามักใช้ keyword move กับ closure ที่ส่งให้ thread::spawn เพราะ
closure จะรับ ownership ของค่าที่มันใช้จาก environment ดังนั้นโอน
ownership ของค่าเหล่านั้นจากเธรดหนึ่งไปยังอีกเธรด ใน
“จับ Reference หรือย้าย Ownership” ในบทที่
13 เราพูดถึง move ใน context ของ closure ตอนนี้เราจะโฟกัสมากขึ้น
ที่การ interaction ระหว่าง move และ thread::spawn
สังเกตใน Listing 16-1 ว่า closure ที่เราส่งให้ thread::spawn ไม่
รับอาร์กิวเมนต์ — เราไม่ใช้ข้อมูลใดจากเธรดหลักในโค้ดของเธรดที่ spawn
เพื่อใช้ข้อมูลจากเธรดหลักในเธรดที่ spawn closure ของเธรดที่ spawn
ต้องจับค่าที่มันต้องการ Listing 16-3 แสดงการพยายามสร้าง vector ใน
เธรดหลักและใช้มันในเธรดที่ spawn อย่างไรก็ตาม นี่จะยังไม่ทำงาน ดังที่
คุณจะเห็นในอีกสักครู่
use std::thread;
fn main() {
let v = vec![1, 2, 3];
let handle = thread::spawn(|| {
println!("Here's a vector: {v:?}");
});
handle.join().unwrap();
}closure ใช้ v ดังนั้นมันจะจับ v และทำให้มันเป็นส่วนของ
environment ของ closure เพราะ thread::spawn รัน closure นี้ใน
เธรดใหม่ เราควรเข้าถึง v ภายในเธรดใหม่นั้นได้ แต่เมื่อเราคอมไพล์
ตัวอย่างนี้ เราได้ error ต่อไปนี้:
$ cargo run
Compiling threads v0.1.0 (file:///projects/threads)
error[E0373]: closure may outlive the current function, but it borrows `v`, which is owned by the current function
--> src/main.rs:6:32
|
6 | let handle = thread::spawn(|| {
| ^^ may outlive borrowed value `v`
7 | println!("Here's a vector: {v:?}");
| - `v` is borrowed here
|
note: function requires argument type to outlive `'static`
--> src/main.rs:6:18
|
6 | let handle = thread::spawn(|| {
| __________________^
7 | | println!("Here's a vector: {v:?}");
8 | | });
| |______^
help: to force the closure to take ownership of `v` (and any other referenced variables), use the `move` keyword
|
6 | let handle = thread::spawn(move || {
| ++++
For more information about this error, try `rustc --explain E0373`.
error: could not compile `threads` (bin "threads") due to 1 previous error
Rust infer วิธีจับ v และเพราะ println! ต้องการเพียง reference
ของ v closure พยายาม borrow v อย่างไรก็ตาม มีปัญหา — Rust บอก
ไม่ได้ว่าเธรดที่ spawn จะรันนานเท่าไร ดังนั้นมันไม่รู้ว่า reference
ของ v จะ valid เสมอไหม
Listing 16-4 ให้ scenario ที่มีแนวโน้มมากขึ้นที่จะมี reference ของ
v ที่จะไม่ valid
use std::thread;
fn main() {
let v = vec![1, 2, 3];
let handle = thread::spawn(|| {
println!("Here's a vector: {v:?}");
});
drop(v); // oh no!
handle.join().unwrap();
}v จากเธรดหลักที่ drop vถ้า Rust อนุญาตให้เรารันโค้ดนี้ มีความเป็นไปได้ที่เธรดที่ spawn
จะถูกใส่ background ทันทีโดยไม่รันเลย เธรดที่ spawn มี reference
ของ v ภายใน แต่เธรดหลัก drop v ทันที โดยใช้ฟังก์ชัน drop
ที่เราพูดถึงในบทที่ 15 จากนั้น เมื่อเธรดที่ spawn เริ่ม execute,
v ไม่ valid อีก ดังนั้น reference ของมันก็ไม่ valid โอ้!
เพื่อแก้ error compiler ใน Listing 16-3 เราใช้คำแนะนำของข้อความ error ได้:
help: to force the closure to take ownership of `v` (and any other referenced variables), use the `move` keyword
|
6 | let handle = thread::spawn(move || {
| ++++
โดยเพิ่ม keyword move ก่อน closure เราบังคับให้ closure รับ
ownership ของค่าที่มันใช้แทนการอนุญาตให้ Rust infer ว่ามันควร
borrow ค่า การแก้ Listing 16-3 ที่แสดงใน Listing 16-5 จะคอมไพล์
และรันตามที่เราตั้งใจ
use std::thread;
fn main() {
let v = vec![1, 2, 3];
let handle = thread::spawn(move || {
println!("Here's a vector: {v:?}");
});
handle.join().unwrap();
}move เพื่อบังคับให้ closure รับ ownership ของค่าที่มันใช้เราอาจถูกล่อใจให้ลองสิ่งเดียวกันเพื่อแก้โค้ดใน Listing 16-4 ที่เธรด
หลักเรียก drop โดยใช้ closure move อย่างไรก็ตาม การแก้นี้จะไม่
ทำงานเพราะสิ่งที่ Listing 16-4 พยายามทำไม่ได้รับอนุญาตด้วยเหตุผล
ต่างกัน ถ้าเราเพิ่ม move ให้ closure เราจะย้าย v เข้า
environment ของ closure และเราจะเรียก drop บนมันในเธรดหลักไม่ได้
อีก เราจะได้ error compiler นี้แทน:
$ cargo run
Compiling threads v0.1.0 (file:///projects/threads)
error[E0382]: use of moved value: `v`
--> src/main.rs:10:10
|
4 | let v = vec![1, 2, 3];
| - move occurs because `v` has type `Vec<i32>`, which does not implement the `Copy` trait
5 |
6 | let handle = thread::spawn(move || {
| ------- value moved into closure here
7 | println!("Here's a vector: {v:?}");
| - variable moved due to use in closure
...
10 | drop(v); // oh no!
| ^ value used here after move
|
help: consider cloning the value before moving it into the closure
|
6 ~ let value = v.clone();
7 ~ let handle = thread::spawn(move || {
8 ~ println!("Here's a vector: {value:?}");
|
For more information about this error, try `rustc --explain E0382`.
error: could not compile `threads` (bin "threads") due to 1 previous error
กฎ ownership ของ Rust ช่วยเราอีก! เราได้ error จากโค้ดใน Listing
16-3 เพราะ Rust เป็น conservative และเพียง borrow v สำหรับเธรด
ซึ่งหมายความว่าเธรดหลักในทางทฤษฎี invalidate reference ของเธรดที่
spawn ได้ โดยบอก Rust ให้ย้าย ownership ของ v ไปยังเธรดที่ spawn
เรากำลังรับประกันต่อ Rust ว่าเธรดหลักจะไม่ใช้ v อีก ถ้าเราเปลี่ยน
Listing 16-4 ในแบบเดียวกัน เราจะละเมิดกฎ ownership เมื่อเราพยายาม
ใช้ v ในเธรดหลัก keyword move override ค่าเริ่มต้น conservative
ของ Rust ในการ borrow — มันไม่ให้เราละเมิดกฎ ownership
ตอนนี้เราครอบคลุมว่าเธรดคืออะไรและเมธอดที่ thread API ให้มา มาดู สถานการณ์บางอย่างที่เราใช้เธรดได้
ส่งข้อมูลระหว่าง thread ด้วย message passing
โอนข้อมูลระหว่าง Thread ด้วย Message Passing
แนวทางที่เป็นที่นิยมมากขึ้นในการรับประกัน concurrency ที่ปลอดภัยคือ message passing ที่เธรดหรือ actor สื่อสารโดยส่งข้อความกันที่บรรจุ ข้อมูล นี่คือไอเดียใน slogan จาก documentation ของภาษา Go — “อย่าสื่อสารโดยแชร์ memory แทน แชร์ memory โดยสื่อสาร”
เพื่อทำ concurrency แบบ message-sending standard library ของ Rust ให้ implementation ของ channel channel คือแนวคิด programming ทั่วไปที่ข้อมูลถูกส่งจากเธรดหนึ่งไปยังอีกเธรด
คุณจินตนาการ channel ใน programming เป็นเหมือน channel ของน้ำที่มี ทิศทาง เช่นลำธารหรือแม่น้ำ ถ้าคุณใส่อะไรเช่นเป็ดยางในแม่น้ำ มันจะ เดินทางลงไปยังท้ายสุดของทางน้ำ
channel มีสองครึ่ง — transmitter และ receiver ครึ่ง transmitter คือที่ upstream ที่คุณใส่เป็ดยางลงในแม่น้ำ และครึ่ง receiver คือที่ ที่เป็ดยางลงเอย downstream ส่วนหนึ่งของโค้ดของคุณเรียกเมธอดบน transmitter ด้วยข้อมูลที่คุณต้องการส่ง และอีกส่วนตรวจสอบปลายรับสำหรับ ข้อความที่มาถึง channel ถูกพูดว่า ปิด ถ้าครึ่ง transmitter หรือ receiver ถูก drop
ที่นี่ เราจะสร้างต่อจนถึงโปรแกรมที่มีเธรดหนึ่งสร้างค่าและส่งพวกมันลง channel และอีกเธรดที่จะรับค่าและ print พวกมันออก เราจะส่งค่าง่ายระหว่าง เธรดโดยใช้ channel เพื่อแสดงฟีเจอร์ เมื่อคุณคุ้นเคยกับเทคนิคแล้ว คุณใช้ channel สำหรับเธรดใดที่ต้องสื่อสารกันได้ เช่นระบบ chat หรือ ระบบที่หลายเธรดทำส่วนของการคำนวณและส่งส่วนไปยังเธรดหนึ่งที่ aggregate ผล
ก่อนอื่น ใน Listing 16-6 เราจะสร้าง channel แต่ไม่ทำอะไรกับมัน สังเกตว่านี่จะยังไม่คอมไพล์เพราะ Rust บอกไม่ได้ว่า type ของค่าใดที่ เราต้องการส่งผ่าน channel
use std::sync::mpsc;
fn main() {
let (tx, rx) = mpsc::channel();
}tx และ rxเราสร้าง channel ใหม่โดยใช้ฟังก์ชัน mpsc::channel — mpsc ย่อมา
จาก multiple producer, single consumer สั้น ๆ วิธีที่ standard
library ของ Rust implement channel หมายความว่า channel มีหลายปลาย
ส่ง ที่สร้างค่าได้ แต่มีเพียงหนึ่งปลาย รับ ที่ consume ค่าเหล่า
นั้น จินตนาการหลายลำธารไหลรวมกันเป็นแม่น้ำใหญ่ — ทุกสิ่งที่ส่งลง
ลำธารใดจะลงเอยในแม่น้ำเดียวที่ปลายสุด เราจะเริ่มด้วย producer เดียว
ตอนนี้ แต่เราจะเพิ่ม producer หลายตัวเมื่อเราทำให้ตัวอย่างนี้ทำงาน
ฟังก์ชัน mpsc::channel return tuple ที่ element แรกคือปลายส่ง —
transmitter — และ element ที่สองคือปลายรับ — receiver คำย่อ tx
และ rx ถูกใช้ตามธรรมเนียมในหลายสาขาสำหรับ transmitter และ
receiver ตามลำดับ ดังนั้นเราตั้งชื่อตัวแปรของเราเช่นนั้นเพื่อระบุ
แต่ละปลาย เรากำลังใช้ statement let กับ pattern ที่ destructure
tuple — เราจะพูดถึงการใช้ pattern ใน statement let และ
destructuring ในบทที่ 19 ตอนนี้ รู้ว่าการใช้ statement let ใน
วิธีนี้เป็นแนวทางสะดวกในการดึงชิ้นส่วนของ tuple ที่ return โดย
mpsc::channel
มาย้ายปลายส่งเข้าเธรดที่ spawn และให้มันส่งหนึ่ง string เพื่อให้ เธรดที่ spawn สื่อสารกับเธรดหลัก ดังที่แสดงใน Listing 16-7 นี่ เหมือนใส่เป็ดยางในแม่น้ำ upstream หรือส่งข้อความ chat จากเธรดหนึ่ง ไปยังอีกเธรด
use std::sync::mpsc;
use std::thread;
fn main() {
let (tx, rx) = mpsc::channel();
thread::spawn(move || {
let val = String::from("hi");
tx.send(val).unwrap();
});
}tx ไปยังเธรดที่ spawn และส่ง "hi"อีกครั้ง เรากำลังใช้ thread::spawn เพื่อสร้างเธรดใหม่และจากนั้น
ใช้ move เพื่อย้าย tx เข้า closure เพื่อให้เธรดที่ spawn own
tx เธรดที่ spawn ต้อง own transmitter เพื่อสามารถส่งข้อความผ่าน
channel
transmitter มีเมธอด send ที่รับค่าที่เราต้องการส่ง เมธอด send
return type Result<T, E> ดังนั้นถ้า receiver ถูก drop แล้วและไม่
มีที่จะส่งค่า การ operation send จะ return error ในตัวอย่างนี้ เรา
กำลังเรียก unwrap เพื่อ panic ในกรณี error แต่ใน application จริง
เราจะจัดการมันอย่างเหมาะสม — กลับไปบทที่ 9 เพื่อทบทวนกลยุทธ์สำหรับ
การจัดการ error ที่เหมาะสม
ใน Listing 16-8 เราจะรับค่าจาก receiver ในเธรดหลัก นี่เหมือนดึงเป็ด ยางจากน้ำที่ปลายแม่น้ำหรือรับข้อความ chat
use std::sync::mpsc;
use std::thread;
fn main() {
let (tx, rx) = mpsc::channel();
thread::spawn(move || {
let val = String::from("hi");
tx.send(val).unwrap();
});
let received = rx.recv().unwrap();
println!("Got: {received}");
}"hi" ในเธรดหลักและ print มันreceiver มีสองเมธอดที่มีประโยชน์ — recv และ try_recv เรากำลัง
ใช้ recv ย่อสำหรับ receive ซึ่งจะ block execution ของเธรดหลัก
และรอจนกว่าค่าถูกส่งลง channel เมื่อค่าถูกส่ง recv จะ return มัน
ใน Result<T, E> เมื่อ transmitter ปิด recv จะ return error เพื่อ
ส่งสัญญาณว่าไม่มีค่ามากกว่าที่จะมา
เมธอด try_recv ไม่ block แต่จะ return Result<T, E> ทันที — ค่า
Ok ที่เก็บข้อความถ้ามี และค่า Err ถ้าไม่มีข้อความใดคราวนี้ การ
ใช้ try_recv มีประโยชน์ถ้าเธรดนี้มีงานอื่นที่จะทำในขณะที่รอข้อความ
— เราเขียน loop ที่เรียก try_recv เป็นบางครั้ง จัดการข้อความถ้ามี
และมิฉะนั้นทำงานอื่นสักพักจนถึงตรวจสอบอีกครั้งได้
เราใช้ recv ในตัวอย่างนี้เพื่อความง่าย — เราไม่มีงานอื่นให้เธรด
หลักทำนอกจากรอข้อความ ดังนั้นการ block เธรดหลักเหมาะสม
เมื่อเรารันโค้ดใน Listing 16-8 เราจะเห็นค่าที่ print จากเธรดหลัก:
Got: hi
สมบูรณ์แบบ!
โอน Ownership ผ่าน Channel
กฎ ownership มีบทบาทสำคัญในการส่งข้อความเพราะพวกมันช่วยให้คุณเขียน
โค้ด concurrent ที่ปลอดภัย การป้องกัน error ใน concurrent programming
คือข้อดีของการคิดเกี่ยวกับ ownership ตลอดโปรแกรม Rust ของคุณ มาทำ
การทดลองเพื่อแสดงว่า channel และ ownership ทำงานร่วมกันเพื่อป้องกัน
ปัญหายังไง — เราจะพยายามใช้ค่า val ในเธรดที่ spawn หลัง ที่เรา
ได้ส่งมันลง channel ลองคอมไพล์โค้ดใน Listing 16-9 เพื่อดูทำไมโค้ด
นี้ไม่ได้รับอนุญาต
use std::sync::mpsc;
use std::thread;
fn main() {
let (tx, rx) = mpsc::channel();
thread::spawn(move || {
let val = String::from("hi");
tx.send(val).unwrap();
println!("val is {val}");
});
let received = rx.recv().unwrap();
println!("Got: {received}");
}val หลังที่เราได้ส่งมันลง channelที่นี่ เราพยายาม print val หลังที่เราได้ส่งมันลง channel ผ่าน
tx.send การอนุญาตสิ่งนี้จะเป็นความคิดที่แย่ — เมื่อค่าถูกส่งไปยัง
อีกเธรด เธรดนั้นแก้หรือ drop มันก่อนเราพยายามใช้ค่าอีกได้ อาจ การ
แก้ของเธรดอื่นก่อให้เกิด error หรือผลที่ไม่คาดหวังเนื่องจากข้อมูล
ไม่สอดคล้องหรือไม่มี อย่างไรก็ตาม Rust ให้ error แก่เราถ้าเราพยายาม
คอมไพล์โค้ดใน Listing 16-9:
$ cargo run
Compiling message-passing v0.1.0 (file:///projects/message-passing)
error[E0382]: borrow of moved value: `val`
--> src/main.rs:10:27
|
8 | let val = String::from("hi");
| --- move occurs because `val` has type `String`, which does not implement the `Copy` trait
9 | tx.send(val).unwrap();
| --- value moved here
10 | println!("val is {val}");
| ^^^ value borrowed here after move
|
= note: this error originates in the macro `$crate::format_args_nl` which comes from the expansion of the macro `println` (in Nightly builds, run with -Z macro-backtrace for more info)
For more information about this error, try `rustc --explain E0382`.
error: could not compile `message-passing` (bin "message-passing") due to 1 previous error
ความผิดพลาด concurrency ของเราก่อให้เกิด error ที่ compile-time
ฟังก์ชัน send รับ ownership ของ parameter ของมัน และเมื่อค่าถูก
ย้าย receiver รับ ownership ของมัน นี่หยุดเราจากการใช้ค่าโดยบังเอิญ
อีกหลังส่งมัน — ระบบ ownership ตรวจสอบว่าทุกอย่างโอเค
ส่งค่าหลายค่า
โค้ดใน Listing 16-8 คอมไพล์และรัน แต่ไม่ได้แสดงเราชัดเจนว่าสองเธรด แยกกำลังคุยกันผ่าน channel
ใน Listing 16-10 เราได้ทำการแก้บางอย่างที่จะพิสูจน์ว่าโค้ดใน Listing 16-8 กำลังรันแบบ concurrent — เธรดที่ spawn ตอนนี้จะส่งหลายข้อความ และ pause หนึ่งวินาทีระหว่างแต่ละข้อความ
use std::sync::mpsc;
use std::thread;
use std::time::Duration;
fn main() {
let (tx, rx) = mpsc::channel();
thread::spawn(move || {
let vals = vec![
String::from("hi"),
String::from("from"),
String::from("the"),
String::from("thread"),
];
for val in vals {
tx.send(val).unwrap();
thread::sleep(Duration::from_secs(1));
}
});
for received in rx {
println!("Got: {received}");
}
}คราวนี้ เธรดที่ spawn มี vector ของ string ที่เราต้องการส่งไปยัง
เธรดหลัก เรา iterate ผ่านพวกมัน ส่งแต่ละตัวแยก และ pause ระหว่าง
แต่ละโดยเรียกฟังก์ชัน thread::sleep กับค่า Duration ของหนึ่งวินาที
ในเธรดหลัก เราไม่ได้เรียกฟังก์ชัน recv ชัดเจนอีก — แทน เรากำลัง
ปฏิบัติ rx เป็น iterator สำหรับแต่ละค่าที่ได้รับ เรากำลัง print
มัน เมื่อ channel ถูกปิด iteration จะจบ
เมื่อรันโค้ดใน Listing 16-10 คุณควรเห็น output ต่อไปนี้กับ pause หนึ่งวินาทีระหว่างแต่ละบรรทัด:
Got: hi
Got: from
Got: the
Got: thread
เพราะเราไม่มีโค้ดที่ pause หรือ delay ใน loop for ในเธรดหลัก เรา
บอกได้ว่าเธรดหลักกำลังรอที่จะรับค่าจากเธรดที่ spawn
สร้าง Producer หลายตัว
ก่อนหน้านี้เรากล่าวว่า mpsc เป็นคำย่อสำหรับ multiple producer,
single consumer มาใช้ mpsc และขยายโค้ดใน Listing 16-10 เพื่อสร้าง
หลายเธรดที่ทุกเธรดส่งค่าไปยัง receiver เดียวกัน เราทำเช่นนั้นได้
โดย clone transmitter ดังที่แสดงใน Listing 16-11
use std::sync::mpsc;
use std::thread;
use std::time::Duration;
fn main() {
// --snip--
let (tx, rx) = mpsc::channel();
let tx1 = tx.clone();
thread::spawn(move || {
let vals = vec![
String::from("hi"),
String::from("from"),
String::from("the"),
String::from("thread"),
];
for val in vals {
tx1.send(val).unwrap();
thread::sleep(Duration::from_secs(1));
}
});
thread::spawn(move || {
let vals = vec![
String::from("more"),
String::from("messages"),
String::from("for"),
String::from("you"),
];
for val in vals {
tx.send(val).unwrap();
thread::sleep(Duration::from_secs(1));
}
});
for received in rx {
println!("Got: {received}");
}
// --snip--
}คราวนี้ ก่อนที่เราสร้างเธรดที่ spawn แรก เราเรียก clone บน
transmitter นี่จะให้เรา transmitter ใหม่ที่เราส่งให้เธรดที่ spawn
แรกได้ เราส่ง transmitter เดิมให้เธรดที่ spawn ที่สอง นี่ให้เรา
สองเธรด แต่ละเธรดส่งข้อความต่างกันไปยัง receiver เดียว
เมื่อคุณรันโค้ด output ของคุณควรดูประมาณนี้:
Got: hi
Got: more
Got: from
Got: messages
Got: for
Got: the
Got: thread
Got: you
คุณอาจเห็นค่าในลำดับอื่น ขึ้นกับระบบของคุณ นี่คือสิ่งที่ทำให้
concurrency น่าสนใจเช่นเดียวกับยาก ถ้าคุณทดลองกับ thread::sleep
ให้ค่าต่าง ๆ ในเธรดต่าง ๆ แต่ละการรันจะมี nondeterministic มากขึ้น
และสร้าง output ต่างกันแต่ละครั้ง
ตอนนี้เราดูว่า channel ทำงานยังไงแล้ว มาดูวิธี concurrency อีกแบบ
Shared-state concurrency
Shared-State Concurrency
Message passing เป็นวิธีดีในการจัดการ concurrency แต่ไม่ใช่วิธีเดียว อีกวิธีจะเป็นการให้หลายเธรดเข้าถึงข้อมูลที่แชร์เดียวกัน พิจารณาส่วน นี้ของ slogan จาก documentation ภาษา Go อีก — “อย่าสื่อสารโดยแชร์ memory”
การสื่อสารโดยแชร์ memory จะดูเป็นยังไง? นอกจากนี้ ทำไมผู้ที่กระตือ รือร้นกับ message-passing เตือนไม่ให้ใช้การแชร์ memory?
ในแง่หนึ่ง channel ในภาษาโปรแกรมใดคล้ายกับ single ownership เพราะ เมื่อคุณโอนค่าลง channel คุณไม่ควรใช้ค่านั้นอีก Shared-memory concurrency เหมือน multiple ownership — หลายเธรดเข้าถึง memory location เดียวกันพร้อมกันได้ ดังที่คุณเห็นในบทที่ 15 ที่ smart pointer ทำให้ multiple ownership เป็นไปได้ multiple ownership เพิ่ม ความซับซ้อนได้เพราะ owner ต่างเหล่านี้ต้องจัดการ ระบบ type และกฎ ownership ของ Rust ช่วยอย่างมากในการจัดการสิ่งนี้ให้ถูกต้อง เป็น ตัวอย่าง มาดู mutex หนึ่งใน concurrency primitive ที่ทั่วไปกว่า สำหรับการแชร์ memory
ควบคุมการเข้าถึงด้วย Mutex
Mutex เป็นคำย่อสำหรับ mutual exclusion — mutex อนุญาตให้เพียง หนึ่งเธรดเข้าถึงข้อมูลในเวลาใดเวลาหนึ่ง ในการเข้าถึงข้อมูลใน mutex เธรดต้องส่งสัญญาณก่อนว่ามันต้องการการเข้าถึงโดยขอ acquire lock ของ mutex lock คือโครงสร้างข้อมูลที่เป็นส่วนของ mutex ที่ตามใครมี สิทธิ์เข้าถึงข้อมูลแบบ exclusive ปัจจุบัน ดังนั้น mutex ถูกอธิบาย ว่า ปกป้อง ข้อมูลที่มันเก็บผ่านระบบ locking
Mutex มีชื่อเสียงว่าใช้ยากเพราะคุณต้องจำกฎสองข้อ:
- คุณต้องพยายาม acquire lock ก่อนใช้ข้อมูล
- เมื่อคุณเสร็จกับข้อมูลที่ mutex ปกป้อง คุณต้อง unlock ข้อมูลเพื่อ ให้เธรดอื่น acquire lock ได้
สำหรับการเปรียบในโลกจริงสำหรับ mutex จินตนาการ panel discussion ที่ conference ที่มีเพียงหนึ่ง microphone ก่อนที่ panelist จะพูด พวกเขา ต้องขอหรือส่งสัญญาณว่าพวกเขาต้องการใช้ microphone เมื่อพวกเขาได้ microphone พวกเขาคุยได้นานเท่าที่ต้องการแล้วส่ง microphone ให้ panelist ถัดไปที่ขอพูด ถ้า panelist ลืมส่ง microphone เมื่อพวกเขา เสร็จกับมัน ไม่มีใครอื่นที่สามารถพูดได้ ถ้าการจัดการ microphone ที่แชร์ผิดพลาด panel จะไม่ทำงานตามที่วางแผน!
การจัดการ mutex ยากมากในการทำให้ถูก ซึ่งเป็นเหตุผลที่คนหลายคน กระตือรือร้นกับ channel อย่างไรก็ตาม ขอบคุณระบบ type และกฎ ownership ของ Rust คุณทำ locking และ unlocking ผิดไม่ได้
API ของ Mutex<T>
เป็นตัวอย่างของวิธีใช้ mutex มาเริ่มโดยใช้ mutex ใน context เธรด เดียว ดังที่แสดงใน Listing 16-12
use std::sync::Mutex;
fn main() {
let m = Mutex::new(5);
{
let mut num = m.lock().unwrap();
*num = 6;
}
println!("m = {m:?}");
}Mutex<T> ใน context เธรดเดียวเพื่อความง่ายเช่นเดียวกับหลาย type เราสร้าง Mutex<T> โดยใช้ associated function
new ในการเข้าถึงข้อมูลภายใน mutex เราใช้เมธอด lock เพื่อ
acquire lock การเรียกนี้จะ block เธรดปัจจุบันเพื่อให้มันทำงานใดไม่
ได้จนกว่าจะถึงเทิร์นของเราที่จะมี lock
การเรียก lock จะ fail ถ้าเธรดอื่นที่ถือ lock panic ในกรณีนั้น
ไม่มีใครที่สามารถได้ lock ดังนั้นเราเลือก unwrap และให้เธรดนี้
panic ถ้าเราอยู่ในสถานการณ์นั้น
หลังจากเรา acquire lock เราปฏิบัติกับค่า return ที่ชื่อ num ใน
กรณีนี้ เป็น mutable reference ของข้อมูลภายในได้ ระบบ type รับ
ประกันว่าเรา acquire lock ก่อนใช้ค่าใน m type ของ m คือ
Mutex<i32> ไม่ใช่ i32 ดังนั้นเรา ต้อง เรียก lock เพื่อใช้
ค่า i32 ได้ เราลืมไม่ได้ — ระบบ type จะไม่ให้เราเข้าถึง i32
ภายในมิฉะนั้น
การเรียก lock return type ที่เรียก MutexGuard ที่ wrap ใน
LockResult ที่เราจัดการด้วยการเรียก unwrap type MutexGuard
implement Deref เพื่อชี้ไปยังข้อมูลภายในของเรา — type ยังมี
implementation Drop ที่ปล่อย lock อัตโนมัติเมื่อ MutexGuard
ออกจาก scope ซึ่งเกิดที่ท้ายสุดของ scope ภายใน ผลคือ เราไม่เสี่ยง
ลืมที่จะปล่อย lock และ block mutex จากการถูกใช้โดยเธรดอื่นเพราะการ
ปล่อย lock เกิดอัตโนมัติ
หลังจาก drop lock เรา print ค่า mutex และเห็นว่าเราสามารถเปลี่ยน
i32 ภายในเป็น 6 ได้
การเข้าถึง Mutex<T> แบบแชร์
ตอนนี้ลองแชร์ค่าระหว่างหลายเธรดโดยใช้ Mutex<T> เราจะ spin 10
เธรดและให้แต่ละตัวเพิ่มค่า counter โดย 1 ดังนั้น counter ไปจาก 0
ถึง 10 ตัวอย่างใน Listing 16-13 จะมี error compiler และเราจะใช้
error นั้นเพื่อเรียนรู้เพิ่มเกี่ยวกับการใช้ Mutex<T> และวิธีที่
Rust ช่วยเราใช้มันถูกต้อง
use std::sync::Mutex;
use std::thread;
fn main() {
let counter = Mutex::new(0);
let mut handles = vec![];
for _ in 0..10 {
let handle = thread::spawn(move || {
let mut num = counter.lock().unwrap();
*num += 1;
});
handles.push(handle);
}
for handle in handles {
handle.join().unwrap();
}
println!("Result: {}", *counter.lock().unwrap());
}Mutex<T>เราสร้างตัวแปร counter เพื่อเก็บ i32 ภายใน Mutex<T> ดังที่เรา
ทำใน Listing 16-12 ถัดไป เราสร้าง 10 เธรดโดย iterate ผ่านช่วงของ
ตัวเลข เราใช้ thread::spawn และให้เธรดทั้งหมด closure เดียวกัน —
อันที่ย้าย counter เข้าเธรด acquire lock บน Mutex<T> โดยเรียก
เมธอด lock แล้วเพิ่ม 1 ให้ค่าใน mutex เมื่อเธรดเสร็จรัน closure
ของมัน num จะออกจาก scope และปล่อย lock เพื่อให้เธรดอื่น acquire
มันได้
ในเธรดหลัก เรา collect join handle ทั้งหมด จากนั้น ดังที่เราทำใน
Listing 16-2 เราเรียก join บนแต่ละ handle เพื่อให้แน่ใจว่าเธรด
ทั้งหมดเสร็จ ที่จุดนั้น เธรดหลักจะ acquire lock และ print ผลของ
โปรแกรมนี้
เราใบ้ว่าตัวอย่างนี้จะไม่คอมไพล์ ตอนนี้มาหาว่าทำไม!
$ cargo run
Compiling shared-state v0.1.0 (file:///projects/shared-state)
error[E0382]: borrow of moved value: `counter`
--> src/main.rs:21:29
|
5 | let counter = Mutex::new(0);
| ------- move occurs because `counter` has type `std::sync::Mutex<i32>`, which does not implement the `Copy` trait
...
8 | for _ in 0..10 {
| -------------- inside of this loop
9 | let handle = thread::spawn(move || {
| ------- value moved into closure here, in previous iteration of loop
...
21 | println!("Result: {}", *counter.lock().unwrap());
| ^^^^^^^ value borrowed here after move
|
help: consider moving the expression out of the loop so it is only moved once
|
8 ~ let mut value = counter.lock();
9 ~ for _ in 0..10 {
10 | let handle = thread::spawn(move || {
11 ~ let mut num = value.unwrap();
|
For more information about this error, try `rustc --explain E0382`.
error: could not compile `shared-state` (bin "shared-state") due to 1 previous error
ข้อความ error ระบุว่าค่า counter ถูกย้ายใน iteration ก่อนหน้าของ
loop Rust กำลังบอกเราว่าเราย้าย ownership ของ lock counter เข้า
หลายเธรดไม่ได้ มาแก้ error compiler ด้วยวิธี multiple-ownership ที่
เราพูดถึงในบทที่ 15
Multiple Ownership กับหลาย Thread
ในบทที่ 15 เราให้ค่าให้หลาย owner โดยใช้ smart pointer Rc<T>
เพื่อสร้างค่าที่นับ reference มาทำสิ่งเดียวกันที่นี่และดูสิ่งที่
เกิด เราจะ wrap Mutex<T> ใน Rc<T> ใน Listing 16-14 และ clone
Rc<T> ก่อนย้าย ownership ไปยังเธรด
use std::rc::Rc;
use std::sync::Mutex;
use std::thread;
fn main() {
let counter = Rc::new(Mutex::new(0));
let mut handles = vec![];
for _ in 0..10 {
let counter = Rc::clone(&counter);
let handle = thread::spawn(move || {
let mut num = counter.lock().unwrap();
*num += 1;
});
handles.push(handle);
}
for handle in handles {
handle.join().unwrap();
}
println!("Result: {}", *counter.lock().unwrap());
}Rc<T> เพื่ออนุญาตให้หลายเธรด own Mutex<T>อีกครั้ง เราคอมไพล์และได้… error ต่างกัน! compiler กำลังสอนเรา มาก:
$ cargo run
Compiling shared-state v0.1.0 (file:///projects/shared-state)
error[E0277]: `Rc<std::sync::Mutex<i32>>` cannot be sent between threads safely
--> src/main.rs:11:36
|
11 | let handle = thread::spawn(move || {
| ------------- ^------
| | |
| ______________________|_____________within this `{closure@src/main.rs:11:36: 11:43}`
| | |
| | required by a bound introduced by this call
12 | | let mut num = counter.lock().unwrap();
13 | |
14 | | *num += 1;
15 | | });
| |_________^ `Rc<std::sync::Mutex<i32>>` cannot be sent between threads safely
|
= help: within `{closure@src/main.rs:11:36: 11:43}`, the trait `Send` is not implemented for `Rc<std::sync::Mutex<i32>>`
note: required because it's used within this closure
--> src/main.rs:11:36
|
11 | let handle = thread::spawn(move || {
| ^^^^^^^
note: required by a bound in `spawn`
--> /rustc/1159e78c4747b02ef996e55082b704c09b970588/library/std/src/thread/mod.rs:723:1
For more information about this error, try `rustc --explain E0277`.
error: could not compile `shared-state` (bin "shared-state") due to 1 previous error
ว้าว ข้อความ error นั้นยาวมาก! นี่คือส่วนสำคัญที่จะโฟกัส —
`Rc<Mutex<i32>>` cannot be sent between threads safely
compiler ยังบอกเราเหตุผลทำไม — the trait `Send` is not implemented for `Rc<Mutex<i32>>` เราจะพูดถึง Send ในส่วนถัดไป — มันเป็น
หนึ่งใน trait ที่รับประกันว่า type ที่เราใช้กับเธรดมีไว้สำหรับใช้
ในสถานการณ์ concurrent
โชคไม่ดี Rc<T> ไม่ปลอดภัยที่จะแชร์ข้ามเธรด เมื่อ Rc<T> จัดการ
reference count มันเพิ่มให้ count สำหรับแต่ละการเรียก clone และ
ลบจาก count เมื่อ clone แต่ละตัวถูก drop แต่มันไม่ใช้ concurrency
primitive ใดเพื่อทำให้แน่ใจว่าการเปลี่ยน count ไม่ถูก interrupt
โดยเธรดอื่น สิ่งนี้นำไปสู่ count ที่ผิด — bug ที่ละเอียดอ่อนที่นำ
ไปสู่ memory leak หรือค่าถูก drop ก่อนเราเสร็จกับมันได้ สิ่งที่เรา
ต้องการคือ type ที่เหมือน Rc<T> แน่นอน แต่ที่ทำการเปลี่ยนแปลง
ของ reference count ในแบบที่ thread-safe
นับ Reference แบบ Atomic ด้วย Arc<T>
โชคดี Arc<T> เป็น type เหมือน Rc<T> ที่ปลอดภัยที่จะใช้ใน
สถานการณ์ concurrent a ย่อมาจาก atomic หมายความว่ามันเป็น type
ที่นับ reference แบบ atomic Atomic เป็น primitive ของ
concurrency เพิ่มที่เราจะไม่ครอบคลุมในรายละเอียดที่นี่ — ดู
documentation standard library สำหรับ std::sync::atomic
สำหรับรายละเอียดเพิ่ม ที่จุดนี้ คุณเพียงต้องรู้ว่า atomic ทำงาน
เหมือน primitive type แต่ปลอดภัยที่จะแชร์ข้ามเธรด
คุณอาจสงสัยว่าทำไม primitive type ทั้งหมดไม่ใช่ atomic และทำไม
type standard library ไม่ถูก implement ให้ใช้ Arc<T> เป็นค่า
เริ่มต้น เหตุผลคือ thread safety มาพร้อมบทลงโทษ performance ที่
คุณต้องการจ่ายเมื่อคุณต้องการจริง ๆ ถ้าคุณเพียงทำ operation บน
ค่าภายในเธรดเดียว โค้ดของคุณรันได้เร็วกว่าถ้ามันไม่ต้องบังคับใช้
การรับประกันที่ atomic ให้
มากลับไปยังตัวอย่างของเรา — Arc<T> และ Rc<T> มี API เดียวกัน
ดังนั้นเราแก้โปรแกรมของเราโดยเปลี่ยนบรรทัด use การเรียก new
และการเรียก clone โค้ดใน Listing 16-15 จะคอมไพล์และรันได้ในที่สุด
use std::sync::{Arc, Mutex};
use std::thread;
fn main() {
let counter = Arc::new(Mutex::new(0));
let mut handles = vec![];
for _ in 0..10 {
let counter = Arc::clone(&counter);
let handle = thread::spawn(move || {
let mut num = counter.lock().unwrap();
*num += 1;
});
handles.push(handle);
}
for handle in handles {
handle.join().unwrap();
}
println!("Result: {}", *counter.lock().unwrap());
}Arc<T> เพื่อ wrap Mutex<T> เพื่อสามารถแชร์ ownership ข้ามหลายเธรดโค้ดนี้จะ print ต่อไปนี้:
Result: 10
เราทำได้! เรานับจาก 0 ถึง 10 ซึ่งอาจไม่ดูประทับใจมาก แต่มันสอนเรา
มากเกี่ยวกับ Mutex<T> และ thread safety คุณยังใช้โครงสร้างของ
โปรแกรมนี้เพื่อทำ operation ที่ซับซ้อนกว่าเพียงเพิ่ม counter ได้
โดยใช้กลยุทธ์นี้ คุณแบ่งการคำนวณเป็นส่วนอิสระ แยกส่วนเหล่านั้นข้าม
เธรด แล้วใช้ Mutex<T> เพื่อให้แต่ละเธรดอัพเดทผลลัพธ์สุดท้ายด้วย
ส่วนของมันได้
สังเกตว่าถ้าคุณกำลังทำ operation ตัวเลขที่ง่าย มี type ที่ง่ายกว่า
type Mutex<T> ที่ให้โดย
โมดูล std::sync::atomic ของ standard library
type เหล่านี้ให้การเข้าถึง atomic ที่ปลอดภัยและ concurrent ของ
primitive type เราเลือกใช้ Mutex<T> กับ primitive type สำหรับ
ตัวอย่างนี้เพื่อให้เราสามารถโฟกัสที่ Mutex<T> ทำงานยังไง
เปรียบเทียบ RefCell<T>/Rc<T> และ Mutex<T>/Arc<T>
คุณอาจสังเกตเห็นว่า counter เป็น immutable แต่เราได้ mutable
reference ของค่าภายในมัน — นี่หมายความว่า Mutex<T> ให้ interior
mutability เช่นที่ตระกูล Cell ทำ ในแบบเดียวกับที่เราใช้
RefCell<T> ในบทที่ 15 เพื่ออนุญาตให้เรา mutate เนื้อหาภายใน
Rc<T> เราใช้ Mutex<T> เพื่อ mutate เนื้อหาภายใน Arc<T>
รายละเอียดอีกอย่างที่จะสังเกตคือ Rust ปกป้องคุณจาก error logic ทุก
ประเภทไม่ได้เมื่อคุณใช้ Mutex<T> จำได้จากบทที่ 15 ว่าการใช้ Rc<T>
มาพร้อมความเสี่ยงของการสร้าง reference cycle ที่ค่า Rc<T> สอง
ตัวอ้างถึงกัน ก่อให้เกิด memory leak ในทำนองเดียวกัน Mutex<T> มา
พร้อมความเสี่ยงของการสร้าง deadlock เหล่านี้เกิดเมื่อ operation
ต้อง lock สอง resource และสองเธรดได้ acquire หนึ่งใน lock แต่ละ
ก่อให้เกิดพวกมันรอกันตลอดไป ถ้าคุณสนใจ deadlock ลองสร้างโปรแกรม
Rust ที่มี deadlock — จากนั้น ค้นคว้ากลยุทธ์ mitigation deadlock
สำหรับ mutex ในภาษาใดและลอง implement พวกมันใน Rust API
documentation ของ standard library สำหรับ Mutex<T> และ
MutexGuard เสนอข้อมูลที่มีประโยชน์
เราจะปิดบทนี้โดยพูดถึง trait Send และ Sync และวิธีที่เราใช้
พวกมันกับ type กำหนดเองได้
Concurrency ที่ขยายได้ด้วย Send และ Sync
Concurrency ที่ขยายได้ด้วย Send และ Sync
น่าสนใจ ฟีเจอร์ concurrency เกือบทุกอย่างที่เราพูดถึงในบทนี้เป็นส่วน ของ standard library ไม่ใช่ภาษา ตัวเลือกของคุณสำหรับการจัดการ concurrency ไม่จำกัดอยู่ที่ภาษาหรือ standard library — คุณเขียน ฟีเจอร์ concurrency ของคุณเองหรือใช้ที่เขียนโดยคนอื่นได้
อย่างไรก็ตาม ในหมู่แนวคิด concurrency หลักที่ฝังในภาษาไม่ใช่ standard
library คือ trait std::marker Send และ Sync
โอน Ownership ระหว่าง Thread
trait marker Send ระบุว่า ownership ของค่าของ type ที่ implement
Send โอนได้ระหว่างเธรด เกือบทุก type Rust implement Send แต่
มีข้อยกเว้นบางอย่าง รวม Rc<T> — นี่ implement Send ไม่ได้
เพราะถ้าคุณ clone ค่า Rc<T> และพยายามโอน ownership ของ clone ไปยัง
อีกเธรด ทั้งสองเธรดอาจอัพเดท reference count พร้อมกัน ด้วยเหตุผลนี้
Rc<T> ถูก implement สำหรับใช้ในสถานการณ์เธรดเดียวที่คุณไม่ต้องการ
จ่ายบทลงโทษ performance ที่ thread-safe
ดังนั้น ระบบ type และ trait bound ของ Rust รับประกันว่าคุณส่งค่า
Rc<T> ข้ามเธรดอย่างไม่ปลอดภัยโดยบังเอิญไม่ได้ เมื่อเราพยายามทำสิ่ง
นี้ใน Listing 16-14 เราได้ error
the trait `Send` is not implemented for `Rc<Mutex<i32>>` เมื่อ
เราเปลี่ยนเป็น Arc<T> ซึ่ง implement Send โค้ดคอมไพล์
type ใดที่ประกอบด้วย type Send ทั้งหมดถูกทำเครื่องหมายเป็น Send
อัตโนมัติด้วย เกือบทั้งหมดของ primitive type เป็น Send ยกเว้น
raw pointer ที่เราจะพูดถึงในบทที่ 20
เข้าถึงจากหลาย Thread
trait marker Sync ระบุว่ามันปลอดภัยสำหรับ type ที่ implement
Sync ที่จะถูกอ้างถึงจากหลายเธรด อีกนัยหนึ่ง type T ใด implement
Sync ถ้า &T (immutable reference ของ T) implement Send
หมายความว่า reference ส่งได้ปลอดภัยไปยังอีกเธรด คล้ายกับ Send
primitive type ทั้งหมด implement Sync และ type ที่ประกอบด้วย type
ที่ implement Sync ทั้งหมดก็ implement Sync ด้วย
smart pointer Rc<T> ก็ไม่ implement Sync ด้วยเหตุผลเดียวกับที่
มันไม่ implement Send type RefCell<T> (ที่เราพูดถึงในบทที่ 15)
และตระกูลของ type Cell<T> ที่เกี่ยวข้องไม่ implement Sync
implementation ของ borrow checking ที่ RefCell<T> ทำที่ runtime
ไม่ thread-safe smart pointer Mutex<T> implement Sync และใช้
แชร์การเข้าถึงกับหลายเธรดได้ ดังที่คุณเห็นใน
“การเข้าถึง Mutex<T> แบบแชร์”
Implement Send และ Sync ด้วยมือเป็น Unsafe
เพราะ type ที่ประกอบด้วย type อื่นที่ implement trait Send และ
Sync ก็ implement Send และ Sync อัตโนมัติ เราไม่ต้อง implement
trait เหล่านั้นด้วยมือ ในฐานะ marker trait พวกมันไม่มีเมธอดให้
implement ด้วย พวกมันเพียงมีประโยชน์ในการบังคับใช้ invariant ที่
เกี่ยวกับ concurrency
การ implement trait เหล่านี้ด้วยมือเกี่ยวข้องกับการ implement โค้ด
unsafe Rust เราจะพูดถึงการใช้โค้ด unsafe Rust ในบทที่ 20 — ตอนนี้
ข้อมูลที่สำคัญคือการ build type concurrent ใหม่ที่ไม่ประกอบด้วย
ส่วน Send และ Sync ต้องการความคิดอย่างระวังเพื่อรักษาการรับ
ประกันความปลอดภัย “The Rustonomicon” มีข้อมูลเพิ่มเกี่ยว
กับการรับประกันเหล่านี้และวิธีรักษาพวกมัน
สรุป
นี่ไม่ใช่ครั้งสุดท้ายที่คุณจะเห็น concurrency ในหนังสือเล่มนี้ — บท ถัดไปโฟกัสที่ async programming และโปรเจกต์ในบทที่ 21 จะใช้แนวคิด ในบทนี้ในสถานการณ์ที่ realistic มากกว่าตัวอย่างเล็กกว่าที่พูดถึง ที่นี่
ดังที่กล่าวก่อนหน้า เพราะน้อยมากของวิธีที่ Rust จัดการ concurrency เป็นส่วนของภาษา วิธีแก้ concurrency หลายอย่างถูก implement เป็น crate เหล่านี้พัฒนาเร็วกว่า standard library ดังนั้นอย่าลืมค้นหา online สำหรับ crate ปัจจุบันและ state-of-the-art ที่จะใช้ใน สถานการณ์ multithreaded
standard library ของ Rust ให้ channel สำหรับ message passing และ
type smart pointer เช่น Mutex<T> และ Arc<T> ที่ปลอดภัยที่จะใช้
ใน context concurrent ระบบ type และ borrow checker รับประกันว่า
โค้ดที่ใช้วิธีแก้เหล่านี้จะไม่ลงเอยด้วย data race หรือ reference
ที่ไม่ valid เมื่อคุณทำให้โค้ดของคุณคอมไพล์ คุณวางใจได้ว่ามันจะ
รันอย่างมีความสุขบนหลายเธรดโดยไม่มี bug ที่ track ลงยากที่ทั่วไป
ในภาษาอื่น Concurrent programming ไม่ใช่แนวคิดที่จะกลัวอีก — ไปข้าง
หน้าและทำให้โปรแกรมของคุณ concurrent อย่างไม่กลัว!
พื้นฐาน Async Programming: Async, Await, Future และ Stream
operation หลายอย่างที่เราขอให้คอมพิวเตอร์ทำใช้เวลาสักครู่ที่จะเสร็จ จะดีถ้าเราทำอย่างอื่นได้ในขณะที่เรารอ process ที่รันนานเหล่านั้นเสร็จ คอมพิวเตอร์สมัยใหม่เสนอสองเทคนิคสำหรับทำงานบนมากกว่าหนึ่ง operation ในเวลาเดียวกัน — parallelism และ concurrency อย่างไรก็ตาม logic ของ โปรแกรมของเราถูกเขียนในแบบส่วนใหญ่ linear เราต้องการระบุ operation ที่โปรแกรมควรทำและจุดที่ฟังก์ชัน pause และส่วนอื่นของโปรแกรมรันแทน ได้ โดยไม่ต้องระบุล่วงหน้าแน่นอนลำดับและวิธีที่แต่ละชิ้นของโค้ดควร รัน Asynchronous programming เป็น abstraction ที่ให้เราแสดงโค้ดของ เราในเชิงของจุด pause ที่เป็นไปได้และผลในที่สุดที่ดูแลรายละเอียดของ การประสานงานให้เรา
บทนี้สร้างต่อจากการใช้เธรดสำหรับ parallelism และ concurrency ในบท
ที่ 16 โดยแนะนำแนวทางทางเลือกในการเขียนโค้ด — future, stream ของ
Rust และ syntax async และ await ที่ให้เราแสดงว่า operation
asynchronous ได้ยังไง และ third-party crate ที่ implement
asynchronous runtime — โค้ดที่จัดการและประสานการ execution ของ
operation asynchronous
มาพิจารณาตัวอย่าง สมมติว่าคุณกำลัง export video ที่คุณสร้างของการ ฉลองครอบครัว operation ที่อาจใช้เวลาตั้งแต่นาทีถึงชั่วโมง การ export video จะใช้พลัง CPU และ GPU เท่าที่ทำได้ ถ้าคุณมีเพียง CPU core เดียวและ OS ของคุณไม่ pause การ export นั้นจนกว่ามันเสร็จ — นั่นคือ ถ้ามัน execute การ export synchronously — คุณทำอะไรอื่นบนคอมพิวเตอร์ ไม่ได้ขณะที่งานนั้นกำลังรัน นั่นจะเป็นประสบการณ์ที่ค่อนข้างหงุดหงิด โชคดี OS ของคอมพิวเตอร์ของคุณสามารถ และทำ interrupt การ export อย่าง มองไม่เห็นบ่อยพอเพื่อให้คุณทำงานอื่นได้พร้อมกัน
ตอนนี้สมมติคุณกำลัง download video ที่แชร์โดยคนอื่น ซึ่งยังใช้เวลา สักครู่แต่ไม่ใช้เวลา CPU มากเท่า ในกรณีนี้ CPU ต้องรอข้อมูลมาถึงจาก network ในขณะที่คุณเริ่มอ่านข้อมูลได้เมื่อมันเริ่มมาถึง มันอาจใช้ เวลาให้ทั้งหมดของมันปรากฏ แม้เมื่อข้อมูลทั้งหมดมา ถ้า video ใหญ่ อาจใช้เวลาอย่างน้อยหนึ่งหรือสองวินาทีในการโหลดทั้งหมด นั่นอาจไม่ฟัง ดูมาก แต่มันเป็นเวลานานมากสำหรับ processor สมัยใหม่ ซึ่งทำพันล้าน operation ได้ทุกวินาที อีกครั้ง OS ของคุณจะ interrupt โปรแกรมของ คุณอย่างมองไม่เห็นเพื่ออนุญาตให้ CPU ทำงานอื่นในขณะที่รอการเรียก network จบ
การ export video เป็นตัวอย่างของ operation CPU-bound หรือ compute-bound มันถูกจำกัดโดยความเร็วการประมวลผลข้อมูลที่เป็นไปได้ ของคอมพิวเตอร์ภายใน CPU หรือ GPU และเท่าไรของความเร็วนั้นที่มัน ทุ่มเทให้ operation ได้ การ download video เป็นตัวอย่างของ operation I/O-bound เพราะมันถูกจำกัดโดยความเร็วของ input และ output ของ คอมพิวเตอร์ — มันไปได้เร็วเท่าที่ข้อมูลส่งผ่าน network ได้
ในทั้งสองตัวอย่างเหล่านี้ การ interrupt ที่มองไม่เห็นของ OS ให้รูป แบบของ concurrency concurrency นั้นเกิดเฉพาะที่ระดับของโปรแกรม ทั้งหมด — OS interrupt โปรแกรมหนึ่งเพื่อให้โปรแกรมอื่นทำงานได้ ใน หลายกรณี เพราะเราเข้าใจโปรแกรมของเราที่ระดับที่ละเอียดมากกว่า OS เราสังเกตโอกาสสำหรับ concurrency ที่ OS เห็นไม่ได้
ตัวอย่างเช่น ถ้าเรากำลัง build เครื่องมือเพื่อจัดการ download ไฟล์ เราควรเขียนโปรแกรมของเราเพื่อให้การเริ่ม download หนึ่งไม่ lock UI และ user ควรเริ่มหลาย download พร้อมกันได้ API หลายตัวของ OS สำหรับ interact กับ network เป็น blocking — นั่นคือ พวกมัน block ความก้าวหน้าของโปรแกรมจนกว่าข้อมูลที่พวกมันกำลังประมวลผลพร้อมสมบูรณ์
สังเกต — นี่คือวิธีที่ ส่วนใหญ่ ของการเรียกฟังก์ชันทำงาน ถ้าคุณ คิด อย่างไรก็ตาม คำว่า blocking มักสงวนสำหรับการเรียกฟังก์ชันที่ interact กับไฟล์, network หรือ resource อื่นบนคอมพิวเตอร์ เพราะ เหล่านั้นเป็นกรณีที่โปรแกรมแต่ละตัวจะได้ประโยชน์จาก operation ที่ ไม่ใช่ blocking
เราหลีกเลี่ยงการ block เธรดหลักได้โดย spawn เธรดเฉพาะเพื่อ download แต่ละไฟล์ อย่างไรก็ตาม overhead ของ resource ของระบบที่ใช้โดยเธรด เหล่านั้นในที่สุดจะกลายเป็นปัญหา จะดีกว่าถ้าการเรียกไม่ block ที่ แรก และแทน เรานิยามจำนวนของงานที่เราต้องการให้โปรแกรมของเราเสร็จ และอนุญาตให้ runtime เลือกลำดับและวิธีที่ดีที่สุดในการรันพวกมันได้
นั่นคือสิ่งที่ abstraction async (ย่อสำหรับ asynchronous) ของ Rust ให้เรา ในบทนี้ คุณจะเรียนทั้งหมดเกี่ยวกับ async ขณะที่เรา ครอบคลุมหัวข้อต่อไปนี้:
- วิธีใช้ syntax
asyncและawaitของ Rust และ execute ฟังก์ชัน asynchronous ด้วย runtime - วิธีใช้ model async ในการแก้บางความท้าทายเดียวกับที่เราดูในบทที่ 16
- วิธีที่ multithreading และ async ให้วิธีแก้ที่เสริมกันที่คุณรวม กันในหลายกรณีได้
ก่อนเราเห็น async ทำงานในการปฏิบัติ เราต้องเบี่ยงสั้นเพื่อพูดถึง ความแตกต่างระหว่าง parallelism และ concurrency
Parallelism และ Concurrency
เราได้ปฏิบัติกับ parallelism และ concurrency ว่าส่วนใหญ่แลกเปลี่ยน ได้จนถึงตอนนี้ ตอนนี้เราต้องแยกระหว่างพวกมันแม่นยำขึ้น เพราะความ แตกต่างจะปรากฏเมื่อเราเริ่มทำงาน
พิจารณาวิธีต่างกันที่ทีมแยกงานบนโปรเจกต์ซอฟต์แวร์ คุณ assign สมาชิก เดียวหลายงาน assign แต่ละสมาชิกหนึ่งงาน หรือใช้การผสมของสองแนวทาง ได้
เมื่อบุคคลทำงานบนหลายงานต่างกันก่อนงานใดเสร็จ นี่คือ concurrency วิธีหนึ่งในการ implement concurrency คล้ายกับการมีสองโปรเจกต์ต่างกัน check out บนคอมพิวเตอร์ของคุณ และเมื่อคุณเบื่อหรือติดบนโปรเจกต์หนึ่ง คุณสลับไปยังอีกอัน คุณเป็นเพียงคนเดียว ดังนั้นคุณก้าวหน้าบนทั้งสอง งานพร้อมกันแน่นอนไม่ได้ แต่คุณ multitask ก้าวหน้าบนทีละหนึ่งโดย สลับระหว่างพวกมันได้ (ดู Figure 17-1)

เมื่อทีมแยกกลุ่มของงานโดยให้แต่ละสมาชิกรับหนึ่งงานและทำงานบนมันคน เดียว นี่คือ parallelism แต่ละคนในทีมก้าวหน้าได้ในเวลาเดียวกัน แน่นอน (ดู Figure 17-2)

ในทั้งสอง workflow เหล่านี้ คุณอาจต้องประสานระหว่างงานต่างกัน บางที คุณคิดว่างานที่ assign ให้คนหนึ่งเป็นอิสระจากงานของคนอื่นทั้งหมด แต่จริง ๆ มันต้องการอีกคนในทีมเสร็จงานของพวกเขาก่อน บางส่วนของงาน ทำแบบ parallel ได้ แต่บางส่วนจริง ๆ คือ serial — มันเกิดได้เฉพาะ เป็น series หนึ่งงานหลังอีก ดังใน Figure 17-3

ในทำนองเดียวกัน คุณอาจรู้ตัวว่าหนึ่งในงานของคุณเองขึ้นกับอีกงานของ คุณ ตอนนี้งาน concurrent ของคุณก็กลายเป็น serial
Parallelism และ concurrency ตัดกับกันและกันได้ด้วย ถ้าคุณรู้ว่าเพื่อน ร่วมงานติดจนกว่าคุณเสร็จหนึ่งในงานของคุณ คุณจะโฟกัสความพยายามทั้งหมด ของคุณบนงานนั้นเพื่อ “unblock” เพื่อนร่วมงานของคุณ คุณและเพื่อนร่วม งานไม่สามารถทำงานแบบ parallel อีก และคุณยังไม่สามารถทำงานแบบ concurrent บนงานของคุณเองอีก
dynamic พื้นฐานเดียวกันเข้ามาเล่นกับซอฟต์แวร์และ hardware บนเครื่อง ที่มี CPU core เดียว CPU ทำได้เพียงหนึ่ง operation ในเวลาเดียวกัน แต่มันยังทำงาน concurrent ได้ โดยใช้เครื่องมือเช่นเธรด, process และ async คอมพิวเตอร์ pause กิจกรรมหนึ่งและสลับไปอื่นก่อนในที่สุด cycle กลับไปยังกิจกรรมแรกอีก บนเครื่องที่มีหลาย CPU core มันยังทำงานแบบ parallel ได้ core หนึ่งทำงานหนึ่งในขณะที่อีก core ทำงานที่ไม่ เกี่ยวข้องสมบูรณ์ และ operation เหล่านั้นเกิดในเวลาเดียวกันจริง ๆ
การรันโค้ด async ใน Rust มักเกิด concurrent ขึ้นกับ hardware, OS และ async runtime ที่เราใช้ (เพิ่มเกี่ยวกับ async runtime ในไม่ช้า) concurrency นั้นอาจใช้ parallelism ใต้ฝ่ามือด้วย
ตอนนี้ มาดำดิ่งว่า async programming ใน Rust ทำงานยังไงจริง ๆ
Future และ syntax ของ async
Future และ Syntax ของ Async
element หลักของ asynchronous programming ใน Rust คือ future และ
keyword async และ await ของ Rust
future คือค่าที่อาจไม่พร้อมตอนนี้แต่จะพร้อมในจุดในอนาคต (แนวคิด
เดียวกันนี้ปรากฏในหลายภาษา บางครั้งภายใต้ชื่ออื่นเช่น task หรือ
promise) Rust ให้ trait Future เป็น building block เพื่อให้
operation async ต่าง ๆ ถูก implement ด้วยโครงสร้างข้อมูลต่าง ๆ แต่
ด้วย interface ทั่วไป ใน Rust future คือ type ที่ implement trait
Future แต่ละ future เก็บข้อมูลของตัวเองเกี่ยวกับความก้าวหน้าที่ทำ
และ “พร้อม” หมายความว่าอะไร
คุณใช้ keyword async กับ block และฟังก์ชันเพื่อระบุว่าพวกมันถูก
interrupt และ resume ได้ ภายใน block async หรือฟังก์ชัน async คุณ
ใช้ keyword await เพื่อ await future (นั่นคือ รอให้มันพร้อม)
ได้ จุดใดที่คุณ await future ภายใน block async หรือฟังก์ชันเป็นจุด
ที่เป็นไปได้สำหรับ block หรือฟังก์ชันนั้นที่จะ pause และ resume
กระบวนการของการตรวจสอบกับ future เพื่อดูว่าค่าของมันใช้ได้ยังเรียก
polling
บางภาษาอื่นเช่น C# และ JavaScript ก็ใช้ keyword async และ await
สำหรับ async programming ถ้าคุณคุ้นเคยกับภาษาเหล่านั้น คุณอาจสังเกต
ความแตกต่างสำคัญบางอย่างในวิธีที่ Rust จัดการ syntax นั่นมีเหตุผลที่
ดี ดังที่เราจะเห็น!
เมื่อเขียน async Rust เราใช้ keyword async และ await เกือบทุก
เวลา Rust คอมไพล์พวกมันเป็นโค้ดเทียบเท่าโดยใช้ trait Future เหมือน
ที่มันคอมไพล์ loop for เป็นโค้ดเทียบเท่าโดยใช้ trait Iterator
อย่างไรก็ตาม เพราะ Rust ให้ trait Future คุณยัง implement มัน
สำหรับ type ของคุณเองเมื่อต้องการได้ ฟังก์ชันหลายตัวที่เราจะเห็น
ตลอดบทนี้ return type ที่มี implementation ของ Future ของตัวเอง
เราจะกลับไปยังนิยามของ trait ที่ท้ายสุดของบทและขุดเข้าไปในวิธีที่
มันทำงานเพิ่ม แต่นี่เป็นรายละเอียดเพียงพอที่จะให้เราเดินหน้าต่อ
ทั้งหมดนี้อาจรู้สึก abstract หน่อย ดังนั้นมาเขียนโปรแกรม async แรก ของเรา — web scraper เล็ก เราจะส่งสอง URL จาก command line, fetch ทั้งสองแบบ concurrent และ return ผลของอันไหนเสร็จก่อน ตัวอย่างนี้จะ มี syntax ใหม่พอควร แต่ไม่ต้องกังวล — เราจะอธิบายทุกอย่างที่คุณต้อง รู้ขณะที่เราไป
โปรแกรม Async แรกของเรา
เพื่อเก็บโฟกัสของบทนี้ที่การเรียน async ไม่ใช่การ juggle ส่วนของ
ecosystem เราสร้าง crate trpl (trpl ย่อสำหรับ “The Rust
Programming Language”) มัน re-export type, trait และฟังก์ชันทั้งหมด
ที่คุณต้องการ ส่วนใหญ่จาก crate futures
และ tokio crate futures เป็นบ้านอย่างเป็น
ทางการสำหรับการทดลอง Rust สำหรับโค้ด async และมันจริง ๆ คือที่ที่
trait Future ถูกออกแบบดั้งเดิม Tokio เป็น async runtime ที่ใช้
อย่างกว้างขวางที่สุดใน Rust วันนี้ โดยเฉพาะสำหรับ web application
มี runtime อื่นที่ยอดเยี่ยมอยู่ และพวกมันอาจเหมาะกับจุดประสงค์ของ
คุณมากกว่า เราใช้ crate tokio ใต้ฝ่ามือสำหรับ trpl เพราะมันถูก
ทดสอบดีและใช้กว้างขวาง
ในบางกรณี trpl ยังตั้งชื่อใหม่หรือ wrap API ดั้งเดิมเพื่อเก็บคุณ
โฟกัสที่รายละเอียดที่เกี่ยวข้องกับบทนี้ ถ้าคุณต้องการเข้าใจว่า
crate ทำอะไร เราขอแนะนำให้คุณดู source code ของมัน
คุณจะเห็นได้ว่าแต่ละ re-export มาจาก crate ใด และเราได้ทิ้ง comment
มากที่อธิบายว่า crate ทำอะไร
สร้างโปรเจกต์ binary ใหม่ชื่อ hello-async และเพิ่ม crate trpl
เป็น dependency:
$ cargo new hello-async
$ cd hello-async
$ cargo add trpl
ตอนนี้เราใช้ชิ้นส่วนต่าง ๆ ที่ trpl ให้มาเพื่อเขียนโปรแกรม async
แรกของเรา เราจะ build เครื่องมือ command line เล็กที่ fetch สอง
หน้าเว็บ ดึง element <title> จากแต่ละหน้า และ print title ของหน้า
ใดที่เสร็จกระบวนการทั้งหมดนั้นก่อน
นิยามฟังก์ชัน page_title
มาเริ่มโดยเขียนฟังก์ชันที่รับ URL หนึ่งหน้าเป็น parameter, ทำ request
ไปยังมัน และ return text ของ element <title> (ดู Listing 17-1)
extern crate trpl; // required for mdbook test
fn main() {
// TODO: we'll add this next!
}
use trpl::Html;
async fn page_title(url: &str) -> Option<String> {
let response = trpl::get(url).await;
let response_text = response.text().await;
Html::parse(&response_text)
.select_first("title")
.map(|title| title.inner_html())
}ก่อนอื่น เรานิยามฟังก์ชันชื่อ page_title และทำเครื่องหมายมันด้วย
keyword async จากนั้นเราใช้ฟังก์ชัน trpl::get เพื่อ fetch URL
ใดก็ตามที่ส่งเข้าและเพิ่ม keyword await เพื่อ await response เพื่อ
รับ text ของ response เราเรียกเมธอด text ของมันและ await มันอีก
ครั้งด้วย keyword await ทั้งสองขั้นตอนนี้เป็น asynchronous สำหรับ
ฟังก์ชัน get เราต้องรอ server ส่งคืนส่วนแรกของ response ซึ่งจะ
รวม HTTP header, cookie และอื่น ๆ และส่งแยกจาก body ของ response
ได้ โดยเฉพาะถ้า body ใหญ่มาก อาจใช้เวลาให้ทั้งหมดของมันมาถึง เพราะ
เราต้องรอ ทั้งหมด ของ response ที่มาถึง เมธอด text ยังเป็น async
เราต้อง await future ทั้งสองนี้ชัดเจน เพราะ future ใน Rust เป็น
lazy — พวกมันไม่ทำอะไรจนกว่าคุณขอพวกมันด้วย keyword await
(จริง ๆ Rust จะแสดง warning ของ compiler ถ้าคุณไม่ใช้ future) นี่
อาจทำให้คุณนึกถึงการพูดถึง iterator ในส่วน
“ประมวลผลชุด Item ด้วย Iterator”
ในบทที่ 13 Iterator ไม่ทำอะไรยกเว้นคุณเรียกเมธอด next ของพวกมัน —
ไม่ว่าโดยตรงหรือโดยใช้ loop for หรือเมธอดเช่น map ที่ใช้ next
ใต้ฝ่ามือ ในทำนองเดียวกัน future ไม่ทำอะไรยกเว้นคุณขอพวกมันชัดเจน
ความเป็น lazy นี้อนุญาตให้ Rust หลีกเลี่ยงการรันโค้ด async จนกว่ามัน
ต้องการจริง
สังเกต — นี่ต่างจากพฤติกรรมที่เราเห็นเมื่อใช้
thread::spawnใน ส่วน “สร้าง Thread ใหม่ด้วย spawn” ในบทที่ 16 ที่ closure ที่เราส่งไปยังอีกเธรดเริ่มรันทันที มันยัง ต่างจากวิธีที่ภาษาอื่นหลายภาษาเข้าหา async แต่มันสำคัญสำหรับ Rust ที่จะให้การรับประกัน performance ของมันได้ เช่นเดียวกับ iterator
เมื่อเรามี response_text แล้ว เรา parse มันเป็น instance ของ type
Html โดยใช้ Html::parse ได้ แทน raw string ตอนนี้เรามี type
ข้อมูลที่เราใช้ทำงานกับ HTML เป็นโครงสร้างข้อมูลที่ richer โดย
เฉพาะ เราใช้เมธอด select_first เพื่อหา instance แรกของ selector
CSS ที่ให้ โดยส่ง string "title" เราจะได้ element <title> แรก
ใน document ถ้ามี เพราะอาจไม่มี element ที่ตรง select_first
return Option<ElementRef> สุดท้าย เราใช้เมธอด Option::map ซึ่ง
ให้เราทำงานกับ item ใน Option ถ้ามี และไม่ทำอะไรถ้าไม่มี (เรา
ใช้ expression match ที่นี่ได้ด้วย แต่ map เป็น idiomatic
มากกว่า) ใน body ของฟังก์ชันที่เราให้ map เราเรียก inner_html
บน title เพื่อรับเนื้อหาของมัน ซึ่งเป็น String เมื่อทุกอย่าง
พูดและทำ เรามี Option<String>
สังเกตว่า keyword await ของ Rust ไป หลัง expression ที่คุณกำลัง
await ไม่ใช่ก่อน นั่นคือ มันเป็น keyword postfix นี่อาจต่างจาก
ที่คุณคุ้นเคยถ้าคุณใช้ async ในภาษาอื่น แต่ใน Rust มันทำให้ chain
ของเมธอดทำงานกับด้วยดีกว่ามาก ผลคือ เราเปลี่ยน body ของ page_title
ให้ chain การเรียกฟังก์ชัน trpl::get และ text ด้วย await
ระหว่างพวกมันได้ ดังที่แสดงใน Listing 17-2
extern crate trpl; // required for mdbook test
use trpl::Html;
fn main() {
// TODO: we'll add this next!
}
async fn page_title(url: &str) -> Option<String> {
let response_text = trpl::get(url).await.text().await;
Html::parse(&response_text)
.select_first("title")
.map(|title| title.inner_html())
}awaitด้วยนั้น เราเขียนฟังก์ชัน async แรกของเราสำเร็จแล้ว! ก่อนเราเพิ่ม
โค้ดใน main เพื่อเรียกมัน มาพูดเพิ่มเล็กน้อยเกี่ยวกับสิ่งที่เรา
เขียนและมันหมายความอะไร
เมื่อ Rust เห็น block ที่ทำเครื่องหมายด้วย keyword async มัน
คอมไพล์มันเป็นประเภทข้อมูล unique และ anonymous ที่ implement trait
Future เมื่อ Rust เห็น ฟังก์ชัน ที่ทำเครื่องหมายด้วย async
มันคอมไพล์มันเป็นฟังก์ชันที่ไม่ใช่ async ที่ body ของมันคือ block
async return type ของฟังก์ชัน async คือ type ของประเภทข้อมูล
anonymous ที่ compiler สร้างสำหรับ block async นั้น
ดังนั้น การเขียน async fn เทียบเท่ากับการเขียนฟังก์ชันที่ return
future ของ return type ต่อ compiler นิยามฟังก์ชันเช่น
async fn page_title ใน Listing 17-1 ประมาณเทียบเท่ากับฟังก์ชัน
ที่ไม่ใช่ async ที่นิยามแบบนี้:
#![allow(unused)]
fn main() {
extern crate trpl; // required for mdbook test
use std::future::Future;
use trpl::Html;
fn page_title(url: &str) -> impl Future<Output = Option<String>> {
async move {
let text = trpl::get(url).await.text().await;
Html::parse(&text)
.select_first("title")
.map(|title| title.inner_html())
}
}
}มาเดินผ่านแต่ละส่วนของเวอร์ชันที่แปลง:
- มันใช้ syntax
impl Traitที่เราพูดถึงในบทที่ 10 ในส่วน “Trait เป็น Parameter” - ค่าที่ return implement trait
Futureที่มี associated typeOutputสังเกตว่า typeOutputคือOption<String>ซึ่งเหมือน กับ return type ดั้งเดิมจากเวอร์ชันasync fnของpage_title - โค้ดทั้งหมดที่เรียกใน body ของฟังก์ชันดั้งเดิมถูก wrap ใน block
async moveจำได้ว่า block เป็น expression block ทั้งหมดนี้คือ expression ที่ return จากฟังก์ชัน - block async นี้สร้างค่ากับ type
Option<String>ดังที่อธิบาย ค่านั้นตรงกับ typeOutputใน return type นี่เหมือนกับ block อื่น ที่คุณเห็น - body ฟังก์ชันใหม่เป็น block
async moveเพราะวิธีที่มันใช้ parameterurl(เราจะพูดเพิ่มมากเกี่ยวกับasyncเทียบกับasync moveภายหลังในบท)
ตอนนี้เราเรียก page_title ใน main ได้
Execute ฟังก์ชัน Async ด้วย Runtime
เพื่อเริ่ม เราจะรับ title สำหรับหน้าเดียว แสดงใน Listing 17-3 โชค ไม่ดี โค้ดนี้ยังไม่คอมไพล์
extern crate trpl; // required for mdbook test
use trpl::Html;
async fn main() {
let args: Vec<String> = std::env::args().collect();
let url = &args[1];
match page_title(url).await {
Some(title) => println!("The title for {url} was {title}"),
None => println!("{url} had no title"),
}
}
async fn page_title(url: &str) -> Option<String> {
let response_text = trpl::get(url).await.text().await;
Html::parse(&response_text)
.select_first("title")
.map(|title| title.inner_html())
}page_title จาก main กับอาร์กิวเมนต์ที่ user ให้เราตาม pattern เดียวกับที่เราใช้รับอาร์กิวเมนต์ command line ในส่วน
“รับ Command Line Argument” ในบทที่ 12
จากนั้นเราส่งอาร์กิวเมนต์ URL ให้ page_title และ await ผล เพราะ
ค่าที่ผลิตโดย future คือ Option<String> เราใช้ expression match
เพื่อ print ข้อความต่างกันเพื่อรองรับว่าหน้ามี <title> ไหม
ที่เดียวที่เราใช้ keyword await ได้คือในฟังก์ชันหรือ block async
และ Rust จะไม่ให้เราทำเครื่องหมายฟังก์ชันพิเศษ main เป็น async
error[E0752]: `main` function is not allowed to be `async`
--> src/main.rs:6:1
|
6 | async fn main() {
| ^^^^^^^^^^^^^^^ `main` function is not allowed to be `async`
เหตุผลที่ main ทำเครื่องหมาย async ไม่ได้คือโค้ด async ต้องการ
runtime — crate Rust ที่จัดการรายละเอียดของการ execute โค้ด
asynchronous ฟังก์ชัน main ของโปรแกรม initialize runtime ได้
แต่มันไม่ใช่ runtime เอง (เราจะเห็นเพิ่มเกี่ยวกับทำไมนี่เป็นกรณี
ในไม่ช้า) ทุกโปรแกรม Rust ที่ execute โค้ด async มีอย่างน้อยหนึ่งที่
ที่มันตั้ง runtime ที่ execute future
ภาษาส่วนใหญ่ที่สนับสนุน async bundle runtime แต่ Rust ไม่ แทน มี async runtime ต่างกันหลายตัวให้ใช้ แต่ละตัวทำ tradeoff ต่างกันเหมาะ สำหรับ use case ที่มันเป้าหมาย ตัวอย่างเช่น web server high-throughput กับหลาย CPU core และ RAM จำนวนมากมีความต้องการต่างมาก กับ microcontroller ที่มี core เดียว, RAM จำนวนน้อย และไม่มีความ สามารถ heap allocation crate ที่ให้ runtime เหล่านั้นยังมักจัดส่ง async version ของ functionality ทั่วไปเช่น I/O ไฟล์หรือ network
ที่นี่และตลอดที่เหลือของบทนี้ เราจะใช้ฟังก์ชัน block_on จาก crate
trpl ซึ่งรับ future เป็นอาร์กิวเมนต์และ block เธรดปัจจุบันจนกว่า
future นี้รันจนเสร็จ เบื้องหลัง การเรียก block_on ตั้ง runtime
โดยใช้ crate tokio ที่ใช้รัน future ที่ส่งเข้า (พฤติกรรม block_on
ของ crate trpl คล้ายกับฟังก์ชัน block_on ของ runtime crate อื่น)
เมื่อ future เสร็จ block_on return ค่าใดที่ future สร้าง
เราส่ง future ที่ return โดย page_title ให้ block_on โดยตรง
และเมื่อมันเสร็จ เรา match บน Option<String> ที่ได้ดังที่เราพยายาม
ทำใน Listing 17-3 ได้ อย่างไรก็ตาม สำหรับตัวอย่างส่วนใหญ่ในบท (และ
โค้ด async ส่วนใหญ่ในโลกจริง) เราจะทำมากกว่าเพียงการเรียกฟังก์ชัน
async หนึ่งครั้ง ดังนั้นแทน เราจะส่ง block async และ await ผลของ
การเรียก page_title ชัดเจน ดังใน Listing 17-4
extern crate trpl; // required for mdbook test
use trpl::Html;
fn main() {
let args: Vec<String> = std::env::args().collect();
trpl::block_on(async {
let url = &args[1];
match page_title(url).await {
Some(title) => println!("The title for {url} was {title}"),
None => println!("{url} had no title"),
}
})
}
async fn page_title(url: &str) -> Option<String> {
let response_text = trpl::get(url).await.text().await;
Html::parse(&response_text)
.select_first("title")
.map(|title| title.inner_html())
}trpl::block_onเมื่อเรารันโค้ดนี้ เราได้พฤติกรรมที่เราคาดหวังในตอนแรก:
$ cargo run -- "https://www.rust-lang.org"
Finished `dev` profile [unoptimized + debuginfo] target(s) in 0.05s
Running `target/debug/async_await 'https://www.rust-lang.org'`
The title for https://www.rust-lang.org was
Rust Programming Language
โอ — ในที่สุดเรามีโค้ด async ที่ทำงาน! แต่ก่อนเราเพิ่มโค้ดเพื่อแข่ง สองไซต์กัน มาหันความสนใจสั้น ๆ กลับไปยังวิธีที่ future ทำงาน
แต่ละ จุด await — นั่นคือ ทุกที่ที่โค้ดใช้ keyword await —
แทนที่ที่การควบคุมถูกส่งกลับให้ runtime เพื่อทำให้นั้นทำงาน Rust
ต้องตามว่า state ที่เกี่ยวข้องใน block async เพื่อให้ runtime เริ่ม
งานอื่นและจากนั้นกลับมาเมื่อมันพร้อมที่จะลองก้าวหน้าอันแรกอีก นี่
คือ state machine ที่มองไม่เห็น เหมือนกับว่าคุณเขียน enum แบบนี้
เพื่อบันทึก state ปัจจุบันที่แต่ละจุด await:
#![allow(unused)]
fn main() {
extern crate trpl; // required for mdbook test
enum PageTitleFuture<'a> {
Initial { url: &'a str },
GetAwaitPoint { url: &'a str },
TextAwaitPoint { response: trpl::Response },
}
}การเขียนโค้ดเพื่อเปลี่ยนระหว่างแต่ละ state ด้วยมือจะน่าเบื่อและมี แนวโน้ม error อย่างไรก็ตาม โดยเฉพาะเมื่อคุณต้องเพิ่ม functionality และ state เพิ่มให้โค้ดภายหลัง โชคดี Rust compiler สร้างและจัดการ โครงสร้างข้อมูล state machine สำหรับโค้ด async อัตโนมัติ กฎ borrowing และ ownership ปกติรอบโครงสร้างข้อมูลทั้งหมดยังใช้ และโชค ดี compiler ยังจัดการการตรวจสอบเหล่านั้นให้เราและให้ข้อความ error ที่มีประโยชน์ เราจะทำงานผ่านบางส่วนของพวกนั้นภายหลังในบท
ในที่สุด อะไรบางอย่างต้อง execute state machine นี้ และอะไรบางอย่าง นั้นคือ runtime (นี่คือเหตุผลที่คุณอาจพบการกล่าวถึง executor เมื่อ ดูเข้า runtime — executor เป็นส่วนของ runtime ที่รับผิดชอบในการ execute โค้ด async)
ตอนนี้คุณเห็นได้ว่าทำไม compiler หยุดเราจากการทำ main เอง async
function กลับใน Listing 17-3 ถ้า main เป็นฟังก์ชัน async อะไรบาง
อย่างอื่นจะต้องจัดการ state machine สำหรับ future ใดที่ main
return แต่ main คือจุดเริ่มของโปรแกรม! แทน เราเรียกฟังก์ชัน
trpl::block_on ใน main เพื่อตั้ง runtime และรัน future ที่
return โดย block async จนกว่ามันเสร็จ
สังเกต — บาง runtime ให้ macro เพื่อคุณ สามารถ เขียนฟังก์ชัน
mainasync ได้ macro เหล่านั้นเขียนasync fn main() { ... }ใหม่เป็นfn mainปกติ ซึ่งทำสิ่งเดียวกับที่เราทำด้วยมือใน Listing 17-4 — เรียกฟังก์ชันที่รัน future จนเสร็จในแบบที่trpl::block_onทำ
ตอนนี้มาใส่ชิ้นส่วนเหล่านี้รวมกันและเห็นว่าเราเขียนโค้ด concurrent ยังไงได้
แข่งสอง URL แบบ Concurrent
ใน Listing 17-5 เราเรียก page_title กับสอง URL ต่างกันที่ส่งเข้า
จาก command line และแข่งพวกมันโดยเลือก future ใดที่เสร็จก่อน
extern crate trpl; // required for mdbook test
use trpl::{Either, Html};
fn main() {
let args: Vec<String> = std::env::args().collect();
trpl::block_on(async {
let title_fut_1 = page_title(&args[1]);
let title_fut_2 = page_title(&args[2]);
let (url, maybe_title) =
match trpl::select(title_fut_1, title_fut_2).await {
Either::Left(left) => left,
Either::Right(right) => right,
};
println!("{url} returned first");
match maybe_title {
Some(title) => println!("Its page title was: '{title}'"),
None => println!("It had no title."),
}
})
}
async fn page_title(url: &str) -> (&str, Option<String>) {
let response_text = trpl::get(url).await.text().await;
let title = Html::parse(&response_text)
.select_first("title")
.map(|title| title.inner_html());
(url, title)
}page_title สำหรับสอง URL เพื่อดูว่าอันไหน return ก่อนเราเริ่มโดยเรียก page_title สำหรับแต่ละของ URL ที่ user ให้ เรา
บันทึก future ที่ได้เป็น title_fut_1 และ title_fut_2 จำได้ พวก
มันไม่ทำอะไรยัง เพราะ future เป็น lazy และเรายังไม่ได้ await พวก
มัน จากนั้นเราส่ง future ให้ trpl::select ซึ่ง return ค่าเพื่อ
ระบุว่าอันไหนของ future ที่ส่งให้มันเสร็จก่อน
สังเกต — ใต้ฝ่ามือ
trpl::selectถูก build บนฟังก์ชันselectทั่วไปกว่าที่นิยามใน cratefuturesฟังก์ชันselectของ cratefuturesทำสิ่งหลายอย่างที่ฟังก์ชันtrpl::selectทำไม่ได้ แต่ มันยังมีความซับซ้อนเพิ่มที่เราข้ามได้ตอนนี้
future ใดก็ “ชนะ” อย่างถูกต้องตามกฎหมายได้ ดังนั้นมันไม่สมเหตุสมผล
ที่จะ return Result แทน trpl::select return type ที่เรายังไม่
เห็นก่อน trpl::Either type Either คล้ายกับ Result หน่อยตรงที่
มันมีสองกรณี ต่างจาก Result อย่างไรก็ตาม ไม่มีแนวคิดของความสำเร็จ
หรือ failure ที่ฝังใน Either แทน มันใช้ Left และ Right เพื่อ
ระบุ “อันหนึ่งหรืออีกอัน”:
#![allow(unused)]
fn main() {
enum Either<A, B> {
Left(A),
Right(B),
}
}ฟังก์ชัน select return Left กับ output ของ future นั้นถ้า
อาร์กิวเมนต์แรกชนะ และ Right กับ output ของอาร์กิวเมนต์ future
ที่สองถ้า อันนั้น ชนะ นี่ตรงลำดับที่อาร์กิวเมนต์ปรากฏเมื่อเรียก
ฟังก์ชัน — อาร์กิวเมนต์แรกอยู่ทางซ้ายของอาร์กิวเมนต์ที่สอง
เรายังอัพเดท page_title ให้ return URL เดียวกันที่ส่งเข้า ด้วย
วิธีนั้น ถ้าหน้าที่ return ก่อนไม่มี <title> ที่เรา resolve ได้
เรายัง print ข้อความที่มีความหมายได้ ด้วยข้อมูลนั้นใช้ได้ เราปิด
โดยอัพเดท output println! ของเราเพื่อระบุทั้งว่า URL ไหนเสร็จก่อน
และอะไร ถ้ามี <title> สำหรับหน้าเว็บที่ URL นั้น
คุณได้ build web scraper ที่ทำงานเล็กแล้ว! เลือกสอง URL และรัน เครื่องมือ command line คุณอาจค้นพบว่าบางไซต์เร็วกว่าอื่นอย่าง สม่ำเสมอ ในขณะที่ในบางกรณีไซต์ที่เร็วกว่าต่างกันจากการรันถึงการรัน สำคัญกว่า คุณเรียนพื้นฐานของการทำงานกับ future แล้ว ดังนั้นตอนนี้เรา ขุดลึกขึ้นในสิ่งที่เราทำกับ async ได้
ใช้ async ทำ concurrency
ใช้ Concurrency กับ Async
ในส่วนนี้ เราจะใช้ async กับบางความท้าทาย concurrency เดียวกันที่เรา จัดการด้วยเธรดในบทที่ 16 เพราะเราพูดถึงแนวคิดหลักหลายอย่างที่นั่นแล้ว ในส่วนนี้เราจะโฟกัสที่สิ่งที่ต่างระหว่างเธรดและ future
ในหลายกรณี API สำหรับทำงานกับ concurrency โดยใช้ async คล้ายกับ สำหรับใช้เธรดมาก ในกรณีอื่น พวกมันลงเอยที่ต่างพอควร แม้เมื่อ API ดูเหมือน คล้ายกันระหว่างเธรดและ async พวกมันมักมีพฤติกรรมต่างกัน และพวกมันเกือบเสมอมีลักษณะ performance ต่างกัน
สร้าง Task ใหม่ด้วย spawn_task
operation แรกที่เราจัดการในส่วน
“สร้าง Thread ใหม่ด้วย spawn” ใน
บทที่ 16 คือการนับขึ้นบนสองเธรดแยก มาทำสิ่งเดียวกันโดยใช้ async
crate trpl ให้ฟังก์ชัน spawn_task ที่ดูคล้าย API thread::spawn
มาก และฟังก์ชัน sleep ที่เป็นเวอร์ชัน async ของ API thread::sleep
เราใช้พวกมันรวมกันเพื่อ implement ตัวอย่างการนับได้ ดังที่แสดงใน
Listing 17-6
extern crate trpl; // required for mdbook test
use std::time::Duration;
fn main() {
trpl::block_on(async {
trpl::spawn_task(async {
for i in 1..10 {
println!("hi number {i} from the first task!");
trpl::sleep(Duration::from_millis(500)).await;
}
});
for i in 1..5 {
println!("hi number {i} from the second task!");
trpl::sleep(Duration::from_millis(500)).await;
}
});
}เป็นจุดเริ่มของเรา เราตั้งฟังก์ชัน main ของเราด้วย trpl::block_on
เพื่อให้ฟังก์ชันระดับสูงของเราเป็น async ได้
สังเกต — จากจุดนี้ไปข้างหน้าในบท ทุกตัวอย่างจะรวมโค้ด wrapping เดียวกันนี้กับ
trpl::block_onในmainดังนั้นเราจะข้ามมันบ่อย เหมือนที่เราทำกับmainจำที่จะรวมมันในโค้ดของคุณ!
จากนั้นเราเขียนสอง loop ภายใน block นั้น แต่ละ loop บรรจุการเรียก
trpl::sleep ซึ่งรอครึ่งวินาที (500 millisecond) ก่อนส่งข้อความ
ถัดไป เราใส่หนึ่ง loop ใน body ของ trpl::spawn_task และอีกอันใน
loop for ระดับสูง เรายังเพิ่ม await หลังการเรียก sleep
โค้ดนี้ทำตัวคล้าย implementation ที่ใช้เธรด — รวมข้อเท็จจริงว่าคุณ อาจเห็นข้อความปรากฏในลำดับต่างกันใน terminal ของคุณเองเมื่อคุณรัน มัน:
hi number 1 from the second task!
hi number 1 from the first task!
hi number 2 from the first task!
hi number 2 from the second task!
hi number 3 from the first task!
hi number 3 from the second task!
hi number 4 from the first task!
hi number 4 from the second task!
hi number 5 from the first task!
เวอร์ชันนี้หยุดทันทีที่ loop for ใน body ของ block async หลักเสร็จ
เพราะ task ที่ spawn โดย spawn_task ถูก shut down เมื่อฟังก์ชัน
main จบ ถ้าคุณต้องการให้มันรันจนถึงเสร็จของ task คุณจะต้องใช้
join handle เพื่อรอ task แรกเสร็จ ด้วยเธรด เราใช้เมธอด join เพื่อ
“block” จนกว่าเธรดเสร็จรัน ใน Listing 17-7 เราใช้ await เพื่อทำ
สิ่งเดียวกันได้ เพราะ task handle เองเป็น future type Output ของ
มันคือ Result ดังนั้นเรายัง unwrap มันหลัง await มัน
extern crate trpl; // required for mdbook test
use std::time::Duration;
fn main() {
trpl::block_on(async {
let handle = trpl::spawn_task(async {
for i in 1..10 {
println!("hi number {i} from the first task!");
trpl::sleep(Duration::from_millis(500)).await;
}
});
for i in 1..5 {
println!("hi number {i} from the second task!");
trpl::sleep(Duration::from_millis(500)).await;
}
handle.await.unwrap();
});
}await กับ join handle เพื่อรัน task จนเสร็จเวอร์ชันที่อัพเดทนี้รันจนกว่า ทั้งสอง loop เสร็จ:
hi number 1 from the second task!
hi number 1 from the first task!
hi number 2 from the first task!
hi number 2 from the second task!
hi number 3 from the first task!
hi number 3 from the second task!
hi number 4 from the first task!
hi number 4 from the second task!
hi number 5 from the first task!
hi number 6 from the first task!
hi number 7 from the first task!
hi number 8 from the first task!
hi number 9 from the first task!
จนถึงตอนนี้ ดูเหมือน async และเธรดให้เราผลคล้ายกัน เพียงด้วย syntax
ต่างกัน — ใช้ await แทนการเรียก join บน join handle และ await
การเรียก sleep
ความแตกต่างใหญ่กว่าคือเราไม่ต้อง spawn เธรด OS อีกตัวเพื่อทำสิ่งนี้
จริง ๆ เราไม่ต้อง spawn task ที่นี่ด้วย เพราะ block async คอมไพล์
เป็น future anonymous เราใส่แต่ละ loop ใน block async และให้ runtime
รันทั้งสองจนเสร็จโดยใช้ฟังก์ชัน trpl::join ได้
ในส่วน “รอให้เธรดทั้งหมดเสร็จ” ในบท
ที่ 16 เราแสดงวิธีใช้เมธอด join บน type JoinHandle ที่ return
เมื่อคุณเรียก std::thread::spawn ฟังก์ชัน trpl::join คล้ายกัน
แต่สำหรับ future เมื่อคุณให้มันสอง future มันผลิต future ใหม่หนึ่ง
ที่ output ของมันคือ tuple ที่บรรจุ output ของแต่ละ future ที่คุณ
ส่งเข้าเมื่อพวกมัน ทั้งคู่ เสร็จ ดังนั้น ใน Listing 17-8 เราใช้
trpl::join เพื่อรอ fut1 และ fut2 เสร็จ เรา ไม่ await
fut1 และ fut2 แต่แทน future ใหม่ที่ผลิตโดย trpl::join เรา
ignore output เพราะมันเป็นเพียง tuple ที่บรรจุสองค่า unit
extern crate trpl; // required for mdbook test
use std::time::Duration;
fn main() {
trpl::block_on(async {
let fut1 = async {
for i in 1..10 {
println!("hi number {i} from the first task!");
trpl::sleep(Duration::from_millis(500)).await;
}
};
let fut2 = async {
for i in 1..5 {
println!("hi number {i} from the second task!");
trpl::sleep(Duration::from_millis(500)).await;
}
};
trpl::join(fut1, fut2).await;
});
}trpl::join เพื่อ await สอง future anonymousเมื่อเรารันนี้ เราเห็นทั้งสอง future รันจนเสร็จ:
hi number 1 from the first task!
hi number 1 from the second task!
hi number 2 from the first task!
hi number 2 from the second task!
hi number 3 from the first task!
hi number 3 from the second task!
hi number 4 from the first task!
hi number 4 from the second task!
hi number 5 from the first task!
hi number 6 from the first task!
hi number 7 from the first task!
hi number 8 from the first task!
hi number 9 from the first task!
ตอนนี้ คุณจะเห็นลำดับเดียวกันแน่นอนทุกครั้ง ซึ่งต่างมากจากที่เรา
เห็นกับเธรดและกับ trpl::spawn_task ใน Listing 17-7 นั่นเพราะ
ฟังก์ชัน trpl::join เป็น fair หมายความว่ามันตรวจสอบแต่ละ future
อย่างเท่ากันบ่อย สลับระหว่างพวกมัน และไม่ให้อันหนึ่งแข่งไปข้างหน้า
ถ้าอีกอันพร้อม ด้วยเธรด OS ตัดสินว่าจะตรวจสอบเธรดไหนและให้รันนาน
เท่าไร ด้วย async Rust runtime ตัดสินว่าจะตรวจสอบ task ไหน (ในการ
ปฏิบัติ รายละเอียดซับซ้อนเพราะ async runtime อาจใช้เธรด OS ใต้
ฝ่ามือเป็นส่วนของวิธีที่มันจัดการ concurrency ดังนั้นการรับประกัน
fairness งานเพิ่มสำหรับ runtime — แต่ยังเป็นไปได้!) Runtime ไม่ต้อง
รับประกัน fairness สำหรับ operation ใด และพวกมันมักเสนอ API ต่างกัน
เพื่อให้คุณเลือกว่าคุณต้องการ fairness หรือไม่
ลองรูปแบบบางอย่างเหล่านี้ในการ await future และดูว่าพวกมันทำอะไร:
- ลบ block async จากรอบ loop ใดอันหนึ่งหรือทั้งสอง
- Await แต่ละ block async ทันทีหลังนิยามมัน
- Wrap เพียง loop แรกใน block async และ await future ที่ได้หลัง body ของ loop ที่สอง
สำหรับความท้าทายเพิ่ม ดูว่าคุณคิดออกได้ไหมว่า output จะเป็นอะไรใน แต่ละกรณี ก่อน รันโค้ด!
ส่งข้อมูลระหว่างสอง Task โดยใช้ Message Passing
การแชร์ข้อมูลระหว่าง future ก็จะคุ้นเคย — เราจะใช้ message passing อีก แต่คราวนี้ด้วย type และฟังก์ชัน async version เราจะใช้ทาง ต่างเล็กน้อยจากที่เราทำในส่วน “โอนข้อมูลระหว่าง Thread ด้วย Message Passing” ในบทที่ 16 เพื่อแสดงบางความแตกต่างหลักระหว่าง concurrency ที่ใช้ เธรดและที่ใช้ future ใน Listing 17-9 เราจะเริ่มด้วยเพียง block async เดียว — ไม่ spawn task แยกเหมือนที่เรา spawn เธรดแยก
extern crate trpl; // required for mdbook test
fn main() {
trpl::block_on(async {
let (tx, mut rx) = trpl::channel();
let val = String::from("hi");
tx.send(val).unwrap();
let received = rx.recv().await.unwrap();
println!("received '{received}'");
});
}tx และ rxที่นี่ เราใช้ trpl::channel async version ของ API channel
multiple-producer, single-consumer ที่เราใช้กับเธรดในบทที่ 16
async version ของ API ต่างจาก thread-based version เพียงเล็กน้อย —
มันใช้ receiver rx แบบ mutable ไม่ใช่ immutable และเมธอด recv
ของมันผลิต future ที่เราต้อง await แทนการผลิตค่าโดยตรง ตอนนี้เรา
ส่งข้อความจาก sender ไปยัง receiver ได้ สังเกตว่าเราไม่ต้อง spawn
เธรดแยกหรือแม้แต่ task — เราเพียงต้อง await การเรียก rx.recv
เมธอด synchronous Receiver::recv ใน std::mpsc::channel block จน
กว่ามันรับข้อความ เมธอด trpl::Receiver::recv ไม่ทำ เพราะมันเป็น
async แทนการ block มันส่งการควบคุมกลับให้ runtime จนกว่าข้อความถูก
รับหรือฝั่ง send ของ channel ปิด เปรียบเทียบ เราไม่ await การเรียก
send เพราะมันไม่ block มันไม่ต้อง เพราะ channel ที่เราส่งเข้าเป็น
unbounded
สังเกต — เพราะโค้ด async ทั้งหมดนี้รันใน block async ในการเรียก
trpl::block_onทุกอย่างภายในมันหลีกเลี่ยงการ block ได้ อย่างไร ก็ตาม โค้ด ภายนอก มันจะ block บนฟังก์ชันblock_onreturn นั่น คือประเด็นทั้งหมดของฟังก์ชันtrpl::block_on— มันให้คุณ เลือก ที่ที่จะ block บนชุดของโค้ด async และดังนั้นที่ที่เปลี่ยนระหว่าง โค้ด sync และ async
สังเกตสองสิ่งเกี่ยวกับตัวอย่างนี้ ก่อนอื่น ข้อความจะมาถึงทันที ที่ สอง แม้เราใช้ future ที่นี่ ยังไม่มี concurrency ทุกอย่างใน listing เกิดในลำดับ เพียงเหมือนที่จะถ้าไม่มี future ที่เกี่ยวข้อง
มาแก้ส่วนแรกโดยส่งชุดของข้อความและ sleep ระหว่างพวกมัน ดังที่แสดงใน Listing 17-10
extern crate trpl; // required for mdbook test
use std::time::Duration;
fn main() {
trpl::block_on(async {
let (tx, mut rx) = trpl::channel();
let vals = vec![
String::from("hi"),
String::from("from"),
String::from("the"),
String::from("future"),
];
for val in vals {
tx.send(val).unwrap();
trpl::sleep(Duration::from_millis(500)).await;
}
while let Some(value) = rx.recv().await {
println!("received '{value}'");
}
});
}await ระหว่างแต่ละข้อความนอกจากส่งข้อความ เราต้องรับพวกมัน ในกรณีนี้ เพราะเรารู้ว่ามีกี่
ข้อความที่กำลังมา เราทำสิ่งนั้นด้วยมือโดยเรียก rx.recv().await
สี่ครั้งได้ ในโลกจริง อย่างไรก็ตาม เราจะรอจำนวน ไม่รู้ ของข้อความ
โดยทั่วไป ดังนั้นเราต้องรอต่อจนกว่าเราตัดสินว่าไม่มีข้อความเพิ่ม
ใน Listing 16-10 เราใช้ loop for เพื่อประมวลผล item ทั้งหมดที่
รับจาก channel synchronous Rust ยังไม่มีวิธีใช้ loop for กับชุด
ของ item ผลิตแบบ asynchronous อย่างไรก็ตาม ดังนั้นเราต้องใช้ loop
ที่เรายังไม่เห็น — loop conditional while let นี่คือ loop version
ของ construct if let ที่เราเห็นในส่วน
“Control Flow สั้น ๆ ด้วย if let และ let...else”
ในบทที่ 6 loop จะ execute ต่อตราบใดที่ pattern ที่มันระบุยัง match
ค่า
การเรียก rx.recv ผลิต future ซึ่งเรา await runtime จะ pause
future จนกว่ามันพร้อม เมื่อข้อความมาถึง future จะ resolve เป็น
Some(message) มากเท่าที่ข้อความมาถึง เมื่อ channel ปิด ไม่ว่า ใด
ข้อความมาถึงหรือไม่ future จะแทน resolve เป็น None เพื่อระบุว่า
ไม่มีค่าเพิ่มและดังนั้นเราควรหยุด polling — นั่นคือ หยุด await
loop while let ดึงทั้งหมดนี้ด้วยกัน ถ้าผลของการเรียก
rx.recv().await คือ Some(message) เราได้สิทธิ์เข้าถึงข้อความและ
ใช้มันใน body ของ loop ได้ เพียงเหมือนที่เราทำได้กับ if let ถ้า
ผลคือ None loop จบ ทุกครั้งที่ loop เสร็จ มันชน await point อีก
ดังนั้น runtime pause มันอีกจนกว่าข้อความอื่นมาถึง
โค้ดตอนนี้ส่งและรับข้อความทั้งหมดสำเร็จ โชคไม่ดี ยังมีสองสามปัญหา สำหรับสิ่งหนึ่ง ข้อความไม่มาถึงที่ช่วงครึ่งวินาที พวกมันมาถึงพร้อม กันทั้งหมด 2 วินาที (2,000 millisecond) หลังเราเริ่มโปรแกรม สำหรับ อีกอย่าง โปรแกรมนี้ก็ไม่ออกเลย! แทน มันรอตลอดสำหรับข้อความใหม่ คุณ จะต้อง shut down โดยใช้ ctrl-C
โค้ดภายใน Async Block หนึ่ง Execute แบบ Linear
มาเริ่มโดยตรวจสอบทำไมข้อความมาพร้อมกันหลังการ delay เต็ม ไม่ใช่
มาด้วย delay ระหว่างแต่ละอัน ภายใน block async ที่ให้ ลำดับที่
keyword await ปรากฏในโค้ดก็เป็นลำดับที่พวกมันถูก execute เมื่อ
โปรแกรมรัน
มีเพียงหนึ่ง block async ใน Listing 17-10 ดังนั้นทุกอย่างในมันรัน
linear ยังไม่มี concurrency การเรียก tx.send ทั้งหมดเกิด แทรกกับ
การเรียก trpl::sleep ทั้งหมดและ await point ที่ associate ของพวก
มัน เพียงจากนั้น loop while let จึงไปผ่าน await point ใดบนการ
เรียก recv
เพื่อรับพฤติกรรมที่เราต้องการ ที่ sleep delay เกิดระหว่างแต่ละ
ข้อความ เราต้องใส่ operation tx และ rx ใน block async ของพวก
มันเอง ดังที่แสดงใน Listing 17-11 จากนั้น runtime execute แต่ละ
พวกมันแยกโดยใช้ trpl::join ได้ เพียงเหมือนใน Listing 17-8 อีก
ครั้ง เรา await ผลของการเรียก trpl::join ไม่ใช่ future แต่ละตัว
ถ้าเรา await future แต่ละตัวในลำดับ เราจะลงเอยกลับใน flow ลำดับ —
แน่นอนสิ่งที่เราพยายาม ไม่ ทำ
extern crate trpl; // required for mdbook test
use std::time::Duration;
fn main() {
trpl::block_on(async {
let (tx, mut rx) = trpl::channel();
let tx_fut = async {
let vals = vec![
String::from("hi"),
String::from("from"),
String::from("the"),
String::from("future"),
];
for val in vals {
tx.send(val).unwrap();
trpl::sleep(Duration::from_millis(500)).await;
}
};
let rx_fut = async {
while let Some(value) = rx.recv().await {
println!("received '{value}'");
}
};
trpl::join(tx_fut, rx_fut).await;
});
}send และ recv เข้า block async ของพวกมันเองและ await future สำหรับ block เหล่านั้นด้วยโค้ดอัพเดทใน Listing 17-11 ข้อความถูก print ที่ช่วง 500 millisecond ไม่ใช่ทั้งหมดในรวดเดียวหลัง 2 วินาที
ย้าย Ownership เข้า Async Block
โปรแกรมยังไม่ออกเลย อย่างไรก็ตาม เพราะวิธีที่ loop while let
interact กับ trpl::join:
- future ที่ return จาก
trpl::joinเสร็จเฉพาะเมื่อ ทั้งสอง future ที่ส่งให้มันเสร็จ - future
tx_futเสร็จเมื่อมัน sleep เสร็จหลังส่งข้อความสุดท้ายในvals - future
rx_futจะไม่เสร็จจนกว่า loopwhile letจบ - loop
while letจะไม่จบจนกว่าการ awaitrx.recvผลิตNone - การ await
rx.recvจะ returnNoneเฉพาะเมื่อปลายอื่นของ channel ถูกปิด - channel จะปิดเฉพาะถ้าเราเรียก
rx.closeหรือเมื่อฝั่ง sender,txถูก drop - เราไม่เรียก
rx.closeที่ไหน และtxจะไม่ถูก drop จนกว่า block async ภายนอกสุดที่ส่งให้trpl::block_onจบ - block ไม่จบเพราะมันถูก block บน
trpl::joinเสร็จ ซึ่งพาเรากลับ ไปยังบนสุดของ list นี้
ตอนนี้ block async ที่เราส่งข้อความเพียง borrow tx เพราะการส่ง
ข้อความไม่ต้องการ ownership แต่ถ้าเรา ย้าย tx เข้า block async
นั้นได้ มันจะถูก drop เมื่อ block นั้นจบ ในส่วน
“จับ Reference หรือย้าย Ownership”
ในบทที่ 13 คุณเรียนวิธีใช้ keyword move กับ closure และดังที่
พูดในส่วน “ใช้ Closure move กับ Thread”
ในบทที่ 16 เราต้องย้ายข้อมูลเข้า closure เมื่อทำงานกับเธรดบ่อย
dynamic พื้นฐานเดียวกันใช้กับ block async ดังนั้น keyword move
ทำงานกับ block async เพียงเหมือนที่ทำกับ closure
ใน Listing 17-12 เราเปลี่ยน block ที่ใช้ส่งข้อความจาก async เป็น
async move
extern crate trpl; // required for mdbook test
use std::time::Duration;
fn main() {
trpl::block_on(async {
let (tx, mut rx) = trpl::channel();
let tx_fut = async move {
// --snip--
let vals = vec![
String::from("hi"),
String::from("from"),
String::from("the"),
String::from("future"),
];
for val in vals {
tx.send(val).unwrap();
trpl::sleep(Duration::from_millis(500)).await;
}
};
let rx_fut = async {
while let Some(value) = rx.recv().await {
println!("received '{value}'");
}
};
trpl::join(tx_fut, rx_fut).await;
});
}เมื่อเรารัน นี้ version ของโค้ด มัน shut down อย่างสง่างามหลัง ข้อความสุดท้ายถูกส่งและรับ ถัดไป มาดูว่าอะไรจะต้องเปลี่ยนเพื่อส่ง ข้อมูลจากมากกว่าหนึ่ง future
Join จำนวน Future ด้วยมาโคร join!
channel async นี้ยังเป็น channel multiple-producer ดังนั้นเราเรียก
clone บน tx ได้ถ้าเราต้องการส่งข้อความจากหลาย future ดังที่
แสดงใน Listing 17-13
extern crate trpl; // required for mdbook test
use std::time::Duration;
fn main() {
trpl::block_on(async {
let (tx, mut rx) = trpl::channel();
let tx1 = tx.clone();
let tx1_fut = async move {
let vals = vec![
String::from("hi"),
String::from("from"),
String::from("the"),
String::from("future"),
];
for val in vals {
tx1.send(val).unwrap();
trpl::sleep(Duration::from_millis(500)).await;
}
};
let rx_fut = async {
while let Some(value) = rx.recv().await {
println!("received '{value}'");
}
};
let tx_fut = async move {
let vals = vec![
String::from("more"),
String::from("messages"),
String::from("for"),
String::from("you"),
];
for val in vals {
tx.send(val).unwrap();
trpl::sleep(Duration::from_millis(1500)).await;
}
};
trpl::join!(tx1_fut, tx_fut, rx_fut);
});
}ก่อนอื่น เรา clone tx สร้าง tx1 ภายนอก block async แรก เราย้าย
tx1 เข้า block นั้นเพียงเหมือนที่เราทำก่อนกับ tx จากนั้น ภายหลัง
เราย้าย tx ดั้งเดิมเข้า block async ใหม่ ที่เราส่งข้อความเพิ่ม
ใน delay ที่ช้ากว่าเล็กน้อย เราบังเอิญใส่ block async ใหม่นี้หลัง
block async สำหรับรับข้อความ แต่มันไปก่อนมันก็ได้เช่นกัน กุญแจคือ
ลำดับที่ future ถูก await ไม่ใช่ที่พวกมันถูกสร้าง
block async ทั้งสองสำหรับส่งข้อความต้องเป็น block async move
เพื่อให้ทั้ง tx และ tx1 ถูก drop เมื่อ block เหล่านั้นเสร็จ
มิฉะนั้น เราจะลงเอยกลับใน loop infinite เดียวกันที่เราเริ่ม
สุดท้าย เราเปลี่ยนจาก trpl::join เป็น trpl::join! เพื่อจัดการ
future เพิ่ม — มาโคร join! await จำนวน future ตามอำเภอใจที่เรารู้
จำนวน future ที่ compile time เราจะพูดถึงการ await collection ของ
จำนวนไม่รู้ของ future ภายหลังในบทนี้
ตอนนี้เราเห็นข้อความทั้งหมดจาก future ส่งทั้งสอง และเพราะ future ส่งใช้ delay ต่างเล็กน้อยหลังส่ง ข้อความถูกรับที่ช่วงต่างเหล่านั้น ด้วย:
received 'hi'
received 'more'
received 'from'
received 'the'
received 'messages'
received 'future'
received 'for'
received 'you'
เราสำรวจวิธีใช้ message passing ในการส่งข้อมูลระหว่าง future, วิธีที่ โค้ดภายใน block async รันลำดับ, วิธีย้าย ownership เข้า block async และวิธี join หลาย future ถัดไป มาพูดถึงวิธีและทำไมบอก runtime ว่า มันสลับไปยังอีก task ได้
จัดการ future จำนวนเท่าใดก็ได้
Yield การควบคุมให้ Runtime
จำได้จากส่วน “โปรแกรม Async แรกของเรา” ว่าที่แต่ละ await point, Rust ให้ runtime โอกาสที่จะ pause task และ สลับไปยังอีกอันถ้า future ที่ await ไม่พร้อม สิ่งตรงข้ามก็จริง — Rust เพียง pause block async และส่งการควบคุมกลับให้ runtime ที่ await point ทุกอย่างระหว่าง await point เป็น synchronous
นั่นหมายความว่าถ้าคุณทำงานเยอะใน block async โดยไม่มี await point future นั้นจะ block future อื่นจากการก้าวหน้า บางครั้งคุณอาจได้ยิน นี่ถูกอ้างถึงว่า future หนึ่ง starve future อื่น ในบางกรณี นั่น อาจไม่เป็นเรื่องใหญ่ อย่างไรก็ตาม ถ้าคุณกำลังทำ setup ราคาสูงหรืองาน ที่รันนาน หรือถ้าคุณมี future ที่จะทำงานเฉพาะตลอดไป คุณจะต้องคิด ว่าเมื่อและที่ไหนที่จะส่งการควบคุมกลับให้ runtime
มา simulate operation ที่รันนานเพื่อแสดงปัญหา starvation จากนั้น
สำรวจวิธีแก้มัน Listing 17-14 แนะนำฟังก์ชัน slow
extern crate trpl; // required for mdbook test
use std::{thread, time::Duration};
fn main() {
trpl::block_on(async {
// We will call `slow` here later
});
}
fn slow(name: &str, ms: u64) {
thread::sleep(Duration::from_millis(ms));
println!("'{name}' ran for {ms}ms");
}thread::sleep เพื่อ simulate operation ที่ช้าโค้ดนี้ใช้ std::thread::sleep แทน trpl::sleep เพื่อให้การเรียก
slow จะ block เธรดปัจจุบันสำหรับจำนวน millisecond บางอย่าง เราใช้
slow แทน operation ในโลกจริงที่ทั้งรันนานและ blocking
ใน Listing 17-15 เราใช้ slow เพื่อจำลองการทำงาน CPU-bound ประเภท
นี้ในคู่ของ future
extern crate trpl; // required for mdbook test
use std::{thread, time::Duration};
fn main() {
trpl::block_on(async {
let a = async {
println!("'a' started.");
slow("a", 30);
slow("a", 10);
slow("a", 20);
trpl::sleep(Duration::from_millis(50)).await;
println!("'a' finished.");
};
let b = async {
println!("'b' started.");
slow("b", 75);
slow("b", 10);
slow("b", 15);
slow("b", 350);
trpl::sleep(Duration::from_millis(50)).await;
println!("'b' finished.");
};
trpl::select(a, b).await;
});
}
fn slow(name: &str, ms: u64) {
thread::sleep(Duration::from_millis(ms));
println!("'{name}' ran for {ms}ms");
}slow เพื่อ simulate operation ที่ช้าแต่ละ future ส่งการควบคุมกลับให้ runtime เพียง หลัง ดำเนินการ operation ช้าเยอะ ถ้าคุณรันโค้ดนี้ คุณจะเห็น output นี้:
'a' started.
'a' ran for 30ms
'a' ran for 10ms
'a' ran for 20ms
'b' started.
'b' ran for 75ms
'b' ran for 10ms
'b' ran for 15ms
'b' ran for 350ms
'a' finished.
เช่นเดียวกับ Listing 17-5 ที่เราใช้ trpl::select เพื่อแข่ง future
fetch สอง URL select ยังเสร็จทันทีที่ a เสร็จ ไม่มี interleaving
ระหว่างการเรียก slow ในสอง future อย่างไรก็ตาม future a ทำงาน
ทั้งหมดจนกว่าการเรียก trpl::sleep ถูก await จากนั้น future b
ทำงานทั้งหมดจนกว่าการเรียก trpl::sleep ของมันเองถูก await และ
สุดท้าย future a เสร็จ เพื่ออนุญาตให้ทั้งสอง future ก้าวหน้า
ระหว่าง task ช้าของพวกมัน เราต้องการ await point เพื่อเราส่งการ
ควบคุมกลับให้ runtime ได้ นั่นหมายความว่าเราต้องการอะไรที่ await ได้!
เราเห็นการส่งต่อประเภทนี้เกิดใน Listing 17-15 ได้แล้ว — ถ้าเราลบ
trpl::sleep ที่ท้ายสุดของ future a มันจะเสร็จโดยที่ future b
ไม่ เคย รัน ลองใช้ฟังก์ชัน trpl::sleep เป็นจุดเริ่มเพื่อให้
operation สลับการก้าวหน้า ดังที่แสดงใน Listing 17-16
extern crate trpl; // required for mdbook test
use std::{thread, time::Duration};
fn main() {
trpl::block_on(async {
let one_ms = Duration::from_millis(1);
let a = async {
println!("'a' started.");
slow("a", 30);
trpl::sleep(one_ms).await;
slow("a", 10);
trpl::sleep(one_ms).await;
slow("a", 20);
trpl::sleep(one_ms).await;
println!("'a' finished.");
};
let b = async {
println!("'b' started.");
slow("b", 75);
trpl::sleep(one_ms).await;
slow("b", 10);
trpl::sleep(one_ms).await;
slow("b", 15);
trpl::sleep(one_ms).await;
slow("b", 350);
trpl::sleep(one_ms).await;
println!("'b' finished.");
};
trpl::select(a, b).await;
});
}
fn slow(name: &str, ms: u64) {
thread::sleep(Duration::from_millis(ms));
println!("'{name}' ran for {ms}ms");
}trpl::sleep เพื่อให้ operation สลับการก้าวหน้าเราเพิ่มการเรียก trpl::sleep กับ await point ระหว่างแต่ละการเรียก
slow ตอนนี้งานของ future ทั้งสอง interleave:
'a' started.
'a' ran for 30ms
'b' started.
'b' ran for 75ms
'a' ran for 10ms
'b' ran for 10ms
'a' ran for 20ms
'b' ran for 15ms
'a' finished.
future a ยังรันสักครู่ก่อนส่งการควบคุมให้ b เพราะมันเรียก slow
ก่อนเรียก trpl::sleep แต่หลังจากนั้น future สลับไปมาแต่ละครั้งที่
หนึ่งในพวกมันชน await point ในกรณีนี้ เราทำเช่นนั้นหลังทุกการเรียก
slow แต่เราแบ่งงานในวิธีที่สมเหตุสมผลที่สุดสำหรับเราได้
เราไม่อยาก sleep ที่นี่จริง ๆ — เราต้องการก้าวหน้าเร็วที่สุดเท่า
ที่ทำได้ เราเพียงต้องส่งการควบคุมกลับให้ runtime เราทำสิ่งนั้นได้
โดยตรงโดยใช้ฟังก์ชัน trpl::yield_now ใน Listing 17-17 เราแทนที่
การเรียก trpl::sleep ทั้งหมดเหล่านั้นด้วย trpl::yield_now
extern crate trpl; // required for mdbook test
use std::{thread, time::Duration};
fn main() {
trpl::block_on(async {
let a = async {
println!("'a' started.");
slow("a", 30);
trpl::yield_now().await;
slow("a", 10);
trpl::yield_now().await;
slow("a", 20);
trpl::yield_now().await;
println!("'a' finished.");
};
let b = async {
println!("'b' started.");
slow("b", 75);
trpl::yield_now().await;
slow("b", 10);
trpl::yield_now().await;
slow("b", 15);
trpl::yield_now().await;
slow("b", 350);
trpl::yield_now().await;
println!("'b' finished.");
};
trpl::select(a, b).await;
});
}
fn slow(name: &str, ms: u64) {
thread::sleep(Duration::from_millis(ms));
println!("'{name}' ran for {ms}ms");
}yield_now เพื่อให้ operation สลับการก้าวหน้าโค้ดนี้ทั้งชัดเจนเกี่ยวกับเจตนาจริงและเร็วกว่าการใช้ sleep อย่าง
มีนัยสำคัญ เพราะ timer เช่นที่ sleep ใช้มักมีขีดจำกัดเกี่ยวกับ
ความละเอียดของพวกมันได้ version ของ sleep ที่เราใช้ ตัวอย่างเช่น
จะ sleep อย่างน้อยหนึ่ง millisecond เสมอ แม้เราจะส่งมัน Duration
ของหนึ่ง nanosecond อีกครั้ง คอมพิวเตอร์สมัยใหม่ เร็ว — พวกมัน
ทำได้มากในหนึ่ง millisecond!
นี่หมายความว่า async มีประโยชน์แม้สำหรับ task compute-bound ขึ้นกับ สิ่งที่โปรแกรมของคุณกำลังทำอย่างอื่น เพราะมันให้เครื่องมือที่มี ประโยชน์ในการจัดโครงสร้างความสัมพันธ์ระหว่างส่วนต่าง ๆ ของโปรแกรม (แต่ที่ค่าของ overhead ของ state machine async) นี่คือรูปแบบของ cooperative multitasking ที่แต่ละ future มีอำนาจในการตัดสินเมื่อ มันส่งการควบคุมผ่าน await point แต่ละ future ดังนั้นยังมีความรับ ผิดชอบที่จะหลีกเลี่ยงการ block นานเกินไป ในบาง OS embedded ที่ใช้ Rust นี่คือ เท่านั้น ประเภทของ multitasking!
ในโค้ดโลกจริง คุณจะไม่สลับการเรียกฟังก์ชันกับ await point บนทุก บรรทัดเดียวโดยปกติ แน่นอน ในขณะที่การ yield การควบคุมในวิธีนี้ ราคาถูกค่อนข้างมาก มันไม่ฟรี ในหลายกรณี การพยายามแบ่ง task compute-bound อาจทำให้มันช้าลงอย่างมีนัยสำคัญ ดังนั้นบางครั้งดีกว่า สำหรับ performance โดยรวม ที่จะให้ operation block สั้น ๆ วัด เสมอเพื่อดูว่า performance bottleneck จริงของโค้ดของคุณคืออะไร dynamic ที่ underlying สำคัญที่จะเก็บในใจ อย่างไรก็ตาม ถ้าคุณ กำลัง เห็นงานเยอะเกิดใน serial ที่คุณคาดว่าจะเกิด concurrent!
สร้าง Async Abstraction ของเราเอง
เรายัง compose future ด้วยกันเพื่อสร้าง pattern ใหม่ได้ ตัวอย่าง
เช่น เรา build ฟังก์ชัน timeout ด้วย building block async ที่เรา
มีแล้วได้ เมื่อเราเสร็จ ผลจะเป็น building block อีกอันที่เราใช้
สร้าง async abstraction เพิ่มได้
Listing 17-18 แสดงว่าเราคาดว่า timeout นี้จะทำงานกับ future ช้า
อย่างไร
extern crate trpl; // required for mdbook test
use std::time::Duration;
fn main() {
trpl::block_on(async {
let slow = async {
trpl::sleep(Duration::from_secs(5)).await;
"Finally finished"
};
match timeout(slow, Duration::from_secs(2)).await {
Ok(message) => println!("Succeeded with '{message}'"),
Err(duration) => {
println!("Failed after {} seconds", duration.as_secs())
}
}
});
}timeout ที่จินตนาการของเราเพื่อรัน operation ช้ากับขีดจำกัดเวลามา implement สิ่งนี้! เพื่อเริ่ม มาคิดเกี่ยวกับ API สำหรับ timeout:
- มันต้องเป็นฟังก์ชัน async เองเพื่อให้เรา await มันได้
- parameter แรกของมันควรเป็น future ที่จะรัน เราทำให้มัน generic เพื่ออนุญาตให้มันทำงานกับ future ใดก็ได้
- parameter ที่สองของมันจะเป็นเวลาสูงสุดที่จะรอ ถ้าเราใช้
Durationนั่นจะทำให้ง่ายในการส่งต่อให้trpl::sleep - มันควร return
Resultถ้า future เสร็จสำเร็จResultจะเป็นOkกับค่าที่ผลิตโดย future ถ้า timeout เลยก่อนResultจะเป็นErrกับ duration ที่ timeout รอ
Listing 17-19 แสดงการประกาศนี้
extern crate trpl; // required for mdbook test
use std::time::Duration;
fn main() {
trpl::block_on(async {
let slow = async {
trpl::sleep(Duration::from_secs(5)).await;
"Finally finished"
};
match timeout(slow, Duration::from_secs(2)).await {
Ok(message) => println!("Succeeded with '{message}'"),
Err(duration) => {
println!("Failed after {} seconds", duration.as_secs())
}
}
});
}
async fn timeout<F: Future>(
future_to_try: F,
max_time: Duration,
) -> Result<F::Output, Duration> {
// Here is where our implementation will go!
}timeoutนั่นพอใจเป้าหมายของเราสำหรับ type ตอนนี้มาคิดเกี่ยวกับ พฤติกรรม
ที่เราต้องการ — เราต้องการแข่ง future ที่ส่งเข้ากับ duration เราใช้
trpl::sleep เพื่อสร้าง future timer จาก duration และใช้
trpl::select เพื่อรัน timer นั้นกับ future ที่ caller ส่งเข้าได้
ใน Listing 17-20 เรา implement timeout โดย match บนผลของการ await
trpl::select
extern crate trpl; // required for mdbook test
use std::time::Duration;
use trpl::Either;
// --snip--
fn main() {
trpl::block_on(async {
let slow = async {
trpl::sleep(Duration::from_secs(5)).await;
"Finally finished"
};
match timeout(slow, Duration::from_secs(2)).await {
Ok(message) => println!("Succeeded with '{message}'"),
Err(duration) => {
println!("Failed after {} seconds", duration.as_secs())
}
}
});
}
async fn timeout<F: Future>(
future_to_try: F,
max_time: Duration,
) -> Result<F::Output, Duration> {
match trpl::select(future_to_try, trpl::sleep(max_time)).await {
Either::Left(output) => Ok(output),
Either::Right(_) => Err(max_time),
}
}timeout ด้วย select และ sleepimplementation ของ trpl::select ไม่ fair — มัน poll อาร์กิวเมนต์
ในลำดับที่พวกมันส่ง (implementation select อื่นจะสุ่มเลือก
อาร์กิวเมนต์ที่จะ poll ก่อน) ดังนั้นเราส่ง future_to_try ให้
select ก่อนเพื่อให้มันมีโอกาสเสร็จแม้ max_time เป็น duration
สั้นมาก ถ้า future_to_try เสร็จก่อน select จะ return Left
กับ output จาก future_to_try ถ้า timer เสร็จก่อน select จะ
return Right กับ output ของ timer เป็น ()
ถ้า future_to_try สำเร็จและเราได้ Left(output) เรา return
Ok(output) ถ้า sleep timer เลยแทนและเราได้ Right(()) เรา
ignore () ด้วย _ และ return Err(max_time) แทน
ด้วยนั้น เรามี timeout ทำงานที่ build ออกจากสอง async helper
อื่น ถ้าเรารันโค้ดของเรา มันจะ print failure mode หลัง timeout:
Failed after 2 seconds
เพราะ future compose กับ future อื่น คุณสร้างเครื่องมือทรงพลังจริงๆ โดยใช้ building block async เล็กกว่าได้ ตัวอย่างเช่น คุณใช้แนวทาง เดียวกันนี้เพื่อรวม timeout กับ retry และในทางกลับใช้พวกนั้นกับ operation เช่นการเรียก network (เช่นที่ใน Listing 17-5)
ในการปฏิบัติ คุณจะทำงานโดยตรงกับ async และ await โดยปกติ และ
รองด้วยฟังก์ชันเช่น select และมาโครเช่นมาโคร join! เพื่อควบคุม
วิธีที่ future ภายนอกสุดถูก execute
เราเห็นวิธีหลายอย่างในการทำงานกับ future หลายตัวพร้อมกันแล้ว ถัดไป เราจะดูว่าเราทำงานกับ future หลายตัวในลำดับเหนือเวลาด้วย stream ยังไงได้
Stream: future ที่ต่อกันเป็นลำดับ
Stream — Future ในลำดับ
จำได้ว่าเราใช้ receiver สำหรับ channel async ของเราก่อนหน้านี้ใน
บทในส่วน “Message Passing” เมธอด
async recv ผลิตลำดับของ item เหนือเวลา นี่คือ instance ของ
pattern ทั่วไปมากกว่าที่รู้จักว่า stream แนวคิดหลายอย่างถูกแทน
โดยธรรมชาติเป็น stream — item ที่กลายเป็นใช้ได้ใน queue, chunk
ของข้อมูลที่ถูกดึงเป็น increment จาก filesystem เมื่อชุดข้อมูลเต็ม
ใหญ่เกินไปสำหรับ memory ของคอมพิวเตอร์ หรือข้อมูลที่มาถึงผ่าน
network เหนือเวลา เพราะ stream เป็น future เราใช้พวกมันกับประเภท
อื่นของ future และรวมพวกมันในวิธีที่น่าสนใจได้ ตัวอย่างเช่น เรา
batch event เพื่อหลีกเลี่ยงการ trigger การเรียก network มากเกินไป
ตั้ง timeout บนลำดับของ operation ที่รันนาน หรือ throttle event
user interface เพื่อหลีกเลี่ยงการทำงานที่ไม่จำเป็นได้
เราเห็นลำดับของ item ในบทที่ 13 เมื่อเราดูที่ trait Iterator ใน
ส่วน “Trait Iterator และเมธอด next”
แต่มีสองความแตกต่างระหว่าง iterator และ receiver channel async
ความแตกต่างแรกคือเวลา — iterator เป็น synchronous ในขณะที่ receiver
channel เป็น asynchronous ความแตกต่างที่สองคือ API เมื่อทำงานโดยตรง
กับ Iterator เราเรียกเมธอด synchronous next ของมัน ด้วย stream
trpl::Receiver โดยเฉพาะ เราเรียกเมธอด asynchronous recv แทน
มิฉะนั้น API เหล่านี้รู้สึกคล้ายมาก และความคล้ายนั้นไม่ใช่ความ
บังเอิญ stream เหมือนรูปแบบ asynchronous ของ iteration ในขณะที่
trpl::Receiver รอเฉพาะเพื่อรับข้อความ อย่างไรก็ตาม API stream
จุดประสงค์ทั่วไปกว้างกว่ามาก — มันให้ item ถัดไปในแบบที่ Iterator
ทำ แต่แบบ asynchronous
ความคล้ายระหว่าง iterator และ stream ใน Rust หมายความว่าเราสร้าง
stream จาก iterator ใดก็ได้จริง ๆ เช่นเดียวกับ iterator เราทำงาน
กับ stream โดยเรียกเมธอด next ของมันและจากนั้น await output ดัง
ใน Listing 17-21 ซึ่งจะยังไม่คอมไพล์
extern crate trpl; // required for mdbook test
fn main() {
trpl::block_on(async {
let values = [1, 2, 3, 4, 5, 6, 7, 8, 9, 10];
let iter = values.iter().map(|n| n * 2);
let mut stream = trpl::stream_from_iter(iter);
while let Some(value) = stream.next().await {
println!("The value was: {value}");
}
});
}เราเริ่มด้วย array ของตัวเลข ซึ่งเราแปลงเป็น iterator แล้วเรียก
map บนเพื่อ double ค่าทั้งหมด จากนั้นเราแปลง iterator เป็น stream
โดยใช้ฟังก์ชัน trpl::stream_from_iter ถัดไป เรา loop ผ่าน item
ใน stream เมื่อพวกมันมาถึงด้วย loop while let
โชคไม่ดี เมื่อเราพยายามรันโค้ด มันไม่คอมไพล์แต่แทนรายงานว่าไม่มี
เมธอด next ใช้ได้:
error[E0599]: no method named `next` found for struct `tokio_stream::iter::Iter` in the current scope
--> src/main.rs:10:40
|
10 | while let Some(value) = stream.next().await {
| ^^^^
|
= help: items from traits can only be used if the trait is in scope
help: the following traits which provide `next` are implemented but not in scope; perhaps you want to import one of them
|
1 + use crate::trpl::StreamExt;
|
1 + use futures_util::stream::stream::StreamExt;
|
1 + use std::iter::Iterator;
|
1 + use std::str::pattern::Searcher;
|
help: there is a method `try_next` with a similar name
|
10 | while let Some(value) = stream.try_next().await {
| ~~~~~~~~
ดังที่ output นี้อธิบาย เหตุผลสำหรับ error compiler คือเราต้องการ
trait ที่ถูกต้องใน scope เพื่อใช้เมธอด next ได้ จากการพูดของเรา
จนถึงตอนนี้ คุณอาจคาดหวังตามเหตุผลว่า trait นั้นเป็น Stream แต่
มันจริง ๆ คือ StreamExt ย่อสำหรับ extension Ext เป็น pattern
ทั่วไปใน community Rust สำหรับขยาย trait หนึ่งด้วยอีก trait
trait Stream นิยาม interface ระดับต่ำที่รวม trait Iterator และ
Future อย่างมีประสิทธิภาพ StreamExt ให้ชุด API ระดับสูงกว่าด้าน
บน Stream รวมเมธอด next รวมถึงเมธอด utility อื่นคล้ายกับที่
trait Iterator ให้ Stream และ StreamExt ยังไม่เป็นส่วนของ
standard library ของ Rust แต่ ecosystem crate ส่วนใหญ่ใช้นิยาม
คล้ายกัน
การแก้ error compiler คือเพิ่ม statement use สำหรับ
trpl::StreamExt ดังใน Listing 17-22
extern crate trpl; // required for mdbook test
use trpl::StreamExt;
fn main() {
trpl::block_on(async {
let values = [1, 2, 3, 4, 5, 6, 7, 8, 9, 10];
// --snip--
let iter = values.iter().map(|n| n * 2);
let mut stream = trpl::stream_from_iter(iter);
while let Some(value) = stream.next().await {
println!("The value was: {value}");
}
});
}ด้วยชิ้นส่วนเหล่านั้นทั้งหมดใส่รวมกัน โค้ดนี้ทำงานในแบบที่เรา
ต้องการ! ที่มากกว่านี้ ตอนนี้เรามี StreamExt ใน scope เราใช้
เมธอด utility ทั้งหมดของมัน เพียงเหมือนกับ iterator
Trait ที่เกี่ยวกับ async
ดู Trait สำหรับ Async ใกล้ขึ้น
ตลอดบท เราใช้ trait Future, Stream และ StreamExt ในวิธีต่าง ๆ
จนถึงตอนนี้ อย่างไรก็ตาม เราหลีกเลี่ยงการเข้าไกลเกินไปในรายละเอียด
ว่าพวกมันทำงานยังไงหรือพวกมันเข้ากันยังไง ซึ่งโอเคส่วนใหญ่ของเวลา
สำหรับงาน Rust ประจำวันของคุณ บางครั้ง อย่างไรก็ตาม คุณจะพบ
สถานการณ์ที่คุณต้องเข้าใจรายละเอียดของ trait เหล่านี้มากกว่า รวมถึง
type Pin และ trait Unpin ในส่วนนี้ เราจะขุดเข้าไปเพียงพอที่จะ
ช่วยใน scenario เหล่านั้น ยังเก็บการดำดิ่งลึก จริง ๆ ไว้สำหรับ
documentation อื่น
Trait Future
มาเริ่มโดยดู trait Future ทำงานยังไงใกล้ขึ้น นี่คือวิธีที่ Rust
นิยามมัน:
#![allow(unused)]
fn main() {
use std::pin::Pin;
use std::task::{Context, Poll};
pub trait Future {
type Output;
fn poll(self: Pin<&mut Self>, cx: &mut Context<'_>) -> Poll<Self::Output>;
}
}นิยาม trait นั้นรวม type ใหม่และ syntax บางอย่างที่เรายังไม่เห็น ก่อน ดังนั้นมาเดินผ่านนิยามทีละชิ้น
ก่อนอื่น associated type Output ของ Future บอกว่า future
resolve เป็นอะไร นี่เปรียบเทียบกับ associated type Item สำหรับ
trait Iterator ที่สอง Future มีเมธอด poll ซึ่งรับ reference
พิเศษ Pin สำหรับ parameter self ของมันและ mutable reference
ของ type Context และ return Poll<Self::Output> เราจะพูดเพิ่ม
เกี่ยวกับ Pin และ Context ในอีกครู่ ตอนนี้ มาโฟกัสที่สิ่งที่
เมธอด return — type Poll:
#![allow(unused)]
fn main() {
pub enum Poll<T> {
Ready(T),
Pending,
}
}type Poll นี้คล้ายกับ Option มันมีหนึ่ง variant ที่มีค่า
Ready(T) และอันหนึ่งที่ไม่มี Pending Poll หมายความค่อนข้าง
ต่างจาก Option อย่างไรก็ตาม! variant Pending ระบุว่า future
ยังมีงานที่จะทำ ดังนั้น caller จะต้องตรวจสอบอีกครั้งภายหลัง variant
Ready ระบุว่า Future เสร็จงานของมันแล้วและค่า T ใช้ได้
สังเกต — หายากที่จะต้องเรียก
pollโดยตรง แต่ถ้าคุณต้อง เก็บในใจ ว่ากับ future ส่วนใหญ่ caller ไม่ควรเรียกpollอีกหลัง future ได้ returnReadyfuture หลายตัวจะ panic ถ้าถูก poll อีกหลัง กลายเป็น ready future ที่ปลอดภัยที่จะ poll อีกจะพูดเช่นนั้น ชัดเจนใน documentation ของพวกมัน นี่คล้ายกับวิธีที่Iterator::nextทำตัว
เมื่อคุณเห็นโค้ดที่ใช้ await Rust คอมไพล์มันใต้ฝ่ามือเป็นโค้ดที่
เรียก poll ถ้าคุณมองกลับที่ Listing 17-4 ที่เรา print title หน้า
สำหรับ URL เดียวเมื่อมัน resolve Rust คอมไพล์มันเป็นอะไรประเภท
(แม้ไม่แน่นอน) แบบนี้:
match page_title(url).poll() {
Ready(page_title) => match page_title {
Some(title) => println!("The title for {url} was {title}"),
None => println!("{url} had no title"),
}
Pending => {
// But what goes here?
}
}เราควรทำอะไรเมื่อ future ยัง Pending? เราต้องการวิธีบางอย่างที่
จะลองอีก และอีก และอีก จนกว่า future สุดท้ายพร้อม อีกแง่หนึ่ง เรา
ต้องการ loop:
let mut page_title_fut = page_title(url);
loop {
match page_title_fut.poll() {
Ready(value) => match page_title {
Some(title) => println!("The title for {url} was {title}"),
None => println!("{url} had no title"),
}
Pending => {
// continue
}
}
}ถ้า Rust คอมไพล์มันเป็นโค้ดนั้นแน่นอน อย่างไรก็ตาม ทุก await จะ
เป็น blocking — แน่นอนตรงข้ามกับสิ่งที่เรากำลังไป! แทน Rust รับ
ประกันว่า loop ส่งการควบคุมไปยังอะไรที่ pause งานบน future นี้เพื่อ
ทำงานบน future อื่นแล้วตรวจสอบอันนี้อีกภายหลังได้ ดังที่เราเห็น
สิ่งนั้นคือ async runtime และงานการ scheduling และการประสานนี้คือ
หนึ่งในงานหลักของมัน
ในส่วน
“ส่งข้อมูลระหว่างสอง Task โดยใช้ Message Passing”
เราอธิบายการรอบน rx.recv การเรียก recv return future และการ
await future poll มัน เราระบุว่า runtime จะ pause future จนกว่ามัน
พร้อมด้วย Some(message) หรือ None เมื่อ channel ปิด ด้วยความ
เข้าใจลึกขึ้นของเราเกี่ยวกับ trait Future และเจาะจง
Future::poll เราเห็นว่ามันทำงานยังไง runtime รู้ว่า future ไม่
พร้อมเมื่อมัน return Poll::Pending ในทางกลับกัน runtime รู้ว่า
future พร้อม และก้าวหน้ามันเมื่อ poll return
Poll::Ready(Some(message)) หรือ Poll::Ready(None)
รายละเอียดแน่นอนของวิธีที่ runtime ทำสิ่งนั้นอยู่นอก scope ของ หนังสือเล่มนี้ แต่กุญแจคือเห็นกลไกพื้นฐานของ future — runtime poll แต่ละ future ที่มันรับผิดชอบ ใส่ future กลับ sleep เมื่อมันยังไม่ พร้อม
Type Pin และ Trait Unpin
กลับใน Listing 17-13 เราใช้มาโคร trpl::join! เพื่อ await สาม
future อย่างไรก็ตาม ทั่วไปที่จะมี collection เช่น vector ที่บรรจุ
จำนวน future ที่จะไม่รู้จนถึง runtime มาเปลี่ยน Listing 17-13 เป็น
โค้ดใน Listing 17-23 ที่ใส่สาม future เข้า vector และเรียกฟังก์ชัน
trpl::join_all แทน ซึ่งจะยังไม่คอมไพล์
extern crate trpl; // required for mdbook test
use std::time::Duration;
fn main() {
trpl::block_on(async {
let (tx, mut rx) = trpl::channel();
let tx1 = tx.clone();
let tx1_fut = async move {
let vals = vec![
String::from("hi"),
String::from("from"),
String::from("the"),
String::from("future"),
];
for val in vals {
tx1.send(val).unwrap();
trpl::sleep(Duration::from_secs(1)).await;
}
};
let rx_fut = async {
while let Some(value) = rx.recv().await {
println!("received '{value}'");
}
};
let tx_fut = async move {
// --snip--
let vals = vec![
String::from("more"),
String::from("messages"),
String::from("for"),
String::from("you"),
];
for val in vals {
tx.send(val).unwrap();
trpl::sleep(Duration::from_secs(1)).await;
}
};
let futures: Vec<Box<dyn Future<Output = ()>>> =
vec![Box::new(tx1_fut), Box::new(rx_fut), Box::new(tx_fut)];
trpl::join_all(futures).await;
});
}เราใส่แต่ละ future ภายใน Box เพื่อทำให้พวกมันเป็น trait object
เพียงเหมือนที่เราทำในส่วน “Return Error จาก run” ในบทที่ 12 (เรา
จะครอบคลุม trait object ในรายละเอียดในบทที่ 18) การใช้ trait
object ให้เราปฏิบัติกับแต่ละ future anonymous ที่ผลิตโดย type
เหล่านี้เป็น type เดียวกัน เพราะพวกมันทั้งหมด implement trait Future
นี่อาจน่าประหลาดใจ ในที่สุด ไม่มี block async ใด return อะไร ดังนั้น
แต่ละอันผลิต Future<Output = ()> จำได้ว่า Future เป็น trait
อย่างไรก็ตาม และ compiler สร้าง enum unique สำหรับแต่ละ block async
แม้เมื่อพวกมันมี output type เหมือนกัน เพียงเหมือนคุณใส่ struct ที่
เขียนด้วยมือต่างกันสองตัวใน Vec ไม่ได้ คุณผสม enum ที่ compiler
สร้างไม่ได้
จากนั้นเราส่ง collection ของ future ให้ฟังก์ชัน trpl::join_all และ
await ผล อย่างไรก็ตาม นี่ไม่คอมไพล์ นี่คือส่วนที่เกี่ยวข้องของ
ข้อความ error
error[E0277]: `dyn Future<Output = ()>` cannot be unpinned
--> src/main.rs:48:33
|
48 | trpl::join_all(futures).await;
| ^^^^^ the trait `Unpin` is not implemented for `dyn Future<Output = ()>`
|
= note: consider using the `pin!` macro
consider using `Box::pin` if you need to access the pinned value outside of the current scope
= note: required for `Box<dyn Future<Output = ()>>` to implement `Future`
note: required by a bound in `futures_util::future::join_all::JoinAll`
--> file:///home/.cargo/registry/src/index.crates.io-1949cf8c6b5b557f/futures-util-0.3.30/src/future/join_all.rs:29:8
|
27 | pub struct JoinAll<F>
| ------- required by a bound in this struct
28 | where
29 | F: Future,
| ^^^^^^ required by this bound in `JoinAll`
note ในข้อความ error นี้บอกเราว่าเราควรใช้มาโคร pin! เพื่อ pin
ค่า ซึ่งหมายความว่าใส่พวกมันภายใน type Pin ที่รับประกันว่าค่าจะ
ไม่ถูกย้ายใน memory ข้อความ error บอกว่า pinning ต้องการเพราะ
dyn Future<Output = ()> ต้อง implement trait Unpin และมัน
ปัจจุบันไม่
ฟังก์ชัน trpl::join_all return struct ที่เรียก JoinAll struct
นั้นเป็น generic เหนือ type F ซึ่งถูกจำกัดที่จะ implement trait
Future การ await future โดยตรงด้วย await pin future โดยปริยาย
นั่นคือเหตุผลที่เราไม่ต้องใช้ pin! ทุกที่ที่เราต้องการ await
future
อย่างไรก็ตาม เราไม่ได้ await future โดยตรงที่นี่ แทน เราสร้าง future
ใหม่ JoinAll โดยส่ง collection ของ future ให้ฟังก์ชัน join_all
signature สำหรับ join_all ต้องการให้ type ของ item ใน collection
ทั้งหมด implement trait Future และ Box<T> implement Future
เฉพาะถ้า T ที่มัน wrap คือ future ที่ implement trait Unpin
นั่นมาก! เพื่อเข้าใจจริง ๆ มาดำดิ่งเพิ่มเข้าไปในวิธีที่ trait
Future ทำงานจริง ๆ โดยเฉพาะรอบ pinning ดูนิยามของ trait Future
อีก:
#![allow(unused)]
fn main() {
use std::pin::Pin;
use std::task::{Context, Poll};
pub trait Future {
type Output;
// Required method
fn poll(self: Pin<&mut Self>, cx: &mut Context<'_>) -> Poll<Self::Output>;
}
}parameter cx และ type Context ของมันเป็นกุญแจที่ runtime รู้
จริง ๆ เมื่อจะตรวจสอบ future ใดในขณะที่ยังเป็น lazy อีกครั้ง
รายละเอียดของวิธีที่ทำงานอยู่นอก scope ของบทนี้ และคุณโดยทั่วไป
เพียงต้องคิดเกี่ยวกับนี้เมื่อเขียน implementation Future กำหนด
เอง เราจะโฟกัสแทนที่ type สำหรับ self เพราะนี่เป็นครั้งแรกที่เรา
เห็นเมธอดที่ self มี type annotation type annotation สำหรับ
self ทำงานเหมือน type annotation สำหรับ parameter ฟังก์ชันอื่น
แต่ด้วยสองความแตกต่างหลัก:
- มันบอก Rust ว่า type
selfต้องเป็นอะไรเพื่อให้เมธอดถูกเรียกได้ - มันเป็นเพียง type ใดไม่ได้ มันถูกจำกัดที่ type ที่เมธอดถูก
implement, reference หรือ smart pointer ของ type นั้น หรือ
Pinที่ wrap reference ของ type นั้น
เราจะเห็นเพิ่มเกี่ยวกับ syntax นี้ใน บทที่ 18
ตอนนี้ เพียงพอที่จะรู้ว่าถ้าเราต้องการ poll future เพื่อตรวจสอบว่า
มัน Pending หรือ Ready(Output) เราต้องการ mutable reference
ที่ wrap ด้วย Pin ของ type
Pin คือ wrapper สำหรับ type คล้าย pointer เช่น &, &mut, Box
และ Rc (เชิงเทคนิค Pin ทำงานกับ type ที่ implement trait
Deref หรือ DerefMut แต่นี่เทียบเท่าจริงกับการทำงานเพียงกับ
reference และ smart pointer) Pin ไม่ใช่ pointer เองและไม่มี
พฤติกรรมของตัวเองเหมือน Rc และ Arc ทำกับ reference counting —
มันเป็นเพียงเครื่องมือที่ compiler ใช้เพื่อบังคับข้อจำกัดบนการใช้
pointer
จำได้ว่า await ถูก implement ในแง่ของการเรียก poll เริ่มอธิบาย
ข้อความ error ที่เราเห็นก่อนหน้า แต่นั่นอยู่ในแง่ของ Unpin ไม่ใช่
Pin แล้ว Pin เกี่ยวกับ Unpin ยังไง และทำไม Future ต้องการ
self ที่จะอยู่ใน type Pin เพื่อเรียก poll?
จำได้จากต้นบทว่าชุด await point ใน future ถูกคอมไพล์เป็น state machine และ compiler ทำให้แน่ใจว่า state machine นั้นตามกฎปกติของ Rust ทั้งหมดรอบความปลอดภัย รวมถึง borrowing และ ownership เพื่อทำ สิ่งนั้นทำงาน Rust ดูว่าข้อมูลใดต้องการระหว่าง await point หนึ่ง และ await point ถัดไปหรือสิ้นสุดของ block async มันจากนั้นสร้าง variant ที่ตรงกันใน state machine ที่คอมไพล์ แต่ละ variant ได้ สิทธิ์เข้าถึงที่มันต้องการของข้อมูลที่จะถูกใช้ในส่วนนั้นของ source code ไม่ว่าโดยรับ ownership ของข้อมูลนั้นหรือรับ mutable หรือ immutable reference ของมัน
จนถึงตอนนี้ ดี — ถ้าเราได้ผิดอะไรเกี่ยวกับ ownership หรือ reference
ใน block async ที่ให้ borrow checker จะบอกเรา เมื่อเราต้องการย้าย
future ที่ตรงกับ block นั้น — เช่นย้ายมันเข้า Vec เพื่อส่งให้
join_all — สิ่งต่าง ๆ ยุ่งยากขึ้น
เมื่อเราย้าย future — ไม่ว่าโดย push มันเข้าโครงสร้างข้อมูลเพื่อใช้
เป็น iterator กับ join_all หรือโดย return มันจากฟังก์ชัน — นั่น
หมายความจริง ๆ ว่าย้าย state machine ที่ Rust สร้างให้เรา และ
ต่างจาก type อื่นส่วนใหญ่ใน Rust future ที่ Rust สร้างสำหรับ block
async ลงเอยด้วย reference ของตัวมันเองใน field ของ variant ใดที่
ให้ ดังที่แสดงในภาพประกอบที่ง่ายใน Figure 17-4

ตามค่าเริ่มต้น อย่างไรก็ตาม object ใดที่มี reference ของตัวเองไม่ ปลอดภัยที่จะย้าย เพราะ reference ชี้ไปยัง address memory จริงของอะไร ก็ตามที่พวกมันอ้างถึงเสมอ (ดู Figure 17-5) ถ้าคุณย้ายโครงสร้างข้อมูล เอง reference ภายในเหล่านั้นจะเหลือชี้ไปยังที่เก่า อย่างไรก็ตาม ที่ memory นั้นตอนนี้ไม่ valid สำหรับสิ่งหนึ่ง ค่าของมันจะไม่ถูกอัพเดท เมื่อคุณทำการเปลี่ยนแปลงให้โครงสร้างข้อมูล สำหรับสิ่งอื่น — สำคัญ มากกว่า — คอมพิวเตอร์ตอนนี้ฟรีที่จะใช้ memory นั้นใหม่สำหรับ จุดประสงค์อื่น! คุณลงเอยอ่านข้อมูลไม่เกี่ยวข้องสมบูรณ์ภายหลังได้

ในทางทฤษฎี Rust compiler ลองอัพเดททุก reference ของ object เมื่อใด ก็ตามที่มันถูกย้ายได้ แต่นั่นเพิ่ม overhead performance มากได้ โดย เฉพาะถ้า web ของ reference ทั้งหมดต้องการการอัพเดท ถ้าเราทำให้ แน่ใจได้แทนว่าโครงสร้างข้อมูลในคำถาม_ไม่ย้ายใน memory_ เราจะไม่ต้อง อัพเดท reference ใด นี่คือแน่นอนสิ่งที่ borrow checker ของ Rust มีไว้สำหรับ — ในโค้ดปลอดภัย มันป้องกันคุณจากการย้าย item ใดที่มี active reference ของมัน
Pin build บนนั้นเพื่อให้เราการรับประกันแน่นอนที่เราต้องการ เมื่อ
เรา pin ค่าโดย wrap pointer ของค่านั้นใน Pin มันย้ายไม่ได้อีก
ดังนั้น ถ้าคุณมี Pin<Box<SomeType>> คุณจริง ๆ pin ค่า SomeType
ไม่ใช่ pointer Box Figure 17-6 แสดงกระบวนการนี้

จริง ๆ pointer Box ยังย้ายไปมาอย่างอิสระได้ จำได้ — เราสนใจที่
จะทำให้แน่ใจว่าข้อมูลที่ในที่สุดถูกอ้างถึงอยู่ที่ ถ้า pointer ย้าย
ไปมา แต่ข้อมูลที่มันชี้ อยู่ที่เดียวกัน ดังใน Figure 17-7 ไม่มี
ปัญหาที่เป็นไปได้ (เป็นการฝึกอิสระ ดู docs สำหรับ type รวมถึงโมดูล
std::pin และลองหาว่าคุณทำสิ่งนี้กับ Pin ที่ wrap Box ยังไง)
กุญแจคือ type self-referential เองย้ายไม่ได้ เพราะมันยังถูก pin

อย่างไรก็ตาม type ส่วนใหญ่ปลอดภัยสมบูรณ์ที่จะย้ายไปมา แม้พวกมัน
บังเอิญจะอยู่หลัง pointer Pin เราต้องคิดเกี่ยวกับ pinning เพียง
เมื่อ item มี reference ภายใน ค่า primitive เช่นตัวเลขและ Boolean
ปลอดภัยเพราะพวกมันชัดเจนไม่มี reference ภายใน type ส่วนใหญ่ที่คุณ
ทำงานปกติใน Rust ก็ไม่ คุณย้าย Vec ไปมาได้ ตัวอย่างเช่น โดยไม่
กังวล จากสิ่งที่เราเห็นจนถึงตอนนี้ ถ้าคุณมี Pin<Vec<String>>
คุณจะต้องทำทุกอย่างผ่าน API ปลอดภัยแต่จำกัดที่ Pin ให้ แม้
Vec<String> ปลอดภัยที่จะย้ายเสมอถ้าไม่มี reference อื่นของมัน
เราต้องการวิธีในการบอก compiler ว่ามันโอเคที่จะย้าย item ไปมาใน
กรณีเช่นนี้ — และนั่นคือที่ที่ Unpin เข้ามาเล่น
Unpin คือ marker trait คล้ายกับ trait Send และ Sync ที่เรา
เห็นในบทที่ 16 และดังนั้นไม่มี functionality ของตัวเอง Marker
trait มีอยู่เพียงเพื่อบอก compiler ว่ามันปลอดภัยที่จะใช้ type ที่
implement trait ที่ให้ใน context เฉพาะ Unpin แจ้ง compiler ว่า
type ที่ให้ ไม่ ต้องรักษาการรับประกันใดเกี่ยวกับว่าค่าในคำถามถูก
ย้ายปลอดภัยได้
เพียงเหมือนกับ Send และ Sync compiler implement Unpin
อัตโนมัติสำหรับทุก type ที่มันพิสูจน์ได้ว่าปลอดภัย กรณีพิเศษ คล้าย
กับ Send และ Sync อีก คือที่ Unpin ไม่ ถูก implement
สำหรับ type notation สำหรับนี้คือ
impl !Unpin for SomeType ที่
SomeType คือชื่อของ type ที่ ต้อง รักษา
การรับประกันเหล่านั้นเพื่อปลอดภัยเมื่อใดก็ตามที่ pointer ของ type
นั้นถูกใช้ใน Pin
อีกแง่หนึ่ง มีสองสิ่งที่จะเก็บในใจเกี่ยวกับความสัมพันธ์ระหว่าง
Pin และ Unpin ก่อนอื่น Unpin คือกรณี “ปกติ” และ !Unpin คือ
กรณีพิเศษ ที่สอง ว่า type implement Unpin หรือ !Unpin เพียง
สำคัญเมื่อคุณกำลังใช้ pinned pointer ของ type นั้นเช่น
Pin<&mut SomeType>
เพื่อทำให้นั้นเป็นรูปธรรม คิดเกี่ยวกับ String — มันมีความยาวและ
character Unicode ที่ประกอบมัน เรา wrap String ใน Pin ได้ ดังที่
เห็นใน Figure 17-8 อย่างไรก็ตาม String implement Unpin
อัตโนมัติ เหมือนกับ type อื่นส่วนใหญ่ใน Rust

ผลคือ เราทำสิ่งที่จะผิดกฎหมายได้ถ้า String implement !Unpin
แทน เช่นแทนที่หนึ่ง string ด้วยอื่นที่ที่เดียวกันแน่นอนใน memory
ดังใน Figure 17-9 นี่ไม่ละเมิดสัญญา Pin เพราะ String ไม่มี
reference ภายในที่ทำให้มันไม่ปลอดภัยที่จะย้ายไปมา นั่นคือแน่นอน
ทำไมมัน implement Unpin ไม่ใช่ !Unpin

ตอนนี้เรารู้พอที่จะเข้าใจ error ที่รายงานสำหรับการเรียก join_all
นั้นกลับใน Listing 17-23 เราดั้งเดิมพยายามย้าย future ที่ผลิตโดย
block async เข้า Vec<Box<dyn Future<Output = ()>>> แต่ดังที่เรา
เห็น future เหล่านั้นอาจมี reference ภายใน ดังนั้นพวกมันไม่
implement Unpin อัตโนมัติ เมื่อเรา pin พวกมัน เราส่ง type Pin
ที่ได้เข้า Vec ได้ มั่นใจว่าข้อมูล underlying ใน future จะ ไม่
ถูกย้าย Listing 17-24 แสดงวิธีแก้โค้ดโดยเรียกมาโคร pin! ที่แต่
ละสาม future ถูกนิยามและปรับ type trait object
extern crate trpl; // required for mdbook test
use std::pin::{Pin, pin};
// --snip--
use std::time::Duration;
fn main() {
trpl::block_on(async {
let (tx, mut rx) = trpl::channel();
let tx1 = tx.clone();
let tx1_fut = pin!(async move {
// --snip--
let vals = vec![
String::from("hi"),
String::from("from"),
String::from("the"),
String::from("future"),
];
for val in vals {
tx1.send(val).unwrap();
trpl::sleep(Duration::from_secs(1)).await;
}
});
let rx_fut = pin!(async {
// --snip--
while let Some(value) = rx.recv().await {
println!("received '{value}'");
}
});
let tx_fut = pin!(async move {
// --snip--
let vals = vec![
String::from("more"),
String::from("messages"),
String::from("for"),
String::from("you"),
];
for val in vals {
tx.send(val).unwrap();
trpl::sleep(Duration::from_secs(1)).await;
}
});
let futures: Vec<Pin<&mut dyn Future<Output = ()>>> =
vec![tx1_fut, rx_fut, tx_fut];
trpl::join_all(futures).await;
});
}ตัวอย่างนี้ตอนนี้คอมไพล์และรัน และเราเพิ่มหรือลบ future จาก vector ที่ runtime และ join พวกมันทั้งหมดได้
Pin และ Unpin สำคัญส่วนใหญ่สำหรับการ build library ระดับต่ำ
หรือเมื่อคุณกำลัง build runtime เอง ไม่ใช่สำหรับโค้ด Rust ประจำวัน
เมื่อคุณเห็น trait เหล่านี้ในข้อความ error อย่างไรก็ตาม ตอนนี้คุณ
จะมีไอเดียดีขึ้นในการแก้โค้ดของคุณ!
สังเกต — การรวมของ
PinและUnpinนี้ทำให้เป็นไปได้ที่จะ implement ทั้ง class ของ type ซับซ้อนใน Rust ปลอดภัยที่มิฉะนั้น จะพิสูจน์ท้าทายเพราะพวกมันเป็น self-referential type ที่ต้องการPinปรากฏที่ทั่วไปที่สุดใน async Rust วันนี้ แต่เป็นบางครั้ง คุณอาจเห็นพวกมันใน context อื่นด้วยเจาะจงว่า
PinและUnpinทำงานยังไง และกฎที่พวกมันต้องรักษา ถูกครอบคลุมอย่างกว้างขวางใน API documentation สำหรับstd::pinดังนั้นถ้าคุณสนใจในการเรียนเพิ่ม นั่นเป็นที่ดีที่จะเริ่มถ้าคุณต้องการเข้าใจว่าสิ่งต่าง ๆ ทำงานยังไงใต้ฝ่ามือในรายละเอียด มากกว่า ดูบท 2 และ 4 ของ Asynchronous Programming in Rust
Trait Stream
ตอนนี้คุณมีความเข้าใจลึกขึ้นบน trait Future, Pin และ Unpin
เราหันความสนใจของเราไปยัง trait Stream ได้ ดังที่คุณเรียนก่อน
หน้านี้ในบท stream คล้ายกับ asynchronous iterator ต่างจาก Iterator
และ Future อย่างไรก็ตาม Stream ไม่มีนิยามใน standard library
ณ เวลาที่เขียนนี้ แต่ มี นิยามทั่วไปมากจาก crate futures ที่ใช้
ตลอด ecosystem
มาทบทวนนิยามของ trait Iterator และ Future ก่อนดูว่า trait
Stream อาจรวมพวกมันด้วยกันยังไง จาก Iterator เรามีไอเดียของ
ลำดับ — เมธอด next ของมันให้ Option<Self::Item> จาก Future
เรามีไอเดียของความพร้อมเหนือเวลา — เมธอด poll ของมันให้
Poll<Self::Output> เพื่อแทนลำดับของ item ที่กลายเป็นพร้อมเหนือ
เวลา เรานิยาม trait Stream ที่ใส่ฟีเจอร์เหล่านั้นด้วยกัน:
#![allow(unused)]
fn main() {
use std::pin::Pin;
use std::task::{Context, Poll};
trait Stream {
type Item;
fn poll_next(
self: Pin<&mut Self>,
cx: &mut Context<'_>
) -> Poll<Option<Self::Item>>;
}
}trait Stream นิยาม associated type ที่เรียก Item สำหรับ type
ของ item ที่ผลิตโดย stream นี่คล้ายกับ Iterator ที่อาจมี item
ศูนย์ถึงหลาย และต่างจาก Future ที่มี Output เดียวเสมอ แม้มัน
เป็น unit type ()
Stream ยังนิยามเมธอดเพื่อรับ item เหล่านั้น เราเรียกมัน poll_next
เพื่อทำให้ชัดเจนว่ามัน poll ในแบบเดียวกับที่ Future::poll ทำและ
ผลิตลำดับของ item ในแบบเดียวกับที่ Iterator::next ทำ return type
ของมันรวม Poll กับ Option type ภายนอกคือ Poll เพราะมันต้อง
ถูกตรวจสอบความพร้อม เพียงเหมือน future ทำ type ภายในคือ Option
เพราะมันต้องส่งสัญญาณว่ามีข้อความเพิ่มไหม เพียงเหมือน iterator ทำ
อะไรคล้ายมากกับนิยามนี้น่าจะลงเอยเป็นส่วนของ standard library ของ Rust ในระหว่างนี้ มันเป็นส่วนของชุดเครื่องมือของ runtime ส่วนใหญ่ ดังนั้นคุณพึ่งมันได้ และทุกอย่างที่เราครอบคลุมต่อไปควรใช้โดยทั่วไป!
ในตัวอย่างที่เราเห็นในส่วน
“Stream — Future ในลำดับ” อย่างไรก็ตาม
เราไม่ใช้ poll_next หรือ Stream แต่แทนใช้ next และ
StreamExt เรา ทำงานโดยตรง ในแง่ของ API poll_next โดยเขียน
state machine Stream ของเราเองด้วยมือได้ แน่นอน เพียงเหมือนที่เรา
ทำงานกับ future โดยตรง ผ่านเมธอด poll ของพวกมันได้ การใช้
await ดีกว่ามาก อย่างไรก็ตาม และ trait StreamExt ให้เมธอด
next เพื่อเราทำสิ่งนั้นได้:
#![allow(unused)]
fn main() {
use std::pin::Pin;
use std::task::{Context, Poll};
trait Stream {
type Item;
fn poll_next(
self: Pin<&mut Self>,
cx: &mut Context<'_>,
) -> Poll<Option<Self::Item>>;
}
trait StreamExt: Stream {
async fn next(&mut self) -> Option<Self::Item>
where
Self: Unpin;
// other methods...
}
}สังเกต — นิยามจริงที่เราใช้ก่อนหน้านี้ในบทดูต่างเล็กน้อยจากนี้ เพราะมันสนับสนุน version ของ Rust ที่ยังไม่สนับสนุนการใช้ฟังก์ชัน async ใน trait ผลคือ มันดูแบบนี้:
fn next(&mut self) -> Next<'_, Self> where Self: Unpin;type
Nextนั้นคือstructที่ implementFutureและอนุญาตให้ เราตั้งชื่อ lifetime ของ reference ของselfด้วยNext<'_, Self>เพื่อให้awaitทำงานกับเมธอดนี้ได้
trait StreamExt ยังเป็นบ้านของเมธอดที่น่าสนใจทั้งหมดที่ใช้กับ
stream ได้ StreamExt ถูก implement อัตโนมัติสำหรับทุก type ที่
implement Stream แต่ trait เหล่านี้ถูกนิยามแยกเพื่อเปิดใช้
community ในการ iterate บน API ความสะดวกโดยไม่กระทบ trait พื้นฐาน
ใน version ของ StreamExt ที่ใช้ใน crate trpl trait ไม่เพียง
นิยามเมธอด next แต่ยังให้ implementation เริ่มต้นของ next ที่
จัดการรายละเอียดของการเรียก Stream::poll_next ถูกต้อง นี่หมายความ
ว่าแม้เมื่อคุณต้องเขียนประเภทข้อมูล streaming ของตัวเอง คุณ
เพียง ต้อง implement Stream และจากนั้นใครก็ตามที่ใช้ประเภท
ข้อมูลของคุณใช้ StreamExt และเมธอดของมันกับมันได้อัตโนมัติ
นั่นคือทั้งหมดที่เราจะครอบคลุมสำหรับรายละเอียดระดับต่ำบน trait เหล่า นี้ เพื่อปิด มาพิจารณาว่า future (รวม stream), task และเธรดทั้งหมด เข้ากันยังไง!
Future, Task และ Thread
ใส่ทั้งหมดด้วยกัน — Future, Task และ Thread
ดังที่เราเห็นใน บทที่ 16 เธรดให้แนวทางหนึ่ง ต่อ concurrency เราเห็นอีกแนวทางในบทนี้ — ใช้ async กับ future และ stream ถ้าคุณสงสัยว่าเมื่อจะเลือกหนึ่งวิธีเหนืออื่น คำตอบคือ — ขึ้นกับ! และในหลายกรณี ทางเลือกไม่ใช่เธรด หรือ async แต่เธรด และ async
OS หลายตัวให้ model concurrency ที่ใช้เธรดมาทศวรรษแล้ว และภาษา โปรแกรมหลายภาษาสนับสนุนพวกมัน ผลคือ อย่างไรก็ตาม model เหล่านี้ไม่ ไร้ tradeoff ของพวกมัน บน OS หลายตัว พวกมันใช้ memory พอควรสำหรับ แต่ละเธรด เธรดยังเป็นตัวเลือกเพียงเมื่อ OS และ hardware ของคุณ สนับสนุนพวกมัน ต่างจากคอมพิวเตอร์ desktop และ mobile mainstream บางระบบ embedded ไม่มี OS เลย ดังนั้นพวกมันก็ไม่มีเธรดด้วย
model async ให้ชุด tradeoff ที่ต่างและในที่สุดเสริมกัน ใน model
async operation concurrent ไม่ต้องการเธรดของตัวเอง แทน พวกมันรันบน
task ได้ เช่นเมื่อเราใช้ trpl::spawn_task เพื่อเริ่มงานจากฟังก์ชัน
synchronous ในส่วน stream task คล้ายกับเธรด แต่แทนที่จะถูกจัดการ
โดย OS มันถูกจัดการโดยโค้ดระดับ library — runtime
มีเหตุผลที่ API สำหรับ spawn เธรดและ spawn task คล้ายมาก เธรดทำตัว เป็น boundary สำหรับชุดของ operation synchronous — concurrency เป็น ไปได้ ระหว่าง เธรด Task ทำตัวเป็น boundary สำหรับชุดของ operation asynchronous — concurrency เป็นไปได้ทั้ง ระหว่าง และ ภายใน task เพราะ task สลับระหว่าง future ใน body ของมันได้ สุดท้าย future คือหน่วย concurrency ที่ละเอียดที่สุดของ Rust และ แต่ละ future อาจแทนต้นไม้ของ future อื่น runtime — เจาะจง executor ของมัน — จัดการ task และ task จัดการ future ในแง่นั้น task คล้าย กับเธรดที่เบาที่จัดการโดย runtime พร้อมความสามารถเพิ่มที่มาจากการ ถูกจัดการโดย runtime แทน OS
นี่ไม่ได้แปลว่า async task ดีกว่าเธรดเสมอ (หรือในทางกลับกัน)
concurrency ด้วยเธรดในบางแง่เป็น model programming ง่ายกว่า
concurrency ด้วย async นั่นเป็นจุดแข็งหรือจุดอ่อนได้ เธรดเป็น
“fire and forget” หน่อย — พวกมันไม่มีเทียบเท่า native ของ future
ดังนั้นพวกมันเพียงรันจนเสร็จโดยไม่ถูก interrupt ยกเว้นโดย OS เอง
และมันกลายเป็นว่าเธรดและ task มักทำงานด้วยกันได้ดีมาก เพราะ task
(อย่างน้อยใน runtime บางตัว) ถูกย้ายไปมาระหว่างเธรดได้ จริง ๆ ใต้
ฝ่ามือ runtime ที่เราใช้ — รวมฟังก์ชัน spawn_blocking และ
spawn_task — เป็น multithreaded เป็นค่าเริ่มต้น! runtime หลายตัว
ใช้แนวทางที่เรียก work stealing เพื่อย้าย task ไปมาระหว่างเธรด
อย่างโปร่งใส ตามวิธีที่เธรดถูกใช้ปัจจุบัน เพื่อปรับปรุง performance
ของระบบโดยรวม แนวทางนั้นจริง ๆ ต้องการเธรด และ task และดังนั้น
future
เมื่อคิดเกี่ยวกับวิธีใดจะใช้เมื่อไร พิจารณากฎ thumb เหล่านี้:
- ถ้างานเป็น ขนานได้มาก (นั่นคือ CPU-bound) เช่นประมวลผลข้อมูล เยอะที่แต่ละส่วนถูกประมวลผลแยกได้ เธรดเป็นทางเลือกดีกว่า
- ถ้างานเป็น concurrent มาก (นั่นคือ I/O-bound) เช่นจัดการข้อความ จากแหล่งต่างกันเยอะที่อาจมาในช่วงต่างกันหรืออัตราต่างกัน async เป็นทางเลือกดีกว่า
และถ้าคุณต้องการทั้ง parallelism และ concurrency คุณไม่ต้องเลือก ระหว่างเธรดและ async คุณใช้พวกมันด้วยกันอย่างอิสระ ให้แต่ละเล่นส่วน ที่มันดีที่สุดได้ ตัวอย่างเช่น Listing 17-25 แสดงตัวอย่างค่อนข้าง ทั่วไปของการผสมประเภทนี้ในโค้ด Rust โลกจริง
extern crate trpl; // for mdbook test
use std::{thread, time::Duration};
fn main() {
let (tx, mut rx) = trpl::channel();
thread::spawn(move || {
for i in 1..11 {
tx.send(i).unwrap();
thread::sleep(Duration::from_secs(1));
}
});
trpl::block_on(async {
while let Some(message) = rx.recv().await {
println!("{message}");
}
});
}เราเริ่มโดยสร้าง channel async แล้ว spawn เธรดที่รับ ownership ของ
ฝั่ง sender ของ channel โดยใช้ keyword move ภายในเธรด เราส่ง
ตัวเลข 1 ถึง 10, sleep หนึ่งวินาทีระหว่างแต่ละตัว สุดท้าย เรารัน
future ที่สร้างกับ block async ที่ส่งให้ trpl::block_on เพียง
เหมือนที่เราทำตลอดบท ใน future นั้น เรา await ข้อความเหล่านั้น
เพียงเหมือนใน ตัวอย่าง message-passing อื่นที่เราเห็น
เพื่อกลับไปยัง scenario ที่เราเปิดบทด้วย จินตนาการการรันชุดของ task encoding video โดยใช้เธรดเฉพาะ (เพราะ encoding video เป็น compute-bound) แต่แจ้ง UI ว่า operation เหล่านั้นเสร็จด้วย channel async มีตัวอย่างนับไม่ถ้วนของการรวมประเภทเหล่านี้ใน use case โลก จริง
สรุป
นี่ไม่ใช่ครั้งสุดท้ายที่คุณจะเห็น concurrency ในหนังสือเล่มนี้ โปรเจกต์ใน บทที่ 21 จะใช้แนวคิดเหล่านี้ใน สถานการณ์ที่ realistic มากกว่าตัวอย่างที่ง่ายที่พูดที่นี่ และ เปรียบเทียบการแก้ปัญหากับ threading เทียบกับ task และ future โดยตรงกว่า
ไม่ว่าคุณเลือกแนวทางใดเหล่านี้ Rust ให้คุณเครื่องมือที่คุณต้องการ เพื่อเขียนโค้ด concurrent ปลอดภัยและเร็ว — ไม่ว่าสำหรับ web server high-throughput หรือ OS embedded
ถัดไป เราจะพูดถึงวิธี idiomatic ในการ model ปัญหาและจัดโครงสร้าง วิธีแก้เมื่อโปรแกรม Rust ของคุณใหญ่ขึ้น นอกจากนี้ เราจะพูดถึงว่า idiom ของ Rust เกี่ยวกับที่คุณอาจคุ้นเคยจาก object-oriented programming อย่างไร
ฟีเจอร์แบบ Object Oriented Programming
Object-oriented programming (OOP) คือวิธีในการ model โปรแกรม Object ในฐานะแนวคิดเชิงโปรแกรมถูกแนะนำในภาษาโปรแกรม Simula ในทศวรรษ 1960 Object เหล่านั้นมีอิทธิพลต่อ architecture programming ของ Alan Kay ที่ object ส่งข้อความกันและกัน เพื่ออธิบาย architecture นี้ เขา ประดิษฐ์คำว่า object-oriented programming ในปี 1967 นิยามที่ แข่งกันหลายตัวอธิบายว่า OOP คืออะไร และโดยบางนิยามเหล่านี้ Rust เป็น object oriented แต่โดยอื่นไม่ใช่ ในบทนี้ เราจะสำรวจลักษณะ บางอย่างที่พิจารณาทั่วไปว่าเป็น object oriented และวิธีที่ลักษณะ เหล่านั้นแปลเป็น Rust idiomatic เราจะแสดงวิธี implement object-oriented design pattern ใน Rust และพูดถึง trade-off ของการ ทำเช่นนั้นเทียบกับการ implement วิธีแก้โดยใช้บางจุดแข็งของ Rust แทน
คุณลักษณะของภาษา object-oriented
คุณลักษณะของภาษา Object-Oriented
ไม่มีฉันทามติใน community programming เกี่ยวกับว่าฟีเจอร์อะไรที่ ภาษาต้องมีเพื่อพิจารณาว่าเป็น object oriented Rust ได้รับอิทธิพล จาก paradigm programming หลายตัว รวม OOP — ตัวอย่างเช่น เราสำรวจ ฟีเจอร์ที่มาจาก functional programming ในบทที่ 13 อาจกล่าวได้ว่า ภาษา OOP แชร์ลักษณะทั่วไปบางอย่าง — กล่าวคือ object, encapsulation และ inheritance มาดูว่าแต่ละลักษณะเหล่านั้นหมายความอะไรและ Rust สนับสนุนมันไหม
Object บรรจุข้อมูลและพฤติกรรม
หนังสือ Design Patterns: Elements of Reusable Object-Oriented Software โดย Erich Gamma, Richard Helm, Ralph Johnson และ John Vlissides (Addison-Wesley, 1994) อ้างถึงในภาษาพูดว่า The Gang of Four คือ catalog ของ object-oriented design pattern มันนิยาม OOP ในวิธีนี้:
โปรแกรม object-oriented ประกอบด้วย object Object บรรจุทั้ง ข้อมูลและ procedure ที่ operate บนข้อมูลนั้น procedure ถูกเรียก โดยทั่วไปว่า method หรือ operation
โดยใช้นิยามนี้ Rust เป็น object oriented — struct และ enum มีข้อมูล
และ block impl ให้เมธอดบน struct และ enum แม้ struct และ enum
ที่มีเมธอดไม่ ถูกเรียก object พวกมันให้ functionality เดียวกัน
ตามนิยามของ Gang of Four ของ object
Encapsulation ที่ซ่อนรายละเอียด Implementation
แง่มุมอีกอย่างที่ associate ทั่วไปกับ OOP คือไอเดียของ encapsulation ซึ่งหมายความว่ารายละเอียด implementation ของ object ไม่เข้าถึงได้โดยโค้ดที่ใช้ object นั้น ดังนั้น วิธีเดียวที่ จะ interact กับ object คือผ่าน public API ของมัน — โค้ดที่ใช้ object ไม่ควรไปถึงภายในของ object และเปลี่ยนข้อมูลหรือพฤติกรรม โดยตรง นี่เปิดใช้ programmer ให้เปลี่ยนและ refactor ภายในของ object โดยไม่ต้องเปลี่ยนโค้ดที่ใช้ object
เราพูดถึงวิธีควบคุม encapsulation ในบทที่ 7 — เราใช้ keyword pub
เพื่อตัดสินว่าโมดูล, type, ฟังก์ชัน และเมธอดใดในโค้ดของเราควรเป็น
public และตามค่าเริ่มต้นทุกอย่างอื่นเป็น private ตัวอย่างเช่น เรา
นิยาม struct AveragedCollection ที่มี field บรรจุ vector ของค่า
i32 struct ยังมี field ที่บรรจุค่าเฉลี่ยของค่าใน vector ได้
หมายความว่าค่าเฉลี่ยไม่ต้องถูกคำนวณตามความต้องการเมื่อใครก็ตามต้อง
มัน อีกแง่หนึ่ง AveragedCollection จะ cache ค่าเฉลี่ยที่คำนวณ
ให้เรา Listing 18-1 มีนิยามของ struct AveragedCollection
pub struct AveragedCollection {
list: Vec<i32>,
average: f64,
}AveragedCollection ที่รักษา list ของ integer และค่าเฉลี่ยของ item ใน collectionstruct ถูกทำเครื่องหมาย pub เพื่อให้โค้ดอื่นใช้มันได้ แต่ field
ภายใน struct ยัง private สิ่งนี้สำคัญในกรณีนี้เพราะเราต้องการรับ
ประกันว่าเมื่อใดก็ตามที่ค่าถูกเพิ่มหรือลบจาก list ค่าเฉลี่ยก็ถูก
อัพเดทด้วย เราทำสิ่งนี้โดย implement เมธอด add, remove และ
average บน struct ดังที่แสดงใน Listing 18-2
pub struct AveragedCollection {
list: Vec<i32>,
average: f64,
}
impl AveragedCollection {
pub fn add(&mut self, value: i32) {
self.list.push(value);
self.update_average();
}
pub fn remove(&mut self) -> Option<i32> {
let result = self.list.pop();
match result {
Some(value) => {
self.update_average();
Some(value)
}
None => None,
}
}
pub fn average(&self) -> f64 {
self.average
}
fn update_average(&mut self) {
let total: i32 = self.list.iter().sum();
self.average = total as f64 / self.list.len() as f64;
}
}add, remove และ average บน AveragedCollectionเมธอด public add, remove และ average เป็นวิธีเดียวที่จะเข้า
ถึงหรือแก้ข้อมูลใน instance ของ AveragedCollection เมื่อ item
ถูกเพิ่มให้ list โดยใช้เมธอด add หรือลบโดยใช้เมธอด remove
implementation ของแต่ละเรียกเมธอด private update_average ที่
จัดการการอัพเดท field average ด้วย
เราเหลือ field list และ average private เพื่อให้ไม่มีวิธีให้
โค้ดภายนอกเพิ่มหรือลบ item เข้าหรือออกจาก field list โดยตรง —
มิฉะนั้น field average อาจกลายเป็น out of sync เมื่อ list
เปลี่ยน เมธอด average return ค่าใน field average อนุญาตให้โค้ด
ภายนอกอ่าน average แต่ไม่แก้มัน
เพราะเรา encapsulate รายละเอียด implementation ของ struct
AveragedCollection เราเปลี่ยนแง่มุม เช่นโครงสร้างข้อมูล ในอนาคต
ได้ง่าย ตัวอย่างเช่น เราใช้ HashSet<i32> แทน Vec<i32> สำหรับ
field list ได้ ตราบใดที่ signature ของเมธอด public add,
remove และ average ยังเหมือนเดิม โค้ดที่ใช้ AveragedCollection
ไม่ต้องเปลี่ยน ถ้าเราทำ list เป็น public แทน นี่จะไม่จำเป็นเป็น
กรณี — HashSet<i32> และ Vec<i32> มีเมธอดต่างกันสำหรับการเพิ่ม
และลบ item ดังนั้นโค้ดภายนอกอาจต้องเปลี่ยนถ้ามันแก้ list โดยตรง
ถ้า encapsulation เป็นแง่มุมที่ต้องการสำหรับภาษาที่จะพิจารณาเป็น
object oriented Rust ตรงข้อกำหนดนั้น ตัวเลือกในการใช้ pub หรือ
ไม่สำหรับส่วนต่างกันของโค้ดเปิดใช้ encapsulation ของรายละเอียด
implementation
Inheritance ในฐานะระบบ Type และในฐานะการแชร์โค้ด
Inheritance คือกลไกที่ object สืบทอด element จากนิยามของ object อื่น ดังนั้นได้ข้อมูลและพฤติกรรมของ object parent โดยคุณไม่ต้อง นิยามพวกมันอีก
ถ้าภาษาต้องมี inheritance เพื่อเป็น object oriented Rust ก็ไม่ใช่ ภาษาเช่นนั้น ไม่มีวิธีนิยาม struct ที่สืบทอด field และ implementation เมธอดของ struct parent โดยไม่ใช้ macro
อย่างไรก็ตาม ถ้าคุณคุ้นเคยกับการมี inheritance ใน toolbox programming ของคุณ คุณใช้วิธีแก้อื่นใน Rust ขึ้นกับเหตุผลของคุณ สำหรับการเอื้อมไป inheritance ที่แรก
คุณจะเลือก inheritance ด้วยเหตุผลหลักสองอย่าง อันหนึ่งคือสำหรับการ
ใช้โค้ดซ้ำ — คุณ implement พฤติกรรมเฉพาะสำหรับหนึ่ง type และ
inheritance เปิดใช้ให้คุณใช้ implementation นั้นซ้ำสำหรับอีก type คุณ
ทำสิ่งนี้ในแบบจำกัดในโค้ด Rust โดยใช้ implementation เมธอด trait
เริ่มต้น ซึ่งคุณเห็นใน Listing 10-14 เมื่อเราเพิ่ม implementation
เริ่มต้นของเมธอด summarize บน trait Summary ได้ type ใดที่
implement trait Summary จะมีเมธอด summarize ใช้ได้บนมันโดย
ไม่มีโค้ดเพิ่ม นี่คล้ายกับ class parent ที่มี implementation ของ
เมธอดและ class child ที่สืบทอดก็มี implementation ของเมธอด เรายัง
override implementation เริ่มต้นของเมธอด summarize เมื่อเรา
implement trait Summary ได้ ซึ่งคล้ายกับ class child ที่ override
implementation ของเมธอดที่สืบทอดจาก class parent
เหตุผลอื่นในการใช้ inheritance เกี่ยวกับระบบ type — เพื่อเปิดใช้ type child ที่จะถูกใช้ในที่เดียวกับ type parent นี่ยังเรียก polymorphism ซึ่งหมายความว่าคุณทดแทน object หลายตัวสำหรับกันและ กันที่ runtime ได้ถ้าพวกมันแชร์ลักษณะบางอย่าง
Polymorphism
สำหรับคนหลายคน polymorphism เป็น synonymous กับ inheritance แต่ มันจริง ๆ เป็นแนวคิดทั่วไปกว่าที่อ้างถึงโค้ดที่ทำงานกับข้อมูลของ หลาย type สำหรับ inheritance type เหล่านั้นโดยทั่วไปคือ subclass
Rust แทนใช้ generic เพื่อนามธรรมเหนือ type ต่างกันที่เป็นไปได้ และ trait bound เพื่อบังคับข้อจำกัดบนสิ่งที่ type เหล่านั้นต้อง ให้ นี่บางครั้งเรียก bounded parametric polymorphism
Rust เลือกชุดของ trade-off ต่างกันโดยไม่เสนอ inheritance Inheritance มักเสี่ยงในการแชร์โค้ดมากกว่าจำเป็น Subclass ไม่ควรแชร์ลักษณะทั้งหมด ของ class parent ของพวกมันเสมอ แต่จะทำเช่นนั้นด้วย inheritance นี่ ทำให้การออกแบบของโปรแกรมยืดหยุ่นน้อยลงได้ มันยังแนะนำความเป็นไปได้ ในการเรียกเมธอดบน subclass ที่ไม่สมเหตุสมผลหรือก่อให้เกิด error เพราะเมธอดไม่ใช้กับ subclass นอกจากนี้ บางภาษาจะอนุญาตเพียง single inheritance (หมายความว่า subclass สืบทอดได้จากเพียงหนึ่ง class) จำกัดความยืดหยุ่นของการออกแบบของโปรแกรมเพิ่ม
ด้วยเหตุผลเหล่านี้ Rust ใช้แนวทางต่างของการใช้ trait object แทน inheritance เพื่อบรรลุ polymorphism ที่ runtime มาดูว่า trait object ทำงานยังไง
ใช้ trait object เพื่อนามธรรมพฤติกรรมร่วม
ใช้ Trait Object เพื่อนามธรรมพฤติกรรมร่วม
ในบทที่ 8 เรากล่าวว่าข้อจำกัดหนึ่งของ vector คือพวกมันเก็บ element
ของเพียงหนึ่ง type ได้ เราสร้างวิธีแก้ใน Listing 8-9 ที่เรานิยาม
enum SpreadsheetCell ที่มี variant เพื่อเก็บ integer, float และ
text นี่หมายความว่าเราเก็บ type ต่างกันของข้อมูลในแต่ละ cell และยัง
มี vector ที่แทน row ของ cell ได้ นี่เป็นวิธีแก้ดีสมบูรณ์เมื่อ item
แลกเปลี่ยนได้ของเราคือชุด type คงที่ที่เรารู้เมื่อโค้ดของเราถูก
คอมไพล์
อย่างไรก็ตาม บางครั้งเราต้องการให้ user ของ library ของเราขยายชุด
type ที่ valid ในสถานการณ์เฉพาะ เพื่อแสดงว่าเราบรรลุนี้ยังไงได้ เรา
จะสร้างเครื่องมือ GUI ตัวอย่างที่ iterate ผ่าน list ของ item เรียก
เมธอด draw บนแต่ละตัวเพื่อ draw มันบนหน้าจอ — เทคนิคทั่วไปสำหรับ
เครื่องมือ GUI เราจะสร้าง library crate ชื่อ gui ที่บรรจุโครงสร้าง
ของ library GUI crate นี้อาจรวม type บางตัวให้คนใช้ เช่น Button
หรือ TextField นอกจากนี้ user gui จะต้องการสร้าง type ของพวก
เขาเองที่ draw ได้ — ตัวอย่างเช่น programmer หนึ่งอาจเพิ่ม Image
และอีกคนอาจเพิ่ม SelectBox
ตอนเขียน library เรารู้และนิยาม type ทั้งหมดที่ programmer อื่นอาจ
ต้องการสร้างไม่ได้ แต่เรารู้ว่า gui ต้องตามค่าหลายค่าของ type
ต่างกัน และมันต้องเรียกเมธอด draw บนแต่ละค่าที่ type ต่างเหล่านี้
มันไม่ต้องรู้แน่นอนว่าจะเกิดอะไรเมื่อเราเรียกเมธอด draw เพียงว่า
ค่าจะมีเมธอดนั้นใช้ได้สำหรับเราเรียก
เพื่อทำสิ่งนี้ในภาษากับ inheritance เราอาจนิยาม class ชื่อ
Component ที่มีเมธอดชื่อ draw บนมัน class อื่น เช่น Button,
Image และ SelectBox จะสืบทอดจาก Component และดังนั้นสืบทอด
เมธอด draw พวกมันแต่ละตัว override เมธอด draw เพื่อนิยามพฤติกรรม
custom ของพวกมันได้ แต่ framework จะปฏิบัติกับ type ทั้งหมดเหมือน
พวกมันเป็น instance Component และเรียก draw บนพวกมัน แต่เพราะ
Rust ไม่มี inheritance เราต้องการอีกวิธีในการจัดโครงสร้าง library
gui เพื่ออนุญาตให้ user สร้าง type ใหม่ที่เข้ากันได้กับ library
นิยาม Trait สำหรับพฤติกรรมร่วม
เพื่อ implement พฤติกรรมที่เราต้องการให้ gui มี เราจะนิยาม trait
ชื่อ Draw ที่จะมีหนึ่งเมธอดชื่อ draw จากนั้น เรานิยาม vector
ที่รับ trait object ได้ trait object ชี้ไปยังทั้ง instance ของ
type ที่ implement trait ที่เราระบุและ table ที่ใช้ค้นหาเมธอด
trait บน type นั้นที่ runtime เราสร้าง trait object โดยระบุ
pointer บางประเภท เช่น reference หรือ smart pointer Box<T>
แล้ว keyword dyn แล้วระบุ trait ที่เกี่ยวข้อง (เราจะพูดถึงเหตุผล
ที่ trait object ต้องใช้ pointer ใน
“Type ขนาด Dynamic และ Trait Sized”
ในบทที่ 20) เราใช้ trait object ในที่ของ generic หรือ type
คอนกรีต ที่ใดที่เราใช้ trait object ระบบ type ของ Rust จะรับ
ประกันที่ compile time ว่าค่าใดที่ใช้ใน context นั้นจะ implement
trait ของ trait object ผลคือ เราไม่ต้องรู้ type ทั้งหมดที่เป็นไป
ได้ที่ compile time
เรากล่าวว่าใน Rust เราละเว้นจากการเรียก struct และ enum “object”
เพื่อแยกพวกมันจาก object ของภาษาอื่น ใน struct หรือ enum ข้อมูล
ใน field struct และพฤติกรรมใน block impl ถูกแยก ในขณะที่ในภาษา
อื่น ข้อมูลและพฤติกรรมที่รวมเป็นแนวคิดเดียวมักถูก label เป็น object
Trait object ต่างจาก object ในภาษาอื่นในที่เราเพิ่มข้อมูลให้ trait
object ไม่ได้ Trait object ไม่มีประโยชน์ทั่วไปเท่า object ในภาษา
อื่น — จุดประสงค์เฉพาะของพวกมันคือการอนุญาต abstraction ข้ามพฤติกรรม
ร่วม
Listing 18-3 แสดงวิธีนิยาม trait ชื่อ Draw ที่มีหนึ่งเมธอดชื่อ
draw
pub trait Draw {
fn draw(&self);
}Drawsyntax นี้ควรดูคุ้นเคยจากการพูดคุยของเราเกี่ยวกับวิธีนิยาม trait
ในบทที่ 10 ถัดมาคือ syntax ใหม่ — Listing 18-4 นิยาม struct ชื่อ
Screen ที่เก็บ vector ชื่อ components vector นี้เป็น type
Box<dyn Draw> ซึ่งคือ trait object — มันเป็นตัวยืนแทนสำหรับ type
ใดภายใน Box ที่ implement trait Draw
pub trait Draw {
fn draw(&self);
}
pub struct Screen {
pub components: Vec<Box<dyn Draw>>,
}Screen ที่มี field components เก็บ vector ของ trait object ที่ implement trait Drawบน struct Screen เราจะนิยามเมธอดชื่อ run ที่จะเรียกเมธอด
draw บนแต่ละ components ของมัน ดังที่แสดงใน Listing 18-5
pub trait Draw {
fn draw(&self);
}
pub struct Screen {
pub components: Vec<Box<dyn Draw>>,
}
impl Screen {
pub fn run(&self) {
for component in self.components.iter() {
component.draw();
}
}
}run บน Screen ที่เรียกเมธอด draw บนแต่ละ componentนี่ทำงานต่างจากการนิยาม struct ที่ใช้ generic type parameter กับ
trait bound generic type parameter ถูกทดแทนด้วยเพียงหนึ่ง type
คอนกรีตในเวลาเดียวกัน ในขณะที่ trait object อนุญาตให้หลาย type
คอนกรีตเติมแทน trait object ที่ runtime ตัวอย่างเช่น เรานิยาม
struct Screen โดยใช้ generic type และ trait bound ดังใน Listing
18-6 ได้
pub trait Draw {
fn draw(&self);
}
pub struct Screen<T: Draw> {
pub components: Vec<T>,
}
impl<T> Screen<T>
where
T: Draw,
{
pub fn run(&self) {
for component in self.components.iter() {
component.draw();
}
}
}Screen และเมธอด run ของมันโดยใช้ generic และ trait boundนี่จำกัดเราที่ instance Screen ที่มี list ของ component ทั้งหมด
ของ type Button หรือทั้งหมดของ type TextField ถ้าคุณจะมี
collection homogeneous เท่านั้น การใช้ generic และ trait bound
ดีกว่าเพราะนิยามจะถูก monomorphize ที่ compile time เพื่อใช้ type
คอนกรีต
ในทางตรงกันข้าม ด้วยวิธีที่ใช้ trait object instance Screen หนึ่ง
เก็บ Vec<T> ที่บรรจุ Box<Button> รวมถึง Box<TextField> ได้
มาดูว่านี่ทำงานยังไง แล้วเราจะพูดถึงผลกระทบ performance ที่ runtime
Implement Trait
ตอนนี้เราจะเพิ่ม type บางตัวที่ implement trait Draw เราจะให้ type
Button อีกครั้ง การ implement library GUI จริง ๆ อยู่นอก scope
ของหนังสือเล่มนี้ ดังนั้นเมธอด draw จะไม่มี implementation ที่
มีประโยชน์ใน body ของมัน เพื่อจินตนาการว่า implementation อาจดู
ยังไง struct Button อาจมี field สำหรับ width, height และ
label ดังที่แสดงใน Listing 18-7
pub trait Draw {
fn draw(&self);
}
pub struct Screen {
pub components: Vec<Box<dyn Draw>>,
}
impl Screen {
pub fn run(&self) {
for component in self.components.iter() {
component.draw();
}
}
}
pub struct Button {
pub width: u32,
pub height: u32,
pub label: String,
}
impl Draw for Button {
fn draw(&self) {
// code to actually draw a button
}
}Button ที่ implement trait Drawfield width, height และ label บน Button จะต่างจาก field บน
component อื่น — ตัวอย่างเช่น type TextField อาจมี field
เดียวกันเหล่านั้นบวก field placeholder แต่ละ type ที่เราต้องการ
draw บนหน้าจอจะ implement trait Draw แต่จะใช้โค้ดต่างกันในเมธอด
draw เพื่อนิยามว่าจะ draw type นั้นยังไง เช่นที่ Button มีที่
นี่ (โดยไม่มีโค้ด GUI จริง ดังที่กล่าว) type Button ตัวอย่างเช่น
อาจมี block impl เพิ่มที่บรรจุเมธอดที่เกี่ยวกับสิ่งที่เกิดเมื่อ
user click ปุ่ม เมธอดประเภทเหล่านี้จะไม่ใช้กับ type เช่น
TextField
ถ้าใครที่ใช้ library ของเราตัดสินใจ implement struct SelectBox
ที่มี field width, height และ options พวกเขาจะ implement
trait Draw บน type SelectBox ด้วย ดังที่แสดงใน Listing 18-8
use gui::Draw;
struct SelectBox {
width: u32,
height: u32,
options: Vec<String>,
}
impl Draw for SelectBox {
fn draw(&self) {
// code to actually draw a select box
}
}
fn main() {}gui และ implement trait Draw บน struct SelectBoxuser ของ library เรา ตอนนี้เขียนฟังก์ชัน main ของพวกเขาเพื่อสร้าง
instance Screen ได้ ให้ instance Screen พวกเขาเพิ่ม
SelectBox และ Button โดยใส่แต่ละตัวใน Box<T> เพื่อกลายเป็น
trait object ได้ พวกเขาจากนั้นเรียกเมธอด run บน instance
Screen ซึ่งจะเรียก draw บนแต่ละ component Listing 18-9 แสดง
implementation นี้
use gui::Draw;
struct SelectBox {
width: u32,
height: u32,
options: Vec<String>,
}
impl Draw for SelectBox {
fn draw(&self) {
// code to actually draw a select box
}
}
use gui::{Button, Screen};
fn main() {
let screen = Screen {
components: vec![
Box::new(SelectBox {
width: 75,
height: 10,
options: vec![
String::from("Yes"),
String::from("Maybe"),
String::from("No"),
],
}),
Box::new(Button {
width: 50,
height: 10,
label: String::from("OK"),
}),
],
};
screen.run();
}เมื่อเราเขียน library เราไม่รู้ว่าใครอาจเพิ่ม type SelectBox แต่
implementation Screen ของเราสามารถ operate บน type ใหม่และ draw
มันได้เพราะ SelectBox implement trait Draw ซึ่งหมายความว่ามัน
implement เมธอด draw
แนวคิดนี้ — ของการเป็นกังวลเพียงกับข้อความที่ค่าตอบสนองไม่ใช่ type
คอนกรีตของค่า — คล้ายกับแนวคิดของ duck typing ในภาษาที่ type
แบบ dynamic — ถ้ามันเดินเหมือนเป็ดและร้องก๊าบเหมือนเป็ด มันต้องเป็น
เป็ด! ใน implementation ของ run บน Screen ใน Listing 18-5
run ไม่ต้องรู้ว่า type คอนกรีตของแต่ละ component คืออะไร มันไม่
ตรวจสอบว่า component เป็น instance ของ Button หรือ SelectBox
มันเพียงเรียกเมธอด draw บน component โดยระบุ Box<dyn Draw> เป็น
type ของค่าใน vector components เรานิยาม Screen ให้ต้องการค่า
ที่เราเรียกเมธอด draw บนได้
ข้อดีของการใช้ trait object และระบบ type ของ Rust ในการเขียนโค้ด คล้ายกับโค้ดที่ใช้ duck typing คือเราไม่เคยต้องตรวจสอบว่าค่า implement เมธอดเฉพาะที่ runtime หรือกังวลเกี่ยวกับการได้ error ถ้าค่าไม่ implement เมธอดแต่เราเรียกมันต่อ Rust จะไม่คอมไพล์โค้ด ของเราถ้าค่าไม่ implement trait ที่ trait object ต้องการ
ตัวอย่างเช่น Listing 18-10 แสดงสิ่งที่เกิดถ้าเราพยายามสร้าง
Screen กับ String เป็น component
use gui::Screen;
fn main() {
let screen = Screen {
components: vec![Box::new(String::from("Hi"))],
};
screen.run();
}เราจะได้ error นี้เพราะ String ไม่ implement trait Draw:
$ cargo run
Compiling gui v0.1.0 (file:///projects/gui)
error[E0277]: the trait bound `String: Draw` is not satisfied
--> src/main.rs:5:26
|
5 | components: vec![Box::new(String::from("Hi"))],
| ^^^^^^^^^^^^^^^^^^^^^^^^^^^^ the trait `Draw` is not implemented for `String`
|
= help: the trait `Draw` is implemented for `Button`
= note: required for the cast from `Box<String>` to `Box<dyn Draw>`
For more information about this error, try `rustc --explain E0277`.
error: could not compile `gui` (bin "gui") due to 1 previous error
error นี้ให้เรารู้ว่าเรากำลังส่งอะไรให้ Screen ที่เราไม่ได้ตั้งใจ
ส่ง และดังนั้นควรส่ง type ต่างกัน หรือเราควร implement Draw บน
String เพื่อให้ Screen เรียก draw บนมันได้
ทำ Dynamic Dispatch
จำได้ใน “Performance ของโค้ดที่ใช้ Generic” ในบทที่ 10 การพูดคุยของเราเกี่ยวกับกระบวนการ monomorphization ที่ ทำบน generic โดย compiler — compiler สร้าง implementation ที่ไม่ใช่ generic ของฟังก์ชันและเมธอดสำหรับแต่ละ type คอนกรีตที่เราใช้แทน generic type parameter โค้ดที่ได้จาก monomorphization กำลังทำ static dispatch ซึ่งคือเมื่อ compiler รู้ว่าเมธอดไหนที่คุณกำลัง เรียกที่ compile time นี่ตรงข้ามกับ dynamic dispatch ซึ่งคือเมื่อ compiler บอกที่ compile time ไม่ได้ว่าเมธอดไหนที่คุณกำลังเรียก ใน กรณี dynamic dispatch compiler ปล่อยโค้ดที่ที่ runtime จะรู้ว่า เมธอดไหนที่จะเรียก
เมื่อเราใช้ trait object Rust ต้องใช้ dynamic dispatch compiler ไม่รู้ type ทั้งหมดที่อาจถูกใช้กับโค้ดที่ใช้ trait object ดังนั้น มันไม่รู้ว่าเมธอดที่ implement บน type ไหนที่จะเรียก แทน ที่ runtime Rust ใช้ pointer ภายใน trait object เพื่อรู้ว่าเมธอดไหน ที่จะเรียก การค้นหานี้มีค่าใช้จ่ายที่ runtime ที่ไม่เกิดกับ static dispatch Dynamic dispatch ยังป้องกัน compiler จากการเลือก inline โค้ดของ เมธอด ซึ่งในทางกลับป้องกัน optimization บางอย่าง และ Rust มีกฎบาง ตัวเกี่ยวกับที่ที่คุณใช้ dynamic dispatch ได้และใช้ไม่ได้ เรียก dyn compatibility กฎเหล่านั้นอยู่นอก scope ของการพูดคุยนี้ แต่ คุณอ่านเพิ่มเกี่ยวกับพวกมันได้ ใน reference อย่างไรก็ตาม เรา ได้ความยืดหยุ่นเพิ่มในโค้ดที่เราเขียนใน Listing 18-5 และสามารถ สนับสนุนใน Listing 18-9 ดังนั้นมันเป็น trade-off ที่จะพิจารณา
Implement design pattern แบบ OOP
Implement Design Pattern แบบ OOP
State pattern คือ design pattern แบบ object-oriented แก่นของ pattern คือเรานิยามชุดของ state ที่ค่ามีภายในได้ State ถูก represent โดยชุดของ state object และพฤติกรรมของค่าเปลี่ยนตาม state ของมัน เราจะทำตัวอย่าง struct blog post ที่มี field บรรจุ state ซึ่งจะเป็น state object จากชุด “draft”, “review” หรือ “published”
State object แชร์ functionality — ใน Rust แน่นอน เราใช้ struct และ trait แทน object และ inheritance State object แต่ละตัวรับผิดชอบพฤติกรรมของ ตัวเองและการกำกับว่าเมื่อไรควรเปลี่ยนเป็น state อื่น ค่าที่บรรจุ state object ไม่รู้อะไรเกี่ยวกับพฤติกรรมต่างกันของ state หรือเมื่อจะ transition ระหว่าง state
ข้อได้เปรียบของการใช้ state pattern คือ เมื่อข้อกำหนด business ของ โปรแกรมเปลี่ยน เราไม่ต้องเปลี่ยนโค้ดของค่าที่บรรจุ state หรือโค้ดที่ใช้ ค่า เราจะต้องอัพเดทโค้ดภายในหนึ่งใน state object เพื่อเปลี่ยนกฎของมัน หรือเพิ่ม state object เท่านั้น
ก่อนอื่น เราจะ implement state pattern ในแบบ object-oriented ดั้งเดิม มากขึ้น แล้วเราจะใช้แนวทางที่ natural กว่าใน Rust เล็กน้อย มาเจาะดู implement workflow blog post แบบเพิ่มทีละขั้นโดยใช้ state pattern
Functionality สุดท้ายจะเป็นแบบนี้:
- blog post เริ่มเป็น draft ว่าง
- เมื่อ draft เสร็จ มีการขอ review ของ post
- เมื่อ post ถูก approve มันถูก publish
- เพียง blog post ที่ publish แล้ว return content เพื่อ print ดังนั้น post ที่ไม่ approve ไม่สามารถถูก publish โดยบังเอิญได้
การเปลี่ยนแปลงอื่นใดที่พยายามทำบน post ไม่ควรมีผล ตัวอย่างเช่น ถ้าเรา พยายาม approve blog post ที่เป็น draft ก่อนเราขอ review post ควรยังเป็น draft ที่ไม่ได้ publish
ลองสไตล์ Object-Oriented แบบดั้งเดิม
มีวิธีไม่จำกัดในการจัดโครงสร้างโค้ดเพื่อแก้ปัญหาเดียวกัน แต่ละวิธีมี trade-off ต่างกัน Implementation ของส่วนนี้เป็นสไตล์ object-oriented แบบดั้งเดิมมากกว่า ซึ่งเป็นไปได้ในการเขียนใน Rust แต่ไม่ใช้ประโยชน์จาก จุดแข็งบางอย่างของ Rust ภายหลัง เราจะแสดงวิธีแก้ที่ต่างที่ยังใช้ design pattern แบบ object-oriented แต่ถูกจัดโครงสร้างในวิธีที่อาจดูคุ้นเคยน้อย กว่ากับ programmer ที่มีประสบการณ์ object-oriented เราจะเปรียบเทียบสอง วิธีแก้เพื่อสัมผัส trade-off ของการออกแบบโค้ด Rust ต่างจากโค้ดในภาษาอื่น
Listing 18-11 แสดง workflow นี้ในรูปแบบโค้ด — นี่คือตัวอย่างการใช้ API
ที่เราจะ implement ใน library crate ชื่อ blog นี่จะยังไม่ compile
เพราะเรายังไม่ได้ implement crate blog
use blog::Post;
fn main() {
let mut post = Post::new();
post.add_text("I ate a salad for lunch today");
assert_eq!("", post.content());
post.request_review();
assert_eq!("", post.content());
post.approve();
assert_eq!("I ate a salad for lunch today", post.content());
}blog ของเรามีเราต้องการอนุญาตให้ user สร้าง blog post draft ใหม่ด้วย Post::new เรา
ต้องการอนุญาตให้เพิ่ม text ให้ blog post ถ้าเราพยายามได้ content ของ
post ทันที ก่อน approval เราไม่ควรได้ text ใดเพราะ post ยังเป็น draft
เราเพิ่ม assert_eq! ในโค้ดเพื่อจุดประสงค์สาธิต unit test ที่ยอดเยี่ยม
สำหรับสิ่งนี้คือ assert ว่า blog post draft return string ว่างจากเมธอด
content แต่เราจะไม่เขียน test สำหรับตัวอย่างนี้
ถัดไป เราต้องการเปิดใช้คำขอ review ของ post และเราต้องการให้ content
return string ว่างระหว่างรอ review เมื่อ post ได้รับการ approve มันควร
ถูก publish หมายความว่า text ของ post จะถูก return เมื่อ content ถูก
เรียก
สังเกตว่า type เดียวที่เรา interact กับ crate คือ type Post Type นี้
จะใช้ state pattern และจะบรรจุค่าที่จะเป็นหนึ่งใน state object สามตัวที่
represent state ต่างกันที่ post เป็นได้ — draft, review หรือ published
การเปลี่ยนจาก state หนึ่งเป็นอีกอันจะถูกจัดการภายในใน type Post
State เปลี่ยน response ต่อเมธอดที่เรียกโดย user ของ library ของเราบน
instance Post แต่พวกเขาไม่ต้องจัดการการเปลี่ยน state โดยตรง นอกจากนี้
user ไม่สามารถทำผิดกับ state เช่น publishing post ก่อนมันถูก review
นิยาม Post และสร้าง Instance ใหม่
มาเริ่ม implement library กัน! เรารู้ว่าเราต้องการ struct Post แบบ
public ที่บรรจุ content ดังนั้นเราจะเริ่มด้วยนิยามของ struct และฟังก์ชัน
public new ที่ associate เพื่อสร้าง instance ของ Post ดังที่แสดงใน
Listing 18-12 เราจะทำ trait private State ที่จะนิยามพฤติกรรมที่
state object ทั้งหมดสำหรับ Post ต้องมีด้วย
แล้ว Post จะบรรจุ trait object ของ Box<dyn State> ภายใน Option<T>
ใน field private ชื่อ state เพื่อบรรจุ state object คุณจะเห็นว่า
ทำไม Option<T> จำเป็นเร็ว ๆ นี้
pub struct Post {
state: Option<Box<dyn State>>,
content: String,
}
impl Post {
pub fn new() -> Post {
Post {
state: Some(Box::new(Draft {})),
content: String::new(),
}
}
}
trait State {}
struct Draft {}
impl State for Draft {}Post และฟังก์ชัน new ที่สร้าง instance Post ใหม่, trait State และ struct DraftTrait State นิยามพฤติกรรมที่แชร์โดย post state ต่างกัน State object คือ
Draft, PendingReview และ Published และพวกมันทั้งหมดจะ implement
trait State ตอนนี้ trait ยังไม่มีเมธอด และเราจะเริ่มโดยนิยามเพียง
state Draft เพราะนั่นคือ state ที่เราต้องการให้ post เริ่ม
เมื่อเราสร้าง Post ใหม่ เราตั้ง field state ของมันเป็นค่า Some ที่
บรรจุ Box Box นี้ point ไปยัง instance ใหม่ของ struct Draft นี่
รับประกันว่าเมื่อใดก็ตามที่เราสร้าง instance ใหม่ของ Post มันจะเริ่ม
เป็น draft เพราะ field state ของ Post เป็น private ไม่มีวิธีสร้าง
Post ใน state อื่นใด! ในฟังก์ชัน Post::new เราตั้ง field content
เป็น String ว่างใหม่
เก็บ Text ของ Content ของ Post
เราเห็นใน Listing 18-11 ว่าเราต้องการสามารถเรียกเมธอดชื่อ add_text และ
ส่ง &str ที่ถูกเพิ่มเป็น text content ของ blog post เรา implement
สิ่งนี้เป็นเมธอด แทนที่จะเปิดเผย field content เป็น pub ดังนั้น
ภายหลังเราสามารถ implement เมธอดที่จะควบคุมวิธีที่ data ของ field
content ถูกอ่าน เมธอด add_text ค่อนข้างตรงไปตรงมา ดังนั้นมาเพิ่ม
implementation ใน Listing 18-13 ให้ block impl Post
pub struct Post {
state: Option<Box<dyn State>>,
content: String,
}
impl Post {
// --snip--
pub fn new() -> Post {
Post {
state: Some(Box::new(Draft {})),
content: String::new(),
}
}
pub fn add_text(&mut self, text: &str) {
self.content.push_str(text);
}
}
trait State {}
struct Draft {}
impl State for Draft {}add_text เพื่อเพิ่ม text ให้ content ของ postเมธอด add_text รับ mutable reference ของ self เพราะเรากำลังเปลี่ยน
instance Post ที่เราเรียก add_text บนมัน แล้วเราเรียก push_str บน
String ใน content และส่ง argument text เพื่อเพิ่มให้ content ที่
save พฤติกรรมนี้ไม่ขึ้นกับ state ที่ post เป็น ดังนั้นมันไม่ใช่ส่วนของ
state pattern เมธอด add_text ไม่ interact กับ field state เลย แต่
มันเป็นส่วนของพฤติกรรมที่เราต้องการสนับสนุน
ทำให้แน่ใจว่า Content ของ Draft Post ว่าง
แม้หลังจากที่เราเรียก add_text และเพิ่ม content บ้างให้ post ของเรา
เรายังต้องการให้เมธอด content return string slice ว่างเพราะ post ยัง
อยู่ใน state draft ดังที่แสดงโดย assert_eq! ตัวแรกใน Listing 18-11
ตอนนี้ มา implement เมธอด content ด้วยสิ่งที่ง่ายที่สุดที่จะ fulfill
ข้อกำหนดนี้ — return string slice ว่างเสมอ เราจะเปลี่ยนนี่ภายหลังเมื่อ
เรา implement ความสามารถในการเปลี่ยน state ของ post ได้เพื่อให้มันถูก
publish ตอนนี้ post ได้เพียงใน state draft ดังนั้น post content ควร
ว่างเสมอ Listing 18-14 แสดง implementation ตัวยืน
pub struct Post {
state: Option<Box<dyn State>>,
content: String,
}
impl Post {
// --snip--
pub fn new() -> Post {
Post {
state: Some(Box::new(Draft {})),
content: String::new(),
}
}
pub fn add_text(&mut self, text: &str) {
self.content.push_str(text);
}
pub fn content(&self) -> &str {
""
}
}
trait State {}
struct Draft {}
impl State for Draft {}content บน Post ที่ return string slice ว่างเสมอด้วยเมธอด content ที่เพิ่มนี้ ทุกอย่างใน Listing 18-11 ผ่าน assert_eq!
ตัวแรกทำงานตามตั้งใจ
Request Review ที่เปลี่ยน State ของ Post
ถัดไป เราต้องเพิ่ม functionality เพื่อขอ review ของ post ซึ่งควรเปลี่ยน
state ของมันจาก Draft เป็น PendingReview Listing 18-15 แสดงโค้ดนี้
pub struct Post {
state: Option<Box<dyn State>>,
content: String,
}
impl Post {
// --snip--
pub fn new() -> Post {
Post {
state: Some(Box::new(Draft {})),
content: String::new(),
}
}
pub fn add_text(&mut self, text: &str) {
self.content.push_str(text);
}
pub fn content(&self) -> &str {
""
}
pub fn request_review(&mut self) {
if let Some(s) = self.state.take() {
self.state = Some(s.request_review())
}
}
}
trait State {
fn request_review(self: Box<Self>) -> Box<dyn State>;
}
struct Draft {}
impl State for Draft {
fn request_review(self: Box<Self>) -> Box<dyn State> {
Box::new(PendingReview {})
}
}
struct PendingReview {}
impl State for PendingReview {
fn request_review(self: Box<Self>) -> Box<dyn State> {
self
}
}request_review บน Post และ trait Stateเราให้ Post เมธอด public ชื่อ request_review ที่จะรับ mutable
reference ของ self แล้วเราเรียกเมธอด request_review ภายในบน state
ปัจจุบันของ Post และเมธอด request_review ตัวที่สองนี้ consume state
ปัจจุบันและ return state ใหม่
เราเพิ่มเมธอด request_review ให้ trait State — type ทั้งหมดที่
implement trait จะต้อง implement เมธอด request_review แล้ว สังเกตว่า
แทนที่จะมี self, &self หรือ &mut self เป็น parameter แรกของเมธอด
เรามี self: Box<Self> Syntax นี้หมายความว่าเมธอด valid เพียงเมื่อ
เรียกบน Box ที่บรรจุ type Syntax นี้รับ ownership ของ Box<Self>
ทำให้ state เก่า invalid เพื่อให้ค่า state ของ Post transform เป็น
state ใหม่ได้
เพื่อ consume state เก่า เมธอด request_review ต้องรับ ownership ของ
ค่า state นี่คือที่ Option ใน field state ของ Post เข้ามา — เรา
เรียกเมธอด take เพื่อรับค่า Some ออกจาก field state และทิ้ง None
ในที่ของมันเพราะ Rust ไม่ให้เรามี field ที่ไม่มีค่าใน struct นี่ให้เรา
ย้ายค่า state ออกจาก Post แทนที่จะ borrow มัน แล้วเราจะตั้งค่า
state ของ post เป็นผลของ operation นี้
เราต้องตั้ง state เป็น None ชั่วคราวแทนที่จะตั้งโดยตรงด้วยโค้ดเช่น
self.state = self.state.request_review(); เพื่อรับ ownership ของค่า
state นี่รับประกันว่า Post ไม่สามารถใช้ค่า state เก่าหลังจากที่
เรา transform มันเป็น state ใหม่
เมธอด request_review บน Draft return instance boxed ใหม่ของ struct
PendingReview ใหม่ ซึ่ง represent state เมื่อ post รอ review struct
PendingReview ก็ implement เมธอด request_review แต่ไม่ทำการ
transformation ใด แทน มัน return ตัวเองเพราะเมื่อเราขอ review บน post
ที่อยู่ใน state PendingReview แล้ว มันควรอยู่ใน state PendingReview
ตอนนี้เราเริ่มเห็นข้อได้เปรียบของ state pattern — เมธอด request_review
บน Post เหมือนกันไม่ว่าค่า state ของมันจะเป็นอะไร State แต่ละตัวรับผิดชอบ
กฎของตัวเอง
เราจะปล่อยเมธอด content บน Post เป็นเหมือนเดิม return string slice
ว่าง ตอนนี้เราสามารถมี Post ใน state PendingReview รวมทั้งใน state
Draft แต่เราต้องการพฤติกรรมเดียวกันใน state PendingReview Listing
18-11 ตอนนี้ทำงานได้ถึง call assert_eq! ตัวที่สอง!
เพิ่ม approve เพื่อเปลี่ยนพฤติกรรมของ content
เมธอด approve จะคล้ายกับเมธอด request_review — มันจะตั้ง state เป็น
ค่าที่ state ปัจจุบันบอกว่ามันควรมีเมื่อ state นั้นถูก approve ดังที่
แสดงใน Listing 18-16
pub struct Post {
state: Option<Box<dyn State>>,
content: String,
}
impl Post {
// --snip--
pub fn new() -> Post {
Post {
state: Some(Box::new(Draft {})),
content: String::new(),
}
}
pub fn add_text(&mut self, text: &str) {
self.content.push_str(text);
}
pub fn content(&self) -> &str {
""
}
pub fn request_review(&mut self) {
if let Some(s) = self.state.take() {
self.state = Some(s.request_review())
}
}
pub fn approve(&mut self) {
if let Some(s) = self.state.take() {
self.state = Some(s.approve())
}
}
}
trait State {
fn request_review(self: Box<Self>) -> Box<dyn State>;
fn approve(self: Box<Self>) -> Box<dyn State>;
}
struct Draft {}
impl State for Draft {
// --snip--
fn request_review(self: Box<Self>) -> Box<dyn State> {
Box::new(PendingReview {})
}
fn approve(self: Box<Self>) -> Box<dyn State> {
self
}
}
struct PendingReview {}
impl State for PendingReview {
// --snip--
fn request_review(self: Box<Self>) -> Box<dyn State> {
self
}
fn approve(self: Box<Self>) -> Box<dyn State> {
Box::new(Published {})
}
}
struct Published {}
impl State for Published {
fn request_review(self: Box<Self>) -> Box<dyn State> {
self
}
fn approve(self: Box<Self>) -> Box<dyn State> {
self
}
}approve บน Post และ trait Stateเราเพิ่มเมธอด approve ให้ trait State และเพิ่ม struct ใหม่ที่
implement State, state Published
คล้ายกับวิธีที่ request_review บน PendingReview ทำงาน ถ้าเราเรียก
เมธอด approve บน Draft มันจะไม่มีผลเพราะ approve จะ return self
เมื่อเราเรียก approve บน PendingReview มัน return instance boxed
ใหม่ของ struct Published struct Published implement trait State
และสำหรับทั้งเมธอด request_review และเมธอด approve มัน return
ตัวเองเพราะ post ควรอยู่ใน state Published ในกรณีเหล่านั้น
ตอนนี้เราต้องอัพเดทเมธอด content บน Post เราต้องการให้ค่าที่ return
จาก content ขึ้นกับ state ปัจจุบันของ Post ดังนั้นเราจะให้ Post
delegate ให้เมธอด content ที่นิยามบน state ของมัน ดังที่แสดงใน
Listing 18-17
pub struct Post {
state: Option<Box<dyn State>>,
content: String,
}
impl Post {
// --snip--
pub fn new() -> Post {
Post {
state: Some(Box::new(Draft {})),
content: String::new(),
}
}
pub fn add_text(&mut self, text: &str) {
self.content.push_str(text);
}
pub fn content(&self) -> &str {
self.state.as_ref().unwrap().content(self)
}
// --snip--
pub fn request_review(&mut self) {
if let Some(s) = self.state.take() {
self.state = Some(s.request_review())
}
}
pub fn approve(&mut self) {
if let Some(s) = self.state.take() {
self.state = Some(s.approve())
}
}
}
trait State {
fn request_review(self: Box<Self>) -> Box<dyn State>;
fn approve(self: Box<Self>) -> Box<dyn State>;
}
struct Draft {}
impl State for Draft {
fn request_review(self: Box<Self>) -> Box<dyn State> {
Box::new(PendingReview {})
}
fn approve(self: Box<Self>) -> Box<dyn State> {
self
}
}
struct PendingReview {}
impl State for PendingReview {
fn request_review(self: Box<Self>) -> Box<dyn State> {
self
}
fn approve(self: Box<Self>) -> Box<dyn State> {
Box::new(Published {})
}
}
struct Published {}
impl State for Published {
fn request_review(self: Box<Self>) -> Box<dyn State> {
self
}
fn approve(self: Box<Self>) -> Box<dyn State> {
self
}
}content บน Post เพื่อ delegate ให้เมธอด content บน Stateเพราะเป้าหมายคือให้กฎทั้งหมดเหล่านี้อยู่ภายใน struct ที่ implement
State เราเรียกเมธอด content บนค่าใน state และส่ง instance post
(นั่นคือ self) เป็น argument แล้วเรา return ค่าที่ return จากการใช้
เมธอด content บนค่า state
เราเรียกเมธอด as_ref บน Option เพราะเราต้องการ reference ของค่า
ภายใน Option แทนที่จะเป็น ownership ของค่า เพราะ state เป็น
Option<Box<dyn State>> เมื่อเราเรียก as_ref, Option<&Box<dyn State>>
ถูก return ถ้าเราไม่เรียก as_ref เราจะได้ error เพราะเราไม่สามารถย้าย
state ออกจาก &self ที่ถูก borrow ของ parameter ฟังก์ชัน
แล้วเราเรียกเมธอด unwrap ซึ่งเรารู้ว่าจะไม่ panic เพราะเรารู้ว่าเมธอด
บน Post รับประกันว่า state จะบรรจุค่า Some เสมอเมื่อเมธอดเหล่านั้น
เสร็จ นี่คือหนึ่งในกรณีที่เราพูดถึงในส่วน “เมื่อคุณมีข้อมูลมากกว่า
Compiler” ของบทที่ 9 เมื่อเรารู้
ว่าค่า None ไม่เป็นไปได้ แม้ compiler ไม่สามารถเข้าใจสิ่งนั้น
ที่จุดนี้ เมื่อเราเรียก content บน &Box<dyn State> deref coercion
จะมีผลบน & และ Box ดังนั้นเมธอด content จะถูกเรียกท้ายสุดบน type
ที่ implement trait State นั่นหมายความว่าเราต้องเพิ่ม content ให้
นิยาม trait State และนั่นคือที่เราจะใส่ logic สำหรับ content ที่จะ
return ขึ้นกับ state ใดที่เรามี ดังที่แสดงใน Listing 18-18
pub struct Post {
state: Option<Box<dyn State>>,
content: String,
}
impl Post {
pub fn new() -> Post {
Post {
state: Some(Box::new(Draft {})),
content: String::new(),
}
}
pub fn add_text(&mut self, text: &str) {
self.content.push_str(text);
}
pub fn content(&self) -> &str {
self.state.as_ref().unwrap().content(self)
}
pub fn request_review(&mut self) {
if let Some(s) = self.state.take() {
self.state = Some(s.request_review())
}
}
pub fn approve(&mut self) {
if let Some(s) = self.state.take() {
self.state = Some(s.approve())
}
}
}
trait State {
// --snip--
fn request_review(self: Box<Self>) -> Box<dyn State>;
fn approve(self: Box<Self>) -> Box<dyn State>;
fn content<'a>(&self, post: &'a Post) -> &'a str {
""
}
}
// --snip--
struct Draft {}
impl State for Draft {
fn request_review(self: Box<Self>) -> Box<dyn State> {
Box::new(PendingReview {})
}
fn approve(self: Box<Self>) -> Box<dyn State> {
self
}
}
struct PendingReview {}
impl State for PendingReview {
fn request_review(self: Box<Self>) -> Box<dyn State> {
self
}
fn approve(self: Box<Self>) -> Box<dyn State> {
Box::new(Published {})
}
}
struct Published {}
impl State for Published {
// --snip--
fn request_review(self: Box<Self>) -> Box<dyn State> {
self
}
fn approve(self: Box<Self>) -> Box<dyn State> {
self
}
fn content<'a>(&self, post: &'a Post) -> &'a str {
&post.content
}
}content ให้ trait Stateเราเพิ่ม implementation เริ่มต้นสำหรับเมธอด content ที่ return string
slice ว่าง นั่นหมายความว่าเราไม่ต้อง implement content บน struct
Draft และ PendingReview struct Published จะ override เมธอด
content และ return ค่าใน post.content แม้จะสะดวก การมีเมธอด
content บน State ตัดสิน content ของ Post คือทำให้เส้นระหว่างความ
รับผิดชอบของ State และความรับผิดชอบของ Post เบลอ
สังเกตว่าเราต้องการ lifetime annotation บนเมธอดนี้ ตามที่เราพูดถึงใน
บทที่ 10 เรากำลังรับ reference ของ post เป็น argument และ return
reference ของส่วนของ post นั้น ดังนั้น lifetime ของ reference ที่
return เกี่ยวกับ lifetime ของ argument post
และเราเสร็จแล้ว — Listing 18-11 ทั้งหมดทำงานแล้ว! เรา implement state
pattern ด้วยกฎของ workflow blog post Logic ที่เกี่ยวกับกฎอยู่ใน state
object แทนที่จะกระจายผ่าน Post
ทำไมไม่ใช้ Enum?
คุณอาจสงสัยว่าทำไมเราไม่ใช้ enum กับ post state ที่เป็นไปได้ต่างกัน
เป็น variant นั่นเป็นวิธีแก้ที่เป็นไปได้แน่นอน ลองมันและเปรียบเทียบ
ผลสุดท้ายเพื่อดูว่าคุณชอบอันไหน! ข้อเสียอย่างหนึ่งของการใช้ enum คือ
ทุกที่ที่ check ค่าของ enum จะต้องการ expression match หรือคล้ายกัน
เพื่อจัดการทุก variant ที่เป็นไปได้ นี่ซ้ำซ้อนกว่าวิธีแก้ trait
object นี้ได้
ประเมิน State Pattern
เราแสดงว่า Rust สามารถ implement state pattern แบบ object-oriented ได้
เพื่อ encapsulate พฤติกรรมต่างชนิดที่ post ควรมีในแต่ละ state เมธอดบน
Post ไม่รู้อะไรเกี่ยวกับพฤติกรรมต่างกัน เพราะวิธีที่เราจัด organize
โค้ด เราต้องดูเพียงที่เดียวเพื่อรู้วิธีต่างกันที่ published post ทำตัว —
implementation ของ trait State บน struct Published
ถ้าเราจะสร้าง implementation ทางเลือกที่ไม่ใช้ state pattern เราอาจใช้
expression match ในเมธอดบน Post หรือแม้ในโค้ด main ที่ check
state ของ post และเปลี่ยนพฤติกรรมในที่เหล่านั้นแทน นั่นหมายความว่าเราจะ
ต้องดูในหลายที่เพื่อเข้าใจ implication ทั้งหมดของ post ที่อยู่ใน state
published
ด้วย state pattern เมธอด Post และที่ที่เราใช้ Post ไม่ต้องการ
expression match และเพื่อเพิ่ม state ใหม่ เราจะต้องการเพียงเพิ่ม
struct ใหม่และ implement เมธอด trait บน struct นั้นในที่เดียว
Implementation ที่ใช้ state pattern ขยายเพื่อเพิ่ม functionality ได้ ง่าย เพื่อดูความเรียบง่ายของการ maintain โค้ดที่ใช้ state pattern ลอง ข้อแนะนำเหล่านี้บ้าง:
- เพิ่มเมธอด
rejectที่เปลี่ยน state ของ post จากPendingReviewกลับ ไปDraft - ต้องการการเรียก
approveสองครั้งก่อน state สามารถเปลี่ยนเป็นPublished - อนุญาตให้ user เพิ่ม text content เพียงเมื่อ post อยู่ใน state
DraftHint: ให้ state object รับผิดชอบสิ่งที่อาจเปลี่ยนเกี่ยวกับ content แต่ไม่รับผิดชอบการแก้Post
ข้อเสียอย่างหนึ่งของ state pattern คือ เพราะ state implement transition
ระหว่าง state บาง state ถูก couple กันและกัน ถ้าเราเพิ่ม state อีกอัน
ระหว่าง PendingReview และ Published เช่น Scheduled เราจะต้อง
เปลี่ยนโค้ดใน PendingReview เพื่อ transition เป็น Scheduled แทน
งานจะน้อยกว่าถ้า PendingReview ไม่ต้องเปลี่ยนกับการเพิ่ม state ใหม่
แต่นั่นจะหมายความว่าต้อง switch ไป design pattern อื่น
ข้อเสียอีกอย่างคือเรา duplicate logic บางส่วน เพื่อตัด duplication
บางส่วน เราอาจลองทำ implementation เริ่มต้นสำหรับเมธอด request_review
และ approve บน trait State ที่ return self อย่างไรก็ตาม นี่จะไม่
ทำงาน — เมื่อใช้ State เป็น trait object trait ไม่รู้ว่า self
concrete จะเป็นอะไรแน่ ๆ ดังนั้น return type ไม่รู้ที่ compile time
(นี่คือหนึ่งในกฎ dyn compatibility ที่กล่าวก่อนหน้า)
Duplication อื่นรวม implementation คล้ายกันของเมธอด request_review
และ approve บน Post ทั้งเมธอดใช้ Option::take กับ field state
ของ Post และถ้า state เป็น Some พวกมัน delegate ให้ implementation
ของเมธอดเดียวกันของค่า wrap และตั้งค่าใหม่ของ field state เป็นผล ถ้า
เรามีเมธอดเยอะบน Post ที่ตามแบบนี้ เราอาจพิจารณานิยาม macro เพื่อ
ขจัด repetition (ดูส่วน “Macros” ในบทที่ 20)
โดยการ implement state pattern ตรงตามที่นิยามสำหรับภาษา object-oriented
เราไม่ใช้ประโยชน์จากจุดแข็งของ Rust เต็มที่เท่าที่เราทำได้ มาดูการ
เปลี่ยนแปลงบ้างที่เราทำกับ crate blog ได้ที่ทำให้ state และ
transition ที่ invalid เป็น compile-time error
Encode State และพฤติกรรมเป็น Type
เราจะแสดงให้คุณเห็นว่าคิดใหม่ state pattern เพื่อได้ชุด trade-off ต่างยังไง แทนที่จะ encapsulate state และ transition โดยสมบูรณ์เพื่อให้โค้ดภายนอก ไม่มีความรู้เกี่ยวกับพวกมัน เราจะ encode state ลงใน type ต่างกัน ตามนั้น ระบบ type-checking ของ Rust จะป้องกันความพยายามใช้ draft post ที่เพียง published post ถูกอนุญาตโดยออก error compiler
มาพิจารณาส่วนแรกของ main ใน Listing 18-11:
use blog::Post;
fn main() {
let mut post = Post::new();
post.add_text("I ate a salad for lunch today");
assert_eq!("", post.content());
post.request_review();
assert_eq!("", post.content());
post.approve();
assert_eq!("I ate a salad for lunch today", post.content());
}เรายังเปิดใช้การสร้าง post ใหม่ใน state draft โดยใช้ Post::new และ
ความสามารถในการเพิ่ม text ให้ content ของ post แต่แทนที่จะมีเมธอด
content บน draft post ที่ return string ว่าง เราจะทำให้ draft post
ไม่มีเมธอด content เลย ด้วยวิธีนั้น ถ้าเราพยายามได้ content ของ draft
post เราจะได้ error compiler บอกเราว่าเมธอดไม่มี ผลคือ มันจะเป็นไปไม่ได้
สำหรับเราที่จะแสดง content draft post โดยบังเอิญใน production เพราะโค้ด
นั้นจะไม่ compile เลย Listing 18-19 แสดงนิยามของ struct Post และ
struct DraftPost รวมทั้งเมธอดบนแต่ละ
pub struct Post {
content: String,
}
pub struct DraftPost {
content: String,
}
impl Post {
pub fn new() -> DraftPost {
DraftPost {
content: String::new(),
}
}
pub fn content(&self) -> &str {
&self.content
}
}
impl DraftPost {
pub fn add_text(&mut self, text: &str) {
self.content.push_str(text);
}
}Post ที่มีเมธอด content และ DraftPost โดยไม่มีเมธอด contentทั้ง struct Post และ DraftPost มี field private content ที่เก็บ
text blog post struct ไม่มี field state แล้วเพราะเราย้าย encoding
ของ state ไปยัง type ของ struct struct Post จะ represent published
post และมีเมธอด content ที่ return content
เรายังมีฟังก์ชัน Post::new แต่แทนที่จะ return instance ของ Post มัน
return instance ของ DraftPost เพราะ content เป็น private และไม่มี
ฟังก์ชันใดที่ return Post มันไม่เป็นไปได้ที่จะสร้าง instance ของ
Post ตอนนี้
Struct DraftPost มีเมธอด add_text ดังนั้นเราเพิ่ม text ให้ content
เหมือนเดิมได้ แต่สังเกตว่า DraftPost ไม่มีเมธอด content ที่นิยาม!
ดังนั้นตอนนี้โปรแกรมรับประกันว่า post ทั้งหมดเริ่มเป็น draft post และ
draft post ไม่มี content ที่ใช้ได้สำหรับการแสดง ความพยายามใด ๆ
ที่จะอ้อมข้อจำกัดเหล่านี้จะให้ผลเป็น error compiler
แล้วเราจะได้ published post ยังไง? เราต้องการบังคับกฎที่ draft post
ต้องถูก review และ approve ก่อนมันถูก publish post ใน state pending
review ควรยังไม่แสดง content ใด มา implement ข้อจำกัดเหล่านี้โดยเพิ่ม
struct อีกอัน PendingReviewPost นิยามเมธอด request_review บน
DraftPost ให้ return PendingReviewPost และนิยามเมธอด approve บน
PendingReviewPost ให้ return Post ดังที่แสดงใน Listing 18-20
pub struct Post {
content: String,
}
pub struct DraftPost {
content: String,
}
impl Post {
pub fn new() -> DraftPost {
DraftPost {
content: String::new(),
}
}
pub fn content(&self) -> &str {
&self.content
}
}
impl DraftPost {
// --snip--
pub fn add_text(&mut self, text: &str) {
self.content.push_str(text);
}
pub fn request_review(self) -> PendingReviewPost {
PendingReviewPost {
content: self.content,
}
}
}
pub struct PendingReviewPost {
content: String,
}
impl PendingReviewPost {
pub fn approve(self) -> Post {
Post {
content: self.content,
}
}
}PendingReviewPost ที่ถูกสร้างโดยเรียก request_review บน DraftPost และเมธอด approve ที่เปลี่ยน PendingReviewPost เป็น Post ที่ publishedเมธอด request_review และ approve รับ ownership ของ self ดังนั้น
consume instance DraftPost และ PendingReviewPost และ transform
พวกมันเป็น PendingReviewPost และ Post ที่ published ตามลำดับ ด้วย
วิธีนี้ เราจะไม่มี instance DraftPost ที่ค้างหลังจากที่เราเรียก
request_review บนพวกมัน และอื่น ๆ Struct PendingReviewPost ไม่มี
เมธอด content ที่นิยามบนมัน ดังนั้นความพยายามอ่าน content ของมันให้ผล
เป็น error compiler เช่นเดียวกับ DraftPost เพราะวิธีเดียวที่จะได้
instance Post ที่ published ที่มีเมธอด content ที่นิยามคือเรียกเมธอด
approve บน PendingReviewPost และวิธีเดียวที่จะได้ PendingReviewPost
คือเรียกเมธอด request_review บน DraftPost ตอนนี้เรา encode workflow
blog post ลงในระบบ type แล้ว
แต่เราต้องทำการเปลี่ยนเล็กน้อยให้ main ด้วย เมธอด request_review และ
approve return instance ใหม่แทนที่จะแก้ struct ที่ถูกเรียกบน ดังนั้น
เราต้องเพิ่ม shadowing assignment let post = อีกเพื่อ save instance
ที่ return เราไม่สามารถมี assertion ว่า content ของ draft และ pending
review post เป็น string ว่าง และเราไม่ต้องการพวกมัน — เราไม่สามารถ
compile โค้ดที่พยายามใช้ content ของ post ใน state เหล่านั้นได้อีกแล้ว
โค้ดอัพเดทใน main แสดงใน Listing 18-21
use blog::Post;
fn main() {
let mut post = Post::new();
post.add_text("I ate a salad for lunch today");
let post = post.request_review();
let post = post.approve();
assert_eq!("I ate a salad for lunch today", post.content());
}main เพื่อใช้ implementation ใหม่ของ workflow blog postการเปลี่ยนที่เราต้องทำให้ main เพื่อ reassign post หมายความว่า
implementation นี้ไม่ตามแบบ state pattern แบบ object-oriented อีกแล้ว —
การ transformation ระหว่าง state ไม่ถูก encapsulate ทั้งหมดภายใน
implementation ของ Post อีก อย่างไรก็ตาม สิ่งที่เราได้คือ state ที่
invalid ตอนนี้เป็นไปไม่ได้เพราะระบบ type และ type checking ที่เกิดที่
compile time! นี่รับประกันว่า bug บางอย่าง เช่น การแสดง content ของ
post ที่ไม่ published จะถูกค้นพบก่อนพวกมันไปถึง production
ลองงานที่แนะนำในตอนเริ่มของส่วนนี้บน crate blog ตามที่เป็นหลัง Listing
18-21 เพื่อดูสิ่งที่คุณคิดเกี่ยวกับการออกแบบของ version นี้ของโค้ด
สังเกตว่างานบางอย่างอาจ complete แล้วในการออกแบบนี้
เราเห็นว่าแม้ Rust สามารถ implement design pattern แบบ object-oriented ได้ pattern อื่น เช่น encoding state ลงในระบบ type ก็ใช้ได้ใน Rust ด้วย Pattern เหล่านี้มี trade-off ต่างกัน แม้คุณอาจคุ้นเคยมากกับ pattern object-oriented การคิดใหม่ปัญหาเพื่อใช้ประโยชน์จากฟีเจอร์ของ Rust ให้ประโยชน์ได้ เช่นป้องกัน bug บางอย่างที่ compile time Pattern object-oriented จะไม่ใช่วิธีแก้ที่ดีที่สุดใน Rust เสมอเพราะฟีเจอร์ บางอย่าง เช่น ownership ที่ภาษา object-oriented ไม่มี
สรุป
ไม่ว่าคุณคิดว่า Rust เป็นภาษา object-oriented หรือไม่หลังจากอ่านบทนี้ ตอนนี้คุณรู้ว่าคุณใช้ trait object เพื่อได้ฟีเจอร์ object-oriented บางส่วนใน Rust ได้ Dynamic dispatch ให้โค้ดของคุณความยืดหยุ่นบ้างเพื่อ แลกกับ performance ที่ runtime เล็กน้อย คุณใช้ความยืดหยุ่นนี้เพื่อ implement pattern object-oriented ที่ช่วย maintainability ของโค้ดของ คุณได้ Rust ยังมีฟีเจอร์อื่น เช่น ownership ที่ภาษา object-oriented ไม่ มี Pattern object-oriented จะไม่ใช่วิธีที่ดีที่สุดในการใช้ประโยชน์จาก จุดแข็งของ Rust เสมอ แต่มันเป็นตัวเลือกที่ใช้ได้
ถัดไป เราจะดู pattern ซึ่งเป็นอีกฟีเจอร์ของ Rust ที่เปิดใช้ความยืดหยุ่น มาก เราดูพวกมันสั้น ๆ ผ่านหนังสือ แต่ยังไม่เห็นความสามารถเต็มของพวกมัน ไปกันเลย!
Pattern และการ Matching
Pattern คือ syntax พิเศษใน Rust สำหรับ match กับโครงสร้างของ type ทั้ง
complex และ simple การใช้ pattern ร่วมกับ expression match และ
construct อื่น ๆ ให้คุณควบคุม control flow ของโปรแกรมมากขึ้น Pattern
ประกอบด้วยการรวมกันบางอย่างต่อไปนี้:
- Literal
- Array, enum, struct หรือ tuple ที่ destructure
- ตัวแปร
- Wildcard
- Placeholder
ตัวอย่าง pattern บางอย่างรวม x, (a, 3) และ Some(Color::Red) ใน
context ที่ pattern valid component เหล่านี้อธิบายรูปร่างของข้อมูล แล้ว
โปรแกรมของเรา match ค่ากับ pattern เพื่อตัดสินว่ามันมีรูปร่างถูกของข้อมูล
ที่จะรันชิ้นโค้ดเฉพาะต่อไป
เพื่อใช้ pattern เราเปรียบเทียบมันกับค่า ถ้า pattern match ค่า เราใช้
ส่วนค่าในโค้ดของเรา จำ expression match ในบทที่ 6 ที่ใช้ pattern เช่น
ตัวอย่างเครื่อง coin-sorting ถ้าค่า fit รูปร่างของ pattern เราใช้ชิ้น
ที่ named ได้ ถ้าไม่ โค้ดที่ associate กับ pattern จะไม่รัน
บทนี้เป็น reference เกี่ยวกับทุกสิ่งที่เกี่ยวกับ pattern เราจะครอบคลุม ที่ที่ valid ในการใช้ pattern, ความแตกต่างระหว่าง refutable และ irrefutable pattern และชนิดต่างของ syntax pattern ที่คุณอาจเห็น เมื่อ จบบท คุณจะรู้วิธีใช้ pattern เพื่อแสดงแนวคิดหลายอย่างในวิธีชัดเจน
ที่ ๆ ใช้ pattern ได้ทั้งหมด
ทุกที่ที่ Pattern ถูกใช้ได้
Pattern โผล่ในที่หลายแห่งใน Rust และคุณใช้พวกมันมากโดยไม่รู้ตัว! ส่วนนี้ พูดถึงทุกที่ที่ pattern valid
match Arm
ตามที่พูดถึงในบทที่ 6 เราใช้ pattern ใน arm ของ expression match อย่าง
เป็นทางการ expression match ถูกนิยามเป็นคีย์เวิร์ด match, ค่าที่จะ
match บน และหนึ่งหรือมากกว่า match arm ที่ประกอบด้วย pattern และ
expression ที่จะรันถ้าค่า match pattern ของ arm นั้น แบบนี้:
match VALUE {
PATTERN => EXPRESSION,
PATTERN => EXPRESSION,
PATTERN => EXPRESSION,
}ตัวอย่างเช่น นี่คือ expression match จาก Listing 6-5 ที่ match บนค่า
Option<i32> ในตัวแปร x:
match x {
None => None,
Some(i) => Some(i + 1),
}Pattern ใน expression match นี้คือ None และ Some(i) ทางซ้ายของ
ลูกศรแต่ละตัว
ข้อกำหนดหนึ่งสำหรับ expression match คือพวกมันต้อง exhaustive ในความ
หมายที่ความเป็นไปได้ทั้งหมดสำหรับค่าใน expression match ต้องถูกคำนึง
ถึง วิธีหนึ่งในการรับประกันว่าคุณครอบคลุมทุกความเป็นไปได้คือมี pattern
catch-all สำหรับ arm สุดท้าย — ตัวอย่างเช่น ชื่อตัวแปรที่ match ค่าใดได้
ไม่สามารถ fail และดังนั้นครอบคลุมทุกกรณีที่เหลือ
pattern เฉพาะ _ จะ match อะไรก็ได้ แต่มันไม่ bind ให้ตัวแปร ดังนั้นมัน
มักถูกใช้ใน match arm สุดท้าย Pattern _ มีประโยชน์เมื่อคุณต้องการ
ignore ค่าใดที่ไม่ระบุ ตัวอย่างเช่น เราจะครอบคลุม pattern _ ในราย
ละเอียดมากขึ้นใน “Ignore ค่าใน Pattern”
ภายหลังในบทนี้
let Statement
ก่อนหน้าบทนี้ เราเพียงพูดถึงการใช้ pattern กับ match และ if let
อย่างชัดเจน แต่จริง ๆ เราใช้ pattern ในที่อื่นด้วย รวมใน statement
let ตัวอย่างเช่น พิจารณา assignment ตัวแปรตรงไปตรงมานี้กับ let:
#![allow(unused)]
fn main() {
let x = 5;
}ทุกครั้งที่คุณใช้ statement let แบบนี้ คุณกำลังใช้ pattern แม้คุณ
อาจไม่ได้สังเกต! เป็นทางการมากขึ้น statement let ดูแบบนี้:
let PATTERN = EXPRESSION;
ใน statement เช่น let x = 5; กับชื่อตัวแปรในช่อง PATTERN ชื่อตัวแปร
เป็นเพียงรูปแบบที่ง่ายเป็นพิเศษของ pattern Rust เปรียบเทียบ expression
กับ pattern และ assign ชื่อที่มันพบ ดังนั้น ในตัวอย่าง let x = 5;,
x คือ pattern ที่หมายถึง “bind สิ่งที่ match ที่นี่ให้ตัวแปร x”
เพราะชื่อ x คือ pattern ทั้งหมด pattern นี้มีผลหมายความว่า “bind ทุก
อย่างให้ตัวแปร x ไม่ว่าค่าเป็นอะไร”
เพื่อเห็นแง่มุม pattern-matching ของ let ชัดเจนมากขึ้น พิจารณา Listing
19-1 ซึ่งใช้ pattern กับ let เพื่อ destructure tuple
fn main() {
let (x, y, z) = (1, 2, 3);
}ที่นี่ เรา match tuple กับ pattern Rust เปรียบเทียบค่า (1, 2, 3) กับ
pattern (x, y, z) และเห็นว่าค่า match pattern — นั่นคือ มันเห็นว่า
จำนวน element เหมือนกันในทั้งสอง — ดังนั้น Rust bind 1 ให้ x, 2 ให้
y และ 3 ให้ z คุณคิด pattern tuple นี้เป็นการ nest pattern ตัวแปร
สามตัวภายในมันได้
ถ้าจำนวน element ใน pattern ไม่ match จำนวน element ใน tuple type โดย รวมจะไม่ match และเราจะได้ error compiler ตัวอย่างเช่น Listing 19-2 แสดงความพยายาม destructure tuple ที่มีสาม element เป็นสองตัวแปร ซึ่งจะ ไม่ทำงาน
fn main() {
let (x, y) = (1, 2, 3);
}การพยายาม compile โค้ดนี้ให้ผลเป็น error type นี้:
$ cargo run
Compiling patterns v0.1.0 (file:///projects/patterns)
error[E0308]: mismatched types
--> src/main.rs:2:9
|
2 | let (x, y) = (1, 2, 3);
| ^^^^^^ --------- this expression has type `({integer}, {integer}, {integer})`
| |
| expected a tuple with 3 elements, found one with 2 elements
|
= note: expected tuple `({integer}, {integer}, {integer})`
found tuple `(_, _)`
For more information about this error, try `rustc --explain E0308`.
error: could not compile `patterns` (bin "patterns") due to 1 previous error
เพื่อ fix error เรา ignore หนึ่งหรือมากกว่าของค่าใน tuple โดยใช้ _
หรือ .. ดังที่คุณจะเห็นในส่วน “Ignore ค่าใน
Pattern” ได้ ถ้าปัญหาคือ
เรามีตัวแปรเยอะเกินไปใน pattern วิธีแก้คือทำให้ type match โดยลบตัวแปร
เพื่อให้จำนวนตัวแปรเท่ากับจำนวน element ใน tuple
Expression if let แบบ Conditional
ในบทที่ 6 เราพูดถึงวิธีใช้ expression if let หลัก ๆ เป็นวิธีสั้นในการ
เขียนเทียบเท่า match ที่ match เพียงหนึ่งกรณี ตัวเลือก if let มี
else ที่ตรงกันบรรจุโค้ดที่จะรันถ้า pattern ใน if let ไม่ match ได้
Listing 19-3 แสดงว่ามันเป็นไปได้ที่จะผสม if let, else if และ
expression else if let ด้วย การทำเช่นนั้นให้เราความยืดหยุ่นมากกว่า
expression match ที่เราแสดงเพียงหนึ่งค่าเพื่อเปรียบเทียบกับ pattern
นอกจากนี้ Rust ไม่ต้องการให้เงื่อนไขในชุดของ if let, else if และ
else if let arm เกี่ยวข้องกัน
โค้ดใน Listing 19-3 ตัดสินสีอะไรจะทำพื้นหลังของคุณตามชุดของการ check สำหรับเงื่อนไขหลายอย่าง สำหรับตัวอย่างนี้ เราสร้างตัวแปรกับค่า hardcoded ที่โปรแกรมจริงอาจรับจาก input ของ user
fn main() {
let favorite_color: Option<&str> = None;
let is_tuesday = false;
let age: Result<u8, _> = "34".parse();
if let Some(color) = favorite_color {
println!("Using your favorite color, {color}, as the background");
} else if is_tuesday {
println!("Tuesday is green day!");
} else if let Ok(age) = age {
if age > 30 {
println!("Using purple as the background color");
} else {
println!("Using orange as the background color");
}
} else {
println!("Using blue as the background color");
}
}if let, else if, else if let และ elseถ้า user ระบุสีโปรด สีนั้นถูกใช้เป็นพื้นหลัง ถ้าไม่มีสีโปรดระบุและวัน นี้คือวันอังคาร สีพื้นหลังคือเขียว มิฉะนั้น ถ้า user ระบุอายุของพวกเขา เป็น string และเราสามารถ parse มันเป็นตัวเลขสำเร็จ สีคือม่วงหรือส้ม ขึ้นกับค่าของตัวเลข ถ้าไม่มีเงื่อนไขเหล่านี้ apply สีพื้นหลังคือฟ้า
โครงสร้าง conditional นี้ให้เราสนับสนุนข้อกำหนด complex ด้วยค่า
hardcoded ที่เรามีที่นี่ ตัวอย่างนี้จะ print Using purple as the background color
คุณเห็นได้ว่า if let สามารถแนะนำตัวแปรใหม่ที่ shadow ตัวแปรที่มีใน
วิธีเดียวกับที่ match arm ทำได้ — บรรทัด if let Ok(age) = age แนะนำตัวแปร
age ใหม่ที่บรรจุค่าภายใน variant Ok shadow ตัวแปร age ที่มี นี่
หมายความว่าเราต้องวางเงื่อนไข if age > 30 ภายใน block นั้น — เราไม่
สามารถรวมสองเงื่อนไขนี้เป็น if let Ok(age) = age && age > 30 age
ใหม่ที่เราต้องการเปรียบเทียบกับ 30 ไม่ valid จนกระทั่ง scope ใหม่เริ่ม
ด้วย curly bracket
ข้อเสียของการใช้ expression if let คือ compiler ไม่ check
exhaustiveness ขณะที่กับ expression match มัน check ถ้าเราละ block
else สุดท้ายและดังนั้นพลาดการจัดการบางกรณี compiler จะไม่เตือนเรา
เกี่ยวกับ bug logic ที่เป็นไปได้
while let Conditional Loop
คล้ายกับการสร้างของ if let loop conditional while let อนุญาตให้ loop
while รันตราบใดที่ pattern ยัง match ใน Listing 19-4 เราแสดง loop
while let ที่รอข้อความที่ส่งระหว่างเธรด แต่ในกรณีนี้ check Result
แทน Option
fn main() {
let (tx, rx) = std::sync::mpsc::channel();
std::thread::spawn(move || {
for val in [1, 2, 3] {
tx.send(val).unwrap();
}
});
while let Ok(value) = rx.recv() {
println!("{value}");
}
}while let เพื่อ print ค่าตราบใดที่ rx.recv() return Okตัวอย่างนี้ print 1, 2 แล้ว 3 เมธอด recv รับข้อความตัวแรกออก
จากฝั่ง receiver ของ channel และ return Ok(value) เมื่อเราเห็น recv
ครั้งแรกในบทที่ 16 เรา unwrap error โดยตรง หรือเรา interact กับมันเป็น
iterator โดยใช้ loop for อย่างไรก็ตาม ดังที่ Listing 19-4 แสดง เราใช้
while let ได้ด้วย เพราะเมธอด recv return Ok แต่ละครั้งที่ข้อความ
มา ตราบใดที่ sender มี และแล้วผลิต Err เมื่อฝั่ง sender disconnect
Loop for
ใน loop for ค่าที่ตามคีย์เวิร์ด for โดยตรงคือ pattern ตัวอย่างเช่น
ใน for x in y, x คือ pattern Listing 19-5 สาธิตวิธีใช้ pattern ใน
loop for เพื่อ destructure หรือ break apart tuple เป็นส่วนของ loop
for
fn main() {
let v = vec!['a', 'b', 'c'];
for (index, value) in v.iter().enumerate() {
println!("{value} is at index {index}");
}
}for เพื่อ destructure tupleโค้ดใน Listing 19-5 จะ print ต่อไปนี้:
$ cargo run
Compiling patterns v0.1.0 (file:///projects/patterns)
Finished `dev` profile [unoptimized + debuginfo] target(s) in 0.52s
Running `target/debug/patterns`
a is at index 0
b is at index 1
c is at index 2
เรา adapt iterator โดยใช้เมธอด enumerate เพื่อให้มันผลิตค่าและ index
สำหรับค่านั้น วางใน tuple ค่าแรกที่ผลิตคือ tuple (0, 'a') เมื่อค่านี้
ถูก match กับ pattern (index, value) index จะเป็น 0 และ value จะ
เป็น 'a' print บรรทัดแรกของ output
Parameter ฟังก์ชัน
Parameter ฟังก์ชันเป็น pattern ได้เช่นกัน โค้ดใน Listing 19-6 ซึ่ง
ประกาศฟังก์ชันชื่อ foo ที่รับหนึ่ง parameter ชื่อ x ของ type i32
ควรดูคุ้นเคยแล้ว
fn foo(x: i32) {
// code goes here
}
fn main() {}ส่วน x คือ pattern! ดังที่เราทำกับ let เรา match tuple ใน argument
ของฟังก์ชันกับ pattern ได้ Listing 19-7 แบ่งค่าใน tuple เมื่อเราส่งมัน
ให้ฟังก์ชัน
fn print_coordinates(&(x, y): &(i32, i32)) {
println!("Current location: ({x}, {y})");
}
fn main() {
let point = (3, 5);
print_coordinates(&point);
}โค้ดนี้ print Current location: (3, 5) ค่า &(3, 5) match pattern
&(x, y) ดังนั้น x คือค่า 3 และ y คือค่า 5
เราใช้ pattern ใน list parameter closure ในวิธีเดียวกับใน list parameter ฟังก์ชันได้เพราะ closure คล้ายกับฟังก์ชัน ดังที่พูดถึงในบทที่ 13
ที่จุดนี้ คุณเห็นวิธีหลายอย่างในการใช้ pattern แต่ pattern ไม่ทำงาน เหมือนกันในทุกที่ที่เราใช้ได้ ในที่บางที่ pattern ต้อง irrefutable; ใน สถานการณ์อื่น พวกมันเป็น refutable ได้ เราจะพูดถึงสองแนวคิดนี้ถัดไป
Refutability: pattern ที่อาจ match ไม่สำเร็จ
Refutability — Pattern อาจ Fail ในการ Match ไหม
Pattern มีสองรูปแบบ — refutable และ irrefutable Pattern ที่จะ match
สำหรับค่าที่เป็นไปได้ใดที่ส่งคือ irrefutable ตัวอย่างจะเป็น x ใน
statement let x = 5; เพราะ x match อะไรก็ได้และดังนั้นไม่ fail ใน
การ match Pattern ที่ fail ในการ match สำหรับค่าที่เป็นไปได้บางอย่างคือ
refutable ตัวอย่างจะเป็น Some(x) ใน expression if let Some(x) = a_value เพราะถ้าค่าในตัวแปร a_value คือ None แทนที่จะเป็น Some
pattern Some(x) จะไม่ match
Parameter ฟังก์ชัน, statement let และ loop for รับเพียง pattern
irrefutable เพราะโปรแกรมไม่สามารถทำอะไรที่มีความหมายเมื่อค่าไม่ match
Expression if let และ while let และ statement let...else รับทั้ง
pattern refutable และ irrefutable แต่ compiler เตือนต่อ pattern
irrefutable เพราะตามนิยาม พวกมันตั้งใจจัดการ failure ที่เป็นไปได้ —
functionality ของ conditional คือในความสามารถของมันที่จะทำต่างขึ้นกับ
success หรือ failure
โดยทั่วไป คุณไม่ต้องกังวลเกี่ยวกับความแตกต่างระหว่าง pattern refutable และ irrefutable; อย่างไรก็ตาม คุณต้องคุ้นเคยกับแนวคิดของ refutability เพื่อให้คุณตอบสนองได้เมื่อคุณเห็นมันในข้อความ error ในกรณีเหล่านั้น คุณจะต้องเปลี่ยนทั้ง pattern หรือ construct ที่คุณใช้ pattern กับ ขึ้นกับพฤติกรรมที่ตั้งใจของโค้ด
มาดูตัวอย่างของสิ่งที่เกิดขึ้นเมื่อเราพยายามใช้ pattern refutable ที่
Rust ต้องการ pattern irrefutable และในทางกลับกัน Listing 19-8 แสดง
statement let แต่สำหรับ pattern เราระบุ Some(x), pattern refutable
ดังที่คุณคาดเดา โค้ดนี้จะไม่ compile
fn main() {
let some_option_value: Option<i32> = None;
let Some(x) = some_option_value;
}letถ้า some_option_value เป็นค่า None มันจะ fail ในการ match pattern
Some(x) หมายความว่า pattern เป็น refutable อย่างไรก็ตาม statement
let รับเพียง pattern irrefutable ได้เพราะไม่มีอะไร valid ที่โค้ดทำกับ
ค่า None ได้ ที่ compile time Rust จะบ่นว่าเราพยายามใช้ pattern
refutable ที่ pattern irrefutable ถูกต้องการ:
$ cargo run
Compiling patterns v0.1.0 (file:///projects/patterns)
error[E0005]: refutable pattern in local binding
--> src/main.rs:3:9
|
3 | let Some(x) = some_option_value;
| ^^^^^^^ pattern `None` not covered
|
= note: `let` bindings require an "irrefutable pattern", like a `struct` or an `enum` with only one variant
= note: for more information, visit https://doc.rust-lang.org/book/ch19-02-refutability.html
= note: the matched value is of type `Option<i32>`
help: you might want to use `let else` to handle the variant that isn't matched
|
3 | let Some(x) = some_option_value else { todo!() };
| ++++++++++++++++
For more information about this error, try `rustc --explain E0005`.
error: could not compile `patterns` (bin "patterns") due to 1 previous error
เพราะเราไม่ครอบคลุม (และไม่สามารถครอบคลุม!) ทุกค่า valid กับ pattern
Some(x) Rust ผลิต error compiler อย่างถูกต้อง
ถ้าเรามี pattern refutable ที่ pattern irrefutable ถูกต้องการ เรา fix
มันโดยเปลี่ยนโค้ดที่ใช้ pattern ได้ — แทนที่จะใช้ let เราใช้
let...else ได้ แล้ว ถ้า pattern ไม่ match โค้ดใน curly bracket จะ
จัดการค่า Listing 19-9 แสดงวิธี fix โค้ดใน Listing 19-8
fn main() {
let some_option_value: Option<i32> = None;
let Some(x) = some_option_value else {
return;
};
}let...else และ block กับ pattern refutable แทน letเราให้โค้ดทางออก! โค้ดนี้ valid อย่างสมบูรณ์ แม้มันหมายความว่าเราไม่
สามารถใช้ pattern irrefutable โดยไม่รับ warning ถ้าเราให้ let...else
pattern ที่จะ match เสมอ เช่น x ดังที่แสดงใน Listing 19-10 compiler
จะให้ warning
fn main() {
let x = 5 else {
return;
};
}let...elseRust บ่นว่ามันไม่สมเหตุสมผลที่จะใช้ let...else กับ pattern
irrefutable:
$ cargo run
Compiling patterns v0.1.0 (file:///projects/patterns)
warning: irrefutable `let...else` pattern
--> src/main.rs:2:5
|
2 | let x = 5 else {
| ^^^^^^^^^
|
= note: this pattern will always match, so the `else` clause is useless
= help: consider removing the `else` clause
= note: `#[warn(irrefutable_let_patterns)]` on by default
warning: `patterns` (bin "patterns") generated 1 warning
Finished `dev` profile [unoptimized + debuginfo] target(s) in 0.39s
Running `target/debug/patterns`
เพราะเหตุผลนี้ match arm ต้องใช้ pattern refutable ยกเว้น arm สุดท้าย
ซึ่งควร match ค่าที่เหลือใดกับ pattern irrefutable Rust อนุญาตให้เรา
ใช้ pattern irrefutable ใน match กับเพียงหนึ่ง arm ได้ แต่ syntax นี้
ไม่มีประโยชน์เป็นพิเศษและถูกแทนที่ด้วย statement let ที่ง่ายกว่าได้
ตอนนี้คุณรู้ที่จะใช้ pattern และความแตกต่างระหว่าง pattern refutable และ irrefutable มาครอบคลุม syntax ทั้งหมดที่เราใช้สร้าง pattern ได้
Syntax ของ pattern
Syntax Pattern
ในส่วนนี้ เรารวบรวม syntax ทั้งหมดที่ valid ใน pattern และพูดถึงว่าทำไม และเมื่อไรคุณอาจต้องการใช้แต่ละอัน
Match Literal
ดังที่คุณเห็นในบทที่ 6 คุณ match pattern กับ literal โดยตรงได้ โค้ดต่อ ไปนี้ให้ตัวอย่างบ้าง:
fn main() {
let x = 1;
match x {
1 => println!("one"),
2 => println!("two"),
3 => println!("three"),
_ => println!("anything"),
}
}โค้ดนี้ print one เพราะค่าใน x คือ 1 Syntax นี้มีประโยชน์เมื่อ
คุณต้องการให้โค้ดของคุณทำ action ถ้ามันได้ค่า concrete เฉพาะ
Match Named Variable
ตัวแปร named คือ pattern irrefutable ที่ match ค่าใดก็ได้ และเราใช้พวก
มันหลายครั้งในหนังสือนี้ อย่างไรก็ตาม มี complication เมื่อคุณใช้ตัวแปร
named ใน expression match, if let หรือ while let เพราะแต่ละชนิด
ของ expression เหล่านี้เริ่ม scope ใหม่ ตัวแปรที่ประกาศเป็นส่วนของ
pattern ภายใน expression เหล่านี้จะ shadow ที่มีชื่อเดียวกันนอก
construct เหมือนกรณีกับตัวแปรทั้งหมด ใน Listing 19-11 เราประกาศตัวแปร
ชื่อ x กับค่า Some(5) และตัวแปร y กับค่า 10 แล้วเราสร้าง
expression match บนค่า x ดู pattern ใน match arm และ println!
ในตอนท้าย และลองคิดออกว่าโค้ดจะ print อะไรก่อนรันโค้ดนี้หรืออ่านต่อ
fn main() {
let x = Some(5);
let y = 10;
match x {
Some(50) => println!("Got 50"),
Some(y) => println!("Matched, y = {y}"),
_ => println!("Default case, x = {x:?}"),
}
println!("at the end: x = {x:?}, y = {y}");
}match ที่มี arm ที่แนะนำตัวแปรใหม่ซึ่ง shadow ตัวแปร y ที่มีมาเดินผ่านสิ่งที่เกิดขึ้นเมื่อ expression match รัน Pattern ใน match
arm ตัวแรกไม่ match ค่าที่นิยามของ x ดังนั้นโค้ดต่อไป
Pattern ใน match arm ตัวที่สองแนะนำตัวแปรใหม่ชื่อ y ที่จะ match ค่าใด
ภายในค่า Some เพราะเราอยู่ใน scope ใหม่ภายใน expression match นี่
คือตัวแปร y ใหม่ ไม่ใช่ y ที่เราประกาศตอนเริ่มกับค่า 10 การ
binding y ใหม่นี้จะ match ค่าใดภายใน Some ซึ่งคือสิ่งที่เรามีใน x
ดังนั้น y ใหม่นี้ bind กับค่าด้านในของ Some ใน x ค่านั้นคือ 5
ดังนั้น expression สำหรับ arm นั้นรันและ print Matched, y = 5
ถ้า x เป็นค่า None แทนที่จะเป็น Some(5) pattern ในสอง arm แรกจะ
ไม่ match ดังนั้นค่าจะถูก match กับ underscore เราไม่ได้แนะนำตัวแปร x
ใน pattern ของ arm underscore ดังนั้น x ใน expression ยังเป็น x
ภายนอกที่ไม่ถูก shadow ในกรณีสมมตินี้ match จะ print Default case, x = None
เมื่อ expression match เสร็จ scope ของมันจบ และ scope ของ y ด้านในก็
จบ println! สุดท้ายผลิต at the end: x = Some(5), y = 10
เพื่อสร้าง expression match ที่เปรียบเทียบค่าของ x และ y ภายนอก
แทนที่จะแนะนำตัวแปรใหม่ที่ shadow ตัวแปร y ที่มี เราจะต้องใช้
conditional match guard แทน เราจะพูดถึง match guard ภายหลังในส่วน
“เพิ่ม Conditional ด้วย Match
Guard”
Match หลาย Pattern
ในเครือข่าย expression match คุณ match หลาย pattern โดยใช้ syntax |
ได้ ซึ่งคือ pattern operator or ตัวอย่างเช่น ในโค้ดต่อไปนี้ เรา match
ค่าของ x กับ match arm ตัวแรกของซึ่งมี option or หมายความว่าถ้าค่า
ของ x match ค่าใดในสองค่าใน arm นั้น โค้ดของ arm นั้นจะรัน:
fn main() {
let x = 1;
match x {
1 | 2 => println!("one or two"),
3 => println!("three"),
_ => println!("anything"),
}
}โค้ดนี้ print one or two
Match Range ของค่าด้วย ..=
Syntax ..= อนุญาตให้เรา match range inclusive ของค่า ในโค้ดต่อไปนี้
เมื่อ pattern match ค่าใดภายใน range ที่ให้ arm นั้นจะรัน:
fn main() {
let x = 5;
match x {
1..=5 => println!("one through five"),
_ => println!("something else"),
}
}ถ้า x คือ 1, 2, 3, 4 หรือ 5 arm แรกจะ match Syntax นี้
สะดวกกว่าสำหรับหลายค่า match กว่าใช้ operator | เพื่อแสดงไอเดียเดียว
กัน — ถ้าเราจะใช้ | เราจะต้องระบุ 1 | 2 | 3 | 4 | 5 ระบุ range สั้น
กว่ามาก โดยเฉพาะถ้าเราต้องการ match สมมุติ ตัวเลขใดระหว่าง 1 ถึง 1,000!
Compiler check ว่า range ไม่ว่างที่ compile time และเพราะ type เดียวที่
Rust บอกได้ว่า range ว่างหรือไม่คือ char และค่า numeric, range ถูก
อนุญาตเพียงกับค่า numeric หรือ char
นี่คือตัวอย่างที่ใช้ range ของค่า char:
fn main() {
let x = 'c';
match x {
'a'..='j' => println!("early ASCII letter"),
'k'..='z' => println!("late ASCII letter"),
_ => println!("something else"),
}
}Rust บอกได้ว่า 'c' อยู่ภายใน range ของ pattern แรกและ print early ASCII letter
Destructure เพื่อ Break Apart ค่า
เราใช้ pattern เพื่อ destructure struct, enum และ tuple เพื่อใช้ส่วน ต่างกันของค่าเหล่านี้ได้ด้วย มาเดินผ่านค่าแต่ละ
Struct
Listing 19-12 แสดง struct Point ที่มีสอง field, x และ y ที่เรา
break apart โดยใช้ pattern กับ statement let ได้
struct Point {
x: i32,
y: i32,
}
fn main() {
let p = Point { x: 0, y: 7 };
let Point { x: a, y: b } = p;
assert_eq!(0, a);
assert_eq!(7, b);
}โค้ดนี้สร้างตัวแปร a และ b ที่ match ค่าของ field x และ y ของ
struct p ตัวอย่างนี้แสดงว่าชื่อของตัวแปรใน pattern ไม่ต้อง match ชื่อ
field ของ struct อย่างไรก็ตาม มันเป็นปกติที่จะ match ชื่อตัวแปรให้ชื่อ
field เพื่อให้ง่ายขึ้นในการจำว่าตัวแปรใดมาจาก field ใด เพราะการใช้ปกตินี้
และเพราะการเขียน let Point { x: x, y: y } = p; บรรจุ duplication เยอะ
Rust มี shorthand สำหรับ pattern ที่ match field struct — คุณเพียงต้อง
list ชื่อของ field struct และตัวแปรที่สร้างจาก pattern จะมีชื่อเดียวกัน
Listing 19-13 ทำตัวในวิธีเดียวกับโค้ดใน Listing 19-12 แต่ตัวแปรที่สร้าง
ใน pattern let คือ x และ y แทน a และ b
struct Point {
x: i32,
y: i32,
}
fn main() {
let p = Point { x: 0, y: 7 };
let Point { x, y } = p;
assert_eq!(0, x);
assert_eq!(7, y);
}โค้ดนี้สร้างตัวแปร x และ y ที่ match field x และ y ของตัวแปร
p ผลคือตัวแปร x และ y บรรจุค่าจาก struct p
เรา destructure กับค่า literal เป็นส่วนของ pattern struct แทนที่จะสร้าง ตัวแปรสำหรับทุก field ได้ด้วย การทำเช่นนั้นอนุญาตให้เรา test field บาง field สำหรับค่าเฉพาะขณะที่สร้างตัวแปรเพื่อ destructure field อื่น
ใน Listing 19-14 เรามี expression match ที่แยกค่า Point เป็นสาม
กรณี — point ที่อยู่บนแกน x โดยตรง (ซึ่งเป็นจริงเมื่อ y = 0), บน
แกน y (x = 0) หรือไม่อยู่บนแกนใด
struct Point {
x: i32,
y: i32,
}
fn main() {
let p = Point { x: 0, y: 7 };
match p {
Point { x, y: 0 } => println!("On the x axis at {x}"),
Point { x: 0, y } => println!("On the y axis at {y}"),
Point { x, y } => {
println!("On neither axis: ({x}, {y})");
}
}
}arm แรกจะ match point ใดที่อยู่บนแกน x โดยระบุว่า field y match ถ้า
ค่าของมัน match literal 0 Pattern ยังสร้างตัวแปร x ที่เราใช้ในโค้ด
สำหรับ arm นี้
คล้ายกัน arm ที่สอง match point ใดบนแกน y โดยระบุว่า field x match
ถ้าค่าของมันคือ 0 และสร้างตัวแปร y สำหรับค่าของ field y arm ที่
สามไม่ระบุ literal ใด ดังนั้นมัน match Point อื่นใดและสร้างตัวแปร
สำหรับทั้ง field x และ y
ในตัวอย่างนี้ ค่า p match arm ที่สองโดยอาศัย x บรรจุ 0 ดังนั้นโค้ด
นี้จะ print On the y axis at 7
จำว่า expression match หยุด check arm เมื่อมันพบ pattern ที่ match ตัว
แรก ดังนั้นแม้ Point { x: 0, y: 0 } อยู่บนแกน x และแกน y โค้ดนี้
จะ print เพียง On the x axis at 0
Enum
เรา destructure enum ในหนังสือนี้ (ตัวอย่างเช่น Listing 6-5 ในบทที่ 6)
แต่เรายังไม่ได้พูดถึงอย่างชัดเจนว่า pattern เพื่อ destructure enum
ตรงกับวิธีที่ข้อมูลที่เก็บภายใน enum ถูกนิยาม เป็นตัวอย่าง ใน Listing
19-15 เราใช้ enum Message จาก Listing 6-2 และเขียน match กับ pattern
ที่จะ destructure ค่าด้านในแต่ละ
enum Message {
Quit,
Move { x: i32, y: i32 },
Write(String),
ChangeColor(i32, i32, i32),
}
fn main() {
let msg = Message::ChangeColor(0, 160, 255);
match msg {
Message::Quit => {
println!("The Quit variant has no data to destructure.");
}
Message::Move { x, y } => {
println!("Move in the x direction {x} and in the y direction {y}");
}
Message::Write(text) => {
println!("Text message: {text}");
}
Message::ChangeColor(r, g, b) => {
println!("Change color to red {r}, green {g}, and blue {b}");
}
}
}โค้ดนี้จะ print Change color to red 0, green 160, and blue 255 ลอง
เปลี่ยนค่าของ msg เพื่อดูโค้ดจาก arm อื่นรัน
สำหรับ variant enum ที่ไม่มีข้อมูล เช่น Message::Quit เราไม่สามารถ
destructure ค่าเพิ่มได้ เรา match บนค่า literal Message::Quit ได้
เพียงและไม่มีตัวแปรใน pattern นั้น
สำหรับ variant enum แบบ struct เช่น Message::Move เราใช้ pattern ที่
คล้ายกับ pattern ที่เราระบุเพื่อ match struct ได้ หลังชื่อ variant เรา
วาง curly bracket แล้ว list field กับตัวแปรเพื่อให้เรา break apart ชิ้น
เพื่อใช้ในโค้ดสำหรับ arm นี้ ที่นี่เราใช้รูป shorthand เหมือนที่เราทำ
ใน Listing 19-13
สำหรับ variant enum แบบ tuple เช่น Message::Write ที่บรรจุ tuple
หนึ่ง element และ Message::ChangeColor ที่บรรจุ tuple สาม element
pattern คล้ายกับ pattern ที่เราระบุเพื่อ match tuple จำนวนตัวแปรใน
pattern ต้อง match จำนวน element ใน variant ที่เรา match
Struct และ Enum ที่ Nest
ตอนนี้ ตัวอย่างของเราทั้งหมด match struct หรือ enum หนึ่งระดับลึก แต่
matching ทำงานบน item ที่ nest ได้ด้วย! ตัวอย่างเช่น เรา refactor โค้ด
ใน Listing 19-15 เพื่อสนับสนุนสี RGB และ HSV ในข้อความ ChangeColor ได้
ดังที่แสดงใน Listing 19-16
enum Color {
Rgb(i32, i32, i32),
Hsv(i32, i32, i32),
}
enum Message {
Quit,
Move { x: i32, y: i32 },
Write(String),
ChangeColor(Color),
}
fn main() {
let msg = Message::ChangeColor(Color::Hsv(0, 160, 255));
match msg {
Message::ChangeColor(Color::Rgb(r, g, b)) => {
println!("Change color to red {r}, green {g}, and blue {b}");
}
Message::ChangeColor(Color::Hsv(h, s, v)) => {
println!("Change color to hue {h}, saturation {s}, value {v}");
}
_ => (),
}
}Pattern ของ arm แรกใน expression match match variant enum
Message::ChangeColor ที่บรรจุ variant Color::Rgb; แล้ว pattern bind
กับสามค่า i32 ด้านใน Pattern ของ arm ที่สองก็ match variant enum
Message::ChangeColor แต่ enum ด้านใน match Color::Hsv แทน เราระบุ
เงื่อนไข complex เหล่านี้ในหนึ่ง expression match ได้ แม้สอง enum
เกี่ยวข้อง
Struct และ Tuple
เราผสม match และ nest pattern destructure ในวิธี complex มากกว่าได้ ตัวอย่างต่อไปนี้แสดง destructure ที่ซับซ้อนที่เรา nest struct และ tuple ภายใน tuple และ destructure ค่า primitive ทั้งหมดออก:
fn main() {
struct Point {
x: i32,
y: i32,
}
let ((feet, inches), Point { x, y }) = ((3, 10), Point { x: 3, y: -10 });
}โค้ดนี้ให้เรา break type complex เป็นส่วน component เพื่อให้เราใช้ค่าที่ เราสนใจแยกได้
Destructure กับ pattern คือวิธีสะดวกในการใช้ชิ้นของค่า เช่นค่าจากแต่ละ field ใน struct แยกกัน
Ignore ค่าใน Pattern
คุณเห็นว่าบางครั้งมีประโยชน์ที่จะ ignore ค่าใน pattern เช่นใน arm
สุดท้ายของ match เพื่อได้ catch-all ที่ไม่ทำอะไรจริง ๆ แต่คำนึงถึงค่า
ที่เป็นไปได้ที่เหลือทั้งหมด มีวิธีไม่กี่อย่างในการ ignore ค่าทั้งหมดหรือ
ส่วนของค่าใน pattern — ใช้ pattern _ (ซึ่งคุณเห็นแล้ว) ใช้ pattern
_ ภายใน pattern อื่น ใช้ชื่อที่เริ่มด้วย underscore หรือใช้ .. เพื่อ
ignore ส่วนที่เหลือของค่า มาสำรวจวิธีและทำไมจะใช้แต่ละ pattern เหล่านี้
ค่าทั้งหมดด้วย _
เราใช้ underscore เป็น pattern wildcard ที่จะ match ค่าใดแต่ไม่ bind
ให้ค่า นี่มีประโยชน์เป็นพิเศษเป็น arm สุดท้ายใน expression match แต่
เราใช้มันใน pattern ใดได้ด้วย รวม parameter ฟังก์ชัน ดังที่แสดงใน
Listing 19-17
fn foo(_: i32, y: i32) {
println!("This code only uses the y parameter: {y}");
}
fn main() {
foo(3, 4);
}_ ใน signature ฟังก์ชันโค้ดนี้จะ ignore ค่า 3 ที่ส่งเป็น argument แรกอย่างสมบูรณ์ และจะ print
This code only uses the y parameter: 4
ในกรณีส่วนใหญ่เมื่อคุณไม่ต้องการ parameter ฟังก์ชันเฉพาะอีกแล้ว คุณจะ เปลี่ยน signature เพื่อให้มันไม่รวม parameter ที่ไม่ใช้ Ignore parameter ฟังก์ชันมีประโยชน์เป็นพิเศษในกรณีเมื่อ ตัวอย่างเช่น คุณ implement trait เมื่อคุณต้องการ signature type เฉพาะแต่ body ฟังก์ชันใน implementation ของคุณไม่ต้องการหนึ่งใน parameter คุณจะหลีกเลี่ยงการได้ warning compiler เกี่ยวกับ parameter ฟังก์ชันที่ไม่ใช้ ดังที่คุณจะถ้า คุณใช้ชื่อแทน
ส่วนของค่าด้วย _ ที่ Nest
เราใช้ _ ภายใน pattern อื่นเพื่อ ignore เพียงส่วนของค่า ตัวอย่างเช่น
เมื่อเราต้องการ test เพียงส่วนของค่าแต่ไม่มีการใช้ส่วนอื่นในโค้ดที่
ตรงกันที่เราต้องการรัน Listing 19-18 แสดงโค้ดที่รับผิดชอบการจัดการค่า
ของ setting ข้อกำหนด business คือ user ไม่ควรถูกอนุญาตให้เขียนทับ
customization ที่มีของ setting แต่ unset setting ได้และให้ค่ามันถ้ามัน
ปัจจุบัน unset
fn main() {
let mut setting_value = Some(5);
let new_setting_value = Some(10);
match (setting_value, new_setting_value) {
(Some(_), Some(_)) => {
println!("Can't overwrite an existing customized value");
}
_ => {
setting_value = new_setting_value;
}
}
println!("setting is {setting_value:?}");
}Some เมื่อเราไม่ต้องใช้ค่าภายใน Someโค้ดนี้จะ print Can't overwrite an existing customized value แล้ว
setting is Some(5) ใน match arm แรก เราไม่ต้อง match บนหรือใช้ค่า
ภายใน variant Some ใด แต่เราต้อง test สำหรับกรณีเมื่อ setting_value
และ new_setting_value คือ variant Some ในกรณีนั้น เรา print เหตุผล
สำหรับการไม่เปลี่ยน setting_value และมันไม่ถูกเปลี่ยน
ในกรณีอื่นทั้งหมด (ถ้าทั้ง setting_value หรือ new_setting_value คือ
None) แสดงโดย pattern _ ใน arm ที่สอง เราต้องการอนุญาต
new_setting_value ให้กลายเป็น setting_value
เราใช้ underscore ในหลายที่ภายในหนึ่ง pattern เพื่อ ignore ค่าเฉพาะได้ ด้วย Listing 19-19 แสดงตัวอย่างของการ ignore ค่าที่สองและสี่ใน tuple ของห้า item
fn main() {
let numbers = (2, 4, 8, 16, 32);
match numbers {
(first, _, third, _, fifth) => {
println!("Some numbers: {first}, {third}, {fifth}");
}
}
}โค้ดนี้จะ print Some numbers: 2, 8, 32 และค่า 4 และ 16 จะถูก
ignore
ตัวแปรที่ไม่ใช้โดยเริ่มชื่อด้วย _
ถ้าคุณสร้างตัวแปรแต่ไม่ใช้มันที่ไหน Rust จะออก warning ปกติเพราะตัวแปร ที่ไม่ใช้เป็น bug ได้ อย่างไรก็ตาม บางครั้งมีประโยชน์ที่จะสามารถสร้าง ตัวแปรที่คุณจะไม่ใช้ยัง เช่นเมื่อคุณกำลัง prototype หรือเพิ่งเริ่ม project ในสถานการณ์นี้ คุณบอก Rust ไม่ให้เตือนคุณเกี่ยวกับตัวแปรที่ ไม่ใช้โดยเริ่มชื่อของตัวแปรด้วย underscore ใน Listing 19-20 เราสร้างสอง ตัวแปรที่ไม่ใช้ แต่เมื่อเรา compile โค้ดนี้ เราควรได้ warning เกี่ยวกับ หนึ่งในพวกมันเพียง
fn main() {
let _x = 5;
let y = 10;
}ที่นี่ เราได้ warning เกี่ยวกับการไม่ใช้ตัวแปร y แต่เราไม่ได้
warning เกี่ยวกับการไม่ใช้ _x
สังเกตว่ามีความแตกต่างเล็กน้อยระหว่างการใช้เพียง _ และใช้ชื่อที่เริ่ม
ด้วย underscore Syntax _x ยัง bind ค่าให้ตัวแปร ขณะที่ _ ไม่ bind
เลย เพื่อแสดงกรณีที่ความแตกต่างนี้สำคัญ Listing 19-21 จะให้ error เรา
fn main() {
let s = Some(String::from("Hello!"));
if let Some(_s) = s {
println!("found a string");
}
println!("{s:?}");
}เราจะรับ error เพราะค่า s จะยังถูกย้ายเข้า _s ซึ่งป้องกันเราจาก
การใช้ s อีก อย่างไรก็ตาม การใช้ underscore เพียงตัวเดียวไม่เคย bind
ให้ค่า Listing 19-22 จะ compile โดยไม่มี error เพราะ s ไม่ถูกย้ายเข้า
_
fn main() {
let s = Some(String::from("Hello!"));
if let Some(_) = s {
println!("found a string");
}
println!("{s:?}");
}โค้ดนี้ทำงานได้ดีเพราะเราไม่เคย bind s กับอะไร — มันไม่ถูกย้าย
ส่วนที่เหลือของค่าด้วย ..
กับค่าที่มีหลายส่วน เราใช้ syntax .. เพื่อใช้ส่วนเฉพาะและ ignore
ที่เหลือได้ หลีกเลี่ยงความต้องการ list underscore สำหรับแต่ละค่าที่
ignore Pattern .. ignore ส่วนใดของค่าที่เราไม่ได้ match อย่างชัดเจน
ใน pattern ที่เหลือ ใน Listing 19-23 เรามี struct Point ที่บรรจุพิกัด
ในพื้นที่สามมิติ ใน expression match เราต้องการ operate เพียงบน
พิกัด x และ ignore ค่าใน field y และ z
fn main() {
struct Point {
x: i32,
y: i32,
z: i32,
}
let origin = Point { x: 0, y: 0, z: 0 };
match origin {
Point { x, .. } => println!("x is {x}"),
}
}Point ยกเว้น x โดยใช้ ..เรา list ค่า x แล้วเพียงรวม pattern .. นี่เร็วกว่าต้อง list y: _
และ z: _ โดยเฉพาะเมื่อเราทำงานกับ struct ที่มี field เยอะในสถานการณ์
ที่เพียงหนึ่งหรือสอง field เกี่ยวข้อง
Syntax .. จะขยายเป็นค่าเยอะตามที่มันต้องการ Listing 19-24 แสดงวิธีใช้
.. กับ tuple
fn main() {
let numbers = (2, 4, 8, 16, 32);
match numbers {
(first, .., last) => {
println!("Some numbers: {first}, {last}");
}
}
}ในโค้ดนี้ ค่าแรกและสุดท้ายถูก match กับ first และ last .. จะ
match และ ignore ทุกอย่างตรงกลาง
อย่างไรก็ตาม การใช้ .. ต้องไม่กำกวม ถ้าไม่ชัดเจนว่าค่าใดตั้งใจให้ match
และค่าใดควรถูก ignore Rust จะให้ error เรา Listing 19-25 แสดงตัวอย่าง
ของการใช้ .. กำกวม ดังนั้นมันจะไม่ compile
fn main() {
let numbers = (2, 4, 8, 16, 32);
match numbers {
(.., second, ..) => {
println!("Some numbers: {second}")
},
}
}.. ในวิธีกำกวมเมื่อเรา compile ตัวอย่างนี้ เราได้ error นี้:
$ cargo run
Compiling patterns v0.1.0 (file:///projects/patterns)
error: `..` can only be used once per tuple pattern
--> src/main.rs:5:22
|
5 | (.., second, ..) => {
| -- ^^ can only be used once per tuple pattern
| |
| previously used here
error: could not compile `patterns` (bin "patterns") due to 1 previous error
มันเป็นไปไม่ได้สำหรับ Rust ที่จะตัดสินว่ามีค่าเยอะแค่ไหนใน tuple ที่จะ
ignore ก่อน matching ค่ากับ second และแล้วเยอะแค่ไหนค่าถัดไปที่จะ
ignore หลังจากนั้น โค้ดนี้อาจหมายถึงเราต้องการ ignore 2, bind
second ให้ 4 แล้ว ignore 8, 16 และ 32; หรือเราต้องการ ignore
2 และ 4, bind second ให้ 8 แล้ว ignore 16 และ 32; และอื่นๆ
ชื่อตัวแปร second ไม่หมายถึงอะไรพิเศษให้ Rust ดังนั้นเราได้ error
compiler เพราะการใช้ .. ในสองที่แบบนี้กำกวม
เพิ่ม Conditional ด้วย Match Guard
match guard คือเงื่อนไข if เพิ่มเติม ระบุหลัง pattern ใน match arm
ที่ต้อง match ด้วยเพื่อ arm นั้นถูกเลือก Match guard มีประโยชน์ในการ
แสดงไอเดีย complex มากกว่าที่ pattern อย่างเดียวอนุญาต อย่างไรก็ตาม
สังเกตว่าพวกมันใช้ได้เพียงใน expression match ไม่ใช่ expression
if let หรือ while let
เงื่อนไขใช้ตัวแปรที่สร้างใน pattern ได้ Listing 19-26 แสดง match ที่
arm แรกมี pattern Some(x) และยังมี match guard if x % 2 == 0 (ซึ่ง
จะเป็น true ถ้าตัวเลขเป็นเลขคู่)
fn main() {
let num = Some(4);
match num {
Some(x) if x % 2 == 0 => println!("The number {x} is even"),
Some(x) => println!("The number {x} is odd"),
None => (),
}
}ตัวอย่างนี้จะ print The number 4 is even เมื่อ num ถูกเปรียบเทียบ
กับ pattern ใน arm แรก มัน match เพราะ Some(4) match Some(x) แล้ว
match guard check ว่าเศษของการหาร x ด้วย 2 เท่ากับ 0 หรือไม่ และเพราะ
มันเท่า arm แรกถูกเลือก
ถ้า num เป็น Some(5) แทน match guard ใน arm แรกจะเป็น false เพราะ
เศษของ 5 หารด้วย 2 คือ 1 ซึ่งไม่เท่ากับ 0 Rust จะไป arm ที่สอง ซึ่งจะ
match เพราะ arm ที่สองไม่มี match guard และดังนั้น match variant Some
ใด
ไม่มีวิธีแสดงเงื่อนไข if x % 2 == 0 ภายใน pattern ดังนั้น match guard
ให้เราความสามารถในการแสดง logic นี้ ข้อเสียของความ expressive เพิ่มนี้
คือ compiler ไม่พยายาม check exhaustiveness เมื่อ expression match
guard เกี่ยวข้อง
เมื่อพูดถึง Listing 19-11 เรากล่าวว่าเราใช้ match guard เพื่อแก้ปัญหา
pattern-shadowing ของเราได้ จำว่าเราสร้างตัวแปรใหม่ภายใน pattern ใน
expression match แทนที่จะใช้ตัวแปรนอก match ตัวแปรใหม่นั้นหมายความ
ว่าเราไม่สามารถ test กับค่าของตัวแปรภายนอก Listing 19-27 แสดงวิธีเราใช้
match guard เพื่อ fix ปัญหานี้
fn main() {
let x = Some(5);
let y = 10;
match x {
Some(50) => println!("Got 50"),
Some(n) if n == y => println!("Matched, n = {n}"),
_ => println!("Default case, x = {x:?}"),
}
println!("at the end: x = {x:?}, y = {y}");
}โค้ดนี้ตอนนี้จะ print Default case, x = Some(5) Pattern ใน match arm
ที่สองไม่แนะนำตัวแปร y ใหม่ที่จะ shadow y ภายนอก หมายความว่าเราใช้
y ภายนอกใน match guard ได้ แทนที่จะระบุ pattern เป็น Some(y) ซึ่ง
จะ shadow y ภายนอก เราระบุ Some(n) นี่สร้างตัวแปร n ใหม่ที่ไม่
shadow อะไรเพราะไม่มีตัวแปร n นอก match
Match guard if n == y ไม่ใช่ pattern และดังนั้นไม่แนะนำตัวแปรใหม่
y นี่ คือ y ภายนอก แทนที่จะเป็น y ใหม่ที่ shadow มัน และเรา
มองหาค่าที่มีค่าเดียวกับ y ภายนอกได้โดยเปรียบเทียบ n กับ y
คุณใช้ operator or | ใน match guard เพื่อระบุหลาย pattern ได้ด้วย —
เงื่อนไข match guard จะ apply ให้ pattern ทั้งหมด Listing 19-28 แสดง
precedence เมื่อรวม pattern ที่ใช้ | กับ match guard ส่วนสำคัญของ
ตัวอย่างนี้คือ match guard if y apply กับ 4, 5 และ 6 แม้
มันอาจดูเหมือน if y apply เพียงกับ 6
fn main() {
let x = 4;
let y = false;
match x {
4 | 5 | 6 if y => println!("yes"),
_ => println!("no"),
}
}เงื่อนไข match บอกว่า arm match เพียงถ้าค่าของ x เท่ากับ 4, 5
หรือ 6 และ ถ้า y คือ true เมื่อโค้ดนี้รัน pattern ของ arm แรก
match เพราะ x คือ 4 แต่ match guard if y คือ false ดังนั้น arm
แรกไม่ถูกเลือก โค้ดเลื่อนไป arm ที่สอง ซึ่ง match และโปรแกรมนี้ print
no เหตุผลคือเงื่อนไข if apply กับทั้ง pattern 4 | 5 | 6 ไม่
เพียงค่าสุดท้าย 6 ในคำพูดอื่น precedence ของ match guard ในความสัมพันธ์
กับ pattern ทำตัวแบบนี้:
(4 | 5 | 6) if y => ...
แทนที่จะเป็นแบบนี้:
4 | 5 | (6 if y) => ...
หลังจากรันโค้ด พฤติกรรม precedence ชัดเจน — ถ้า match guard ถูก apply
เพียงกับค่าสุดท้ายใน list ของค่าที่ระบุโดยใช้ operator | arm จะ
match และโปรแกรมจะ print yes
ใช้ @ Binding
Operator at @ ให้เราสร้างตัวแปรที่บรรจุค่าในเวลาเดียวกับที่เรา
กำลัง test ค่านั้นสำหรับ pattern match ใน Listing 19-29 เราต้องการ
test ว่า field id ของ Message::Hello อยู่ภายใน range 3..=7 เรา
ต้องการ bind ค่าให้ตัวแปร id ด้วยเพื่อให้เราใช้มันในโค้ดที่
associate กับ arm
fn main() {
enum Message {
Hello { id: i32 },
}
let msg = Message::Hello { id: 5 };
match msg {
Message::Hello { id: id @ 3..=7 } => {
println!("Found an id in range: {id}")
}
Message::Hello { id: 10..=12 } => {
println!("Found an id in another range")
}
Message::Hello { id } => println!("Found some other id: {id}"),
}
}@ เพื่อ bind กับค่าใน pattern ขณะที่ test มันด้วยตัวอย่างนี้จะ print Found an id in range: 5 โดยระบุ id @ ก่อน range
3..=7 เรา capture ค่าใดที่ match range ในตัวแปรชื่อ id ขณะ test ว่า
ค่า match pattern range ด้วย
ใน arm ที่สอง ที่เรามีเพียง range ระบุใน pattern โค้ดที่ associate
กับ arm ไม่มีตัวแปรที่บรรจุค่าจริงของ field id ค่าของ field id อาจ
เป็น 10, 11 หรือ 12 แต่โค้ดที่ไปกับ pattern นั้นไม่รู้ว่าเป็นอันไหน
โค้ด pattern ไม่สามารถใช้ค่าจาก field id ได้เพราะเราไม่ save ค่า id
ในตัวแปร
ใน arm สุดท้าย ที่เราระบุตัวแปรโดยไม่มี range เรามีค่าใช้ได้เพื่อใช้
ในโค้ดของ arm ในตัวแปรชื่อ id เหตุผลคือเราใช้ syntax shorthand field
struct แต่เราไม่ apply test ใดกับค่าใน field id ใน arm นี้ ดังที่เรา
ทำกับสอง arm แรก — ค่าใดจะ match pattern นี้
ใช้ @ ให้เรา test ค่าและ save มันในตัวแปรภายในหนึ่ง pattern
สรุป
Pattern ของ Rust มีประโยชน์มากในการแยกระหว่างชนิดต่างกันของข้อมูล เมื่อ
ใช้ใน expression match Rust รับประกันว่า pattern ของคุณครอบคลุมทุก
ค่าที่เป็นไปได้ หรือโปรแกรมของคุณจะไม่ compile Pattern ใน statement
let และ parameter ฟังก์ชันทำ construct เหล่านั้นมีประโยชน์มากขึ้น
เปิดใช้ destructure ของค่าเป็นส่วนเล็กลงและ assign ส่วนเหล่านั้นให้
ตัวแปร เราสร้าง pattern simple หรือ complex เพื่อตอบโจทย์ของเราได้
ถัดไป สำหรับบทที่ก่อนสุดท้ายของหนังสือ เราจะดูแง่มุมขั้นสูงของฟีเจอร์ ของ Rust ที่หลากหลาย
ฟีเจอร์ขั้นสูง
ถึงตอนนี้ คุณเรียนรู้ส่วนที่ใช้ปกติที่สุดของภาษาโปรแกรม Rust แล้ว ก่อน เราทำอีก project ในบทที่ 21 เราจะดูแง่มุมของภาษาไม่กี่อย่างที่คุณอาจ เจอเป็นบางครั้งแต่อาจไม่ใช้ทุกวัน คุณใช้บทนี้เป็น reference สำหรับเมื่อ คุณเจอสิ่งที่ไม่รู้ได้ ฟีเจอร์ที่ครอบคลุมที่นี่มีประโยชน์ในสถานการณ์ เฉพาะมาก แม้คุณอาจไม่ใช้พวกมันบ่อย เราต้องการรับประกันว่าคุณมีความเข้าใจ ของฟีเจอร์ทั้งหมดที่ Rust เสนอ
ในบทนี้ เราจะครอบคลุม:
- Unsafe Rust — วิธี opt out จากการรับประกันของ Rust บางส่วนและรับ ผิดชอบสำหรับการยึดถือการรับประกันเหล่านั้นโดยมือ
- Trait ขั้นสูง — associated type, default type parameter, fully qualified syntax, supertrait และ newtype pattern ในความสัมพันธ์กับ trait
- Type ขั้นสูง — เพิ่มเติมเกี่ยวกับ newtype pattern, type alias, never type และ dynamically sized type
- ฟังก์ชันและ closure ขั้นสูง — function pointer และการ return closure
- Macro — วิธีนิยามโค้ดที่นิยามโค้ดเพิ่มเติมที่ compile time
มันคือชุดฟีเจอร์ Rust ที่หลากหลาย มีบางอย่างสำหรับทุกคน! มาเจาะกัน!
Unsafe Rust
Unsafe Rust
โค้ดทั้งหมดที่เราพูดถึงตอนนี้มีการรับประกัน memory safety ของ Rust ที่ บังคับที่ compile time อย่างไรก็ตาม Rust มีภาษาที่สองซ่อนภายในที่ไม่ บังคับการรับประกัน memory safety เหล่านี้ — มันถูกเรียก unsafe Rust และทำงานเหมือน Rust ปกติแต่ให้เรา superpower เพิ่ม
Unsafe Rust มีอยู่เพราะตามธรรมชาติ การวิเคราะห์ static เป็น conservative เมื่อ compiler พยายามตัดสินว่าโค้ดยึดถือการรับประกันหรือไม่ มันดีกว่า สำหรับมันที่จะปฏิเสธโปรแกรม valid บางอย่างมากกว่ายอมรับโปรแกรม invalid บางอย่าง แม้โค้ด อาจ โอเค ถ้า compiler Rust ไม่มีข้อมูลพอที่จะมั่นใจ มันจะปฏิเสธโค้ด ในกรณีเหล่านี้ คุณใช้โค้ด unsafe เพื่อบอก compiler “เชื่อฉัน ฉันรู้ที่ฉันทำ” ได้ ถูกเตือน อย่างไรก็ตาม คุณใช้ unsafe Rust ที่ความเสี่ยงของคุณเอง — ถ้าคุณใช้โค้ด unsafe ผิด ปัญหาเกิดได้เพราะ memory unsafety เช่นการ dereference null pointer
เหตุผลอื่นที่ Rust มี alter ego unsafe คือ hardware computer พื้นฐาน unsafe ในตัวเอง ถ้า Rust ไม่ให้คุณทำ operation unsafe คุณจะทำงานบาง อย่างไม่ได้ Rust ต้องอนุญาตให้คุณทำ low-level systems programming เช่น interact กับ operating system โดยตรงหรือแม้เขียน operating system ของคุณเอง การทำงานกับ low-level systems programming เป็นหนึ่งใน เป้าหมายของภาษา มาสำรวจว่าเราทำอะไรได้กับ unsafe Rust และวิธีทำมัน
ใช้ Unsafe Superpower
เพื่อ switch ไป unsafe Rust ใช้คีย์เวิร์ด unsafe แล้วเริ่ม block ใหม่
ที่บรรจุโค้ด unsafe คุณทำ action ห้าอย่างใน unsafe Rust ที่คุณทำไม่ได้
ใน safe Rust ซึ่งเราเรียก unsafe superpower Superpower เหล่านั้น
รวมถึงความสามารถใน:
- Dereference raw pointer
- เรียกฟังก์ชันหรือเมธอด unsafe
- เข้าถึงหรือแก้ตัวแปร static แบบ mutable
- Implement trait unsafe
- เข้าถึง field ของ
union
มันสำคัญที่จะเข้าใจว่า unsafe ไม่ปิด borrow checker หรือปิดการ check
safety อื่นของ Rust — ถ้าคุณใช้ reference ในโค้ด unsafe มันจะยังถูก
check คีย์เวิร์ด unsafe เพียงให้คุณเข้าถึงห้าฟีเจอร์เหล่านี้ที่แล้ว
ไม่ถูก check โดย compiler สำหรับ memory safety คุณจะยังได้ safety
ระดับหนึ่งภายใน block unsafe
นอกจากนี้ unsafe ไม่ได้หมายความว่าโค้ดภายใน block อันตรายแน่หรือว่ามัน
จะมีปัญหา memory safety แน่ — เจตนาคือในฐานะ programmer คุณจะรับประกัน
ว่าโค้ดภายใน block unsafe จะเข้าถึง memory ในวิธี valid
คนผิดพลาดได้และความผิดพลาดจะเกิด แต่โดยต้องการ operation unsafe ห้านี้
อยู่ภายใน block ที่ annotate ด้วย unsafe คุณจะรู้ว่า error ใดที่
เกี่ยวกับ memory safety ต้องอยู่ภายใน block unsafe รักษา block
unsafe ให้เล็ก — คุณจะขอบคุณภายหลังเมื่อคุณตรวจสอบ memory bug
เพื่อแยก isolate โค้ด unsafe มากที่สุด ดีที่สุดที่จะห่อโค้ดเช่นนั้น
ภายใน safe abstraction และให้ safe API ซึ่งเราจะพูดถึงภายหลังในบทเมื่อ
เราตรวจสอบฟังก์ชันและเมธอด unsafe ส่วนของ standard library ถูก
implement เป็น safe abstraction เหนือโค้ด unsafe ที่ถูก audit แล้ว
การห่อโค้ด unsafe ใน safe abstraction ป้องกันการใช้ unsafe จากการ
รั่วไปยังทุกที่ที่คุณหรือ user ของคุณอาจต้องการใช้ functionality ที่
implement ด้วยโค้ด unsafe เพราะการใช้ safe abstraction เป็น safe
มาดูแต่ละ unsafe superpower ทั้งห้าตามลำดับ เราจะดู abstraction บาง อย่างที่ให้ interface safe ให้โค้ด unsafe ด้วย
Dereference Raw Pointer
ในบทที่ 4 ในส่วน “Dangling Reference”
เรากล่าวว่า compiler รับประกันว่า reference valid เสมอ Unsafe Rust มี
type ใหม่สองอันเรียก raw pointer ที่คล้ายกับ reference เช่นเดียวกับ
reference, raw pointer เป็น immutable หรือ mutable ได้และเขียนเป็น
*const T และ *mut T ตามลำดับ Asterisk ไม่ใช่ dereference operator —
มันเป็นส่วนของชื่อ type ใน context ของ raw pointer, immutable หมาย
ความว่า pointer ไม่สามารถถูก assign โดยตรงหลังจากถูก dereference
ต่างจาก reference และ smart pointer, raw pointer:
- ถูกอนุญาตให้ ignore กฎ borrowing โดยมีทั้ง pointer immutable และ mutable หรือหลาย mutable pointer ไปยังที่เดียวกัน
- ไม่ถูกรับประกันว่า point ไปยัง memory ที่ valid
- ถูกอนุญาตให้เป็น null
- ไม่ implement การ cleanup อัตโนมัติใด
โดย opt out จากการให้ Rust บังคับการรับประกันเหล่านี้ คุณยกเลิก safety ที่รับประกันเพื่อแลกกับ performance ที่ดีกว่าหรือความสามารถในการ interface กับภาษาอื่นหรือ hardware ที่การรับประกันของ Rust ไม่ apply
Listing 20-1 แสดงวิธีสร้าง raw pointer แบบ immutable และ mutable
fn main() {
let mut num = 5;
let r1 = &raw const num;
let r2 = &raw mut num;
}สังเกตว่าเราไม่รวมคีย์เวิร์ด unsafe ในโค้ดนี้ เราสร้าง raw pointer
ในโค้ด safe ได้ — เราเพียงไม่สามารถ dereference raw pointer นอก block
unsafe ดังที่คุณจะเห็นในไม่กี่ที่
เราสร้าง raw pointer โดยใช้ raw borrow operator: &raw const num สร้าง
raw pointer immutable *const i32 และ &raw mut num สร้าง raw pointer
mutable *mut i32 เพราะเราสร้างพวกมันโดยตรงจากตัวแปร local เรารู้ว่า
raw pointer เฉพาะเหล่านี้ valid แต่เราทำสมมติฐานนั้นเกี่ยวกับ raw
pointer ใดไม่ได้
เพื่อสาธิตสิ่งนี้ ถัดไปเราจะสร้าง raw pointer ที่ความ valid ของมันเรา
ไม่สามารถมั่นใจ โดยใช้คีย์เวิร์ด as เพื่อ cast ค่าแทนการใช้ raw
borrow operator Listing 20-2 แสดงวิธีสร้าง raw pointer ไปยังที่ใด ๆ
ใน memory การพยายามใช้ memory ใด ๆ คือ undefined — อาจมีข้อมูลที่
address นั้นหรือไม่มี compiler อาจ optimize โค้ดเพื่อให้ไม่มีการเข้า
ถึง memory หรือโปรแกรมอาจสิ้นสุดด้วย segmentation fault ปกติไม่มีเหตุผล
ดีที่จะเขียนโค้ดแบบนี้ โดยเฉพาะในกรณีที่คุณใช้ raw borrow operator แทน
ได้ แต่มันเป็นไปได้
fn main() {
let address = 0x012345usize;
let r = address as *const i32;
}จำว่าเราสร้าง raw pointer ในโค้ด safe ได้ แต่เราไม่สามารถ dereference
raw pointer และอ่านข้อมูลที่ถูก point ไป ใน Listing 20-3 เราใช้
dereference operator * บน raw pointer ที่ต้องการ block unsafe
fn main() {
let mut num = 5;
let r1 = &raw const num;
let r2 = &raw mut num;
unsafe {
println!("r1 is: {}", *r1);
println!("r2 is: {}", *r2);
}
}unsafeสร้าง pointer ไม่ทำอันตราย — มันเพียงเมื่อเราพยายามเข้าถึงค่าที่มัน point ไปที่เราอาจจบลงที่จัดการกับค่า invalid
สังเกตด้วยว่าใน Listing 20-1 และ 20-3 เราสร้าง raw pointer *const i32
และ *mut i32 ที่ point ไปยังที่ memory เดียวกัน ที่ num ถูกเก็บ
ถ้าเราลองสร้าง reference immutable และ mutable ของ num แทน โค้ดจะ
ไม่ compile เพราะกฎ ownership ของ Rust ไม่อนุญาต mutable reference ใน
เวลาเดียวกับ immutable reference ใด ๆ ด้วย raw pointer เราสร้าง mutable
pointer และ immutable pointer ไปยังที่เดียวกันและเปลี่ยนข้อมูลผ่าน
mutable pointer ได้ อาจสร้าง data race ระวัง!
ด้วยอันตรายทั้งหมดเหล่านี้ ทำไมคุณจะใช้ raw pointer? Use case หลัก อันหนึ่งคือเมื่อ interface กับโค้ด C ดังที่คุณจะเห็นในส่วนถัดไป กรณี อื่นคือเมื่อสร้าง safe abstraction ที่ borrow checker ไม่เข้าใจ เราจะ แนะนำฟังก์ชัน unsafe แล้วดูตัวอย่างของ safe abstraction ที่ใช้โค้ด unsafe
เรียกฟังก์ชันหรือเมธอด Unsafe
ชนิดที่สองของ operation ที่คุณทำใน block unsafe ได้คือการเรียกฟังก์ชัน
unsafe ฟังก์ชันและเมธอด unsafe ดูเหมือนฟังก์ชันและเมธอดปกติเป๊ะ แต่
พวกมันมี unsafe เพิ่มก่อนส่วนที่เหลือของนิยาม คีย์เวิร์ด unsafe ใน
context นี้บ่งบอกว่าฟังก์ชันมีข้อกำหนดที่เราต้องยึดถือเมื่อเราเรียก
ฟังก์ชันนี้ เพราะ Rust ไม่สามารถรับประกันว่าเราพบข้อกำหนดเหล่านี้ โดย
เรียกฟังก์ชัน unsafe ภายใน block unsafe เราบอกว่าเราอ่าน documentation
ของฟังก์ชันนี้และเรารับผิดชอบสำหรับการยึดถือ contract ของฟังก์ชัน
นี่คือฟังก์ชัน unsafe ชื่อ dangerous ที่ไม่ทำอะไรใน body ของมัน:
fn main() {
unsafe fn dangerous() {}
unsafe {
dangerous();
}
}เราต้องเรียกฟังก์ชัน dangerous ภายใน block unsafe แยก ถ้าเราพยายาม
เรียก dangerous โดยไม่มี block unsafe เราจะได้ error:
$ cargo run
Compiling unsafe-example v0.1.0 (file:///projects/unsafe-example)
error[E0133]: call to unsafe function `dangerous` is unsafe and requires unsafe block
--> src/main.rs:4:5
|
4 | dangerous();
| ^^^^^^^^^^^ call to unsafe function
|
= note: consult the function's documentation for information on how to avoid undefined behavior
For more information about this error, try `rustc --explain E0133`.
error: could not compile `unsafe-example` (bin "unsafe-example") due to 1 previous error
ด้วย block unsafe เรากำลัง assert กับ Rust ว่าเราอ่าน documentation
ของฟังก์ชัน เราเข้าใจวิธีใช้มันอย่างเหมาะสม และเรา verify ว่าเรากำลัง
fulfill contract ของฟังก์ชัน
เพื่อทำ operation unsafe ใน body ของฟังก์ชัน unsafe คุณยังต้องใช้
block unsafe เหมือนภายในฟังก์ชันปกติ และ compiler จะเตือนคุณถ้าคุณลืม
นี่ช่วยเรารักษา block unsafe ให้เล็กที่สุดเท่าที่เป็นไปได้ เพราะ
operation unsafe อาจไม่จำเป็นทั่ว body ฟังก์ชันทั้งหมด
สร้าง Safe Abstraction เหนือโค้ด Unsafe
เพียงเพราะฟังก์ชันบรรจุโค้ด unsafe ไม่ได้หมายความว่าเราต้องทำเครื่องหมาย
ฟังก์ชันทั้งหมดเป็น unsafe จริง ๆ การห่อโค้ด unsafe ใน safe function
คือ abstraction ปกติ เป็นตัวอย่าง มาศึกษาฟังก์ชัน split_at_mut จาก
standard library ซึ่งต้องการโค้ด unsafe เราจะสำรวจว่าเราอาจ implement
มันยังไง เมธอด safe นี้ถูกนิยามบน mutable slice — มันรับหนึ่ง slice และ
ทำให้มันเป็นสองโดย split slice ที่ index ที่ให้เป็น argument Listing
20-4 แสดงวิธีใช้ split_at_mut
fn main() {
let mut v = vec![1, 2, 3, 4, 5, 6];
let r = &mut v[..];
let (a, b) = r.split_at_mut(3);
assert_eq!(a, &mut [1, 2, 3]);
assert_eq!(b, &mut [4, 5, 6]);
}split_at_mut ที่ safeเราไม่สามารถ implement ฟังก์ชันนี้โดยใช้เพียง safe Rust ความพยายามอาจดู
แบบ Listing 20-5 ซึ่งจะไม่ compile เพื่อความเรียบง่าย เราจะ implement
split_at_mut เป็นฟังก์ชันแทนเมธอดและเพียงสำหรับ slice ของค่า i32
แทน type generic T
fn split_at_mut(values: &mut [i32], mid: usize) -> (&mut [i32], &mut [i32]) {
let len = values.len();
assert!(mid <= len);
(&mut values[..mid], &mut values[mid..])
}
fn main() {
let mut vector = vec![1, 2, 3, 4, 5, 6];
let (left, right) = split_at_mut(&mut vector, 3);
}split_at_mut โดยใช้เพียง safe Rustฟังก์ชันนี้ได้ความยาวทั้งหมดของ slice ก่อน แล้ว มัน assert ว่า index ที่ให้เป็น parameter อยู่ภายใน slice โดย check ว่ามันน้อยกว่าหรือเท่า ความยาว Assertion หมายความว่าถ้าเราส่ง index ที่มากกว่าความยาวเพื่อ split slice ที่ ฟังก์ชันจะ panic ก่อนมันพยายามใช้ index นั้น
แล้ว เรา return สอง mutable slice ใน tuple — หนึ่งจากตอนเริ่มของ slice
เดิมถึง index mid และอีกอันจาก mid ถึงตอนจบของ slice
เมื่อเราพยายาม compile โค้ดใน Listing 20-5 เราจะได้ error:
$ cargo run
Compiling unsafe-example v0.1.0 (file:///projects/unsafe-example)
error[E0499]: cannot borrow `*values` as mutable more than once at a time
--> src/main.rs:6:31
|
1 | fn split_at_mut(values: &mut [i32], mid: usize) -> (&mut [i32], &mut [i32]) {
| - let's call the lifetime of this reference `'1`
...
6 | (&mut values[..mid], &mut values[mid..])
| --------------------------^^^^^^--------
| | | |
| | | second mutable borrow occurs here
| | first mutable borrow occurs here
| returning this value requires that `*values` is borrowed for `'1`
|
= help: use `.split_at_mut(position)` to obtain two mutable non-overlapping sub-slices
For more information about this error, try `rustc --explain E0499`.
error: could not compile `unsafe-example` (bin "unsafe-example") due to 1 previous error
borrow checker ของ Rust ไม่สามารถเข้าใจว่าเรากำลัง borrow ส่วนต่างกันของ slice — มันเพียงรู้ว่าเรากำลัง borrow จาก slice เดียวกันสองครั้ง Borrowing ส่วนต่างกันของ slice พื้นฐานคือ okay เพราะสอง slice ไม่ overlap แต่ Rust ไม่ฉลาดพอที่จะรู้นี่ เมื่อเรารู้ว่าโค้ด okay แต่ Rust ไม่ มันถึงเวลาที่จะเอื้อมไปโค้ด unsafe
Listing 20-6 แสดงวิธีใช้ block unsafe, raw pointer และการเรียก
ฟังก์ชัน unsafe บางตัวเพื่อทำให้ implementation ของ split_at_mut
ทำงาน
use std::slice;
fn split_at_mut(values: &mut [i32], mid: usize) -> (&mut [i32], &mut [i32]) {
let len = values.len();
let ptr = values.as_mut_ptr();
assert!(mid <= len);
unsafe {
(
slice::from_raw_parts_mut(ptr, mid),
slice::from_raw_parts_mut(ptr.add(mid), len - mid),
)
}
}
fn main() {
let mut vector = vec![1, 2, 3, 4, 5, 6];
let (left, right) = split_at_mut(&mut vector, 3);
}split_at_mutจำจากส่วน “Type Slice” ในบทที่ 4 ว่า
slice คือ pointer ไปยังข้อมูลและความยาวของ slice เราใช้เมธอด len
เพื่อได้ความยาวของ slice และเมธอด as_mut_ptr เพื่อเข้าถึง raw
pointer ของ slice ในกรณีนี้ เพราะเรามี mutable slice ของค่า i32,
as_mut_ptr return raw pointer ที่มี type *mut i32 ซึ่งเราเก็บใน
ตัวแปร ptr
เรารักษา assertion ว่า index mid อยู่ภายใน slice แล้ว เราไปยังโค้ด
unsafe — ฟังก์ชัน slice::from_raw_parts_mut รับ raw pointer และความ
ยาว และมันสร้าง slice เราใช้ฟังก์ชันนี้เพื่อสร้าง slice ที่เริ่มจาก
ptr และยาว mid item แล้ว เราเรียกเมธอด add บน ptr กับ mid
เป็น argument เพื่อได้ raw pointer ที่เริ่มที่ mid และเราสร้าง slice
โดยใช้ pointer นั้นและจำนวน item ที่เหลือหลัง mid เป็นความยาว
ฟังก์ชัน slice::from_raw_parts_mut คือ unsafe เพราะมันรับ raw pointer
และต้องเชื่อว่า pointer นี้ valid เมธอด add บน raw pointer ก็ unsafe
เพราะมันต้องเชื่อว่าที่ตั้ง offset ก็เป็น pointer valid ดังนั้น เรา
ต้องใส่ block unsafe รอบการเรียก slice::from_raw_parts_mut และ
add เพื่อให้เราเรียกพวกมันได้ โดยดูที่โค้ดและโดยเพิ่ม assertion ว่า
mid ต้องน้อยกว่าหรือเท่า len เราบอกได้ว่า raw pointer ทั้งหมดที่
ใช้ภายใน block unsafe จะเป็น pointer valid ไปยังข้อมูลภายใน slice
นี่คือการใช้ unsafe ที่ยอมรับได้และเหมาะสม
สังเกตว่าเราไม่ต้องทำเครื่องหมายฟังก์ชัน split_at_mut ผลลัพธ์เป็น
unsafe และเราเรียกฟังก์ชันนี้จาก safe Rust ได้ เราสร้าง safe
abstraction ให้โค้ด unsafe ด้วย implementation ของฟังก์ชันที่ใช้โค้ด
unsafe ในวิธี safe เพราะมันสร้างเพียง pointer valid จากข้อมูลที่
ฟังก์ชันนี้เข้าถึงได้
ในทางกลับ การใช้ slice::from_raw_parts_mut ใน Listing 20-7 น่าจะ
crash เมื่อ slice ถูกใช้ โค้ดนี้รับที่ memory ใด ๆ และสร้าง slice ยาว
10,000 item
fn main() {
use std::slice;
let address = 0x01234usize;
let r = address as *mut i32;
let values: &[i32] = unsafe { slice::from_raw_parts_mut(r, 10000) };
}เราไม่เป็นเจ้าของ memory ที่ที่ใด ๆ นี้ และไม่มีการรับประกันว่า slice
ที่โค้ดนี้สร้างบรรจุค่า i32 valid ความพยายามใช้ values ราวกับมัน
เป็น slice valid ส่งผลเป็น undefined behavior
ใช้ฟังก์ชัน extern เพื่อเรียกโค้ดภายนอก
บางครั้งโค้ด Rust ของคุณอาจต้อง interact กับโค้ดที่เขียนในภาษาอื่น
สำหรับนี้ Rust มีคีย์เวิร์ด extern ที่ facilitate การสร้างและใช้
Foreign Function Interface (FFI) ซึ่งคือวิธีสำหรับภาษาโปรแกรมที่จะ
นิยามฟังก์ชันและเปิดใช้ภาษาโปรแกรมที่ต่าง (foreign) เพื่อเรียกฟังก์ชัน
เหล่านั้น
Listing 20-8 สาธิตวิธีตั้ง integration กับฟังก์ชัน abs จาก C
standard library ฟังก์ชันที่ประกาศภายใน block extern โดยทั่วไป unsafe
ที่จะเรียกจากโค้ด Rust ดังนั้น block extern ต้องถูกทำเครื่องหมาย
unsafe ด้วย เหตุผลคือภาษาอื่นไม่บังคับกฎและการรับประกันของ Rust และ
Rust ไม่สามารถ check พวกมัน ดังนั้นความรับผิดชอบตกที่ programmer เพื่อ
รับประกัน safety
unsafe extern "C" {
fn abs(input: i32) -> i32;
}
fn main() {
unsafe {
println!("Absolute value of -3 according to C: {}", abs(-3));
}
}extern ที่นิยามในภาษาอื่นภายใน block unsafe extern "C" เรา list ชื่อและ signature ของฟังก์ชัน
ภายนอกจากภาษาอื่นที่เราต้องการเรียก ส่วน "C" นิยามว่า application
binary interface (ABI) ใดที่ฟังก์ชันภายนอกใช้ — ABI นิยามวิธีเรียก
ฟังก์ชันที่ระดับ assembly ABI "C" ปกติที่สุดและตาม ABI ของภาษาโปรแกรม
C ข้อมูลเกี่ยวกับ ABI ทั้งหมดที่ Rust สนับสนุนใช้ได้ใน the Rust
Reference
ทุก item ที่ประกาศภายใน block unsafe extern เป็น unsafe โดยปริยาย
อย่างไรก็ตาม ฟังก์ชัน FFI บาง เป็น safe ที่จะเรียก ตัวอย่างเช่น
ฟังก์ชัน abs จาก C standard library ไม่มีการพิจารณา memory safety ใด
และเรารู้ว่ามันถูกเรียกได้ด้วย i32 ใด ในกรณีแบบนี้ เราใช้คีย์เวิร์ด
safe เพื่อบอกว่าฟังก์ชันเฉพาะนี้ safe ที่จะเรียกแม้มันอยู่ใน block
unsafe extern ได้ เมื่อเราทำการเปลี่ยนแปลงนั้น การเรียกมันไม่ต้องการ
block unsafe อีก ดังที่แสดงใน Listing 20-9
unsafe extern "C" {
safe fn abs(input: i32) -> i32;
}
fn main() {
println!("Absolute value of -3 according to C: {}", abs(-3));
}safe อย่างชัดเจนภายใน block unsafe extern และเรียกมันอย่าง safeทำเครื่องหมายฟังก์ชันเป็น safe ไม่ทำให้มัน safe ในตัวเอง! แทน มัน
เหมือนสัญญาที่คุณกำลังทำกับ Rust ว่ามัน safe มันยังเป็นความรับผิดชอบของ
คุณที่จะรับประกันสัญญานั้นถูกรักษา!
เรียกฟังก์ชัน Rust จากภาษาอื่น
เราใช้ extern เพื่อสร้าง interface ที่อนุญาตให้ภาษาอื่นเรียกฟังก์ชัน
Rust ได้ด้วย แทนการสร้าง block extern ทั้งหมด เราเพิ่มคีย์เวิร์ด
extern และระบุ ABI ที่จะใช้ก่อนคีย์เวิร์ด fn สำหรับฟังก์ชันที่
เกี่ยวข้อง เราต้องเพิ่ม annotation #[unsafe(no_mangle)] เพื่อบอก
compiler Rust ไม่ให้ mangle ชื่อของฟังก์ชันนี้ Mangling คือเมื่อ
compiler เปลี่ยนชื่อที่เราให้ฟังก์ชันเป็นชื่อต่างที่บรรจุข้อมูลมากขึ้น
สำหรับส่วนอื่นของกระบวนการ compilation เพื่อใช้แต่ readable โดยมนุษย์
น้อยกว่า ทุก compiler ภาษาโปรแกรม mangle ชื่อต่างกันเล็กน้อย ดังนั้น
สำหรับฟังก์ชัน Rust ที่จะ nameable โดยภาษาอื่น เราต้องปิดการ mangling
ชื่อของ compiler Rust นี่คือ unsafe เพราะอาจมี collision ชื่อทั่ว
library ที่ไม่มี mangling ในตัว ดังนั้นมันคือความรับผิดชอบของเราที่จะ
รับประกันว่าชื่อที่เราเลือก safe ที่จะ export โดยไม่ mangle
ในตัวอย่างต่อไปนี้ เราทำฟังก์ชัน call_from_c เข้าถึงได้จากโค้ด C
หลังจากมันถูก compile เป็น shared library และ link จาก C:
#[unsafe(no_mangle)]
pub extern "C" fn call_from_c() {
println!("Just called a Rust function from C!");
}
การใช้ extern นี้ต้องการ unsafe เพียงใน attribute ไม่ใช่บน block
extern
เข้าถึงหรือแก้ตัวแปร Static แบบ Mutable
ในหนังสือนี้ เรายังไม่ได้พูดเกี่ยวกับตัวแปร global ซึ่ง Rust สนับสนุน แต่ซึ่งเป็นปัญหาได้กับกฎ ownership ของ Rust ถ้าสองเธรดเข้าถึงตัวแปร global แบบ mutable เดียวกัน มันสาเหตุ data race ได้
ใน Rust ตัวแปร global ถูกเรียกตัวแปร static Listing 20-10 แสดงตัวอย่าง การประกาศและการใช้ตัวแปร static กับ string slice เป็นค่า
static HELLO_WORLD: &str = "Hello, world!";
fn main() {
println!("value is: {HELLO_WORLD}");
}ตัวแปร static คล้ายกับ constant ซึ่งเราพูดถึงในส่วน “ประกาศ
Constant” ในบทที่ 3 ชื่อของตัวแปร static
อยู่ใน SCREAMING_SNAKE_CASE โดย convention ตัวแปร static เก็บได้
เพียง reference ที่มี lifetime 'static ซึ่งหมายความว่า compiler Rust
คำนวณ lifetime ได้และเราไม่ต้องการ annotate มันอย่างชัดเจน การเข้าถึง
ตัวแปร static แบบ immutable เป็น safe
ความแตกต่างเล็กน้อยระหว่าง constant และตัวแปร static แบบ immutable คือ
ค่าในตัวแปร static มี address คงที่ใน memory ใช้ค่าจะเข้าถึงข้อมูล
เดียวกันเสมอ ตรงข้าม Constant ถูกอนุญาตให้ duplicate ข้อมูลของพวกมัน
เมื่อใดก็ตามที่พวกมันถูกใช้ ความแตกต่างอื่นคือตัวแปร static เป็น
mutable ได้ การเข้าถึงและแก้ตัวแปร static แบบ mutable เป็น unsafe
Listing 20-11 แสดงวิธีประกาศ เข้าถึง และแก้ตัวแปร static แบบ mutable
ชื่อ COUNTER
static mut COUNTER: u32 = 0;
/// SAFETY: Calling this from more than a single thread at a time is undefined
/// behavior, so you *must* guarantee you only call it from a single thread at
/// a time.
unsafe fn add_to_count(inc: u32) {
unsafe {
COUNTER += inc;
}
}
fn main() {
unsafe {
// SAFETY: This is only called from a single thread in `main`.
add_to_count(3);
println!("COUNTER: {}", *(&raw const COUNTER));
}
}เช่นเดียวกับตัวแปรปกติ เราระบุ mutability โดยใช้คีย์เวิร์ด mut โค้ดใด
ที่อ่านหรือเขียนจาก COUNTER ต้องอยู่ภายใน block unsafe โค้ดใน
Listing 20-11 compile และ print COUNTER: 3 ตามที่เราคาดเดาเพราะมัน
เป็น single threaded การมีหลายเธรดเข้าถึง COUNTER น่าจะส่งผลเป็น data
race ดังนั้นมันเป็น undefined behavior ดังนั้น เราต้องทำเครื่องหมาย
ฟังก์ชันทั้งหมดเป็น unsafe และ document ข้อจำกัด safety เพื่อให้ใคร
ก็ตามที่เรียกฟังก์ชันรู้ว่าพวกเขาได้รับและไม่ได้รับอนุญาตให้ทำอะไรอย่าง safe
เมื่อใดก็ตามที่เราเขียนฟังก์ชัน unsafe มันคือ idiomatic ที่จะเขียน
comment เริ่มต้นด้วย SAFETY และอธิบายสิ่งที่ caller ต้องทำเพื่อเรียก
ฟังก์ชันอย่าง safe เช่นกัน เมื่อใดก็ตามที่เราทำ operation unsafe มัน
คือ idiomatic ที่จะเขียน comment เริ่มต้นด้วย SAFETY เพื่ออธิบายวิธี
ที่กฎ safety ถูกยึดถือ
นอกจากนี้ compiler จะปฏิเสธโดยค่าเริ่มต้นความพยายามใดที่จะสร้าง
reference ไปยังตัวแปร static แบบ mutable ผ่าน compiler lint คุณต้อง
ทั้ง opt out จากการปกป้องของ lint นั้นอย่างชัดเจนโดยเพิ่ม annotation
#[allow(static_mut_refs)] หรือเข้าถึงตัวแปร static แบบ mutable ผ่าน
raw pointer ที่สร้างกับหนึ่งใน raw borrow operator นั้นรวมกรณีที่
reference ถูกสร้างมองไม่เห็น เช่นเมื่อมันถูกใช้ใน println! ใน listing
โค้ดนี้ ต้องการ reference ไปยังตัวแปร static mutable ให้ถูกสร้างผ่าน
raw pointer ช่วยทำให้ข้อกำหนด safety สำหรับการใช้พวกมันชัดเจนมากขึ้น
ด้วยข้อมูล mutable ที่ globally เข้าถึงได้ มันยากที่จะรับประกันว่าไม่มี data race ซึ่งเป็นเหตุผลที่ Rust พิจารณาตัวแปร static แบบ mutable ว่า เป็น unsafe ที่เป็นไปได้ มันเป็นที่นิยมมากกว่าที่จะใช้เทคนิค concurrency และ smart pointer thread-safe ที่เราพูดถึงในบทที่ 16 เพื่อ ให้ compiler check ว่าการเข้าถึงข้อมูลจากเธรดต่างกันถูกทำอย่าง safe
Implement Trait Unsafe
เราใช้ unsafe เพื่อ implement trait unsafe ได้ Trait เป็น unsafe เมื่อ
อย่างน้อยหนึ่งในเมธอดของมันมี invariant บางอย่างที่ compiler ไม่
สามารถ verify เราประกาศว่า trait คือ unsafe โดยเพิ่มคีย์เวิร์ด
unsafe ก่อน trait และทำเครื่องหมาย implementation ของ trait เป็น
unsafe ด้วย ดังที่แสดงใน Listing 20-12
unsafe trait Foo {
// methods go here
}
unsafe impl Foo for i32 {
// method implementations go here
}
fn main() {}โดยใช้ unsafe impl เราสัญญาว่าเราจะยึดถือ invariant ที่ compiler ไม่
สามารถ verify
เป็นตัวอย่าง จำ trait marker Send และ Sync ที่เราพูดถึงในส่วน
“Concurrency แบบขยายได้ด้วย Send และ Sync”
ในบทที่ 16 — compiler implement trait เหล่านี้อัตโนมัติถ้า type ของเรา
ประกอบทั้งหมดของ type อื่นที่ implement Send และ Sync ถ้าเรา
implement type ที่บรรจุ type ที่ไม่ implement Send หรือ Sync เช่น
raw pointer และเราต้องการทำเครื่องหมาย type นั้นเป็น Send หรือ
Sync เราต้องใช้ unsafe Rust ไม่สามารถ verify ว่า type ของเรา
ยึดถือการรับประกันว่ามันถูกส่งทั่วเธรดได้อย่าง safe หรือเข้าถึงจากหลาย
เธรด ดังนั้น เราต้องทำ check เหล่านั้นโดยมือและบ่งบอกเช่นนั้นด้วย
unsafe
เข้าถึง Field ของ Union
action สุดท้ายที่ทำงานเพียงกับ unsafe คือการเข้าถึง field ของ union
union คล้ายกับ struct แต่เพียงหนึ่ง field ที่ประกาศถูกใช้ใน instance
เฉพาะในเวลาเดียวกัน Union ใช้หลัก ๆ เพื่อ interface กับ union ในโค้ด
C การเข้าถึง field union คือ unsafe เพราะ Rust ไม่สามารถรับประกัน type
ของข้อมูลที่ถูกเก็บปัจจุบันใน instance union คุณเรียนเพิ่มเกี่ยวกับ
union ใน the Rust Reference ได้
ใช้ Miri เพื่อ Check โค้ด Unsafe
เมื่อเขียนโค้ด unsafe คุณอาจต้องการ check ว่าสิ่งที่คุณเขียนจริง ๆ คือ safe และถูก หนึ่งในวิธีดีที่สุดในการทำนั้นคือใช้ Miri ซึ่งคือเครื่อง มือ Rust official สำหรับการตรวจหา undefined behavior ขณะที่ borrow checker คือเครื่องมือ static ที่ทำงานที่ compile time, Miri คือ เครื่องมือ dynamic ที่ทำงานที่ runtime มัน check โค้ดของคุณโดยรัน โปรแกรมของคุณ หรือ test suite ของมัน และตรวจหาเมื่อคุณละเมิดกฎที่มัน เข้าใจเกี่ยวกับวิธีที่ Rust ควรทำงาน
ใช้ Miri ต้องการ nightly build ของ Rust (ซึ่งเราพูดมากขึ้นใน ภาคผนวก
G — Rust ถูกสร้างยังไงและ “Nightly Rust”) คุณ
ติดตั้งทั้ง version nightly ของ Rust และเครื่องมือ Miri ได้โดยพิมพ์
rustup +nightly component add miri นี่ไม่เปลี่ยน version ของ Rust ที่
project ของคุณใช้ — มันเพียงเพิ่มเครื่องมือให้ system ของคุณเพื่อให้
คุณใช้มันได้เมื่อคุณต้องการ คุณรัน Miri บน project ได้โดยพิมพ์ cargo +nightly miri run หรือ cargo +nightly miri test
สำหรับตัวอย่างของวิธีที่มีประโยชน์นี้ได้ พิจารณาสิ่งที่เกิดขึ้นเมื่อ เรารันมันกับ Listing 20-7
$ cargo +nightly miri run
Compiling unsafe-example v0.1.0 (file:///projects/unsafe-example)
Finished `dev` profile [unoptimized + debuginfo] target(s) in 0.01s
Running `file:///home/.rustup/toolchains/nightly/bin/cargo-miri runner target/miri/debug/unsafe-example`
warning: integer-to-pointer cast
--> src/main.rs:5:13
|
5 | let r = address as *mut i32;
| ^^^^^^^^^^^^^^^^^^^ integer-to-pointer cast
|
= help: this program is using integer-to-pointer casts or (equivalently) `ptr::with_exposed_provenance`, which means that Miri might miss pointer bugs in this program
= help: see https://doc.rust-lang.org/nightly/std/ptr/fn.with_exposed_provenance.html for more details on that operation
= help: to ensure that Miri does not miss bugs in your program, use Strict Provenance APIs (https://doc.rust-lang.org/nightly/std/ptr/index.html#strict-provenance, https://crates.io/crates/sptr) instead
= help: you can then set `MIRIFLAGS=-Zmiri-strict-provenance` to ensure you are not relying on `with_exposed_provenance` semantics
= help: alternatively, `MIRIFLAGS=-Zmiri-permissive-provenance` disables this warning
= note: BACKTRACE:
= note: inside `main` at src/main.rs:5:13: 5:32
error: Undefined Behavior: pointer not dereferenceable: pointer must be dereferenceable for 40000 bytes, but got 0x1234[noalloc] which is a dangling pointer (it has no provenance)
--> src/main.rs:7:35
|
7 | let values: &[i32] = unsafe { slice::from_raw_parts_mut(r, 10000) };
| ^^^^^^^^^^^^^^^^^^^^^^^^^^^^^^^^^^^ Undefined Behavior occurred here
|
= help: this indicates a bug in the program: it performed an invalid operation, and caused Undefined Behavior
= help: see https://doc.rust-lang.org/nightly/reference/behavior-considered-undefined.html for further information
= note: BACKTRACE:
= note: inside `main` at src/main.rs:7:35: 7:70
note: some details are omitted, run with `MIRIFLAGS=-Zmiri-backtrace=full` for a verbose backtrace
error: aborting due to 1 previous error; 1 warning emitted
Miri เตือนเราอย่างถูกต้องว่าเรากำลัง cast integer เป็น pointer ซึ่ง อาจเป็นปัญหา แต่ Miri ไม่สามารถตัดสินว่าปัญหามีหรือไม่เพราะมันไม่รู้ว่า pointer มาจากที่ไหน แล้ว Miri return error ที่ Listing 20-7 มี undefined behavior เพราะเรามี dangling pointer ขอบคุณ Miri ตอนนี้เรา รู้มีความเสี่ยงของ undefined behavior และเราคิดเกี่ยวกับวิธีทำให้โค้ด safe ได้ ในบางกรณี Miri แม้ทำคำแนะนำเกี่ยวกับวิธี fix error ได้
Miri ไม่จับทุกอย่างที่คุณอาจได้ผิดเมื่อเขียนโค้ด unsafe Miri คือ เครื่องมือวิเคราะห์ dynamic ดังนั้นมันเพียงจับปัญหากับโค้ดที่ถูกรันจริง นั่นหมายความว่าคุณจะต้องใช้มันร่วมกับเทคนิค testing ที่ดีเพื่อเพิ่ม ความมั่นใจของคุณเกี่ยวกับโค้ด unsafe ที่คุณเขียน Miri ก็ไม่ครอบคลุม ทุกวิธีที่เป็นไปได้ที่โค้ดของคุณ unsound ได้
ในอีกคำพูด — ถ้า Miri จับ ปัญหา คุณรู้มี bug แต่เพียงเพราะ Miri ไม่ จับ bug ไม่ได้หมายความว่าไม่มีปัญหา มันจับเยอะได้ ลองรันมันบนตัวอย่าง อื่นของโค้ด unsafe ในบทนี้และดูว่ามันบอกอะไร!
คุณเรียนรู้เพิ่มเกี่ยวกับ Miri ที่ GitHub repository ของมัน ได้
ใช้โค้ด Unsafe อย่างถูกต้อง
ใช้ unsafe เพื่อใช้หนึ่งในห้า superpower ที่เพิ่งพูดถึงไม่ผิดหรือแม้
ถูกขมวดคิ้วใส่ แต่มันยุ่งยากกว่าที่จะได้โค้ด unsafe ถูกเพราะ compiler
ไม่สามารถช่วยยึดถือ memory safety เมื่อคุณมีเหตุผลที่จะใช้โค้ด unsafe
คุณทำเช่นนั้นได้ และมี annotation unsafe ที่ชัดเจนทำให้ง่ายขึ้นที่จะ
ติดตามแหล่งของปัญหาเมื่อพวกมันเกิด เมื่อใดก็ตามที่คุณเขียนโค้ด unsafe
คุณใช้ Miri เพื่อช่วยคุณให้มั่นใจมากขึ้นว่าโค้ดที่คุณเขียนยึดถือกฎของ
Rust ได้
สำหรับการสำรวจที่ลึกกว่าเกี่ยวกับวิธีทำงานอย่างมีประสิทธิภาพกับ unsafe
Rust อ่านคู่มือ official ของ Rust สำหรับ unsafe, The
Rustonomicon
Trait ขั้นสูง
Trait ขั้นสูง
เราครอบคลุม trait ครั้งแรกในส่วน “นิยามพฤติกรรมที่แชร์ด้วย Trait” ในบทที่ 10 แต่เราไม่ได้พูดถึงรายละเอียด ขั้นสูง ตอนนี้คุณรู้มากขึ้นเกี่ยวกับ Rust เราสามารถเข้าไปในส่วนเล็ก ๆ น้อย ๆ
นิยาม Trait ด้วย Associated Type
Associated type เชื่อม type placeholder กับ trait เพื่อให้นิยามเมธอด trait ใช้ placeholder type เหล่านี้ใน signature ของพวกมัน Implementor ของ trait จะระบุ type concrete ที่จะใช้แทน placeholder type สำหรับ implementation เฉพาะ ด้วยวิธีนั้น เรานิยาม trait ที่ใช้ type บางอย่าง โดยไม่ต้องรู้ว่า type เหล่านั้นเป็นอะไรแน่ ๆ จนกระทั่ง trait ถูก implement ได้
เราอธิบายฟีเจอร์ขั้นสูงส่วนใหญ่ในบทนี้ว่าจำเป็นแทบไม่ Associated type อยู่ที่ไหนสักแห่งตรงกลาง — พวกมันถูกใช้แทบไม่กว่าฟีเจอร์ที่อธิบายในส่วน อื่นของหนังสือ แต่ปกติมากกว่าหลายฟีเจอร์อื่นที่พูดถึงในบทนี้
ตัวอย่างของ trait ที่มี associated type คือ trait Iterator ที่
standard library ให้ Associated type ถูก named Item และยืนแทน type
ของค่าที่ type ที่ implement trait Iterator กำลัง iterate บน นิยาม
ของ trait Iterator เป็นดังที่แสดงใน Listing 20-13
pub trait Iterator {
type Item;
fn next(&mut self) -> Option<Self::Item>;
}Iterator ที่มี associated type Itemtype Item คือ placeholder และนิยามของเมธอด next แสดงว่ามันจะ return
ค่าของ type Option<Self::Item> Implementor ของ trait Iterator จะ
ระบุ type concrete สำหรับ Item และเมธอด next จะ return Option ที่
บรรจุค่าของ type concrete นั้น
Associated type อาจดูเหมือนแนวคิดคล้ายกับ generic ที่อย่างหลังอนุญาตให้
เรานิยามฟังก์ชันโดยไม่ระบุว่ามันจัดการ type อะไรได้ เพื่อตรวจสอบความ
แตกต่างระหว่างสองแนวคิด เราจะดู implementation ของ trait Iterator
บน type ชื่อ Counter ที่ระบุว่า type Item คือ u32:
struct Counter {
count: u32,
}
impl Counter {
fn new() -> Counter {
Counter { count: 0 }
}
}
impl Iterator for Counter {
type Item = u32;
fn next(&mut self) -> Option<Self::Item> {
// --snip--
if self.count < 5 {
self.count += 1;
Some(self.count)
} else {
None
}
}
}Syntax นี้ดูเทียบเคียงได้กับของ generic แล้วทำไมไม่นิยาม trait
Iterator ด้วย generic ดังที่แสดงใน Listing 20-14?
pub trait Iterator<T> {
fn next(&mut self) -> Option<T>;
}Iterator โดยใช้ genericความแตกต่างคือเมื่อใช้ generic เช่นใน Listing 20-14 เราต้อง annotate
type ในแต่ละ implementation — เพราะเราสามารถ implement
Iterator<String> for Counter หรือ type อื่นใดด้วย เราจะมีหลาย
implementation ของ Iterator สำหรับ Counter ได้ ในคำพูดอื่น เมื่อ
trait มี generic parameter มันถูก implement สำหรับ type ได้หลายครั้ง
เปลี่ยน type concrete ของ generic type parameter แต่ละครั้ง เมื่อเราใช้
เมธอด next บน Counter เราจะต้องให้ type annotation เพื่อบ่งบอกว่า
implementation ใดของ Iterator ที่เราต้องการใช้
ด้วย associated type เราไม่ต้อง annotate type เพราะเราไม่สามารถ
implement trait บน type ได้หลายครั้ง ใน Listing 20-13 กับนิยามที่ใช้
associated type เราเลือกว่า type ของ Item จะเป็นอะไรได้เพียงครั้ง
เดียวเพราะมีได้เพียงหนึ่ง impl Iterator for Counter เราไม่ต้องระบุว่า
เราต้องการ iterator ของค่า u32 ทุกที่ที่เราเรียก next บน Counter
Associated type ก็กลายเป็นส่วนของ contract ของ trait — Implementor ของ trait ต้องให้ type เพื่อยืนแทน associated type placeholder Associated type มักมีชื่อที่อธิบายว่า type จะถูกใช้ยังไง และ document associated type ใน documentation API คือ practice ดี
ใช้ Default Generic Parameter และ Operator Overloading
เมื่อเราใช้ generic type parameter เราระบุ default concrete type
สำหรับ generic type ได้ นี่ขจัดความต้องการให้ implementor ของ trait
ระบุ concrete type ถ้า default type ทำงาน คุณระบุ default type เมื่อ
ประกาศ generic type ด้วย syntax <PlaceholderType=ConcreteType>
ตัวอย่างที่ดีของสถานการณ์ที่เทคนิคนี้มีประโยชน์คือกับ operator
overloading ซึ่งคุณ customize พฤติกรรมของ operator (เช่น +) ใน
สถานการณ์เฉพาะ
Rust ไม่อนุญาตให้คุณสร้าง operator ของตัวเองหรือ overload operator
ใด ๆ แต่คุณ overload operation และ trait ที่ตรงกันที่ list ใน
std::ops ได้โดย implement trait ที่ associate กับ operator ตัวอย่าง
เช่น ใน Listing 20-15 เรา overload operator + เพื่อเพิ่มสอง instance
Point ด้วยกัน เราทำสิ่งนี้โดย implement trait Add บน struct
Point
use std::ops::Add;
#[derive(Debug, Copy, Clone, PartialEq)]
struct Point {
x: i32,
y: i32,
}
impl Add for Point {
type Output = Point;
fn add(self, other: Point) -> Point {
Point {
x: self.x + other.x,
y: self.y + other.y,
}
}
}
fn main() {
assert_eq!(
Point { x: 1, y: 0 } + Point { x: 2, y: 3 },
Point { x: 3, y: 3 }
);
}Add เพื่อ overload operator + สำหรับ instance Pointเมธอด add เพิ่มค่า x ของสอง instance Point และค่า y ของสอง
instance Point เพื่อสร้าง Point ใหม่ trait Add มี associated
type ชื่อ Output ที่ตัดสิน type ที่ return จากเมธอด add
Default generic type ในโค้ดนี้อยู่ภายใน trait Add นี่คือนิยามของมัน:
#![allow(unused)]
fn main() {
trait Add<Rhs=Self> {
type Output;
fn add(self, rhs: Rhs) -> Self::Output;
}
}โค้ดนี้ควรดูคุ้นเคยโดยทั่วไป — trait ที่มีหนึ่งเมธอดและ associated type
ส่วนใหม่คือ Rhs=Self — syntax นี้ถูกเรียก default type parameter
generic type parameter Rhs (ย่อมาจาก “right-hand side”) นิยาม type
ของ parameter rhs ในเมธอด add ถ้าเราไม่ระบุ concrete type สำหรับ
Rhs เมื่อเรา implement trait Add type ของ Rhs จะ default เป็น
Self ซึ่งจะเป็น type ที่เรากำลัง implement Add บน
เมื่อเรา implement Add สำหรับ Point เราใช้ default สำหรับ Rhs
เพราะเราต้องการเพิ่มสอง instance Point มาดูตัวอย่างของการ implement
trait Add ที่เราต้องการ customize type Rhs แทนการใช้ default
เรามีสอง struct, Millimeters และ Meters ที่บรรจุค่าในหน่วยต่างกัน
การห่อบางของ type ที่มีใน struct อื่นนี้เรียก newtype pattern ซึ่ง
เราอธิบายในรายละเอียดมากขึ้นในส่วน “Implement External Trait ด้วย
Newtype Pattern” เราต้องการเพิ่มค่าใน
millimeter ให้ค่าใน meter และมี implementation ของ Add ทำ
conversion ถูก เรา implement Add สำหรับ Millimeters ด้วย Meters
เป็น Rhs ได้ ดังที่แสดงใน Listing 20-16
use std::ops::Add;
struct Millimeters(u32);
struct Meters(u32);
impl Add<Meters> for Millimeters {
type Output = Millimeters;
fn add(self, other: Meters) -> Millimeters {
Millimeters(self.0 + (other.0 * 1000))
}
}Add บน Millimeters เพื่อเพิ่ม Millimeters และ Metersเพื่อเพิ่ม Millimeters และ Meters เราระบุ impl Add<Meters> เพื่อ
ตั้งค่าของ type parameter Rhs แทนการใช้ default ของ Self
คุณจะใช้ default type parameter ในสองวิธีหลัก:
- เพื่อขยาย type โดยไม่ break โค้ดที่มี
- เพื่ออนุญาต customization ในกรณีเฉพาะที่ user ส่วนใหญ่ไม่ต้องการ
trait Add ของ standard library คือตัวอย่างของจุดประสงค์ที่สอง —
ปกติ คุณจะเพิ่มสอง type ที่เหมือนกัน แต่ trait Add ให้ความสามารถใน
การ customize เกินกว่านั้น ใช้ default type parameter ในนิยามของ trait
Add หมายความว่าคุณไม่ต้องระบุ parameter เพิ่มส่วนใหญ่ของเวลา ในคำพูด
อื่น boilerplate implementation เล็กน้อยไม่จำเป็น ทำให้ง่ายขึ้นที่จะ
ใช้ trait
จุดประสงค์แรกคล้ายกับที่สองแต่กลับกัน — ถ้าคุณต้องการเพิ่ม type parameter ให้ trait ที่มี คุณให้ default มันเพื่ออนุญาตการขยายของ functionality ของ trait โดยไม่ break โค้ด implementation ที่มี
Disambiguate ระหว่างเมธอดที่ตั้งชื่อเหมือนกัน
ไม่มีอะไรใน Rust ป้องกัน trait จากการมีเมธอดที่มีชื่อเดียวกับเมธอดของ trait อื่น และ Rust ไม่ป้องกันคุณจากการ implement ทั้งสอง trait บนหนึ่ง type มันเป็นไปได้ที่จะ implement เมธอดโดยตรงบน type ที่มีชื่อเดียวกับ เมธอดจาก trait
เมื่อเรียกเมธอดที่มีชื่อเดียวกัน คุณจะต้องบอก Rust ว่าอันไหนที่คุณ
ต้องการใช้ พิจารณาโค้ดใน Listing 20-17 ที่เรานิยามสอง trait, Pilot
และ Wizard ที่ทั้งสองมีเมธอดเรียก fly แล้วเรา implement ทั้งสอง
trait บน type Human ที่มีเมธอดชื่อ fly ที่ implement บนมันแล้ว
เมธอด fly แต่ละทำสิ่งที่ต่างกัน
trait Pilot {
fn fly(&self);
}
trait Wizard {
fn fly(&self);
}
struct Human;
impl Pilot for Human {
fn fly(&self) {
println!("This is your captain speaking.");
}
}
impl Wizard for Human {
fn fly(&self) {
println!("Up!");
}
}
impl Human {
fn fly(&self) {
println!("*waving arms furiously*");
}
}
fn main() {}fly และถูก implement บน type Human และเมธอด fly ถูก implement บน Human โดยตรงเมื่อเราเรียก fly บน instance ของ Human, compiler default ไปเรียก
เมธอดที่ถูก implement บน type โดยตรง ดังที่แสดงใน Listing 20-18
trait Pilot {
fn fly(&self);
}
trait Wizard {
fn fly(&self);
}
struct Human;
impl Pilot for Human {
fn fly(&self) {
println!("This is your captain speaking.");
}
}
impl Wizard for Human {
fn fly(&self) {
println!("Up!");
}
}
impl Human {
fn fly(&self) {
println!("*waving arms furiously*");
}
}
fn main() {
let person = Human;
person.fly();
}fly บน instance ของ Humanรันโค้ดนี้จะ print *waving arms furiously* แสดงว่า Rust เรียกเมธอด
fly ที่ implement บน Human โดยตรง
เพื่อเรียกเมธอด fly จาก trait Pilot หรือ trait Wizard เราต้องใช้
syntax ที่ชัดเจนกว่าเพื่อระบุว่าเมธอด fly ใดที่เราหมายถึง Listing
20-19 สาธิต syntax นี้
trait Pilot {
fn fly(&self);
}
trait Wizard {
fn fly(&self);
}
struct Human;
impl Pilot for Human {
fn fly(&self) {
println!("This is your captain speaking.");
}
}
impl Wizard for Human {
fn fly(&self) {
println!("Up!");
}
}
impl Human {
fn fly(&self) {
println!("*waving arms furiously*");
}
}
fn main() {
let person = Human;
Pilot::fly(&person);
Wizard::fly(&person);
person.fly();
}fly ของ trait ใดที่เราต้องการเรียกระบุชื่อ trait ก่อนชื่อเมธอดทำให้ชัดเจนกับ Rust ว่า implementation ใด
ของ fly ที่เราต้องการเรียก เรายังเขียน Human::fly(&person) ได้
ซึ่งเทียบเท่ากับ person.fly() ที่เราใช้ใน Listing 20-19 แต่นี่ยาวกว่า
เล็กน้อยถ้าเราไม่ต้อง disambiguate
รันโค้ดนี้ print ต่อไปนี้:
$ cargo run
Compiling traits-example v0.1.0 (file:///projects/traits-example)
Finished `dev` profile [unoptimized + debuginfo] target(s) in 0.46s
Running `target/debug/traits-example`
This is your captain speaking.
Up!
*waving arms furiously*
เพราะเมธอด fly รับ parameter self ถ้าเรามีสอง type ที่ทั้งสอง
implement หนึ่ง trait, Rust คำนวณว่า implementation ใดของ trait ที่
จะใช้ตาม type ของ self ได้
อย่างไรก็ตาม associated function ที่ไม่ใช่เมธอดไม่มี parameter self
เมื่อมีหลาย type หรือ trait ที่นิยามฟังก์ชันไม่ใช่เมธอดที่มีชื่อ
ฟังก์ชันเดียวกัน Rust ไม่รู้เสมอว่า type ใดที่คุณหมายถึงเว้นแต่คุณใช้
fully qualified syntax ตัวอย่างเช่น ใน Listing 20-20 เราสร้าง trait
สำหรับ shelter สัตว์ที่ต้องการ name ลูก dog ทั้งหมด Spot เราทำ trait
Animal กับ associated non-method function baby_name trait Animal
ถูก implement สำหรับ struct Dog ที่เราให้ associated non-method
function baby_name โดยตรงด้วย
trait Animal {
fn baby_name() -> String;
}
struct Dog;
impl Dog {
fn baby_name() -> String {
String::from("Spot")
}
}
impl Animal for Dog {
fn baby_name() -> String {
String::from("puppy")
}
}
fn main() {
println!("A baby dog is called a {}", Dog::baby_name());
}เรา implement โค้ดสำหรับ naming puppy ทั้งหมด Spot ใน associated
function baby_name ที่นิยามบน Dog type Dog ก็ implement trait
Animal ซึ่งอธิบายลักษณะที่สัตว์ทั้งหมดมี ลูก dog ถูกเรียก puppy และ
นั่นถูกแสดงใน implementation ของ trait Animal บน Dog ในฟังก์ชัน
baby_name ที่ associate กับ trait Animal
ใน main เราเรียกฟังก์ชัน Dog::baby_name ซึ่งเรียก associated
function ที่นิยามบน Dog โดยตรง โค้ดนี้ print ต่อไปนี้:
$ cargo run
Compiling traits-example v0.1.0 (file:///projects/traits-example)
Finished `dev` profile [unoptimized + debuginfo] target(s) in 0.54s
Running `target/debug/traits-example`
A baby dog is called a Spot
Output นี้ไม่ใช่สิ่งที่เราต้องการ เราต้องการเรียกฟังก์ชัน baby_name
ที่เป็นส่วนของ trait Animal ที่เรา implement บน Dog เพื่อให้โค้ด
print A baby dog is called a puppy เทคนิคของระบุชื่อ trait ที่เราใช้
ใน Listing 20-19 ไม่ช่วยที่นี่ — ถ้าเราเปลี่ยน main เป็นโค้ดใน
Listing 20-21 เราจะได้ error compilation
trait Animal {
fn baby_name() -> String;
}
struct Dog;
impl Dog {
fn baby_name() -> String {
String::from("Spot")
}
}
impl Animal for Dog {
fn baby_name() -> String {
String::from("puppy")
}
}
fn main() {
println!("A baby dog is called a {}", Animal::baby_name());
}baby_name จาก trait Animal แต่ Rust ไม่รู้ว่า implementation ใดที่จะใช้เพราะ Animal::baby_name ไม่มี parameter self และอาจมี type อื่นที่
implement trait Animal, Rust ไม่สามารถคำนวณว่า implementation ใดของ
Animal::baby_name ที่เราต้องการ เราจะได้ error compiler นี้:
$ cargo run
Compiling traits-example v0.1.0 (file:///projects/traits-example)
error[E0790]: cannot call associated function on trait without specifying the corresponding `impl` type
--> src/main.rs:20:43
|
2 | fn baby_name() -> String;
| ------------------------- `Animal::baby_name` defined here
...
20 | println!("A baby dog is called a {}", Animal::baby_name());
| ^^^^^^^^^^^^^^^^^^^ cannot call associated function of trait
|
help: use the fully-qualified path to the only available implementation
|
20 | println!("A baby dog is called a {}", <Dog as Animal>::baby_name());
| +++++++ +
For more information about this error, try `rustc --explain E0790`.
error: could not compile `traits-example` (bin "traits-example") due to 1 previous error
เพื่อ disambiguate และบอก Rust ว่าเราต้องการใช้ implementation ของ
Animal สำหรับ Dog ตรงข้ามกับ implementation ของ Animal สำหรับ
type อื่น เราต้องใช้ fully qualified syntax Listing 20-22 สาธิตวิธีใช้
fully qualified syntax
trait Animal {
fn baby_name() -> String;
}
struct Dog;
impl Dog {
fn baby_name() -> String {
String::from("Spot")
}
}
impl Animal for Dog {
fn baby_name() -> String {
String::from("puppy")
}
}
fn main() {
println!("A baby dog is called a {}", <Dog as Animal>::baby_name());
}baby_name จาก trait Animal ตามที่ implement บน Dogเรากำลังให้ Rust type annotation ภายใน angle bracket ซึ่งบ่งบอกว่าเรา
ต้องการเรียกเมธอด baby_name จาก trait Animal ตามที่ implement บน
Dog โดยบอกว่าเราต้องการ treat type Dog เป็น Animal สำหรับการ
เรียกฟังก์ชันนี้ โค้ดนี้ตอนนี้จะ print สิ่งที่เราต้องการ:
$ cargo run
Compiling traits-example v0.1.0 (file:///projects/traits-example)
Finished `dev` profile [unoptimized + debuginfo] target(s) in 0.48s
Running `target/debug/traits-example`
A baby dog is called a puppy
โดยทั่วไป fully qualified syntax ถูกนิยามแบบนี้:
<Type as Trait>::function(receiver_if_method, next_arg, ...);สำหรับ associated function ที่ไม่ใช่เมธอด จะไม่มี receiver — จะมี
เพียง list ของ argument อื่น คุณใช้ fully qualified syntax ทุกที่ที่
คุณเรียกฟังก์ชันหรือเมธอดได้ อย่างไรก็ตาม คุณถูกอนุญาตให้ละส่วนใดของ
syntax นี้ที่ Rust คำนวณจากข้อมูลอื่นในโปรแกรมได้ คุณเพียงต้องใช้
syntax verbose มากขึ้นนี้ในกรณีที่มีหลาย implementation ที่ใช้ชื่อ
เดียวกันและ Rust ต้องการความช่วยเหลือในการระบุ implementation ใดที่
คุณต้องการเรียก
ใช้ Supertrait
บางครั้งคุณอาจเขียนนิยาม trait ที่ขึ้นกับ trait อื่น — สำหรับ type ที่ จะ implement trait แรก คุณต้องการให้ type นั้น implement trait ที่สองด้วย คุณจะทำสิ่งนี้เพื่อให้นิยาม trait ของคุณใช้ประโยชน์จาก associated item ของ trait ที่สองได้ trait ที่นิยาม trait ของคุณพึ่งพา ถูกเรียก supertrait ของ trait ของคุณ
ตัวอย่างเช่น สมมุติเราต้องการทำ trait OutlinePrint กับเมธอด
outline_print ที่จะ print ค่าที่ให้ formatted เพื่อให้มันถูก frame ใน
asterisk นั่นคือ ให้ struct Point ที่ implement trait
Display ของ standard library เพื่อส่งผลเป็น (x, y) เมื่อเราเรียก
outline_print บน instance Point ที่มี 1 สำหรับ x และ 3
สำหรับ y มันควร print ต่อไปนี้:
**********
* *
* (1, 3) *
* *
**********
ใน implementation ของเมธอด outline_print เราต้องการใช้ functionality
ของ trait Display ดังนั้น เราต้องระบุว่า trait OutlinePrint จะ
ทำงานเพียงสำหรับ type ที่ implement Display ด้วยและให้ functionality
ที่ OutlinePrint ต้องการ เราทำนั้นได้ในนิยาม trait โดยระบุ
OutlinePrint: Display เทคนิคนี้คล้ายกับการเพิ่ม trait bound ให้
trait Listing 20-23 แสดง implementation ของ trait OutlinePrint
use std::fmt;
trait OutlinePrint: fmt::Display {
fn outline_print(&self) {
let output = self.to_string();
let len = output.len();
println!("{}", "*".repeat(len + 4));
println!("*{}*", " ".repeat(len + 2));
println!("* {output} *");
println!("*{}*", " ".repeat(len + 2));
println!("{}", "*".repeat(len + 4));
}
}
fn main() {}OutlinePrint ที่ต้องการ functionality จาก Displayเพราะเราระบุว่า OutlinePrint ต้องการ trait Display เราใช้ฟังก์ชัน
to_string ที่ถูก implement อัตโนมัติสำหรับ type ใดที่ implement
Display ได้ ถ้าเราลองใช้ to_string โดยไม่เพิ่ม colon และระบุ trait
Display หลังชื่อ trait เราจะได้ error บอกว่าไม่มีเมธอดชื่อ
to_string พบสำหรับ type &Self ใน scope ปัจจุบัน
มาดูสิ่งที่เกิดเมื่อเราพยายาม implement OutlinePrint บน type ที่ไม่
implement Display เช่น struct Point:
use std::fmt;
trait OutlinePrint: fmt::Display {
fn outline_print(&self) {
let output = self.to_string();
let len = output.len();
println!("{}", "*".repeat(len + 4));
println!("*{}*", " ".repeat(len + 2));
println!("* {output} *");
println!("*{}*", " ".repeat(len + 2));
println!("{}", "*".repeat(len + 4));
}
}
struct Point {
x: i32,
y: i32,
}
impl OutlinePrint for Point {}
fn main() {
let p = Point { x: 1, y: 3 };
p.outline_print();
}เราได้ error บอกว่า Display ถูกต้องการแต่ไม่ถูก implement:
$ cargo run
Compiling traits-example v0.1.0 (file:///projects/traits-example)
error[E0277]: `Point` doesn't implement `std::fmt::Display`
--> src/main.rs:20:23
|
20 | impl OutlinePrint for Point {}
| ^^^^^ the trait `std::fmt::Display` is not implemented for `Point`
|
note: required by a bound in `OutlinePrint`
--> src/main.rs:3:21
|
3 | trait OutlinePrint: fmt::Display {
| ^^^^^^^^^^^^ required by this bound in `OutlinePrint`
error[E0277]: `Point` doesn't implement `std::fmt::Display`
--> src/main.rs:24:7
|
24 | p.outline_print();
| ^^^^^^^^^^^^^ the trait `std::fmt::Display` is not implemented for `Point`
|
note: required by a bound in `OutlinePrint::outline_print`
--> src/main.rs:3:21
|
3 | trait OutlinePrint: fmt::Display {
| ^^^^^^^^^^^^ required by this bound in `OutlinePrint::outline_print`
4 | fn outline_print(&self) {
| ------------- required by a bound in this associated function
For more information about this error, try `rustc --explain E0277`.
error: could not compile `traits-example` (bin "traits-example") due to 2 previous errors
เพื่อ fix สิ่งนี้ เรา implement Display บน Point และ satisfy
constraint ที่ OutlinePrint ต้องการ แบบนี้:
trait OutlinePrint: fmt::Display {
fn outline_print(&self) {
let output = self.to_string();
let len = output.len();
println!("{}", "*".repeat(len + 4));
println!("*{}*", " ".repeat(len + 2));
println!("* {output} *");
println!("*{}*", " ".repeat(len + 2));
println!("{}", "*".repeat(len + 4));
}
}
struct Point {
x: i32,
y: i32,
}
impl OutlinePrint for Point {}
use std::fmt;
impl fmt::Display for Point {
fn fmt(&self, f: &mut fmt::Formatter) -> fmt::Result {
write!(f, "({}, {})", self.x, self.y)
}
}
fn main() {
let p = Point { x: 1, y: 3 };
p.outline_print();
}แล้ว implement trait OutlinePrint บน Point จะ compile สำเร็จ และเรา
เรียก outline_print บน instance Point เพื่อแสดงมันภายใน outline ของ
asterisk ได้
Implement External Trait ด้วย Newtype Pattern
ในส่วน “Implement Trait บน Type” ในบทที่ 10 เรากล่าวถึง orphan rule ที่บอกว่าเราถูกอนุญาต เพียงให้ implement trait บน type ถ้าทั้ง trait หรือ type หรือทั้งสอง อยู่ใน crate ของเรา มันเป็นไปได้ที่จะอ้อม restriction นี้โดยใช้ newtype pattern ซึ่งเกี่ยวกับการสร้าง type ใหม่ใน tuple struct (เราครอบคลุม tuple struct ในส่วน “สร้าง Type ต่างกันด้วย Tuple Struct” ในบทที่ 5) tuple struct จะมี หนึ่ง field และเป็นการห่อบางรอบ type ที่เราต้องการ implement trait แล้ว wrapper type อยู่ใน crate ของเรา และเราสามารถ implement trait บน wrapper Newtype คือ term ที่มาจากภาษาโปรแกรม Haskell ไม่มี penalty performance runtime สำหรับการใช้ pattern นี้ และ wrapper type ถูก elide ที่ compile time
เป็นตัวอย่าง สมมุติเราต้องการ implement Display บน Vec<T> ซึ่ง
orphan rule ป้องกันเราจากการทำโดยตรงเพราะ trait Display และ type
Vec<T> ถูกนิยามนอก crate ของเรา เราทำ struct Wrapper ที่บรรจุ
instance ของ Vec<T> ได้ แล้ว เราสามารถ implement Display บน
Wrapper และใช้ค่า Vec<T> ได้ ดังที่แสดงใน Listing 20-24
use std::fmt;
struct Wrapper(Vec<String>);
impl fmt::Display for Wrapper {
fn fmt(&self, f: &mut fmt::Formatter) -> fmt::Result {
write!(f, "[{}]", self.0.join(", "))
}
}
fn main() {
let w = Wrapper(vec![String::from("hello"), String::from("world")]);
println!("w = {w}");
}Wrapper รอบ Vec<String> เพื่อ implement DisplayImplementation ของ Display ใช้ self.0 เพื่อเข้าถึง Vec<T> ด้านใน
เพราะ Wrapper เป็น tuple struct และ Vec<T> คือ item ที่ index 0 ใน
tuple แล้ว เราใช้ functionality ของ trait Display บน Wrapper ได้
ข้อเสียของการใช้เทคนิคนี้คือ Wrapper คือ type ใหม่ ดังนั้นมันไม่มี
เมธอดของค่าที่มันบรรจุ เราจะต้อง implement เมธอดทั้งหมดของ Vec<T>
โดยตรงบน Wrapper เพื่อให้เมธอด delegate ให้ self.0 ซึ่งจะอนุญาต
ให้เรา treat Wrapper เป๊ะแบบ Vec<T> ถ้าเราต้องการให้ type ใหม่มี
ทุกเมธอดที่ type ด้านในมี implement trait Deref บน Wrapper เพื่อ
return type ด้านในจะเป็นวิธีแก้ (เราพูดถึงการ implement trait Deref
ในส่วน “Treat Smart Pointer เหมือน Reference
ปกติ” ในบทที่ 15) ถ้าเราไม่
ต้องการให้ type Wrapper มีเมธอดทั้งหมดของ type ด้านใน — ตัวอย่างเช่น
เพื่อ restrict พฤติกรรมของ type Wrapper — เราจะต้อง implement เพียง
เมธอดที่เราต้องการโดยมือ
newtype pattern นี้ก็มีประโยชน์แม้เมื่อ trait ไม่เกี่ยวข้อง มา switch focus และดูวิธีขั้นสูงในการ interact กับระบบ type ของ Rust
Type ขั้นสูง
Type ขั้นสูง
ระบบ type ของ Rust มีฟีเจอร์บางอย่างที่เราเคยกล่าวถึงแต่ยังไม่ได้พูดถึง
เราจะเริ่มโดยพูดถึง newtype โดยทั่วไปเมื่อเราตรวจสอบว่าทำไมพวกมันมี
ประโยชน์เป็น type แล้ว เราจะไปที่ type alias ฟีเจอร์ที่คล้ายกับ newtype
แต่มี semantic แตกต่างเล็กน้อย เราจะพูดถึง type ! และ dynamically
sized type ด้วย
Type Safety และ Abstraction ด้วย Newtype Pattern
ส่วนนี้สมมุติว่าคุณอ่านส่วนก่อนหน้า “Implement External Trait ด้วย
Newtype Pattern” แล้ว newtype pattern มี
ประโยชน์สำหรับงานเกินจากที่เราพูดถึงตอนนี้ด้วย รวมการบังคับ statically
ว่าค่าไม่เคย confuse และบ่งบอกหน่วยของค่า คุณเห็นตัวอย่างของการใช้
newtype เพื่อบ่งบอกหน่วยใน Listing 20-16 — จำว่า struct Millimeters
และ Meters ห่อค่า u32 ใน newtype ถ้าเราเขียนฟังก์ชันกับ parameter
ของ type Millimeters เราจะไม่สามารถ compile โปรแกรมที่บังเอิญพยายาม
เรียกฟังก์ชันนั้นกับค่าของ type Meters หรือ u32 ธรรมดา
เราใช้ newtype pattern เพื่อ abstract รายละเอียด implementation บาง อย่างของ type ได้ด้วย — type ใหม่สามารถเปิดเผย public API ที่ต่างจาก API ของ inner type private
Newtype สามารถซ่อน implementation ภายในได้ด้วย ตัวอย่างเช่น เราให้
type People เพื่อห่อ HashMap<i32, String> ที่เก็บ ID ของคนที่
associate กับชื่อของพวกเขา โค้ดที่ใช้ People จะ interact เพียงกับ
public API ที่เราให้ เช่นเมธอดเพื่อเพิ่ม string ชื่อให้ collection
People — โค้ดนั้นไม่ต้องรู้ว่าเรา assign ID i32 ให้ชื่อภายใน
Newtype pattern คือวิธีเบาเพื่อบรรลุ encapsulation เพื่อซ่อนรายละเอียด
implementation ซึ่งเราพูดถึงในส่วน “Encapsulation ที่ซ่อนรายละเอียด
Implementation”
ในบทที่ 18
Type Synonym และ Type Alias
Rust ให้ความสามารถในการประกาศ type alias เพื่อให้ type ที่มีอยู่ชื่อ
อื่น สำหรับนี้เราใช้คีย์เวิร์ด type ตัวอย่างเช่น เราสร้าง alias
Kilometers ให้ i32 แบบนี้ได้:
fn main() {
type Kilometers = i32;
let x: i32 = 5;
let y: Kilometers = 5;
println!("x + y = {}", x + y);
}ตอนนี้ alias Kilometers คือ synonym สำหรับ i32 ต่างจาก type
Millimeters และ Meters ที่เราสร้างใน Listing 20-16, Kilometers
ไม่ใช่ type แยกใหม่ ค่าที่มี type Kilometers จะถูก treat เหมือนค่า
ของ type i32:
fn main() {
type Kilometers = i32;
let x: i32 = 5;
let y: Kilometers = 5;
println!("x + y = {}", x + y);
}เพราะ Kilometers และ i32 เป็น type เดียวกัน เราเพิ่มค่าของทั้งสอง
type และส่งค่า Kilometers ให้ฟังก์ชันที่รับ parameter i32 ได้
อย่างไรก็ตาม ใช้เมธอดนี้ เราไม่ได้ประโยชน์ type-checking ที่เราได้
จาก newtype pattern ที่พูดถึงก่อนหน้า ในคำพูดอื่น ถ้าเราผสมค่า
Kilometers และ i32 ที่ไหนสักแห่ง compiler จะไม่ให้ error เรา
Use case หลักสำหรับ type synonym คือลดการซ้ำซ้อน ตัวอย่างเช่น เราอาจมี type ยาวแบบนี้:
Box<dyn Fn() + Send + 'static>เขียน type ยาวนี้ใน signature ฟังก์ชันและเป็น type annotation ทั่วโค้ด ทำให้เหนื่อยและเสี่ยง error จินตนาการมี project เต็มไปด้วยโค้ดแบบใน Listing 20-25
fn main() {
let f: Box<dyn Fn() + Send + 'static> = Box::new(|| println!("hi"));
fn takes_long_type(f: Box<dyn Fn() + Send + 'static>) {
// --snip--
}
fn returns_long_type() -> Box<dyn Fn() + Send + 'static> {
// --snip--
Box::new(|| ())
}
}Type alias ทำให้โค้ดนี้จัดการง่ายมากขึ้นโดยลดการซ้ำซ้อน ใน Listing
20-26 เราแนะนำ alias ชื่อ Thunk สำหรับ type verbose และแทนการใช้
type ทั้งหมดด้วย alias ที่สั้นกว่า Thunk ได้
fn main() {
type Thunk = Box<dyn Fn() + Send + 'static>;
let f: Thunk = Box::new(|| println!("hi"));
fn takes_long_type(f: Thunk) {
// --snip--
}
fn returns_long_type() -> Thunk {
// --snip--
Box::new(|| ())
}
}Thunk เพื่อลดการซ้ำซ้อนโค้ดนี้ง่ายในการอ่านและเขียนมาก! เลือกชื่อที่มีความหมายสำหรับ type alias ช่วยสื่อสารเจตนาของคุณได้ด้วย (thunk คือคำสำหรับโค้ดที่จะถูก evaluate ในเวลาภายหลัง ดังนั้นมันคือชื่อที่เหมาะสำหรับ closure ที่ถูก เก็บ)
Type alias ก็ถูกใช้ปกติกับ type Result<T, E> สำหรับการลดการซ้ำซ้อน
พิจารณาโมดูล std::io ใน standard library Operation I/O มัก return
Result<T, E> เพื่อจัดการสถานการณ์เมื่อ operation fail ในการทำงาน
Library นี้มี struct std::io::Error ที่ represent error I/O ที่
เป็นไปได้ทั้งหมด ฟังก์ชันหลายตัวใน std::io จะ return Result<T, E>
ที่ E คือ std::io::Error เช่นฟังก์ชันเหล่านี้ใน trait Write:
use std::fmt;
use std::io::Error;
pub trait Write {
fn write(&mut self, buf: &[u8]) -> Result<usize, Error>;
fn flush(&mut self) -> Result<(), Error>;
fn write_all(&mut self, buf: &[u8]) -> Result<(), Error>;
fn write_fmt(&mut self, fmt: fmt::Arguments) -> Result<(), Error>;
}Result<..., Error> ถูกซ้ำเยอะ ดังนั้น std::io มีการประกาศ type
alias นี้:
use std::fmt;
type Result<T> = std::result::Result<T, std::io::Error>;
pub trait Write {
fn write(&mut self, buf: &[u8]) -> Result<usize>;
fn flush(&mut self) -> Result<()>;
fn write_all(&mut self, buf: &[u8]) -> Result<()>;
fn write_fmt(&mut self, fmt: fmt::Arguments) -> Result<()>;
}เพราะการประกาศนี้อยู่ในโมดูล std::io เราใช้ fully qualified alias
std::io::Result<T> ได้ — นั่นคือ Result<T, E> ที่ E ถูกเติมเป็น
std::io::Error Signature ฟังก์ชัน trait Write จบลงดูแบบนี้:
use std::fmt;
type Result<T> = std::result::Result<T, std::io::Error>;
pub trait Write {
fn write(&mut self, buf: &[u8]) -> Result<usize>;
fn flush(&mut self) -> Result<()>;
fn write_all(&mut self, buf: &[u8]) -> Result<()>;
fn write_fmt(&mut self, fmt: fmt::Arguments) -> Result<()>;
}Type alias ช่วยในสองวิธี — มันทำให้โค้ดง่ายในการเขียน และ มันให้เรา
interface consistent ทั่ว std::io ทั้งหมด เพราะมันเป็น alias มัน
เป็นเพียง Result<T, E> อื่น ซึ่งหมายความว่าเราใช้เมธอดใดที่ทำงานบน
Result<T, E> กับมันได้ รวมทั้ง syntax พิเศษเช่น operator ?
Never Type ที่ไม่เคย Return
Rust มี type พิเศษชื่อ ! ที่รู้จักในศัพท์ theory type เป็น empty
type เพราะมันไม่มีค่า เราชอบเรียกมัน never type เพราะมันยืนใน
ที่ของ return type เมื่อฟังก์ชันจะไม่เคย return นี่คือตัวอย่าง:
fn bar() -> ! {
// --snip--
panic!();
}โค้ดนี้อ่านเป็น “ฟังก์ชัน bar return never” ฟังก์ชันที่ return never
ถูกเรียก diverging function เราไม่สามารถสร้างค่าของ type ! ดังนั้น
bar ไม่เคย return ได้
แต่มีประโยชน์อะไรของ type ที่คุณไม่เคยสร้างค่าให้ได้? จำโค้ดจาก Listing 2-5 ส่วนของเกมเดาตัวเลข — เราสร้างใหม่บางส่วนที่นี่ใน Listing 20-27
use std::cmp::Ordering;
use std::io;
use rand::Rng;
fn main() {
println!("Guess the number!");
let secret_number = rand::thread_rng().gen_range(1..=100);
println!("The secret number is: {secret_number}");
loop {
println!("Please input your guess.");
let mut guess = String::new();
// --snip--
io::stdin()
.read_line(&mut guess)
.expect("Failed to read line");
let guess: u32 = match guess.trim().parse() {
Ok(num) => num,
Err(_) => continue,
};
println!("You guessed: {guess}");
// --snip--
match guess.cmp(&secret_number) {
Ordering::Less => println!("Too small!"),
Ordering::Greater => println!("Too big!"),
Ordering::Equal => {
println!("You win!");
break;
}
}
}
}match ที่มี arm ที่จบใน continueในเวลานั้น เราข้ามรายละเอียดบางอย่างในโค้ดนี้ ในส่วน “Control Flow
Construct match”
ในบทที่ 6 เราพูดถึงว่า arm match ต้องทั้งหมด return type เดียวกัน
ดังนั้น ตัวอย่างเช่น โค้ดต่อไปนี้ไม่ทำงาน:
fn main() {
let guess = "3";
let guess = match guess.trim().parse() {
Ok(_) => 5,
Err(_) => "hello",
};
}Type ของ guess ในโค้ดนี้จะต้องเป็น integer และ string และ Rust
ต้องการให้ guess มีเพียงหนึ่ง type แล้ว continue return อะไร?
เราได้รับอนุญาตให้ return u32 จาก arm หนึ่งและมี arm อีกอันที่จบ
ด้วย continue ใน Listing 20-27 ได้ยังไง?
อย่างที่คุณเดา continue มีค่า ! นั่นคือ เมื่อ Rust คำนวณ type ของ
guess มันดูทั้งสอง match arm อันแรกกับค่า u32 และอันหลังกับค่า !
เพราะ ! ไม่เคยมีค่าได้ Rust ตัดสินว่า type ของ guess คือ u32
วิธีเป็นทางการของการอธิบายพฤติกรรมนี้คือ expression ของ type ! ถูก
coerce เป็น type อื่นใดได้ เราได้รับอนุญาตให้จบ match arm นี้ด้วย
continue เพราะ continue ไม่ return ค่า — แทน มันย้าย control กลับ
ไปยังบนของ loop ดังนั้นในกรณี Err เราไม่เคย assign ค่าให้ guess
Never type มีประโยชน์กับ macro panic! ด้วย จำฟังก์ชัน unwrap ที่
เราเรียกบนค่า Option<T> เพื่อผลิตค่าหรือ panic กับนิยามนี้:
enum Option<T> {
Some(T),
None,
}
use crate::Option::*;
impl<T> Option<T> {
pub fn unwrap(self) -> T {
match self {
Some(val) => val,
None => panic!("called `Option::unwrap()` on a `None` value"),
}
}
}ในโค้ดนี้ สิ่งเดียวกันเกิดขึ้นเหมือนใน match ใน Listing 20-27 — Rust
เห็นว่า val มี type T และ panic! มี type ! ดังนั้นผลของ
expression match โดยรวมคือ T โค้ดนี้ทำงานเพราะ panic! ไม่ผลิตค่า
— มันจบโปรแกรม ในกรณี None เราจะไม่ return ค่าจาก unwrap ดังนั้น
โค้ดนี้ valid
Expression สุดท้ายอันหนึ่งที่มี type ! คือ loop:
fn main() {
print!("forever ");
loop {
print!("and ever ");
}
}ที่นี่ loop ไม่เคยจบ ดังนั้น ! คือค่าของ expression อย่างไรก็ตาม นี่
จะไม่จริงถ้าเรารวม break เพราะ loop จะสิ้นสุดเมื่อมันได้ไปยัง break
Dynamically Sized Type และ Trait Sized
Rust ต้องการรู้รายละเอียดบางอย่างเกี่ยวกับ type ของมัน เช่นพื้นที่ เท่าไหร่ที่จะ allocate สำหรับค่าของ type เฉพาะ นี่ทิ้งหนึ่งมุมของระบบ type ของมัน confusing เล็กน้อยที่แรก — แนวคิดของ dynamically sized type บางครั้งเรียก DST หรือ unsized type type เหล่านี้ให้เราเขียน โค้ดโดยใช้ค่าที่ขนาดของเราสามารถรู้เพียงที่ runtime
มาเจาะรายละเอียดของ dynamically sized type เรียก str ซึ่งเราใช้ผ่าน
หนังสือ ใช่แล้ว ไม่ใช่ &str แต่ str เองคือ DST ในหลายกรณี เช่น
เมื่อเก็บ text ที่ป้อนโดย user เราไม่สามารถรู้ว่า string ยาวเท่าไหร่
จนกระทั่ง runtime นั่นหมายความว่าเราไม่สามารถสร้างตัวแปรของ type str
และเราไม่สามารถรับ argument ของ type str พิจารณาโค้ดต่อไปนี้ ซึ่งไม่
ทำงาน:
fn main() {
let s1: str = "Hello there!";
let s2: str = "How's it going?";
}Rust ต้องการรู้ memory เท่าไหร่ที่จะ allocate สำหรับค่าใดของ type
เฉพาะ และค่าทั้งหมดของ type ต้องใช้ memory ปริมาณเดียวกัน ถ้า Rust
อนุญาตให้เราเขียนโค้ดนี้ สองค่า str เหล่านี้จะต้องใช้พื้นที่ปริมาณ
เดียวกัน แต่พวกมันมีความยาวต่างกัน — s1 ต้องการ 12 byte ของ storage
และ s2 ต้องการ 15 นี่คือเหตุผลที่ไม่เป็นไปได้ที่จะสร้างตัวแปรที่บรรจุ
dynamically sized type
แล้วเราทำอะไร? ในกรณีนี้ คุณรู้คำตอบแล้ว — เราทำ type ของ s1 และ s2
เป็น string slice (&str) แทน str จำจากส่วน “String
Slice” ในบทที่ 4 ว่าโครงสร้างข้อมูล
slice เก็บเพียงตำแหน่งเริ่มต้นและความยาวของ slice ดังนั้น แม้ &T
คือค่าเดียวที่เก็บ memory address ของที่ที่ T ตั้งอยู่ string slice
คือ สอง ค่า — address ของ str และความยาวของมัน ดังนั้น เรารู้ขนาด
ของค่า string slice ที่ compile time ได้ — มันคือสองเท่าของความยาวของ
usize นั่นคือ เรารู้ขนาดของ string slice เสมอ ไม่ว่า string ที่มัน
อ้างถึงยาวเท่าไหร่ โดยทั่วไป นี่คือวิธีที่ dynamically sized type ถูก
ใช้ใน Rust — พวกมันมี metadata เพิ่มเล็กน้อยที่เก็บขนาดของข้อมูล
dynamic กฎทองของ dynamically sized type คือเราต้องวางค่าของ
dynamically sized type ไว้หลัง pointer ของบางชนิดเสมอ
เรารวม str กับ pointer ทุกชนิดได้ — ตัวอย่างเช่น Box<str> หรือ
Rc<str> จริง ๆ คุณเห็นนี่ก่อนแต่กับ dynamically sized type ต่างกัน —
trait ทุก trait คือ dynamically sized type ที่เราอ้างถึงได้โดยใช้
ชื่อของ trait ในส่วน “ใช้ Trait Object เพื่อ Abstract เหนือพฤติกรรมที่
แชร์”
ในบทที่ 18 เรากล่าวว่าเพื่อใช้ trait เป็น trait object เราต้องวางพวกมัน
ไว้หลัง pointer เช่น &dyn Trait หรือ Box<dyn Trait> (Rc<dyn Trait> จะทำงานด้วย)
เพื่อทำงานกับ DST, Rust ให้ trait Sized เพื่อตัดสินว่าขนาดของ type
รู้ที่ compile time หรือไม่ trait นี้ถูก implement อัตโนมัติสำหรับ
ทุกอย่างที่ขนาดรู้ที่ compile time นอกจากนี้ Rust เพิ่ม bound บน
Sized ทุก generic function โดยปริยาย นั่นคือ นิยาม generic function
แบบนี้:
fn generic<T>(t: T) {
// --snip--
}จริง ๆ ถูก treat ราวกับเราเขียนนี้:
fn generic<T: Sized>(t: T) {
// --snip--
}โดยค่าเริ่มต้น generic function จะทำงานเพียงบน type ที่มีขนาดที่รู้ที่ compile time อย่างไรก็ตาม คุณใช้ syntax พิเศษต่อไปนี้เพื่อ relax restriction นี้ได้:
fn generic<T: ?Sized>(t: &T) {
// --snip--
}Trait bound บน ?Sized หมายถึง “T อาจหรืออาจไม่เป็น Sized” และ
notation นี้ override default ที่ generic type ต้องมีขนาดรู้ที่ compile
time Syntax ?Trait กับความหมายนี้ใช้ได้เพียงสำหรับ Sized ไม่ใช่
trait อื่นใด
สังเกตด้วยว่าเรา switch type ของ parameter t จาก T เป็น &T เพราะ
type อาจไม่เป็น Sized เราต้องใช้มันหลัง pointer ของบางชนิด ในกรณีนี้
เราเลือก reference
ถัดไป เราจะพูดเกี่ยวกับฟังก์ชันและ closure!
Function และ closure ขั้นสูง
ฟังก์ชันและ Closure ขั้นสูง
ส่วนนี้สำรวจฟีเจอร์ขั้นสูงบางอย่างที่เกี่ยวกับฟังก์ชันและ closure รวม function pointer และการ return closure
Function Pointer
เราพูดถึงวิธีส่ง closure ให้ฟังก์ชัน — คุณส่งฟังก์ชันปกติให้ฟังก์ชัน
ได้ด้วย! เทคนิคนี้มีประโยชน์เมื่อคุณต้องการส่งฟังก์ชันที่คุณนิยามแล้ว
แทนการนิยาม closure ใหม่ ฟังก์ชัน coerce ไปยัง type fn (กับ f
ตัวพิมพ์เล็ก) ไม่ให้สับสนกับ closure trait Fn type fn ถูกเรียก
function pointer ส่งฟังก์ชันด้วย function pointer จะอนุญาตให้คุณใช้
ฟังก์ชันเป็น argument ให้ฟังก์ชันอื่น
Syntax สำหรับระบุว่า parameter คือ function pointer คล้ายกับของ
closure ดังที่แสดงใน Listing 20-28 ที่เรานิยามฟังก์ชัน add_one ที่
เพิ่ม 1 ให้ parameter ของมัน ฟังก์ชัน do_twice รับสอง parameter —
function pointer ไปยังฟังก์ชันใดที่รับ parameter i32 และ return
i32 และหนึ่งค่า i32 ฟังก์ชัน do_twice เรียกฟังก์ชัน f สองครั้ง
ส่งค่า arg ให้มัน แล้วเพิ่มผลการเรียกฟังก์ชันสองตัวด้วยกัน ฟังก์ชัน
main เรียก do_twice กับ argument add_one และ 5
fn add_one(x: i32) -> i32 {
x + 1
}
fn do_twice(f: fn(i32) -> i32, arg: i32) -> i32 {
f(arg) + f(arg)
}
fn main() {
let answer = do_twice(add_one, 5);
println!("The answer is: {answer}");
}fn เพื่อรับ function pointer เป็น argumentโค้ดนี้ print The answer is: 12 เราระบุว่า parameter f ใน
do_twice คือ fn ที่รับหนึ่ง parameter ของ type i32 และ return
i32 แล้วเราเรียก f ใน body ของ do_twice ได้ ใน main เราส่งชื่อ
ฟังก์ชัน add_one เป็น argument แรกให้ do_twice ได้
ต่างจาก closure, fn คือ type แทนที่จะเป็น trait ดังนั้นเราระบุ fn
เป็น type parameter โดยตรงแทนการประกาศ generic type parameter กับหนึ่ง
ใน trait Fn เป็น trait bound
Function pointer implement ทั้งสาม closure trait (Fn, FnMut และ
FnOnce) หมายความว่าคุณส่ง function pointer เป็น argument สำหรับ
ฟังก์ชันที่คาด closure ได้เสมอ มันดีที่สุดที่จะเขียนฟังก์ชันโดยใช้
generic type และหนึ่งใน closure trait เพื่อให้ฟังก์ชันของคุณรับทั้ง
ฟังก์ชันหรือ closure ได้
ที่กล่าวมา ตัวอย่างหนึ่งที่คุณจะต้องการรับเพียง fn และไม่ใช่ closure
คือเมื่อ interface กับโค้ดภายนอกที่ไม่มี closure — ฟังก์ชัน C รับ
ฟังก์ชันเป็น argument ได้ แต่ C ไม่มี closure
เป็นตัวอย่างของที่คุณใช้ทั้ง closure ที่นิยาม inline หรือฟังก์ชันที่
ตั้งชื่อได้ มาดูการใช้เมธอด map ที่ trait Iterator ใน standard
library ให้ เพื่อใช้เมธอด map เพื่อเปลี่ยน vector ของตัวเลขเป็น
vector ของ string เราใช้ closure ได้ ดังใน Listing 20-29
fn main() {
let list_of_numbers = vec![1, 2, 3];
let list_of_strings: Vec<String> =
list_of_numbers.iter().map(|i| i.to_string()).collect();
}map เพื่อแปลงตัวเลขเป็น stringหรือเราตั้งชื่อฟังก์ชันเป็น argument ให้ map แทน closure ได้ Listing
20-30 แสดงสิ่งนี้จะดูยังไง
fn main() {
let list_of_numbers = vec![1, 2, 3];
let list_of_strings: Vec<String> =
list_of_numbers.iter().map(ToString::to_string).collect();
}String::to_string กับเมธอด map เพื่อแปลงตัวเลขเป็น stringสังเกตว่าเราต้องใช้ fully qualified syntax ที่เราพูดถึงในส่วน “Trait
ขั้นสูง” เพราะมีหลายฟังก์ชันใช้ได้
ชื่อ to_string
ที่นี่ เรากำลังใช้ฟังก์ชัน to_string ที่นิยามใน trait ToString ซึ่ง
standard library implement สำหรับ type ใดที่ implement Display
จำจากส่วน “ค่า Enum” ในบทที่ 6 ว่าชื่อ ของแต่ละ enum variant ที่เรานิยามก็กลายเป็น initializer function เรา ใช้ initializer function เหล่านี้เป็น function pointer ที่ implement closure trait ได้ ซึ่งหมายความว่าเราระบุ initializer function เป็น argument สำหรับเมธอดที่รับ closure ได้ ดังที่เห็นใน Listing 20-31
fn main() {
enum Status {
Value(u32),
Stop,
}
let list_of_statuses: Vec<Status> = (0u32..20).map(Status::Value).collect();
}map เพื่อสร้าง instance Status จากตัวเลขที่นี่ เราสร้าง instance Status::Value โดยใช้แต่ละค่า u32 ใน range
ที่ map ถูกเรียกบนโดยใช้ initializer function ของ Status::Value
บางคนชอบ style นี้และบางคนชอบใช้ closure พวกมัน compile เป็นโค้ด
เดียวกัน ดังนั้นใช้ style ใดที่ชัดเจนกับคุณ
Return Closure
Closure ถูก represent โดย trait ซึ่งหมายความว่าคุณไม่สามารถ return
closure โดยตรง ในกรณีส่วนใหญ่ที่คุณอาจต้องการ return trait คุณใช้
concrete type ที่ implement trait เป็น return value ของฟังก์ชันแทนได้
อย่างไรก็ตาม ปกติคุณทำนั้นไม่ได้กับ closure เพราะพวกมันไม่มี concrete
type ที่ returnable — คุณไม่ได้รับอนุญาตให้ใช้ function pointer fn
เป็น return type ถ้า closure capture ค่าใดจาก scope ของมัน ตัวอย่างเช่น
แทน คุณจะใช้ syntax impl Trait ที่เราเรียนรู้ในบทที่ 10 ปกติ คุณ
return type ฟังก์ชันใดก็ได้ โดยใช้ Fn, FnOnce และ FnMut ตัวอย่าง
เช่น โค้ดใน Listing 20-32 จะ compile ได้ดี
#![allow(unused)]
fn main() {
fn returns_closure() -> impl Fn(i32) -> i32 {
|x| x + 1
}
}impl Traitอย่างไรก็ตาม ดังที่เราสังเกตในส่วน “Infer และ Annotate Type Closure” ในบทที่ 13 แต่ละ closure ก็เป็น type ที่แตกต่างของตัวเอง ถ้าคุณต้องทำงานกับหลายฟังก์ชันที่มี signature เดียวกันแต่ implementation ต่างกัน คุณจะต้องใช้ trait object สำหรับ พวกมัน พิจารณาสิ่งที่เกิดขึ้นถ้าคุณเขียนโค้ดแบบที่แสดงใน Listing 20-33
fn main() {
let handlers = vec![returns_closure(), returns_initialized_closure(123)];
for handler in handlers {
let output = handler(5);
println!("{output}");
}
}
fn returns_closure() -> impl Fn(i32) -> i32 {
|x| x + 1
}
fn returns_initialized_closure(init: i32) -> impl Fn(i32) -> i32 {
move |x| x + init
}Vec<T> ของ closure ที่นิยามโดยฟังก์ชันที่ return type impl Fnที่นี่เรามีสองฟังก์ชัน returns_closure และ
returns_initialized_closure ซึ่งทั้งสอง return impl Fn(i32) -> i32
สังเกตว่า closure ที่พวกมัน return ต่างกัน แม้พวกมัน implement type
เดียวกัน ถ้าเราพยายาม compile นี่ Rust ให้เรารู้ว่ามันจะไม่ทำงาน:
$ cargo build
Compiling functions-example v0.1.0 (file:///projects/functions-example)
error[E0308]: mismatched types
--> src/main.rs:2:44
|
2 | let handlers = vec![returns_closure(), returns_initialized_closure(123)];
| ^^^^^^^^^^^^^^^^^^^^^^^^^^^^^^^^ expected opaque type, found a different opaque type
...
9 | fn returns_closure() -> impl Fn(i32) -> i32 {
| ------------------- the expected opaque type
...
13 | fn returns_initialized_closure(init: i32) -> impl Fn(i32) -> i32 {
| ------------------- the found opaque type
|
= note: expected opaque type `impl Fn(i32) -> i32`
found opaque type `impl Fn(i32) -> i32`
= note: distinct uses of `impl Trait` result in different opaque types
For more information about this error, try `rustc --explain E0308`.
error: could not compile `functions-example` (bin "functions-example") due to 1 previous error
ข้อความ error บอกเราว่าเมื่อใดก็ตามที่เรา return impl Trait, Rust
สร้าง opaque type ที่ unique, type ที่เราไม่สามารถดูเข้าไปในราย
ละเอียดของสิ่งที่ Rust สร้างให้เรา และเราไม่สามารถเดา type ที่ Rust
จะ generate เพื่อเขียนตัวเอง ดังนั้น แม้ฟังก์ชันเหล่านี้ return closure
ที่ implement trait เดียวกัน Fn(i32) -> i32, opaque type ที่ Rust
generate สำหรับแต่ละแตกต่าง (นี่คล้ายกับวิธีที่ Rust ผลิต concrete
type ต่างกันสำหรับ async block ที่แตกต่างแม้พวกมันมี output type
เดียวกัน ดังที่เราเห็นใน “Type Pin และ Trait
Unpin” ในบทที่ 17) เราเห็นวิธีแก้ปัญหา
นี้ไม่กี่ครั้งตอนนี้ — เราใช้ trait object ได้ ดังใน Listing 20-34
fn main() {
let handlers = vec![returns_closure(), returns_initialized_closure(123)];
for handler in handlers {
let output = handler(5);
println!("{output}");
}
}
fn returns_closure() -> Box<dyn Fn(i32) -> i32> {
Box::new(|x| x + 1)
}
fn returns_initialized_closure(init: i32) -> Box<dyn Fn(i32) -> i32> {
Box::new(move |x| x + init)
}Vec<T> ของ closure ที่นิยามโดยฟังก์ชันที่ return Box<dyn Fn> เพื่อให้พวกมันมี type เดียวกันโค้ดนี้จะ compile ได้ดี สำหรับเพิ่มเติมเกี่ยวกับ trait object อ้างถึง ส่วน “ใช้ Trait Object เพื่อ Abstract เหนือพฤติกรรมที่ แชร์” ในบทที่ 18
ถัดไป มาดู macro!
Macro
Macro
เราใช้ macro เช่น println! ผ่านหนังสือนี้ แต่เรายังไม่ได้สำรวจเต็มที่
ว่า macro คืออะไรและทำงานยังไง Term macro อ้างถึงตระกูลของฟีเจอร์ใน
Rust — macro แบบ declarative ด้วย macro_rules! และสามชนิดของ
procedural macro:
- Custom
#[derive]macro ที่ระบุโค้ดที่เพิ่มด้วย attributederiveที่ใช้บน struct และ enum - Attribute-like macro ที่นิยาม attribute custom ใช้ได้บน item ใด
- Function-like macro ที่ดูเหมือนการเรียกฟังก์ชันแต่ operate บน token ที่ระบุเป็น argument ของพวกมัน
เราจะพูดเกี่ยวกับแต่ละตามลำดับ แต่ก่อนอื่น มาดูว่าทำไมเราต้องการ macro แม้เรามีฟังก์ชันแล้ว
ความแตกต่างระหว่าง Macro และฟังก์ชัน
พื้นฐาน macro คือวิธีของการเขียนโค้ดที่เขียนโค้ดอื่น ซึ่งรู้จักเป็น
metaprogramming ใน Appendix C เราพูดถึง attribute derive ซึ่ง
generate implementation ของ trait ต่าง ๆ ให้คุณ เราใช้ macro
println! และ vec! ผ่านหนังสือด้วย macro ทั้งหมดเหล่านี้ expand
เพื่อผลิตโค้ดมากกว่าโค้ดที่คุณเขียนโดยมือ
Metaprogramming มีประโยชน์สำหรับลดปริมาณโค้ดที่คุณต้องเขียนและ maintain ซึ่งก็เป็นบทบาทหนึ่งของฟังก์ชัน อย่างไรก็ตาม macro มีอำนาจ เพิ่มบางอย่างที่ฟังก์ชันไม่มี
signature ฟังก์ชันต้องประกาศจำนวนและ type ของ parameter ที่ฟังก์ชันมี
Macro ในทางกลับ รับจำนวนตัวแปรของ parameter ได้ — เราเรียก
println!("hello") กับหนึ่ง argument หรือ println!("hello {}", name)
กับสอง argument ได้ นอกจากนี้ macro ถูก expand ก่อน compiler ตีความ
ความหมายของโค้ด ดังนั้น macro สามารถ ตัวอย่างเช่น implement trait บน
type ที่ให้ ฟังก์ชันทำไม่ได้ เพราะมันถูกเรียกที่ runtime และ trait ต้อง
ถูก implement ที่ compile time
ข้อเสียของการ implement macro แทนฟังก์ชันคือนิยาม macro complex มากกว่า นิยามฟังก์ชันเพราะคุณกำลังเขียนโค้ด Rust ที่เขียนโค้ด Rust เพราะ indirection นี้ นิยาม macro โดยทั่วไปยากกว่าในการอ่าน เข้าใจ และ maintain กว่านิยามฟังก์ชัน
ความแตกต่างสำคัญอื่นระหว่าง macro และฟังก์ชันคือคุณต้องนิยาม macro หรือนำพวกมันเข้า scope ก่อน คุณเรียกพวกมันในไฟล์ ตรงข้ามกับฟังก์ชัน ที่คุณนิยามได้ที่ไหนและเรียกได้ที่ไหน
Declarative Macro สำหรับ Metaprogramming ทั่วไป
รูปแบบที่ใช้กว้างที่สุดของ macro ใน Rust คือ declarative macro พวกนี้
บางครั้งเรียก “macro by example”, “macro_rules! macro” หรือเพียง
“macro” ที่แกนของพวกมัน, declarative macro อนุญาตให้คุณเขียนสิ่งที่
คล้ายกับ expression match ของ Rust ตามที่พูดถึงในบทที่ 6 expression
match คือโครงสร้าง control ที่รับ expression เปรียบเทียบค่าผลลัพธ์
ของ expression กับ pattern แล้วรันโค้ดที่ associate กับ pattern ที่
match Macro ยังเปรียบเทียบค่ากับ pattern ที่ associate กับโค้ดเฉพาะ —
ในสถานการณ์นี้ ค่าคือ source code Rust literal ที่ส่งให้ macro;
pattern ถูกเปรียบเทียบกับโครงสร้างของ source code นั้น และโค้ดที่
associate กับแต่ละ pattern เมื่อ match แทนโค้ดที่ส่งให้ macro ทั้งหมด
นี้เกิดขึ้นระหว่าง compilation
เพื่อนิยาม macro คุณใช้ construct macro_rules! มาสำรวจวิธีใช้
macro_rules! โดยดูที่ macro vec! ถูกนิยามยังไง บทที่ 8 ครอบคลุม
วิธีเราใช้ macro vec! เพื่อสร้าง vector ใหม่กับค่าเฉพาะ ตัวอย่างเช่น
macro ต่อไปนี้สร้าง vector ใหม่ที่บรรจุสาม integer:
#![allow(unused)]
fn main() {
let v: Vec<u32> = vec![1, 2, 3];
}เรายังใช้ macro vec! เพื่อทำ vector ของสอง integer หรือ vector ของ
ห้า string slice ได้ เราจะไม่สามารถใช้ฟังก์ชันเพื่อทำเหมือนกันเพราะเรา
จะไม่รู้จำนวนหรือ type ของค่าล่วงหน้า
Listing 20-35 แสดงนิยาม macro vec! ที่ทำให้ง่ายเล็กน้อย
#[macro_export]
macro_rules! vec {
( $( $x:expr ),* ) => {
{
let mut temp_vec = Vec::new();
$(
temp_vec.push($x);
)*
temp_vec
}
};
}vec!Note: นิยามจริงของ macro vec! ใน standard library รวมโค้ดเพื่อ
pre-allocate ปริมาณ memory ถูกล่วงหน้า โค้ดนั้นเป็น optimization ที่
เราไม่รวมที่นี่ เพื่อทำตัวอย่างง่ายกว่า
Annotation #[macro_export] บ่งบอกว่า macro นี้ควรถูกทำให้ใช้ได้เมื่อ
ใดก็ตามที่ crate ที่ macro ถูกนิยามใน ถูกนำเข้า scope โดยไม่มี
annotation นี้ macro ไม่สามารถถูกนำเข้า scope
แล้วเราเริ่มนิยาม macro ด้วย macro_rules! และชื่อของ macro ที่เรากำลัง
นิยาม โดยไม่มี exclamation mark ชื่อ ในกรณีนี้ vec ตามด้วย curly
bracket แสดง body ของนิยาม macro
โครงสร้างใน body ของ vec! คล้ายกับโครงสร้างของ expression match
ที่นี่เรามีหนึ่ง arm กับ pattern ( $( $x:expr ),* ) ตามด้วย => และ
block ของโค้ดที่ associate กับ pattern นี้ ถ้า pattern match block
ของโค้ดที่ associate จะถูก emit ให้ว่านี่คือ pattern เดียวใน macro นี้
มีเพียงหนึ่งวิธี valid ที่จะ match — pattern อื่นใดจะส่งผลเป็น error
Macro complex มากกว่าจะมีมากกว่าหนึ่ง arm
Syntax pattern ที่ valid ในนิยาม macro ต่างจาก syntax pattern ที่ ครอบคลุมในบทที่ 19 เพราะ pattern macro ถูก match กับโครงสร้างโค้ด Rust แทนค่า มาเดินผ่านสิ่งที่ชิ้น pattern ใน Listing 20-35 หมายถึง — สำหรับ syntax pattern macro เต็ม ดู Rust Reference
ก่อนอื่น เราใช้ชุดของวงเล็บเพื่อครอบคลุม pattern ทั้งหมด เราใช้ dollar
sign ($) เพื่อประกาศตัวแปรในระบบ macro ที่จะบรรจุโค้ด Rust ที่
match pattern dollar sign ทำให้ชัดเจนว่านี่คือตัวแปร macro ตรงข้ามกับ
ตัวแปร Rust ปกติ ถัดมาคือชุดของวงเล็บที่ capture ค่าที่ match pattern
ภายในวงเล็บสำหรับการใช้ในโค้ดแทน ภายใน $() คือ $x:expr ซึ่ง match
expression Rust ใดและให้ expression ชื่อ $x
Comma ที่ตาม $() บ่งบอกว่าตัวคั่น comma literal ต้องปรากฏระหว่างแต่ละ
instance ของโค้ดที่ match โค้ดใน $() * ระบุว่า pattern match ศูนย์
หรือมากกว่าของสิ่งใดที่นำหน้า *
เมื่อเราเรียก macro นี้ด้วย vec![1, 2, 3];, pattern $x match สาม
ครั้งกับสาม expression 1, 2 และ 3
ตอนนี้มาดู pattern ใน body ของโค้ดที่ associate กับ arm นี้ —
temp_vec.push() ภายใน $()* ถูก generate สำหรับแต่ละส่วนที่ match
$() ใน pattern ศูนย์หรือมากกว่าครั้งขึ้นกับ pattern match กี่ครั้ง
$x ถูกแทนด้วยแต่ละ expression ที่ match เมื่อเราเรียก macro นี้ด้วย
vec![1, 2, 3];, โค้ดที่ generate ที่แทนการเรียก macro นี้จะเป็นต่อ
ไปนี้:
{
let mut temp_vec = Vec::new();
temp_vec.push(1);
temp_vec.push(2);
temp_vec.push(3);
temp_vec
}เรานิยาม macro ที่รับจำนวนใดของ argument ของ type ใดและสามารถ generate โค้ดเพื่อสร้าง vector ที่บรรจุ element ที่ระบุ
เพื่อเรียนรู้เพิ่มเกี่ยวกับวิธีเขียน macro ปรึกษา documentation online หรือ resource อื่น เช่น “The Little Book of Rust Macros” ที่ เริ่มโดย Daniel Keep และต่อโดย Lukas Wirth
Procedural Macro สำหรับ Generate โค้ดจาก Attribute
รูปแบบที่สองของ macro คือ procedural macro ซึ่งทำตัวเหมือนฟังก์ชันมาก
กว่า (และเป็นชนิดของ procedure) Procedural macro รับโค้ดบางอย่างเป็น
input, operate บนโค้ดนั้น และผลิตโค้ดบางอย่างเป็น output แทนการ match
กับ pattern และแทนโค้ดด้วยโค้ดอื่นแบบที่ declarative macro ทำ สามชนิด
ของ procedural macro คือ custom derive, attribute-like และ
function-like และทั้งหมดทำงานในแฟชั่นที่คล้ายกัน
เมื่อสร้าง procedural macro นิยามต้องอยู่ใน crate ของตัวเองกับ crate
type พิเศษ นี่เป็นเหตุผลทางเทคนิค complex ที่เราหวังจะขจัดในอนาคต ใน
Listing 20-36 เราแสดงวิธีนิยาม procedural macro ที่ some_attribute
คือ placeholder สำหรับการใช้ macro variety เฉพาะ
use proc_macro::TokenStream;
#[some_attribute]
pub fn some_name(input: TokenStream) -> TokenStream {
}ฟังก์ชันที่นิยาม procedural macro รับ TokenStream เป็น input และผลิต
TokenStream เป็น output type TokenStream ถูกนิยามโดย crate
proc_macro ที่รวมกับ Rust และ represent ลำดับของ token นี่คือแกน
ของ macro — source code ที่ macro กำลัง operate บนสร้าง input
TokenStream และโค้ดที่ macro ผลิตคือ output TokenStream ฟังก์ชัน
ยังมี attribute ติดมาที่บอกว่าชนิดของ procedural macro ใดที่เรากำลัง
สร้าง เรามีหลายชนิดของ procedural macro ใน crate เดียวกันได้
มาดูชนิดต่างกันของ procedural macro เราจะเริ่มด้วย custom derive
macro แล้วอธิบายความไม่คล้ายเล็กน้อยที่ทำให้รูปแบบอื่นต่างกัน
Custom derive Macro
มาสร้าง crate ชื่อ hello_macro ที่นิยาม trait ชื่อ HelloMacro กับ
หนึ่ง associated function ชื่อ hello_macro แทนที่จะทำให้ user ของ
เรา implement trait HelloMacro สำหรับแต่ละ type ของพวกเขา เราจะให้
procedural macro เพื่อให้ user annotate type ของพวกเขาด้วย
#[derive(HelloMacro)] เพื่อได้ default implementation ของฟังก์ชัน
hello_macro Default implementation จะ print Hello, Macro! My name is TypeName! ที่ TypeName คือชื่อของ type ที่ trait นี้ถูกนิยามบน
ในคำพูดอื่น เราจะเขียน crate ที่เปิดใช้ programmer อื่นเขียนโค้ดแบบ
Listing 20-37 โดยใช้ crate ของเรา
use hello_macro::HelloMacro;
use hello_macro_derive::HelloMacro;
#[derive(HelloMacro)]
struct Pancakes;
fn main() {
Pancakes::hello_macro();
}โค้ดนี้จะ print Hello, Macro! My name is Pancakes! เมื่อเราเสร็จ ขั้น
ตอนแรกคือทำ library crate ใหม่ แบบนี้:
$ cargo new hello_macro --lib
ถัดไป ใน Listing 20-38 เราจะนิยาม trait HelloMacro และ associated
function ของมัน
pub trait HelloMacro {
fn hello_macro();
}deriveเรามี trait และฟังก์ชันของมัน ที่จุดนี้ user crate ของเราสามารถ implement trait เพื่อบรรลุ functionality ที่ต้องการได้ ดังใน Listing 20-39
use hello_macro::HelloMacro;
struct Pancakes;
impl HelloMacro for Pancakes {
fn hello_macro() {
println!("Hello, Macro! My name is Pancakes!");
}
}
fn main() {
Pancakes::hello_macro();
}HelloMacroอย่างไรก็ตาม พวกเขาจะต้องเขียน implementation block สำหรับแต่ละ type
ที่พวกเขาต้องการใช้กับ hello_macro — เราต้องการประหยัดพวกเขาจากการ
ต้องทำงานนี้
นอกจากนี้ เรายังไม่สามารถให้ฟังก์ชัน hello_macro กับ default
implementation ที่จะ print ชื่อของ type ที่ trait ถูก implement บน —
Rust ไม่มีความสามารถ reflection ดังนั้นมันไม่สามารถ look up ชื่อของ
type ที่ runtime เราต้องการ macro เพื่อ generate โค้ดที่ compile time
ขั้นตอนถัดไปคือนิยาม procedural macro ในเวลาเขียนนี้ procedural macro
ต้องอยู่ใน crate ของตัวเอง ในที่สุด restriction นี้อาจถูกยกขึ้น
Convention สำหรับการจัดโครงสร้าง crate และ macro crate เป็นต่อไปนี้ —
สำหรับ crate ชื่อ foo crate procedural macro derive custom ถูก
เรียก foo_derive มาเริ่ม crate ใหม่เรียก hello_macro_derive ภายใน
project hello_macro ของเรา:
$ cargo new hello_macro_derive --lib
สอง crate ของเราเกี่ยวข้องอย่างแน่น ดังนั้นเราสร้าง crate procedural
macro ภายในไดเรกทอรีของ crate hello_macro ของเรา ถ้าเราเปลี่ยนนิยาม
trait ใน hello_macro เราจะต้องเปลี่ยน implementation ของ procedural
macro ใน hello_macro_derive ด้วย สอง crate จะต้องถูก publish แยก
และ programmer ที่ใช้ crate เหล่านี้จะต้องเพิ่มทั้งสองเป็น dependency
และนำพวกมันเข้า scope ทั้งสอง เราสามารถมี crate hello_macro ใช้
hello_macro_derive เป็น dependency และ re-export โค้ด procedural
macro แทนได้ อย่างไรก็ตาม วิธีที่เราจัดโครงสร้าง project ทำให้เป็นไป
ได้สำหรับ programmer ที่จะใช้ hello_macro แม้พวกเขาไม่ต้องการ
functionality derive
เราต้องประกาศ crate hello_macro_derive เป็น crate procedural macro
เราจะต้องการ functionality จาก crate syn และ quote ด้วย ดังที่คุณ
จะเห็นในไม่ช้า ดังนั้นเราต้องเพิ่มพวกมันเป็น dependency เพิ่มต่อไปนี้
ไปยังไฟล์ Cargo.toml สำหรับ hello_macro_derive:
[lib]
proc-macro = true
[dependencies]
syn = "2.0"
quote = "1.0"
เพื่อเริ่มนิยาม procedural macro วางโค้ดใน Listing 20-40 ในไฟล์
src/lib.rs ของคุณสำหรับ crate hello_macro_derive สังเกตว่าโค้ดนี้
จะไม่ compile จนกว่าเราเพิ่มนิยามสำหรับฟังก์ชัน impl_hello_macro
use proc_macro::TokenStream;
use quote::quote;
#[proc_macro_derive(HelloMacro)]
pub fn hello_macro_derive(input: TokenStream) -> TokenStream {
// Construct a representation of Rust code as a syntax tree
// that we can manipulate.
let ast = syn::parse(input).unwrap();
// Build the trait implementation.
impl_hello_macro(&ast)
}สังเกตว่าเราแยกโค้ดเป็นฟังก์ชัน hello_macro_derive ซึ่งรับผิดชอบการ
parse TokenStream และฟังก์ชัน impl_hello_macro ซึ่งรับผิดชอบการ
transform syntax tree — นี่ทำให้การเขียน procedural macro สะดวกมากขึ้น
โค้ดในฟังก์ชันภายนอก (hello_macro_derive ในกรณีนี้) จะเหมือนกัน
สำหรับเกือบทุก crate procedural macro ที่คุณเห็นหรือสร้าง โค้ดที่คุณ
ระบุใน body ของฟังก์ชันภายใน (impl_hello_macro ในกรณีนี้) จะต่างกัน
ขึ้นกับจุดประสงค์ของ procedural macro ของคุณ
เราแนะนำสาม crate ใหม่ — proc_macro, syn และ
quote crate proc_macro มากับ Rust ดังนั้น
เราไม่ต้องเพิ่มนั่นให้ dependency ใน Cargo.toml crate proc_macro
คือ API ของ compiler ที่อนุญาตให้เราอ่านและ manipulate โค้ด Rust จาก
โค้ดของเรา
Crate syn parse โค้ด Rust จาก string เป็นโครงสร้างข้อมูลที่เราทำ
operation บนได้ Crate quote เปลี่ยนโครงสร้างข้อมูล syn กลับเป็น
โค้ด Rust crate เหล่านี้ทำให้ง่ายขึ้นมากในการ parse โค้ด Rust ชนิดใด
ที่เราอาจต้องการจัดการ — เขียน parser เต็มสำหรับโค้ด Rust ไม่ใช่งาน
ง่าย
ฟังก์ชัน hello_macro_derive จะถูกเรียกเมื่อ user ของ library ของเรา
ระบุ #[derive(HelloMacro)] บน type นี่เป็นไปได้เพราะเรา annotate
ฟังก์ชัน hello_macro_derive ที่นี่ด้วย proc_macro_derive และระบุ
ชื่อ HelloMacro ซึ่ง match ชื่อ trait ของเรา — นี่คือ convention ที่
procedural macro ส่วนใหญ่ตาม
ฟังก์ชัน hello_macro_derive แปลง input จาก TokenStream เป็น
โครงสร้างข้อมูลที่เราตีความและทำ operation บนได้ก่อน นี่คือที่ syn
เข้ามาเล่น ฟังก์ชัน parse ใน syn รับ TokenStream และ return
struct DeriveInput ที่ represent โค้ด Rust ที่ parse Listing 20-41
แสดงส่วนที่เกี่ยวข้องของ struct DeriveInput ที่เราได้จากการ parse
string struct Pancakes;
DeriveInput {
// --snip--
ident: Ident {
ident: "Pancakes",
span: #0 bytes(95..103)
},
data: Struct(
DataStruct {
struct_token: Struct,
fields: Unit,
semi_token: Some(
Semi
)
}
)
}DeriveInput ที่เราได้เมื่อ parse โค้ดที่มี attribute ของ macro ใน Listing 20-37Field ของ struct นี้แสดงว่าโค้ด Rust ที่เรา parse คือ unit struct กับ
ident (identifier หมายถึงชื่อ) ของ Pancakes มี field มากขึ้นบน
struct นี้สำหรับการอธิบายโค้ด Rust ทุกชนิด — check documentation
syn สำหรับ DeriveInput สำหรับข้อมูลเพิ่มเติม
ไม่ช้าเราจะนิยามฟังก์ชัน impl_hello_macro ซึ่งคือที่เราจะสร้างโค้ด
Rust ใหม่ที่เราต้องการรวม แต่ก่อนเราทำ สังเกตว่า output สำหรับ macro
derive ของเราก็เป็น TokenStream TokenStream ที่ return ถูกเพิ่ม
ให้โค้ดที่ user crate ของเราเขียน ดังนั้นเมื่อพวกเขา compile crate
ของพวกเขา พวกเขาจะได้ functionality เพิ่มที่เราให้ใน TokenStream
ที่แก้
คุณอาจสังเกตว่าเรากำลังเรียก unwrap เพื่อทำให้ฟังก์ชัน
hello_macro_derive panic ถ้าการเรียกฟังก์ชัน syn::parse fail
ที่นี่ มันจำเป็นสำหรับ procedural macro ของเราที่จะ panic บน error
เพราะฟังก์ชัน proc_macro_derive ต้อง return TokenStream แทน
Result เพื่อ conform กับ API procedural macro เราทำให้ตัวอย่างนี้
ง่ายโดยใช้ unwrap — ในโค้ด production คุณควรให้ข้อความ error
เฉพาะมากขึ้นเกี่ยวกับสิ่งที่ผิดพลาดโดยใช้ panic! หรือ expect
ตอนนี้เรามีโค้ดเพื่อเปลี่ยนโค้ด Rust ที่ annotate จาก TokenStream
เป็น instance DeriveInput มา generate โค้ดที่ implement trait
HelloMacro บน type ที่ annotate ดังที่แสดงใน Listing 20-42
use proc_macro::TokenStream;
use quote::quote;
#[proc_macro_derive(HelloMacro)]
pub fn hello_macro_derive(input: TokenStream) -> TokenStream {
// Construct a representation of Rust code as a syntax tree
// that we can manipulate
let ast = syn::parse(input).unwrap();
// Build the trait implementation
impl_hello_macro(&ast)
}
fn impl_hello_macro(ast: &syn::DeriveInput) -> TokenStream {
let name = &ast.ident;
let generated = quote! {
impl HelloMacro for #name {
fn hello_macro() {
println!("Hello, Macro! My name is {}!", stringify!(#name));
}
}
};
generated.into()
}HelloMacro โดยใช้โค้ด Rust ที่ parseเราได้ instance struct Ident ที่บรรจุชื่อ (identifier) ของ type ที่
annotate โดยใช้ ast.ident Struct ใน Listing 20-41 แสดงว่าเมื่อเรารัน
ฟังก์ชัน impl_hello_macro บนโค้ดใน Listing 20-37, ident ที่เราได้
จะมี field ident กับค่า "Pancakes" ดังนั้นตัวแปร name ใน Listing
20-42 จะบรรจุ instance struct Ident ที่ เมื่อ print จะเป็น string
"Pancakes" ชื่อของ struct ใน Listing 20-37
Macro quote! ให้เรานิยามโค้ด Rust ที่เราต้องการ return Compiler คาด
สิ่งที่ต่างจากผลโดยตรงของการ execute macro quote! ดังนั้นเราต้อง
แปลงมันเป็น TokenStream เราทำสิ่งนี้โดยเรียกเมธอด into ซึ่ง
consume representation intermediate นี้และ return ค่าของ type
TokenStream ที่ต้องการ
Macro quote! ยังให้ template mechanic ที่เจ๋งมาก — เราเข้า #name
และ quote! จะแทนมันด้วยค่าในตัวแปร name คุณยังทำการซ้ำคล้ายกับวิธี
ที่ macro ปกติทำงานได้ ดู docs ของ crate quote สำหรับ
การแนะนำที่ละเอียด
เราต้องการให้ procedural macro ของเรา generate implementation ของ
trait HelloMacro ของเราสำหรับ type ที่ user annotate ซึ่งเราได้
โดยใช้ #name Implementation trait มีหนึ่งฟังก์ชัน hello_macro ที่
body บรรจุ functionality ที่เราต้องการให้ — print Hello, Macro! My name is แล้วชื่อของ type ที่ annotate
Macro stringify! ที่ใช้ที่นี่ถูก build ใน Rust มันรับ expression
Rust เช่น 1 + 2 และที่ compile time เปลี่ยน expression เป็น string
literal เช่น "1 + 2" นี่ต่างจาก format! หรือ println! ซึ่งเป็น
macro ที่ evaluate expression แล้วเปลี่ยนผลเป็น String มีความเป็นไป
ได้ที่ input #name อาจเป็น expression ที่จะ print literal ดังนั้น
เราใช้ stringify! ใช้ stringify! ยังประหยัด allocation โดยแปลง
#name เป็น string literal ที่ compile time
ที่จุดนี้ cargo build ควร complete สำเร็จในทั้ง hello_macro และ
hello_macro_derive มาเชื่อม crate เหล่านี้ให้โค้ดใน Listing 20-37
เพื่อเห็น procedural macro ในการ action! สร้าง binary project ใหม่ใน
ไดเรกทอรี projects ของคุณโดยใช้ cargo new pancakes เราต้องเพิ่ม
hello_macro และ hello_macro_derive เป็น dependency ใน Cargo.toml
ของ crate pancakes ถ้าคุณกำลัง publish version ของคุณของ
hello_macro และ hello_macro_derive ไปยัง
crates.io พวกมันจะเป็น dependency
ปกติ — ถ้าไม่ คุณระบุพวกมันเป็น dependency path ดังต่อไปนี้:
[dependencies]
hello_macro = { path = "../hello_macro" }
hello_macro_derive = { path = "../hello_macro/hello_macro_derive" }
วางโค้ดใน Listing 20-37 ใน src/main.rs และรัน cargo run — มันควร
print Hello, Macro! My name is Pancakes! Implementation ของ trait
HelloMacro จาก procedural macro ถูกรวมโดย crate pancakes ไม่ต้อง
implement มัน — #[derive(HelloMacro)] เพิ่ม implementation trait
ถัดไป มาสำรวจว่าชนิดอื่นของ procedural macro ต่างจาก custom derive
macro ยังไง
Attribute-Like Macro
Attribute-like macro คล้ายกับ custom derive macro แต่แทนการ
generate โค้ดสำหรับ attribute derive พวกมันอนุญาตให้คุณสร้าง
attribute ใหม่ พวกมันยืดหยุ่นมากกว่าด้วย — derive เพียงทำงานสำหรับ
struct และ enum; attribute apply ให้ item อื่นได้ด้วย เช่นฟังก์ชัน
นี่คือตัวอย่างของการใช้ attribute-like macro สมมุติคุณมี attribute
ชื่อ route ที่ annotate ฟังก์ชันเมื่อใช้ framework web application:
#[route(GET, "/")]
fn index() {attribute #[route] นี้จะถูกนิยามโดย framework เป็น procedural macro
Signature ของฟังก์ชันนิยาม macro จะดูแบบนี้:
#[proc_macro_attribute]
pub fn route(attr: TokenStream, item: TokenStream) -> TokenStream {ที่นี่ เรามีสอง parameter ของ type TokenStream ตัวแรกคือสำหรับเนื้อหา
ของ attribute — ส่วน GET, "/" ตัวที่สองคือ body ของ item ที่
attribute ติด — ในกรณีนี้ fn index() {} และส่วนที่เหลือของ body
ฟังก์ชัน
นอกเหนือจากนั้น attribute-like macro ทำงานในวิธีเดียวกับ custom
derive macro — คุณสร้าง crate กับ crate type proc-macro และ
implement ฟังก์ชันที่ generate โค้ดที่คุณต้องการ!
Function-Like Macro
Function-like macro นิยาม macro ที่ดูเหมือนการเรียกฟังก์ชัน คล้ายกับ
macro macro_rules! พวกมันยืดหยุ่นมากกว่าฟังก์ชัน — ตัวอย่างเช่น พวก
มันรับจำนวน argument ที่ไม่รู้ได้ อย่างไรก็ตาม macro macro_rules!
ถูกนิยามได้เพียงโดยใช้ syntax แบบ match ที่เราพูดถึงในส่วน
“Declarative Macro สำหรับ Metaprogramming ทั่วไป”
ก่อนหน้า Function-like macro รับ parameter TokenStream และนิยามของ
พวกมัน manipulate TokenStream นั้นโดยใช้โค้ด Rust แบบที่สองชนิดอื่น
ของ procedural macro ทำ ตัวอย่างของ function-like macro คือ macro
sql! ที่อาจถูกเรียกแบบนี้:
let sql = sql!(SELECT * FROM posts WHERE id=1);Macro นี้จะ parse statement SQL ภายในมันและ check ว่ามันถูก syntax
ซึ่งคือการ processing complex มากกว่าที่ macro macro_rules! ทำได้
Macro sql! จะถูกนิยามแบบนี้:
#[proc_macro]
pub fn sql(input: TokenStream) -> TokenStream {นิยามนี้คล้ายกับ signature ของ custom derive macro — เรารับ token
ที่อยู่ภายในวงเล็บและ return โค้ดที่เราต้องการ generate
สรุป
โอ้! ตอนนี้คุณมีฟีเจอร์ Rust บางอย่างใน toolbox ของคุณที่คุณน่าจะไม่ใช้ บ่อย แต่คุณจะรู้พวกมันใช้ได้ในสถานการณ์เฉพาะมาก เราแนะนำหัวข้อ complex หลายตัวเพื่อให้เมื่อคุณเจอพวกมันในคำแนะนำข้อความ error หรือในโค้ดของ คนอื่น คุณจะสามารถจำแนกแนวคิดและ syntax เหล่านี้ ใช้บทนี้เป็น reference เพื่อนำทางคุณไปยังวิธีแก้
ถัดไป เราจะเอาทุกอย่างที่เราพูดถึงผ่านหนังสือไป practice และทำอีกหนึ่ง project!
Project สุดท้าย — สร้าง Web Server แบบ Multithreaded
มันเป็นการเดินทางที่ยาวนาน แต่เรามาถึงจุดจบของหนังสือ ในบทนี้ เราจะ build อีกหนึ่ง project ด้วยกันเพื่อสาธิตแนวคิดบางอย่างที่เราครอบคลุมใน บทสุดท้าย รวมทั้งทบทวน lesson ก่อนหน้าบ้าง
สำหรับ project สุดท้ายของเรา เราจะทำ web server ที่บอก “Hello!” และดู เหมือน Figure 21-1 ใน web browser
นี่คือแผนของเราสำหรับ build web server:
- เรียนรู้เล็กน้อยเกี่ยวกับ TCP และ HTTP
- ฟัง TCP connection บน socket
- Parse คำขอ HTTP จำนวนเล็กน้อย
- สร้าง response HTTP ที่เหมาะสม
- ปรับปรุง throughput ของ server ของเราด้วย thread pool
Figure 21-1: Project สุดท้ายที่เราจะแชร์
ก่อนเราเริ่ม เราควรกล่าวสองรายละเอียด ก่อนอื่น เมธอดที่เราจะใช้จะไม่ เป็นวิธีที่ดีที่สุดในการ build web server กับ Rust สมาชิก community publish จำนวนของ crate ระดับ production ใช้ได้ที่ crates.io ที่ให้ implementation web server และ thread pool ที่สมบูรณ์มากกว่าที่เราจะ build อย่างไรก็ตาม เจตนาของเรา ในบทนี้คือช่วยคุณเรียน ไม่ใช่รับเส้นทางที่ง่าย เพราะ Rust เป็นภาษา systems programming เราเลือกระดับของ abstraction ที่เราต้องการทำงานกับ ได้และไปยังระดับต่ำกว่าที่เป็นไปได้หรือ practical ในภาษาอื่น
ที่สอง เราจะไม่ใช้ async และ await ที่นี่ Build thread pool คือความ ท้าทายใหญ่พอในตัวเอง โดยไม่เพิ่ม build runtime async! อย่างไรก็ตาม เรา จะ note ว่า async และ await อาจ apply ให้ปัญหาบางอย่างเดียวกันที่เราจะ เห็นในบทนี้ได้ ในที่สุด ตามที่เราสังเกตกลับในบทที่ 17 runtime async หลายตัวใช้ thread pool สำหรับการจัดการงานของพวกเขา
ดังนั้นเราจะเขียน HTTP server พื้นฐานและ thread pool โดยมือเพื่อให้คุณ เรียนรู้ไอเดียทั่วไปและเทคนิคหลัง crate ที่คุณอาจใช้ในอนาคต
เขียน web server แบบ single-threaded
Build Web Server แบบ Single-Threaded
เราจะเริ่มโดยทำให้ web server แบบ single-threaded ทำงาน ก่อนเราเริ่ม มาดู overview ด่วนของ protocol ที่เกี่ยวข้องใน build web server ราย ละเอียดของ protocol เหล่านี้เกินกว่า scope ของหนังสือ แต่ overview สั้น จะให้ข้อมูลที่คุณต้องการ
สอง protocol หลักที่เกี่ยวข้องใน web server คือ Hypertext Transfer Protocol (HTTP) และ Transmission Control Protocol (TCP) ทั้ง สอง protocol เป็น protocol request-response หมายความว่า client initiate request และ server ฟัง request และให้ response กับ client เนื้อหาของ request และ response เหล่านั้นถูกนิยามโดย protocol
TCP คือ protocol ระดับต่ำกว่าที่อธิบายรายละเอียดของวิธีที่ข้อมูลได้จาก server หนึ่งไปยังอีก server แต่ไม่ระบุว่าข้อมูลนั้นคืออะไร HTTP build บน TCP โดยนิยามเนื้อหาของ request และ response มันเทคนิคเป็นไปได้ที่ จะใช้ HTTP กับ protocol อื่น แต่ในกรณีส่วนใหญ่ HTTP ส่งข้อมูลของมัน ผ่าน TCP เราจะทำงานกับ byte raw ของ request และ response TCP และ HTTP
ฟัง TCP Connection
Web server ของเราต้องฟัง TCP connection ดังนั้นนั่นคือส่วนแรกที่เราจะ
ทำงาน Standard library เสนอโมดูล std::net ที่ให้เราทำสิ่งนี้ มาทำ
project ใหม่ในแฟชั่นปกติ:
$ cargo new hello
Created binary (application) `hello` project
$ cd hello
ตอนนี้ใส่โค้ดใน Listing 21-1 ใน src/main.rs เพื่อเริ่ม โค้ดนี้จะ
ฟังที่ address local 127.0.0.1:7878 สำหรับ stream TCP ที่เข้ามา เมื่อ
มันได้ stream ที่เข้ามา มันจะ print Connection established!
use std::net::TcpListener;
fn main() {
let listener = TcpListener::bind("127.0.0.1:7878").unwrap();
for stream in listener.incoming() {
let stream = stream.unwrap();
println!("Connection established!");
}
}ใช้ TcpListener เราฟัง TCP connection ที่ address 127.0.0.1:7878
ได้ ใน address ส่วนก่อน colon คือ IP address ที่ represent computer
ของคุณ (นี่เหมือนกันบนทุก computer และไม่ represent computer ของผู้
เขียนโดยเฉพาะ) และ 7878 คือ port เราเลือก port นี้สำหรับสองเหตุผล
— HTTP ปกติไม่ถูกยอมรับบน port นี้ ดังนั้น server ของเราไม่น่าจะ
conflict กับ web server อื่นที่คุณอาจรันบนเครื่องของคุณ และ 7878 คือ
rust พิมพ์บนโทรศัพท์
ฟังก์ชัน bind ใน scenario นี้ทำงานเหมือนฟังก์ชัน new ในที่มันจะ
return instance TcpListener ใหม่ ฟังก์ชันถูกเรียก bind เพราะ ใน
networking การเชื่อมไปยัง port เพื่อฟังรู้จักเป็น “binding ไปยัง port”
ฟังก์ชัน bind return Result<T, E> ซึ่งบ่งบอกว่ามันเป็นไปได้สำหรับ
binding ที่จะ fail ตัวอย่างเช่น ถ้าเรารันสอง instance ของโปรแกรมของ
เราและดังนั้นมีสองโปรแกรมฟังที่ port เดียวกัน เพราะเรากำลังเขียน
server พื้นฐานเพียงสำหรับจุดประสงค์เรียน เราจะไม่กังวลเกี่ยวกับการ
จัดการ error ชนิดเหล่านี้ — แทน เราใช้ unwrap เพื่อหยุดโปรแกรมถ้า
error เกิด
เมธอด incoming บน TcpListener return iterator ที่ให้เราลำดับของ
stream (เจาะจง stream ของ type TcpStream) stream เดียว represent
connection ที่เปิดระหว่าง client และ server Connection คือชื่อ
สำหรับกระบวนการ request และ response เต็มที่ client เชื่อมกับ server,
server generate response และ server ปิด connection ดังนั้น เราจะอ่าน
จาก TcpStream เพื่อดูสิ่งที่ client ส่งและแล้วเขียน response ของเรา
ไปยัง stream เพื่อส่งข้อมูลกลับให้ client โดยรวม loop for นี้จะ
process แต่ละ connection ตามลำดับและผลิตชุดของ stream ให้เราจัดการ
ตอนนี้ การจัดการของเราของ stream ประกอบด้วยการเรียก unwrap เพื่อสิ้น
สุดโปรแกรมของเราถ้า stream มี error ใด — ถ้าไม่มี error โปรแกรม print
ข้อความ เราจะเพิ่ม functionality เพิ่มสำหรับกรณี success ใน listing
ถัดไป เหตุผลที่เราอาจรับ error จากเมธอด incoming เมื่อ client เชื่อม
กับ server คือเราไม่ได้ iterate ผ่าน connection จริง ๆ แทน เรากำลัง
iterate ผ่าน ความพยายาม connection Connection อาจไม่สำเร็จเพราะ
เหตุผลหลายอย่าง หลายอันเฉพาะ operating system ตัวอย่างเช่น operating
system หลายตัวมี limit สำหรับจำนวนของ connection ที่เปิดพร้อมกันที่
พวกมันสนับสนุน — ความพยายาม connection ใหม่เกินจำนวนนั้นจะผลิต error
จนกระทั่ง connection ที่เปิดบางตัวถูกปิด
มาลองรันโค้ดนี้! Invoke cargo run ใน terminal แล้วโหลด
127.0.0.1:7878 ใน web browser browser ควรแสดงข้อความ error เช่น
“Connection reset” เพราะ server ปัจจุบันไม่ส่งข้อมูลกลับใด ๆ แต่เมื่อ
คุณดูที่ terminal คุณควรเห็นข้อความหลายตัวที่ print เมื่อ browser
เชื่อมกับ server!
Running `target/debug/hello`
Connection established!
Connection established!
Connection established!
บางครั้งคุณจะเห็นหลายข้อความ print สำหรับหนึ่ง browser request — เหตุผล อาจเป็นว่า browser กำลังทำ request สำหรับหน้ารวมทั้ง request สำหรับ resource อื่น เช่น icon favicon.ico ที่ปรากฏใน browser tab
มันอาจเป็นว่า browser กำลังพยายามเชื่อมกับ server หลายครั้งเพราะ
server ไม่ตอบกับข้อมูลใด เมื่อ stream ออกจาก scope และถูก drop ที่
ตอนจบของ loop, connection ถูกปิดเป็นส่วนของ implementation drop
Browser บางครั้งจัดการ connection ที่ปิดโดยลองใหม่ เพราะปัญหาอาจชั่ว
คราว
Browser ก็บางครั้งเปิดหลาย connection ไปยัง server โดยไม่ส่ง request ใดเพื่อให้ถ้าพวกเขา จริง ๆ ส่ง request ภายหลัง request เหล่านั้น เกิดได้เร็วขึ้น เมื่อสิ่งนี้เกิด server ของเราจะเห็นแต่ละ connection ไม่ว่ามี request ใดผ่าน connection นั้น Version หลายตัวของ browser ที่ ตาม Chrome ทำสิ่งนี้ ตัวอย่างเช่น — คุณปิด optimization นั้นได้โดยใช้ private browsing mode หรือใช้ browser ต่างได้
ปัจจัยสำคัญคือเราสำเร็จได้ handle ไปยัง TCP connection!
จำหยุดโปรแกรมโดยกด ctrl-C เมื่อคุณเสร็จรัน
version เฉพาะของโค้ด แล้ว restart โปรแกรมโดย invoke คำสั่ง cargo run หลังคุณทำชุดการเปลี่ยนแปลงโค้ดแต่ละชุดเพื่อให้แน่ใจว่าคุณกำลังรัน
โค้ดใหม่ที่สุด
อ่าน Request
มา implement functionality เพื่ออ่าน request จาก browser! เพื่อแยก
concern ของการได้ connection ก่อนและแล้วทำ action กับ connection
เราจะเริ่มฟังก์ชันใหม่สำหรับการ process connection ในฟังก์ชัน
handle_connection ใหม่นี้ เราจะอ่านข้อมูลจาก TCP stream และ print
มันเพื่อให้เราเห็นข้อมูลที่ส่งจาก browser เปลี่ยนโค้ดให้ดูเหมือน
Listing 21-2
use std::{
io::{BufReader, prelude::*},
net::{TcpListener, TcpStream},
};
fn main() {
let listener = TcpListener::bind("127.0.0.1:7878").unwrap();
for stream in listener.incoming() {
let stream = stream.unwrap();
handle_connection(stream);
}
}
fn handle_connection(mut stream: TcpStream) {
let buf_reader = BufReader::new(&stream);
let http_request: Vec<_> = buf_reader
.lines()
.map(|result| result.unwrap())
.take_while(|line| !line.is_empty())
.collect();
println!("Request: {http_request:#?}");
}TcpStream และ print ข้อมูลเรานำ std::io::BufReader และ std::io::prelude เข้า scope เพื่อ
เข้าถึง trait และ type ที่ให้เราอ่านจากและเขียนไปยัง stream ใน loop
for ในฟังก์ชัน main แทนการ print ข้อความที่บอกว่าเราทำ connection
ตอนนี้เราเรียกฟังก์ชัน handle_connection ใหม่และส่ง stream ให้มัน
ในฟังก์ชัน handle_connection เราสร้าง instance BufReader ใหม่ที่
ห่อ reference ของ stream BufReader เพิ่ม buffering โดยจัดการการ
เรียกเมธอด trait std::io::Read ให้เรา
เราสร้างตัวแปรชื่อ http_request เพื่อ collect บรรทัดของ request ที่
browser ส่งให้ server ของเรา เราบ่งบอกว่าเราต้องการ collect บรรทัด
เหล่านี้ใน vector โดยเพิ่ม type annotation Vec<_>
BufReader implement trait std::io::BufRead ซึ่งให้เมธอด lines
เมธอด lines return iterator ของ Result<String, std::io::Error>
โดย split stream ของข้อมูลเมื่อใดก็ตามที่มันเห็น byte newline เพื่อ
ได้แต่ละ String เรา map และ unwrap แต่ละ Result Result อาจ
เป็น error ถ้าข้อมูลไม่ valid UTF-8 หรือถ้ามีปัญหาในการอ่านจาก stream
อีกครั้ง โปรแกรม production ควรจัดการ error เหล่านี้อย่าง graceful
มากขึ้น แต่เรากำลังเลือกหยุดโปรแกรมในกรณี error เพื่อความเรียบง่าย
Browser signal ตอนจบของ HTTP request โดยส่งสอง character newline ติด กัน ดังนั้นเพื่อได้หนึ่ง request จาก stream เราเอาบรรทัดจนเราได้บรรทัด ที่เป็น string ว่าง เมื่อเรา collect บรรทัดเข้า vector เรากำลัง print พวกมันโดยใช้การ format debug แบบสวยเพื่อให้เราดูที่คำสั่งที่ web browser ส่งให้ server ของเรา
มาลองโค้ดนี้! เริ่มโปรแกรมและทำ request ใน web browser อีก สังเกตว่า เราจะยังได้หน้า error ใน browser แต่ output ของโปรแกรมของเราใน terminal ตอนนี้จะดูคล้ายกับนี้:
$ cargo run
Compiling hello v0.1.0 (file:///projects/hello)
Finished `dev` profile [unoptimized + debuginfo] target(s) in 0.42s
Running `target/debug/hello`
Request: [
"GET / HTTP/1.1",
"Host: 127.0.0.1:7878",
"User-Agent: Mozilla/5.0 (Macintosh; Intel Mac OS X 10.15; rv:99.0) Gecko/20100101 Firefox/99.0",
"Accept: text/html,application/xhtml+xml,application/xml;q=0.9,image/avif,image/webp,*/*;q=0.8",
"Accept-Language: en-US,en;q=0.5",
"Accept-Encoding: gzip, deflate, br",
"DNT: 1",
"Connection: keep-alive",
"Upgrade-Insecure-Requests: 1",
"Sec-Fetch-Dest: document",
"Sec-Fetch-Mode: navigate",
"Sec-Fetch-Site: none",
"Sec-Fetch-User: ?1",
"Cache-Control: max-age=0",
]
ขึ้นกับ browser ของคุณ คุณอาจได้ output ต่างเล็กน้อย ตอนนี้เรากำลัง
print ข้อมูล request เราเห็นได้ว่าทำไมเราได้หลาย connection จากหนึ่ง
browser request โดยดูที่ path หลัง GET ในบรรทัดแรกของ request ถ้า
connection ที่ซ้ำขอ / ทั้งหมด เรารู้ browser กำลังพยายามดึง / ซ้ำ
เพราะมันไม่ได้รับ response จากโปรแกรมของเรา
มาแยกข้อมูล request นี้ลงเพื่อเข้าใจสิ่งที่ browser ขอจากโปรแกรมของเรา
ดู HTTP Request ใกล้ขึ้น
HTTP คือ protocol แบบ text-based และ request รับ format นี้:
Method Request-URI HTTP-Version CRLF
headers CRLF
message-body
บรรทัดแรกคือ บรรทัด request ที่บรรจุข้อมูลเกี่ยวกับสิ่งที่ client
กำลังขอ ส่วนแรกของบรรทัด request บ่งบอก method ที่ถูกใช้ เช่น GET
หรือ POST ซึ่งอธิบายวิธีที่ client ทำ request นี้ Client ของเราใช้
request GET ซึ่งหมายถึงมันกำลังขอข้อมูล
ส่วนถัดของบรรทัด request คือ / ซึ่งบ่งบอก uniform resource identifier (URI) ที่ client ขอ — URI เกือบแต่ไม่เป๊ะเหมือนกับ uniform resource locator (URL) ความแตกต่างระหว่าง URI และ URL ไม่ สำคัญสำหรับจุดประสงค์ของเราในบทนี้ แต่ HTTP spec ใช้คำ URI ดังนั้น เราเพียงเปลี่ยนใจ URL เป็น URI ที่นี่ได้
ส่วนสุดท้ายคือ version HTTP ที่ client ใช้ และแล้วบรรทัด request จบใน
ลำดับ CRLF (CRLF ย่อมาจาก carriage return และ line feed ซึ่งเป็น
คำจากยุค typewriter!) ลำดับ CRLF ก็ถูกเขียนเป็น \r\n ได้ ที่ \r
คือ carriage return และ \n คือ line feed ลำดับ CRLF แยกบรรทัด
request จากข้อมูล request ที่เหลือ สังเกตว่าเมื่อ CRLF ถูก print เรา
เห็นบรรทัดใหม่เริ่มแทน \r\n
ดูที่ข้อมูลบรรทัด request ที่เรารับจากการรันโปรแกรมของเราตอนนี้ เรา
เห็นว่า GET คือ method, / คือ URI request และ HTTP/1.1 คือ
version
หลังบรรทัด request บรรทัดที่เหลือเริ่มจาก Host: ต่อไปเป็น header
request GET ไม่มี body
ลองทำ request จาก browser ต่างหรือขอ address ต่างเช่น 127.0.0.1:7878/test เพื่อดูว่าข้อมูล request เปลี่ยนยังไง
ตอนนี้เรารู้สิ่งที่ browser ขอ มาส่งข้อมูลบางอย่างกลับ!
เขียน Response
เราจะ implement การส่งข้อมูลใน response กับ request ของ client Response มี format ต่อไปนี้:
HTTP-Version Status-Code Reason-Phrase CRLF
headers CRLF
message-body
บรรทัดแรกคือ บรรทัด status ที่บรรจุ version HTTP ที่ใช้ใน response, status code ตัวเลขที่สรุปผลของ request และวลีเหตุผลที่ให้คำอธิบาย text ของ status code หลังลำดับ CRLF เป็น header ใด ลำดับ CRLF อีก และ body ของ response
นี่คือตัวอย่าง response ที่ใช้ HTTP version 1.1 และมี status code 200 วลีเหตุผล OK ไม่มี header และไม่มี body:
HTTP/1.1 200 OK\r\n\r\n
Status code 200 คือ response success มาตรฐาน Text คือ response HTTP
success เล็กจิ๋ว มาเขียนนี้ไปยัง stream เป็น response ของเรากับ
request success! จากฟังก์ชัน handle_connection ลบ println! ที่
print ข้อมูล request และแทนด้วยโค้ดใน Listing 21-3
use std::{
io::{BufReader, prelude::*},
net::{TcpListener, TcpStream},
};
fn main() {
let listener = TcpListener::bind("127.0.0.1:7878").unwrap();
for stream in listener.incoming() {
let stream = stream.unwrap();
handle_connection(stream);
}
}
fn handle_connection(mut stream: TcpStream) {
let buf_reader = BufReader::new(&stream);
let http_request: Vec<_> = buf_reader
.lines()
.map(|result| result.unwrap())
.take_while(|line| !line.is_empty())
.collect();
let response = "HTTP/1.1 200 OK\r\n\r\n";
stream.write_all(response.as_bytes()).unwrap();
}บรรทัดใหม่แรกนิยามตัวแปร response ที่บรรจุข้อมูลของข้อความ success
แล้ว เราเรียก as_bytes บน response ของเราเพื่อแปลงข้อมูล string
เป็น byte เมธอด write_all บน stream รับ &[u8] และส่ง byte
เหล่านั้นโดยตรงลงไป connection เพราะ operation write_all fail ได้
เราใช้ unwrap บนผล error ใดเหมือนก่อน อีกครั้ง ใน application จริง
คุณจะเพิ่มการจัดการ error ที่นี่
ด้วยการเปลี่ยนแปลงเหล่านี้ มารันโค้ดของเราและทำ request เราไม่ได้ print ข้อมูลใดไปยัง terminal อีก ดังนั้นเราจะไม่เห็น output ใดนอกจาก output จาก Cargo เมื่อคุณโหลด 127.0.0.1:7878 ใน web browser คุณควร ได้หน้าว่างแทน error คุณเพิ่ง handcoded รับ HTTP request และส่ง response!
Return HTML จริง
มา implement functionality สำหรับการ return มากกว่าหน้าว่าง สร้างไฟล์ ใหม่ hello.html ที่ root ของไดเรกทอรี project ของคุณ ไม่ใช่ใน ไดเรกทอรี src คุณ input HTML ใดที่ต้องการได้ — Listing 21-4 แสดง หนึ่งความเป็นไปได้
<!DOCTYPE html>
<html lang="en">
<head>
<meta charset="utf-8">
<title>Hello!</title>
</head>
<body>
<h1>Hello!</h1>
<p>Hi from Rust</p>
</body>
</html>
นี่คือเอกสาร HTML5 ขั้นต่ำกับ heading และ text เพื่อ return นี้จาก
server เมื่อ request ถูกรับ เราจะแก้ handle_connection ดังที่แสดง
ใน Listing 21-5 เพื่ออ่านไฟล์ HTML เพิ่มมันให้ response เป็น body และ
ส่งมัน
use std::{
fs,
io::{BufReader, prelude::*},
net::{TcpListener, TcpStream},
};
// --snip--
fn main() {
let listener = TcpListener::bind("127.0.0.1:7878").unwrap();
for stream in listener.incoming() {
let stream = stream.unwrap();
handle_connection(stream);
}
}
fn handle_connection(mut stream: TcpStream) {
let buf_reader = BufReader::new(&stream);
let http_request: Vec<_> = buf_reader
.lines()
.map(|result| result.unwrap())
.take_while(|line| !line.is_empty())
.collect();
let status_line = "HTTP/1.1 200 OK";
let contents = fs::read_to_string("hello.html").unwrap();
let length = contents.len();
let response =
format!("{status_line}\r\nContent-Length: {length}\r\n\r\n{contents}");
stream.write_all(response.as_bytes()).unwrap();
}เราเพิ่ม fs ให้ statement use เพื่อนำโมดูล filesystem ของ standard
library เข้า scope โค้ดสำหรับการอ่านเนื้อหาของไฟล์ไปยัง string ควรดู
คุ้นเคย — เราใช้มันเมื่อเราอ่านเนื้อหาของไฟล์สำหรับ project I/O ของเรา
ใน Listing 12-4
ถัดไป เราใช้ format! เพื่อเพิ่มเนื้อหาของไฟล์เป็น body ของ response
success เพื่อรับประกัน response HTTP ที่ valid เราเพิ่ม header
Content-Length ซึ่งตั้งเป็นขนาดของ body response ของเรา — ในกรณีนี้
ขนาดของ hello.html
รันโค้ดนี้ด้วย cargo run และโหลด 127.0.0.1:7878 ใน browser ของ
คุณ — คุณควรเห็น HTML ของคุณ render!
ปัจจุบัน เรากำลัง ignore ข้อมูล request ใน http_request และเพียงส่ง
กลับเนื้อหาของไฟล์ HTML โดยไม่มีเงื่อนไข นั่นหมายความว่าถ้าคุณลองขอ
127.0.0.1:7878/something-else ใน browser ของคุณ คุณจะยังได้ response
HTML เดียวกันกลับ ที่ขณะนี้ server ของเรามีจำกัดมากและไม่ทำสิ่งที่ web
server ส่วนใหญ่ทำ เราต้องการ customize response ของเราขึ้นกับ request
และส่งกลับไฟล์ HTML เพียงสำหรับ request ที่ form ดีไปยัง /
Validate Request และ Response เลือก
ตอนนี้ web server ของเราจะ return HTML ในไฟล์ไม่ว่า client ขออะไร มา
เพิ่ม functionality เพื่อ check ว่า browser กำลังขอ / ก่อน return
ไฟล์ HTML และ return error ถ้า browser ขออื่นใด สำหรับสิ่งนี้เราต้อง
แก้ handle_connection ดังที่แสดงใน Listing 21-6 โค้ดใหม่นี้ check
เนื้อหาของ request ที่รับกับสิ่งที่เรารู้ว่า request สำหรับ / ดู
เหมือน และเพิ่ม block if และ else เพื่อ treat request ต่างกัน
use std::{
fs,
io::{BufReader, prelude::*},
net::{TcpListener, TcpStream},
};
fn main() {
let listener = TcpListener::bind("127.0.0.1:7878").unwrap();
for stream in listener.incoming() {
let stream = stream.unwrap();
handle_connection(stream);
}
}
// --snip--
fn handle_connection(mut stream: TcpStream) {
let buf_reader = BufReader::new(&stream);
let request_line = buf_reader.lines().next().unwrap().unwrap();
if request_line == "GET / HTTP/1.1" {
let status_line = "HTTP/1.1 200 OK";
let contents = fs::read_to_string("hello.html").unwrap();
let length = contents.len();
let response = format!(
"{status_line}\r\nContent-Length: {length}\r\n\r\n{contents}"
);
stream.write_all(response.as_bytes()).unwrap();
} else {
// some other request
}
}เราจะดูเพียงบรรทัดแรกของ HTTP request ดังนั้นแทนการอ่าน request
ทั้งหมดเข้า vector เรากำลังเรียก next เพื่อได้ item แรกจาก iterator
unwrap แรกดูแล Option และหยุดโปรแกรมถ้า iterator ไม่มี item
unwrap ที่สองจัดการ Result และมีผลเหมือน unwrap ที่อยู่ใน map
ที่เพิ่มใน Listing 21-2
ถัดไป เรา check request_line เพื่อดูว่ามันเท่ากับบรรทัด request ของ
GET request ไปยัง path / ถ้ามัน block if return เนื้อหาของไฟล์
HTML ของเรา
ถ้า request_line ไม่ เท่ากับ GET request ไปยัง path / มันหมายถึง
เรารับ request อื่นบางอย่าง เราจะเพิ่มโค้ดให้ block else ในชั่วครู่
เพื่อ respond ให้ request อื่นทั้งหมด
รันโค้ดนี้ตอนนี้และขอ 127.0.0.1:7878 — คุณควรได้ HTML ใน hello.html ถ้าคุณทำ request อื่นใด เช่น 127.0.0.1:7878/something-else คุณจะได้ error connection เช่นที่คุณเห็นเมื่อรันโค้ดใน Listing 21-1 และ Listing 21-2
ตอนนี้มาเพิ่มโค้ดใน Listing 21-7 ให้ block else เพื่อ return
response กับ status code 404 ซึ่ง signal ว่าเนื้อหาสำหรับ request ไม่
พบ เรายัง return HTML บ้างสำหรับหน้าที่ render ใน browser บ่งบอก
response กับ user สุดท้าย
use std::{
fs,
io::{BufReader, prelude::*},
net::{TcpListener, TcpStream},
};
fn main() {
let listener = TcpListener::bind("127.0.0.1:7878").unwrap();
for stream in listener.incoming() {
let stream = stream.unwrap();
handle_connection(stream);
}
}
fn handle_connection(mut stream: TcpStream) {
let buf_reader = BufReader::new(&stream);
let request_line = buf_reader.lines().next().unwrap().unwrap();
if request_line == "GET / HTTP/1.1" {
let status_line = "HTTP/1.1 200 OK";
let contents = fs::read_to_string("hello.html").unwrap();
let length = contents.len();
let response = format!(
"{status_line}\r\nContent-Length: {length}\r\n\r\n{contents}"
);
stream.write_all(response.as_bytes()).unwrap();
// --snip--
} else {
let status_line = "HTTP/1.1 404 NOT FOUND";
let contents = fs::read_to_string("404.html").unwrap();
let length = contents.len();
let response = format!(
"{status_line}\r\nContent-Length: {length}\r\n\r\n{contents}"
);
stream.write_all(response.as_bytes()).unwrap();
}
}ที่นี่ response ของเรามีบรรทัด status กับ status code 404 และวลีเหตุผล
NOT FOUND Body ของ response จะเป็น HTML ในไฟล์ 404.html คุณจะต้อง
สร้างไฟล์ 404.html ข้าง ๆ hello.html สำหรับหน้า error อีกครั้ง
รู้สึกอิสระที่จะใช้ HTML ใดที่คุณต้องการ หรือใช้ตัวอย่าง HTML ใน
Listing 21-8
<!DOCTYPE html>
<html lang="en">
<head>
<meta charset="utf-8">
<title>Hello!</title>
</head>
<body>
<h1>Oops!</h1>
<p>Sorry, I don't know what you're asking for.</p>
</body>
</html>
ด้วยการเปลี่ยนแปลงเหล่านี้ รัน server ของคุณอีก ขอ 127.0.0.1:7878 ควร return เนื้อหาของ hello.html และ request อื่นใด เช่น 127.0.0.1:7878/foo ควร return HTML error จาก 404.html
Refactoring
ที่ขณะนี้ block if และ else มีการซ้ำซ้อนเยอะ — พวกเขาทั้งสองอ่าน
ไฟล์และเขียนเนื้อหาของไฟล์ไปยัง stream ความแตกต่างเดียวคือบรรทัด
status และชื่อไฟล์ มาทำโค้ดให้กระชับมากขึ้นโดยดึงความแตกต่างเหล่านั้น
ออกมาในบรรทัด if และ else แยกที่จะ assign ค่าของบรรทัด status และ
ชื่อไฟล์ให้ตัวแปร — แล้วเราใช้ตัวแปรเหล่านั้นโดยไม่มีเงื่อนไขในโค้ด
เพื่ออ่านไฟล์และเขียน response ได้ Listing 21-9 แสดงโค้ดผลลัพธ์หลัง
การแทน block if และ else ใหญ่
use std::{
fs,
io::{BufReader, prelude::*},
net::{TcpListener, TcpStream},
};
fn main() {
let listener = TcpListener::bind("127.0.0.1:7878").unwrap();
for stream in listener.incoming() {
let stream = stream.unwrap();
handle_connection(stream);
}
}
// --snip--
fn handle_connection(mut stream: TcpStream) {
// --snip--
let buf_reader = BufReader::new(&stream);
let request_line = buf_reader.lines().next().unwrap().unwrap();
let (status_line, filename) = if request_line == "GET / HTTP/1.1" {
("HTTP/1.1 200 OK", "hello.html")
} else {
("HTTP/1.1 404 NOT FOUND", "404.html")
};
let contents = fs::read_to_string(filename).unwrap();
let length = contents.len();
let response =
format!("{status_line}\r\nContent-Length: {length}\r\n\r\n{contents}");
stream.write_all(response.as_bytes()).unwrap();
}if และ else ให้บรรจุเพียงโค้ดที่ต่างระหว่างสองกรณีตอนนี้ block if และ else เพียง return ค่าเหมาะสมสำหรับบรรทัด
status และชื่อไฟล์ใน tuple — เราแล้วใช้การ destructuring เพื่อ assign
สองค่าเหล่านี้ให้ status_line และ filename โดยใช้ pattern ใน
statement let ตามที่พูดถึงในบทที่ 19
โค้ดที่ duplicate ก่อนหน้าตอนนี้อยู่นอก block if และ else และใช้
ตัวแปร status_line และ filename นี่ทำให้ง่ายขึ้นในการเห็นความแตก
ต่างระหว่างสองกรณี และมันหมายความว่าเรามีเพียงหนึ่งที่ที่จะอัพเดทโค้ด
ถ้าเราต้องการเปลี่ยนวิธีที่การอ่านไฟล์และเขียน response ทำงาน
พฤติกรรมของโค้ดใน Listing 21-9 จะเหมือนกับใน Listing 21-7
เจ๋ง! ตอนนี้เรามี web server ง่ายในประมาณ 40 บรรทัดของโค้ด Rust ที่ ตอบกับหนึ่ง request ด้วยหน้าของเนื้อหาและตอบกับ request อื่นทั้งหมด ด้วย response 404
ปัจจุบัน server ของเรารันในเธรดเดียว หมายความว่ามันสามารถ serve เพียง หนึ่ง request ในเวลาเดียว มาตรวจสอบว่านั่นเป็นปัญหาได้ยังไงโดยจำลอง request ช้าบ้าง แล้ว เราจะ fix มันเพื่อให้ server ของเราจัดการหลาย request พร้อมกันได้
เปลี่ยนจาก single-threaded เป็น multithreaded
จาก Server แบบ Single-Threaded ไป Multithreaded
ตอนนี้ server จะ process แต่ละ request ตามลำดับ หมายความว่ามันจะไม่ process connection ที่สองจนกว่า connection แรก finish process ถ้า server รับ request มากขึ้น ๆ การ execute serial นี้จะ optimal น้อยลง และน้อยลง ถ้า server รับ request ที่ใช้เวลานานในการ process, request ตามมาจะต้องรอจนกระทั่ง request ยาว finish แม้ request ใหม่ถูก process ได้เร็ว เราจะต้อง fix นี่ แต่ก่อนอื่นเราจะดูที่ปัญหาในการ action
จำลอง Request ช้า
เราจะดูว่า request ที่ process ช้าจะส่งผลกับ request อื่นที่ทำกับ implementation server ปัจจุบันของเรายังไง Listing 21-10 implement การ จัดการ request ไปยัง /sleep ด้วย response ช้าจำลองที่จะทำให้ server sleep ห้าวินาทีก่อนตอบ
use std::{
fs,
io::{BufReader, prelude::*},
net::{TcpListener, TcpStream},
thread,
time::Duration,
};
// --snip--
fn main() {
let listener = TcpListener::bind("127.0.0.1:7878").unwrap();
for stream in listener.incoming() {
let stream = stream.unwrap();
handle_connection(stream);
}
}
fn handle_connection(mut stream: TcpStream) {
// --snip--
let buf_reader = BufReader::new(&stream);
let request_line = buf_reader.lines().next().unwrap().unwrap();
let (status_line, filename) = match &request_line[..] {
"GET / HTTP/1.1" => ("HTTP/1.1 200 OK", "hello.html"),
"GET /sleep HTTP/1.1" => {
thread::sleep(Duration::from_secs(5));
("HTTP/1.1 200 OK", "hello.html")
}
_ => ("HTTP/1.1 404 NOT FOUND", "404.html"),
};
// --snip--
let contents = fs::read_to_string(filename).unwrap();
let length = contents.len();
let response =
format!("{status_line}\r\nContent-Length: {length}\r\n\r\n{contents}");
stream.write_all(response.as_bytes()).unwrap();
}เรา switch จาก if ไป match ตอนนี้เรามีสามกรณี เราต้องอย่างชัดเจน
match บน slice ของ request_line เพื่อ pattern-match กับค่า string
literal — match ไม่ทำการ referencing และ dereferencing อัตโนมัติ
แบบที่เมธอด equality ทำ
arm แรกเหมือนกับ block if จาก Listing 21-9 arm ที่สอง match request
ไปยัง /sleep เมื่อ request นั้นถูกรับ server จะ sleep ห้าวินาทีก่อน
render หน้า HTML success arm ที่สามเหมือนกับ block else จาก Listing
21-9
คุณเห็นได้ว่า server ของเราดั้งเดิมแค่ไหน — library จริงจะจัดการการ จำแนกหลาย request ในวิธี verbose น้อยกว่ามาก!
เริ่ม server โดยใช้ cargo run แล้ว เปิดสอง browser window — หนึ่ง
สำหรับ http://127.0.0.1:7878 และอีกอันสำหรับ
http://127.0.0.1:7878/sleep ถ้าคุณใส่ URI / ไม่กี่ครั้ง เหมือนก่อน
คุณจะเห็นมันตอบเร็ว แต่ถ้าคุณใส่ /sleep แล้วโหลด / คุณจะเห็นว่า
/ รอจนกว่า sleep ได้ sleep เต็มห้าวินาทีของมันก่อนโหลด
มีหลายเทคนิคที่เราใช้เพื่อหลีกเลี่ยง request backing up หลัง request ช้าได้ รวมการใช้ async อย่างที่เราทำในบทที่ 17 — อันที่เราจะ implement คือ thread pool
ปรับปรุง Throughput ด้วย Thread Pool
thread pool คือกลุ่มของ spawn เธรดที่พร้อมและรอจัดการงาน เมื่อ โปรแกรมรับงานใหม่ มัน assign หนึ่งในเธรดใน pool ให้งาน และเธรดนั้นจะ process งาน เธรดที่เหลือใน pool ใช้ได้เพื่อจัดการงานอื่นใดที่เข้ามาขณะ เธรดแรก process อยู่ เมื่อเธรดแรกเสร็จ process งานของมัน มันถูก return ไปยัง pool ของเธรดที่ว่าง พร้อมจัดการงานใหม่ Thread pool อนุญาตให้คุณ process connection พร้อมกัน เพิ่ม throughput ของ server ของคุณ
เราจะ limit จำนวนของเธรดใน pool ให้จำนวนเล็กเพื่อปกป้องเราจากการโจมตี DoS — ถ้าเราให้โปรแกรมของเราสร้างเธรดใหม่สำหรับแต่ละ request เมื่อมัน เข้ามา ใครสักคนทำ 10 ล้าน request ให้ server ของเราอาจสร้างความ เสียหายโดยใช้ resource ทั้งหมดของ server ของเราหมดและทำให้การ process request หยุดได้
แทนการ spawn เธรดไม่จำกัด เราจะมีจำนวนคงที่ของเธรดที่รอใน pool
Request ที่เข้ามาถูกส่งให้ pool สำหรับ process Pool จะ maintain queue
ของ request ที่เข้ามา แต่ละเธรดใน pool จะ pop request จาก queue นี้
จัดการ request และแล้วถามให้ queue สำหรับ request อื่น ด้วยการออกแบบนี้
เรา process ได้ถึง N request พร้อมกัน ที่ N คือจำนวนของเธรด
ถ้าแต่ละเธรดกำลังตอบกับ request ที่รันนาน, request ตามมายังสามารถ
back up ใน queue ได้ แต่เราเพิ่มจำนวนของ request ที่รันนานที่เราจัดการ
ได้ก่อนถึงจุดนั้น
เทคนิคนี้เป็นเพียงหนึ่งในหลายวิธีในการปรับปรุง throughput ของ web server ตัวเลือกอื่นที่คุณอาจสำรวจคือ model fork/join, model async I/O แบบ single-threaded และ model async I/O แบบ multithreaded ถ้าคุณสนใจ ในหัวข้อนี้ คุณอ่านเพิ่มเกี่ยวกับวิธีแก้อื่นและพยายาม implement พวก มันได้ — กับภาษาระดับต่ำเช่น Rust ตัวเลือกเหล่านี้ทั้งหมดเป็นไปได้
ก่อนเราเริ่ม implement thread pool มาพูดเกี่ยวกับสิ่งที่ใช้ pool ควร ดูเหมือน เมื่อคุณกำลังพยายามออกแบบโค้ด เขียน client interface ก่อน ช่วยนำทางการออกแบบของคุณได้ เขียน API ของโค้ดให้มันถูกจัดโครงสร้างใน วิธีที่คุณต้องการเรียกมัน — แล้ว implement functionality ภายใน โครงสร้างนั้นแทนการ implement functionality และแล้วออกแบบ public API
คล้ายกับวิธีที่เราใช้ test-driven development ใน project ในบทที่ 12 เราจะใช้ compiler-driven development ที่นี่ เราจะเขียนโค้ดที่เรียก ฟังก์ชันที่เราต้องการ และแล้วเราจะดูที่ error จาก compiler เพื่อ ตัดสินว่าเราควรเปลี่ยนอะไรถัดไปเพื่อให้โค้ดทำงาน อย่างไรก็ตาม ก่อน เราทำสิ่งนั้น เราจะสำรวจเทคนิคที่เราจะไม่ใช้เป็นจุดเริ่มต้น
Spawn เธรดสำหรับแต่ละ Request
ก่อนอื่น มาสำรวจว่าโค้ดของเราอาจดูยังไงถ้ามันสร้างเธรดใหม่สำหรับทุก connection ตามที่กล่าวก่อนหน้า นี่ไม่ใช่แผนสุดท้ายของเราเพราะปัญหา กับการ spawn จำนวนเธรดไม่จำกัด แต่มันเป็นจุดเริ่มต้นเพื่อได้ server แบบ multithreaded ทำงานก่อน แล้ว เราจะเพิ่ม thread pool เป็นการ ปรับปรุง และเปรียบเทียบสองวิธีแก้จะง่ายขึ้น
Listing 21-11 แสดงการเปลี่ยนแปลงที่จะทำกับ main เพื่อ spawn เธรดใหม่
ในการจัดการแต่ละ stream ภายใน loop for
use std::{
fs,
io::{BufReader, prelude::*},
net::{TcpListener, TcpStream},
thread,
time::Duration,
};
fn main() {
let listener = TcpListener::bind("127.0.0.1:7878").unwrap();
for stream in listener.incoming() {
let stream = stream.unwrap();
thread::spawn(|| {
handle_connection(stream);
});
}
}
fn handle_connection(mut stream: TcpStream) {
let buf_reader = BufReader::new(&stream);
let request_line = buf_reader.lines().next().unwrap().unwrap();
let (status_line, filename) = match &request_line[..] {
"GET / HTTP/1.1" => ("HTTP/1.1 200 OK", "hello.html"),
"GET /sleep HTTP/1.1" => {
thread::sleep(Duration::from_secs(5));
("HTTP/1.1 200 OK", "hello.html")
}
_ => ("HTTP/1.1 404 NOT FOUND", "404.html"),
};
let contents = fs::read_to_string(filename).unwrap();
let length = contents.len();
let response =
format!("{status_line}\r\nContent-Length: {length}\r\n\r\n{contents}");
stream.write_all(response.as_bytes()).unwrap();
}ตามที่คุณเรียนในบทที่ 16 thread::spawn จะสร้างเธรดใหม่และแล้วรันโค้ด
ใน closure ในเธรดใหม่ ถ้าคุณรันโค้ดนี้และโหลด /sleep ใน browser ของ
คุณ แล้ว / ในสอง browser tab อื่น คุณจะเห็นจริง ๆ ว่า request ไปยัง
/ ไม่ต้องรอให้ /sleep finish อย่างไรก็ตาม ตามที่เรากล่าว นี่จะ
ในที่สุด overwhelm ระบบเพราะคุณจะทำเธรดใหม่โดยไม่มี limit
คุณอาจจำจากบทที่ 17 ว่านี่คือกรณีที่ async และ await ส่องสว่างจริง ๆ! จำสิ่งนั้นในใจขณะเราสร้าง thread pool และคิดเกี่ยวกับวิธีที่สิ่งต่าง ๆ จะดูต่างหรือเหมือนกับ async
สร้างจำนวนเธรดที่จำกัด
เราต้องการให้ thread pool ของเราทำงานในวิธีคล้ายกัน คุ้นเคยเพื่อให้
การ switch จากเธรดไปยัง thread pool ไม่ต้องการการเปลี่ยนแปลงใหญ่ให้
โค้ดที่ใช้ API ของเรา Listing 21-12 แสดง interface สมมติสำหรับ struct
ThreadPool ที่เราต้องการใช้แทน thread::spawn
use std::{
fs,
io::{BufReader, prelude::*},
net::{TcpListener, TcpStream},
thread,
time::Duration,
};
fn main() {
let listener = TcpListener::bind("127.0.0.1:7878").unwrap();
let pool = ThreadPool::new(4);
for stream in listener.incoming() {
let stream = stream.unwrap();
pool.execute(|| {
handle_connection(stream);
});
}
}
fn handle_connection(mut stream: TcpStream) {
let buf_reader = BufReader::new(&stream);
let request_line = buf_reader.lines().next().unwrap().unwrap();
let (status_line, filename) = match &request_line[..] {
"GET / HTTP/1.1" => ("HTTP/1.1 200 OK", "hello.html"),
"GET /sleep HTTP/1.1" => {
thread::sleep(Duration::from_secs(5));
("HTTP/1.1 200 OK", "hello.html")
}
_ => ("HTTP/1.1 404 NOT FOUND", "404.html"),
};
let contents = fs::read_to_string(filename).unwrap();
let length = contents.len();
let response =
format!("{status_line}\r\nContent-Length: {length}\r\n\r\n{contents}");
stream.write_all(response.as_bytes()).unwrap();
}ThreadPool ในอุดมคติของเราเราใช้ ThreadPool::new เพื่อสร้าง thread pool ใหม่กับจำนวนเธรดที่
configurable ในกรณีนี้สี่ แล้ว ใน loop for, pool.execute มี
interface คล้ายกับ thread::spawn ในที่มันรับ closure ที่ pool ควร
รันสำหรับแต่ละ stream เราต้อง implement pool.execute ให้มันรับ
closure และให้มันกับเธรดใน pool เพื่อรัน โค้ดนี้จะยังไม่ compile แต่
เราจะลองเพื่อให้ compiler นำทางเราในวิธี fix มัน
Build ThreadPool ใช้ Compiler-Driven Development
ทำการเปลี่ยนแปลงใน Listing 21-12 ให้ src/main.rs และแล้วมาใช้
error compiler จาก cargo check เพื่อนำพัฒนาของเรา นี่คือ error แรก
ที่เราได้:
$ cargo check
Checking hello v0.1.0 (file:///projects/hello)
error[E0433]: failed to resolve: use of undeclared type `ThreadPool`
--> src/main.rs:11:16
|
11 | let pool = ThreadPool::new(4);
| ^^^^^^^^^^ use of undeclared type `ThreadPool`
For more information about this error, try `rustc --explain E0433`.
error: could not compile `hello` (bin "hello") due to 1 previous error
ยอดเยี่ยม! error นี้บอกเราเราต้องการ type หรือโมดูล ThreadPool
ดังนั้นเราจะ build อันหนึ่งตอนนี้ Implementation ThreadPool ของเรา
จะอิสระจากชนิดของงานที่ web server ของเรากำลังทำ ดังนั้น มา switch
crate hello จาก binary crate เป็น library crate เพื่อบรรจุ
implementation ThreadPool ของเรา หลังเราเปลี่ยนไปยัง library crate
เรายังใช้ library thread pool แยกสำหรับงานใดที่เราต้องการทำโดยใช้
thread pool ได้ ไม่เพียงสำหรับการ serve web request
สร้างไฟล์ src/lib.rs ที่บรรจุต่อไปนี้ ซึ่งคือนิยามง่ายที่สุดของ
struct ThreadPool ที่เรามีตอนนี้ได้:
pub struct ThreadPool;แล้ว แก้ไฟล์ main.rs เพื่อนำ ThreadPool เข้า scope จาก library
crate โดยเพิ่มโค้ดต่อไปนี้ที่ด้านบนของ src/main.rs:
use hello::ThreadPool;
use std::{
fs,
io::{BufReader, prelude::*},
net::{TcpListener, TcpStream},
thread,
time::Duration,
};
fn main() {
let listener = TcpListener::bind("127.0.0.1:7878").unwrap();
let pool = ThreadPool::new(4);
for stream in listener.incoming() {
let stream = stream.unwrap();
pool.execute(|| {
handle_connection(stream);
});
}
}
fn handle_connection(mut stream: TcpStream) {
let buf_reader = BufReader::new(&stream);
let request_line = buf_reader.lines().next().unwrap().unwrap();
let (status_line, filename) = match &request_line[..] {
"GET / HTTP/1.1" => ("HTTP/1.1 200 OK", "hello.html"),
"GET /sleep HTTP/1.1" => {
thread::sleep(Duration::from_secs(5));
("HTTP/1.1 200 OK", "hello.html")
}
_ => ("HTTP/1.1 404 NOT FOUND", "404.html"),
};
let contents = fs::read_to_string(filename).unwrap();
let length = contents.len();
let response =
format!("{status_line}\r\nContent-Length: {length}\r\n\r\n{contents}");
stream.write_all(response.as_bytes()).unwrap();
}โค้ดนี้ยังไม่ทำงาน แต่มา check มันอีกเพื่อได้ error ถัดไปที่เราต้อง address:
$ cargo check
Checking hello v0.1.0 (file:///projects/hello)
error[E0599]: no function or associated item named `new` found for struct `ThreadPool` in the current scope
--> src/main.rs:12:28
|
12 | let pool = ThreadPool::new(4);
| ^^^ function or associated item not found in `ThreadPool`
For more information about this error, try `rustc --explain E0599`.
error: could not compile `hello` (bin "hello") due to 1 previous error
error นี้บ่งบอกว่าถัดไปเราต้องสร้าง associated function ชื่อ new
สำหรับ ThreadPool เรารู้ด้วยว่า new ต้องมีหนึ่ง parameter ที่รับ
4 เป็น argument ได้และควร return instance ThreadPool มา implement
ฟังก์ชัน new ง่ายที่สุดที่จะมีลักษณะเหล่านั้น:
pub struct ThreadPool;
impl ThreadPool {
pub fn new(size: usize) -> ThreadPool {
ThreadPool
}
}เราเลือก usize เป็น type ของ parameter size เพราะเรารู้ว่าจำนวน
เธรดที่ติดลบไม่สมเหตุสมผล เรารู้ด้วยว่าเราจะใช้ 4 นี้เป็นจำนวนของ
element ใน collection ของเธรด ซึ่งคือสิ่งที่ type usize มีไว้ ตาม
ที่พูดถึงในส่วน “Type Integer” ในบท
ที่ 3
มา check โค้ดอีก:
$ cargo check
Checking hello v0.1.0 (file:///projects/hello)
error[E0599]: no method named `execute` found for struct `ThreadPool` in the current scope
--> src/main.rs:17:14
|
17 | pool.execute(|| {
| -----^^^^^^^ method not found in `ThreadPool`
For more information about this error, try `rustc --explain E0599`.
error: could not compile `hello` (bin "hello") due to 1 previous error
ตอนนี้ error เกิดเพราะเราไม่มีเมธอด execute บน ThreadPool จำจาก
ส่วน “สร้างจำนวนเธรดที่จำกัด”
ว่าเราตัดสินใจว่า thread pool ของเราควรมี interface คล้ายกับ
thread::spawn นอกจากนี้ เราจะ implement ฟังก์ชัน execute ให้มันรับ
closure ที่มันได้และให้มันกับเธรดที่ว่างใน pool เพื่อรัน
เราจะนิยามเมธอด execute บน ThreadPool เพื่อรับ closure เป็น
parameter จำจาก “ย้ายค่าที่ Capture ออกจาก
Closure” ในบทที่ 13 ว่าเรารับ
closure เป็น parameter กับสาม trait ต่างกันได้ — Fn, FnMut และ
FnOnce เราต้องตัดสินว่าชนิดของ closure ใดที่ใช้ที่นี่ เรารู้เราจะ
ลงเอยทำสิ่งคล้ายกับ implementation thread::spawn ของ standard
library ดังนั้นเราดูที่ bound ใดที่ signature ของ thread::spawn มีบน
parameter ของมัน Documentation แสดงเราต่อไปนี้:
pub fn spawn<F, T>(f: F) -> JoinHandle<T>
where
F: FnOnce() -> T,
F: Send + 'static,
T: Send + 'static,type parameter F คือสิ่งที่เรากังวลที่นี่ — type parameter T
เกี่ยวกับ return value และเราไม่กังวลกับนั้น เราเห็นว่า spawn ใช้
FnOnce เป็น trait bound บน F นี่น่าจะเป็นสิ่งที่เราต้องการด้วย
เพราะเราจะในที่สุดส่ง argument ที่เราได้ใน execute ให้ spawn เรา
มั่นใจเพิ่มได้ว่า FnOnce คือ trait ที่เราต้องการใช้เพราะเธรดสำหรับ
รัน request จะ execute closure ของ request นั้นเพียงครั้งเดียว ซึ่ง
match Once ใน FnOnce
type parameter F ก็มี trait bound Send และ lifetime bound
'static ซึ่งมีประโยชน์ในสถานการณ์ของเรา — เราต้องการ Send เพื่อ
transfer closure จากเธรดหนึ่งไปยังอีกอันและ 'static เพราะเราไม่รู้
ว่าเธรดจะใช้เวลานานเท่าไหร่ในการ execute มาสร้างเมธอด execute บน
ThreadPool ที่จะรับ generic parameter ของ type F กับ bound เหล่านี้:
pub struct ThreadPool;
impl ThreadPool {
// --snip--
pub fn new(size: usize) -> ThreadPool {
ThreadPool
}
pub fn execute<F>(&self, f: F)
where
F: FnOnce() + Send + 'static,
{
}
}เรายังใช้ () หลัง FnOnce เพราะ FnOnce นี้ represent closure ที่
รับไม่มี parameter และ return unit type () เหมือนนิยามฟังก์ชัน
return type ถูกละจาก signature ได้ แต่แม้เราไม่มี parameter เรายัง
ต้องการวงเล็บ
อีกครั้ง นี่คือ implementation ง่ายที่สุดของเมธอด execute — มันไม่
ทำอะไร แต่เรากำลังพยายามทำให้โค้ดของเรา compile เพียง มา check มันอีก:
$ cargo check
Checking hello v0.1.0 (file:///projects/hello)
Finished `dev` profile [unoptimized + debuginfo] target(s) in 0.24s
มัน compile! แต่สังเกตว่าถ้าคุณลอง cargo run และทำ request ใน
browser คุณจะเห็น error ใน browser ที่เราเห็นที่ตอนเริ่มของบท Library
ของเรายังไม่ได้เรียก closure ที่ส่งให้ execute จริง ๆ!
Note: คำพูดที่คุณอาจได้ยินเกี่ยวกับภาษากับ compiler เข้มงวด เช่น Haskell และ Rust คือ “ถ้าโค้ด compile มันทำงาน” แต่คำพูดนี้ไม่จริง universal Project ของเรา compile แต่มันทำอะไรไม่เลย! ถ้าเรากำลัง build project จริง สมบูรณ์ นี่จะเป็นเวลาดีที่จะเริ่มเขียน unit test เพื่อ check ว่าโค้ด compile และ มีพฤติกรรมที่เราต้องการ
พิจารณา — อะไรจะต่างที่นี่ถ้าเราจะ execute future แทน closure?
Validate จำนวนเธรดใน new
เราไม่ได้ทำอะไรกับ parameter ของ new และ execute มา implement
body ของฟังก์ชันเหล่านี้ด้วยพฤติกรรมที่เราต้องการ เพื่อเริ่ม มาคิด
เกี่ยวกับ new ก่อนหน้าเราเลือก type ที่ไม่มี sign สำหรับ parameter
size เพราะ pool กับจำนวนเธรดที่ติดลบไม่สมเหตุสมผล อย่างไรก็ตาม pool
กับศูนย์เธรดก็ไม่สมเหตุสมผล แต่ศูนย์เป็น usize valid อย่างสมบูรณ์
เราจะเพิ่มโค้ดเพื่อ check ว่า size มากกว่าศูนย์ก่อนเรา return
instance ThreadPool และเราจะให้โปรแกรม panic ถ้ามันรับศูนย์โดยใช้
macro assert! ดังที่แสดงใน Listing 21-13
pub struct ThreadPool;
impl ThreadPool {
/// Create a new ThreadPool.
///
/// The size is the number of threads in the pool.
///
/// # Panics
///
/// The `new` function will panic if the size is zero.
pub fn new(size: usize) -> ThreadPool {
assert!(size > 0);
ThreadPool
}
// --snip--
pub fn execute<F>(&self, f: F)
where
F: FnOnce() + Send + 'static,
{
}
}ThreadPool::new ให้ panic ถ้า size คือศูนย์เรายังเพิ่ม documentation บ้างสำหรับ ThreadPool ของเราด้วย doc
comment สังเกตว่าเราตาม practice documentation ดีโดยเพิ่มส่วนที่ระบุ
สถานการณ์ที่ฟังก์ชันของเรา panic ได้ ตามที่พูดถึงในบทที่ 14 ลองรัน
cargo doc --open และคลิก struct ThreadPool เพื่อดูว่า docs ที่
generate สำหรับ new ดูเหมือนอะไร!
แทนการเพิ่ม macro assert! ตามที่เราทำที่นี่ เราเปลี่ยน new เป็น
build และ return Result แบบที่เราทำกับ Config::build ใน project
I/O ใน Listing 12-9 ได้ แต่เราตัดสินในกรณีนี้ว่าพยายามสร้าง thread
pool โดยไม่มีเธรดควรเป็น error ที่ไม่กู้คืนได้ ถ้าคุณรู้สึก ambitious
ลองเขียนฟังก์ชันชื่อ build กับ signature ต่อไปนี้เพื่อเปรียบเทียบ
กับฟังก์ชัน new:
pub fn build(size: usize) -> Result<ThreadPool, PoolCreationError> {สร้างพื้นที่เพื่อเก็บเธรด
ตอนนี้เรามีวิธีรู้ว่าเรามีจำนวนเธรด valid ที่จะเก็บใน pool เราสามารถ
สร้างเธรดเหล่านั้นและเก็บพวกมันใน struct ThreadPool ก่อน return
struct แต่เรา “เก็บ” เธรดยังไง? มาดูที่ signature thread::spawn อีก:
pub fn spawn<F, T>(f: F) -> JoinHandle<T>
where
F: FnOnce() -> T,
F: Send + 'static,
T: Send + 'static,ฟังก์ชัน spawn return JoinHandle<T> ที่ T คือ type ที่ closure
return มาลองใช้ JoinHandle ด้วยและดูสิ่งที่เกิดขึ้น ในกรณีของเรา
closure ที่เราส่งให้ thread pool จะจัดการ connection และไม่ return
อะไร ดังนั้น T จะเป็น unit type ()
โค้ดใน Listing 21-14 จะ compile แต่มันยังไม่สร้างเธรดใด เราเปลี่ยน
นิยามของ ThreadPool เพื่อบรรจุ vector ของ instance
thread::JoinHandle<()> initialize vector กับ capacity ของ size
ตั้ง loop for ที่จะรันโค้ดบางอย่างเพื่อสร้างเธรด และ return
instance ThreadPool ที่บรรจุพวกมัน
use std::thread;
pub struct ThreadPool {
threads: Vec<thread::JoinHandle<()>>,
}
impl ThreadPool {
// --snip--
/// Create a new ThreadPool.
///
/// The size is the number of threads in the pool.
///
/// # Panics
///
/// The `new` function will panic if the size is zero.
pub fn new(size: usize) -> ThreadPool {
assert!(size > 0);
let mut threads = Vec::with_capacity(size);
for _ in 0..size {
// create some threads and store them in the vector
}
ThreadPool { threads }
}
// --snip--
pub fn execute<F>(&self, f: F)
where
F: FnOnce() + Send + 'static,
{
}
}ThreadPool เพื่อบรรจุเธรดเรานำ std::thread เข้า scope ใน library crate เพราะเรากำลังใช้
thread::JoinHandle เป็น type ของ item ใน vector ใน ThreadPool
เมื่อ size valid ถูกรับ ThreadPool ของเราสร้าง vector ใหม่ที่บรรจุ
size item ได้ ฟังก์ชัน with_capacity ทำงานเดียวกับ Vec::new แต่
ด้วยความแตกต่างสำคัญ — มัน pre-allocate พื้นที่ใน vector เพราะเรารู้
ว่าเราต้องเก็บ size element ใน vector การทำ allocation นี้ล่วงหน้า
มีประสิทธิภาพมากกว่าใช้ Vec::new เล็กน้อย ซึ่ง resize ตัวเองเมื่อ
element ถูกใส่
เมื่อคุณรัน cargo check อีก มันควรสำเร็จ
ส่งโค้ดจาก ThreadPool ไปเธรด
เราทิ้ง comment ใน loop for ใน Listing 21-14 เกี่ยวกับการสร้างเธรด
ที่นี่ เราจะดูว่าเราสร้างเธรดยังไงจริง ๆ Standard library ให้
thread::spawn เป็นวิธีสร้างเธรด และ thread::spawn คาดได้โค้ดบาง
อย่างที่เธรดควรรันทันทีที่เธรดถูกสร้าง อย่างไรก็ตาม ในกรณีของเรา เรา
ต้องการสร้างเธรดและให้พวกมัน รอ โค้ดที่เราจะส่งภายหลัง
Implementation ของเธรดของ standard library ไม่รวมวิธีทำสิ่งนั้นใด —
เราต้อง implement มันโดยมือ
เราจะ implement พฤติกรรมนี้โดยแนะนำโครงสร้างข้อมูลใหม่ระหว่าง
ThreadPool และเธรดที่จะจัดการพฤติกรรมใหม่นี้ เราจะเรียกโครงสร้าง
ข้อมูลนี้ Worker ซึ่งคือ term ปกติใน implementation pooling
Worker หยิบโค้ดที่ต้องรันและรันโค้ดในเธรดของมัน
คิดถึงคนทำงานในครัวที่ร้านอาหาร — worker รอจนกระทั่ง order มาจากลูกค้า และแล้วพวกเขารับผิดชอบรับ order เหล่านั้นและเติม
แทนการเก็บ vector ของ instance JoinHandle<()> ใน thread pool เรา
จะเก็บ instance ของ struct Worker แต่ละ Worker จะเก็บ instance
JoinHandle<()> เดียว แล้ว เราจะ implement เมธอดบน Worker ที่จะรับ
closure ของโค้ดเพื่อรันและส่งมันให้เธรดที่กำลังรันอยู่แล้วเพื่อ
execute เราจะให้แต่ละ Worker id ด้วยเพื่อให้เราแยกระหว่างแต่ละ
instance ต่างกันของ Worker ใน pool เมื่อ logging หรือ debugging
นี่คือกระบวนการใหม่ที่จะเกิดเมื่อเราสร้าง ThreadPool เราจะ implement
โค้ดที่ส่ง closure ให้เธรดหลังเรามี Worker ตั้งในวิธีนี้:
- นิยาม struct
Workerที่บรรจุidและJoinHandle<()> - เปลี่ยน
ThreadPoolให้บรรจุ vector ของ instanceWorker - นิยามฟังก์ชัน
Worker::newที่รับเลขidและ return instanceWorkerที่บรรจุidและเธรดที่ spawn กับ closure ว่าง - ใน
ThreadPool::newใช้ counter ของ loopforเพื่อ generateidสร้างWorkerใหม่กับidนั้น และเก็บWorkerใน vector
ถ้าคุณพร้อมสำหรับความท้าทาย ลอง implement การเปลี่ยนแปลงเหล่านี้ด้วย ตัวเองก่อนดูที่โค้ดใน Listing 21-15
พร้อม? นี่คือ Listing 21-15 กับวิธีหนึ่งในการทำการแก้ไขที่กล่าวก่อนหน้า
use std::thread;
pub struct ThreadPool {
workers: Vec<Worker>,
}
impl ThreadPool {
// --snip--
/// Create a new ThreadPool.
///
/// The size is the number of threads in the pool.
///
/// # Panics
///
/// The `new` function will panic if the size is zero.
pub fn new(size: usize) -> ThreadPool {
assert!(size > 0);
let mut workers = Vec::with_capacity(size);
for id in 0..size {
workers.push(Worker::new(id));
}
ThreadPool { workers }
}
// --snip--
pub fn execute<F>(&self, f: F)
where
F: FnOnce() + Send + 'static,
{
}
}
struct Worker {
id: usize,
thread: thread::JoinHandle<()>,
}
impl Worker {
fn new(id: usize) -> Worker {
let thread = thread::spawn(|| {});
Worker { id, thread }
}
}ThreadPool ให้บรรจุ instance Worker แทนการบรรจุเธรดโดยตรงเราเปลี่ยนชื่อของ field บน ThreadPool จาก threads เป็น workers
เพราะมันตอนนี้บรรจุ instance Worker แทน instance JoinHandle<()>
เราใช้ counter ใน loop for เป็น argument ให้ Worker::new และเรา
เก็บแต่ละ Worker ใหม่ใน vector ชื่อ workers
โค้ดภายนอก (เช่น server ของเราใน src/main.rs) ไม่ต้องรู้รายละเอียด
implementation เกี่ยวกับการใช้ struct Worker ภายใน ThreadPool
ดังนั้นเราทำ struct Worker และฟังก์ชัน new ของมัน private ฟังก์ชัน
Worker::new ใช้ id ที่เราให้มันและเก็บ instance JoinHandle<()>
ที่สร้างโดย spawn เธรดใหม่โดยใช้ closure ว่าง
Note: ถ้า operating system ไม่สามารถสร้างเธรดเพราะไม่มี resource
ระบบพอ thread::spawn จะ panic นั่นจะทำให้ server ของเราทั้งหมด
panic แม้การสร้างเธรดบางตัวอาจสำเร็จ เพื่อความเรียบง่าย พฤติกรรมนี้
okay แต่ใน implementation thread pool production คุณน่าจะต้องการ
ใช้ std::thread::Builder และเมธอด
spawn ของมันที่ return Result
แทน
โค้ดนี้จะ compile และจะเก็บจำนวนของ instance Worker ที่เราระบุเป็น
argument ให้ ThreadPool::new แต่เรา ยัง ไม่ process closure ที่
เราได้ใน execute มาดูวิธีทำนั้นถัดไป
ส่ง Request ไปเธรดผ่าน Channel
ปัญหาถัดไปที่เราจะแก้คือ closure ที่ให้กับ thread::spawn ไม่ทำอะไร
เลย ปัจจุบัน เราได้ closure ที่เราต้องการ execute ในเมธอด execute
แต่เราต้องให้ thread::spawn closure เพื่อรันเมื่อเราสร้างแต่ละ
Worker ระหว่างการสร้าง ThreadPool
เราต้องการให้ struct Worker ที่เราเพิ่งสร้างดึงโค้ดเพื่อรันจาก
queue ที่บรรจุใน ThreadPool และส่งโค้ดนั้นให้เธรดของมันเพื่อรัน
Channel ที่เราเรียนเกี่ยวกับในบทที่ 16 — วิธีง่ายในการสื่อสารระหว่าง
สองเธรด — จะเหมาะสำหรับ use case นี้ เราจะใช้ channel ในการทำหน้าที่
เป็น queue ของ job และ execute จะส่ง job จาก ThreadPool ไปยัง
instance Worker ซึ่งจะส่ง job ให้เธรดของมัน นี่คือแผน:
ThreadPoolจะสร้าง channel และถือ sender- แต่ละ
Workerจะถือ receiver - เราจะสร้าง struct
Jobใหม่ที่จะบรรจุ closure ที่เราต้องการส่งลง channel - เมธอด
executeจะส่ง job ที่มันต้องการ execute ผ่าน sender - ในเธรดของมัน
Workerจะ loop ผ่าน receiver ของมันและ execute closure ของ job ใดที่มันรับ
มาเริ่มโดยสร้าง channel ใน ThreadPool::new และถือ sender ใน
instance ThreadPool ดังที่แสดงใน Listing 21-16 struct Job ไม่
บรรจุอะไรตอนนี้แต่จะเป็น type ของ item ที่เรากำลังส่งลง channel
use std::{sync::mpsc, thread};
pub struct ThreadPool {
workers: Vec<Worker>,
sender: mpsc::Sender<Job>,
}
struct Job;
impl ThreadPool {
// --snip--
/// Create a new ThreadPool.
///
/// The size is the number of threads in the pool.
///
/// # Panics
///
/// The `new` function will panic if the size is zero.
pub fn new(size: usize) -> ThreadPool {
assert!(size > 0);
let (sender, receiver) = mpsc::channel();
let mut workers = Vec::with_capacity(size);
for id in 0..size {
workers.push(Worker::new(id));
}
ThreadPool { workers, sender }
}
// --snip--
pub fn execute<F>(&self, f: F)
where
F: FnOnce() + Send + 'static,
{
}
}
struct Worker {
id: usize,
thread: thread::JoinHandle<()>,
}
impl Worker {
fn new(id: usize) -> Worker {
let thread = thread::spawn(|| {});
Worker { id, thread }
}
}ThreadPool เพื่อเก็บ sender ของ channel ที่ transmit instance Jobใน ThreadPool::new เราสร้าง channel ใหม่ของเราและให้ pool ถือ
sender นี่จะ compile สำเร็จ
มาลองส่ง receiver ของ channel เข้าแต่ละ Worker เมื่อ thread pool
สร้าง channel เรารู้เราต้องการใช้ receiver ในเธรดที่ instance
Worker spawn ดังนั้นเราจะอ้างถึง parameter receiver ใน closure
โค้ดใน Listing 21-17 จะยังไม่ค่อย compile
use std::{sync::mpsc, thread};
pub struct ThreadPool {
workers: Vec<Worker>,
sender: mpsc::Sender<Job>,
}
struct Job;
impl ThreadPool {
// --snip--
/// Create a new ThreadPool.
///
/// The size is the number of threads in the pool.
///
/// # Panics
///
/// The `new` function will panic if the size is zero.
pub fn new(size: usize) -> ThreadPool {
assert!(size > 0);
let (sender, receiver) = mpsc::channel();
let mut workers = Vec::with_capacity(size);
for id in 0..size {
workers.push(Worker::new(id, receiver));
}
ThreadPool { workers, sender }
}
// --snip--
pub fn execute<F>(&self, f: F)
where
F: FnOnce() + Send + 'static,
{
}
}
// --snip--
struct Worker {
id: usize,
thread: thread::JoinHandle<()>,
}
impl Worker {
fn new(id: usize, receiver: mpsc::Receiver<Job>) -> Worker {
let thread = thread::spawn(|| {
receiver;
});
Worker { id, thread }
}
}Workerเราทำการเปลี่ยนแปลงเล็กและตรงไปตรงมาบ้าง — เราส่ง receiver เข้า
Worker::new และแล้วเราใช้มันภายใน closure
เมื่อเราพยายาม check โค้ดนี้ เราได้ error นี้:
$ cargo check
Checking hello v0.1.0 (file:///projects/hello)
error[E0382]: use of moved value: `receiver`
--> src/lib.rs:26:42
|
21 | let (sender, receiver) = mpsc::channel();
| -------- move occurs because `receiver` has type `std::sync::mpsc::Receiver<Job>`, which does not implement the `Copy` trait
...
25 | for id in 0..size {
| ----------------- inside of this loop
26 | workers.push(Worker::new(id, receiver));
| ^^^^^^^^ value moved here, in previous iteration of loop
|
note: consider changing this parameter type in method `new` to borrow instead if owning the value isn't necessary
--> src/lib.rs:47:33
|
47 | fn new(id: usize, receiver: mpsc::Receiver<Job>) -> Worker {
| --- in this method ^^^^^^^^^^^^^^^^^^^ this parameter takes ownership of the value
help: consider moving the expression out of the loop so it is only moved once
|
25 ~ let mut value = Worker::new(id, receiver);
26 ~ for id in 0..size {
27 ~ workers.push(value);
|
For more information about this error, try `rustc --explain E0382`.
error: could not compile `hello` (lib) due to 1 previous error
โค้ดกำลังพยายามส่ง receiver ให้หลาย instance Worker นี่จะไม่ทำงาน
ตามที่คุณจำจากบทที่ 16 — implementation channel ที่ Rust ให้คือ
multiple producer, single consumer นี่หมายความว่าเราไม่สามารถเพียง
clone end ที่ consume ของ channel เพื่อ fix โค้ดนี้ เรายังไม่ต้องการ
ส่งข้อความหลายครั้งให้หลาย consumer — เราต้องการหนึ่ง list ของข้อความ
กับหลาย instance Worker เพื่อให้แต่ละข้อความถูก process ครั้งเดียว
นอกจากนี้ การรับ job ออกจาก queue channel เกี่ยวข้องกับการ mutate
receiver ดังนั้นเธรดต้องการวิธี safe ในการแชร์และแก้ receiver —
มิฉะนั้น เราอาจได้ race condition (ตามที่ครอบคลุมในบทที่ 16)
จำ smart pointer thread-safe ที่พูดถึงในบทที่ 16 — เพื่อแชร์ ownership
ทั่วหลายเธรดและอนุญาตให้เธรด mutate ค่า เราต้องใช้ Arc<Mutex<T>>
type Arc จะให้หลาย instance Worker เป็นเจ้าของ receiver และ
Mutex จะรับประกันว่าเพียงหนึ่ง Worker ได้ job จาก receiver ในเวลา
เดียว Listing 21-18 แสดงการเปลี่ยนแปลงที่เราต้องทำ
use std::{
sync::{Arc, Mutex, mpsc},
thread,
};
// --snip--
pub struct ThreadPool {
workers: Vec<Worker>,
sender: mpsc::Sender<Job>,
}
struct Job;
impl ThreadPool {
// --snip--
/// Create a new ThreadPool.
///
/// The size is the number of threads in the pool.
///
/// # Panics
///
/// The `new` function will panic if the size is zero.
pub fn new(size: usize) -> ThreadPool {
assert!(size > 0);
let (sender, receiver) = mpsc::channel();
let receiver = Arc::new(Mutex::new(receiver));
let mut workers = Vec::with_capacity(size);
for id in 0..size {
workers.push(Worker::new(id, Arc::clone(&receiver)));
}
ThreadPool { workers, sender }
}
// --snip--
pub fn execute<F>(&self, f: F)
where
F: FnOnce() + Send + 'static,
{
}
}
// --snip--
struct Worker {
id: usize,
thread: thread::JoinHandle<()>,
}
impl Worker {
fn new(id: usize, receiver: Arc<Mutex<mpsc::Receiver<Job>>>) -> Worker {
// --snip--
let thread = thread::spawn(|| {
receiver;
});
Worker { id, thread }
}
}Worker โดยใช้ Arc และ Mutexใน ThreadPool::new เราใส่ receiver ใน Arc และ Mutex สำหรับแต่ละ
Worker ใหม่ เรา clone Arc เพื่อ bump reference count เพื่อให้
instance Worker แชร์ ownership ของ receiver ได้
ด้วยการเปลี่ยนแปลงเหล่านี้ โค้ด compile! เรากำลังไปถึง!
Implement เมธอด execute
มาในที่สุด implement เมธอด execute บน ThreadPool เราจะเปลี่ยน
Job จาก struct เป็น type alias สำหรับ trait object ที่บรรจุ type
ของ closure ที่ execute รับด้วย ตามที่พูดถึงในส่วน “Type Synonym
และ Type Alias” ในบทที่ 20 type alias
อนุญาตให้เราทำ type ยาวสั้นกว่าเพื่อความง่ายในการใช้ ดูที่ Listing
21-19
use std::{
sync::{Arc, Mutex, mpsc},
thread,
};
pub struct ThreadPool {
workers: Vec<Worker>,
sender: mpsc::Sender<Job>,
}
// --snip--
type Job = Box<dyn FnOnce() + Send + 'static>;
impl ThreadPool {
// --snip--
/// Create a new ThreadPool.
///
/// The size is the number of threads in the pool.
///
/// # Panics
///
/// The `new` function will panic if the size is zero.
pub fn new(size: usize) -> ThreadPool {
assert!(size > 0);
let (sender, receiver) = mpsc::channel();
let receiver = Arc::new(Mutex::new(receiver));
let mut workers = Vec::with_capacity(size);
for id in 0..size {
workers.push(Worker::new(id, Arc::clone(&receiver)));
}
ThreadPool { workers, sender }
}
pub fn execute<F>(&self, f: F)
where
F: FnOnce() + Send + 'static,
{
let job = Box::new(f);
self.sender.send(job).unwrap();
}
}
// --snip--
struct Worker {
id: usize,
thread: thread::JoinHandle<()>,
}
impl Worker {
fn new(id: usize, receiver: Arc<Mutex<mpsc::Receiver<Job>>>) -> Worker {
let thread = thread::spawn(|| {
receiver;
});
Worker { id, thread }
}
}Job สำหรับ Box ที่บรรจุแต่ละ closure และแล้วส่ง job ลง channelหลังจากสร้าง instance Job ใหม่โดยใช้ closure ที่เราได้ใน execute
เราส่ง job นั้นลง end การส่งของ channel เรากำลังเรียก unwrap บน
send สำหรับกรณีที่การส่ง fail นี่อาจเกิดถ้า ตัวอย่างเช่น เราหยุด
เธรดทั้งหมดของเราจากการ execute หมายความว่า end ที่รับหยุดรับข้อความ
ใหม่ ที่ขณะนี้ เราไม่สามารถหยุดเธรดของเราจากการ execute — เธรดของเรา
ดำเนิน execute ตราบใดที่ pool มีอยู่ เหตุผลที่เราใช้ unwrap คือเรา
รู้ว่ากรณี failure จะไม่เกิด แต่ compiler ไม่รู้
แต่เรายังไม่ค่อยเสร็จ! ใน Worker ของเรา closure ของเราที่ถูกส่งให้
thread::spawn ยังเพียง อ้างอิง end การรับของ channel แทน เรา
ต้องการให้ closure loop ตลอดไป ขอ end การรับของ channel สำหรับ job
และรัน job เมื่อมันได้อันหนึ่ง มาทำการเปลี่ยนแปลงที่แสดงใน Listing
21-20 ให้ Worker::new
use std::{
sync::{Arc, Mutex, mpsc},
thread,
};
pub struct ThreadPool {
workers: Vec<Worker>,
sender: mpsc::Sender<Job>,
}
type Job = Box<dyn FnOnce() + Send + 'static>;
impl ThreadPool {
/// Create a new ThreadPool.
///
/// The size is the number of threads in the pool.
///
/// # Panics
///
/// The `new` function will panic if the size is zero.
pub fn new(size: usize) -> ThreadPool {
assert!(size > 0);
let (sender, receiver) = mpsc::channel();
let receiver = Arc::new(Mutex::new(receiver));
let mut workers = Vec::with_capacity(size);
for id in 0..size {
workers.push(Worker::new(id, Arc::clone(&receiver)));
}
ThreadPool { workers, sender }
}
pub fn execute<F>(&self, f: F)
where
F: FnOnce() + Send + 'static,
{
let job = Box::new(f);
self.sender.send(job).unwrap();
}
}
struct Worker {
id: usize,
thread: thread::JoinHandle<()>,
}
// --snip--
impl Worker {
fn new(id: usize, receiver: Arc<Mutex<mpsc::Receiver<Job>>>) -> Worker {
let thread = thread::spawn(move || {
loop {
let job = receiver.lock().unwrap().recv().unwrap();
println!("Worker {id} got a job; executing.");
job();
}
});
Worker { id, thread }
}
}Workerที่นี่ เราเรียก lock บน receiver ก่อนเพื่อรับ mutex และแล้วเราเรียก
unwrap เพื่อ panic บน error ใด การรับ lock อาจ fail ถ้า mutex อยู่
ใน state poisoned ซึ่งเกิดได้ถ้าเธรดอื่นบางตัว panic ขณะถือ lock แทน
การปล่อย lock ในสถานการณ์นี้ การเรียก unwrap ให้เธรดนี้ panic คือ
action ถูกต้องที่จะทำ รู้สึกอิสระที่จะเปลี่ยน unwrap นี้เป็น
expect กับข้อความ error ที่มีความหมายให้คุณ
ถ้าเราได้ lock บน mutex เราเรียก recv เพื่อรับ Job จาก channel
unwrap สุดท้ายข้ามผ่าน error ใดที่นี่ด้วย ซึ่งอาจเกิดถ้าเธรดที่ถือ
sender shut down คล้ายกับวิธีที่เมธอด send return Err ถ้า
receiver shut down
การเรียก recv block ดังนั้นถ้าไม่มี job ยัง เธรดปัจจุบันจะรอจนกว่า
job available Mutex<T> รับประกันว่าเพียงหนึ่งเธรด Worker ในเวลาเดียว
กำลังพยายามขอ job
Thread pool ของเราตอนนี้อยู่ใน state ทำงาน! ให้มัน cargo run และทำ
request บ้าง:
$ cargo run
Compiling hello v0.1.0 (file:///projects/hello)
warning: field `workers` is never read
--> src/lib.rs:7:5
|
6 | pub struct ThreadPool {
| ---------- field in this struct
7 | workers: Vec<Worker>,
| ^^^^^^^
|
= note: `#[warn(dead_code)]` on by default
warning: fields `id` and `thread` are never read
--> src/lib.rs:48:5
|
47 | struct Worker {
| ------ fields in this struct
48 | id: usize,
| ^^
49 | thread: thread::JoinHandle<()>,
| ^^^^^^
warning: `hello` (lib) generated 2 warnings
Finished `dev` profile [unoptimized + debuginfo] target(s) in 4.91s
Running `target/debug/hello`
Worker 0 got a job; executing.
Worker 2 got a job; executing.
Worker 1 got a job; executing.
Worker 3 got a job; executing.
Worker 0 got a job; executing.
Worker 2 got a job; executing.
Worker 1 got a job; executing.
Worker 3 got a job; executing.
Worker 0 got a job; executing.
Worker 2 got a job; executing.
สำเร็จ! เราตอนนี้มี thread pool ที่ execute connection แบบ asynchronous ไม่เคยมีมากกว่าสี่เธรดถูกสร้าง ดังนั้นระบบของเราจะไม่ overload ถ้า server รับ request เยอะ ถ้าเราทำ request ไปยัง /sleep server จะสามารถ serve request อื่นโดยมีเธรดอื่นรันพวกมัน
Note: ถ้าคุณเปิด /sleep ในหลาย browser window พร้อมกัน พวกมันอาจ โหลดทีละอันในช่วงห้าวินาที web browser บางตัว execute หลาย instance ของ request เดียวกันตามลำดับสำหรับเหตุผล caching ข้อจำกัดนี้ไม่ได้ ถูกสาเหตุโดย web server ของเรา
นี่คือเวลาดีที่จะหยุดและพิจารณาว่าโค้ดใน Listing 21-18, 21-19 และ 21-20 จะต่างยังไงถ้าเรากำลังใช้ future แทน closure สำหรับงานที่จะทำ type ใดจะเปลี่ยน? signature เมธอดจะต่างยังไง ถ้ามี? ส่วนใดของโค้ดจะ ยังเหมือนเดิม?
หลังเรียนเกี่ยวกับ loop while let ในบทที่ 17 และบทที่ 19 คุณอาจ
สงสัยทำไมเราไม่เขียนโค้ดเธรด Worker ดังที่แสดงใน Listing 21-21
use std::{
sync::{Arc, Mutex, mpsc},
thread,
};
pub struct ThreadPool {
workers: Vec<Worker>,
sender: mpsc::Sender<Job>,
}
type Job = Box<dyn FnOnce() + Send + 'static>;
impl ThreadPool {
/// Create a new ThreadPool.
///
/// The size is the number of threads in the pool.
///
/// # Panics
///
/// The `new` function will panic if the size is zero.
pub fn new(size: usize) -> ThreadPool {
assert!(size > 0);
let (sender, receiver) = mpsc::channel();
let receiver = Arc::new(Mutex::new(receiver));
let mut workers = Vec::with_capacity(size);
for id in 0..size {
workers.push(Worker::new(id, Arc::clone(&receiver)));
}
ThreadPool { workers, sender }
}
pub fn execute<F>(&self, f: F)
where
F: FnOnce() + Send + 'static,
{
let job = Box::new(f);
self.sender.send(job).unwrap();
}
}
struct Worker {
id: usize,
thread: thread::JoinHandle<()>,
}
// --snip--
impl Worker {
fn new(id: usize, receiver: Arc<Mutex<mpsc::Receiver<Job>>>) -> Worker {
let thread = thread::spawn(move || {
while let Ok(job) = receiver.lock().unwrap().recv() {
println!("Worker {id} got a job; executing.");
job();
}
});
Worker { id, thread }
}
}Worker::new ใช้ while letโค้ดนี้ compile และรันแต่ไม่ผลให้พฤติกรรม threading ที่ต้องการ —
request ช้าจะยังทำให้ request อื่นรอเพื่อ process เหตุผลคือบ้าง subtle
— struct Mutex ไม่มีเมธอด public unlock เพราะ ownership ของ lock
ตามกับ lifetime ของ MutexGuard<T> ภายใน LockResult<MutexGuard<T>>
ที่เมธอด lock return ที่ compile time, borrow checker บังคับกฎที่
resource ที่ guard โดย Mutex ไม่สามารถเข้าถึงได้เว้นแต่เราถือ lock
ได้แล้ว อย่างไรก็ตาม implementation นี้ก็ผลให้ lock ถูกถือยาวกว่าที่
ตั้งใจได้ถ้าเราไม่ระวัง lifetime ของ MutexGuard<T>
โค้ดใน Listing 21-20 ที่ใช้ let job = receiver.lock().unwrap().recv().unwrap(); ทำงานเพราะกับ let ค่า
ชั่วคราวใดที่ใช้ใน expression ทางขวาของเครื่องหมายเท่ากับถูก drop ทันที
เมื่อ statement let จบ อย่างไรก็ตาม while let (และ if let และ
match) ไม่ drop ค่าชั่วคราวจนจบของ block ที่ associate ใน Listing
21-21 lock ยังถูกถือสำหรับระยะเวลาของการเรียก job() หมายความว่า
instance Worker อื่นไม่สามารถรับ job
Graceful shutdown และ cleanup
Graceful Shutdown และ Cleanup
โค้ดใน Listing 21-20 กำลังตอบกับ request แบบ asynchronous ผ่านการใช้
thread pool ตามที่เราตั้งใจ เราได้ warning บ้างเกี่ยวกับ field
workers, id และ thread ที่เราไม่ได้ใช้ในวิธีโดยตรงที่เตือนเรา
ว่าเราไม่ได้ cleanup อะไร เมื่อเราใช้เมธอด ctrl-C
ที่ไม่ elegant เพื่อหยุดเธรดหลัก เธรดอื่นทั้งหมดถูกหยุดทันทีด้วย แม้
พวกมันอยู่กลาง serve request
ถัดไป เราจะ implement trait Drop เพื่อเรียก join บนแต่ละเธรดใน
pool เพื่อให้พวกมัน finish request ที่พวกมันกำลังทำก่อนปิด แล้ว เราจะ
implement วิธีบอกเธรดให้พวกมันควรหยุดยอมรับ request ใหม่และ shut
down เพื่อเห็นโค้ดนี้ในการ action เราจะแก้ server ของเราให้ยอมรับเพียง
สอง request ก่อน graceful shut down thread pool ของมัน
สิ่งหนึ่งที่ต้องสังเกตขณะเราไป — ไม่มีของนี้กระทบส่วนของโค้ดที่จัดการ execute closure ดังนั้นทุกอย่างที่นี่จะเหมือนกันถ้าเรากำลังใช้ thread pool สำหรับ async runtime
Implement Trait Drop บน ThreadPool
มาเริ่มด้วยการ implement Drop บน thread pool ของเรา เมื่อ pool ถูก
drop เธรดของเราควร join ทั้งหมดเพื่อให้แน่ใจว่าพวกมัน finish งานของ
พวกมัน Listing 21-22 แสดงความพยายามแรกที่ implementation Drop —
โค้ดนี้ยังไม่ค่อยทำงาน
use std::{
sync::{Arc, Mutex, mpsc},
thread,
};
pub struct ThreadPool {
workers: Vec<Worker>,
sender: mpsc::Sender<Job>,
}
type Job = Box<dyn FnOnce() + Send + 'static>;
impl ThreadPool {
/// Create a new ThreadPool.
///
/// The size is the number of threads in the pool.
///
/// # Panics
///
/// The `new` function will panic if the size is zero.
pub fn new(size: usize) -> ThreadPool {
assert!(size > 0);
let (sender, receiver) = mpsc::channel();
let receiver = Arc::new(Mutex::new(receiver));
let mut workers = Vec::with_capacity(size);
for id in 0..size {
workers.push(Worker::new(id, Arc::clone(&receiver)));
}
ThreadPool { workers, sender }
}
pub fn execute<F>(&self, f: F)
where
F: FnOnce() + Send + 'static,
{
let job = Box::new(f);
self.sender.send(job).unwrap();
}
}
impl Drop for ThreadPool {
fn drop(&mut self) {
for worker in &mut self.workers {
println!("Shutting down worker {}", worker.id);
worker.thread.join().unwrap();
}
}
}
struct Worker {
id: usize,
thread: thread::JoinHandle<()>,
}
impl Worker {
fn new(id: usize, receiver: Arc<Mutex<mpsc::Receiver<Job>>>) -> Worker {
let thread = thread::spawn(move || {
loop {
let job = receiver.lock().unwrap().recv().unwrap();
println!("Worker {id} got a job; executing.");
job();
}
});
Worker { id, thread }
}
}ก่อนอื่น เรา loop ผ่านแต่ละ workers ของ thread pool เราใช้ &mut
สำหรับสิ่งนี้เพราะ self คือ mutable reference และเรายังต้องสามารถ
mutate worker สำหรับแต่ละ worker เรา print ข้อความบอกว่า instance
Worker เฉพาะนี้กำลัง shutting down และแล้วเราเรียก join บนเธรด
ของ instance Worker นั้น ถ้าการเรียก join fail เราใช้ unwrap
เพื่อทำให้ Rust panic และเข้าไปใน shutdown ที่ไม่ graceful
นี่คือ error ที่เราได้เมื่อเรา compile โค้ดนี้:
$ cargo check
Checking hello v0.1.0 (file:///projects/hello)
error[E0507]: cannot move out of `worker.thread` which is behind a mutable reference
--> src/lib.rs:52:13
|
52 | worker.thread.join().unwrap();
| ^^^^^^^^^^^^^ ------ `worker.thread` moved due to this method call
| |
| move occurs because `worker.thread` has type `JoinHandle<()>`, which does not implement the `Copy` trait
|
note: `JoinHandle::<T>::join` takes ownership of the receiver `self`, which moves `worker.thread`
--> /rustc/1159e78c4747b02ef996e55082b704c09b970588/library/std/src/thread/mod.rs:1921:17
For more information about this error, try `rustc --explain E0507`.
error: could not compile `hello` (lib) due to 1 previous error
error บอกเราว่าเราไม่สามารถเรียก join เพราะเราเพียงมี mutable
borrow ของแต่ละ worker และ join รับ ownership ของ argument ของมัน
เพื่อแก้ปัญหานี้ เราต้องย้ายเธรดออกจาก instance Worker ที่เป็นเจ้าของ
thread เพื่อให้ join consume เธรดได้ วิธีหนึ่งในการทำสิ่งนี้คือ
รับแนวทางเดียวกับที่เรารับใน Listing 18-15 ถ้า Worker ถือ
Option<thread::JoinHandle<()>> เราเรียกเมธอด take บน Option
เพื่อย้ายค่าออกจาก variant Some และทิ้ง variant None ในที่ของมัน
ได้ ในคำพูดอื่น Worker ที่กำลังรันจะมี variant Some ใน thread
และเมื่อเราต้องการ cleanup Worker เราจะแทน Some ด้วย None เพื่อ
ให้ Worker ไม่มีเธรดที่จะรัน
อย่างไรก็ตาม เวลา เดียว ที่นี่จะมาคือเมื่อ drop Worker แลกกับนั้น
เราจะต้องจัดการกับ Option<thread::JoinHandle<()>> ที่ใดที่เราเข้า
ถึง worker.thread Idiomatic Rust ใช้ Option ค่อนข้างเยอะ แต่เมื่อ
คุณพบตัวเองห่อบางอย่างที่คุณรู้จะมีอยู่เสมอใน Option เป็น workaround
แบบนี้ มันคือไอเดียดีที่จะมองหาแนวทางทางเลือกเพื่อทำให้โค้ดของคุณ
สะอาดกว่าและเสี่ยง error น้อยกว่า
ในกรณีนี้ ทางเลือกที่ดีกว่ามีอยู่ — เมธอด Vec::drain มันรับ parameter
range เพื่อระบุ item ใดที่จะลบจาก vector และ return iterator ของ item
เหล่านั้น ส่ง syntax range .. จะลบ ทุก ค่าจาก vector
ดังนั้น เราต้องอัพเดท implementation drop ของ ThreadPool แบบนี้:
#![allow(unused)]
fn main() {
use std::{
sync::{Arc, Mutex, mpsc},
thread,
};
pub struct ThreadPool {
workers: Vec<Worker>,
sender: mpsc::Sender<Job>,
}
type Job = Box<dyn FnOnce() + Send + 'static>;
impl ThreadPool {
/// Create a new ThreadPool.
///
/// The size is the number of threads in the pool.
///
/// # Panics
///
/// The `new` function will panic if the size is zero.
pub fn new(size: usize) -> ThreadPool {
assert!(size > 0);
let (sender, receiver) = mpsc::channel();
let receiver = Arc::new(Mutex::new(receiver));
let mut workers = Vec::with_capacity(size);
for id in 0..size {
workers.push(Worker::new(id, Arc::clone(&receiver)));
}
ThreadPool { workers, sender }
}
pub fn execute<F>(&self, f: F)
where
F: FnOnce() + Send + 'static,
{
let job = Box::new(f);
self.sender.send(job).unwrap();
}
}
impl Drop for ThreadPool {
fn drop(&mut self) {
for worker in self.workers.drain(..) {
println!("Shutting down worker {}", worker.id);
worker.thread.join().unwrap();
}
}
}
struct Worker {
id: usize,
thread: thread::JoinHandle<()>,
}
impl Worker {
fn new(id: usize, receiver: Arc<Mutex<mpsc::Receiver<Job>>>) -> Worker {
let thread = thread::spawn(move || {
loop {
let job = receiver.lock().unwrap().recv().unwrap();
println!("Worker {id} got a job; executing.");
job();
}
});
Worker { id, thread }
}
}
}นี่แก้ error compiler และไม่ต้องการการเปลี่ยนแปลงอื่นใดให้โค้ดของเรา สังเกตว่า เพราะ drop สามารถถูกเรียกเมื่อ panic, unwrap ก็ panic ได้ และสาเหตุ double panic ซึ่งทันที crash โปรแกรมและจบ cleanup ใดที่ กำลังดำเนิน นี่ okay สำหรับโปรแกรมตัวอย่าง แต่มันไม่แนะนำสำหรับโค้ด production
Signal ให้เธรดหยุดฟังสำหรับ Job
ด้วยการเปลี่ยนแปลงทั้งหมดที่เราทำ โค้ดของเรา compile โดยไม่มี warning
ใด อย่างไรก็ตาม ข่าวร้ายคือโค้ดนี้ยังไม่ทำงานในวิธีที่เราต้องการ key
คือ logic ใน closure ที่รันโดยเธรดของ instance Worker — ที่ขณะนี้
เราเรียก join แต่นั่นจะไม่ shut down เธรด เพราะพวกมัน loop ตลอด
ไปมองหา job ถ้าเราพยายาม drop ThreadPool ของเรากับ implementation
ปัจจุบันของเราของ drop เธรดหลักจะ block ตลอดไป รอเธรดแรก finish
เพื่อ fix ปัญหานี้ เราจะต้องการการเปลี่ยนแปลงใน implementation drop
ของ ThreadPool และแล้วการเปลี่ยนแปลงใน loop ของ Worker
ก่อนอื่น เราจะเปลี่ยน implementation drop ของ ThreadPool ให้
drop sender อย่างชัดเจนก่อนรอเธรด finish Listing 21-23 แสดงการ
เปลี่ยนแปลงให้ ThreadPool เพื่อ drop sender อย่างชัดเจน ต่างจาก
กรณีของเธรด ที่นี่เรา ต้อง ใช้ Option เพื่อให้สามารถย้าย sender
ออกจาก ThreadPool กับ Option::take
use std::{
sync::{Arc, Mutex, mpsc},
thread,
};
pub struct ThreadPool {
workers: Vec<Worker>,
sender: Option<mpsc::Sender<Job>>,
}
// --snip--
type Job = Box<dyn FnOnce() + Send + 'static>;
impl ThreadPool {
/// Create a new ThreadPool.
///
/// The size is the number of threads in the pool.
///
/// # Panics
///
/// The `new` function will panic if the size is zero.
pub fn new(size: usize) -> ThreadPool {
// --snip--
assert!(size > 0);
let (sender, receiver) = mpsc::channel();
let receiver = Arc::new(Mutex::new(receiver));
let mut workers = Vec::with_capacity(size);
for id in 0..size {
workers.push(Worker::new(id, Arc::clone(&receiver)));
}
ThreadPool {
workers,
sender: Some(sender),
}
}
pub fn execute<F>(&self, f: F)
where
F: FnOnce() + Send + 'static,
{
let job = Box::new(f);
self.sender.as_ref().unwrap().send(job).unwrap();
}
}
impl Drop for ThreadPool {
fn drop(&mut self) {
drop(self.sender.take());
for worker in self.workers.drain(..) {
println!("Shutting down worker {}", worker.id);
worker.thread.join().unwrap();
}
}
}
struct Worker {
id: usize,
thread: thread::JoinHandle<()>,
}
impl Worker {
fn new(id: usize, receiver: Arc<Mutex<mpsc::Receiver<Job>>>) -> Worker {
let thread = thread::spawn(move || {
loop {
let job = receiver.lock().unwrap().recv().unwrap();
println!("Worker {id} got a job; executing.");
job();
}
});
Worker { id, thread }
}
}sender อย่างชัดเจนก่อน join เธรด WorkerDrop sender ปิด channel ซึ่งบ่งบอกว่าจะไม่มีข้อความถูกส่งอีก เมื่อ
นั้นเกิด การเรียก recv ทั้งหมดที่ instance Worker ทำใน loop
infinite จะ return error ใน Listing 21-24 เราเปลี่ยน loop Worker
ให้ exit loop graceful ในกรณีนั้น ซึ่งหมายความว่าเธรดจะ finish เมื่อ
implementation drop ของ ThreadPool เรียก join บนพวกมัน
use std::{
sync::{Arc, Mutex, mpsc},
thread,
};
pub struct ThreadPool {
workers: Vec<Worker>,
sender: Option<mpsc::Sender<Job>>,
}
type Job = Box<dyn FnOnce() + Send + 'static>;
impl ThreadPool {
/// Create a new ThreadPool.
///
/// The size is the number of threads in the pool.
///
/// # Panics
///
/// The `new` function will panic if the size is zero.
pub fn new(size: usize) -> ThreadPool {
assert!(size > 0);
let (sender, receiver) = mpsc::channel();
let receiver = Arc::new(Mutex::new(receiver));
let mut workers = Vec::with_capacity(size);
for id in 0..size {
workers.push(Worker::new(id, Arc::clone(&receiver)));
}
ThreadPool {
workers,
sender: Some(sender),
}
}
pub fn execute<F>(&self, f: F)
where
F: FnOnce() + Send + 'static,
{
let job = Box::new(f);
self.sender.as_ref().unwrap().send(job).unwrap();
}
}
impl Drop for ThreadPool {
fn drop(&mut self) {
drop(self.sender.take());
for worker in self.workers.drain(..) {
println!("Shutting down worker {}", worker.id);
worker.thread.join().unwrap();
}
}
}
struct Worker {
id: usize,
thread: thread::JoinHandle<()>,
}
impl Worker {
fn new(id: usize, receiver: Arc<Mutex<mpsc::Receiver<Job>>>) -> Worker {
let thread = thread::spawn(move || {
loop {
let message = receiver.lock().unwrap().recv();
match message {
Ok(job) => {
println!("Worker {id} got a job; executing.");
job();
}
Err(_) => {
println!("Worker {id} disconnected; shutting down.");
break;
}
}
}
});
Worker { id, thread }
}
}recv return errorเพื่อเห็นโค้ดนี้ในการ action มาแก้ main เพื่อยอมรับเพียงสอง request
ก่อน graceful shut down server ดังที่แสดงใน Listing 21-25
use hello::ThreadPool;
use std::{
fs,
io::{BufReader, prelude::*},
net::{TcpListener, TcpStream},
thread,
time::Duration,
};
fn main() {
let listener = TcpListener::bind("127.0.0.1:7878").unwrap();
let pool = ThreadPool::new(4);
for stream in listener.incoming().take(2) {
let stream = stream.unwrap();
pool.execute(|| {
handle_connection(stream);
});
}
println!("Shutting down.");
}
fn handle_connection(mut stream: TcpStream) {
let buf_reader = BufReader::new(&stream);
let request_line = buf_reader.lines().next().unwrap().unwrap();
let (status_line, filename) = match &request_line[..] {
"GET / HTTP/1.1" => ("HTTP/1.1 200 OK", "hello.html"),
"GET /sleep HTTP/1.1" => {
thread::sleep(Duration::from_secs(5));
("HTTP/1.1 200 OK", "hello.html")
}
_ => ("HTTP/1.1 404 NOT FOUND", "404.html"),
};
let contents = fs::read_to_string(filename).unwrap();
let length = contents.len();
let response =
format!("{status_line}\r\nContent-Length: {length}\r\n\r\n{contents}");
stream.write_all(response.as_bytes()).unwrap();
}คุณจะไม่ต้องการให้ web server โลกจริง shut down หลัง serve เพียงสอง request โค้ดนี้เพียงสาธิตว่า graceful shutdown และ cleanup อยู่ใน state ทำงาน
เมธอด take ถูกนิยามใน trait Iterator และ limit iteration ให้สอง
item แรกที่สุด ThreadPool จะออกจาก scope ที่ตอนจบของ main และ
implementation drop จะรัน
เริ่ม server กับ cargo run และทำสาม request request ที่สามควร error
และใน terminal ของคุณ คุณควรเห็น output คล้ายกับนี้:
$ cargo run
Compiling hello v0.1.0 (file:///projects/hello)
Finished `dev` profile [unoptimized + debuginfo] target(s) in 0.41s
Running `target/debug/hello`
Worker 0 got a job; executing.
Shutting down.
Shutting down worker 0
Worker 3 got a job; executing.
Worker 1 disconnected; shutting down.
Worker 2 disconnected; shutting down.
Worker 3 disconnected; shutting down.
Worker 0 disconnected; shutting down.
Shutting down worker 1
Shutting down worker 2
Shutting down worker 3
คุณอาจเห็น ordering ต่างของ Worker ID และข้อความที่ print เราเห็นได้
ว่าโค้ดนี้ทำงานยังไงจากข้อความ — instance Worker 0 และ 3 ได้สอง
request แรก Server หยุดยอมรับ connection หลัง connection ที่สอง และ
implementation Drop บน ThreadPool เริ่ม execute ก่อนที่ Worker 3
จะเริ่ม job ของมันด้วยซ้ำ Drop sender disconnect instance Worker
ทั้งหมดและบอกพวกมันให้ shut down instance Worker แต่ละ print
ข้อความเมื่อพวกมัน disconnect และแล้ว thread pool เรียก join เพื่อ
รอแต่ละเธรด Worker finish
สังเกตหนึ่งแง่มุมที่น่าสนใจของการ execute เฉพาะนี้ — ThreadPool
drop sender และก่อน Worker ใดรับ error เราพยายาม join Worker 0
Worker 0 ยังไม่ได้ error จาก recv ดังนั้นเธรดหลัก block รอ
Worker 0 finish ในระหว่าง Worker 3 รับ job และแล้วเธรดทั้งหมดรับ
error เมื่อ Worker 0 finish เธรดหลักรอ instance Worker ที่เหลือ
finish ที่จุดนั้น พวกมัน exit loop ของพวกมันและหยุดทั้งหมด
ยินดีด้วย! เรา complete project ของเราแล้ว — เรามี web server พื้นฐานที่ ใช้ thread pool เพื่อตอบแบบ asynchronous เราสามารถทำ graceful shutdown ของ server ซึ่ง cleanup เธรดทั้งหมดใน pool
นี่คือโค้ดเต็มสำหรับ reference:
use hello::ThreadPool;
use std::{
fs,
io::{BufReader, prelude::*},
net::{TcpListener, TcpStream},
thread,
time::Duration,
};
fn main() {
let listener = TcpListener::bind("127.0.0.1:7878").unwrap();
let pool = ThreadPool::new(4);
for stream in listener.incoming().take(2) {
let stream = stream.unwrap();
pool.execute(|| {
handle_connection(stream);
});
}
println!("Shutting down.");
}
fn handle_connection(mut stream: TcpStream) {
let buf_reader = BufReader::new(&stream);
let request_line = buf_reader.lines().next().unwrap().unwrap();
let (status_line, filename) = match &request_line[..] {
"GET / HTTP/1.1" => ("HTTP/1.1 200 OK", "hello.html"),
"GET /sleep HTTP/1.1" => {
thread::sleep(Duration::from_secs(5));
("HTTP/1.1 200 OK", "hello.html")
}
_ => ("HTTP/1.1 404 NOT FOUND", "404.html"),
};
let contents = fs::read_to_string(filename).unwrap();
let length = contents.len();
let response =
format!("{status_line}\r\nContent-Length: {length}\r\n\r\n{contents}");
stream.write_all(response.as_bytes()).unwrap();
}use std::{
sync::{Arc, Mutex, mpsc},
thread,
};
pub struct ThreadPool {
workers: Vec<Worker>,
sender: Option<mpsc::Sender<Job>>,
}
type Job = Box<dyn FnOnce() + Send + 'static>;
impl ThreadPool {
/// Create a new ThreadPool.
///
/// The size is the number of threads in the pool.
///
/// # Panics
///
/// The `new` function will panic if the size is zero.
pub fn new(size: usize) -> ThreadPool {
assert!(size > 0);
let (sender, receiver) = mpsc::channel();
let receiver = Arc::new(Mutex::new(receiver));
let mut workers = Vec::with_capacity(size);
for id in 0..size {
workers.push(Worker::new(id, Arc::clone(&receiver)));
}
ThreadPool {
workers,
sender: Some(sender),
}
}
pub fn execute<F>(&self, f: F)
where
F: FnOnce() + Send + 'static,
{
let job = Box::new(f);
self.sender.as_ref().unwrap().send(job).unwrap();
}
}
impl Drop for ThreadPool {
fn drop(&mut self) {
drop(self.sender.take());
for worker in &mut self.workers {
println!("Shutting down worker {}", worker.id);
if let Some(thread) = worker.thread.take() {
thread.join().unwrap();
}
}
}
}
struct Worker {
id: usize,
thread: Option<thread::JoinHandle<()>>,
}
impl Worker {
fn new(id: usize, receiver: Arc<Mutex<mpsc::Receiver<Job>>>) -> Worker {
let thread = thread::spawn(move || {
loop {
let message = receiver.lock().unwrap().recv();
match message {
Ok(job) => {
println!("Worker {id} got a job; executing.");
job();
}
Err(_) => {
println!("Worker {id} disconnected; shutting down.");
break;
}
}
}
});
Worker {
id,
thread: Some(thread),
}
}
}เราทำเพิ่มที่นี่ได้! ถ้าคุณต้องการดำเนินปรับปรุง project นี้ นี่คือ ไอเดียบางอย่าง:
- เพิ่ม documentation เพิ่มให้
ThreadPoolและเมธอด public ของมัน - เพิ่ม test ของ functionality ของ library
- เปลี่ยนการเรียก
unwrapเป็นการจัดการ error ที่ robust กว่า - ใช้
ThreadPoolเพื่อทำงานอื่นนอกจากการ serve web request - หา crate thread pool บน crates.io และ implement web server คล้ายกันโดยใช้ crate แทน แล้ว เปรียบเทียบ API และ robustness ของมันกับ thread pool ที่เรา implement
สรุป
ทำได้ดี! คุณได้มาถึงจุดจบของหนังสือ! เราต้องการขอบคุณคุณสำหรับการเข้า ร่วมเราในการเดินทางของ Rust นี้ คุณตอนนี้พร้อมที่จะ implement project Rust ของตัวเองและช่วย project ของคนอื่น จำในใจว่ามี community ที่ ต้อนรับของ Rustacean อื่นที่ยินดีช่วยคุณกับความท้าทายใดที่คุณเจอใน การเดินทาง Rust ของคุณ
ภาคผนวก
ส่วนต่อไปนี้บรรจุเอกสาร reference ที่คุณอาจพบมีประโยชน์ในการเดินทาง Rust ของคุณ
A - Keyword
ภาคผนวก A — คีย์เวิร์ด
รายการต่อไปนี้บรรจุคีย์เวิร์ดที่ถูก reserve สำหรับการใช้ปัจจุบันหรือ อนาคตโดยภาษา Rust ดังนั้น พวกมันไม่สามารถถูกใช้เป็น identifier (ยกเว้น เป็น raw identifier ดังที่เราพูดถึงในส่วน “Raw Identifier”) Identifier คือชื่อ ของฟังก์ชัน, ตัวแปร, parameter, field struct, โมดูล, crate, constant, macro, ค่า static, attribute, type, trait หรือ lifetime
คีย์เวิร์ดที่ใช้ปัจจุบัน
ต่อไปนี้คือรายการของคีย์เวิร์ดที่ใช้ปัจจุบัน กับ functionality ของพวก มันอธิบาย
as— ทำ casting primitive, disambiguate trait เฉพาะที่บรรจุ item หรือเปลี่ยนชื่อ item ใน statementuseasync— ReturnFutureแทนการ block เธรดปัจจุบันawait— ระงับการ execute จนกระทั่งผลของFutureพร้อมbreak— Exit loop ทันทีconst— นิยาม item constant หรือ raw pointer constantcontinue— ดำเนินไป iteration loop ถัดไปcrate— ใน path โมดูล อ้างถึง root cratedyn— Dynamic dispatch ไปยัง trait objectelse— Fallback สำหรับ construct control flowifและif letenum— นิยาม enumerationextern— Link ฟังก์ชันหรือตัวแปรภายนอกfalse— Literal Boolean falsefn— นิยามฟังก์ชันหรือ type function pointerfor— Loop ผ่าน item จาก iterator, implement trait หรือระบุ lifetime แบบ higher rankedif— แตกแขนงตามผลของ expression conditionalimpl— Implement functionality inherent หรือ traitin— ส่วนของ syntax loopforlet— Bind ตัวแปรloop— Loop ไม่มีเงื่อนไขmatch— Match ค่ากับ patternmod— นิยามโมดูลmove— ทำให้ closure รับ ownership ของ capture ทั้งหมดของมันmut— แสดง mutability ใน reference, raw pointer หรือ binding patternpub— แสดง visibility public ใน field struct, blockimplหรือโมดูลref— Bind โดย referencereturn— Return จากฟังก์ชันSelf— type alias สำหรับ type ที่เรากำลังนิยามหรือ implementself— subject เมธอดหรือโมดูลปัจจุบันstatic— ตัวแปร global หรือ lifetime ที่ใช้ตลอดการ execute โปรแกรมทั้งหมดstruct— นิยามโครงสร้างsuper— โมดูล parent ของโมดูลปัจจุบันtrait— นิยาม traittrue— Literal Boolean truetype— นิยาม type alias หรือ associated typeunion— นิยาม union — เป็นคีย์เวิร์ด เพียงเมื่อใช้ในการประกาศ unionunsafe— แสดงโค้ด ฟังก์ชัน trait หรือ implementation ที่ unsafeuse— นำ symbol เข้า scopewhere— แสดง clause ที่ constrain typewhile— Loop conditional ตามผลของ expression
คีย์เวิร์ดที่ Reserve สำหรับการใช้อนาคต
คีย์เวิร์ดต่อไปนี้ยังไม่มี functionality แต่ถูก reserve โดย Rust สำหรับ การใช้อนาคตที่อาจมี:
abstractbecomeboxdofinalgenmacrooverrideprivtrytypeofunsizedvirtualyield
Raw Identifier
Raw identifier คือ syntax ที่ให้คุณใช้คีย์เวิร์ดที่พวกมันปกติไม่ถูก
อนุญาต คุณใช้ raw identifier โดยนำคีย์เวิร์ดด้วย r#
ตัวอย่างเช่น match คือคีย์เวิร์ด ถ้าคุณลอง compile ฟังก์ชันต่อไปนี้
ที่ใช้ match เป็นชื่อ:
Filename: src/main.rs
fn match(needle: &str, haystack: &str) -> bool {
haystack.contains(needle)
}คุณจะได้ error นี้:
error: expected identifier, found keyword `match`
--> src/main.rs:4:4
|
4 | fn match(needle: &str, haystack: &str) -> bool {
| ^^^^^ expected identifier, found keyword
error แสดงว่าคุณไม่สามารถใช้คีย์เวิร์ด match เป็น identifier
ฟังก์ชัน เพื่อใช้ match เป็นชื่อฟังก์ชัน คุณต้องใช้ syntax raw
identifier แบบนี้:
Filename: src/main.rs
fn r#match(needle: &str, haystack: &str) -> bool {
haystack.contains(needle)
}
fn main() {
assert!(r#match("foo", "foobar"));
}โค้ดนี้จะ compile โดยไม่มี error สังเกต prefix r# บนชื่อฟังก์ชันใน
นิยามของมันรวมทั้งที่ฟังก์ชันถูกเรียกใน main
Raw identifier อนุญาตให้คุณใช้คำใดที่คุณเลือกเป็น identifier แม้คำนั้น
บังเอิญเป็นคีย์เวิร์ดที่ reserve นี่ให้เราอิสระมากขึ้นในการเลือกชื่อ
identifier รวมทั้งให้เรา integrate กับโปรแกรมที่เขียนในภาษาที่คำเหล่า
นี้ไม่ใช่คีย์เวิร์ด นอกจากนี้ raw identifier อนุญาตให้คุณใช้ library
ที่เขียนใน Rust edition ต่างจากที่ crate ของคุณใช้ ตัวอย่างเช่น try
ไม่ใช่คีย์เวิร์ดใน edition 2015 แต่อยู่ใน edition 2018, 2021 และ 2024
ถ้าคุณ depend บน library ที่เขียนโดยใช้ edition 2015 และมีฟังก์ชัน
try คุณจะต้องใช้ syntax raw identifier, r#try ในกรณีนี้ เพื่อ
เรียกฟังก์ชันนั้นจากโค้ดของคุณบน edition ภายหลัง ดู ภาคผนวก
E สำหรับข้อมูลเพิ่มเติมเกี่ยวกับ edition
B - Operator และสัญลักษณ์
ภาคผนวก B — Operator และ Symbol
ภาคผนวกนี้บรรจุ glossary ของ syntax ของ Rust รวม operator และ symbol อื่นที่ปรากฏด้วยตัวเองหรือใน context ของ path, generic, trait bound, macro, attribute, comment, tuple และ bracket
Operator
ตาราง B-1 บรรจุ operator ใน Rust, ตัวอย่างของวิธีที่ operator จะปรากฏ ใน context, คำอธิบายสั้น และว่า operator นั้น overloadable หรือไม่ ถ้า operator overloadable, trait ที่เกี่ยวข้องที่ใช้เพื่อ overload operator นั้นถูก list
ตาราง B-1: Operator
| Operator | ตัวอย่าง | คำอธิบาย | Overloadable? |
|---|---|---|---|
! | ident!(...), ident!{...}, ident![...] | การ expand Macro | |
! | !expr | Complement bitwise หรือ logical | Not |
!= | expr != expr | เปรียบเทียบไม่เท่า | PartialEq |
% | expr % expr | เศษ arithmetic | Rem |
%= | var %= expr | เศษ arithmetic และ assignment | RemAssign |
& | &expr, &mut expr | Borrow | |
& | &type, &mut type, &'a type, &'a mut type | type pointer ที่ borrow | |
& | expr & expr | Bitwise AND | BitAnd |
&= | var &= expr | Bitwise AND และ assignment | BitAndAssign |
&& | expr && expr | Logical AND แบบ short-circuit | |
* | expr * expr | คูณ arithmetic | Mul |
*= | var *= expr | คูณ arithmetic และ assignment | MulAssign |
* | *expr | Dereference | Deref |
* | *const type, *mut type | Raw pointer | |
+ | trait + trait, 'a + trait | Constraint type แบบรวม | |
+ | expr + expr | บวก arithmetic | Add |
+= | var += expr | บวก arithmetic และ assignment | AddAssign |
, | expr, expr | ตัวคั่น argument และ element | |
- | - expr | Negation arithmetic | Neg |
- | expr - expr | ลบ arithmetic | Sub |
-= | var -= expr | ลบ arithmetic และ assignment | SubAssign |
-> | fn(...) -> type, |…| -> type | return type ฟังก์ชันและ closure | |
. | expr.ident | เข้าถึง field | |
. | expr.ident(expr, ...) | เรียกเมธอด | |
. | expr.0, expr.1, และอื่นๆ | Indexing Tuple | |
.. | .., expr.., ..expr, expr..expr | Literal range แบบ right-exclusive | PartialOrd |
..= | ..=expr, expr..=expr | Literal range แบบ right-inclusive | PartialOrd |
.. | ..expr | Syntax update struct literal | |
.. | variant(x, ..), struct_type { x, .. } | Binding pattern “และที่เหลือ” | |
... | expr...expr | (Deprecated, ใช้ ..= แทน) ใน pattern — pattern range inclusive | |
/ | expr / expr | หาร arithmetic | Div |
/= | var /= expr | หาร arithmetic และ assignment | DivAssign |
: | pat: type, ident: type | Constraint | |
: | ident: expr | Initializer field struct | |
: | 'a: loop {...} | Label loop | |
; | expr; | terminator statement และ item | |
; | [...; len] | ส่วนของ syntax array ขนาดคงที่ | |
<< | expr << expr | Left-shift | Shl |
<<= | var <<= expr | Left-shift และ assignment | ShlAssign |
< | expr < expr | เปรียบเทียบน้อยกว่า | PartialOrd |
<= | expr <= expr | เปรียบเทียบน้อยกว่าหรือเท่า | PartialOrd |
= | var = expr, ident = type | Assignment/เทียบเท่า | |
== | expr == expr | เปรียบเทียบเท่า | PartialEq |
=> | pat => expr | ส่วนของ syntax match arm | |
> | expr > expr | เปรียบเทียบมากกว่า | PartialOrd |
>= | expr >= expr | เปรียบเทียบมากกว่าหรือเท่า | PartialOrd |
>> | expr >> expr | Right-shift | Shr |
>>= | var >>= expr | Right-shift และ assignment | ShrAssign |
@ | ident @ pat | Binding pattern | |
^ | expr ^ expr | Bitwise exclusive OR | BitXor |
^= | var ^= expr | Bitwise exclusive OR และ assignment | BitXorAssign |
| | pat | pat | ทางเลือก pattern | |
| | expr | expr | Bitwise OR | BitOr |
|= | var |= expr | Bitwise OR และ assignment | BitOrAssign |
|| | expr || expr | Logical OR แบบ short-circuit | |
? | expr? | การ propagate error |
Symbol ที่ไม่ใช่ Operator
ตารางต่อไปนี้บรรจุ symbol ทั้งหมดที่ไม่ทำหน้าที่เป็น operator — นั่น คือ พวกมันไม่ทำตัวเหมือนการเรียกฟังก์ชันหรือเมธอด
ตาราง B-2 แสดง symbol ที่ปรากฏด้วยตัวเองและ valid ในที่หลากหลาย
ตาราง B-2: Syntax แบบเดี่ยว
| Symbol | คำอธิบาย |
|---|---|
'ident | Lifetime named หรือ label loop |
Digit ที่ตามทันทีด้วย u8, i32, f64, usize และอื่น ๆ | Literal ตัวเลขของ type เฉพาะ |
"..." | Literal string |
r"...", r#"..."#, r##"..."## และอื่น ๆ | Literal string raw — character escape ไม่ process |
b"..." | Literal string byte — สร้าง array ของ byte แทน string |
br"...", br#"..."#, br##"..."## และอื่น ๆ | Literal string byte raw — รวมของ literal string raw และ byte |
'...' | Literal character |
b'...' | Literal byte ASCII |
|…| expr | Closure |
! | type bottom ว่างเสมอสำหรับฟังก์ชัน diverging |
_ | Binding pattern “ignore” — ใช้เพื่อทำให้ literal integer อ่านง่ายด้วย |
ตาราง B-3 แสดง symbol ที่ปรากฏใน context ของ path ผ่าน hierarchy โมดูล ไปยัง item
ตาราง B-3: Syntax ที่เกี่ยวข้องกับ Path
| Symbol | คำอธิบาย |
|---|---|
ident::ident | Path namespace |
::path | Path สัมพัทธ์กับ root crate (นั่นคือ path absolute อย่างชัดเจน) |
self::path | Path สัมพัทธ์กับโมดูลปัจจุบัน (นั่นคือ path สัมพัทธ์อย่างชัดเจน) |
super::path | Path สัมพัทธ์กับ parent ของโมดูลปัจจุบัน |
type::ident, <type as trait>::ident | Associated constant, function และ type |
<type>::... | Associated item สำหรับ type ที่ไม่สามารถ name โดยตรง (ตัวอย่างเช่น <&T>::..., <[T]>::... และอื่น ๆ) |
trait::method(...) | Disambiguate การเรียกเมธอดโดย name trait ที่นิยามมัน |
type::method(...) | Disambiguate การเรียกเมธอดโดย name type ที่มันถูกนิยาม |
<type as trait>::method(...) | Disambiguate การเรียกเมธอดโดย name trait และ type |
ตาราง B-4 แสดง symbol ที่ปรากฏใน context ของการใช้ generic type parameter
ตาราง B-4: Generic
| Symbol | คำอธิบาย |
|---|---|
path<...> | ระบุ parameter ให้ generic type ใน type (ตัวอย่างเช่น Vec<u8>) |
path::<...>, method::<...> | ระบุ parameter ให้ generic type, ฟังก์ชัน หรือเมธอดใน expression — มักอ้างถึงเป็น turbofish (ตัวอย่างเช่น "42".parse::<i32>()) |
fn ident<...> ... | นิยาม generic function |
struct ident<...> ... | นิยาม generic structure |
enum ident<...> ... | นิยาม generic enumeration |
impl<...> ... | นิยาม generic implementation |
for<...> type | bound lifetime แบบ higher ranked |
type<ident=type> | generic type ที่หนึ่งหรือมากกว่า associated type มี assignment เฉพาะ (ตัวอย่างเช่น Iterator<Item=T>) |
ตาราง B-5 แสดง symbol ที่ปรากฏใน context ของการ constrain generic type parameter ด้วย trait bound
ตาราง B-5: Constraint Trait Bound
| Symbol | คำอธิบาย |
|---|---|
T: U | generic parameter T constrain ให้ type ที่ implement U |
T: 'a | generic type T ต้องอยู่ยาวกว่า lifetime 'a (หมายถึง type ไม่สามารถ transitively บรรจุ reference ใดกับ lifetime ที่สั้นกว่า 'a) |
T: 'static | generic type T ไม่บรรจุ reference ที่ borrow อื่นใดนอกจาก 'static |
'b: 'a | generic lifetime 'b ต้องอยู่ยาวกว่า lifetime 'a |
T: ?Sized | อนุญาตให้ generic type parameter เป็น dynamically sized type |
'a + trait, trait + trait | Constraint type แบบรวม |
ตาราง B-6 แสดง symbol ที่ปรากฏใน context ของการเรียกหรือนิยาม macro และระบุ attribute บน item
ตาราง B-6: Macro และ Attribute
| Symbol | คำอธิบาย |
|---|---|
#[meta] | Attribute ภายนอก |
#![meta] | Attribute ภายใน |
$ident | การแทนใน Macro |
$ident:kind | Metavariable Macro |
$(...)... | การซ้ำ Macro |
ident!(...), ident!{...}, ident![...] | การเรียก Macro |
ตาราง B-7 แสดง symbol ที่สร้าง comment
ตาราง B-7: Comment
| Symbol | คำอธิบาย |
|---|---|
// | Comment บรรทัด |
//! | Inner line doc comment |
/// | Outer line doc comment |
/*...*/ | Comment block |
/*!...*/ | Inner block doc comment |
/**...*/ | Outer block doc comment |
ตาราง B-8 แสดง context ที่วงเล็บถูกใช้
ตาราง B-8: วงเล็บ
| Symbol | คำอธิบาย |
|---|---|
() | Tuple ว่าง (หรือเรียก unit) ทั้ง literal และ type |
(expr) | Expression ในวงเล็บ |
(expr,) | Expression tuple element เดียว |
(type,) | Type tuple element เดียว |
(expr, ...) | Expression tuple |
(type, ...) | Type tuple |
expr(expr, ...) | Expression เรียกฟังก์ชัน — ใช้เพื่อ initialize tuple struct และ variant tuple enum ด้วย |
ตาราง B-9 แสดง context ที่ curly bracket ถูกใช้
ตาราง B-9: Curly Bracket
| Context | คำอธิบาย |
|---|---|
{...} | Expression block |
Type {...} | Literal struct |
ตาราง B-10 แสดง context ที่ square bracket ถูกใช้
ตาราง B-10: Square Bracket
| Context | คำอธิบาย |
|---|---|
[...] | Literal array |
[expr; len] | Literal array ที่บรรจุ len copy ของ expr |
[type; len] | Type array ที่บรรจุ len instance ของ type |
expr[expr] | Indexing collection — overloadable (Index, IndexMut) |
expr[..], expr[a..], expr[..b], expr[a..b] | Indexing collection แสร้งเป็น slice collection โดยใช้ Range, RangeFrom, RangeTo หรือ RangeFull เป็น “index” |
C - Derivable Trait
ภาคผนวก C — Trait ที่ Derive ได้
ในที่ต่าง ๆ ในหนังสือ เราพูดถึง attribute derive ซึ่งคุณ apply ให้
นิยาม struct หรือ enum ได้ Attribute derive generate โค้ดที่จะ
implement trait กับ default implementation ของมันเองบน type ที่คุณ
annotate ด้วย syntax derive
ในภาคผนวกนี้ เราให้ reference ของ trait ทั้งหมดใน standard library
ที่คุณใช้กับ derive ได้ แต่ละส่วนครอบคลุม:
- Operator และเมธอดใดที่การ derive trait นี้จะเปิดใช้
- Implementation ของ trait ที่
deriveให้ทำอะไร - Implement trait หมายถึงอะไรเกี่ยวกับ type
- เงื่อนไขที่คุณได้รับอนุญาตหรือไม่ได้รับอนุญาตให้ implement trait
- ตัวอย่างของ operation ที่ต้องการ trait
ถ้าคุณต้องการพฤติกรรมต่างจากที่ attribute derive ให้ ปรึกษา standard
library documentation สำหรับแต่ละ
trait สำหรับรายละเอียดเกี่ยวกับวิธี implement พวกมันโดยมือ
Trait ที่ list ที่นี่เป็นอันเดียวที่นิยามโดย standard library ที่ถูก
implement บน type ของคุณโดยใช้ derive ได้ Trait อื่นที่นิยามใน
standard library ไม่มีพฤติกรรม default ที่สมเหตุสมผล ดังนั้นมันขึ้นกับ
คุณที่จะ implement พวกมันในวิธีที่สมเหตุสมผลสำหรับสิ่งที่คุณพยายาม
บรรลุ
ตัวอย่างของ trait ที่ derive ไม่ได้คือ Display ซึ่งจัดการการ format
สำหรับ user สุดท้าย คุณควรพิจารณาวิธีเหมาะสมในการแสดง type ให้ user
สุดท้ายเสมอ ส่วนใดของ type ที่ user สุดท้ายควรได้รับอนุญาตให้เห็น?
ส่วนใดที่พวกเขาจะพบเกี่ยวข้อง? Format ของข้อมูลใดจะเกี่ยวข้องที่สุด
กับพวกเขา? Compiler Rust ไม่มี insight นี้ ดังนั้นมันไม่สามารถให้
พฤติกรรม default เหมาะสมให้คุณ
list ของ trait ที่ derive ได้ที่ให้ในภาคผนวกนี้ไม่ครอบคลุม — library
implement derive สำหรับ trait ของพวกเขาเองได้ ทำให้ list ของ trait
ที่คุณใช้ derive ได้ open ended จริง ๆ Implement derive เกี่ยวข้อง
กับการใช้ procedural macro ซึ่งครอบคลุมในส่วน “Custom derive
Macro” ในบทที่ 20
Debug สำหรับ Output Programmer
Trait Debug เปิดใช้ debug formatting ใน format string ซึ่งคุณบ่ง
บอกโดยเพิ่ม :? ภายใน placeholder {}
Trait Debug อนุญาตให้คุณ print instance ของ type สำหรับจุดประสงค์
debug ดังนั้นคุณและ programmer อื่นที่ใช้ type ของคุณ inspect instance
ที่จุดเฉพาะในการ execute โปรแกรมได้
Trait Debug ถูกต้องการ ตัวอย่างเช่น ในการใช้ macro assert_eq!
Macro นี้ print ค่าของ instance ที่ให้เป็น argument ถ้า assertion
equality fail เพื่อให้ programmer เห็นว่าทำไมสอง instance ไม่เท่ากัน
PartialEq และ Eq สำหรับเปรียบเทียบ Equality
Trait PartialEq อนุญาตให้คุณเปรียบเทียบ instance ของ type เพื่อ
check equality และเปิดใช้การใช้ operator == และ !=
การ derive PartialEq implement เมธอด eq เมื่อ PartialEq ถูก
derive บน struct สอง instance เท่าเพียงถ้า ทุก field เท่า และ
instance ไม่เท่าถ้า ใด field ไม่เท่า เมื่อ derive บน enum, แต่ละ
variant เท่าตัวเองและไม่เท่ากับ variant อื่น
Trait PartialEq ถูกต้องการ ตัวอย่างเช่น กับการใช้ macro assert_eq!
ซึ่งต้องสามารถเปรียบเทียบสอง instance ของ type สำหรับ equality
Trait Eq ไม่มีเมธอด จุดประสงค์ของมันคือ signal ว่าสำหรับทุกค่าของ
type ที่ annotate ค่าเท่ากับตัวเอง Trait Eq apply ได้เพียงให้ type
ที่ implement PartialEq ด้วย แม้ไม่ทุก type ที่ implement
PartialEq implement Eq ได้ ตัวอย่างของนี้คือ type ตัวเลข
floating-point — implementation ของตัวเลข floating-point บอกว่าสอง
instance ของค่า not-a-number (NaN) ไม่เท่ากัน
ตัวอย่างของเมื่อ Eq ถูกต้องการคือสำหรับ key ใน HashMap<K, V> เพื่อ
ให้ HashMap<K, V> บอกได้ว่าสอง key เหมือนกัน
PartialOrd และ Ord สำหรับเปรียบเทียบ Ordering
Trait PartialOrd อนุญาตให้คุณเปรียบเทียบ instance ของ type สำหรับ
จุดประสงค์ sort type ที่ implement PartialOrd ใช้กับ operator <,
>, <= และ >= ได้ คุณ apply trait PartialOrd ได้เพียงให้ type
ที่ implement PartialEq ด้วย
การ derive PartialOrd implement เมธอด partial_cmp ซึ่ง return
Option<Ordering> ที่จะเป็น None เมื่อค่าที่ให้ไม่ผลิต ordering
ตัวอย่างของค่าที่ไม่ผลิต ordering แม้ค่าส่วนใหญ่ของ type นั้นถูก
เปรียบเทียบได้ คือค่า floating point NaN เรียก partial_cmp กับ
ตัวเลข floating-point ใดและค่า floating-point NaN จะ return None
เมื่อ derive บน struct, PartialOrd เปรียบเทียบสอง instance โดย
เปรียบเทียบค่าในแต่ละ field ในลำดับที่ field ปรากฏในนิยาม struct เมื่อ
derive บน enum, variant ของ enum ที่ประกาศก่อนหน้าในนิยาม enum ถูก
พิจารณาน้อยกว่า variant ที่ list ภายหลัง
Trait PartialOrd ถูกต้องการ ตัวอย่างเช่น สำหรับเมธอด gen_range
จาก crate rand ที่ generate ค่า random ใน range ที่ระบุโดย
expression range
Trait Ord อนุญาตให้คุณรู้ว่าสำหรับสองค่าใดของ type ที่ annotate
ordering valid จะมี Trait Ord implement เมธอด cmp ซึ่ง return
Ordering แทน Option<Ordering> เพราะ ordering valid จะเป็นไปได้
เสมอ คุณ apply trait Ord ได้เพียงให้ type ที่ implement
PartialOrd และ Eq ด้วย (และ Eq ต้องการ PartialEq) เมื่อ derive
บน struct และ enum, cmp ทำตัวในวิธีเดียวกับ implementation ที่
derive สำหรับ partial_cmp ทำกับ PartialOrd
ตัวอย่างของเมื่อ Ord ถูกต้องการคือเมื่อเก็บค่าใน BTreeSet<T> ซึ่ง
คือโครงสร้างข้อมูลที่เก็บข้อมูลตามลำดับ sort ของค่า
Clone และ Copy สำหรับ Duplicate ค่า
Trait Clone อนุญาตให้คุณสร้าง deep copy ของค่าอย่างชัดเจน และ
กระบวนการ duplicate อาจเกี่ยวข้องกับการรันโค้ดใด ๆ และ copy ข้อมูล
heap ดูส่วน “ตัวแปรและข้อมูล Interact กับ
Clone” ใน
บทที่ 4 สำหรับข้อมูลเพิ่มเติมเกี่ยวกับ Clone
การ derive Clone implement เมธอด clone ซึ่งเมื่อ implement สำหรับ
type ทั้งหมด เรียก clone บนแต่ละส่วนของ type นี่หมายความว่า field
หรือค่าทั้งหมดใน type ต้อง implement Clone ด้วยเพื่อ derive
Clone
ตัวอย่างของเมื่อ Clone ถูกต้องการคือเมื่อเรียกเมธอด to_vec บน
slice slice ไม่เป็นเจ้าของ instance type ที่มันบรรจุ แต่ vector ที่
return จาก to_vec จะต้องเป็นเจ้าของ instance ของมัน ดังนั้น to_vec
เรียก clone บนแต่ละ item ดังนั้น type ที่เก็บใน slice ต้อง
implement Clone
Trait Copy อนุญาตให้คุณ duplicate ค่าโดยเพียง copy bit ที่เก็บบน
stack — ไม่มีโค้ดใด ๆ จำเป็น ดูส่วน “ข้อมูล Stack-Only —
Copy” ในบทที่ 4 สำหรับข้อมูล
เพิ่มเติมเกี่ยวกับ Copy
Trait Copy ไม่นิยามเมธอดใดเพื่อป้องกัน programmer จากการ overload
เมธอดเหล่านั้นและละเมิดสมมติฐานว่าไม่มีโค้ดใด ๆ ถูกรัน ด้วยวิธีนั้น
programmer ทั้งหมดสมมุติได้ว่า copy ค่าจะเร็วมาก
คุณ derive Copy บน type ใดที่ส่วนทั้งหมดของมัน implement Copy ได้
type ที่ implement Copy ต้อง implement Clone ด้วยเพราะ type ที่
implement Copy มี implementation trivial ของ Clone ที่ทำงาน
เดียวกับ Copy
Trait Copy ถูกต้องการแทบไม่ — type ที่ implement Copy มี
optimization ใช้ได้ หมายความว่าคุณไม่ต้องเรียก clone ซึ่งทำให้โค้ด
กระชับมากขึ้น
ทุกอย่างที่เป็นไปได้กับ Copy คุณบรรลุกับ Clone ได้ด้วย แต่โค้ดอาจ
ช้ากว่าหรือต้องใช้ clone ในที่
Hash สำหรับ Map ค่าไปยังค่าของขนาดคงที่
Trait Hash อนุญาตให้คุณรับ instance ของ type ของขนาดใด ๆ และ map
instance นั้นไปยังค่าของขนาดคงที่โดยใช้ฟังก์ชัน hash การ derive Hash
implement เมธอด hash Implementation ที่ derive ของเมธอด hash
รวมผลของการเรียก hash บนแต่ละส่วนของ type หมายความว่า field หรือ
ค่าทั้งหมดต้อง implement Hash ด้วยเพื่อ derive Hash
ตัวอย่างของเมื่อ Hash ถูกต้องการคือในการเก็บ key ใน HashMap<K, V>
เพื่อเก็บข้อมูลอย่างมีประสิทธิภาพ
Default สำหรับค่า Default
Trait Default อนุญาตให้คุณสร้างค่า default สำหรับ type การ derive
Default implement ฟังก์ชัน default Implementation ที่ derive
ของฟังก์ชัน default เรียกฟังก์ชัน default บนแต่ละส่วนของ type
หมายความว่า field หรือค่าทั้งหมดใน type ต้อง implement Default
ด้วยเพื่อ derive Default
ฟังก์ชัน Default::default ถูกใช้ปกติร่วมกับ syntax update struct
ที่พูดถึงในส่วน “สร้าง Instance จาก Instance อื่นด้วย Syntax Update
Struct” ในบทที่ 5 คุณ customize ไม่กี่ field ของ struct และแล้วตั้ง
และใช้ค่า default สำหรับ field ที่เหลือโดยใช้ ..Default::default()
ได้
Trait Default ถูกต้องการเมื่อคุณใช้เมธอด unwrap_or_default บน
instance Option<T> ตัวอย่างเช่น ถ้า Option<T> คือ None เมธอด
unwrap_or_default จะ return ผลของ Default::default สำหรับ type
T ที่เก็บใน Option<T>
D - เครื่องมือพัฒนาที่มีประโยชน์
ภาคผนวก D — เครื่องมือพัฒนาที่มีประโยชน์
ในภาคผนวกนี้ เราพูดเกี่ยวกับเครื่องมือพัฒนาที่มีประโยชน์บางอย่างที่ project Rust ให้ เราจะดูที่ formatting อัตโนมัติ, วิธีด่วนในการ apply fix warning, linter และ integrate กับ IDE
Formatting อัตโนมัติด้วย rustfmt
เครื่องมือ rustfmt reformat โค้ดของคุณตาม community code style ผู้
ใช้ร่วมหลาย project ใช้ rustfmt เพื่อป้องกันการโต้แย้งเกี่ยวกับ
style ใดที่ใช้เมื่อเขียน Rust — ทุกคน format โค้ดของพวกเขาโดยใช้
เครื่องมือ
การติดตั้ง Rust รวม rustfmt โดยค่าเริ่มต้น ดังนั้นคุณควรมีโปรแกรม
rustfmt และ cargo-fmt บนระบบของคุณแล้ว สองคำสั่งนี้คล้ายกับ
rustc และ cargo ในที่ rustfmt อนุญาตการควบคุมที่ละเอียดกว่าและ
cargo-fmt เข้าใจ convention ของ project ที่ใช้ Cargo เพื่อ format
project Cargo ใด ใส่ต่อไปนี้:
$ cargo fmt
รันคำสั่งนี้ reformat โค้ด Rust ทั้งหมดใน crate ปัจจุบัน นี่ควรเปลี่ยน
เพียง style โค้ด ไม่ใช่ semantics โค้ด สำหรับข้อมูลเพิ่มเติมเกี่ยวกับ
rustfmt ดู documentation ของมัน
Fix โค้ดของคุณด้วย rustfix
เครื่องมือ rustfix รวมกับการติดตั้ง Rust และ fix warning compiler ที่
มีวิธีชัดเจนในการแก้ปัญหาที่น่าจะเป็นสิ่งที่คุณต้องการได้อัตโนมัติ
คุณน่าจะเห็น warning compiler ก่อน ตัวอย่างเช่น พิจารณาโค้ดนี้:
Filename: src/main.rs
fn main() {
let mut x = 42;
println!("{x}");
}ที่นี่ เรากำลังนิยามตัวแปร x เป็น mutable แต่เราไม่เคย mutate มันจริง
ๆ Rust เตือนเราเกี่ยวกับนั้น:
$ cargo build
Compiling myprogram v0.1.0 (file:///projects/myprogram)
warning: variable does not need to be mutable
--> src/main.rs:2:9
|
2 | let mut x = 0;
| ----^
| |
| help: remove this `mut`
|
= note: `#[warn(unused_mut)]` on by default
Warning แนะนำว่าเราลบคีย์เวิร์ด mut เรา apply คำแนะนำนั้นโดยใช้
เครื่องมือ rustfix ได้อัตโนมัติโดยรันคำสั่ง cargo fix:
$ cargo fix
Checking myprogram v0.1.0 (file:///projects/myprogram)
Fixing src/main.rs (1 fix)
Finished dev [unoptimized + debuginfo] target(s) in 0.59s
เมื่อเราดูที่ src/main.rs อีก เราจะเห็นว่า cargo fix เปลี่ยนโค้ด:
Filename: src/main.rs
fn main() {
let x = 42;
println!("{x}");
}ตัวแปร x ตอนนี้ immutable และ warning ไม่ปรากฏอีก
คุณใช้คำสั่ง cargo fix เพื่อ transition โค้ดของคุณระหว่าง edition
Rust ต่างกันได้ด้วย Edition ครอบคลุมใน ภาคผนวก E
Lint เพิ่มด้วย Clippy
เครื่องมือ Clippy คือ collection ของ lint เพื่อวิเคราะห์โค้ดของคุณ เพื่อให้คุณจับความผิดพลาดปกติและปรับปรุงโค้ด Rust ของคุณ Clippy รวม กับการติดตั้ง Rust มาตรฐาน
เพื่อรัน lint ของ Clippy บน project Cargo ใด ใส่ต่อไปนี้:
$ cargo clippy
ตัวอย่างเช่น สมมุติคุณเขียนโปรแกรมที่ใช้ approximation ของ constant mathematical เช่น pi เหมือนโปรแกรมนี้ทำ:
fn main() {
let x = 3.1415;
let r = 8.0;
println!("the area of the circle is {}", x * r * r);
}รัน cargo clippy บน project นี้ส่งผลเป็น error นี้:
error: approximate value of `f{32, 64}::consts::PI` found
--> src/main.rs:2:13
|
2 | let x = 3.1415;
| ^^^^^^
|
= note: `#[deny(clippy::approx_constant)]` on by default
= help: consider using the constant directly
= help: for further information visit https://rust-lang.github.io/rust-clippy/master/index.html#approx_constant
error นี้ให้คุณรู้ว่า Rust มี constant PI ที่ precise กว่านิยามแล้ว
และโปรแกรมของคุณจะถูกต้องกว่าถ้าคุณใช้ constant แทน คุณจะแล้วเปลี่ยน
โค้ดของคุณเพื่อใช้ constant PI
โค้ดต่อไปนี้ไม่ส่งผลเป็น error หรือ warning ใดจาก Clippy:
fn main() {
let x = std::f64::consts::PI;
let r = 8.0;
println!("the area of the circle is {}", x * r * r);
}สำหรับข้อมูลเพิ่มเติมเกี่ยวกับ Clippy ดู documentation ของมัน
IDE Integration ใช้ rust-analyzer
เพื่อช่วยกับ IDE integration, Rust community แนะนำให้ใช้
rust-analyzer เครื่องมือนี้คือชุด
ของ utility compiler-centric ที่พูด Language Server Protocol ซึ่งคือ specification สำหรับ IDE และภาษาโปรแกรมในการสื่อสาร
กัน Client ต่างกันใช้ rust-analyzer ได้ เช่น plug-in Rust analyzer
สำหรับ Visual Studio Code
เยี่ยม home page ของ project
rust-analyzer สำหรับคำสั่งติดตั้ง แล้วติดตั้งการสนับสนุน language
server ใน IDE เฉพาะของคุณ IDE ของคุณจะได้ความสามารถเช่น autocompletion,
jump to definition และ inline error
E - Edition
ภาคผนวก E — Edition
ในบทที่ 1 คุณเห็นว่า cargo new เพิ่ม metadata เล็กน้อยให้ไฟล์
Cargo.toml ของคุณเกี่ยวกับ edition ภาคผนวกนี้พูดเกี่ยวกับสิ่งนั้น
หมายความว่าอะไร!
ภาษา Rust และ compiler มี cycle release หกสัปดาห์ หมายความว่า user ได้ stream คงที่ของฟีเจอร์ใหม่ ภาษาโปรแกรมอื่น release การเปลี่ยน ใหญ่กว่าน้อยบ่อย — Rust release update เล็กกว่าบ่อยกว่า หลังจากช่วงหนึ่ง การเปลี่ยนเล็ก ๆ ทั้งหมดเหล่านี้รวมกัน แต่จาก release ถึง release มันยากที่จะมองย้อนกลับและบอกว่า “ว้าว ระหว่าง Rust 1.10 และ Rust 1.31, Rust เปลี่ยนเยอะ!”
ทุกสามปีหรือประมาณนั้น team Rust ผลิต Rust edition ใหม่ แต่ละ edition รวมฟีเจอร์ที่ลงมาเป็น package ชัดเจนกับ documentation และ tooling ที่อัพเดทเต็ม Edition ใหม่ ship เป็นส่วนของกระบวนการ release หกสัปดาห์ปกติ
Edition รับใช้จุดประสงค์ต่างกันสำหรับคนต่างกัน:
- สำหรับ user Rust active, edition ใหม่รวมการเปลี่ยน incremental เป็น package ที่เข้าใจง่าย
- สำหรับ non-user, edition ใหม่ signal ว่า advancement หลักบางตัวลงมา ซึ่งอาจทำให้ Rust คุ้มดูอีก
- สำหรับคนที่พัฒนา Rust, edition ใหม่ให้จุดรวมพลสำหรับ project ทั้งหมด
ในเวลาเขียนนี้ สี่ Rust edition ใช้ได้ — Rust 2015, Rust 2018, Rust 2021 และ Rust 2024 หนังสือนี้ถูกเขียนโดยใช้ idiom Rust 2024 edition
Key edition ใน Cargo.toml บ่งบอกว่า edition ใดที่ compiler ควรใช้
สำหรับโค้ดของคุณ ถ้า key ไม่มี Rust ใช้ 2015 เป็นค่า edition เพราะ
เหตุผล backward compatibility
แต่ละ project opt in ไป edition อื่นนอกจาก default edition 2015 ได้ Edition สามารถบรรจุการเปลี่ยนแปลงที่ไม่เข้ากันได้ เช่น รวมคีย์เวิร์ดใหม่ ที่ conflict กับ identifier ในโค้ด อย่างไรก็ตาม เว้นแต่คุณ opt in ไป การเปลี่ยนเหล่านั้น โค้ดของคุณจะ continue compile แม้คุณ upgrade version compiler Rust ที่คุณใช้
Compiler Rust version ทั้งหมดสนับสนุน edition ใดที่มีอยู่ก่อน release ของ compiler นั้น และพวกมัน link crate ของ edition ที่สนับสนุนใดด้วย กันได้ การเปลี่ยน edition เพียงกระทบวิธีที่ compiler parse โค้ดเริ่ม ต้น ดังนั้น ถ้าคุณใช้ Rust 2015 และหนึ่งใน dependency ของคุณใช้ Rust 2018, project ของคุณจะ compile และสามารถใช้ dependency นั้น สถานการณ์ ตรงข้าม ที่ project ของคุณใช้ Rust 2018 และ dependency ใช้ Rust 2015 ทำงานด้วย
เพื่อความชัดเจน — ฟีเจอร์ส่วนใหญ่จะใช้ได้บน edition ทั้งหมด นักพัฒนา ที่ใช้ Rust edition ใดจะ continue เห็นการปรับปรุงเมื่อ stable release ใหม่ถูกทำ อย่างไรก็ตาม ในบางกรณี หลัก ๆ เมื่อคีย์เวิร์ดใหม่ถูกเพิ่ม ฟีเจอร์ใหม่บางตัวอาจใช้ได้เพียงใน edition ภายหลัง คุณจะต้อง switch edition ถ้าคุณต้องการใช้ประโยชน์จากฟีเจอร์เช่นนั้น
สำหรับรายละเอียดเพิ่มเติม ดู The Rust Edition Guide
นี่คือหนังสือสมบูรณ์ที่ enumerate ความแตกต่างระหว่าง edition และ
อธิบายวิธี upgrade โค้ดของคุณไป edition ใหม่อัตโนมัติผ่าน cargo fix
F - ฉบับแปลของหนังสือ
ภาคผนวก F — การแปลของหนังสือ
สำหรับ resource ในภาษาอื่นนอกจาก English ส่วนใหญ่ยังดำเนินอยู่ — ดู label Translations เพื่อช่วยหรือให้เรารู้เกี่ยวกับการแปลใหม่!
- Português (BR)
- Português (PT)
- 简体中文: KaiserY/trpl-zh-cn, gnu4cn/rust-lang-Zh_CN
- 正體中文
- Українська
- Español, alternate, Español por RustLangES
- Русский
- 한국어
- 日本語
- Français
- Polski
- Cebuano
- Tagalog
- Esperanto
- ελληνική
- Svenska
- Farsi, Persian (FA)
- Deutsch
- हिंदी
- ไทย
- Danske
- O’zbek
- Tiếng Việt
- Italiano
- বাংলা
G - วิธีพัฒนา Rust และ "Nightly Rust"
ภาคผนวก G — Rust ถูกสร้างยังไงและ “Nightly Rust”
ภาคผนวกนี้เกี่ยวกับว่า Rust ถูกสร้างยังไงและนั่นกระทบคุณในฐานะนัก พัฒนา Rust ยังไง
Stability โดยไม่ Stagnation
ในฐานะภาษา Rust ใส่ใจ เยอะ เกี่ยวกับ stability ของโค้ดของคุณ เรา ต้องการให้ Rust เป็นพื้นฐานหินแข็งที่คุณ build บนได้ และถ้าสิ่งต่าง ๆ เปลี่ยนตลอด นั่นจะเป็นไปไม่ได้ ในเวลาเดียว ถ้าเราไม่สามารถ experiment กับฟีเจอร์ใหม่ เราอาจไม่ค้นพบข้อบกพร่องสำคัญจนกว่าหลัง release ของพวกมัน เมื่อเราไม่สามารถเปลี่ยนสิ่งอีก
วิธีแก้ของเราต่อปัญหานี้คือสิ่งที่เราเรียก “stability without stagnation” และหลักนำทางของเราคือ — คุณไม่ควรกลัวการ upgrade ไป version ใหม่ของ Rust stable การ upgrade แต่ละครั้งควรไม่เจ็บปวด แต่ ก็ควรนำคุณฟีเจอร์ใหม่ bug น้อยกว่า และเวลา compile เร็วกว่า
Choo, Choo! Release Channel และการขี่รถไฟ
การพัฒนา Rust ดำเนินบน ตาราง train นั่นคือ การพัฒนาทั้งหมดทำใน branch main ของ Rust repository Release ตาม model release train ของ ซอฟต์แวร์ ซึ่งใช้โดย Cisco IOS และ project ซอฟต์แวร์อื่น มีสาม release channel สำหรับ Rust:
- Nightly
- Beta
- Stable
นักพัฒนา Rust ส่วนใหญ่หลัก ๆ ใช้ stable channel แต่คนที่ต้องการลอง ฟีเจอร์ใหม่ experimental อาจใช้ nightly หรือ beta
นี่คือตัวอย่างของวิธีที่กระบวนการ development และ release ทำงาน — สมมุติว่า team Rust กำลังทำ release ของ Rust 1.5 release นั้นเกิดใน ธันวาคม 2015 แต่จะให้เราเลข version ที่เป็นจริง ฟีเจอร์ใหม่ถูกเพิ่ม ให้ Rust — commit ใหม่ลงบน branch main แต่ละคืน Rust version nightly ใหม่ถูกผลิต ทุกวันคือวัน release และ release เหล่านี้ถูกสร้างโดย infrastructure release ของเราอัตโนมัติ ดังนั้นเมื่อเวลาผ่าน release ของเราดูแบบนี้ ครั้งเดียวต่อคืน:
nightly: * - - * - - *
ทุกหกสัปดาห์ มันคือเวลาเตรียม release ใหม่! branch beta ของ Rust
repository แยกจาก branch main ที่ใช้โดย nightly ตอนนี้ มีสอง release:
nightly: * - - * - - *
|
beta: *
User Rust ส่วนใหญ่ไม่ใช้ beta release active แต่ test กับ beta ใน ระบบ CI ของพวกเขาเพื่อช่วย Rust ค้นพบ regression ที่เป็นไปได้ ใน ระหว่าง ยังมี release nightly ทุกคืน:
nightly: * - - * - - * - - * - - *
|
beta: *
สมมุติว่า regression ถูกพบ ดีที่เรามีเวลาบ้างในการ test release beta
ก่อน regression แอบเข้า stable release! Fix ถูก apply ให้ branch main
เพื่อให้ nightly ถูก fix และแล้ว fix ถูก backport ให้ branch beta
และ release ใหม่ของ beta ถูกผลิต:
nightly: * - - * - - * - - * - - * - - *
|
beta: * - - - - - - - - *
หกสัปดาห์หลังจาก beta แรกถูกสร้าง มันคือเวลาสำหรับ stable release!
branch stable ถูกผลิตจาก branch beta:
nightly: * - - * - - * - - * - - * - - * - * - *
|
beta: * - - - - - - - - *
|
stable: *
ไชโย! Rust 1.5 เสร็จ! อย่างไรก็ตาม เราลืมหนึ่งสิ่ง — เพราะหกสัปดาห์
ผ่านไป เรายังต้องการ beta ใหม่ของ version ถัดไป ของ Rust, 1.6
ดังนั้นหลัง stable แยกจาก beta, version ถัดไปของ beta แยกจาก
nightly อีก:
nightly: * - - * - - * - - * - - * - - * - * - *
| |
beta: * - - - - - - - - * *
|
stable: *
นี่ถูกเรียก “train model” เพราะทุกหกสัปดาห์ release “ออกจากสถานี” แต่ยังต้องเดินทางผ่าน beta channel ก่อนมันมาถึงเป็น stable release
Rust release ทุกหกสัปดาห์ เหมือนนาฬิกา ถ้าคุณรู้วันที่ของ Rust release หนึ่ง คุณรู้วันที่ของอันถัดไปได้ — มันคือหกสัปดาห์ภายหลัง แง่มุมดีของการมี release ตารางทุกหกสัปดาห์คือ train ถัดไปกำลังมาเร็ว ถ้าฟีเจอร์บังเอิญพลาด release เฉพาะ ไม่ต้องกังวล — อีกอันกำลังเกิดใน เวลาสั้น! นี่ช่วยลดความกดดันในการแอบฟีเจอร์ที่อาจไม่ขัดเงาใกล้ deadline release
ขอบคุณกระบวนการนี้ คุณ check build ถัดไปของ Rust และ verify ตัวเองได้
เสมอว่ามันง่ายที่จะ upgrade ไป — ถ้า beta release ไม่ทำงานตามคาด คุณ
รายงานให้ team และให้มันถูก fix ก่อน stable release ถัดไปเกิดได้!
Breakage ใน beta release ค่อนข้างหายาก แต่ rustc ยังเป็นชิ้นของ
ซอฟต์แวร์ และ bug มีอยู่
เวลา Maintenance
Project Rust สนับสนุน version stable ล่าสุด เมื่อ version stable ใหม่ ถูก release version เก่าถึง end of life (EOL) ของมัน นี่หมายความว่า แต่ละ version ถูกสนับสนุนเป็นเวลาหกสัปดาห์
ฟีเจอร์ Unstable
มีอีกหนึ่งจุดสนใจกับ release model นี้ — ฟีเจอร์ unstable Rust ใช้ เทคนิคเรียก “feature flag” เพื่อตัดสินว่าฟีเจอร์ใดถูกเปิดใน release ที่ให้ ถ้าฟีเจอร์ใหม่อยู่ภายใต้การพัฒนา active มันลงบน branch main และดังนั้น ใน nightly แต่หลัง feature flag ถ้าคุณ ในฐานะ user ต้องการลองฟีเจอร์ที่ work-in-progress คุณทำได้ แต่คุณต้องใช้ release nightly ของ Rust และ annotate source code ของคุณกับ flag เหมาะสมเพื่อ opt in
ถ้าคุณกำลังใช้ release beta หรือ stable ของ Rust คุณไม่สามารถใช้ feature flag ใด นี่คือ key ที่อนุญาตให้เราได้การใช้ practical กับ ฟีเจอร์ใหม่ก่อนเราประกาศพวกมัน stable ตลอดไป คนที่ต้องการ opt in ไป bleeding edge ทำได้ และคนที่ต้องการประสบการณ์หินแข็งติด stable และ รู้ว่าโค้ดของพวกเขาจะไม่ break ได้ Stability โดยไม่ stagnation
หนังสือนี้บรรจุเพียงข้อมูลเกี่ยวกับฟีเจอร์ stable เพราะฟีเจอร์ in-progress ยังเปลี่ยน และแน่นอนพวกมันจะต่างกันระหว่างเมื่อหนังสือนี้ ถูกเขียนและเมื่อพวกมันถูกเปิดใน stable build คุณค้นพบ documentation สำหรับฟีเจอร์ nightly-only online ได้
Rustup และบทบาทของ Rust Nightly
Rustup ทำให้ง่ายในการเปลี่ยนระหว่าง release channel ต่างกันของ Rust บนพื้นฐาน global หรือ per-project โดยค่าเริ่มต้น คุณจะมี stable Rust ติดตั้ง เพื่อติดตั้ง nightly ตัวอย่างเช่น:
$ rustup toolchain install nightly
คุณเห็น toolchain ทั้งหมด (release ของ Rust และ component
associate) ที่คุณติดตั้งกับ rustup ได้ด้วย นี่คือตัวอย่างบน
computer Windows ของหนึ่งใน author ของคุณ:
> rustup toolchain list
stable-x86_64-pc-windows-msvc (default)
beta-x86_64-pc-windows-msvc
nightly-x86_64-pc-windows-msvc
ตามที่คุณเห็น toolchain stable คือ default User Rust ส่วนใหญ่ใช้
stable ส่วนใหญ่ของเวลา คุณอาจต้องการใช้ stable ส่วนใหญ่ของเวลา แต่
ใช้ nightly บน project เฉพาะ เพราะคุณใส่ใจเกี่ยวกับฟีเจอร์
cutting-edge เพื่อทำเช่นนั้น คุณใช้ rustup override ในไดเรกทอรีของ
project นั้นเพื่อตั้ง toolchain nightly เป็นอันที่ rustup ควรใช้
เมื่อคุณอยู่ในไดเรกทอรีนั้น:
$ cd ~/projects/needs-nightly
$ rustup override set nightly
ตอนนี้ ทุกครั้งที่คุณเรียก rustc หรือ cargo ภายในของ
~/projects/needs-nightly, rustup จะให้แน่ใจว่าคุณกำลังใช้ nightly
Rust แทน default ของคุณของ stable Rust นี่มีประโยชน์เมื่อคุณมี
project Rust เยอะ!
กระบวนการ RFC และ Team
แล้วคุณเรียนรู้เกี่ยวกับฟีเจอร์ใหม่เหล่านี้ยังไง? Model development ของ Rust ตาม กระบวนการ Request For Comments (RFC) ถ้าคุณต้องการการ ปรับปรุงใน Rust คุณเขียน proposal ที่เรียก RFC ได้
ใคร ๆ เขียน RFC เพื่อปรับปรุง Rust ได้ และ proposal ถูก review และ พูดคุยโดย team Rust ซึ่งประกอบด้วย subteam หัวข้อหลายตัว มี list เต็มของ team บน website ของ Rust ซึ่งรวม team สำหรับแต่ละพื้นที่ของ project — การออกแบบภาษา, implementation compiler, infrastructure, documentation และอื่น ๆ Team เหมาะสมอ่าน proposal และ comment เขียน comment ของพวกเขาเอง และ ในที่สุด มี consensus เพื่อยอมรับหรือปฏิเสธฟีเจอร์
ถ้าฟีเจอร์ถูกยอมรับ issue ถูกเปิดบน Rust repository และใครคนหนึ่ง implement มันได้ คนที่ implement มันอาจไม่ใช่คนที่เสนอฟีเจอร์ที่แรก เลย! เมื่อ implementation พร้อม มันลงบน branch main หลัง feature gate ตามที่เราพูดถึงในส่วน “ฟีเจอร์ Unstable”
หลังจากเวลาบ้าง เมื่อนักพัฒนา Rust ที่ใช้ release nightly ได้สามารถ ลองฟีเจอร์ใหม่ สมาชิก team จะพูดคุยฟีเจอร์ วิธีที่มันทำงานบน nightly และตัดสินว่ามันควรเข้า stable Rust หรือไม่ ถ้าการตัดสินคือเลื่อน ไปข้างหน้า feature gate ถูกลบ และฟีเจอร์ตอนนี้ถูกพิจารณา stable! มันขี่ train เข้าไปยัง stable release ใหม่ของ Rust